
MonkMakes


The MonkMakes Relay for micro:bit is a solid-state (no moving parts) relay that allows an output of a micro:bit to turn things on and off.
A micro:bit can turn an LED on and off directly, but anything more powerful requires something like a relay or a transistor. Using a transistor to switch something on and off requires a shared ground connection with the micro:bit and a knowledge electronics that you or your students may not be ready for. The MonkMakes Relay for micro:bit is much easier to use, acting like a simple micro:bit controlled switch.
This relay can be used to switch low voltage devices such as light bulbs, a motor, a small heating element or even a string of 12V LED lighting. The voltage needs to be kept under 16V, but the relay will automatically protect itself against too much current.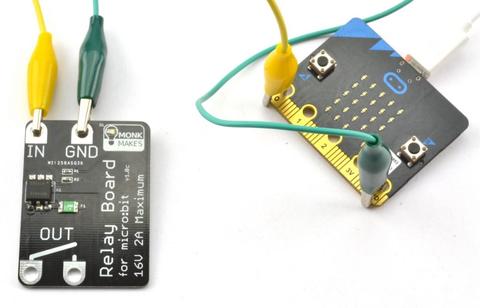
FEATURES
- Solid-sate relay (up to 2 Amps)
- Active LED indicator
- Resettable ‘polyfuse’ to protect against over-current
What's in the box?
1 x relay for micro:bit
Resources
Getting Started with your micro:bit
Connecting your micro:bit
The Relay requires just two connections to the micro:bit. One to GND (ground) and one to whatever pin is to be used to control the relay’s switching action.
When attaching the alligator clips to the micro:bit, make sure that the clips are perpendicular to the board so that they are not touching any of the neighbouring connectors on the micro:Bit edge connector.
Here’s an example of how you could wire up a MonkMakes Relay for micro:bit to turn an old fashioned light bulb on and off.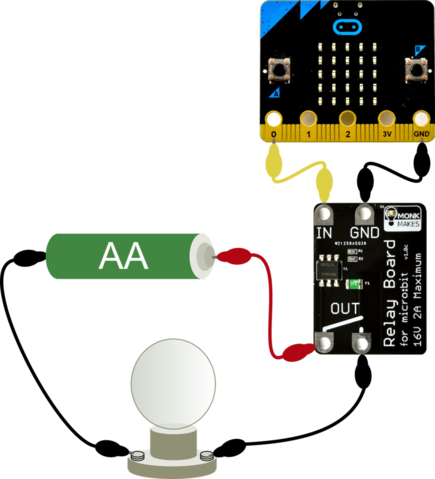
HEX File
The quickest way to try out your relay is to DOWNLOAD THIS HEX FILE >and then copy it onto your micro:bit. The program will turn the relay on and off once a second.
JavaScript Blocks Editor
Set the controlling pin to 1 and the relay contacts will close, set it to 0 and the contacts will open again. Its as simple as that. So, to make your relay turn on and off once a second, open the Blocks Editor, add a forever block and then the digital write blocks from the pins category and the pauses from the basic category.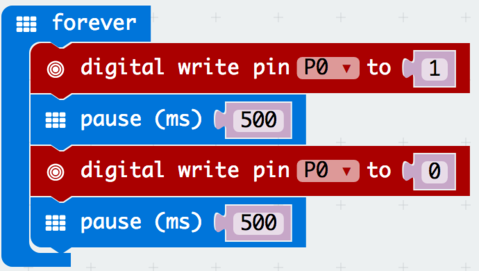
MicroPython
Paste the following code into the Python window and then Download the file and copy it onto your your micro:bit.
from microbit import *

while True:
    pin0.write_digital(True)
    sleep(500)
    pin0.write_digital(False)
    sleep(500)
Analog Outputs
The latest MonkMakes Relay for micro:bit can do more than just switch things on and off. It can also be used with micro:bit analog outputs. Look closely at your Relay for micro:bit and is it has the version number v1ev (under the word ‘Board’) then it can be used with the ‘analog write’ block in the blocks editor or the ‘write_analog’ function in MicroPython. If your board has the version number v1e then it is not suitable for use with analog outputs – sorry you were unlucky to get one of the small batch of first boards to be sold.
The output of the Relay for micro:bit is not linear at low PWM and high PWM values as the following chart illustrates.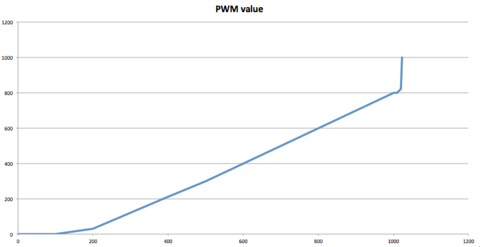
The y-axis shows the current in mA for a test load resistor supplied from a constant voltage source. The x-axis is the analog write value (0 to 1023). As you can see, there is a dead zone up to a analog output value of about 100, followed by a relatively good linear region right up to about 1000, after which the output effectively becomes ‘on’.
The tests were carried out at the default PWM frequency of 50Hz for the micro:bit. Lower frequency PWM is expected to produce more linear results.
The MonkMakes Sensor Board for micro:bit allows you to sense sound level, temperature and light level.
Features
- 3V and GND connections can be made from either side and allow you to power a second board such as the MonkMakes Relay Board or MonkMakes Speaker.
- LED ‘power on’ indicator
- Reverse polarity protection
- All three sensors are analog and can be connected to pins P0, P1 and P2 using alligator clips.
What's in the box?
1 x Sensor for micro:bit board
Getting Started
Connecting to your micro:bit
You only have to wire up the sensors that you are actually using, but you could wire all the sensors up as shown below. The code examples below assume that pin 0 is used for sound, pin 1 for temperature and pin 2 for light. You can use any pin for any of the sensors, but remember to modify the code to match the pin you are using.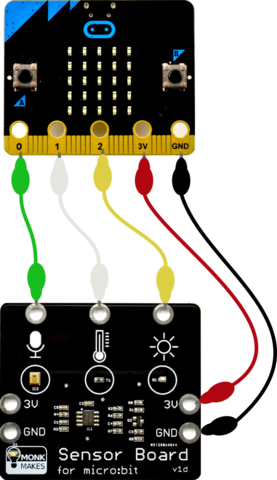
Sound
The Sensor for micro:bit uses a MEMs (microphone on a chip) and a pre-amplifier. The output of the sound sensor is connected to an analog input where it can be sampled. The sound signal varies about the 1.5V level. So, silence will produce an analog output of around 1.5V. When there is sound the analog readings will oscillate above and below the 1.5V level like this: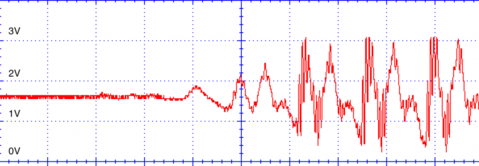
This is why 511 is subtracted from the readings in the code examples below.
JavaScript Blocks Editor
Here is an example of using the Sensor Board to display a bargraph to indicate the sound level. Click on the image below to try it out. Making a noise into the microphone will make the LEDs dance.
MicroPython
from microbit import *

def bargraph(a):
 display.clear()
 for y in range(0, 5):
 if a > y:
 for x in range(0, 5):
 display.set_pixel(x, 4-y, 9)

while True:
 sound_level = (pin0.read_analog() - 511) / 100
 bargraph(sound_level)
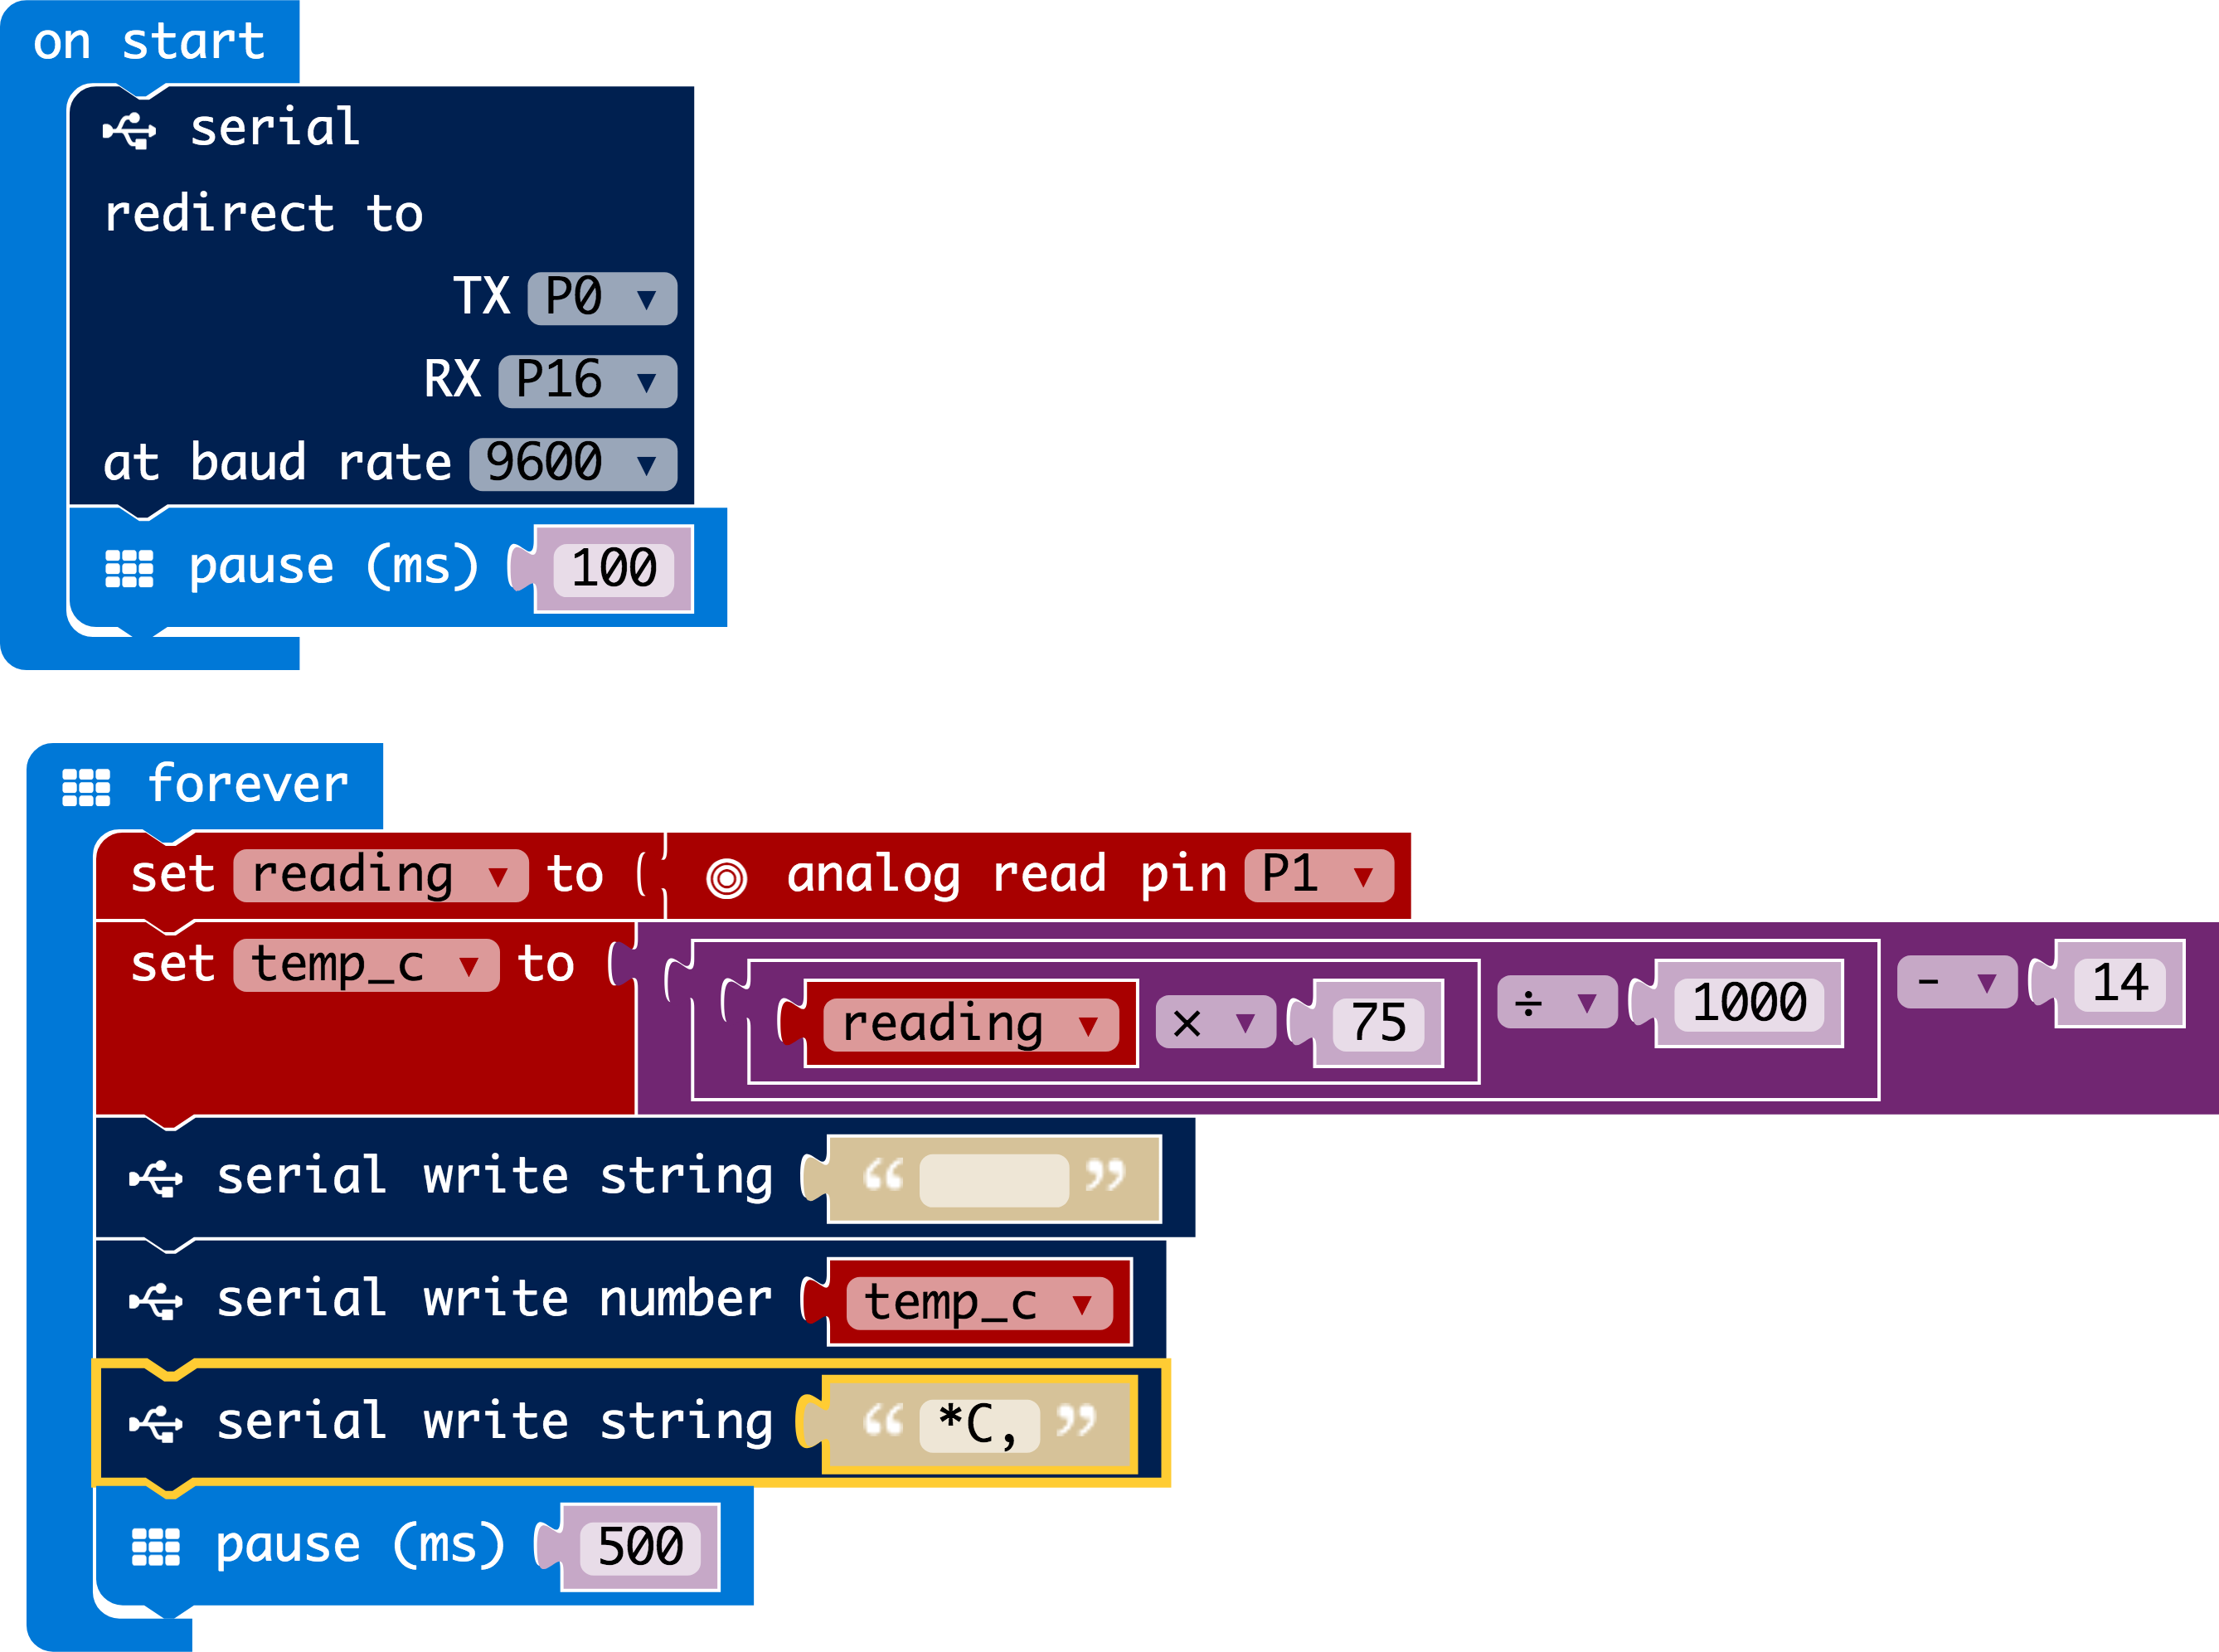
Temperature
The Sensor for micro:bit uses a thermistor to measure temperature. The temperature output from the board is a voltage that indicates the temperature. This is then measured using an analog input on the micro:bit.
The calculations for converting this voltage reading to an actual temperature are quite complicated and so the code examples here will only give a rough idea of temperature.
If you want your temperatures in Fahrenheit, then multiply the temperature in degrees C by 9, divide the result by 5 and then add 32.
JAVASCRIPT BLOCKS EDITOR
This is an example of using the Sensor Board to display the temperature, try putting your finger on the temperature sensor to warm it up. You can run the example below by clicking on it.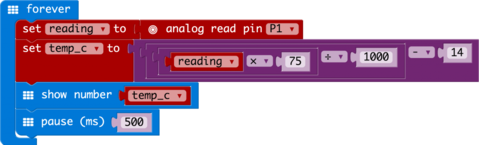
MicroPython
from microbit import *

while True:
 reading = pin1.read_analog()
 temp_c = int(reading / 13.33 - 14)
 display.scroll(str(temp_c))
 sleep(500)
Light
The light sensor uses a phototransistor to measure the light level and produces an output voltage that increases as the light level increases. Here is a guide to the kind of light level you might get from the sensor under different conditions (0 to 1023).
- Dark 0 to 3
- Dimly lit room 6 to 10
- Indoors directly under a light 10 to 50
- Outdoors (dull day) 100 to 200
- Outdoors (sunny day) 800 to 900
Even though the maximum analog read value is 1023, the maximum reading from this sensor is around 900.
JAVASCRIPT BLOCKS EDITOR
Here is an example of using the Sensor Board to display a bargraph to indicate the light level. Click on the image below to try it out. Put your finger over the light sensor to make it dark or shine a flash-light onto it to make more LEDs light up.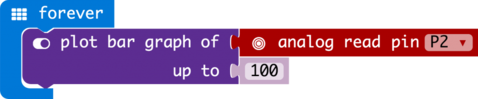
MicroPython
from microbit import *

def bargraph(a):
 display.clear()
 for y in range(0, 5):
 if a > y:
 for x in range(0, 5):
 display.set_pixel(x, 4-y, 9)

while True:
 light_level = pin2.read_analog() / 10
 bargraph(light_level)
The MonkMakes Speaker for micro:bit is a neat little amplified speaker that connects to your micro:bit using alligator clips.
Features
- Amplified output
- LED ‘power on’ indicator
- Reverse polarity protection
Getting Started
Connecting to your micro:bit
Connect the Speaker to the micro:bit as shown below. When attaching the alligator clips to the micro:bit, make sure that the clips are perpendicular to the board so that they are not touching any of the neighbouring connectors on the micro:Bit edge connector.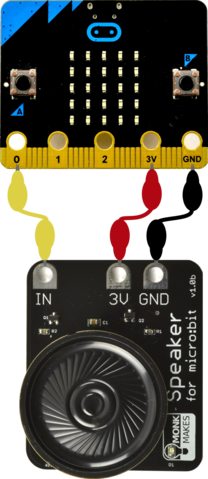
HEX File
The quickest way to try out your speaker is to DOWNLOAD THIS HEX FILE and then copy it onto your micro:bit. Press Button A to hear a tune being played.
JavaScript Blocks Editor
Visit the Blocks Editor in your browser and then from the input section add an on button A pressed block then from the music section add a start melody block and select the tune you want to play (in this case, entertainer).
Click Download and then copy the file onto your micro:bit.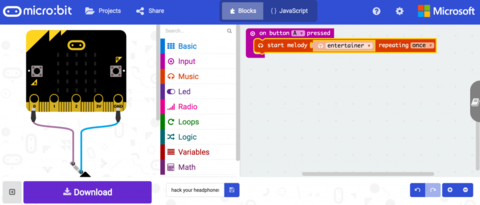
You can also make a simple musical instrument, using this tutorial: https://makecode.microbit.org/projects/hack-your-headphones/code
MicroPython
Paste the following code into the Python window and then Download the file and copy it onto your your micro:bit
from microbit import *
import music

while True:
    if button_a.was_pressed():
        music.play(music.ENTERTAINER)
When you press button A you will hear the tune “The Entertainer” play through the speaker.
Watch the video: https://youtu.be/mu4klw-N8sw

The MonkMakes Servo for micro:bit board provides a really easy way to attach up to three servomotors to a BBC micro:bit. The board requires a power supply or battery pack to provide 5 or 6V to the servomotors. It includes a voltage regulator that will supply 3V back to the micro:bit, so that you don’t have to power it separately.
Features- Header pins for three servo motors
- Up to 2A total can be supplied to the servo motors
- Regulated 3V output to power your micro:bit
- Polarity protection for the servomotors
- Electrolytic reservoir capacitor for the servomotors
- 1kΩ series resistors to the control signals to prevent accidental sort-circuits of the micro:bit’s output pins.
- Orange LED to indicate that the Servo for micro:bit board has power.
What's in the box?
1 x servo for micro:bit
Resources
Connections
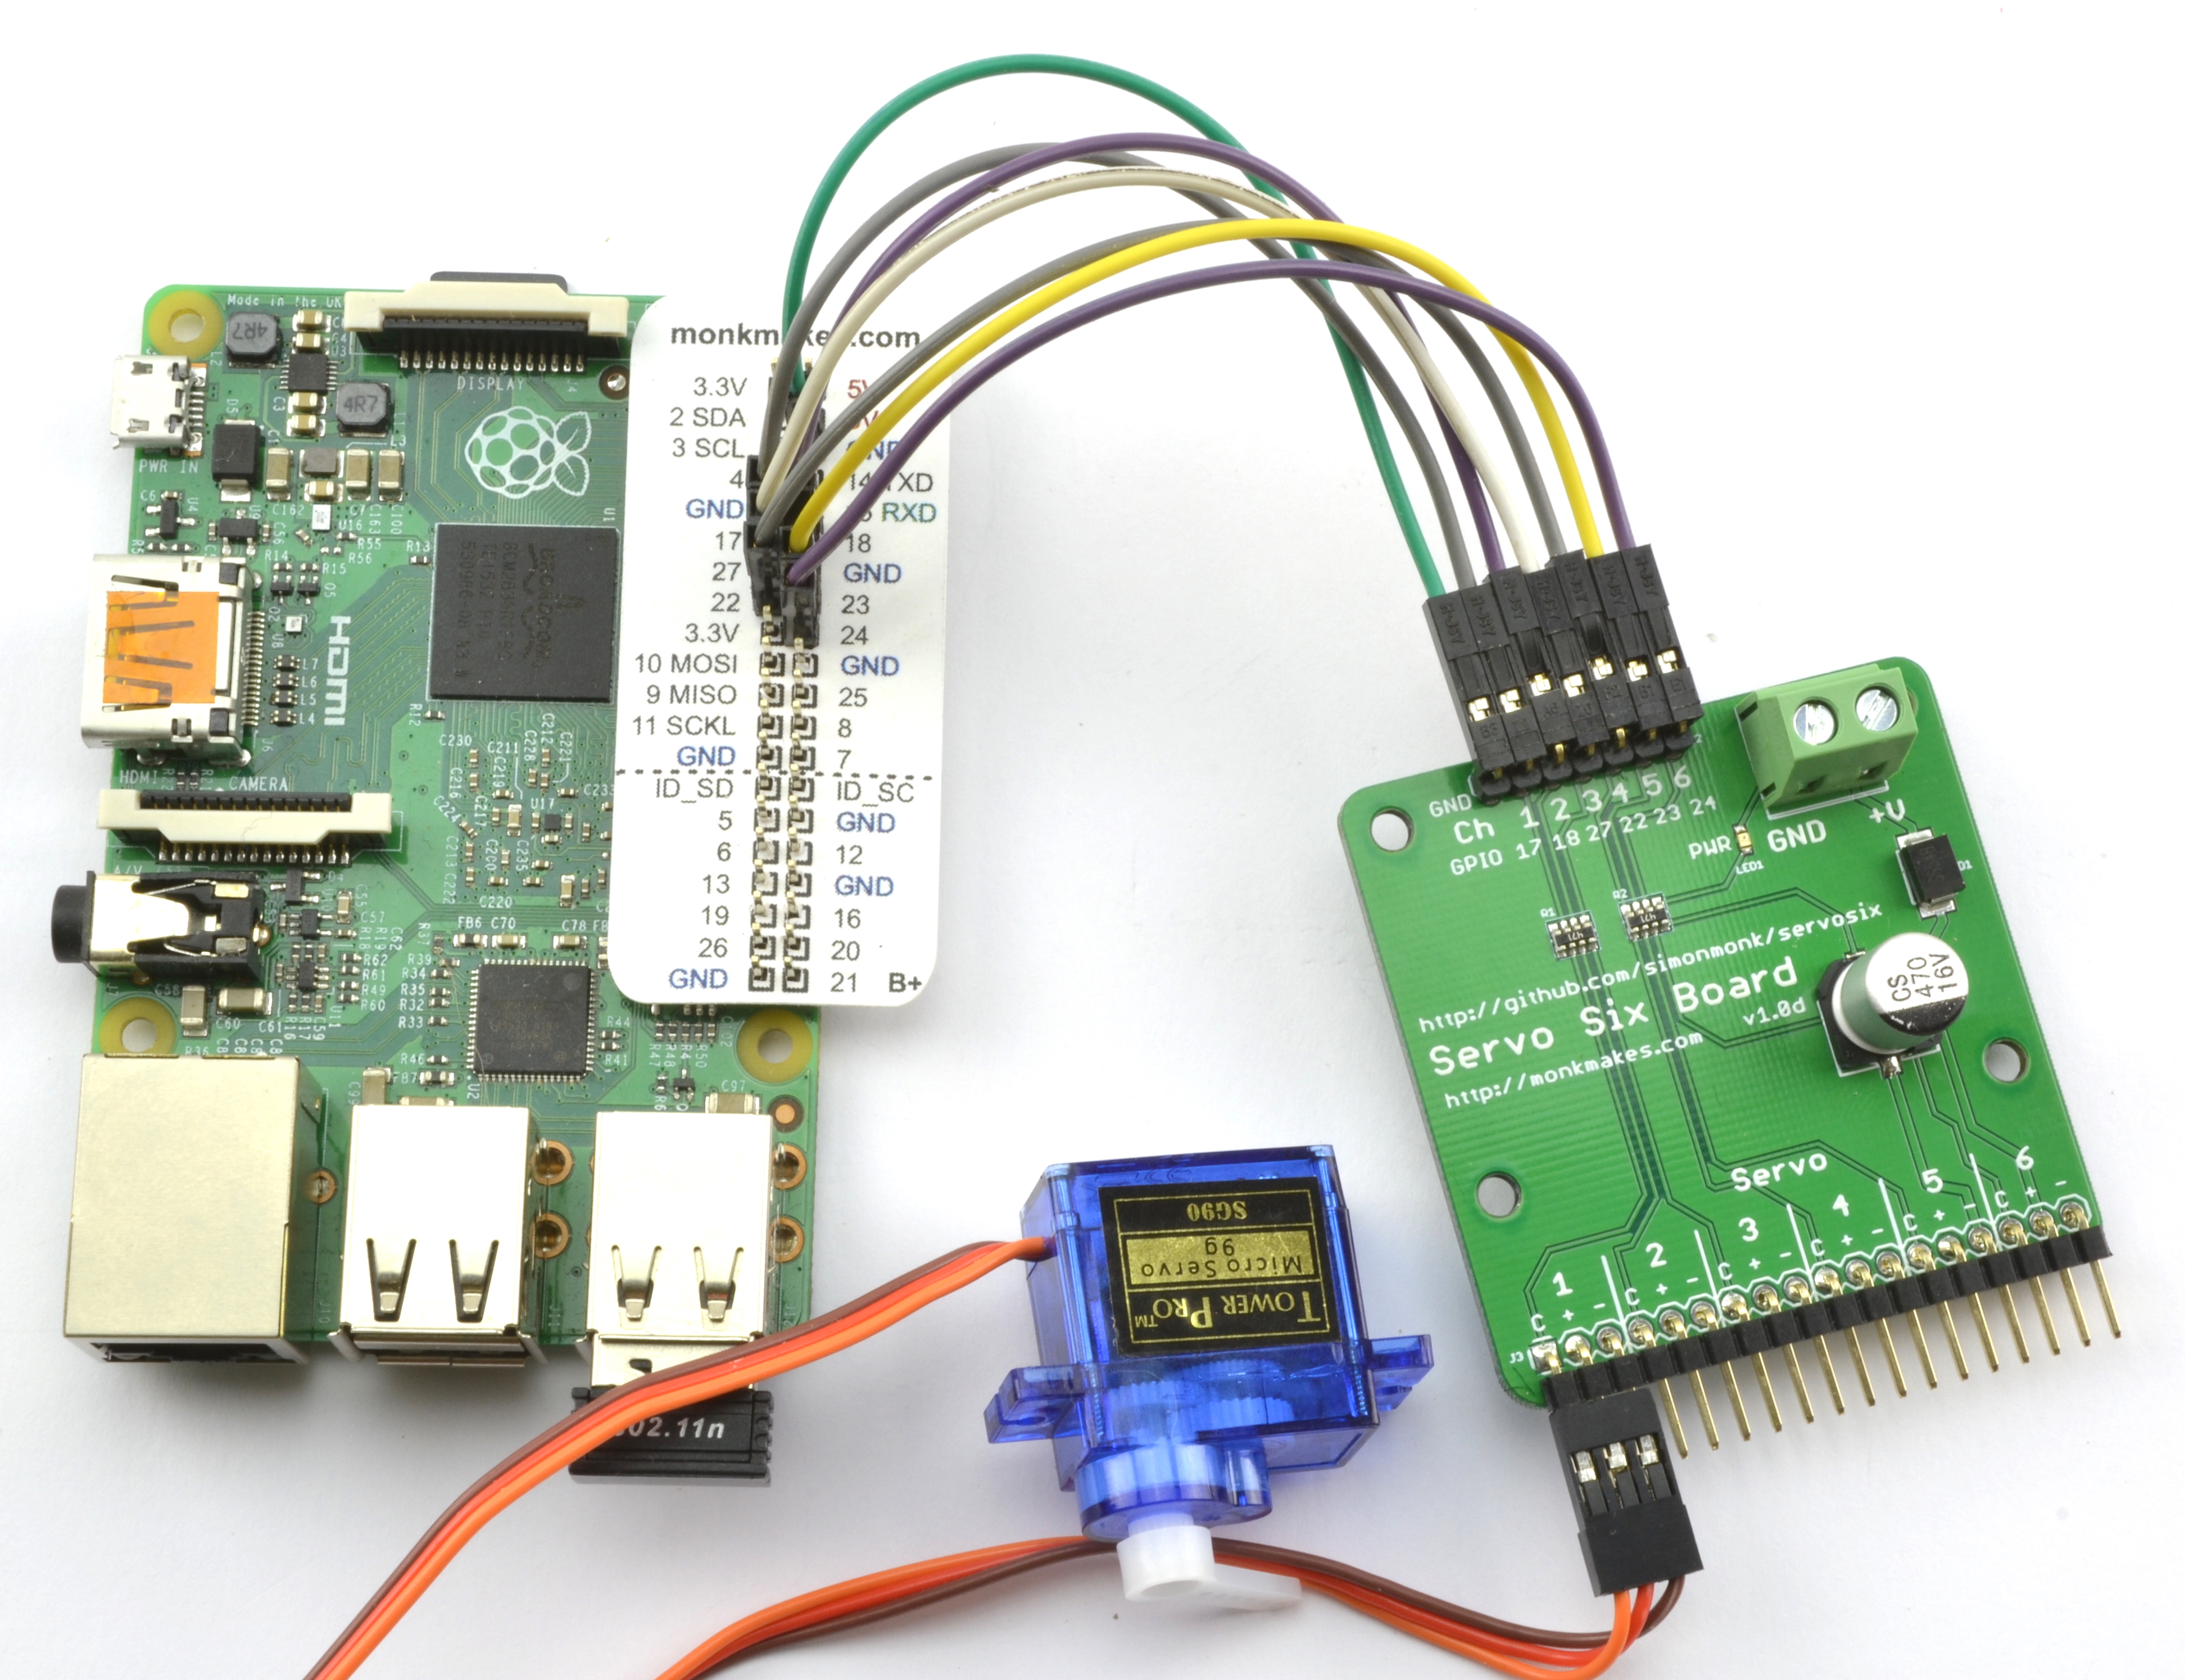
The picture below shows a typical setup using the Servo for micro:bit board.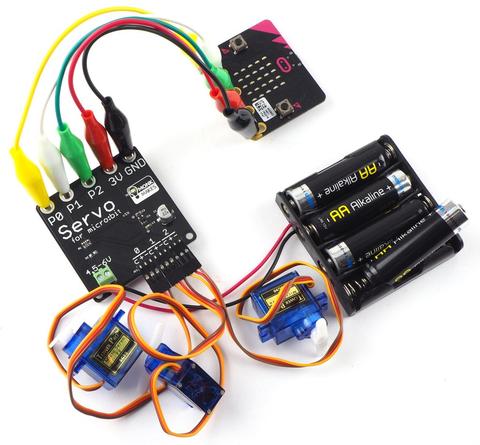
The following connections have been made:
- 3 x servomotors plugged into header pins. These need to be the right way around, with the control signal (yellow or orange wire) to the left (pins marked c).
- Alligator clip lead from GND on the micro:bit to GND on the Servo for micro:bit board.
- Optional alligator clip lead from 3V on the micro:bit to 3V on the Servo for micro:bit board. You only need this if you want to power the micro:bit from the same battery pack as the servomotors. If you want to power the micro:bit over USB or the JST battery connector then you do not need this connection.
- Alligator clip leads between P0, P1, P2 on the micro:bit to the Servo for micro:bit board. These need to match up with the servomotors you are using, so if you only need the board for one servomotor, then just connect P0 on the micro:bit to P0 on the Servo for micro:bit and make sure that there is a servomotor attached to the header pins marked 0.
- Power to the screw terminal on the Servo for micro:bit. Typically this will be a 4xAA battery pack or other power supply. Make sure that the positive lead goes to the screw terminal marked with a
Test Software
To check that everything is working, this Blocks code project will get you started. Flash it onto your Servo for micro:bit and the servo arms should all start waggling in a random manner. You can see a video of this in action here.
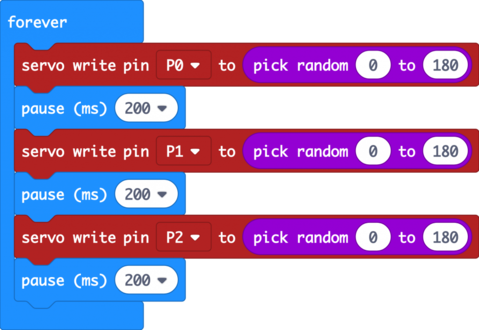
The servo write pin block allows you to set the angle of the servomotor’s arm between 0 and 180 degrees. Note that servomotors, will not usually travel a full 180 degrees so you may find the actual range is more like 10 to 170 degrees.

Description:
The MonkMakes Solar Experimenters Kit for micro:bit is a project kit that allows you to experiment with harvesting energy from the sun and other light sources. It consists of a solar panel to harvest the energy, a solar store that stores the harvested energy, and a low energy light bulb and a motor that can be driven with the energy that you harvest.
Specifications:
There are three projects that introduce energy harvesting without the micro:bit, followed by 3 bigger projects that use the micro:bit (not provided) as an intelligent controller. The micro:bit monitors and manages the charging and discharging of the solar store.
With this project kit you will learn all about how tiny amounts of energy can be harvested from the sun and stored for later use, using a practical and experiment-led approach.
What's in the Box ?
1 x 10v Solar Panel
1 x Solar Store Board
1 x 3v LED light bulb
1 x Set of alligator clip leads (10 leads)
1 x Small motor with fan
1 x Booklet (A5)
Resources:
- Instructions (PDF)
- Data Sheet (PDF)
Lessons Plans are available here: https://drive.google.com/drive/folders/1o5tRY1PeU4N-NSVctra4NxnCvmP65Huj

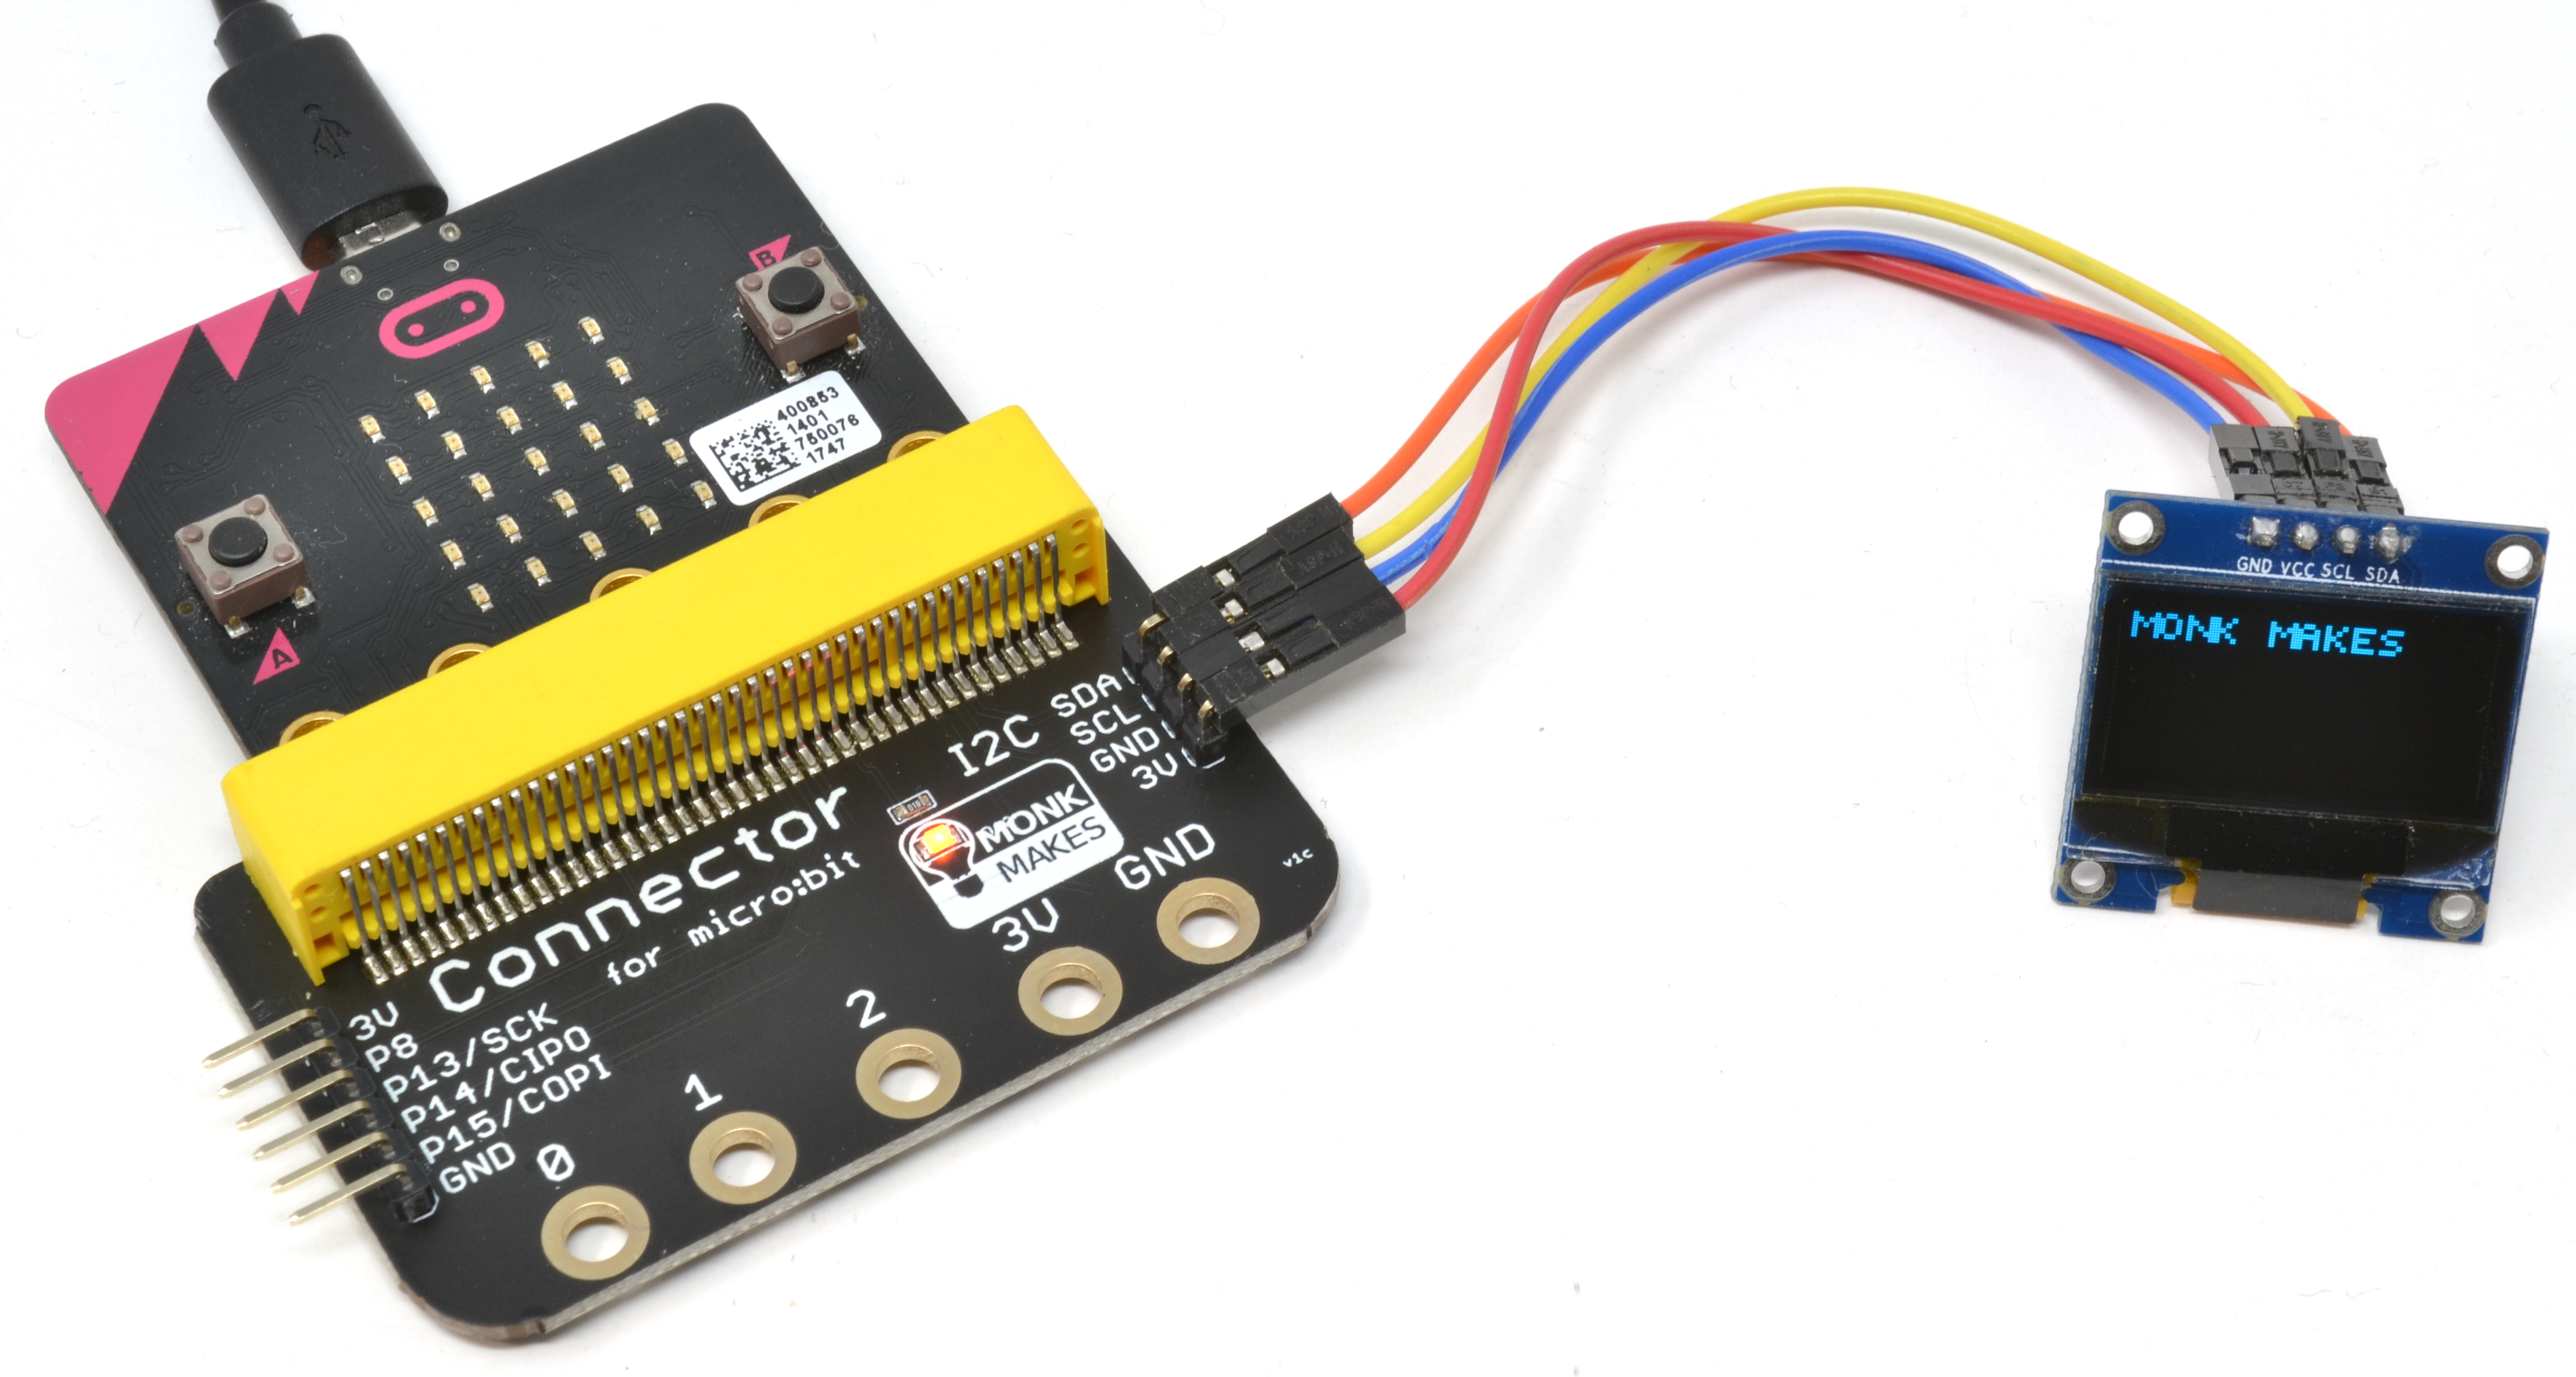
The MonkMakes Connector for micro:bit makes it super-easy to connect I2C, SPI and other devices to your micro:bit without losing the main connector rings.
Unlike other connectors that are designed to break-out all the micro:bit pins, this connector just breaks out the useful ones that are not in use by the micro:bit for other purposes.
And most importantly, you don't lose access to the micro:bit's normal connector rings.
Specifications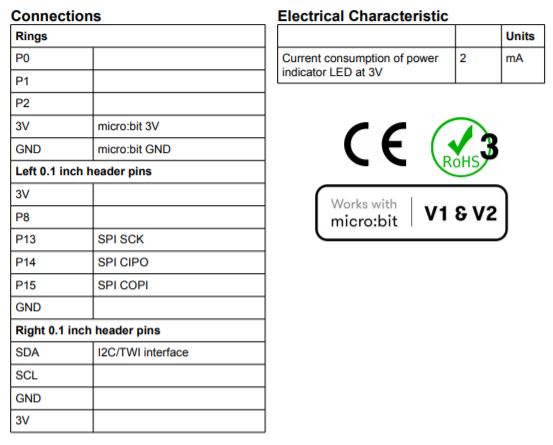
What's in the box ?
1 x Connector for micro:bit (micro:bit not included)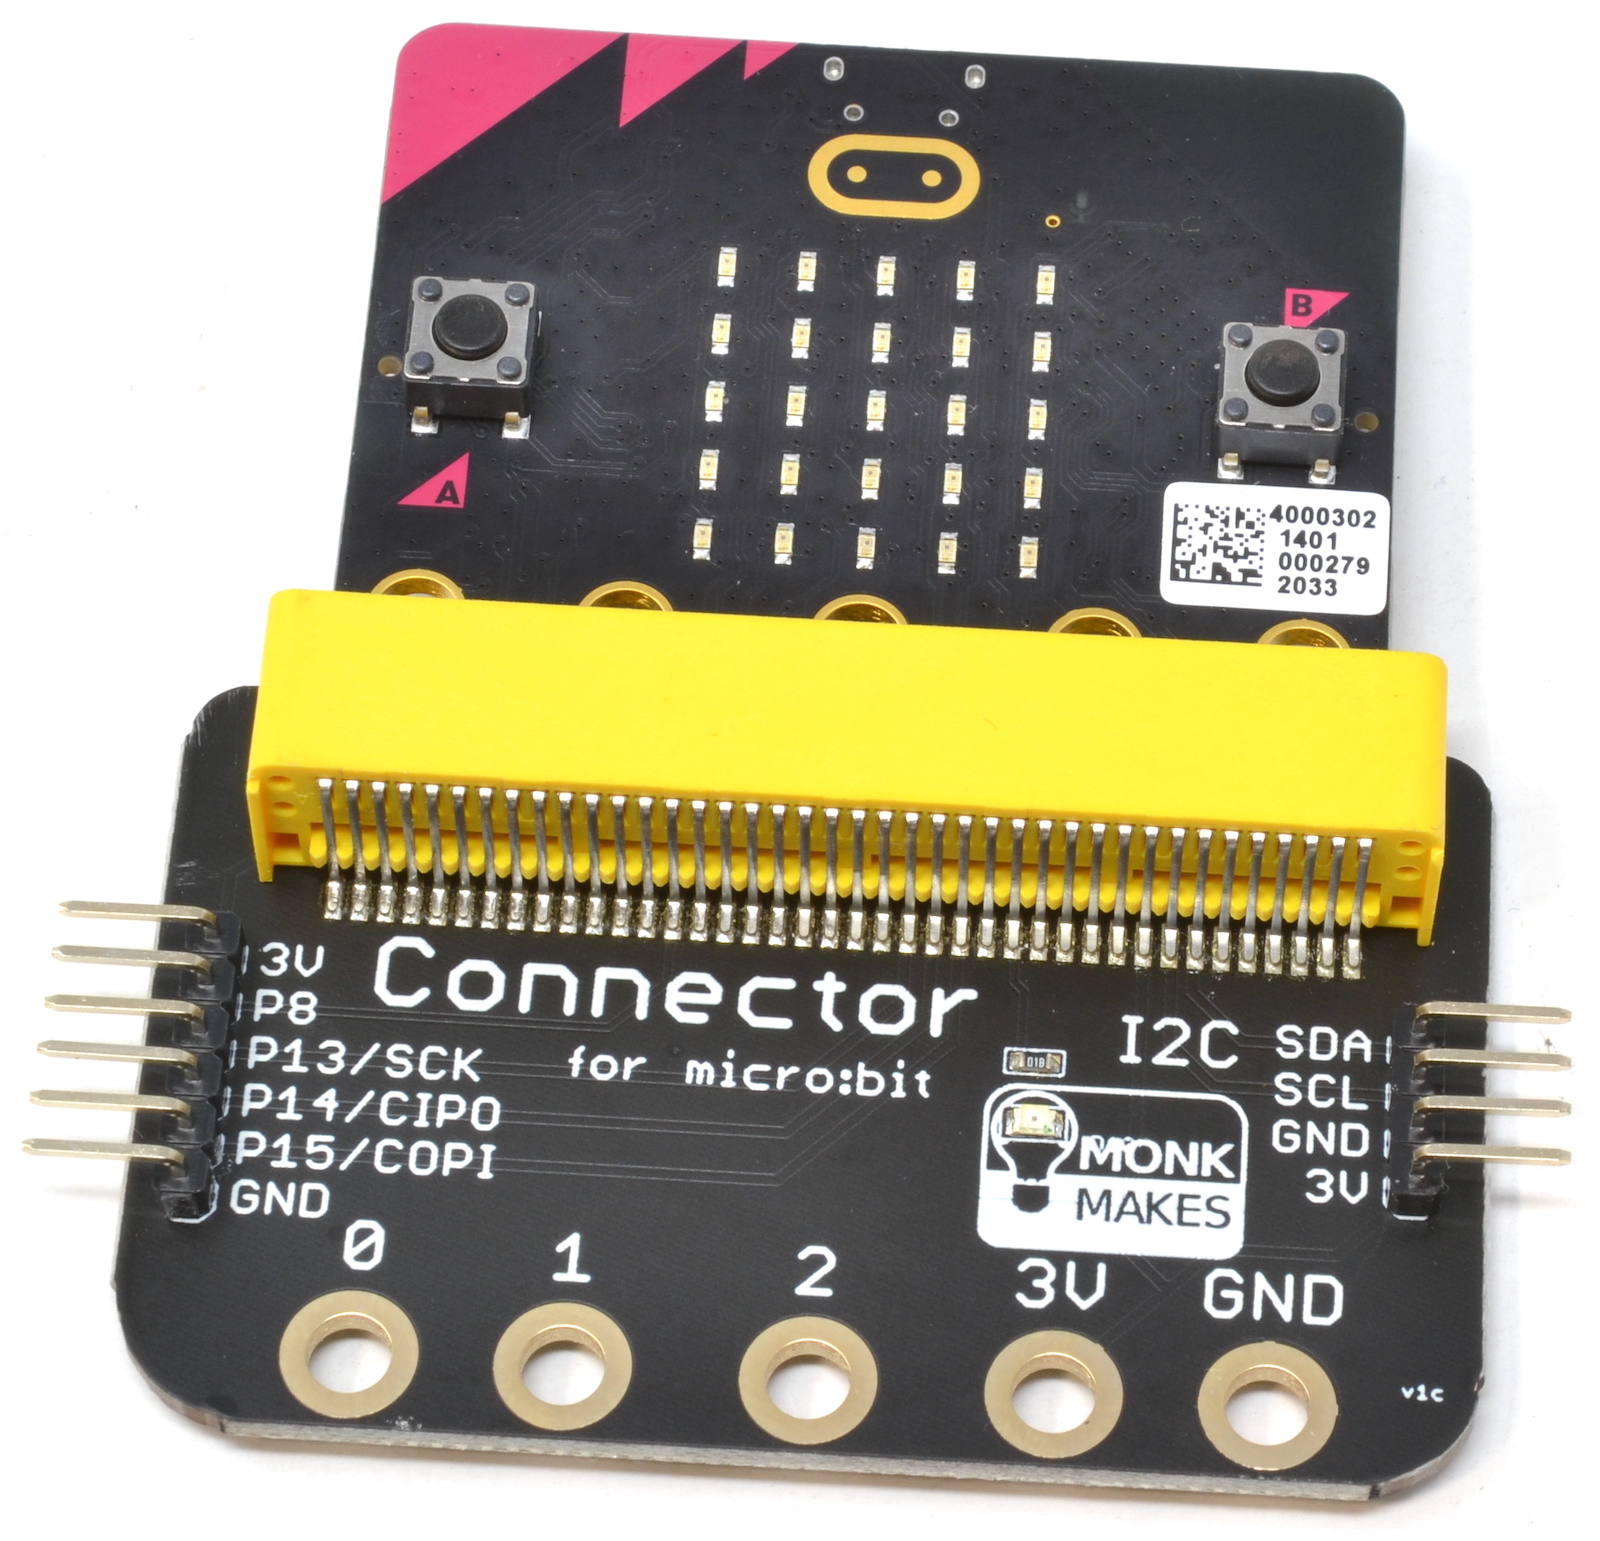

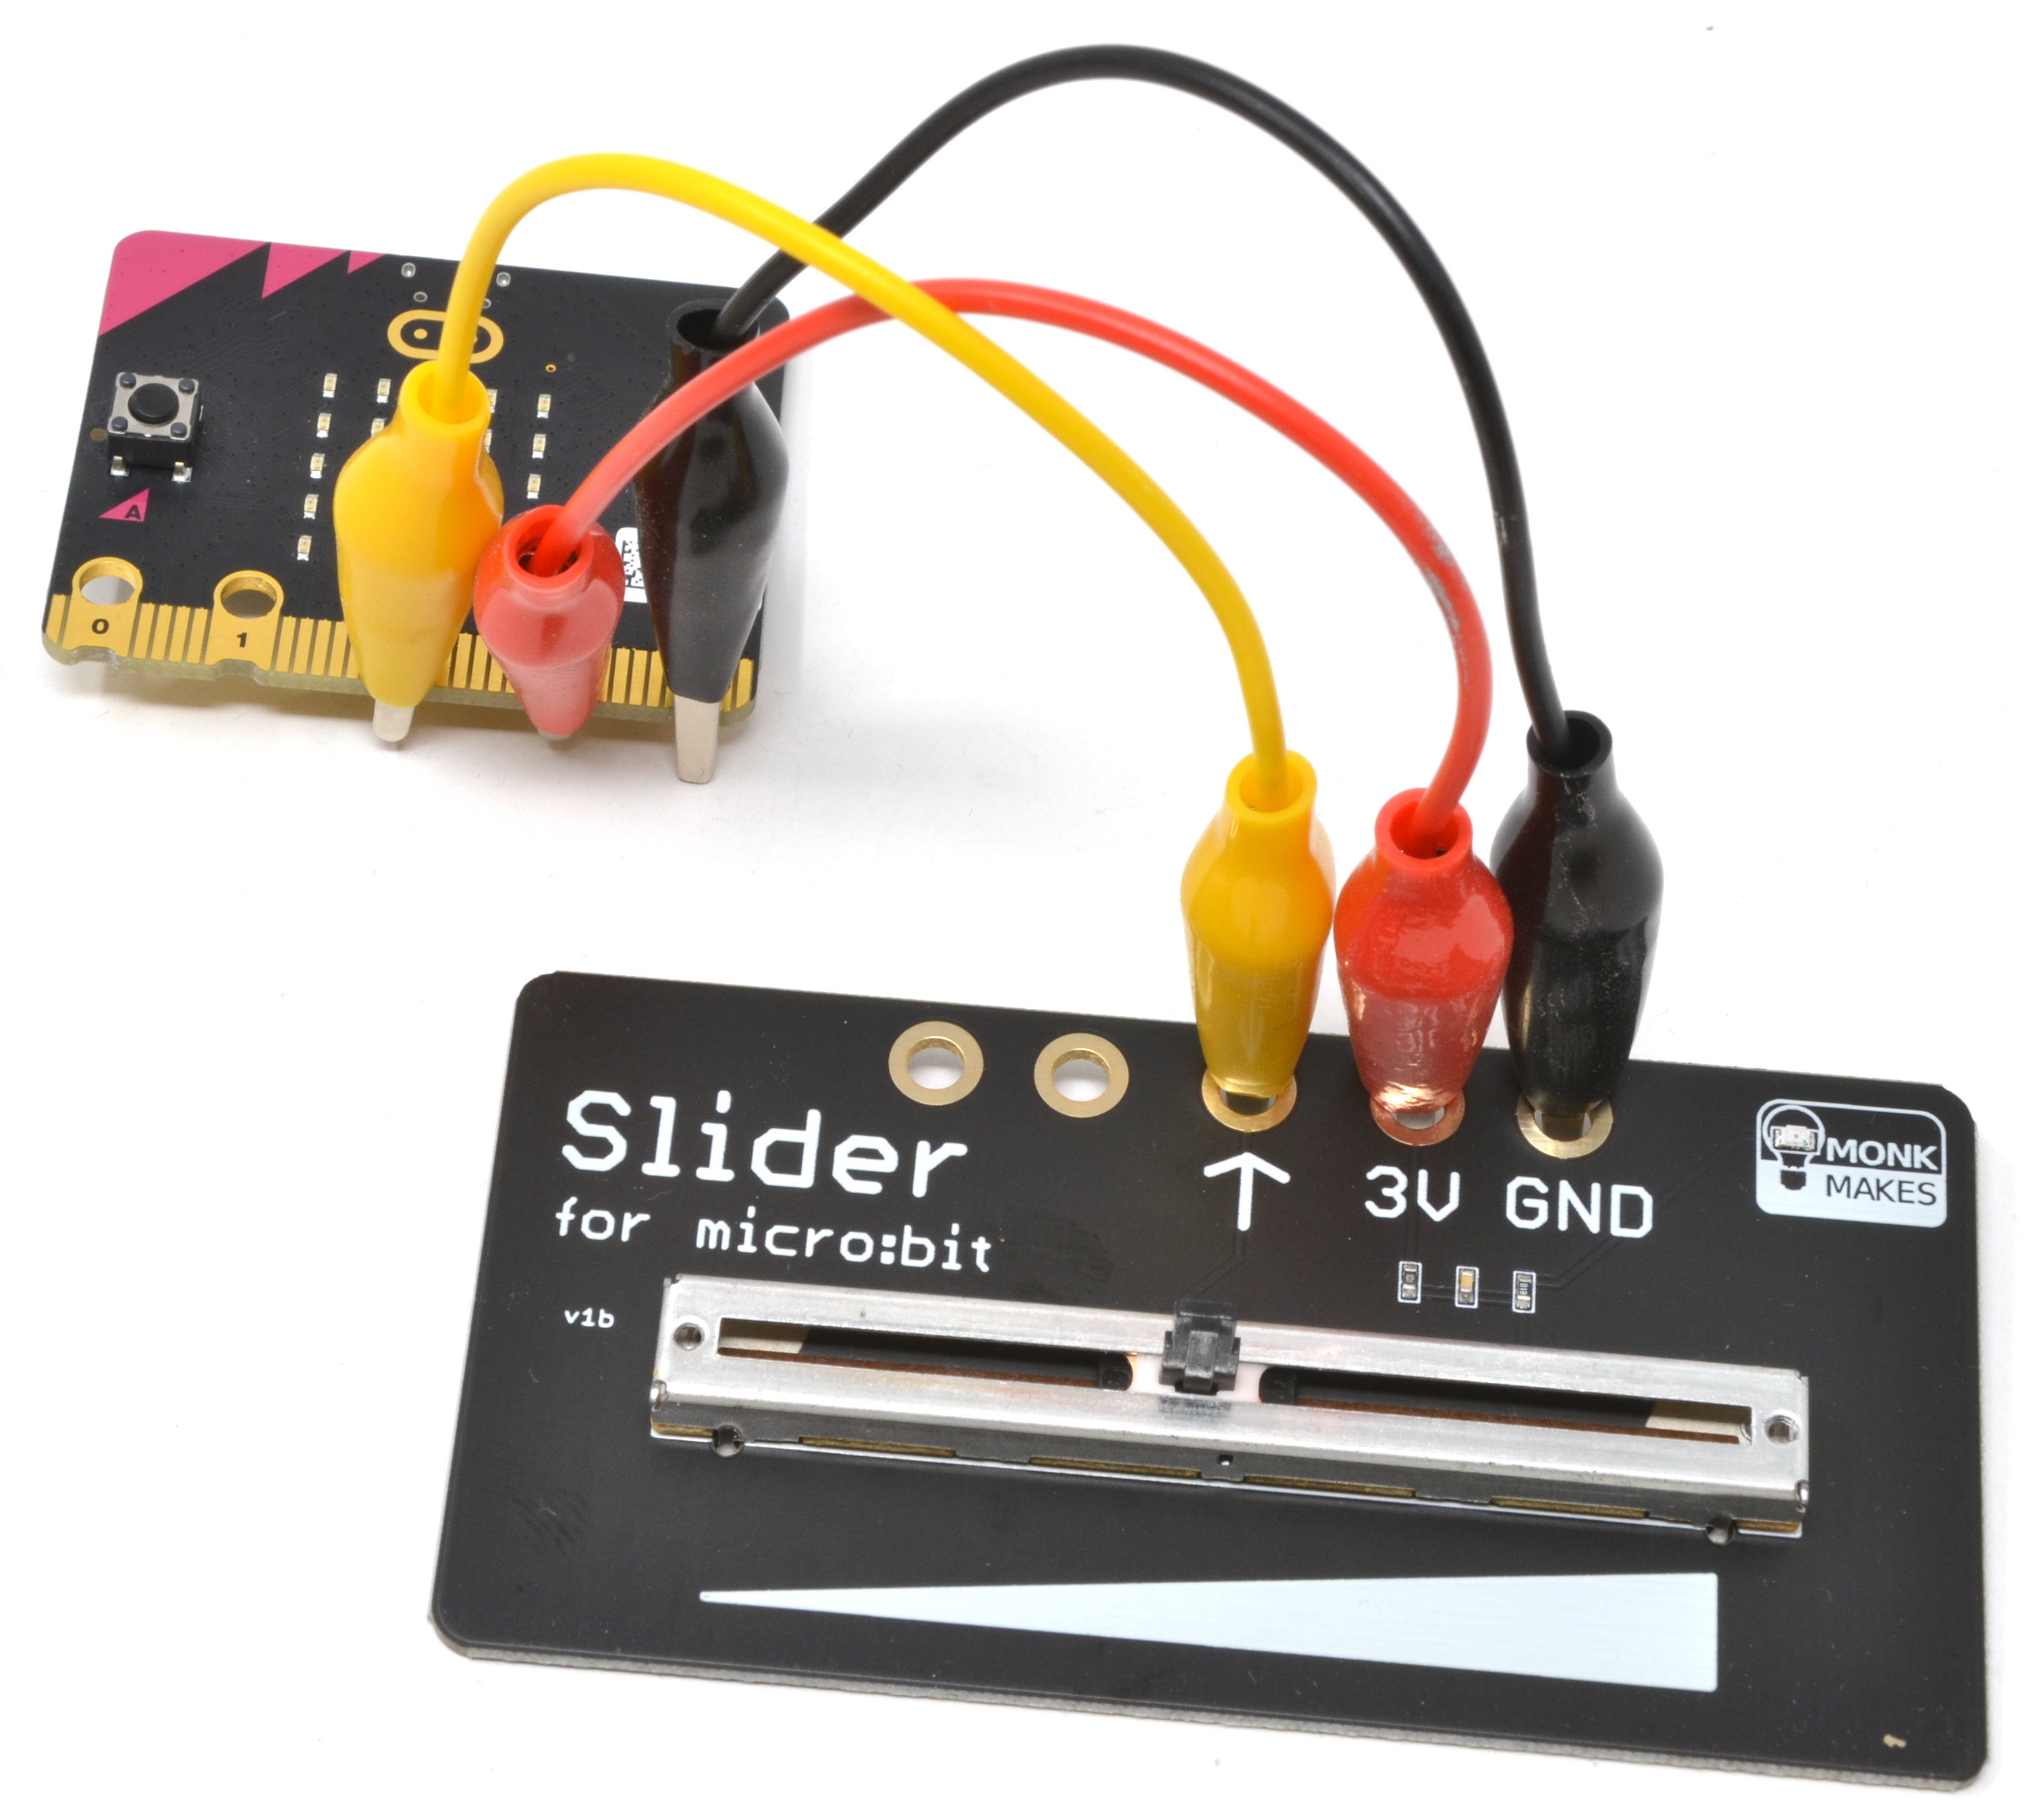
The MonkMakes Slider for micro:bit allows you to interact with your micro:bit by sliding a control left and right.
The board uses a 10kΩ linear variable resistor (pot) to output a voltage between 0 and 3V that can be measured in your micro:bit programs using one of the micro:bit connections as an analog input.
The kit includes the Slider for micro:bit itself plus a set of 5 alligator clip leads.
Specifications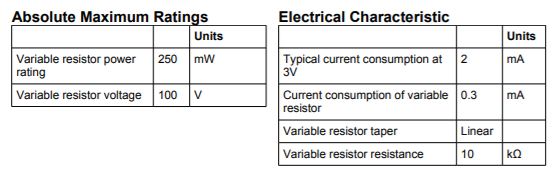
What's in the box ?
1 x 3v Slider
5 x crocodile clip leads
You might also need....
micro:bit not included
Resources
- Instructions (PDF)
- Data Sheet (PDF)
- Lesson Plans (Google file share)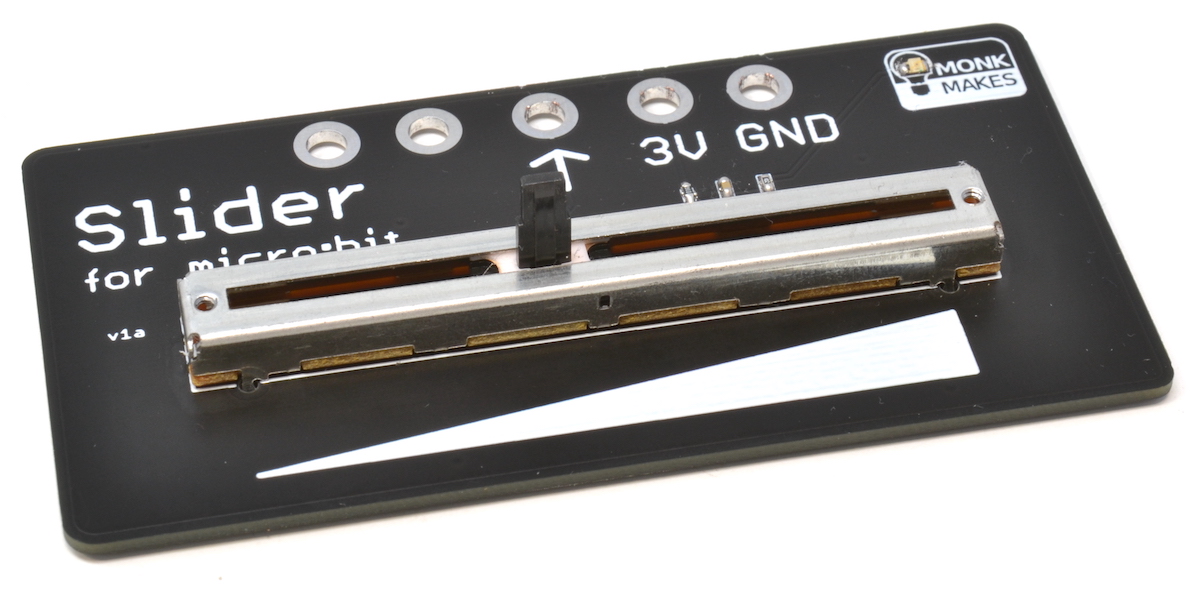
(* micro:bit not included)

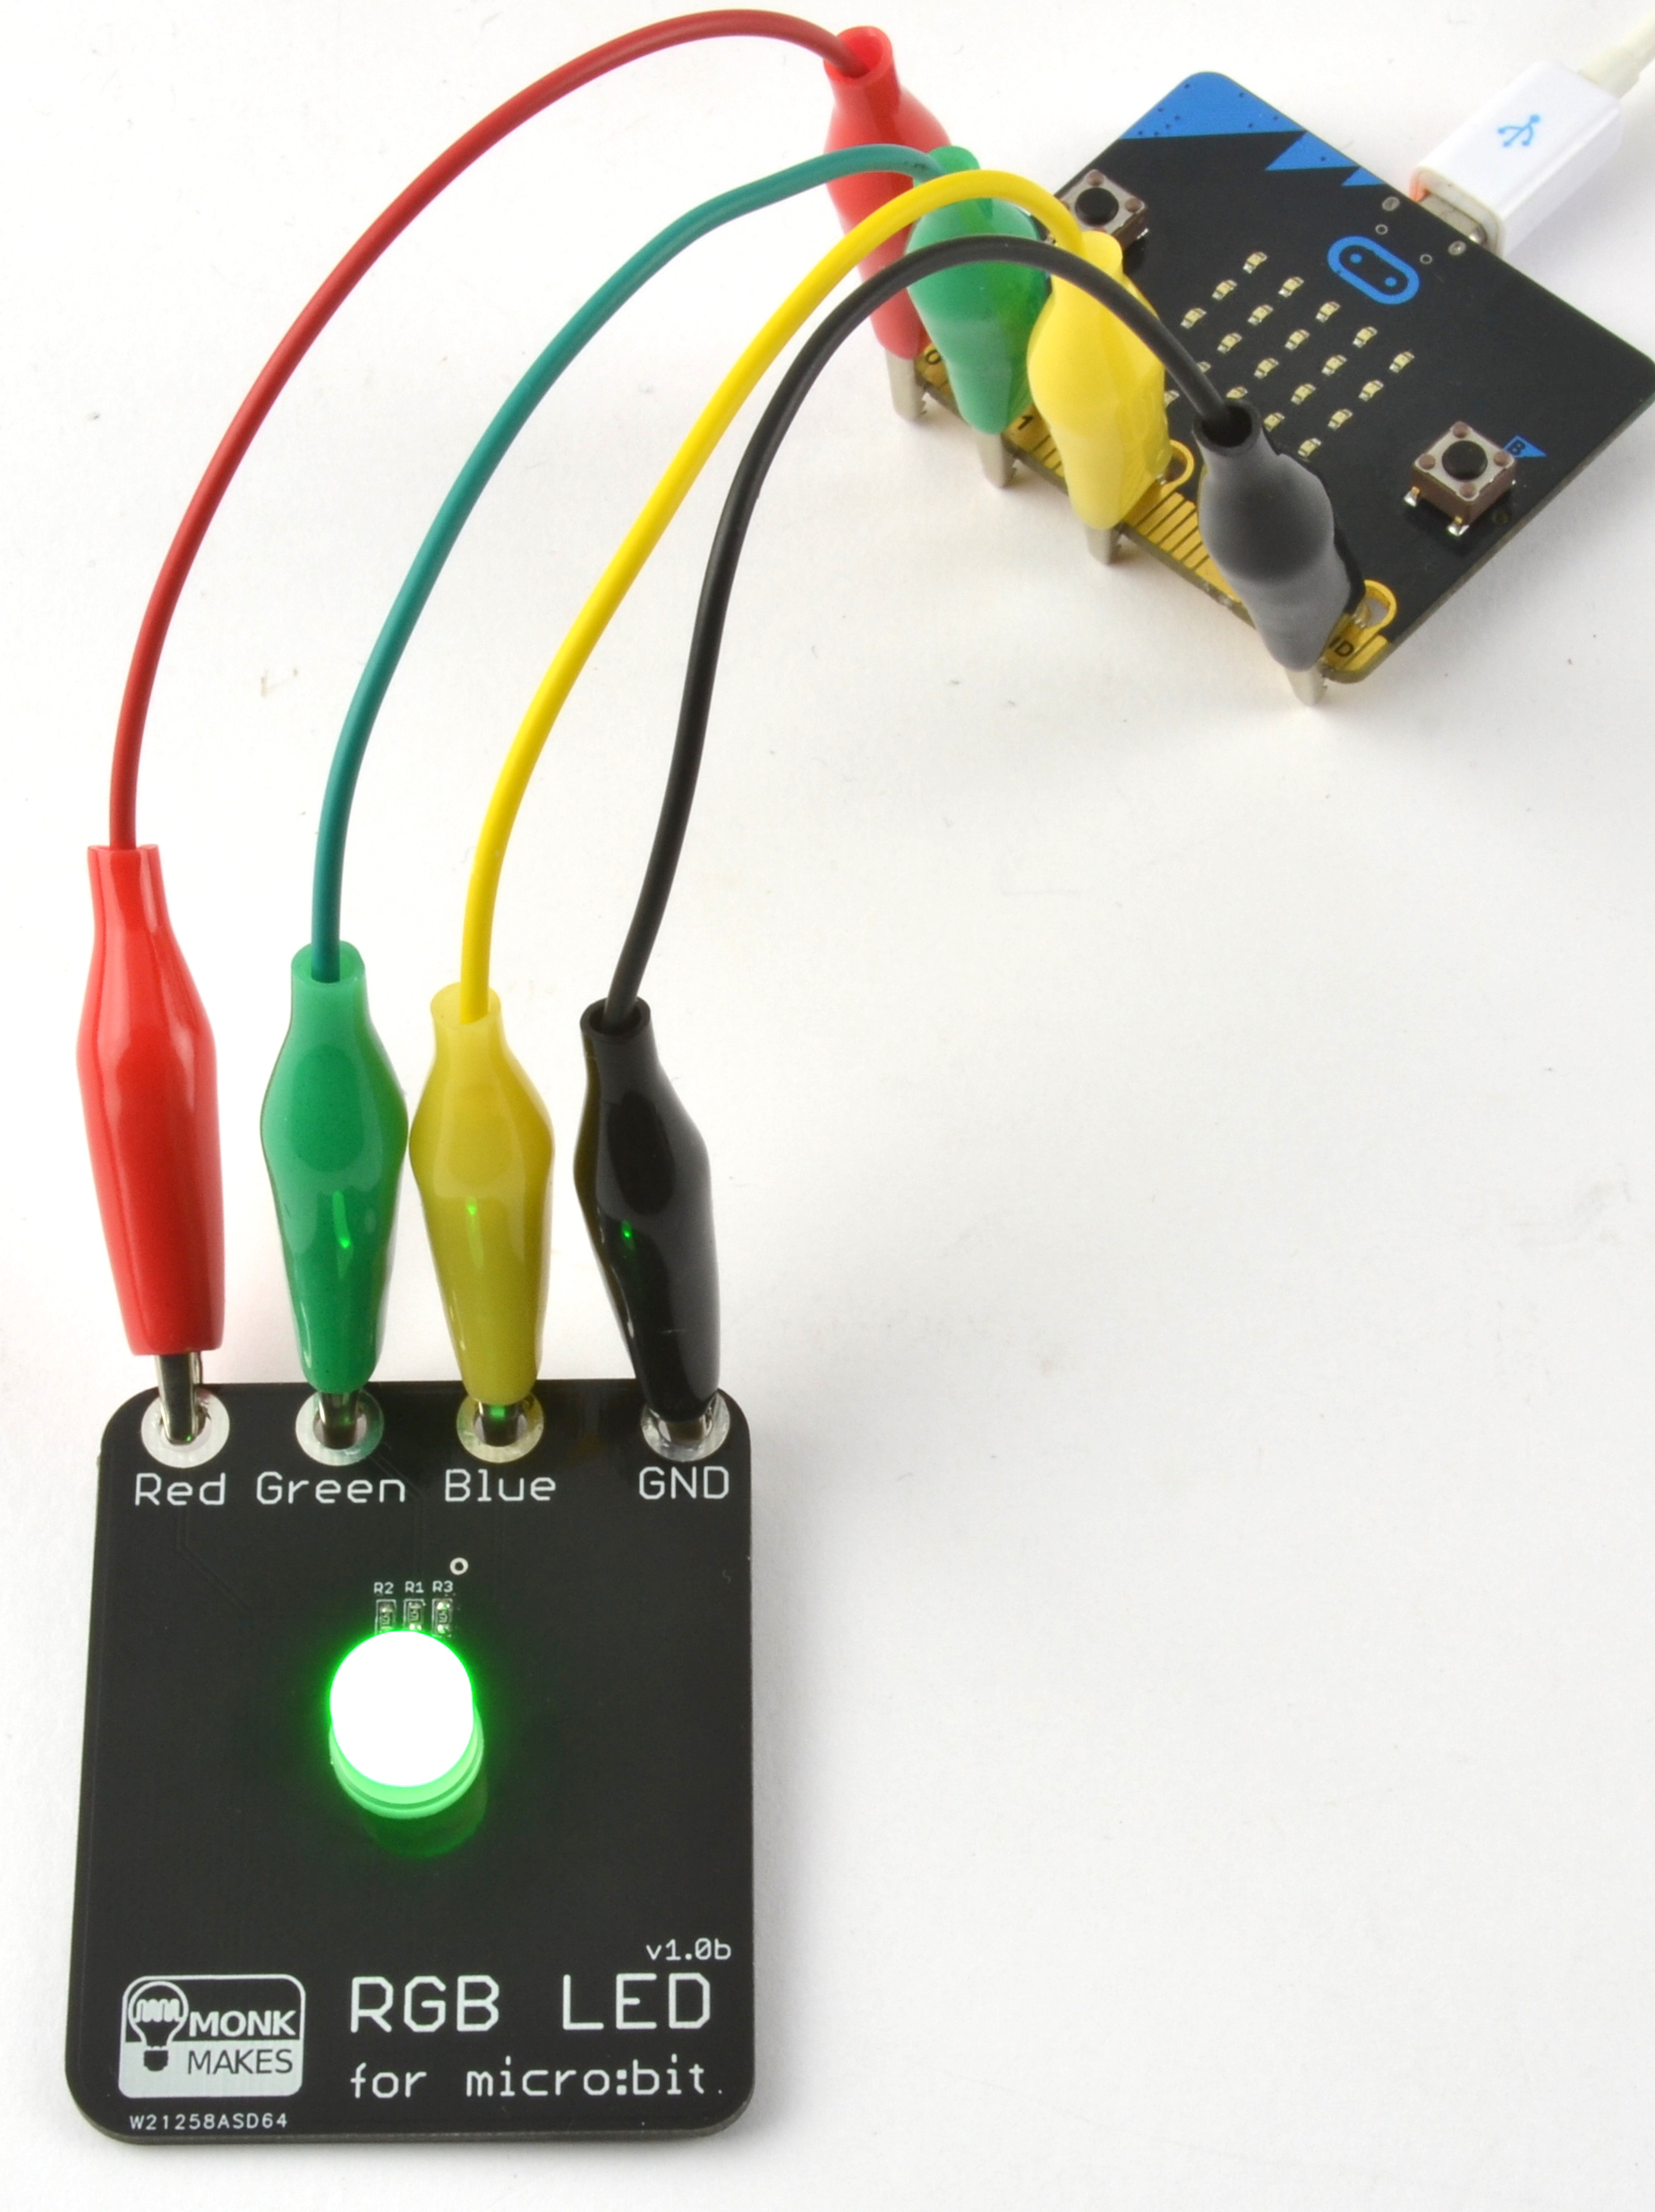
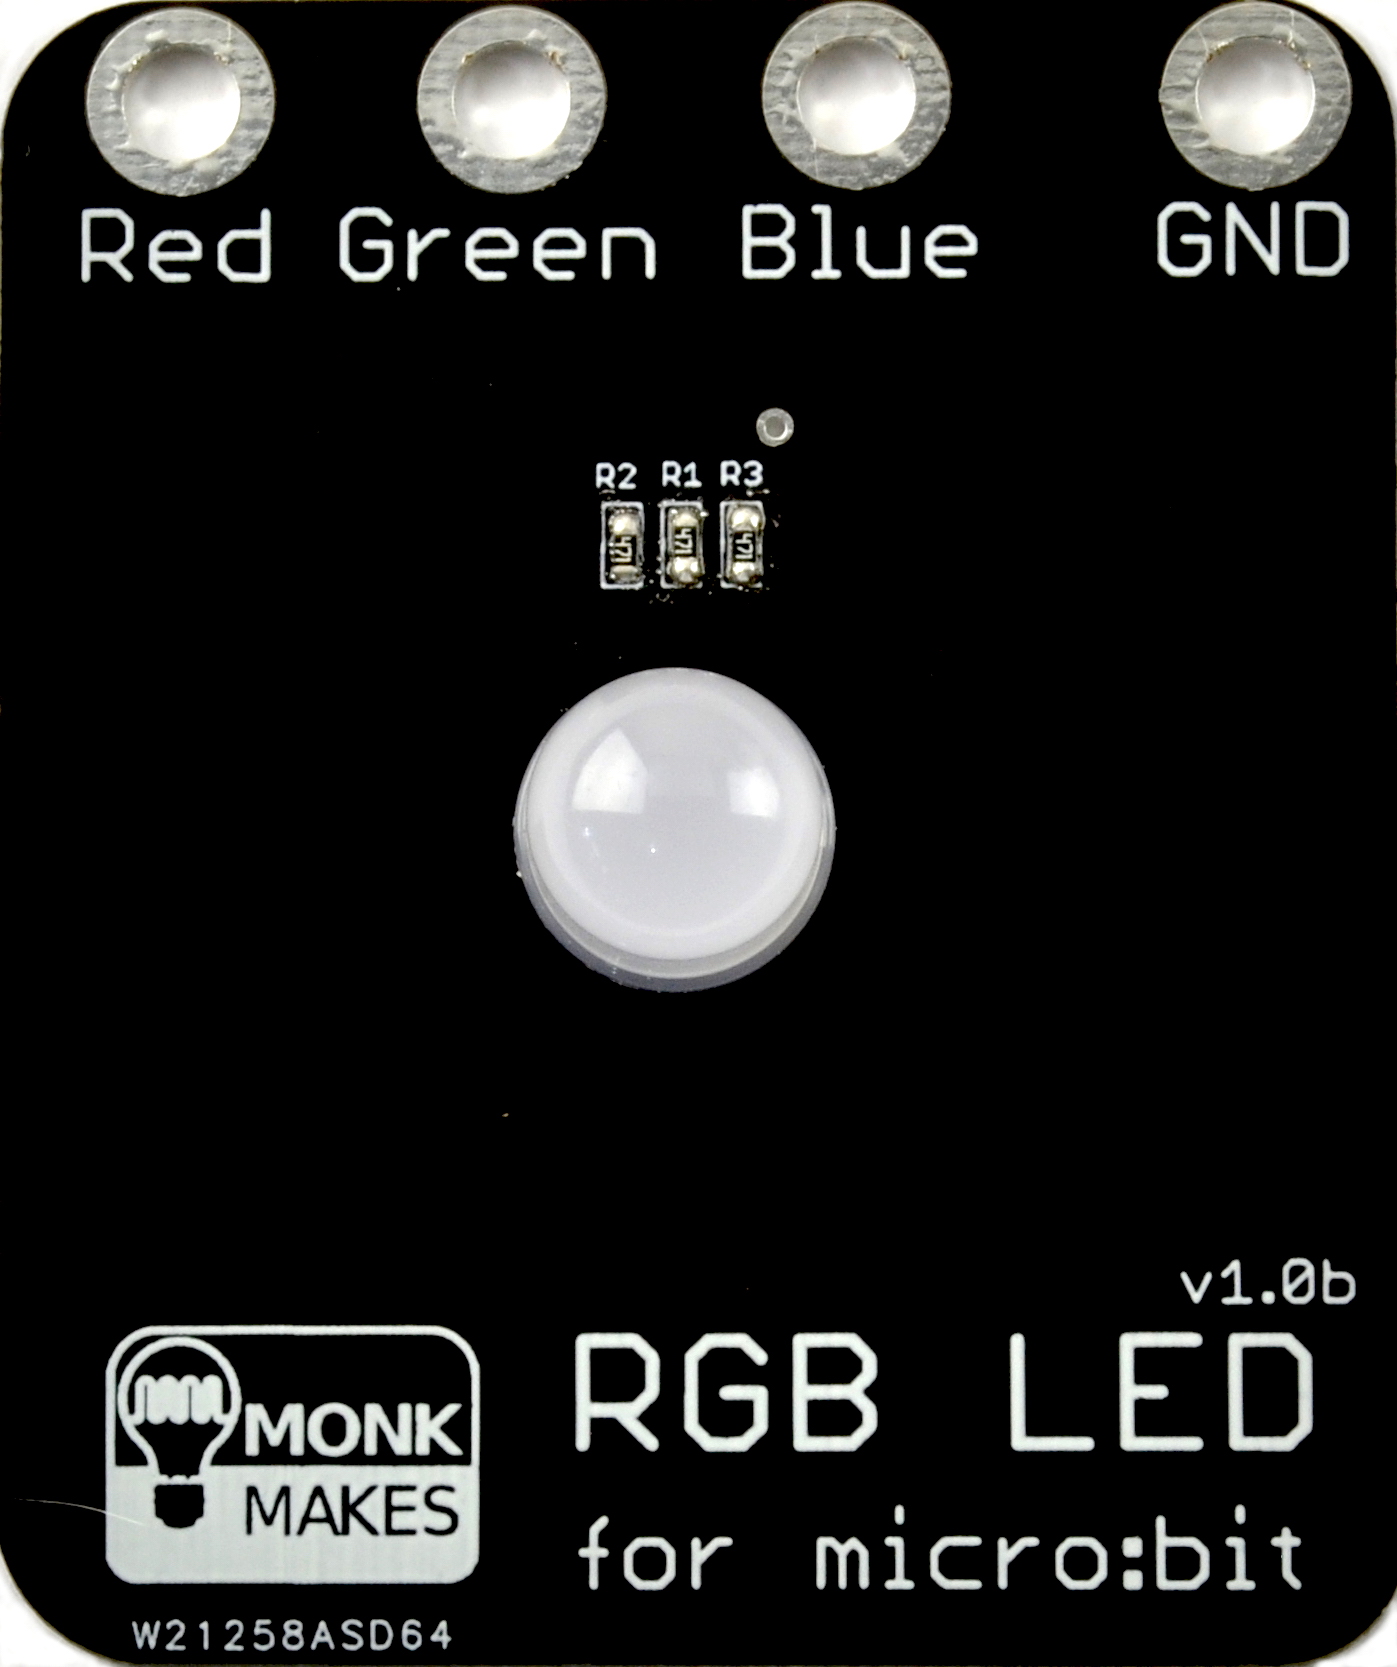
The MonkMakes RGB LED for micro:bit can be used to make any Colour by controlling the red green and blue levels. Handily mounted on a PCB it connects to the micro:bit using alligator clips.
Connect it up with alligator clips and then use the three outputs of your micro:bit to control the red, green and blue channels to mix up any color of light you want.Features
• Easy to connect
• Powered directly from micro:bit pins
• Useful for teaching color mixing.
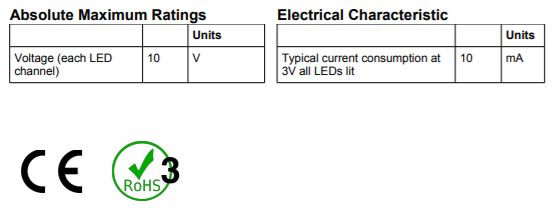
Specifications
Each LED channel has a 1kΩ series resistor to limit the current.
What's in the box ?
1 x RGB LED For micro:bit
(*micro:bit not included )

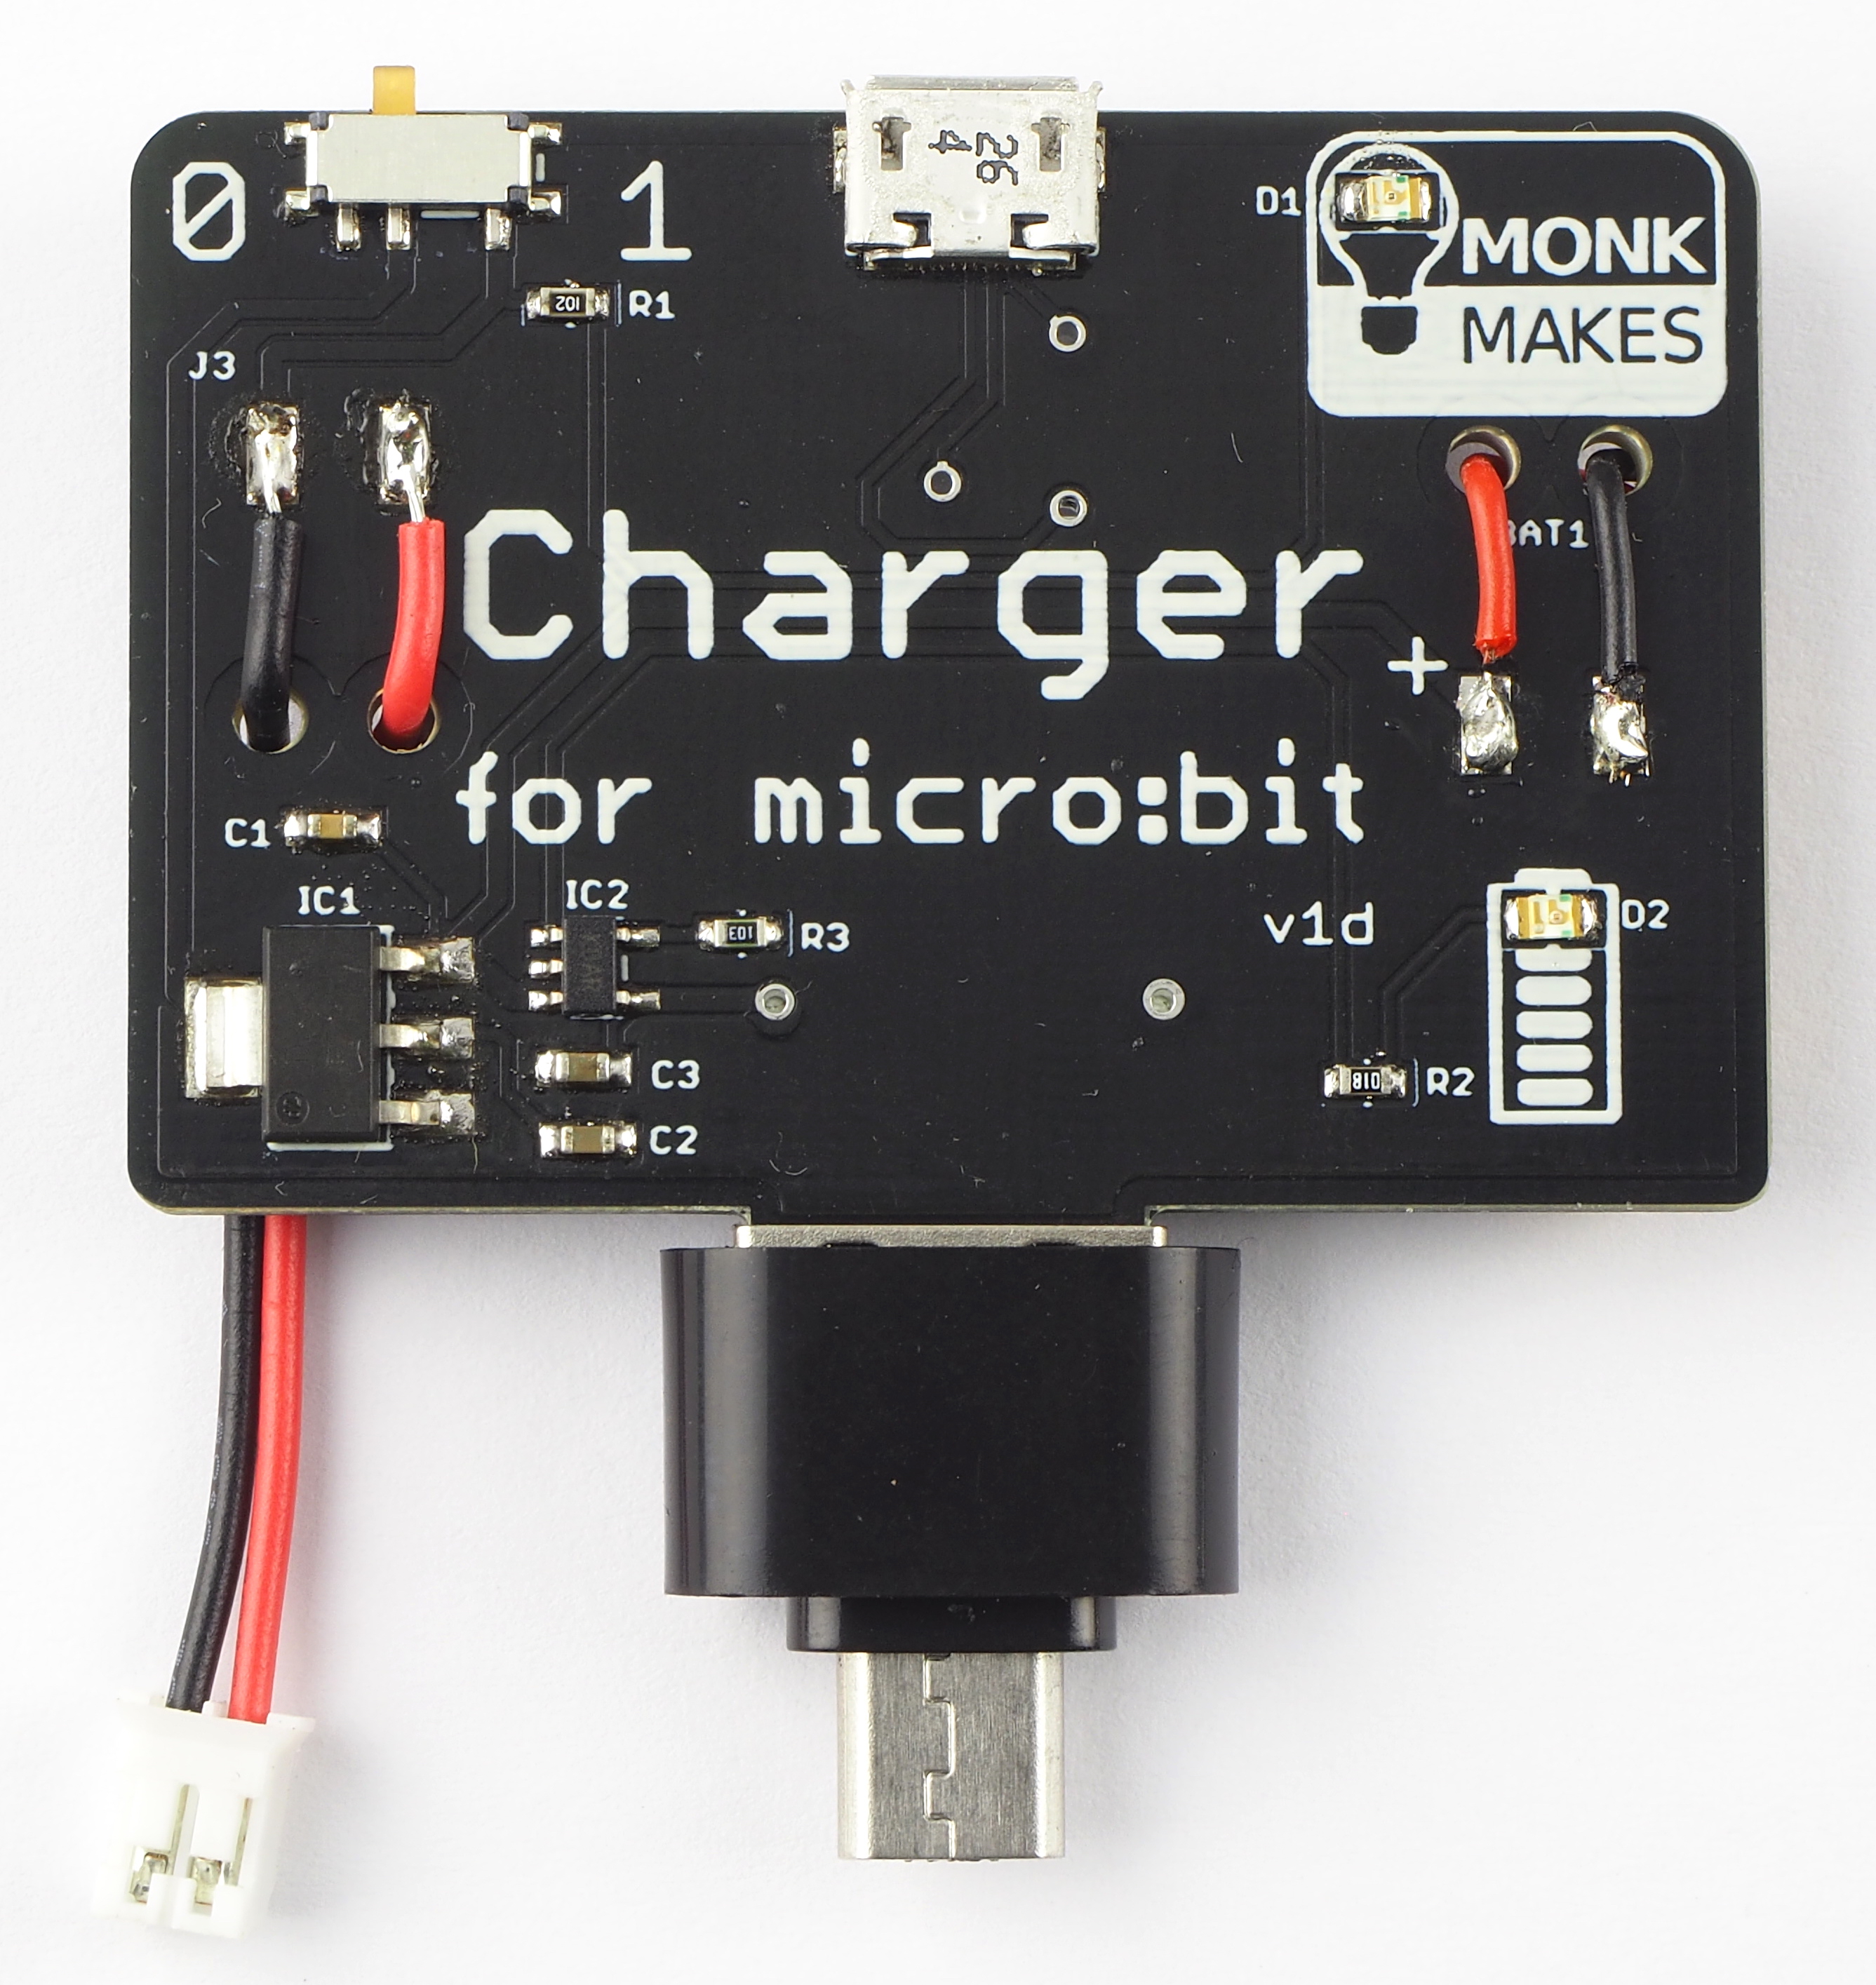
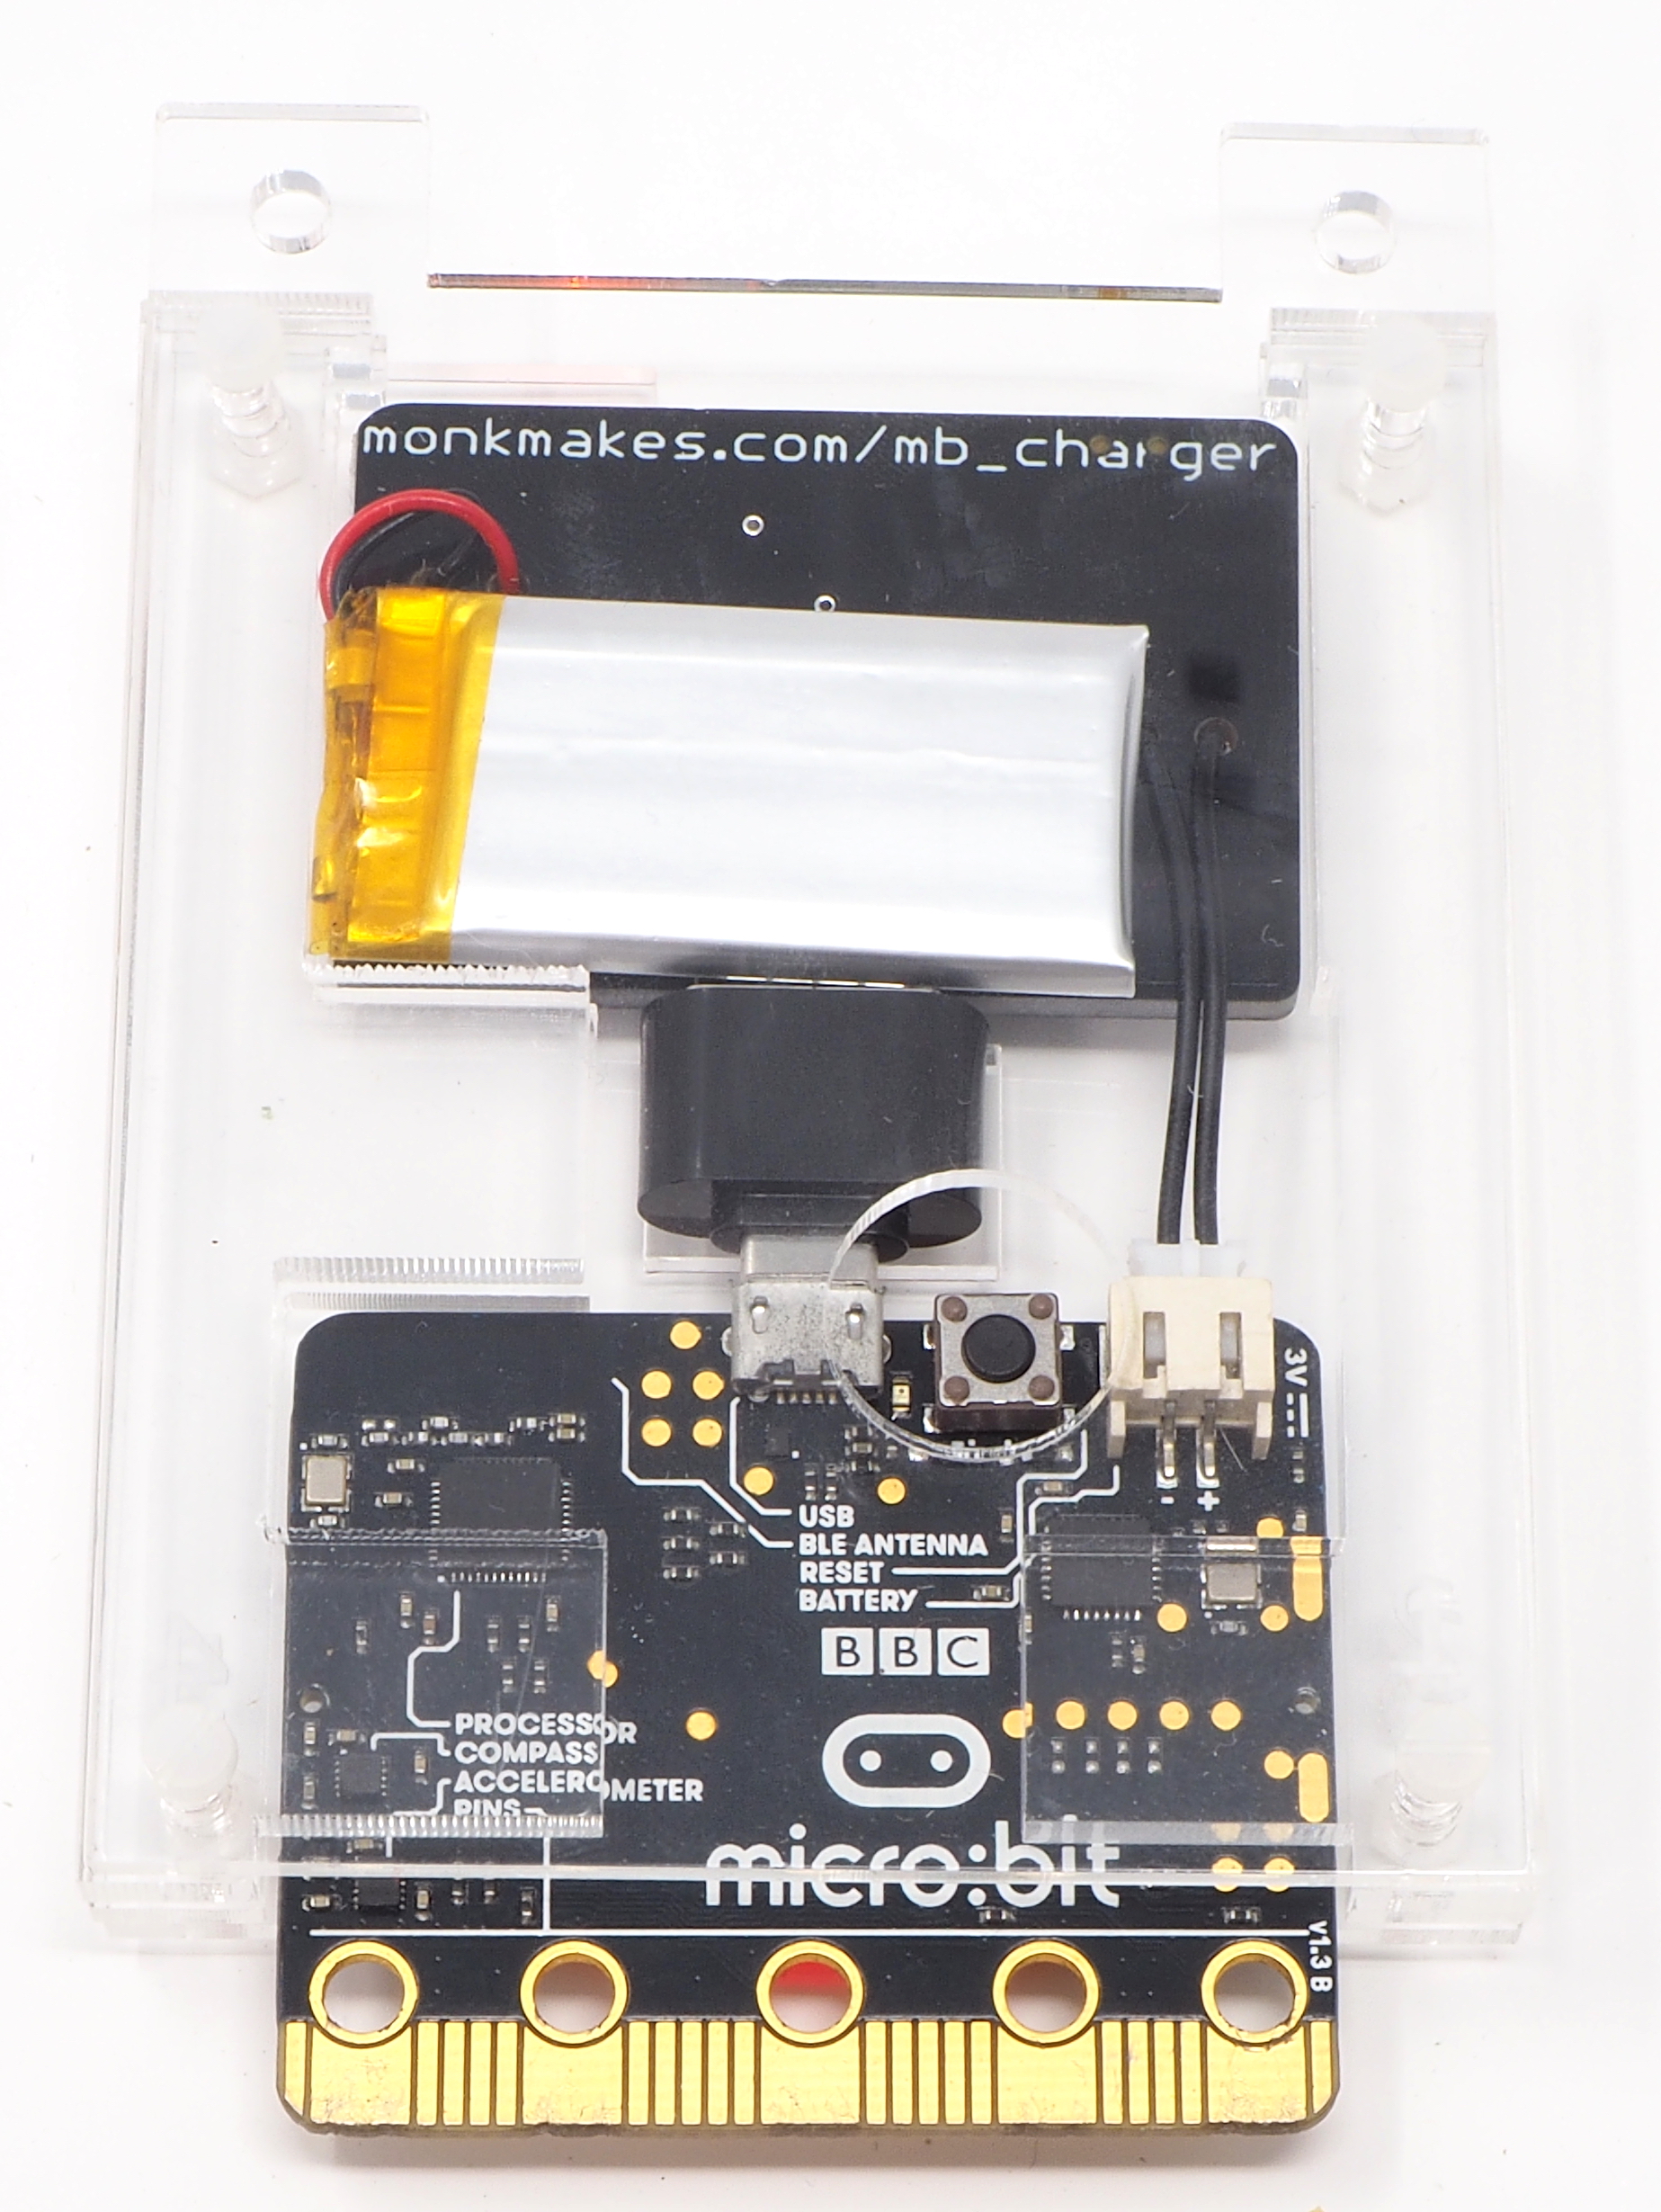
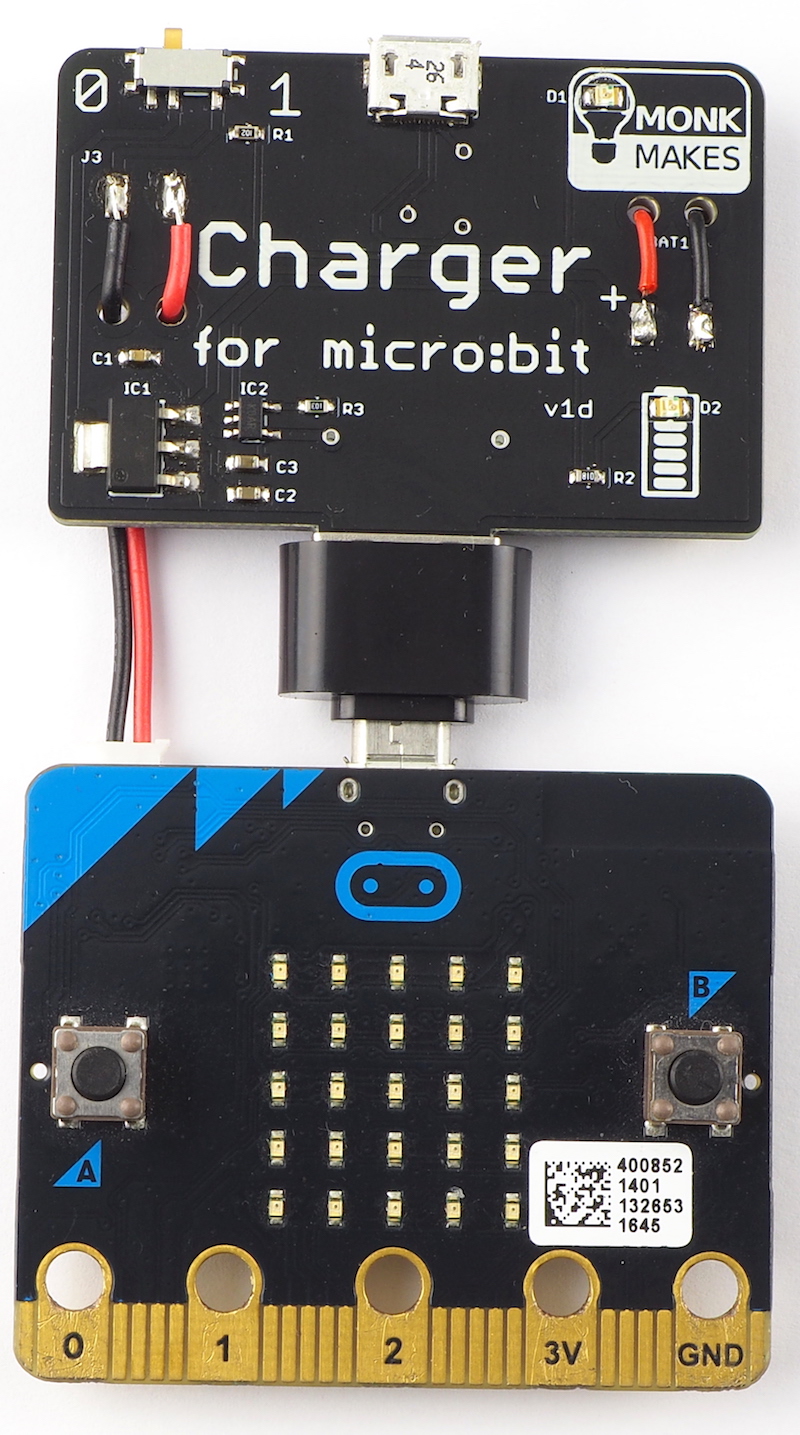
A LiPo battery and charger board that charges automatically while you use your micro:bit! This neat solution to your micro:bit’s power needs comes with an acrylic layer enclosure to protect your micro:bit and the Charger for micro:bit.
Features:
•Program your micro:bit and charge at the same time
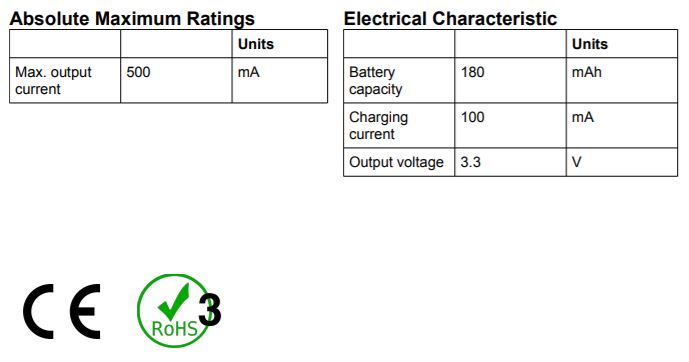
• Once charged the Charger for micro:bit can power your micro:bit for up to 20 hours using its rechargeable built-in LiPo battery
• Acrylic case to protect your micro:bit and Charger for micro:bit
• On/off switch
• Full charge indicator LED
Specifications:
Resources:
- Instructions (PDF)
- DataSheet (PDF)
(* micro:bit not included)
(*micro:bit not included)

The 7-segment for micro:bit is a four digit 7-segment display for micro:bit. You can use it to display numbers, but it can also display letters and other characters, albeit with the limits imposed by the 7 segments of each digit.
Powered directly from micro:bit pins it can be used to send messages to the display using the micro:bit’s Serial blocks.
Please note that this version of the 7-Segment for micro:bit uses a red LED display rather than the green display of earlier versions.
Specifications:
The 7-segment for micro:bit is a four digit 7-segment display for micro:bit.
You can use it to display numbers, but it can also display letters and other characters, albeit with the limits imposed by the 7 segments of each digit.
• Low power high brightness LEDs
• Serial interface using a single micro:bit pin
• ATTiny816 preloaded firmware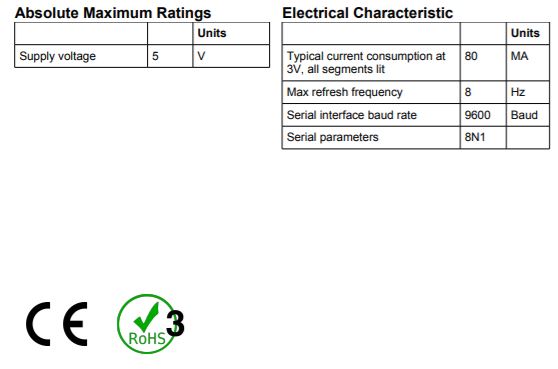
What's in the box ?
1 x 7-Segment for micro:bit
Resources:
Instructions (PDF)
Datasheet (PDF)
(* Micro:bit, Sensor board and jumpers NOT included*)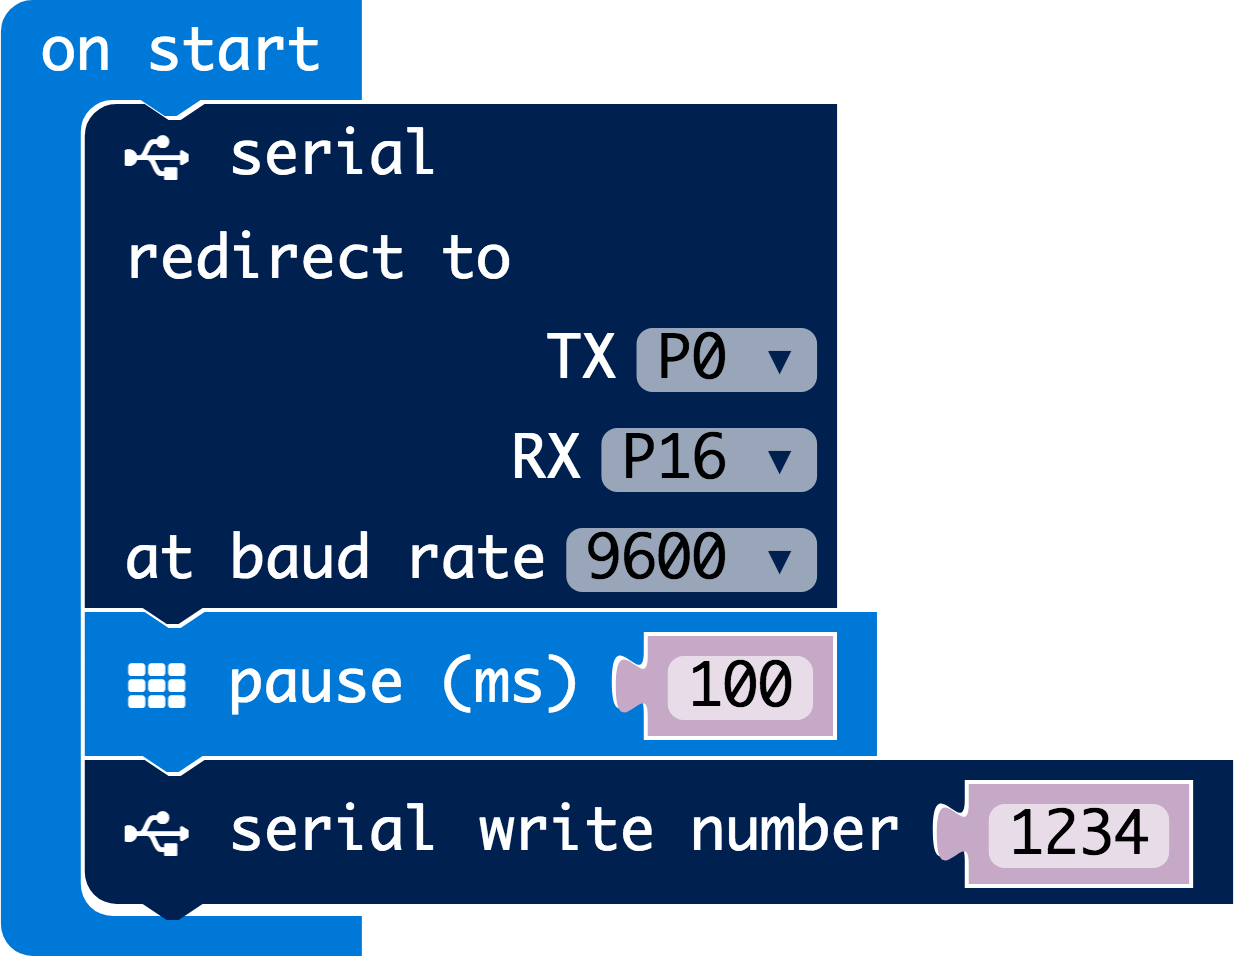

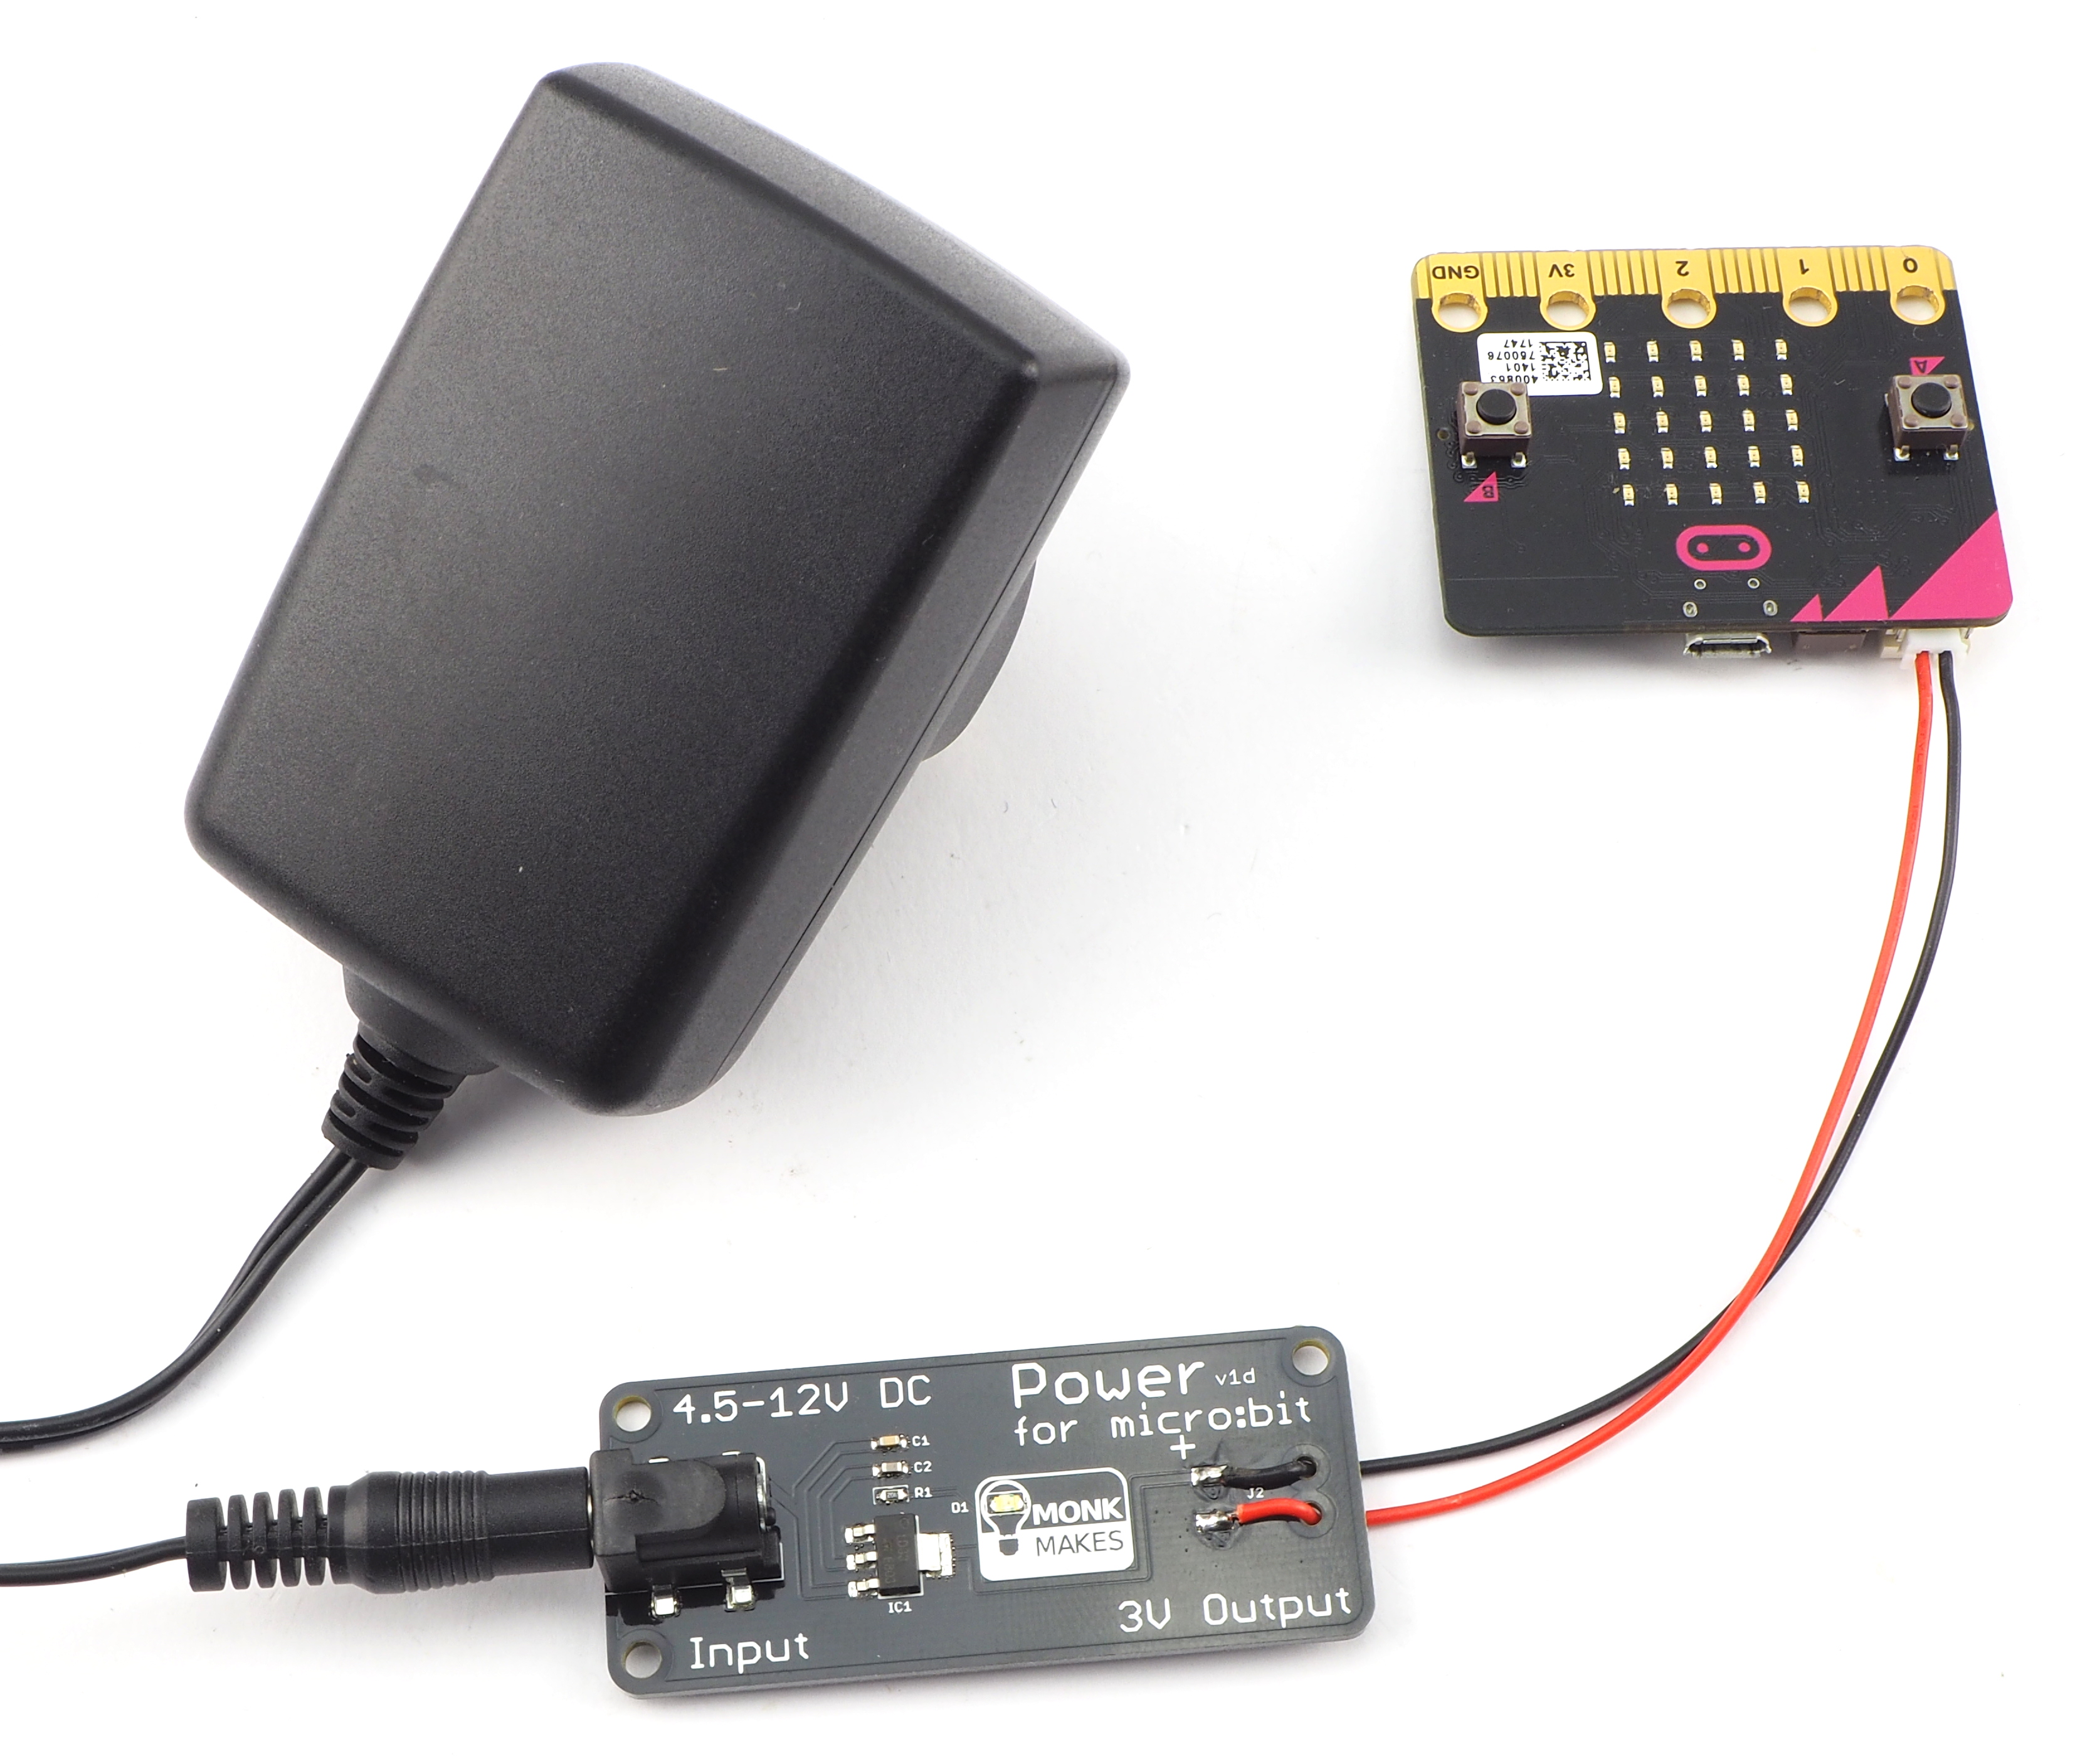
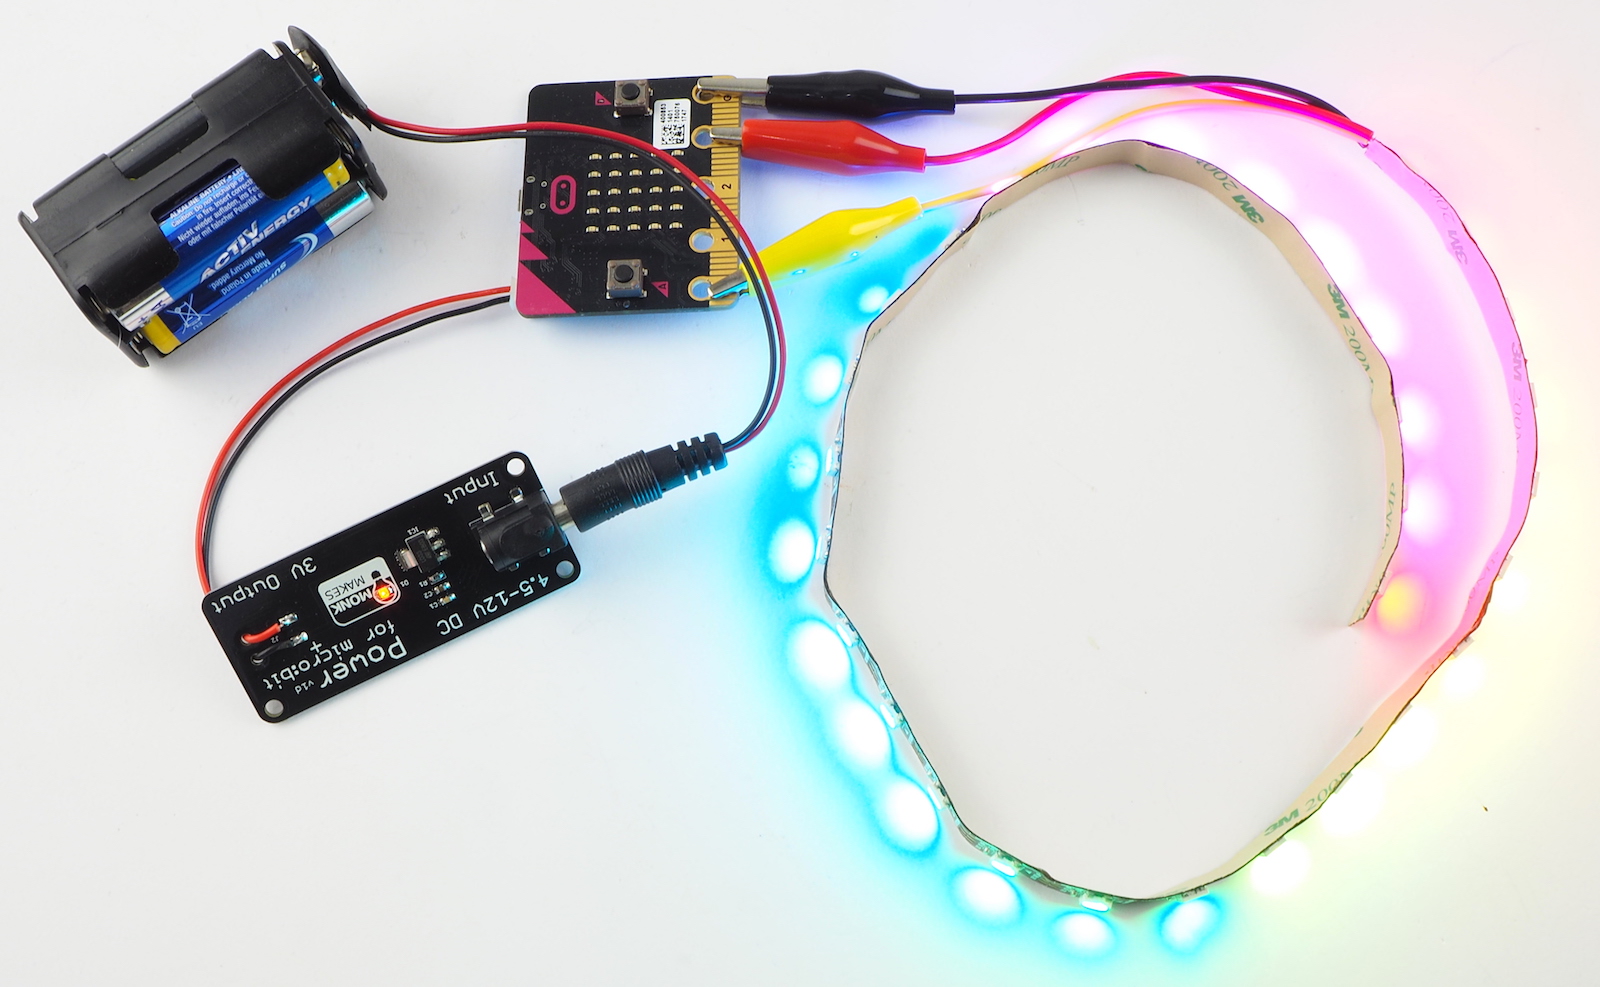
The MonkMakes Power for micro:bit opens up lots of ways of powering your micro:bit.
The board has a standard DC barrel jack that accepts between 4.5 and 12V and provides a regulated 3V output to the micro:bit via its JST battery connector.
Specifications: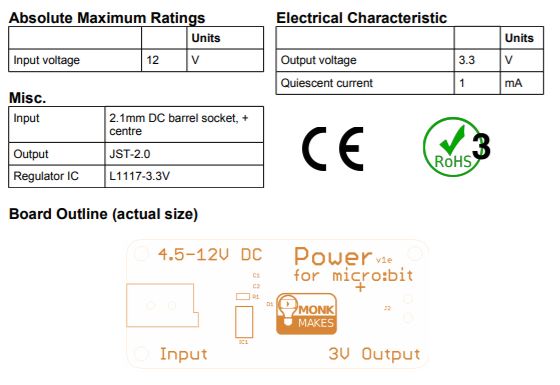
What's in the box ?
1 x power for micro bit board (*Batteries and micro:bit not included)
Resources:
Instructions (PDF)
Datasheet (PDF)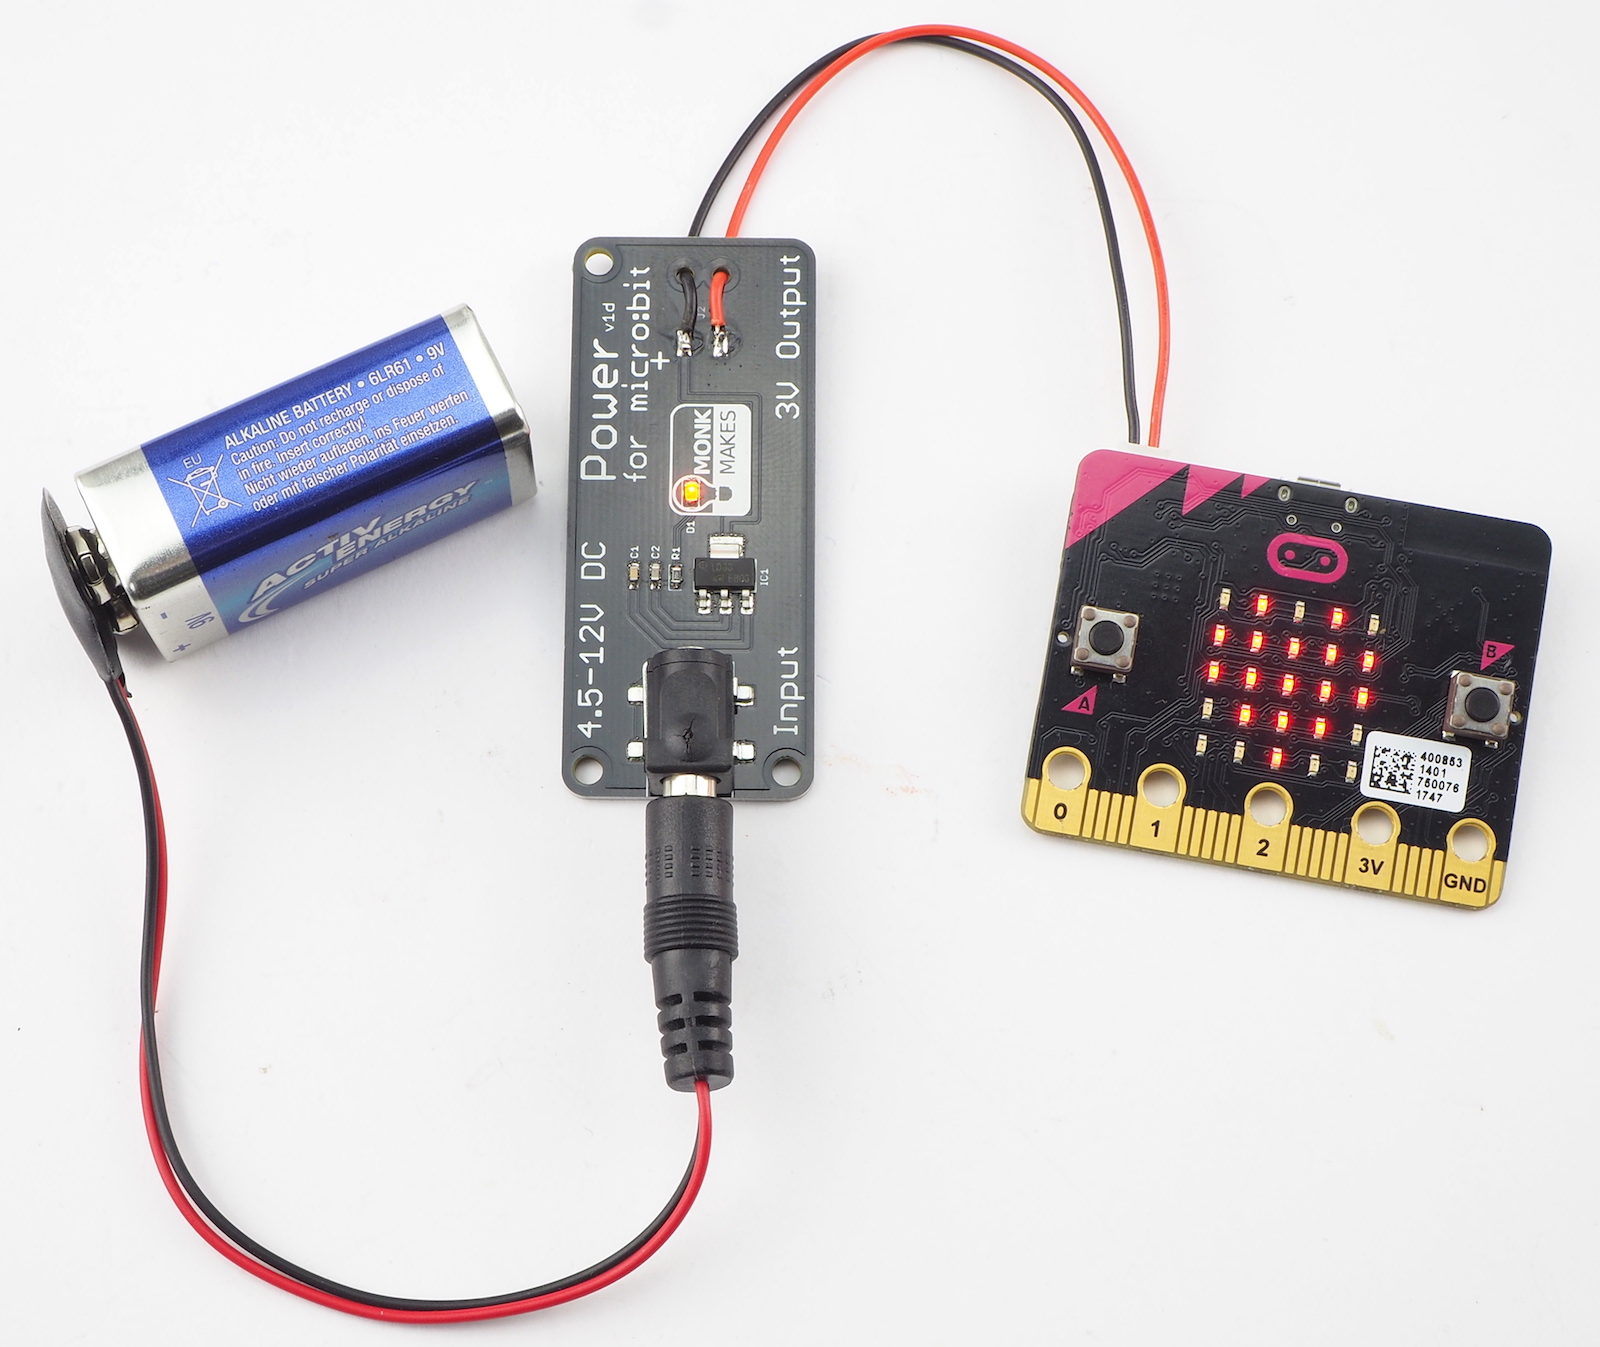

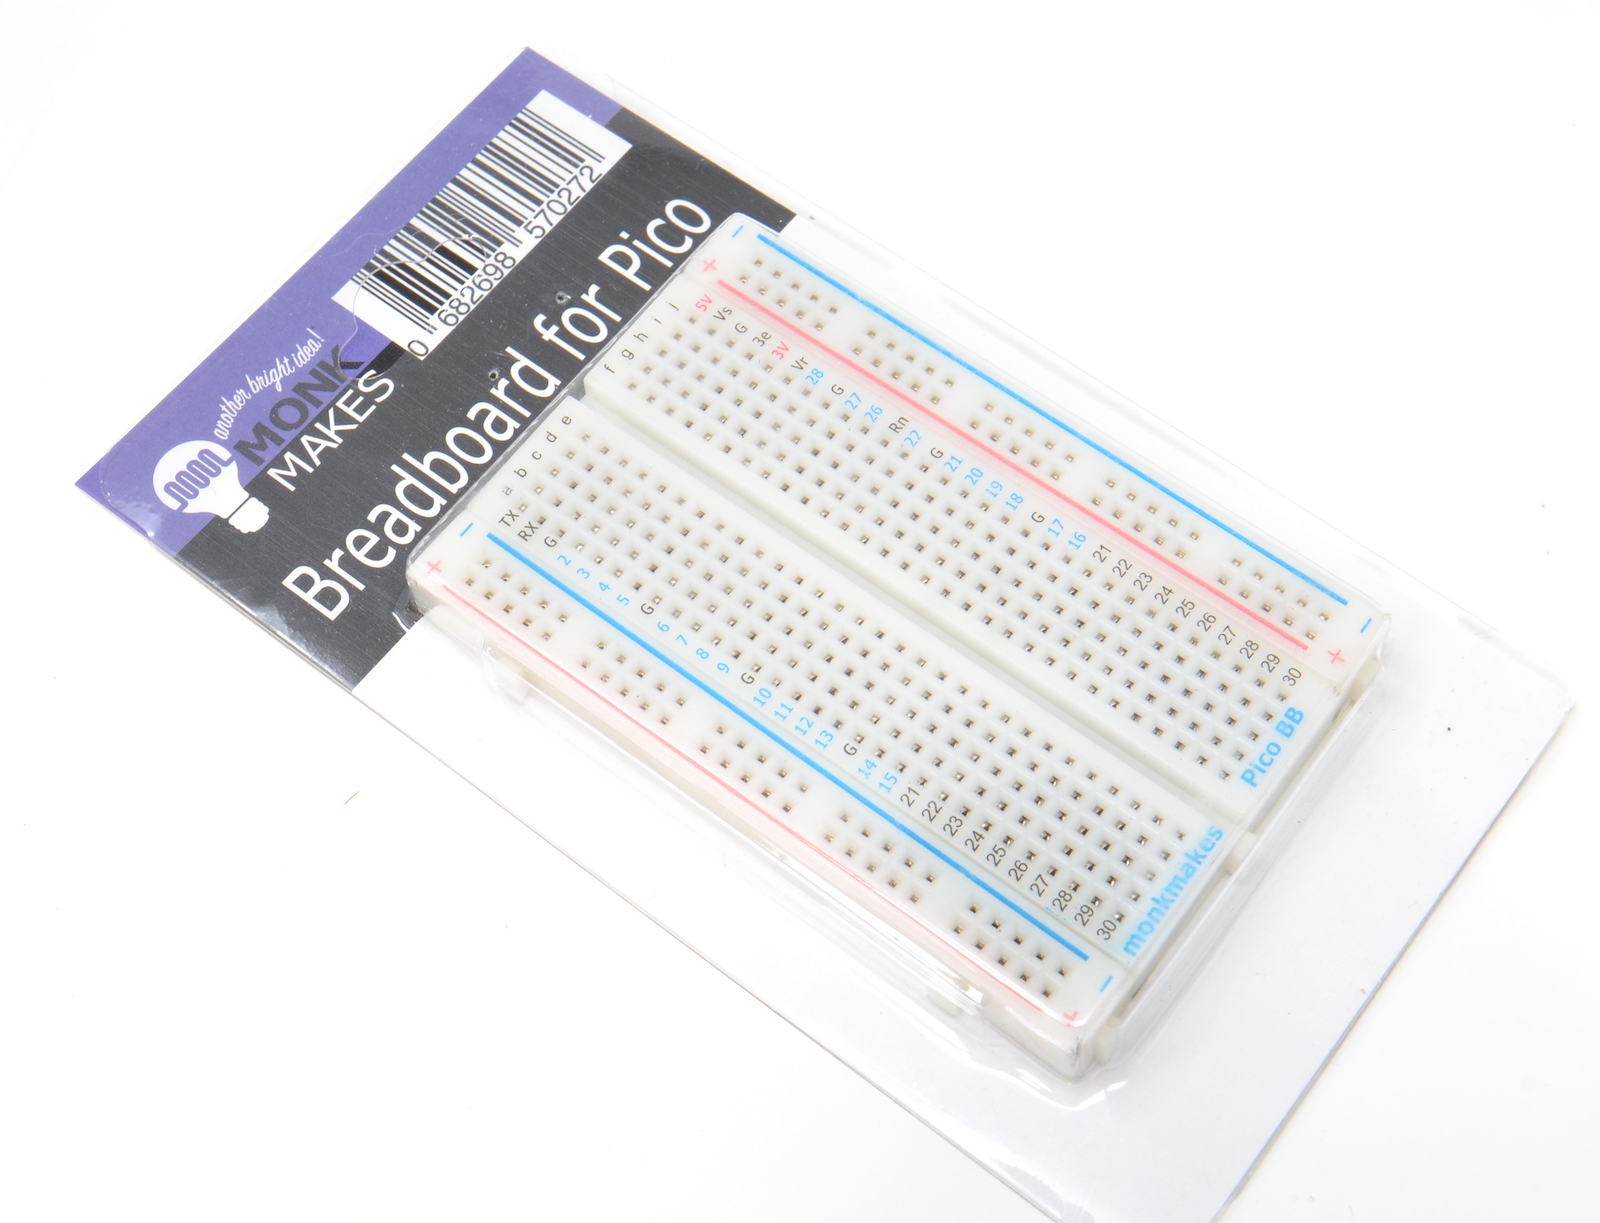
Specifications
- 400 tie point
- 2 power busses
- Size 8.2x5.5x0.85cm
- Self-adhesive back
- Electrical Characteristic Units Accepts wires and legs 20-29 AWG Maximum voltage AC/DC 50 V Maximum Current 2 A
(WARNING: Low voltage, low current usage only. Maximum 50V at 3A.)
What's in the box ?
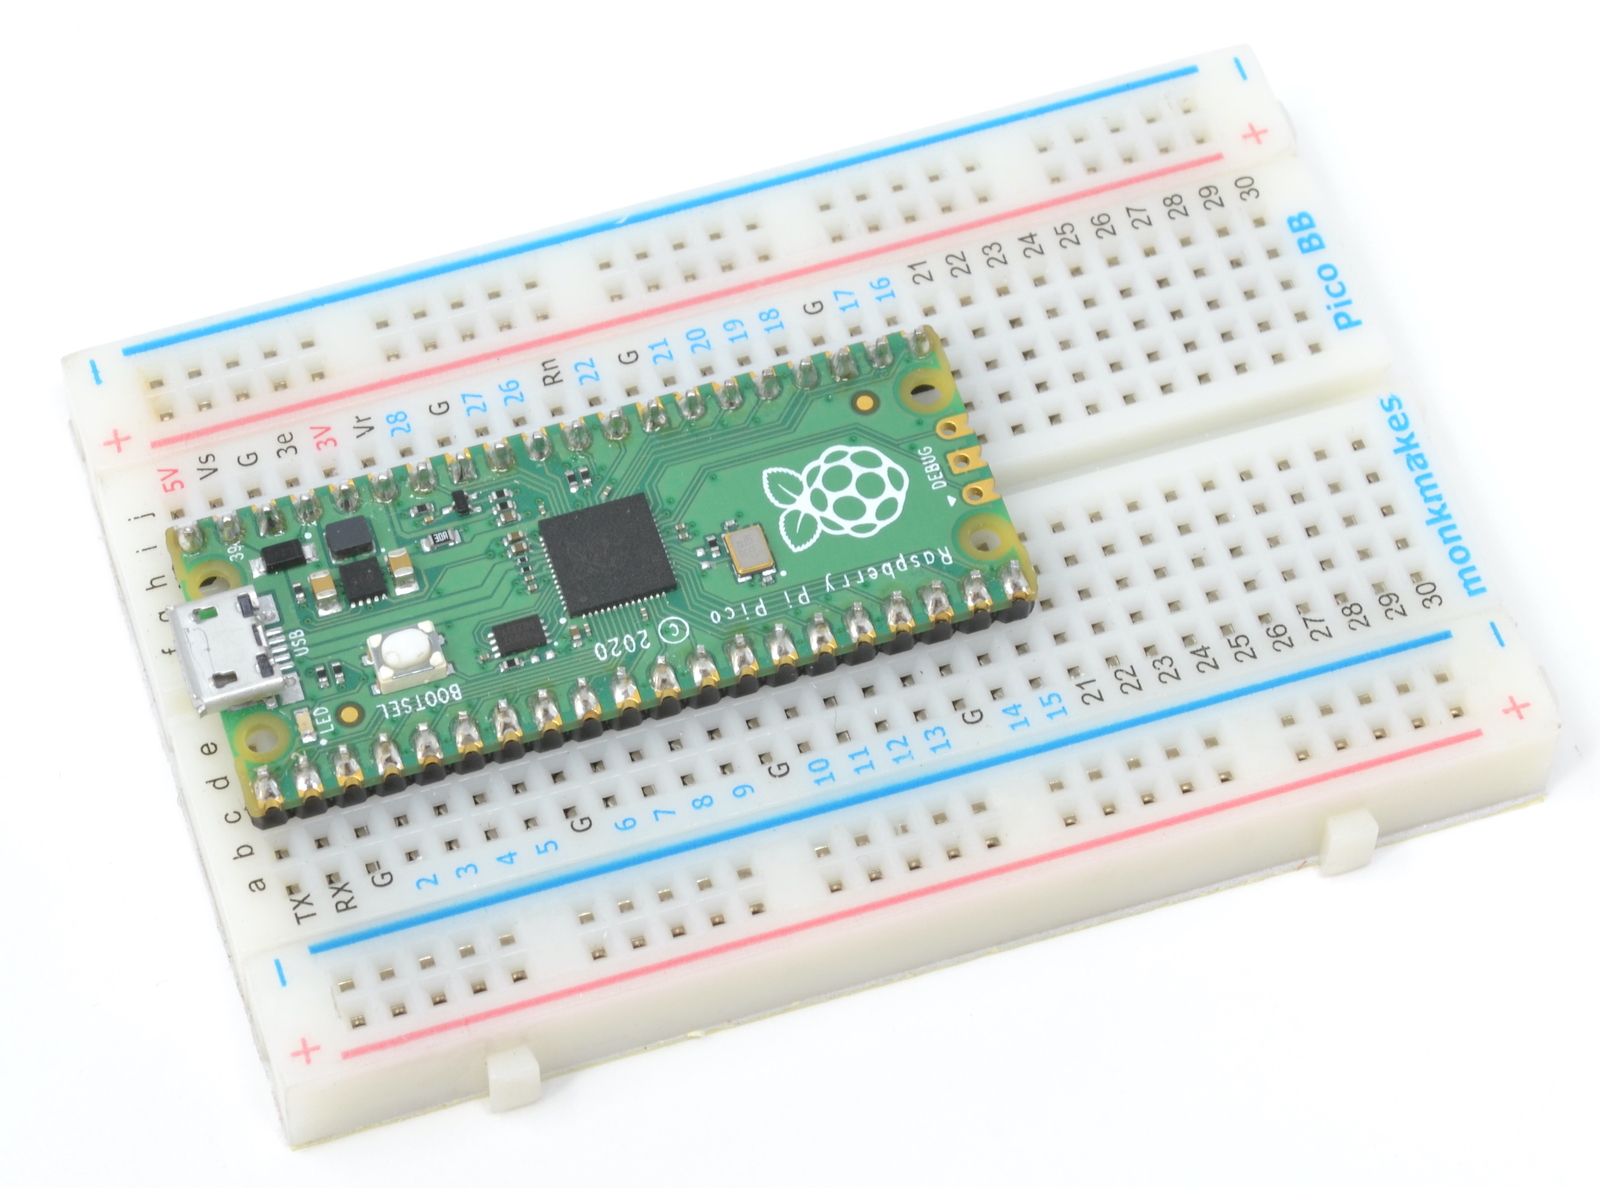
1 x Breadboard for Raspberry Pi Pico
(*Raspberry Pi Pico not included)
Resources
(*Raspberry Pi Pico not included)

This low-cost simple to use electronics kit will teach you electronics and coding with your Raspberry Pi Pico. (or Pico with presoldered headers)
Build ten great projects including: A touch switch, a thermometer, a light meter and lie detector and much MORE !
Specifications:
- Dimensions and Weight (closed box)
- Units Length 120 mm
- Width 105 mm
- Height 35 mm Weight 95 g
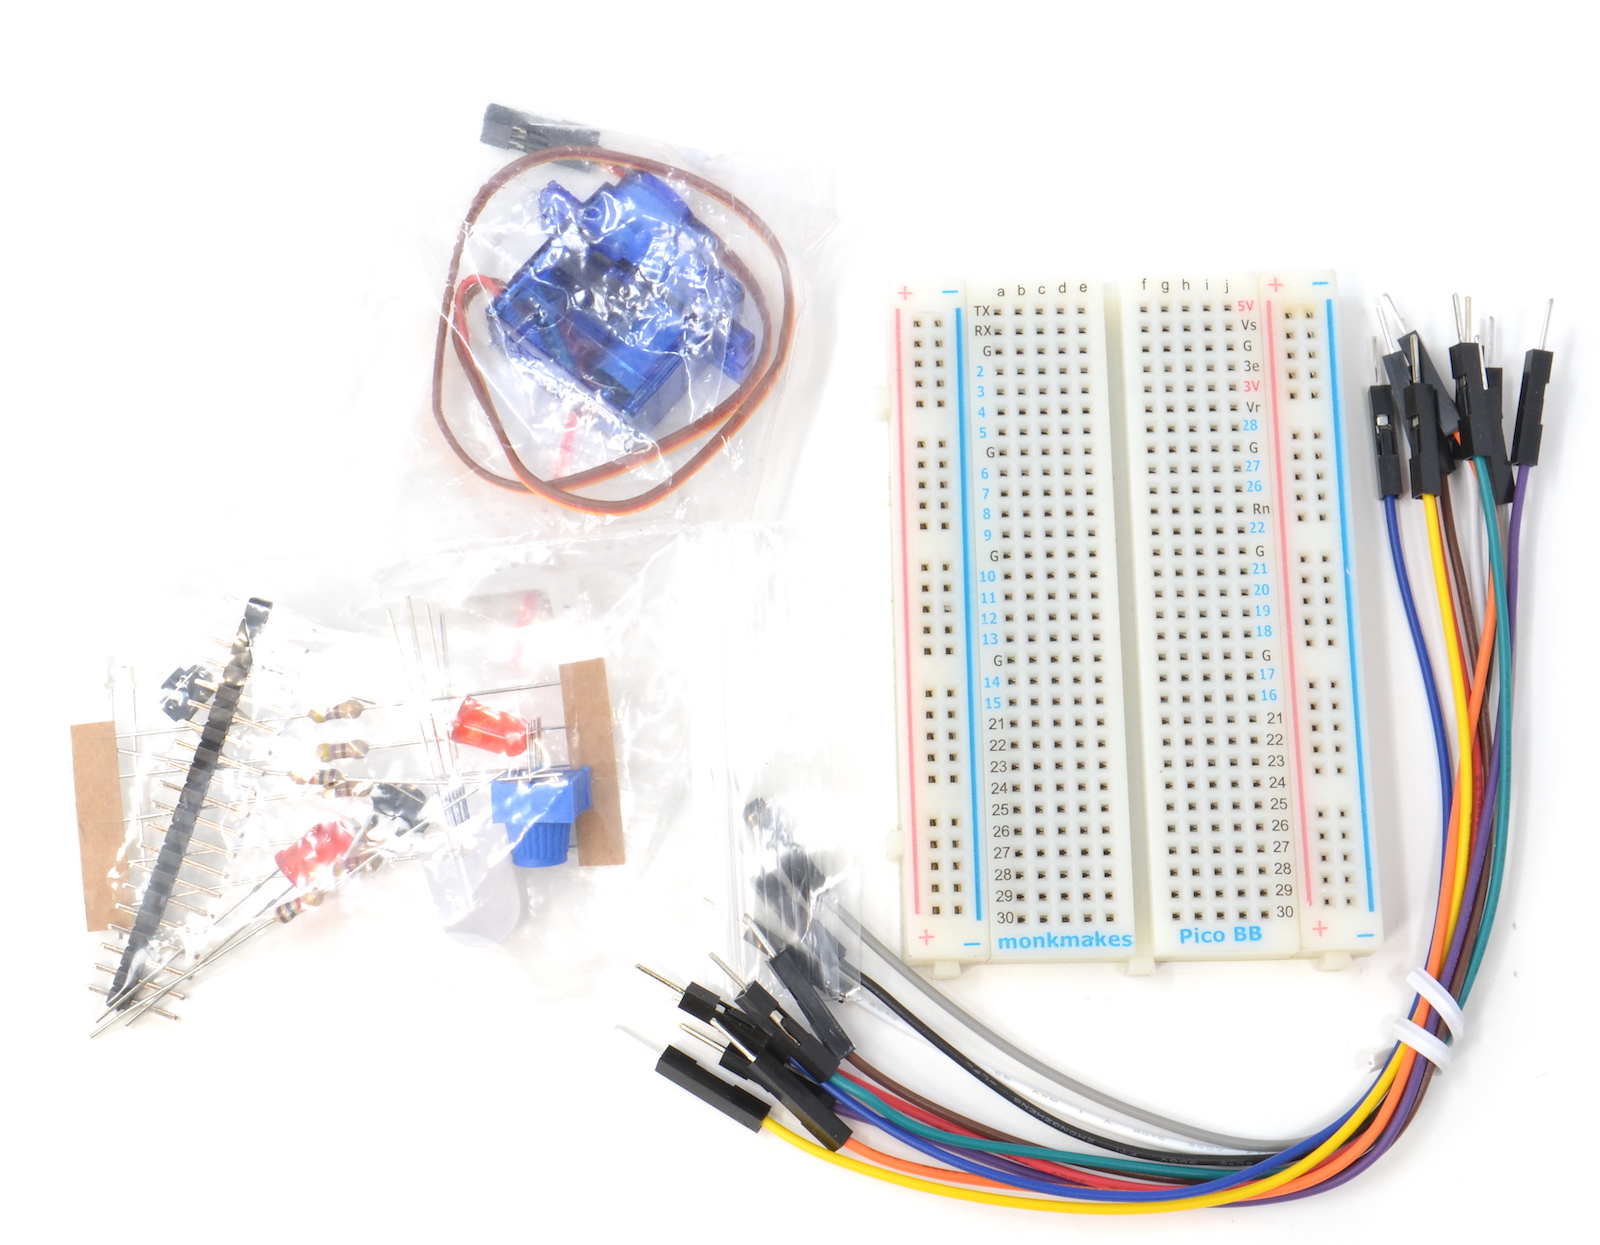
What's in the box ?
1 x Solderless Breadboard 400 point
10 x Male to male jumper wires
1 x Micro-servomotor and accessory bag
2 x Strip of 0.1inch 20way header pins
5 x 470Ω resistor
2 x 1kΩ resistor
1 x 4.7MΩ resistor
2 x Red LED
1 x RGB LED (10mm)
2 x Tactile push switch (2 pin)
1 x Phototransistor
1 x Piezo buzzer
Resources:
Instructions (PDF)
Datasheet (PDF) 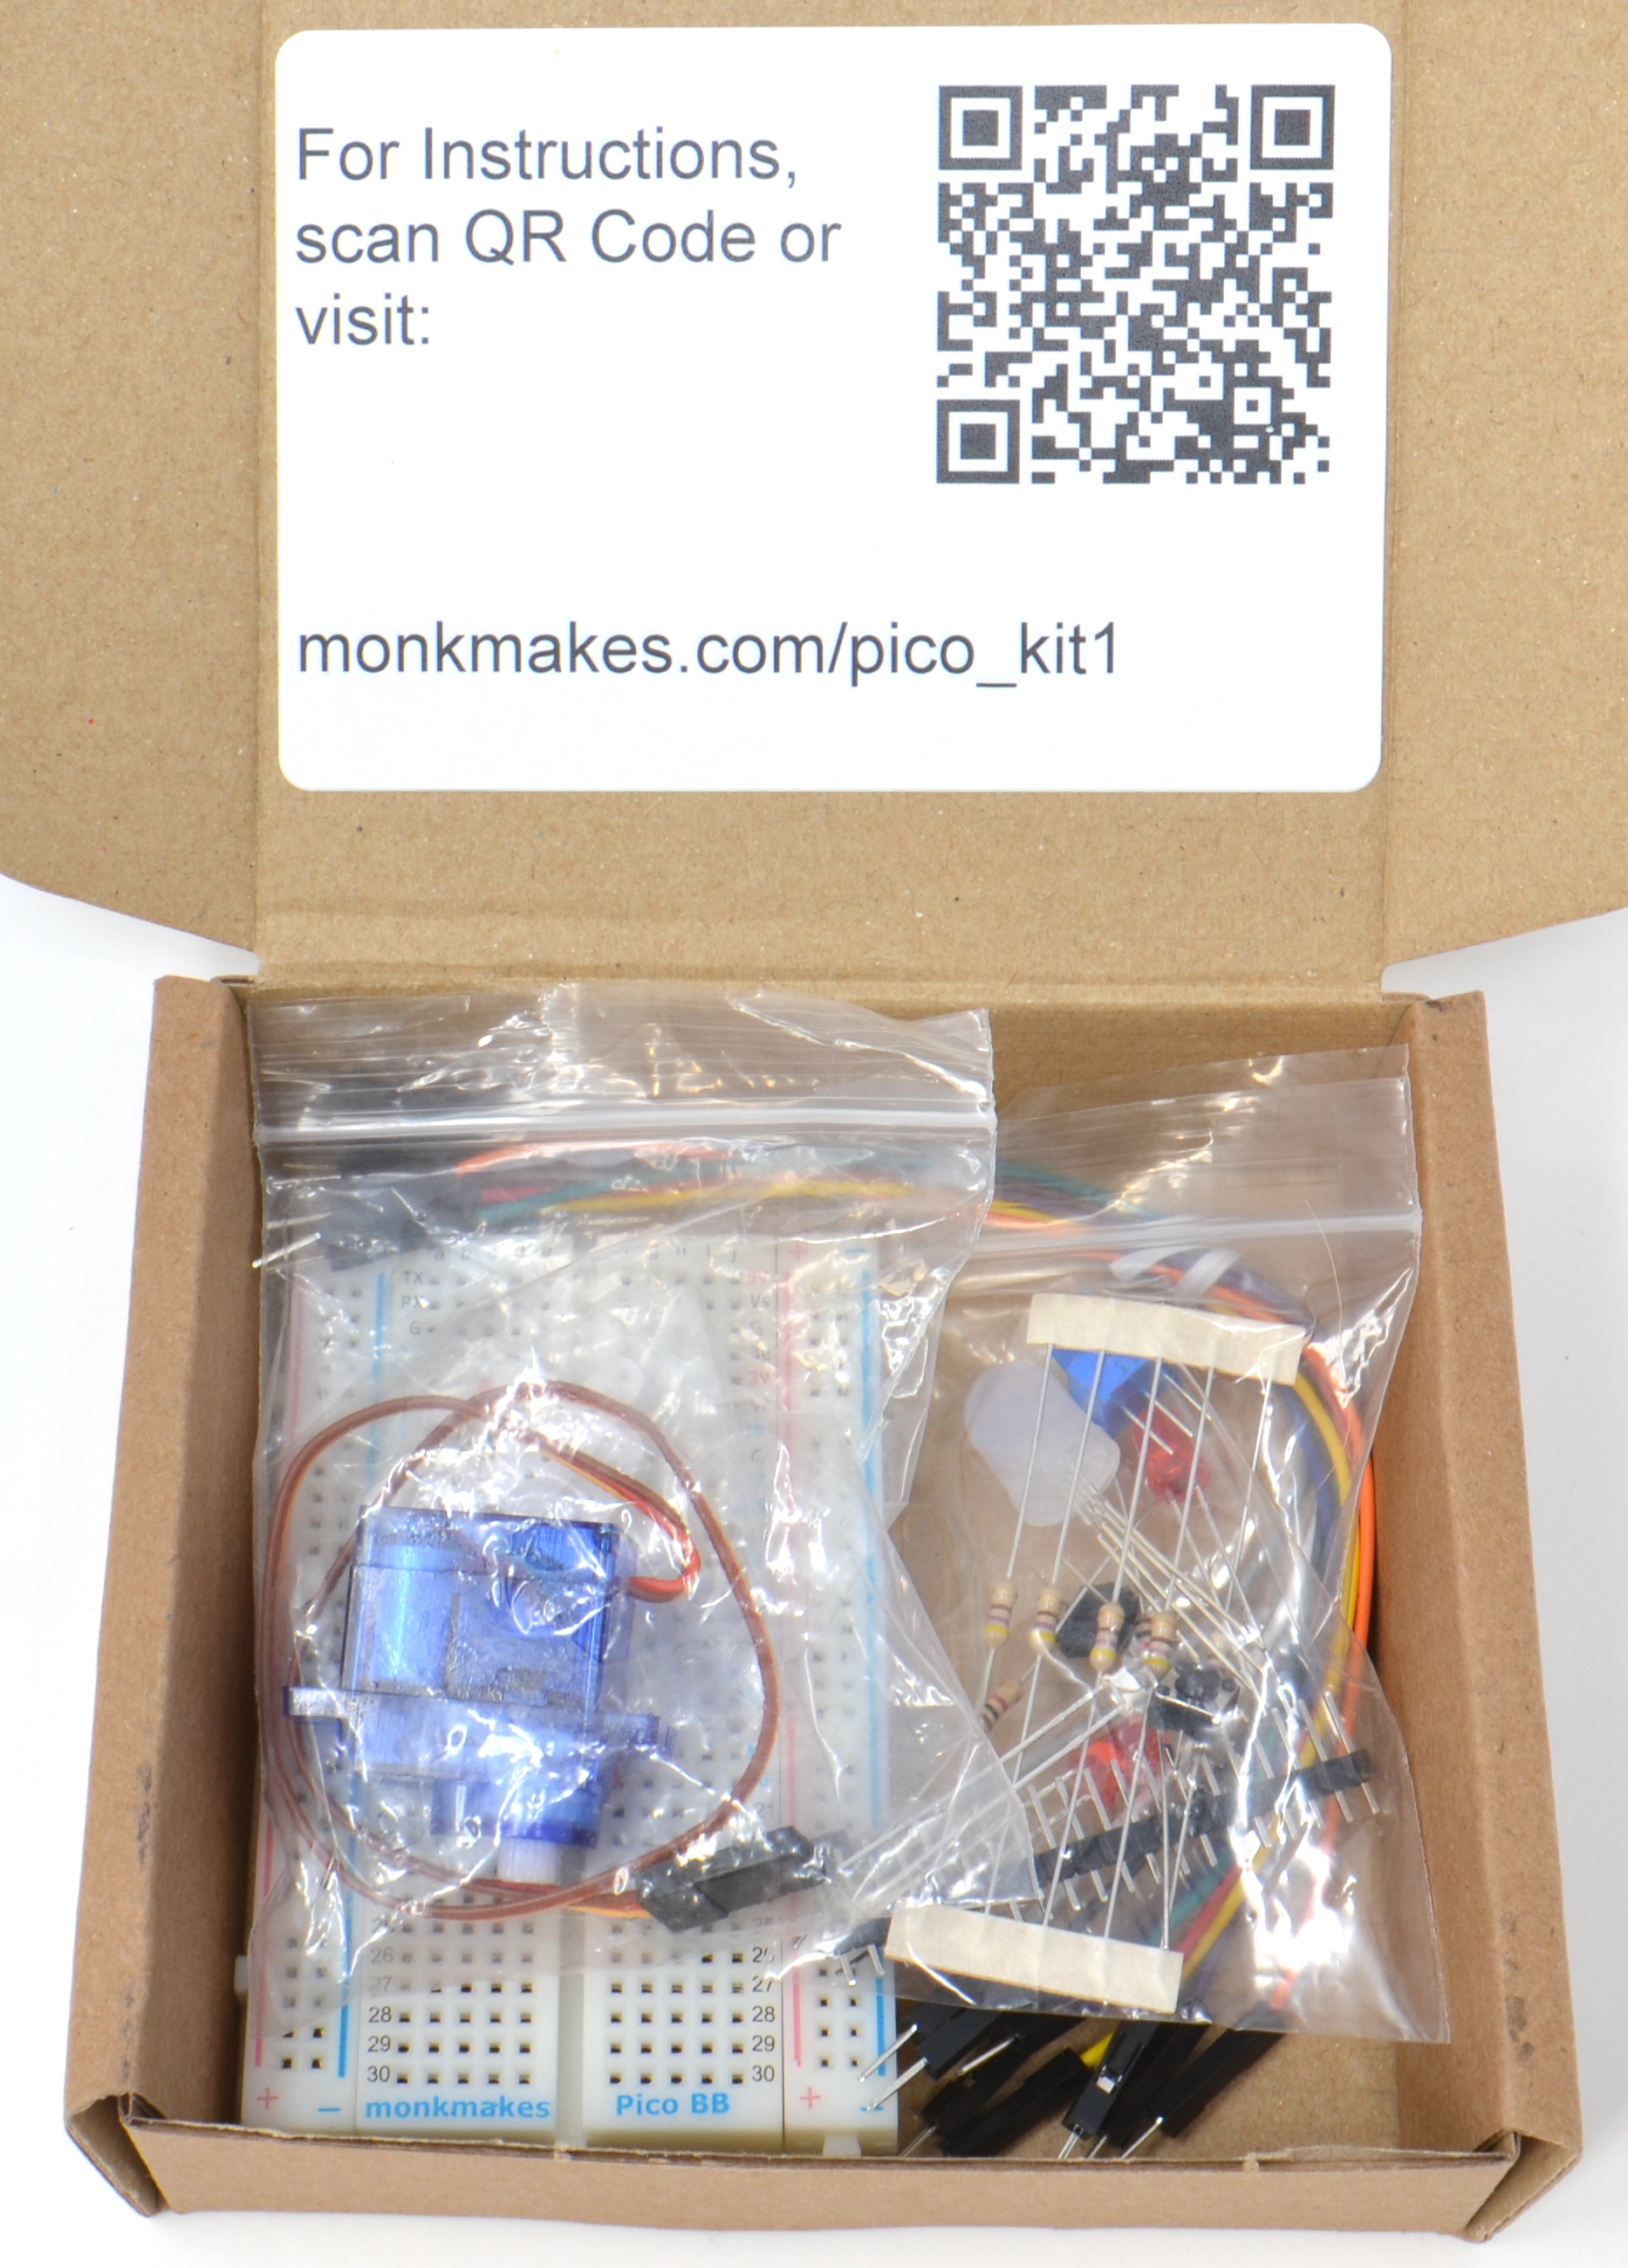

The MonkMakes Air Quality Kit for Raspberry Pi is based around the MonkMakes Air Quality Sensor board. This add-on for the Raspberry Pi measures the quality of the air in a room (how stale the air is) as well as the temperature. The board has a display of six LEDs that display the air quality and a buzzer. Temperature and air quality readings can be read by your Raspberry Pi, and the buzzer and LED display can also be controlled from it.
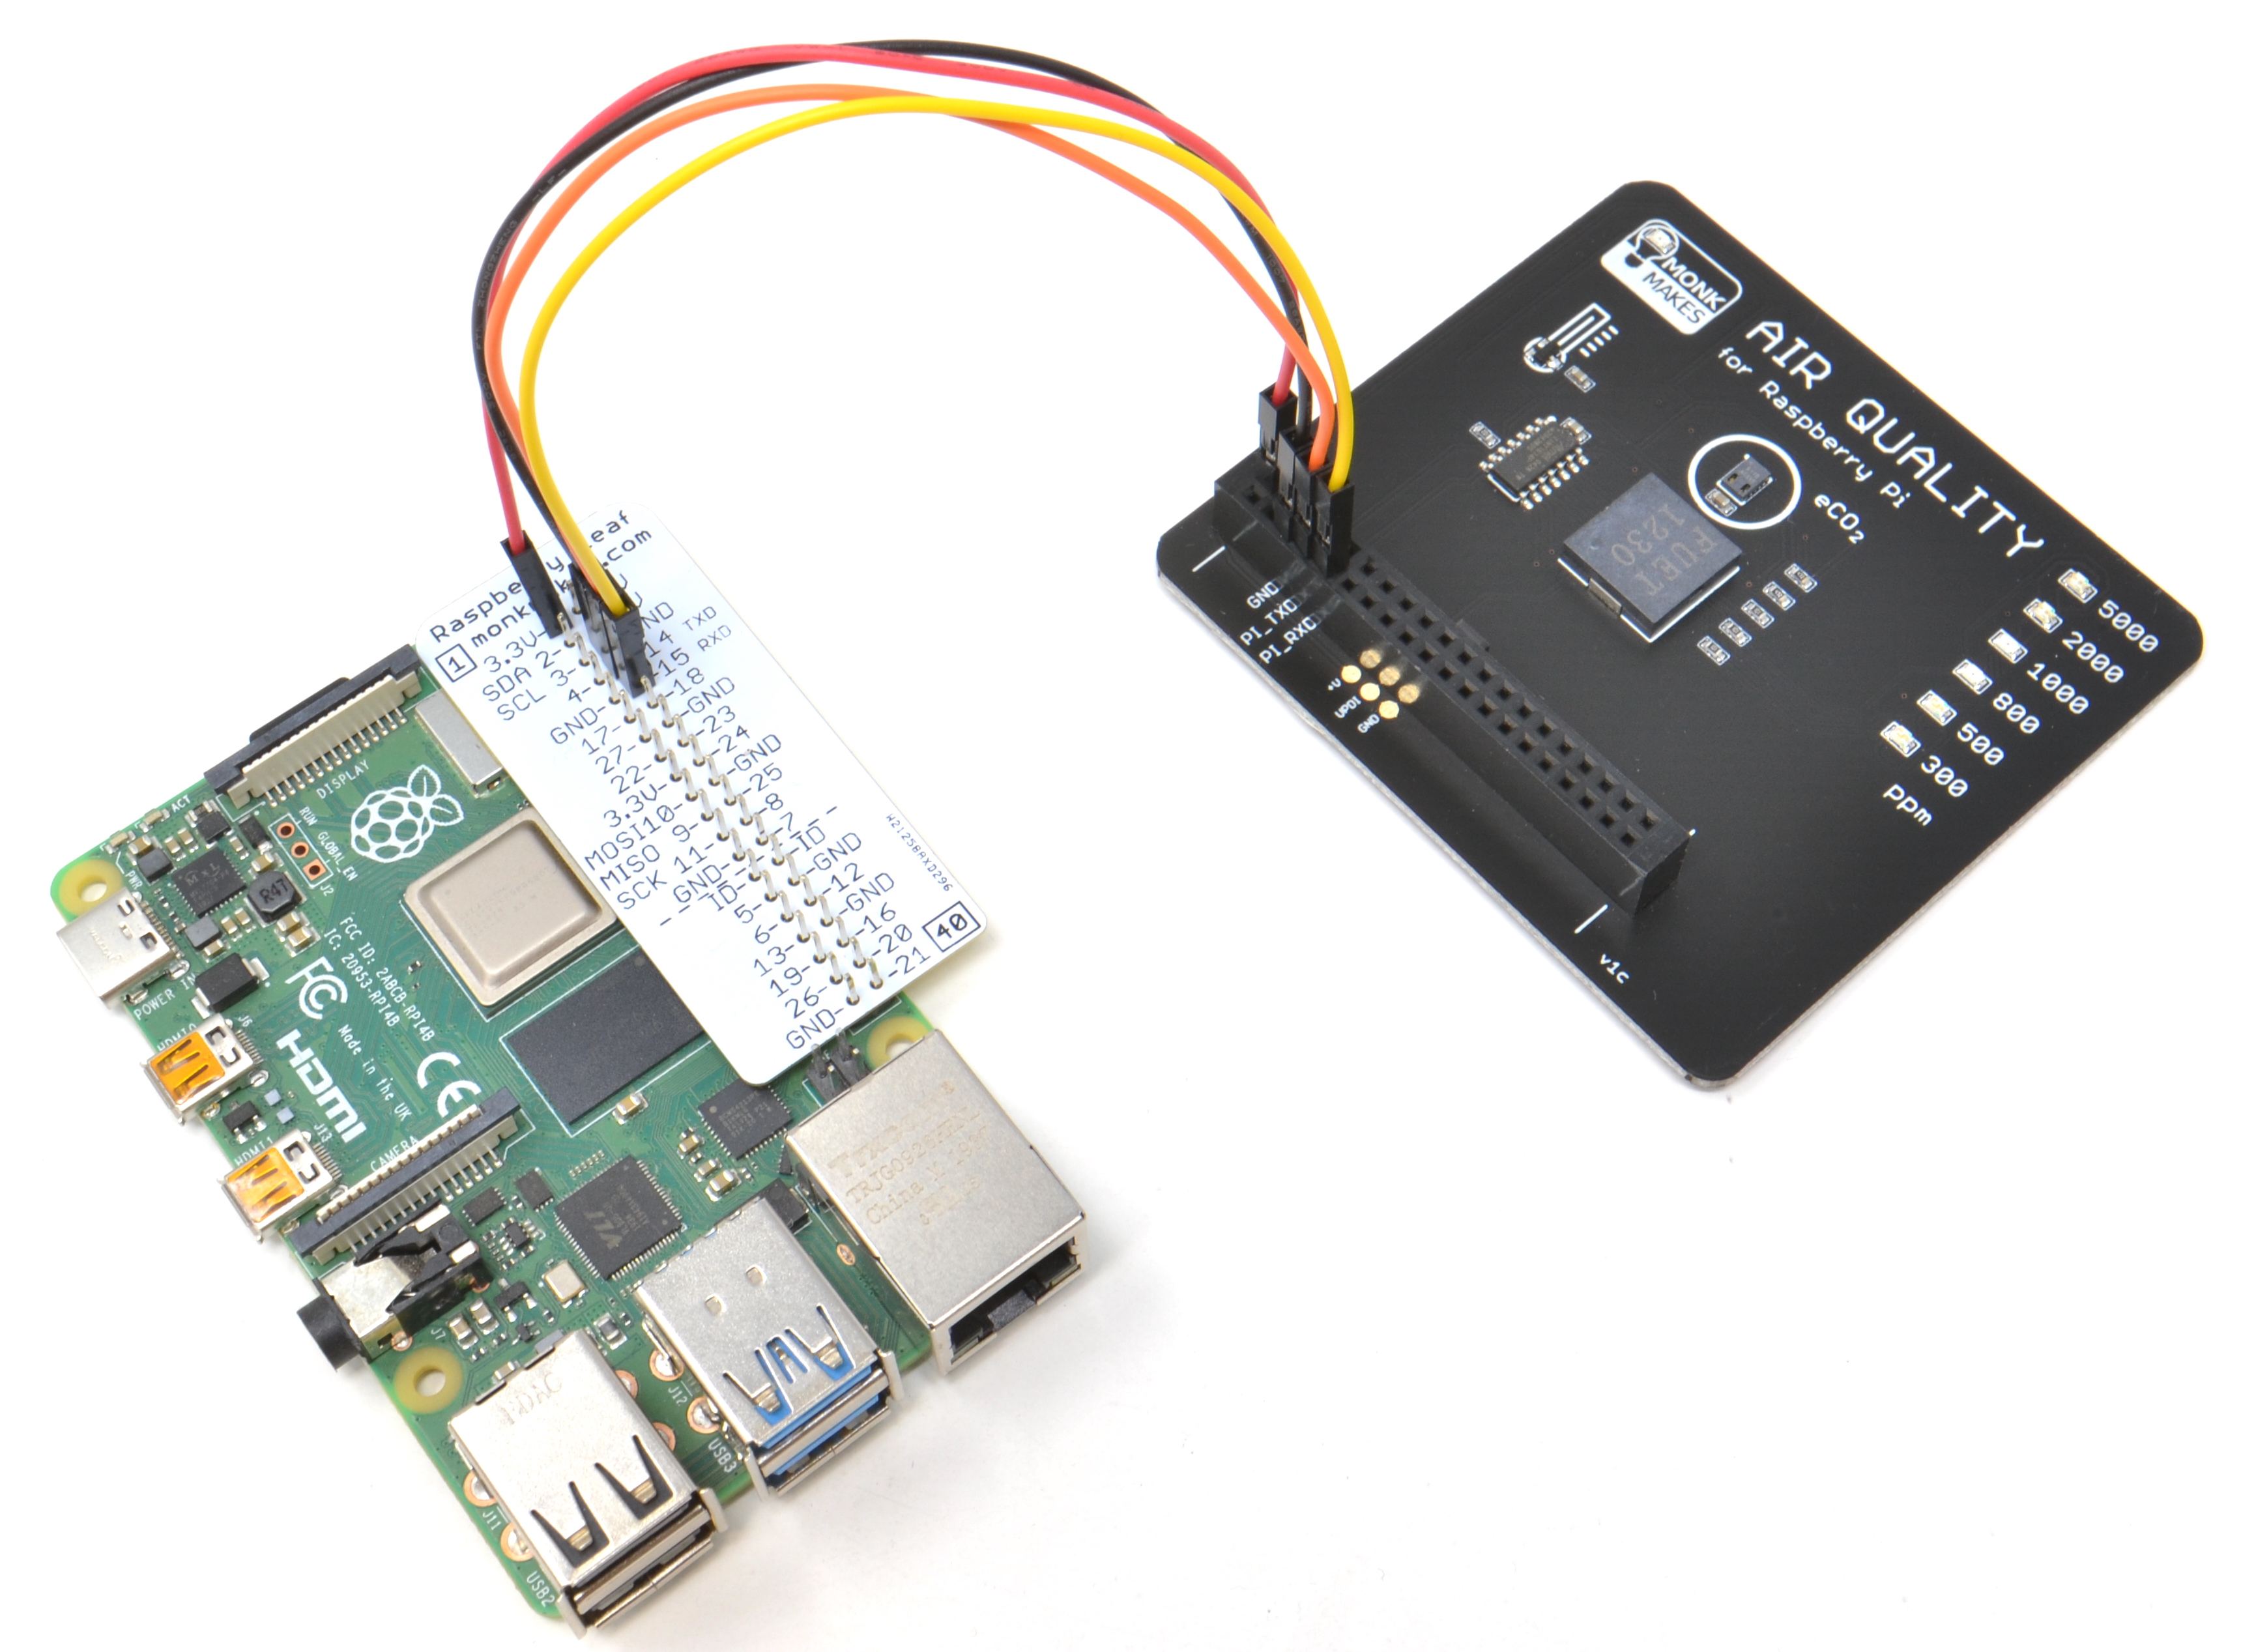
The Air Quality Sensor board, plugs directly into the back of a Raspberry Pi 400, but, can also be used with other models of Raspberry Pi, using the jumper wires and GPIO template included in the kit.
Specifications:
This board uses the CCS811 VOC sensor IC and a TMP235 temperature sensor. It also has a rudimentary display and a buzzer.
The board uses a bi-directional UART interface to communicate with the Pi. The board is designed for use with the Raspberry Pi 400, but also works with other models of Raspberry Pi using the jumper wires included in the kit.
- Absolute maximum supply voltage 3.6 V
- Minimum supply voltage 3.0 V
- Typical current consumption 40 mA
- Maximum current consumption 80 mA
- eCO2 minimum reading 400 ppm
- eCO2 maximum reading 4095 ppm
- eCO2 resolution 1 ppm
- eCO2 accuracy unspecified
- Temperature minimum reading -10 deg. C
- Temperature max reading 100 deg. C
- Temperature accuracy /- 2 deg. C
Resources:
Instructions (PDF)
Datasheet (PDF)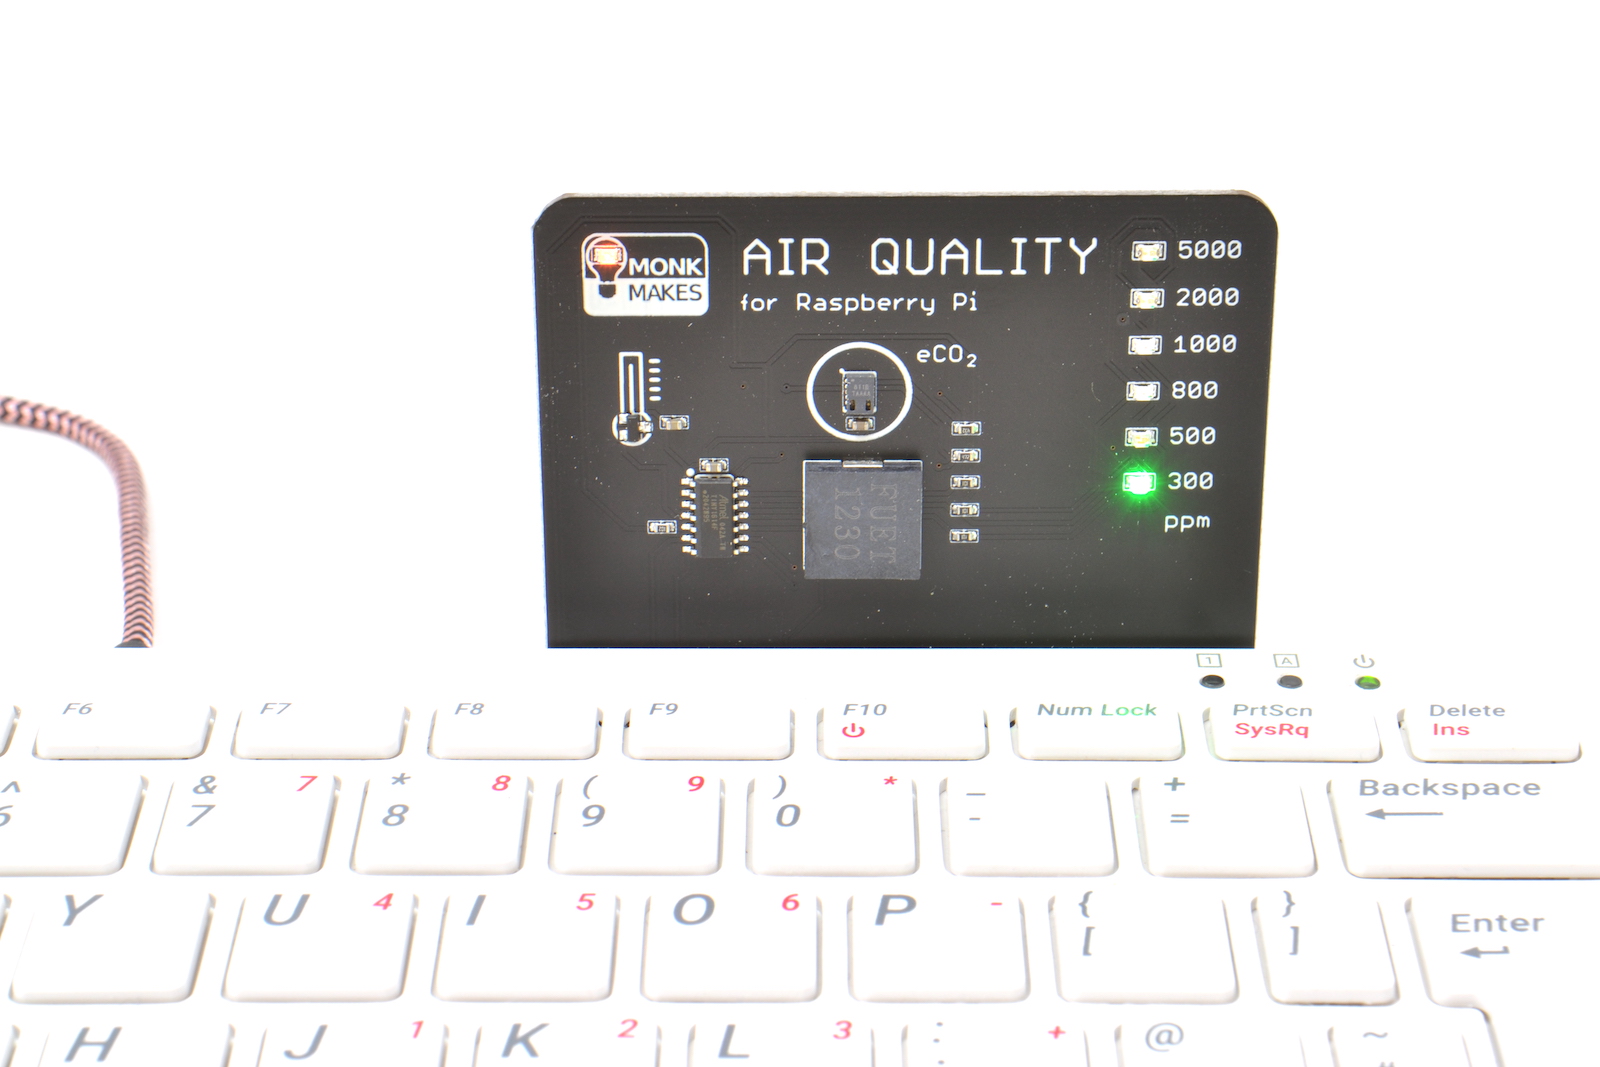
(* Raspberry Pi400 and Raspberry Pi 4 are not included)

Specifications
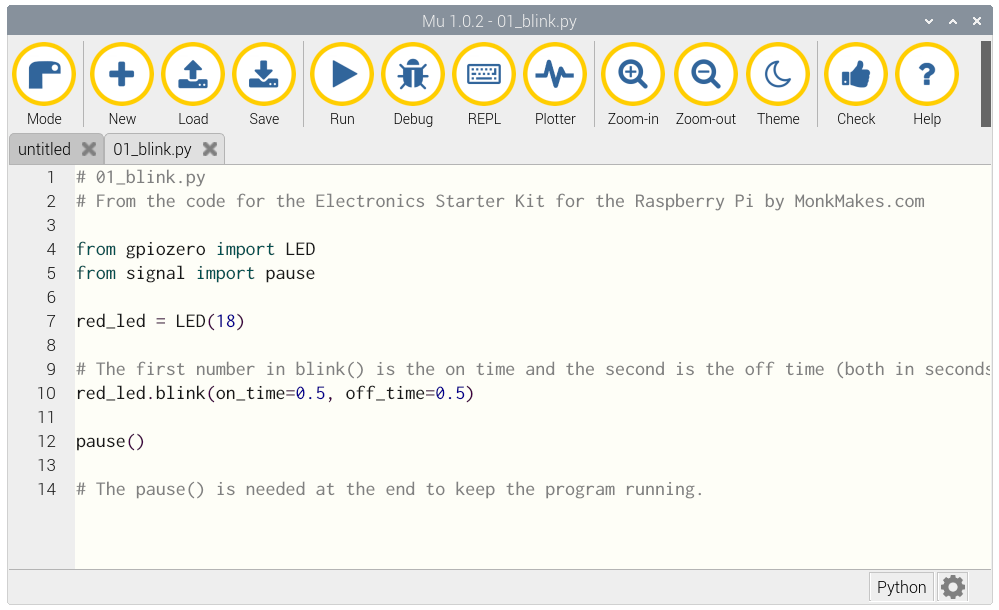
This kit is an improved and updated version of the now retired Electronics Starter Kit for Raspberry Pi
A 40 page booklet by Simon Monk (author of the Raspberry Pi Cookbook and Programming Raspberry Pi) is free to download and explains how to use the kit and build the projects.
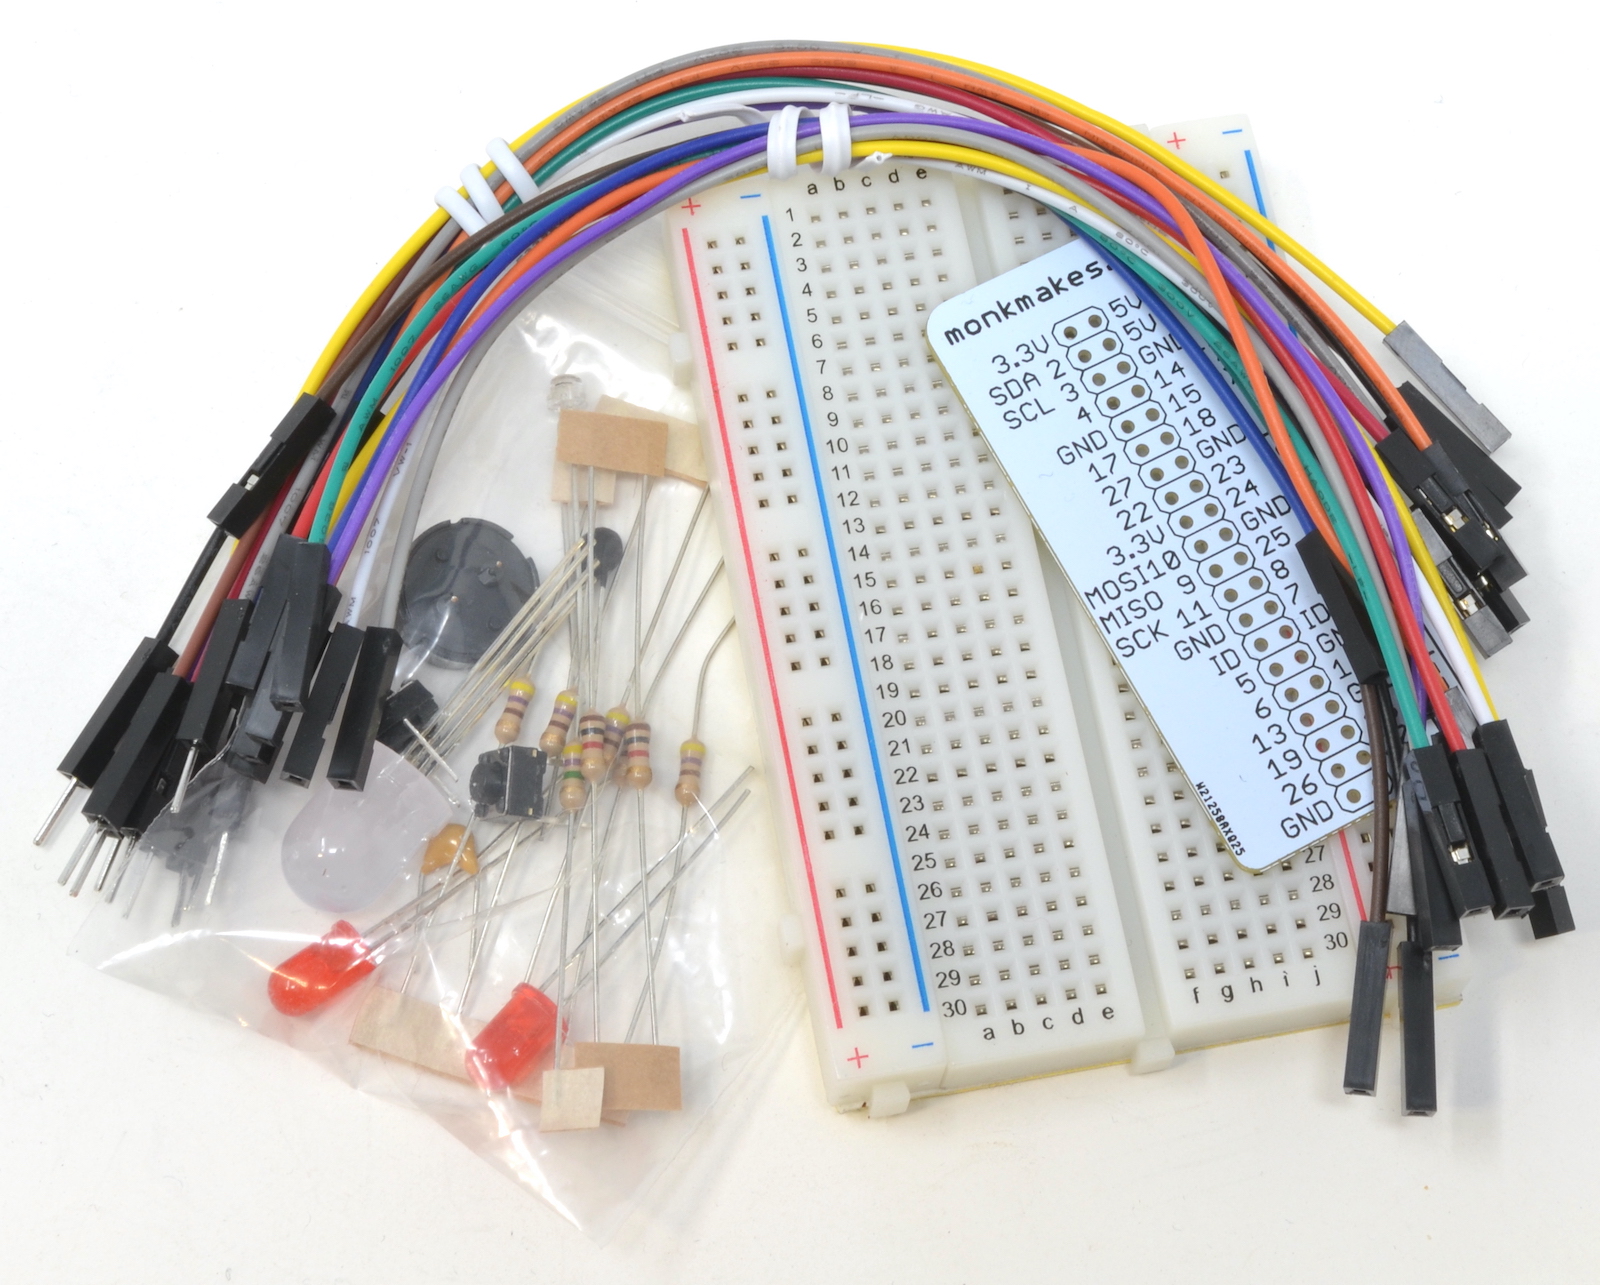
What's in the box ?
1 x Solderless breadboard
1 x Male to male jumper wires
1 x Female to Male Jumper Wires
1 x Raspberry Leaf
5 x 470Ω resistor (yellow, purple, brown stripes)
2 x 1kΩ resistor (brown, black, red)
1 x 4.7MΩ resistor (yellow, purple and green stripes)
1 x 330nF capacitor
2 x Red LED – the longer lead is the (positive) lead
1x RGB LED – the longest lead is the – (negative) lead
2 x Tactile push switch
1 x Phototransistor
1 x Thermistor
1 x Buzzer
You may also need....
Raspberry Pi is NOT INCLUDED
Resources
Instructions (PDF)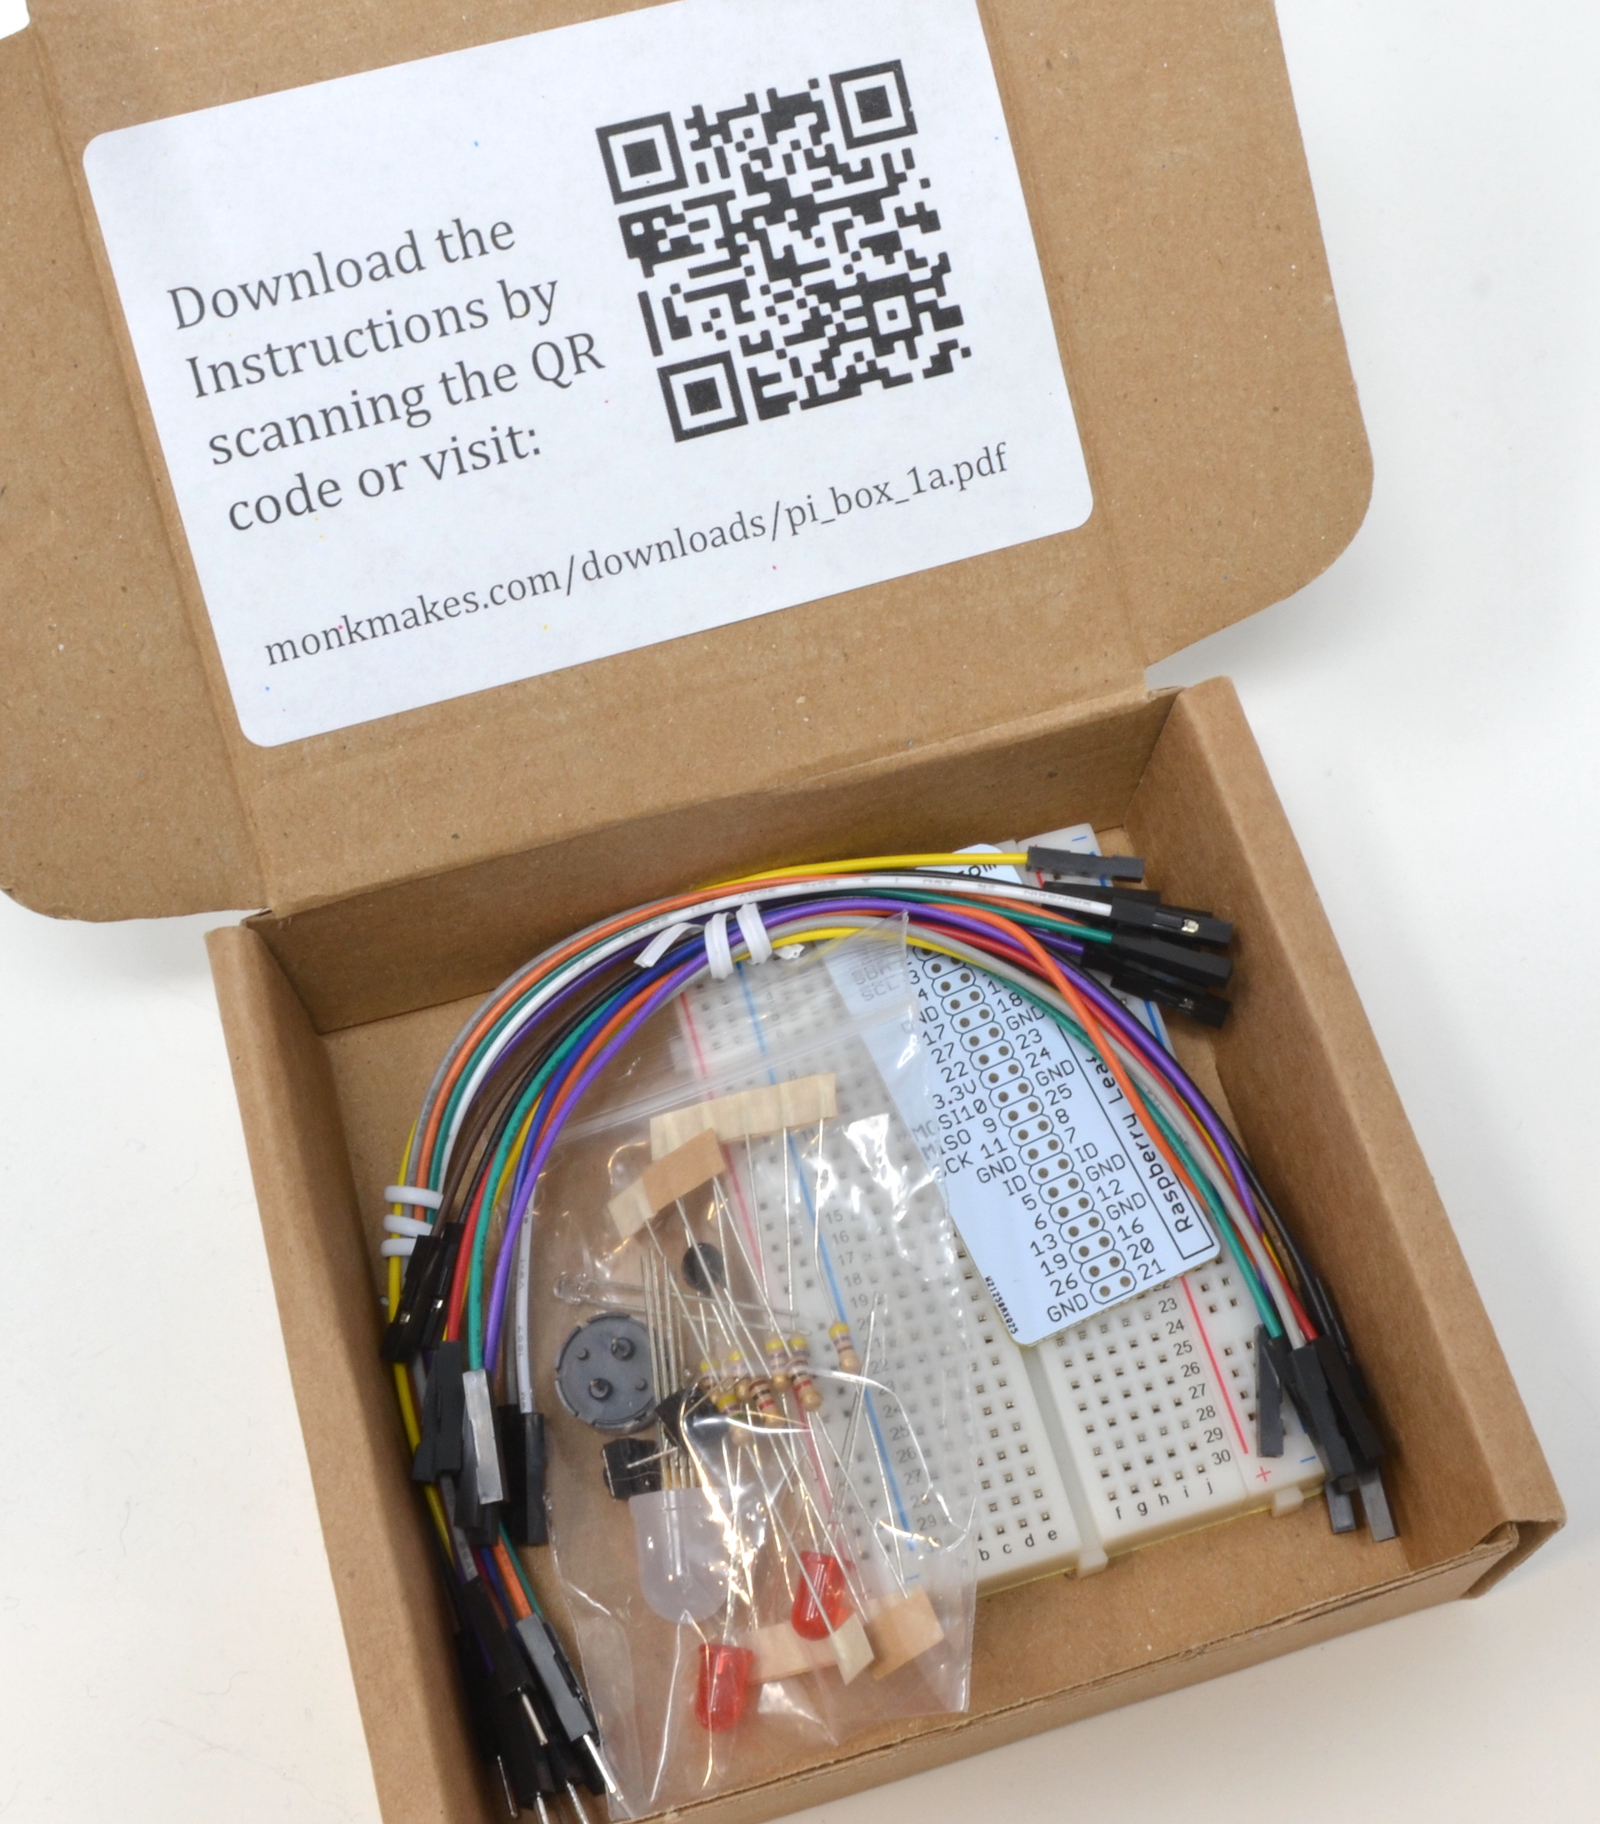

What's in the box ?
1 x Raspberry Leaf GPIO templates

Specifications
Absolute Maximum Ratings Units
- Input voltage - 12 V
- Max. total continuous current to motors - 2A
Electrical Characteristic Units
- Input voltage to screw terminals 3 to 12 V
- Servomotor reservoir capacitor 470 µF
What's in the box ?
1 x Servosix board
Resources
Instructions (PDF)
Datasheet (PDF)
(* Raspberry pi, Leaf, Servo and Jumper cables NOT included *)
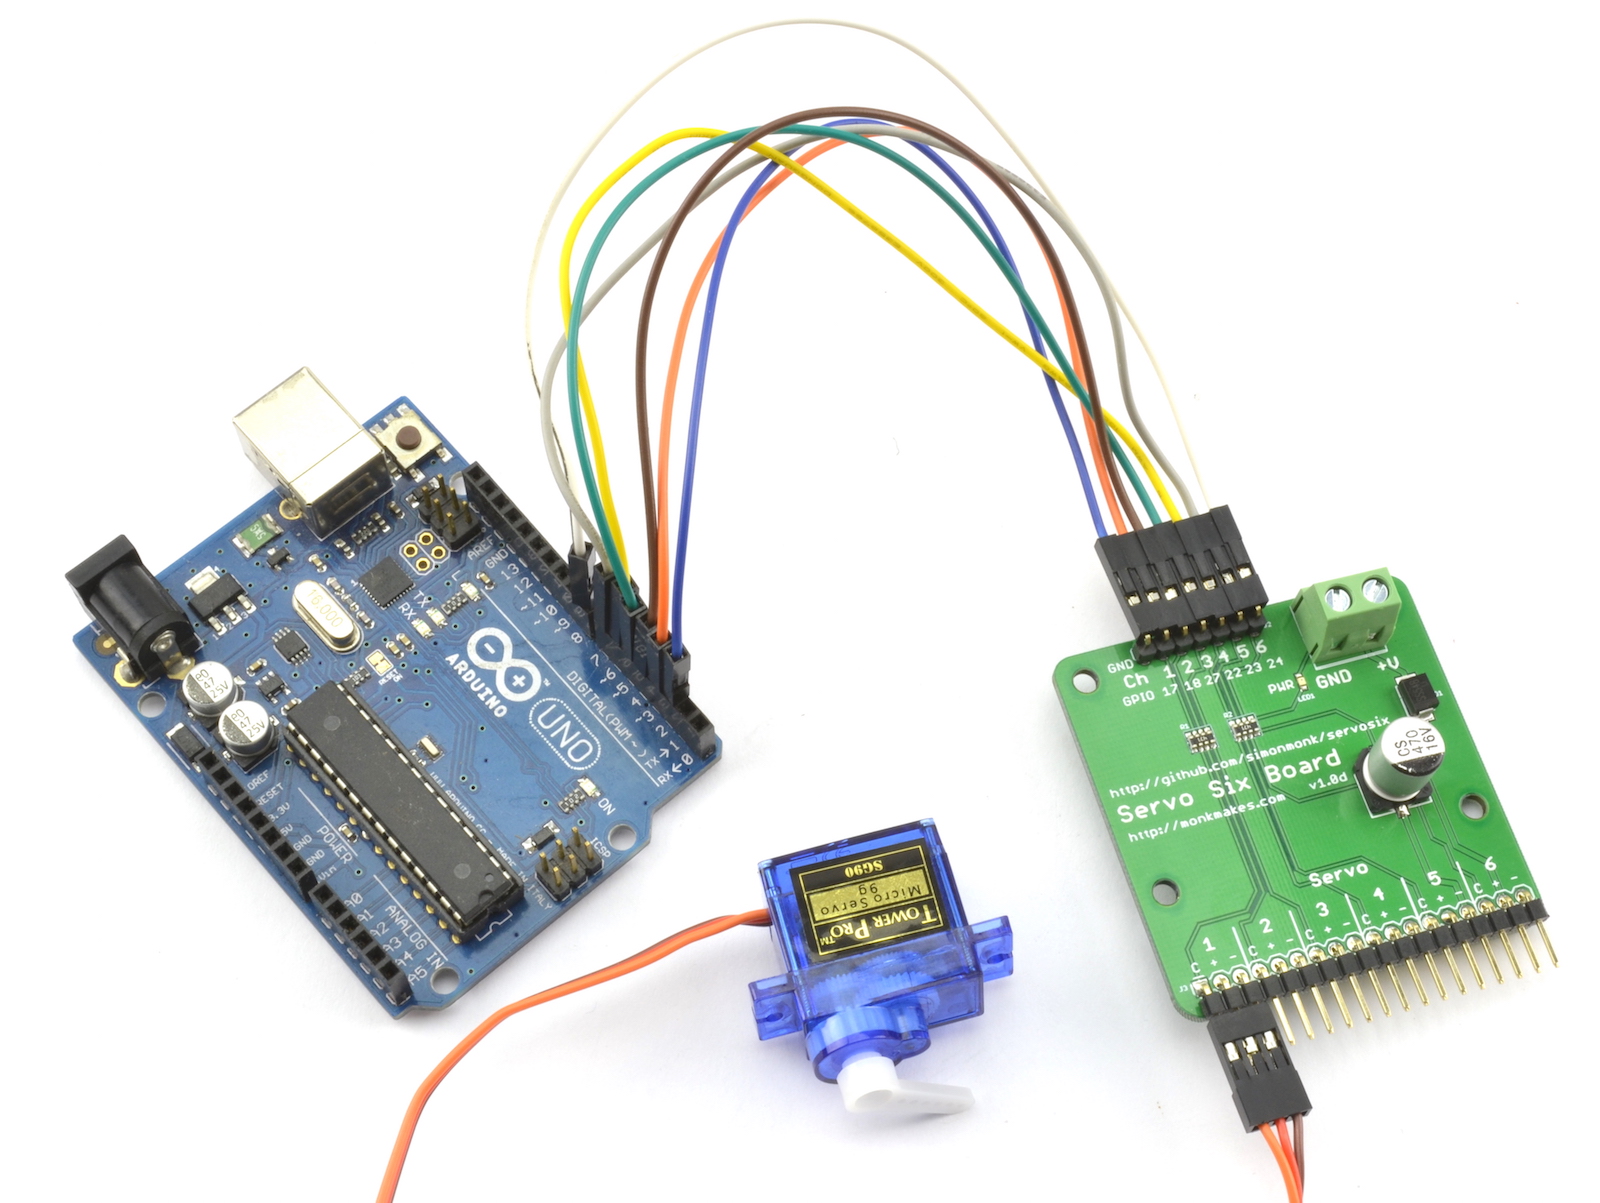
(* Arduino, Servo and Jumper cables NOT included *)

A bright RGB (Red, Green, Blue) LED with built-in resistors and female header leads that can just plug directly onto the GPIO pins of a Raspberry Pi.
What's in the box ?
1 x wired common cathode 10mm RGB LED
2 x wired Momentary Buttons
1 x Raspberry Leaf
Resources
Instructions(PDF)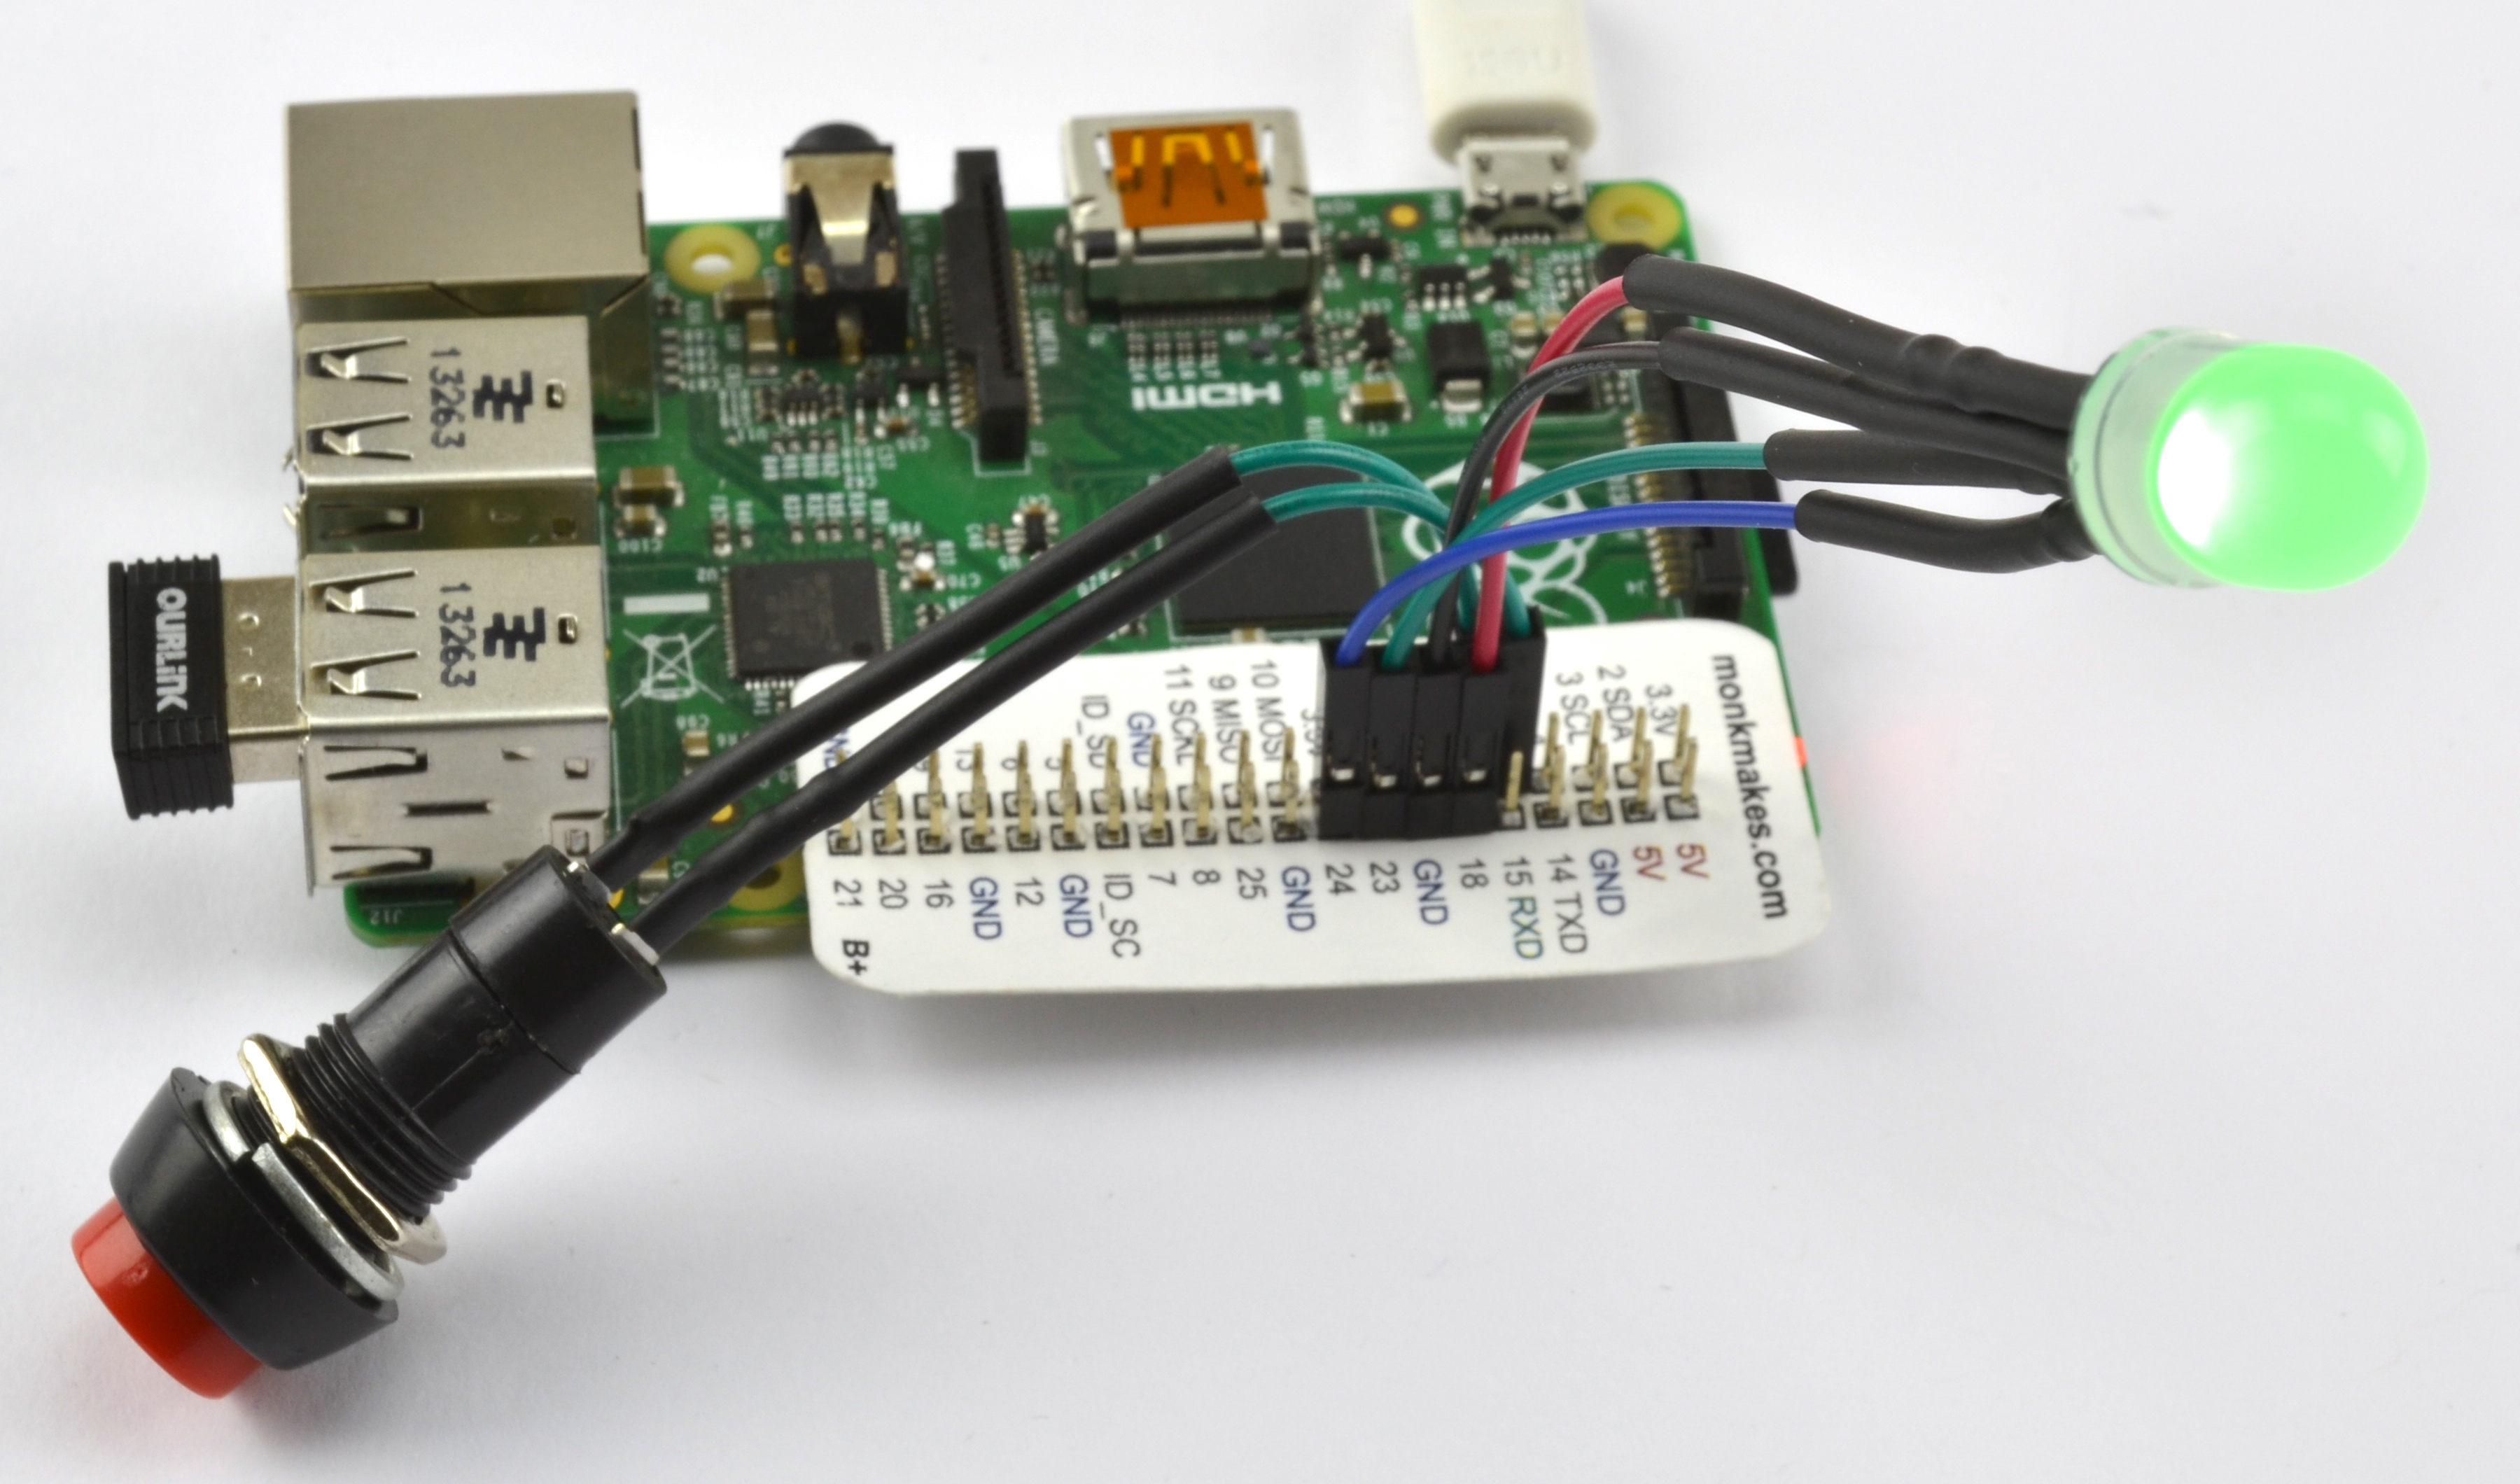
(* Raspberry Pi NOT included *)

The MonkMakes SSR is a low voltage solid state relay (no moving parts). This makes it super-easy to control loads of up to 2A at 16V from an Arduino, Raspberry Pi or other 3 or 5V microcontroller or single board computer.
This modern take on the electro-mechanical relay can even be used for low frequency PWM to control the power to its load.
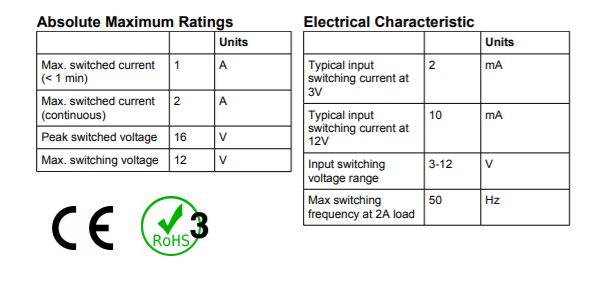
Specifications:
This relay can be used to switch low voltage devices such as light bulbs, a motor, a small heating element or even a string of 12V LED lighting. The voltage needs to be kept under 16V, but the relay will automatically protect itself against too much current.
• Solid-sate relay up to 2 Amp Peak 1A continuous AC/DC
• Active LED indicator
• Resettable ‘polyfuse’ to protect against over-current
• Great for Arduino and Raspberry Pi
• Suitable for low frequency PWM
What's in the box ?
1 x Monkmakes SSR board
Resources:
Datasheet(PDF)

(* ONLY SSR -Solid State Relay - Included - all other products are for reference use only*)

Downloadable 25 page booklet: https://www.monkmakes.com/downloads/instructions_mb_kit_2.pdf
Build 7 great projects:
- Lighthouse
- Movement Alarm
- Color Mixer
- Anemometer
- Fan Speed Controller
- Clap Controller Fan
- Nightlight
What's in the box?
1 x MonkMakes Relay
1 x MonkMakes RGB LED
1 x Alligator Leads
1 x Motor with Fan
1 x Single AA Battery Box
1 x LED Lamp
You might also need....
a micro:bit V2
You will find our selection of batteries here