
All Products


This is one of the cutest little microSD card reader/writer - but don't be fooled by its compact size! It's wicked fast and supports up to 512GB SDHC cards!


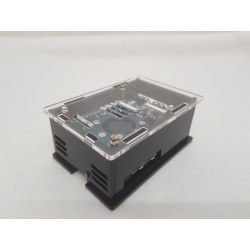


Introducing the Hat uPCIty Lite from Pineboards - a PCI Express evaluation board with an open ended PCIe X4 slot, compatible with Raspberry Pi 5!


USB3.0 microSD Card Reader/Writer (card reader USB3)
This is one of the cutest little microSD card reader/writer - but don't be fooled by its compact size! It's wicked fast and supports up to 512GB SDHC cards!


Pineboards Hat uPCIty Lite for Raspberry Pi 5 (PB Hat uPCIty Lite)
Introducing the Hat uPCIty Lite from Pineboards - a PCI Express evaluation board with an open ended PCIe X4 slot, compatible with Raspberry Pi 5!