
Cytron Technologies


A Ferris wheel is an amusement ride consisting of a rotating upright wheel with multiple passenger-carrying pods attached to the rim in such a way that as the wheel turns, they are kept upright, usually by gravity. And yes, it is fun too even in a miniature form! This kit lets you build your own miniature Ferris wheel while learning its basic structure and the concept of keeping the pods upright through gravity!
Features:
- Do It Yourself Wooden Ferris Wheel
- Suitable for age 6 years old and above
- Come with everything needed to assemble the Ferris wheel project
- Learn the basic concept and the structure of a Ferris wheel
- Perfect kit to modify and reprogram using a microcontroller while adding LEDs and music (Not included in this kit)
What's in the box?

- Wooden parts for the Ferris wheel structure
- Some double-sided tape
- Some wires
- 1 x AA battery holder
- 1 x Wooden filer (For sanding)
- 1 x DC motor
- 1 x Switch
- 1 x Wood glue
Resources:
- Simple Instruction Manual (pdf) available at https://drive.google.com/file/d/14clwbvLiPeMUWPayF7aKrjFicQ3ixX6H/view?usp=sharing
- Assembly instructions video available at https://youtu.be/5XOO0_VdFPc

Features
- Do It Yourself Wooden Battery Powered House for kids
- LED is powered up with 2 AA batteries
- Suitable for age 4 years old and above
- Come with everything needed to assemble as a working mini turbine
- No soldering is needed
What's in the box?
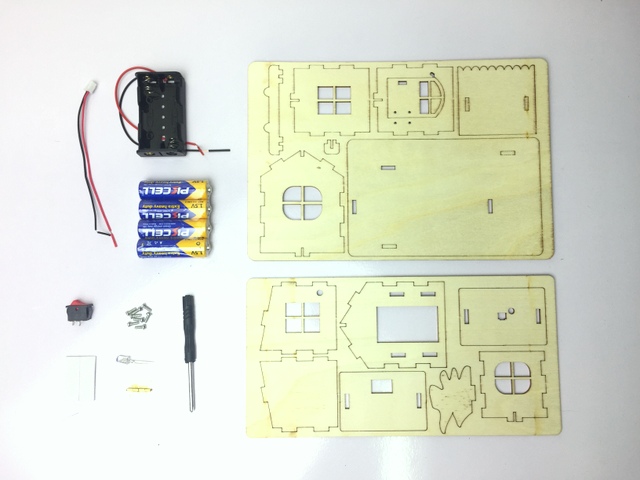
1 x AA Battery Holder1 x Wooden House Structure
1 x Small DC Motor with plastic enclosure
1 x Wire connector
1 x Small screwdriver
1 x Blinking LED
1 x Bracket for Door
1 x Switch
Some screws and nuts for mounting
Some double-sided tape
Resources
- Simple Instruction Manual (pdf) at https://drive.google.com/file/d/1UYzCKMmyzAc_zNrMo1fSc-Sy2Jpq1JRG/view?usp=sharing
- Assembly instructions video at https://youtu.be/GOuhfcXcnVs

For full instructions see our blog
Brushed motor is the most widely used motor because it is easy to use. Just supply the two terminals with DC power, the motor will start rotating! If you want to control its speed and direction using a controller, usually you will use an L298N Motor Driver. But if you want an easy and beginner-friendly motor driver, you are on the right page! Maker Drive is designed for simplicity and with the beginner in mind!
Motor Driver for Beginner- Maker Drive
Maker Drive is not an Arduino Shield, but it is compatible with different models of Arduino main board such as:
Not to forget that it accepts 1.8V, 3.3V & 5V logic(for control) and is compatible with controllers such as Raspberry Pi, micro:bit, Raspberry Pi Pico, ESP etc.
Since you have Maker Drive, you will need suitable DC brushed motors besides the controller, right? So which motor is suitable for Maker Drive? Well, as long as the motor is...
- DC Brush motor (Two Terminals)
- Operating voltage from 2.5V to 9.5VDC
- Rated Current ≤ 1.0A
- Peak Current ≤ 1.5A

Example of suitable DC brush motor for Maker Drive (Not limit to):
These are the suggested power sources for Maker Drive:
- 2, 3 or 4 x AA/AAA batteries (2 x 1.5V = 3.0V) Battery holder
Specifications:
- Dual-channel, Bi-directional control motor driver
- Support motor voltage from 2.5V to 9.5VDC
- Maximum current up to 1.0A continuous and 1.5A peak (less than 5 seconds)
- 5V Output (200mA) to power the controller.
- Inputs compatible with 1.8V, 3.3V and 5V logic (Arduino, Raspberry Pi, etc).
- Solid-state components provide faster response time and eliminate the wear and tear of mechanical relay
- Regenerative Braking
- Speed control PWM frequency up to 20KHz (Actual output frequency is the same as input frequency)
- Dimension: 43mm(W) x 35mm (L) x 14mm (H)

What's in the box:
1 x Maker Drive board
Resources:
- Datasheet
- Arduino Sketch (Github), please select PWM_PWM_DUAL under example
- Tutorial: Line Following Robot using Arduino and Maker Drive
- Fritzing files
- Maker Drive 3D files (IGs and STEP)

Pictures are for reference only
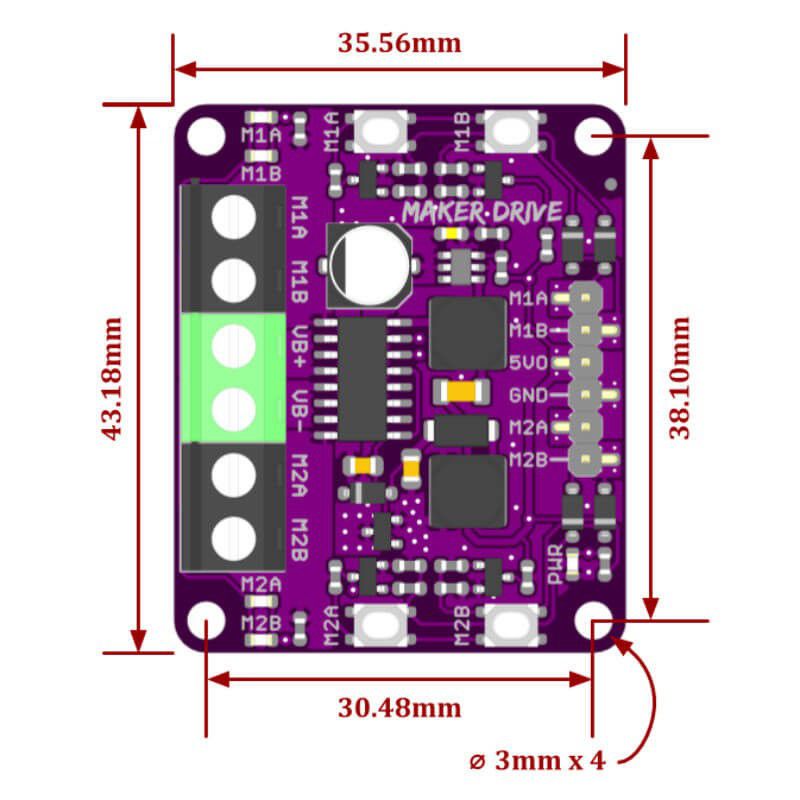
Have some fun with this 3D printing pen, this 3D printing pen is also suitable and safe for kids. They can now develop their hands-on skills and mental development ability.
By using the 3D pen can actually help kids developing their artistic skills, spatial thinking, and can be a great creative outlet that engages their minds as they create. Besides, this 3D printing pen has a stable performance. It is more stable, safe and reassuring. Let your child fall in love with 3D printing.
Specifications
- Electrical Parameter: 5VDC 2A
- Comes with a USB cable. Can be charged and used remotely.
Note: A power adapter is NOT included. - Can be used everywhere
- 3D printer for hand use
- Compatible with ABS and PLA filaments
- Diameter of filaments: 1.75mm
- Nozzle diameter: 0.7mm
- Heating Temperature: 160ºC - 210ºC (PLA), 210ºC - 235ºC (ABS)
- LCD for display filament type and temperature
- Adjustable filament feeding speed
- Ergonomic design, lightweight design, easy to operate
- Dimensions: 184mm x 31mm x 46mm
What's in the box ?
1 x 5V 3D Pen V2 with PLA Filament - Yellow
1 x 3D Printing Pen stand
1 x USB cable
1 x Packet filament (3 random colors, 3 meters in total)
1 x User Manual/Operation Instruction
Check this link out to see what some people come up with :
3D printing pen
Want to print a spool holder that clips onto your 3D pen?
Check out Thingiverse
This device allows you to store and use lengths of 1.75mm filament for a 3D pen. The unique mini spool is designed to prevent the filament from unraveling under its own spring tension. The parts can be welded together with your 3D pen.

I like the purple color:) It matches Maker UNO.
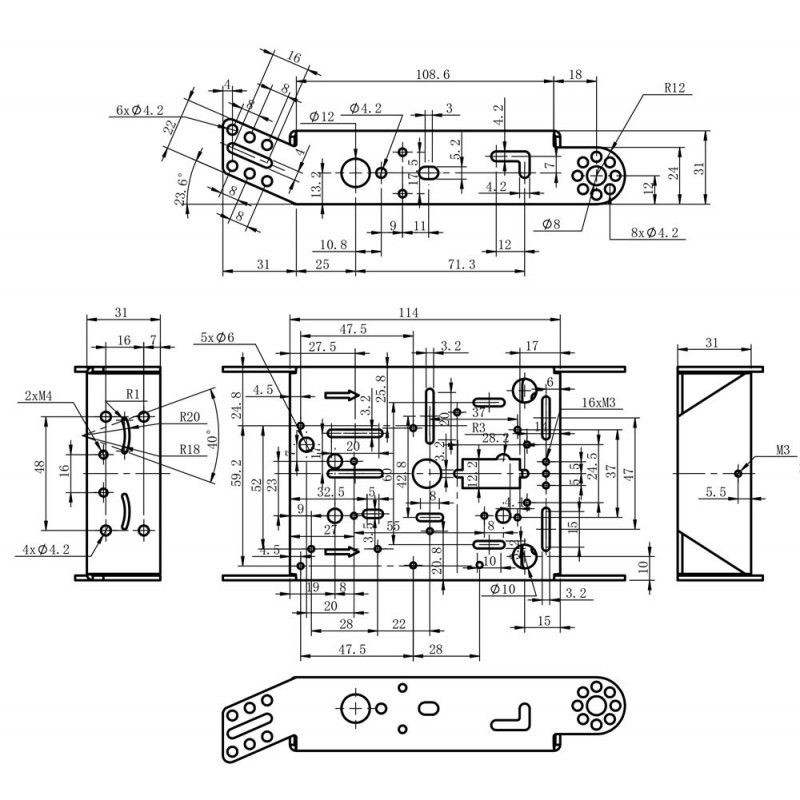
This Aluminum Chassis in Blinka purple makes for an excellent robot body. It's a single piece of bent 2mm thick aluminum, with a variety of holes, slots and cutouts for mounting boards, sensors, and servos. The sides are notched to fit two DC Gear 'TT' motors perfectly - There are four M3 and nuts are included for mounting the motors. In the front you can screw on a ball caster. You can build a very sturdy (and quite handsome!) little robot rover with this metal frame.
Specifications:
- It's made of aluminum so it's light and strong
- The anodizing is quite attractive as a mobile robot, if you use Maker UNO or Maker Pi RP2040, it looks awesome
- Can be used to build a 2-wheel mobile robot
- Tons of mounting holes & slots!
- You can drill and cut aluminum so it's easy to modify
- There are ready mounting holes for Arduino UNO , and Raspberry Pi (though, for Raspberry Pi, there is some slight error).
Note: This is a kit with loose parts, you need to assemble it yourself, DIY :)
Then you will also need a microcontroller and motor driver that can drive the 5V DC motors. We recommend one of the following
- Arduino UNO, or Maker Pi RP2040 or Maker UNO
- Motor Control Shield (drives up to 4 motors), or Maker Drive, or H-Bridge
- Raspberry Pi
What's in the box?
1 x purple color chassis
2 x DC Gearbox "TT" Motors (Yellow color)
2 x "TT" Wheels (White Rim with Black Tyres, 66mm diameter, 15mm thickness)
1 x Metal ball caster (metal ball, plastic holder)
4 x M3, 25mm bolt nut (Mount "TT" to chasis)
2 x M3, 6mm bolt nut (Mount caster to chasis, nut is not needed though)
2 x 15mm self taping screw (secure wheel to "TT" motor shaft)

Maker Reflect is a tiny reflectance sensor that consists of an infrared (IR) LED that transmits IR light onto a surface and a phototransistor measures how much light is reflected back. The output is in analog voltage - The more IR light is sensed by the phototransistor, the lower the voltage.
Typically this sensor is used in line following robot as the white surfaces reflect more IR than black surfaces. However, it is not limited to line follower, there are much more application which can utilize the Maker Reflect. Eg.: Edge/Border sensor in Sumo robot, wall sensor in maze solving robot, short-distance object detector (presence sensor), a sensor for rotary wheel encoder...etc.
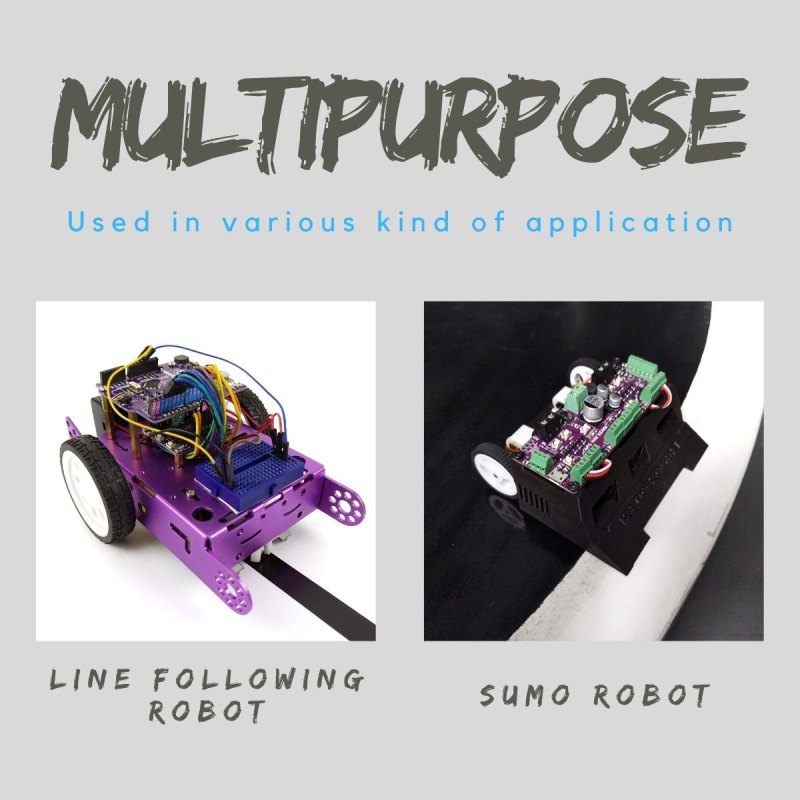
Measuring only (L)18.1mm x (W)8.4mm x (H)4.2mm (Exclude the header pin), this tiny sensor can be easily fitted in the tightest space available on your robot. We purposely designed the sensor so that the mounting hole is at the center so that the sensor can be at the front-most position. This is especially important in the Sumo robot.
Features:
- Operating Voltage: 3.3V and 5V Compatible
- Sensing Distance (Height): 1mm to 40mm (Vcc = 5V, Black line on a white surface)
- Output: Analog Voltage (White surface = lower voltage)
Example Application: Line Following Robot, Sumo Robot, Wall Following Robot, Short Distance Object Sensing, Sensor for Printed Rotary Wheel Encoder.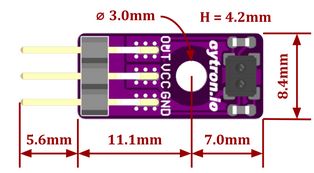
Documents:
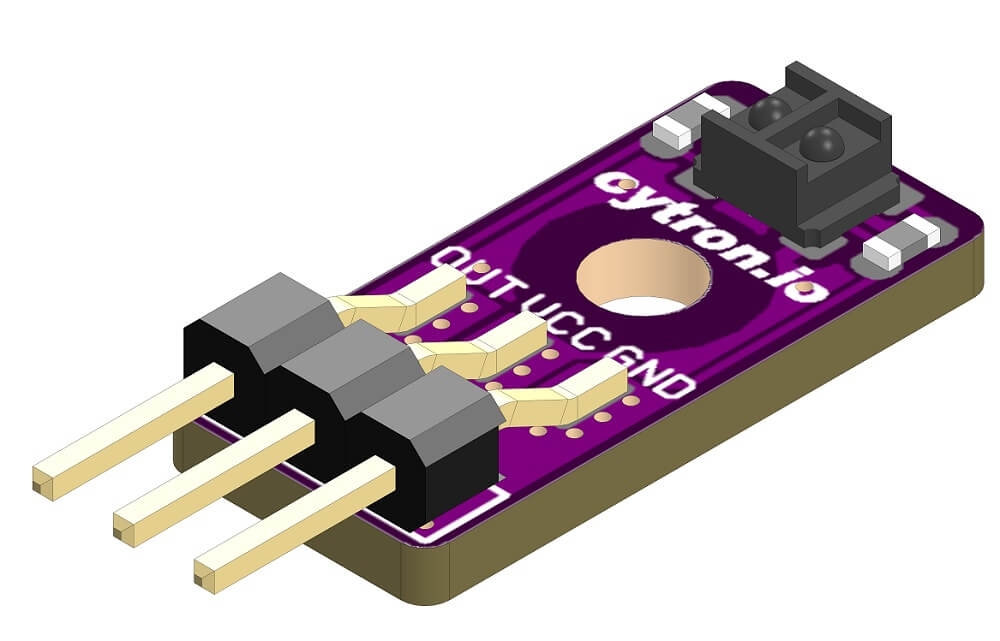
What's in the box?
1 x MAKER-REFLECT

On top of that, we have provided you with detailed instructions on the use of Raspberry Pi and the use of each module, which including 8 lessons for the module. Just click the wiki to view the user manual. Also, you can check the video guide here, which will tell you how to use this kit step by step.
All in all, whether you are a student, teacher, artist, hardware enthusiast, and so on, with the help of the Grove Base Kit for Raspberry Pi, you will get to know Raspberry Pi quickly and comprehensively.
For all Grove users (especially beginners), we provide you guidance PDF documents. Please download and read through Preface - Getting Started and Introduction to Grove before your use of the product.
Features
- A great kit for Raspberry Pi beginner to get started
- With Grove modules, no wiring is necessary
- Plug and Use module
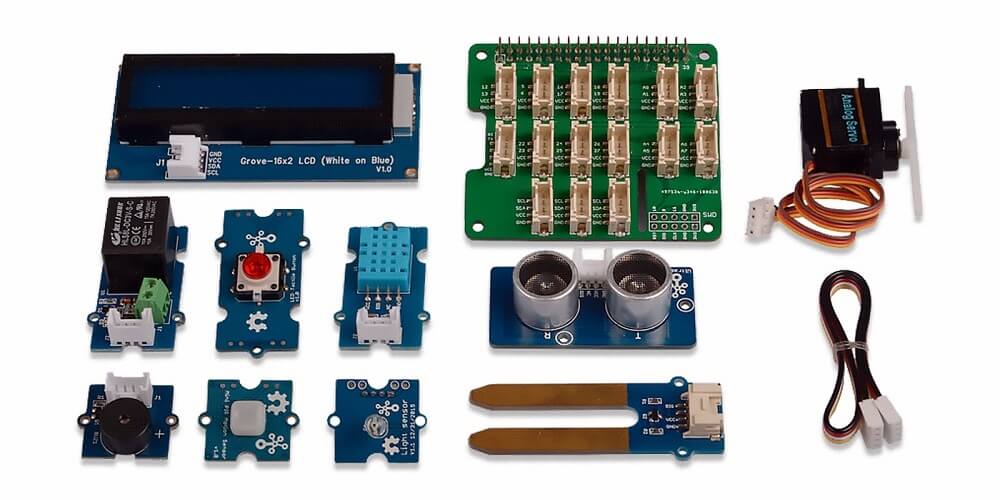
- Include 10 Grove modules and a Grove base for Raspberry Pi
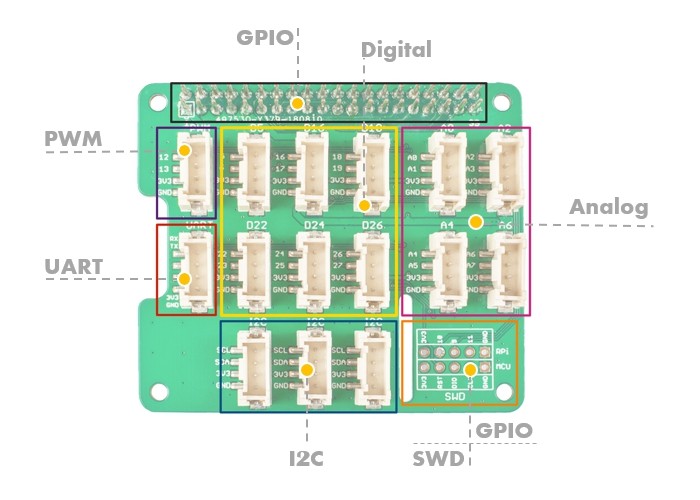
Now the kit comes with the Grove Base Hat for Raspberry Pi, making Raspberry Pi compatible with the Grove System.
The Grove Base Hat for Raspberry Pi provides Digital/Analog/I2C/PWM/UART port to meet all your needs. With the help of build-in MCU, a 12-bit 8 channel ADC is also available for Raspberry Pi.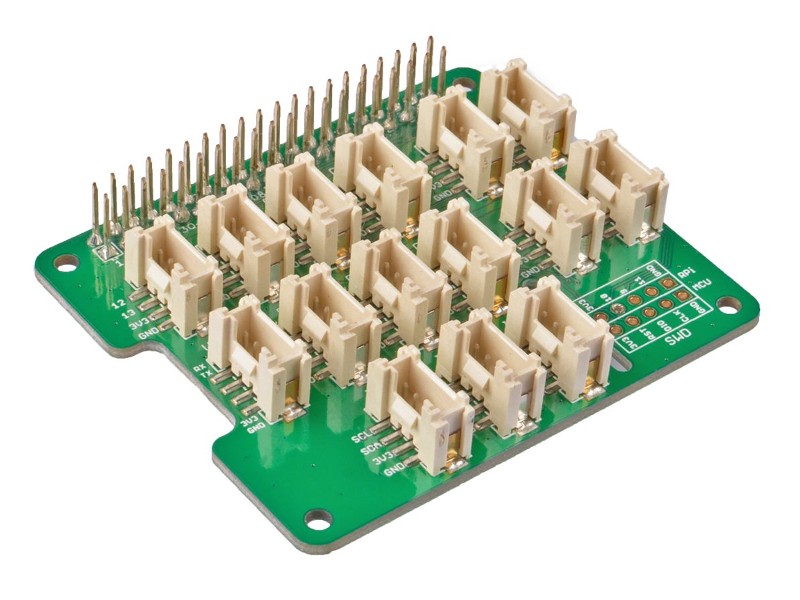
Grove Base HAT Features
- Compatible with all 40 GPIO pin Raspberry Pis:
- build-in MCU
- 12-bit ADC
- Multi-type Grove port
What's in the box?
1 x Grove Base Hat for Raspberry Pi1 x Grove - Red LED Button
1 x Grove - Buzzer
1 x Grove - Moisture Sensor
1 x Grove - Temperature & Humidity Sensor (DHT11)
1 x Grove - Light Sensor
1 x Grove - mini PIR motion sensor
1 x Grove - Ultrasonic Ranger
1 x Grove - Relay
1 x Grove - Servo
1 x Grove - 16 x 2 LCD (White on Blue)
Resources
- Grove - Introduction to Grove
- Grove - WiKi page for projects

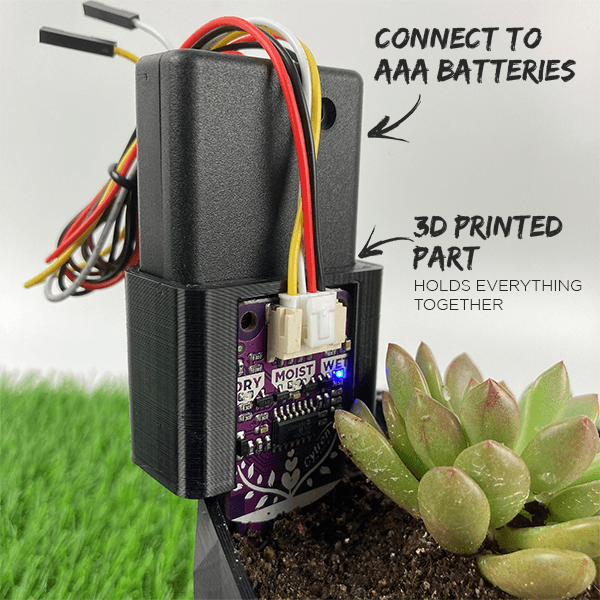
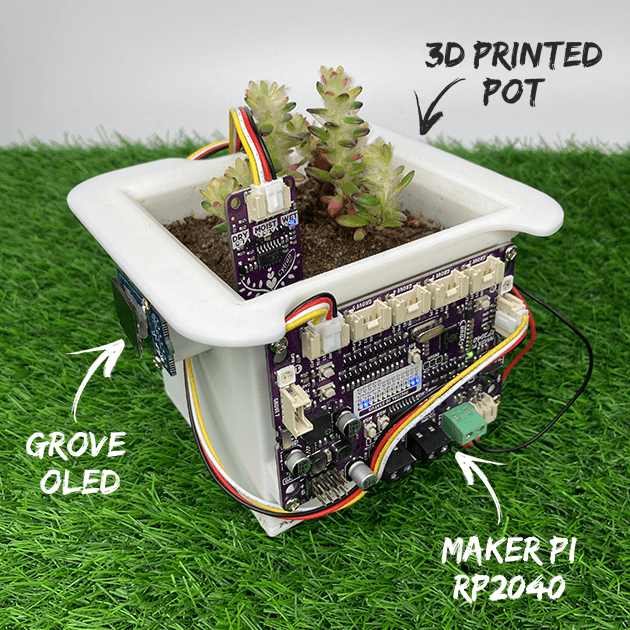
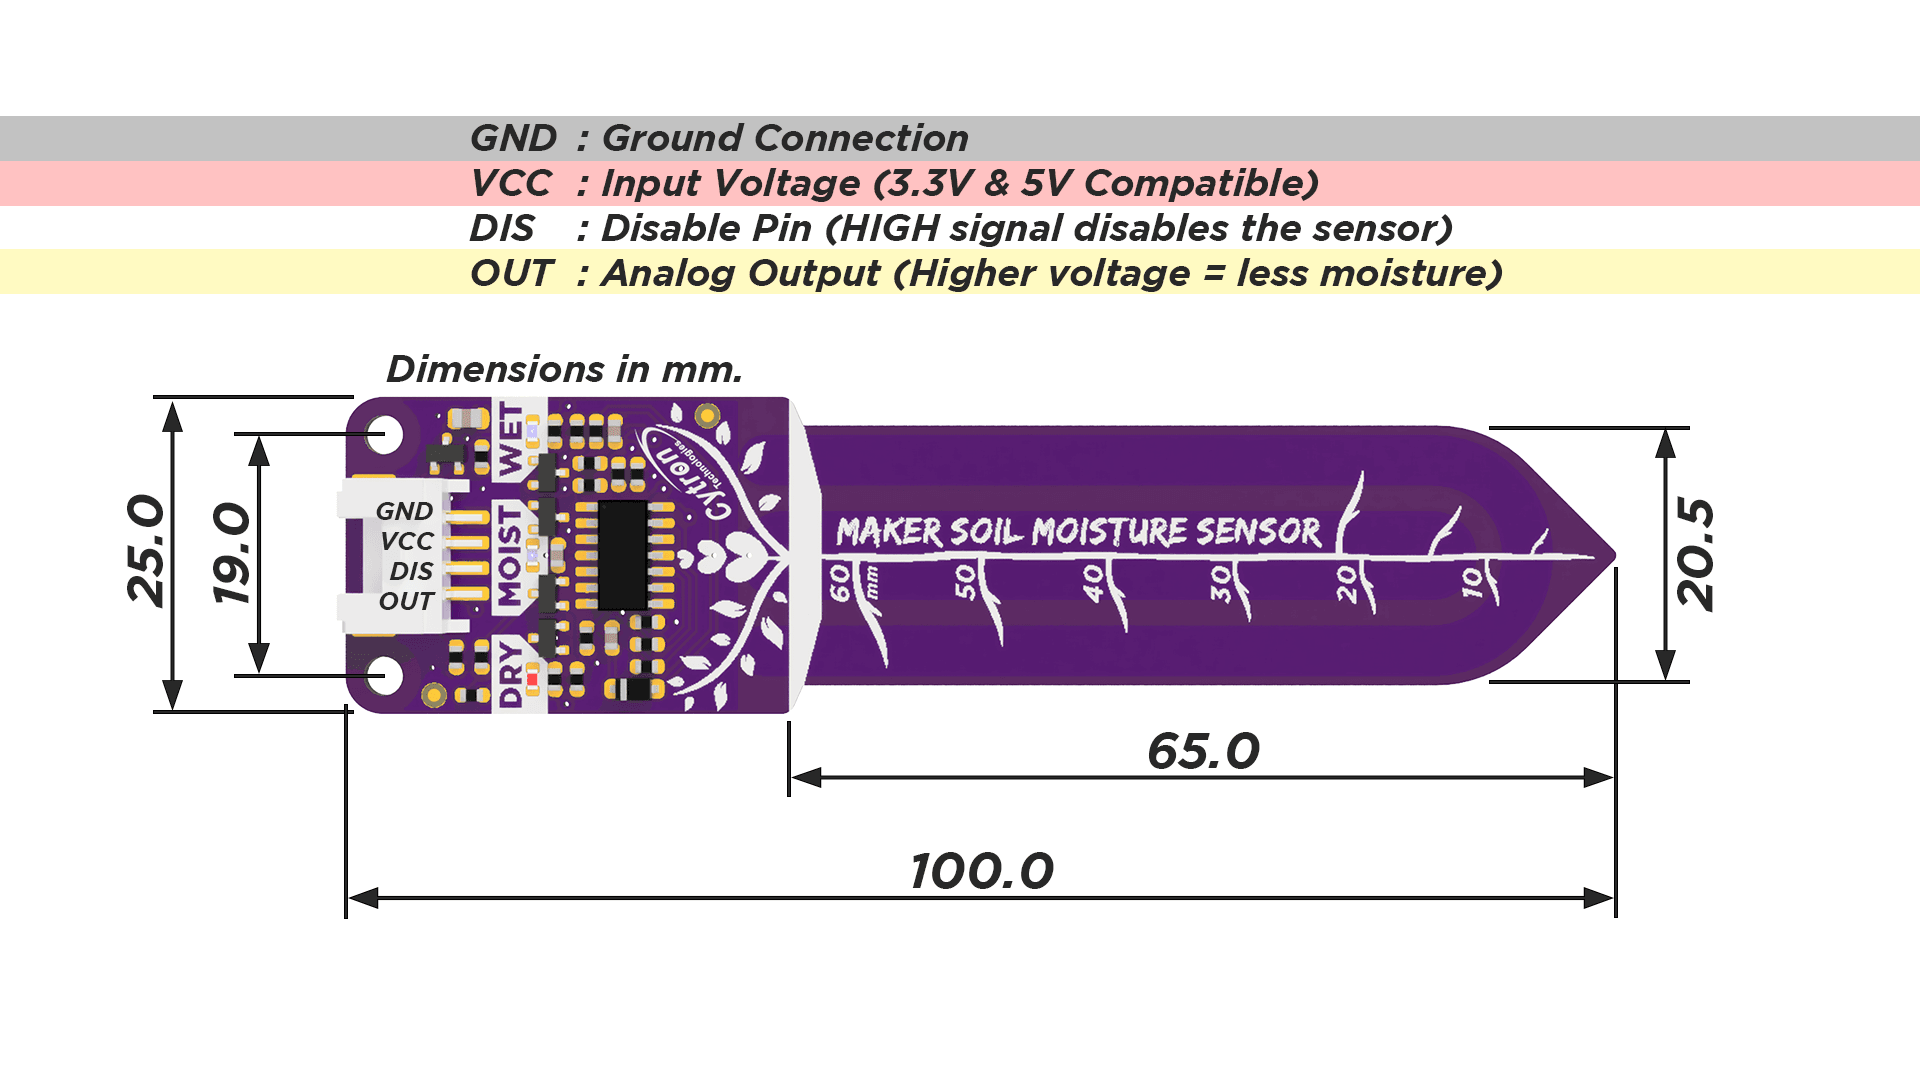
Maker Soil Moisture Sensor measures soil moisture by capacitive sensing, where the presence of water in the soil will increase the probe capacitance. The output of the sensor is analog output; higher moisture levels will produce lower output voltage. Being part of the Maker Series, the sensor is equipped with many features to further simplify digital making for beginners and experts alike.
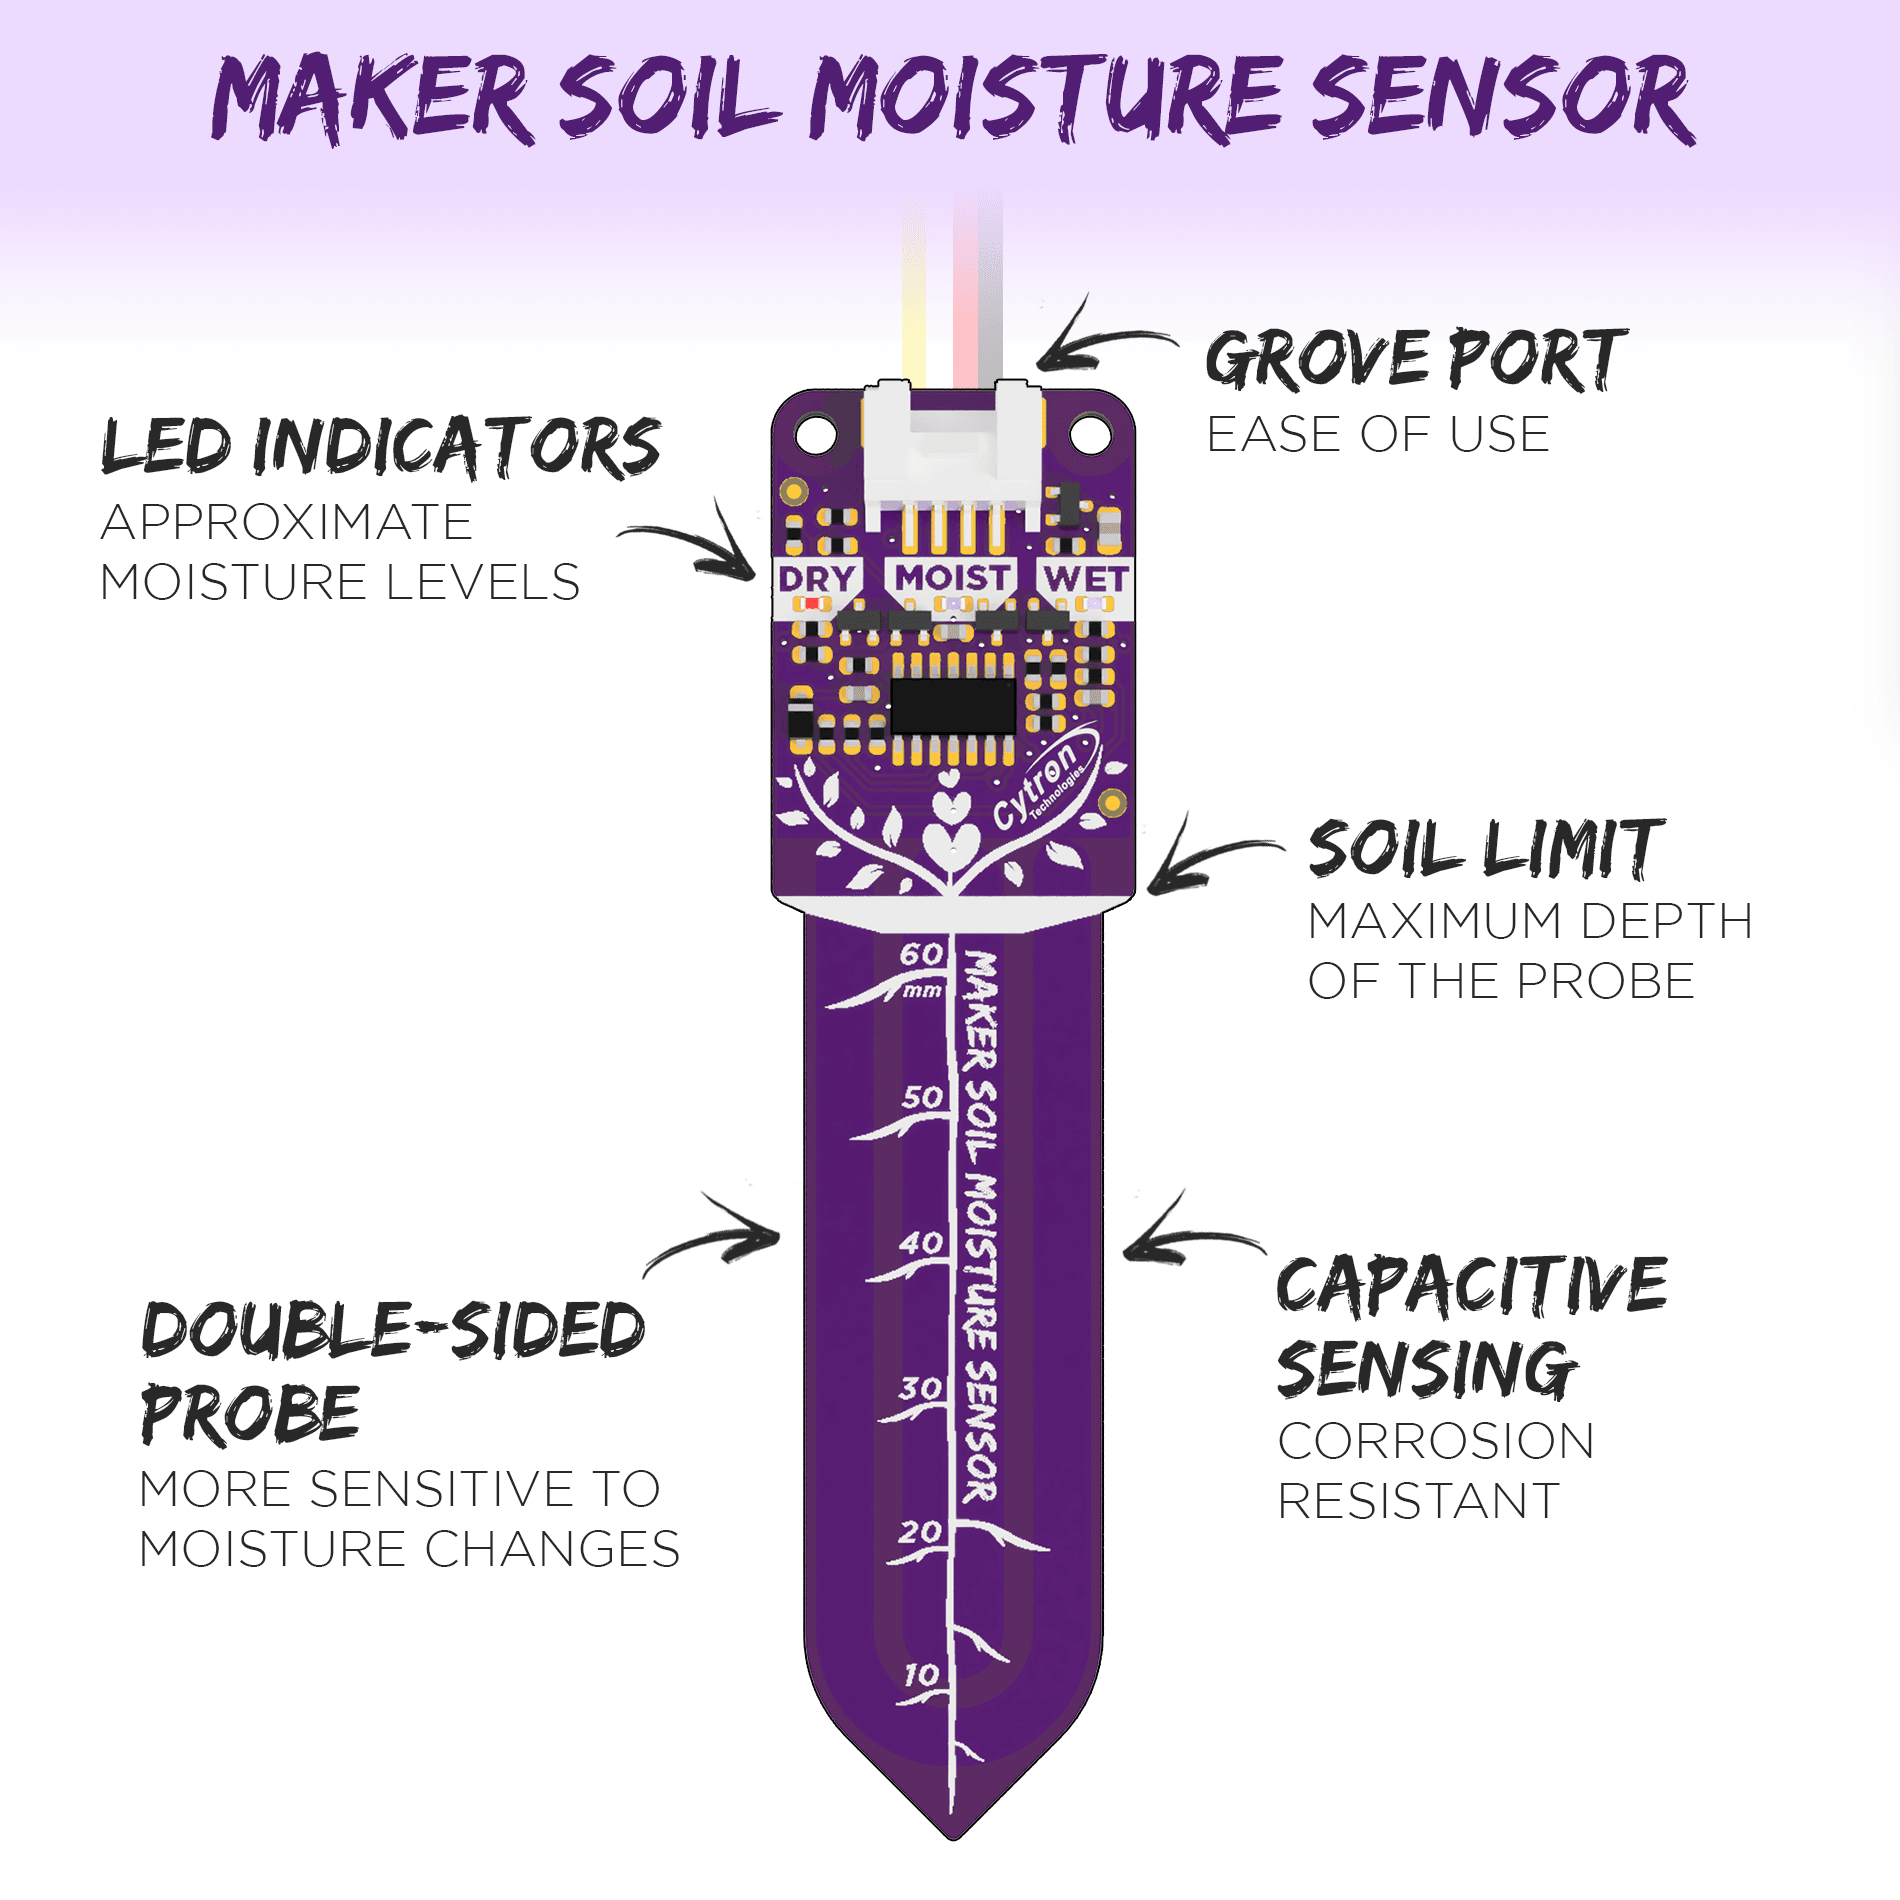
The Maker Soil Moisture Sensor is easy to use. It only needs a power supply, if the LED indicators alone are enough for your application. Make sure that the voltage level of the power supply is within the sensor specifications. Note that the LED indicators only indicate approximate moisture levels and might fluctuate depending on the power supply, since the sensor does not have a voltage regulator on board.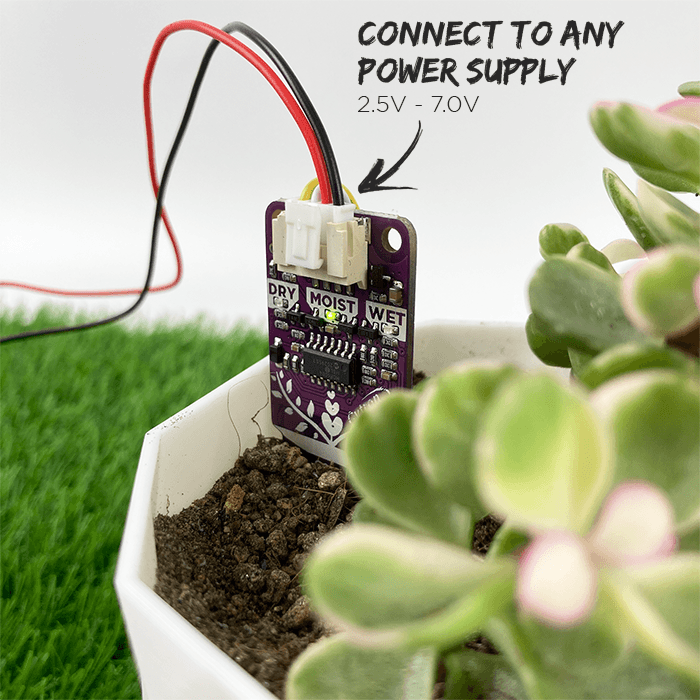
Full Tutorial: Battery Powered Maker Soil Moisture Sensor
Full Tutorial: Self Watering Pot Featuring Maker Soil Moisture Sensor
Features
- Operating Voltage: 2.5V - 7.0V.
- Output: Analog Voltage (Higher moisture = lower voltage)
- Grove port.
- LED indicators for dry/moist/wet soil moisture levels.
- Soil Limit (Maximum depth of the probe)
- Double-sided probe (More sensitive to moisture changes)
- Capacitive sensing probe (Corrosion resistant)
- Disable pin (Power-saving application)
Example Applications
- Soil moisture detection
- Automatic Plant Watering System
- Smart/IoT Gardens
What's in the box?
1 x Sensor
1 x 50 cm Grove cable
Resources

100% cotton Unisex T-shirt from the Cytron for every maker that loves making stuff. Simple yet comfortable!
Comes in black color with the slogan of TRUST ME I'M A MAKER
There are several sizes of this T-shirt to accommodate everyone :) Please choose the preferred size next to the main photo. It is Unisex T-shirt so it is suitable for both male and female maker :)
- XS (Extra Small) Size
- S (Small) Size
- L (Large) Size
- M (Medium) Size
- XL (Extra Large) Size
- XXL (Double Extra Large) Size
- XXXL (Triple Extra Large) Size
Features:
- Coming from makers to makers :)
- 100% cotton, super comfortable
- The black color with:
- Front: Slogan: TRUST ME I'M A MAKER
- Back: Cytron Logo
- Available Sizes:
- Extra Small (XS):
- 36" or 91.44cm for the Chest (Chest = 2 x L)
- 25" or 63.5cm for Height
- Small (S):
- 38" or 96.52cm for the Chest (Chest = 2 x L)
- 26" or 66.04cm for Height
- Medium (M):
- 40" or 101.6cm for the Chest (Chest = 2 x L)
- 27" or 68.58cm for Height
- Large (L):
- 42" or 106.68cm for the Chest (Chest = 2 x L)
- 28" or 71.12cm for Height
- Extra Large (XL):
- 44" or 111.76cm for the Chest (Chest = 2 x L)
- 29" or 73.66cm for Height
- Double Extra Large (XXL):
- 46" or 116.84 cm for the Chest (Chest = 2 x L)
- 30" or 76.2 cm for Height
- Triple Extra Large (XXXL):
- 48" or 121.92 cm for the Chest (Chest = 2 x L)
- 31" or 78.74 cm for Height
- Extra Small (XS):

What's in the box?
1 x Trust Me T-Shirt - Black (Chosen Size)
You can easily program EDU:BIT using open-sourced Microsoft MakeCode Editor. Just add EDU:BIT MakeCode Extension and you’re good to go. If you’re a beginner, you can start with the block programming mode; simply drag, drop and snap the coding blocks together. For more advanced users, you can easily switch into JavaScript or Python mode on MakeCode Editor for text-based programming.
New to coding? Don’t worry. This kit comes with a booklet covering 10+1 hands-on coding lessons, which have been creatively structured to introduce programming basics in a fun and engaging manner. Each chapter features a classic childhood game such as Rock Paper Scissors, Snakes and Ladders, Twister, and Simon Says. Follow the step-by-step guide to build the games and then have fun playing with your friends! *Game accessories are provided in this kit.

At the end of each chapter, there is a challenge which requires you to apply what you’ve learned to build a useful application for your classroom. Give it a try and if you’re stuck, we’re always here to help you. You can go to our online Resource Hub for sample codes and extra resources.
SPECIAL FEATURES
Start having fun with EDU:BIT right out of the box. Start coding right away and see your board lights up and plays melody with the press of a button. No wiring required when used as a training kit.
Cannot control servo motor and play music at the same time on your micro:bit? Servo motor refuses to move correctly? Worry no more! EDU:BIT takes care of these issues with its dedicated controller and power supply. It can even support up to 3 servo motors and 2 DC motors to actuate any creative projects you will build.
Each feature and its associated micro:bit IO pin is clearly labeled on the board for easy reference. In addition, indicator LEDs are built in on EDU:BIT to ease troubleshooting for both digital and analog IO pins.
Ready to build your own projects? You can break off the modules on EDU:BIT board for more flexibility in your project design. Plug-and-play cables are provided for you to connect the broken off Bits to the main board.
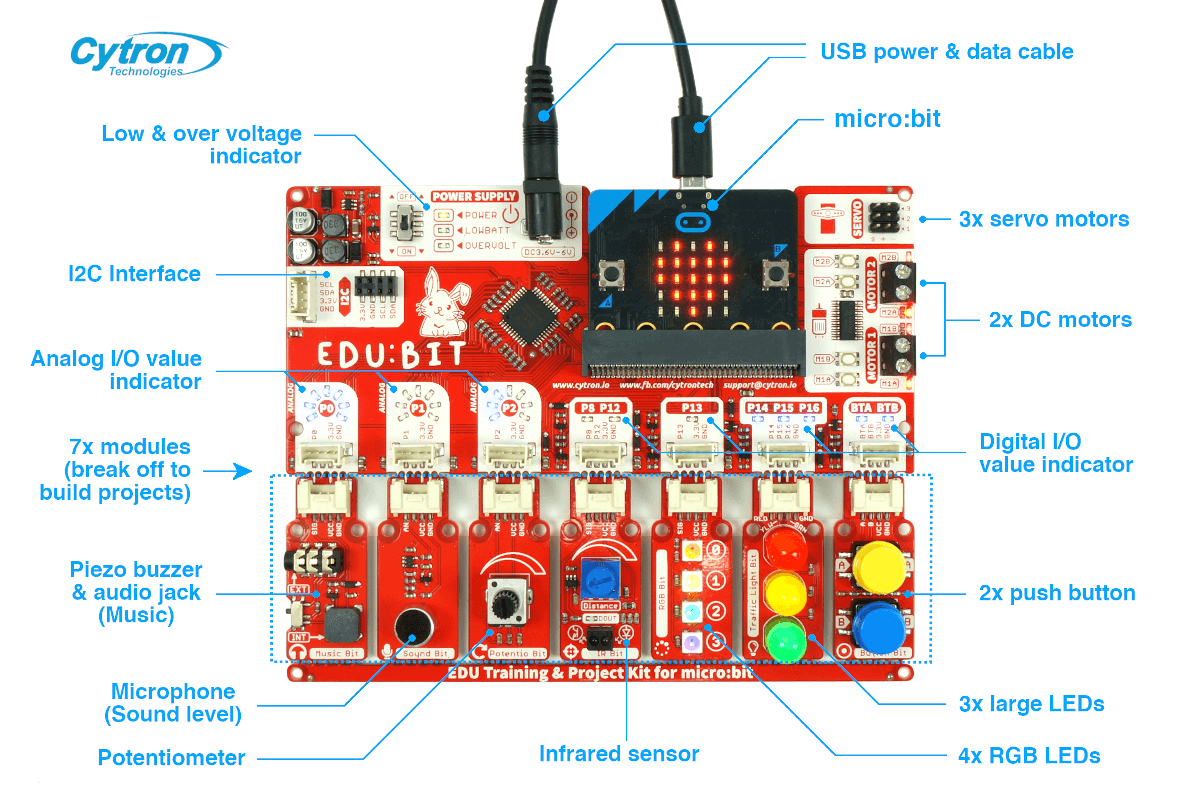
EDU:BIT Specifications
- 1x Piezo buzzer with audio jack
- 1x Sound sensor
- 1x Potentiometer
- 1x IR sensor
- 4x Programmable RGB LEDs
- 3x Big LEDs (traffic light module - red, yellow green)
- 2x Push buttons
- 3x ports for servo motors
- 2x ports for DC motors
- 1x port for I2C Interface (3.3V)
- Dimension: 157.50 mm x 124.50 mm x 19.00 mm
What's in the box?

1 x EDU:BIT board
1 x Step-by-step Guide Book
1 x USB power and data cable
2 x Game maps
2 x Game accessories
7 x Grove cables
1 x Servo motor
1 x DC motor
1 x Pulley wheel
1 x Fan blade
- EDU:BIT Resource Hub (with sample codes and extra resources)
- EDU:BIT Out-of-the-box Demo Code
- micro:bit Getting Started Guide (by microbit.org)
- MakeCode Online Editor
- MakeCode Offline Editor
- EDU:BIT Schematic, PCB Layout and PIC16F1937 Co-Processor Source Code
- MicroPython library for EDU:BIT
Visit our Blog for demo videos and more!

Note: This kit comes without micro:bit, please get it separately here.
Smart Fan
Check out this video using this smart home kit, this is Smart Fan
Smart Home Kit is a product about smart home projects base on micro:bit. We have selected components commonly used at home as TMP36 temperature sensor, sound sensor, crash sensor, servo, motor. You can build a scene like a windowsill, wardrobe and fish tank, create yourself smart sweet home and programming to intelligently driving them using micro:bit. The smart home is what makes life more practical and playing with it is what makes life more interesting.
Voice Activated Light
Here is a video by Cytron: Voice Activated Light using this kit in Bahasa Malaysia with English Subtitles:
- Plug and use connection
- Rich tutorial cases
- Connect limitless creativity with different sensors
What's in the box?
1 x Crystal Battery Box - 2 x AAA
1 x Crash E-Blocks
1 x TMP36 temperature sensor E-blocks
1 x Rainbow LED E-blocks
1 x Simulation noise sensor E-blocks
1 x Light sensor E-blocks
1 x Soil Moisture sensor E-blocks
1 x Relay E-blocks
1 x DC Motor E-blocks
1 x 180º Servo E-blocks
1 x Submersible pump E-blocks
1 x Screw Driver
1 x Micro-B USB Cable
1 x OLED Display
1 x Smart Home kit manual book
- Introduction to Smart Home Kit
- Introduction to sensor:bit
- Case01:Voice-activated Lights
- Case02:Smart Fan
- Case03:Auto Windows
- Case04:Smart Wardrobe
- Case05:Water Level Alarming
- Case 06: Smart Telecontrol Door Opener
- Case 07: Smart Decibel Tester
- Case 08: Simple Spirometer
- Case 09: Lie Detector
- Case 10: Simple Alarm Box
- Case 11: Intruder Detection System
- Cytron tutorial: Smart Home Kit - Smart Fan, with video the steps.
- Cytron tutorial: Smart Home Kit - Voice Activated Light, with video and guides

Note: Not suitable for children under 4 years old!
Note: Download the softcopy instruction manual (English) here.
The solar panel is meant for OUTDOOR actual sunlight, indoor lighting will NOT generate sufficient energy to drive the car.
It's time to make your own toy! Better yet, a solar-powered wooden car! Get this kit to keep your kids occupied with hands-on activities while enjoying the "robot" moving around that is powered by green energy, renewable energy - Solar Power. This DIY kit is simple enough to be built by 4 years old children, with parent's help. And children 6 years old and above can build it by themself! Let them explore solar power and how it can help to save the earth by utilizing it! You can also let your kids understand how solar panel works and electric motor works. Awesome! 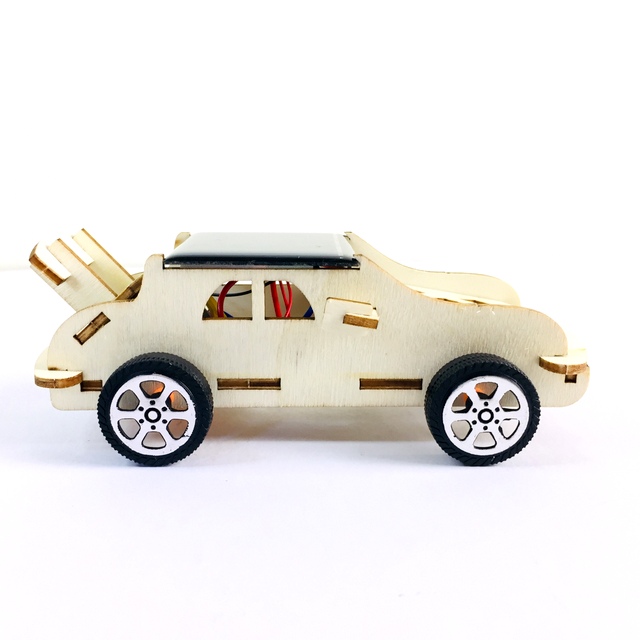
- Do It Yourself Solar Powered Wooden Car STEM Kit
- Simple and yet educational
- Suitable for age 4 years old and above
- Come with everything needed to assemble as a solar-powered moving car.
- No soldering is needed
- Moveable car
- Learn about renewable energy, solar power, electric motor :)
What's in the box?
1 x Solar Panel
4 x Plastic wheels for the car
1 x Small DC Motor
1 x small plastic gear
1 x Rubber band
2 x small iron rod as the shaft for wheel
Some double-sided tape
Sanding filer

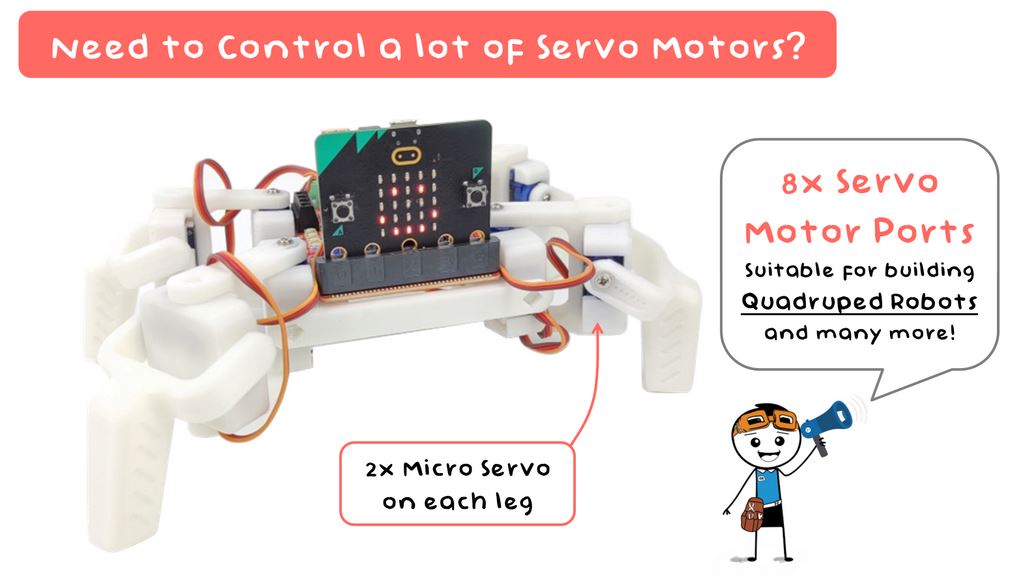
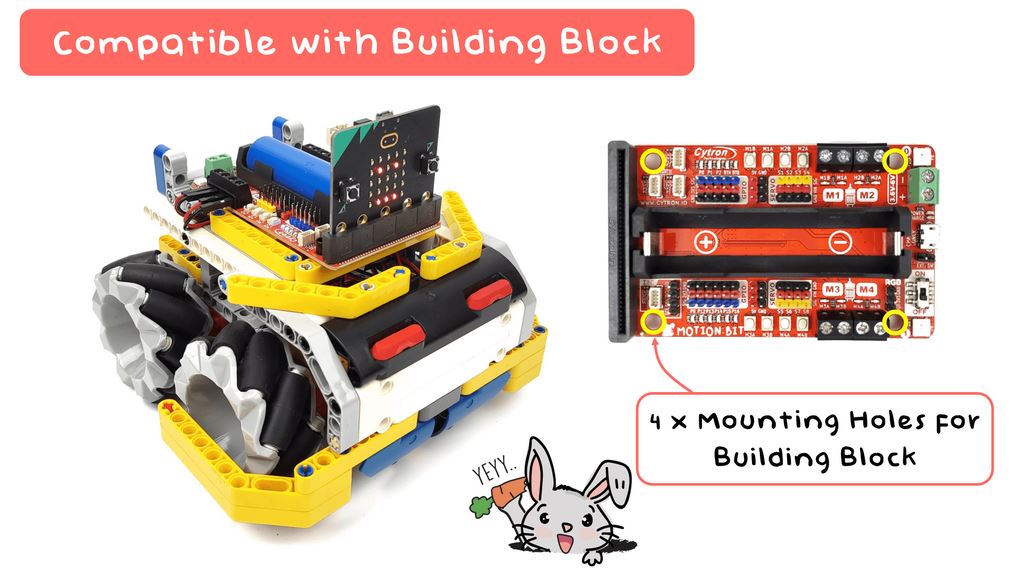
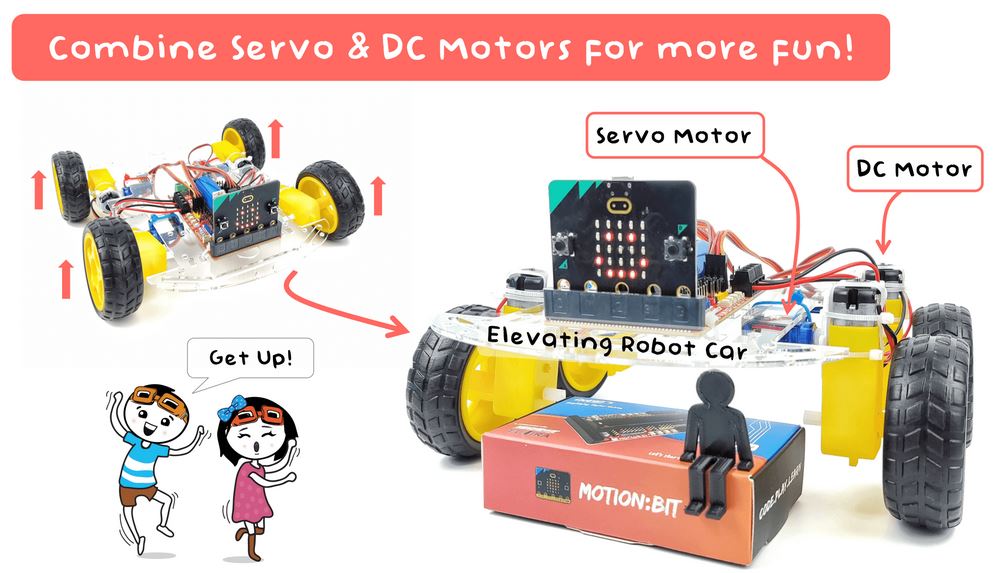
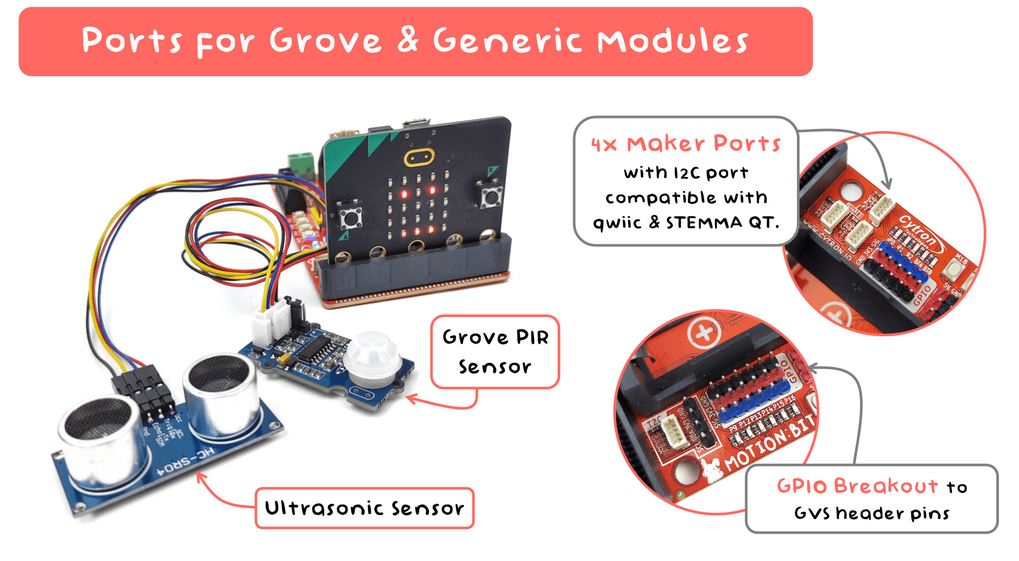
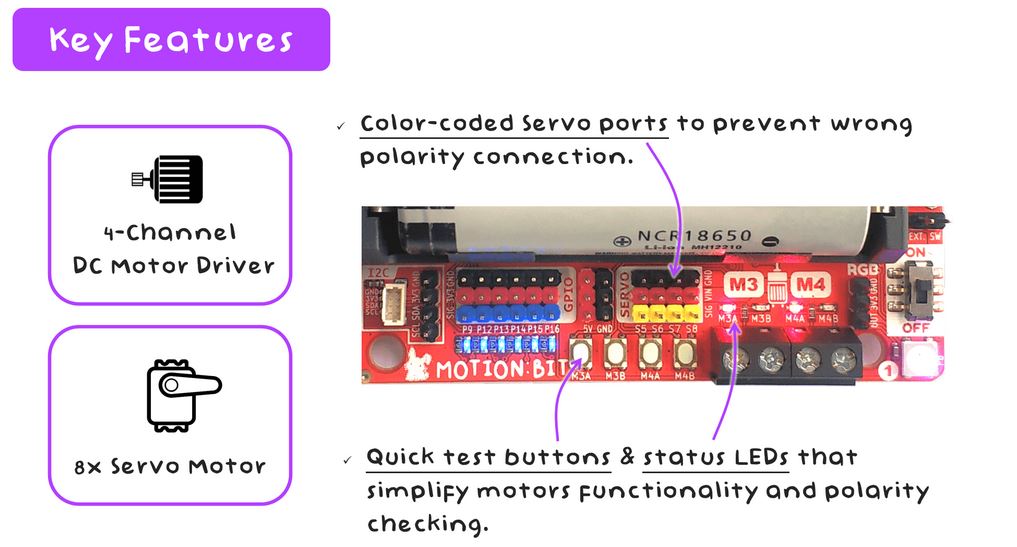
Looking for a suitable micro:bit expansion board to build a robot with DC Motors and Servo Motors?
Introducing the new member to our family - MOTION:BIT.
This is a brainchild of makerspace.UTHM & Cytron Technologies, in collaboration with ISOBOT and Elvira Systems.
Program your MOTION:BIT with Microsoft MakeCode Editor graphical programming interface. Just install MOTION:BIT MakeCode Extension and you may start to code your projects. If you’re a beginner, you can start with the block programming mode; simply drag, drop & snap the coding blocks together. For more advanced users, you can easily switch into JavaScript or Python mode on MakeCode Editor for text-based programming.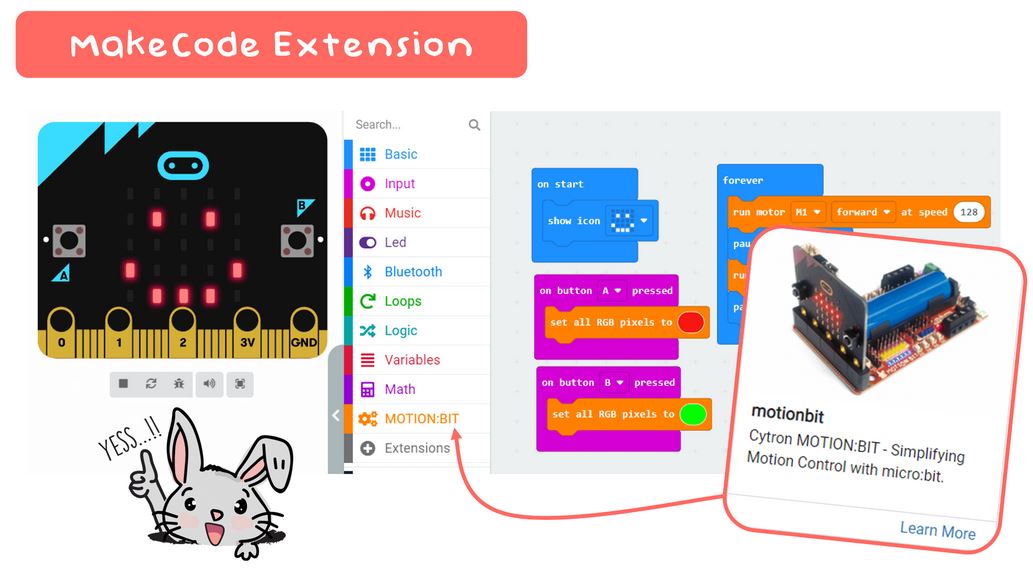
Get your own MOTION:BIT and have fun building your special projects now!
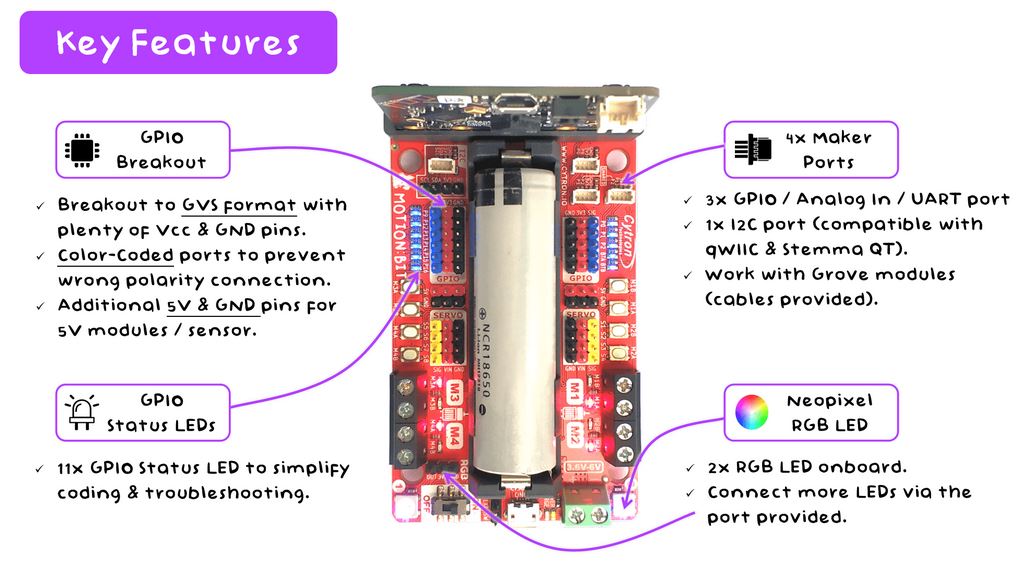
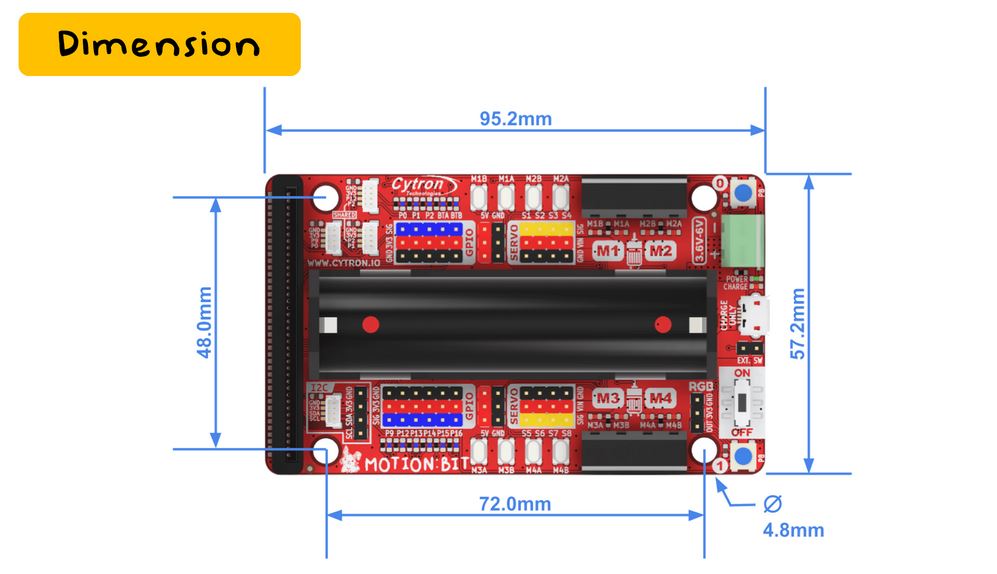
Board Layout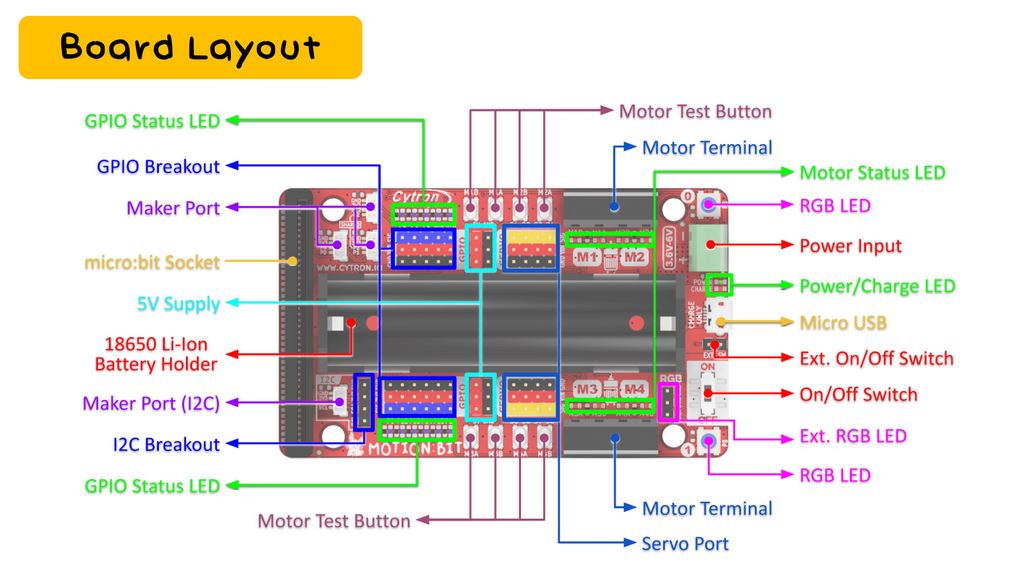
|
|
What's in the box?
1 x MOTION:BIT
1 x Tiny Phillips Screwdriver
3 x Grove to JST-SH(qwiic) Cable
4 x Silicone Bumper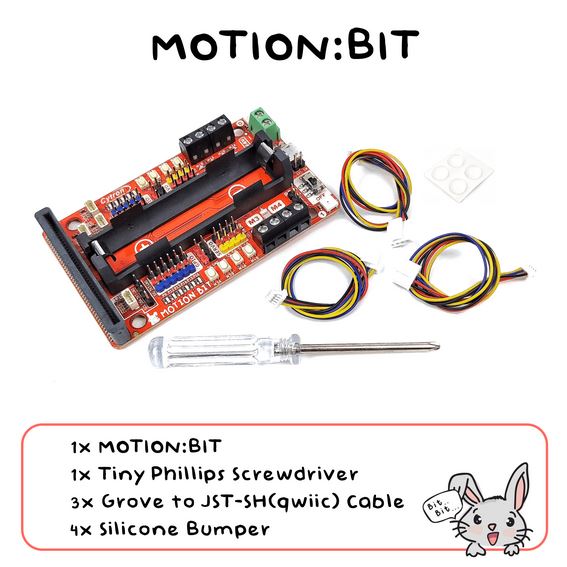
You might also need....
You'll find our battery selection here
Looking for a suitable micro:bit?
and a USB cable

Looking for a suitable micro:bit expansion board to build a robot with DC Motors and Servo Motors?
Introducing the new member to our family - MOTION:BIT.
This is a brainchild of makerspace.UTHM & Cytron Technologies, in collaboration with ISOBOT and Elvira Systems.
Program your MOTION:BIT with Microsoft MakeCode Editor graphical programming interface. Just install MOTION:BIT MakeCode Extension and you may start to code your projects. If you’re a beginner, you can start with the block programming mode; simply drag, drop & snap the coding blocks together. For more advanced users, you can easily switch into JavaScript or Python mode on MakeCode Editor for text-based programming.
Get your own MOTION:BIT and have fun building your special projects now!
Board Layout
|
|
What's in the box?
1 x MOTION:BIT
1 x Tiny Phillips Screwdriver
3 x Grove to JST-SH(qwiic) Cable
4 x Silicone Bumper
1 x micro:bit V2.2
1 x USB micro B cable black
You might also need....
You'll find our battery selection here

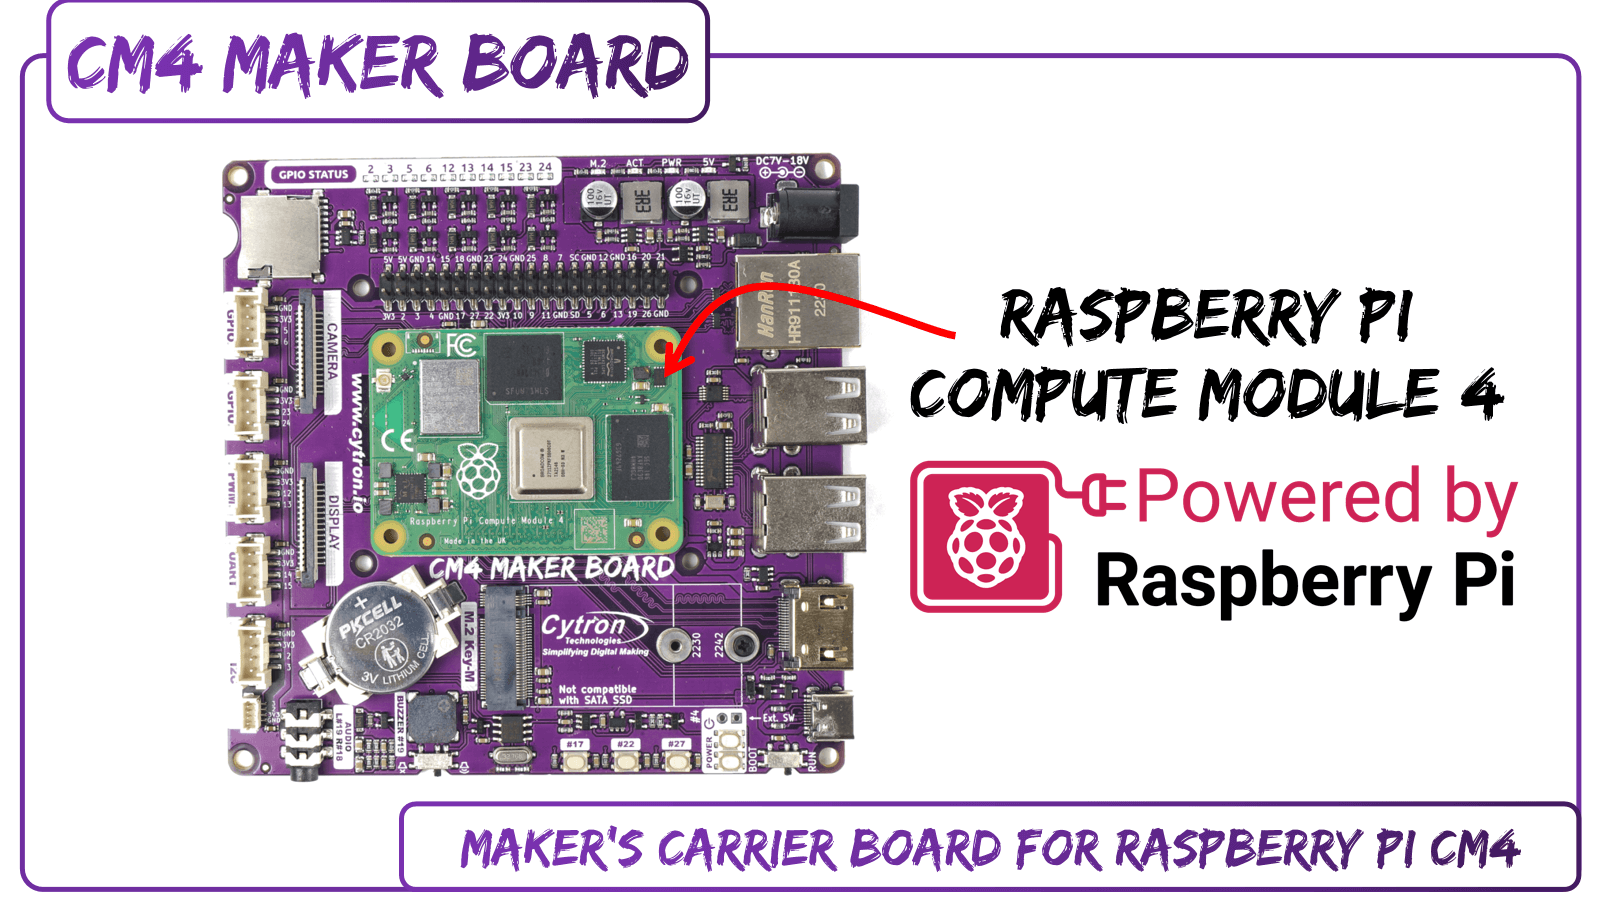
What is the Raspberry Pi Compute Module 4?
Compute Module 4 is officially launched on 19th October 2020, and there are 32 variants of the module to choose from.
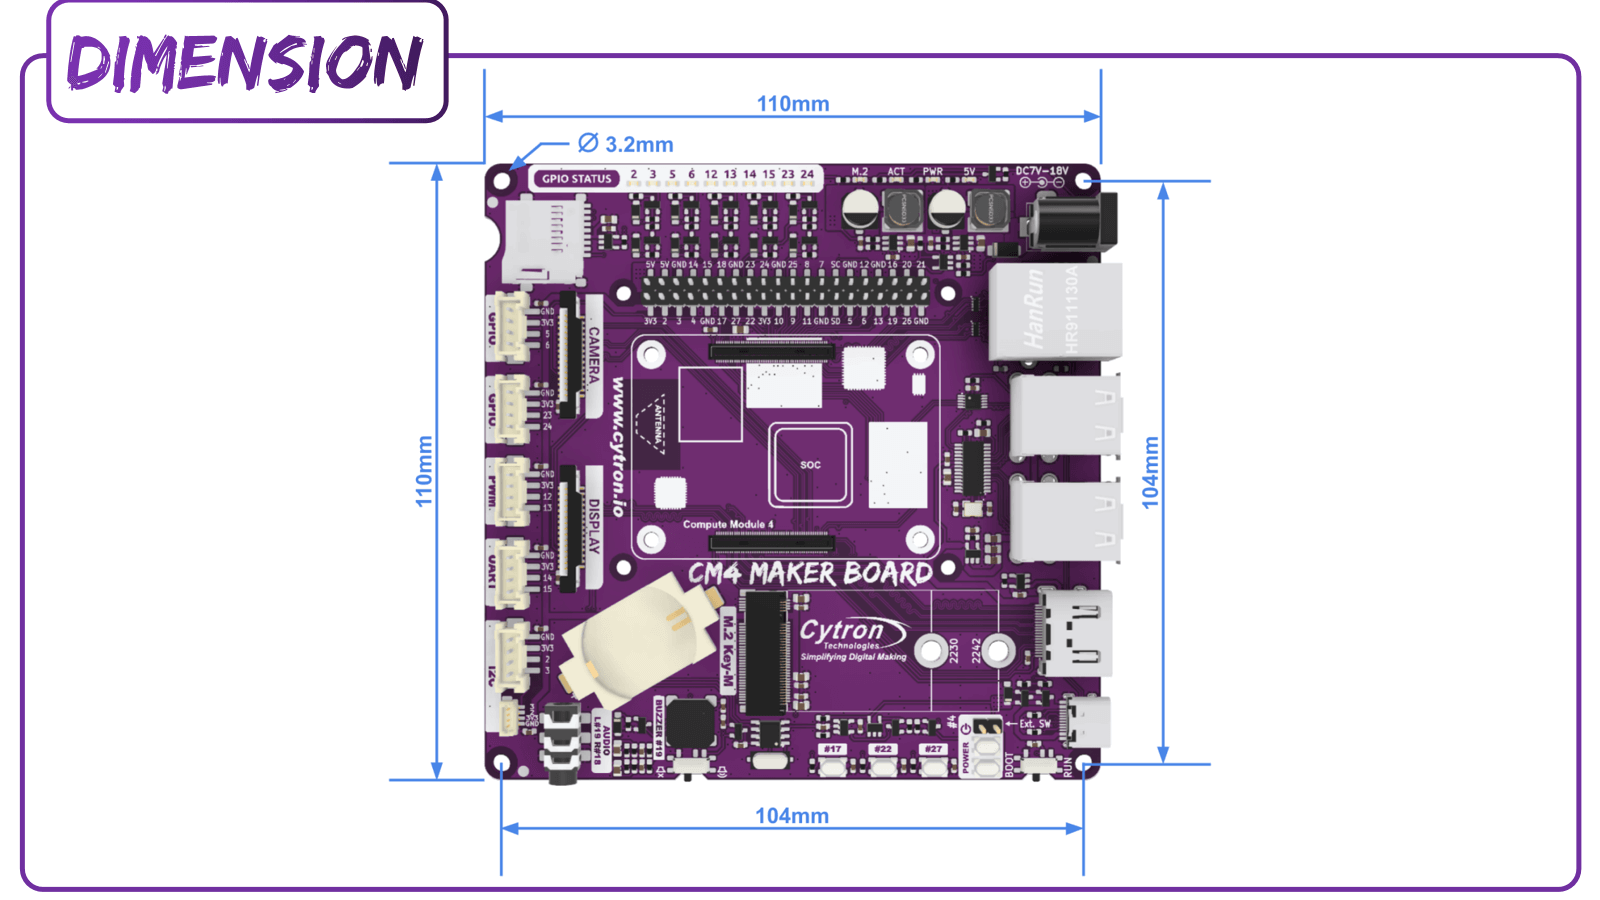
The Raspberry Pi Compute Module 4 (CM4) and Compute Module 4 Lite (CM4Lite) are loosely based on the Raspberry Pi 4 Model B. The CM4 has an option for cost-sensitive applications to be supplied without the eMMC fitted; this version is called the CM4Lite. The form factor of the new CM4 and CM4L is different from previous Compute modules, which have all shared a form factor. The change is due to the addition of new interfaces; a second HDMI, PCIe, and Ethernet. The addition of these new interfaces, especially PCIe, would not have been possible while preserving the older form factor. Instead, the electrical interface of the CM4 is via two 100-pin high-density connectors. While the switch to a newer form factor has allowed a reduction in the footprint. The total footprint of the CM4, including the socket, is smaller with the new form factor design.
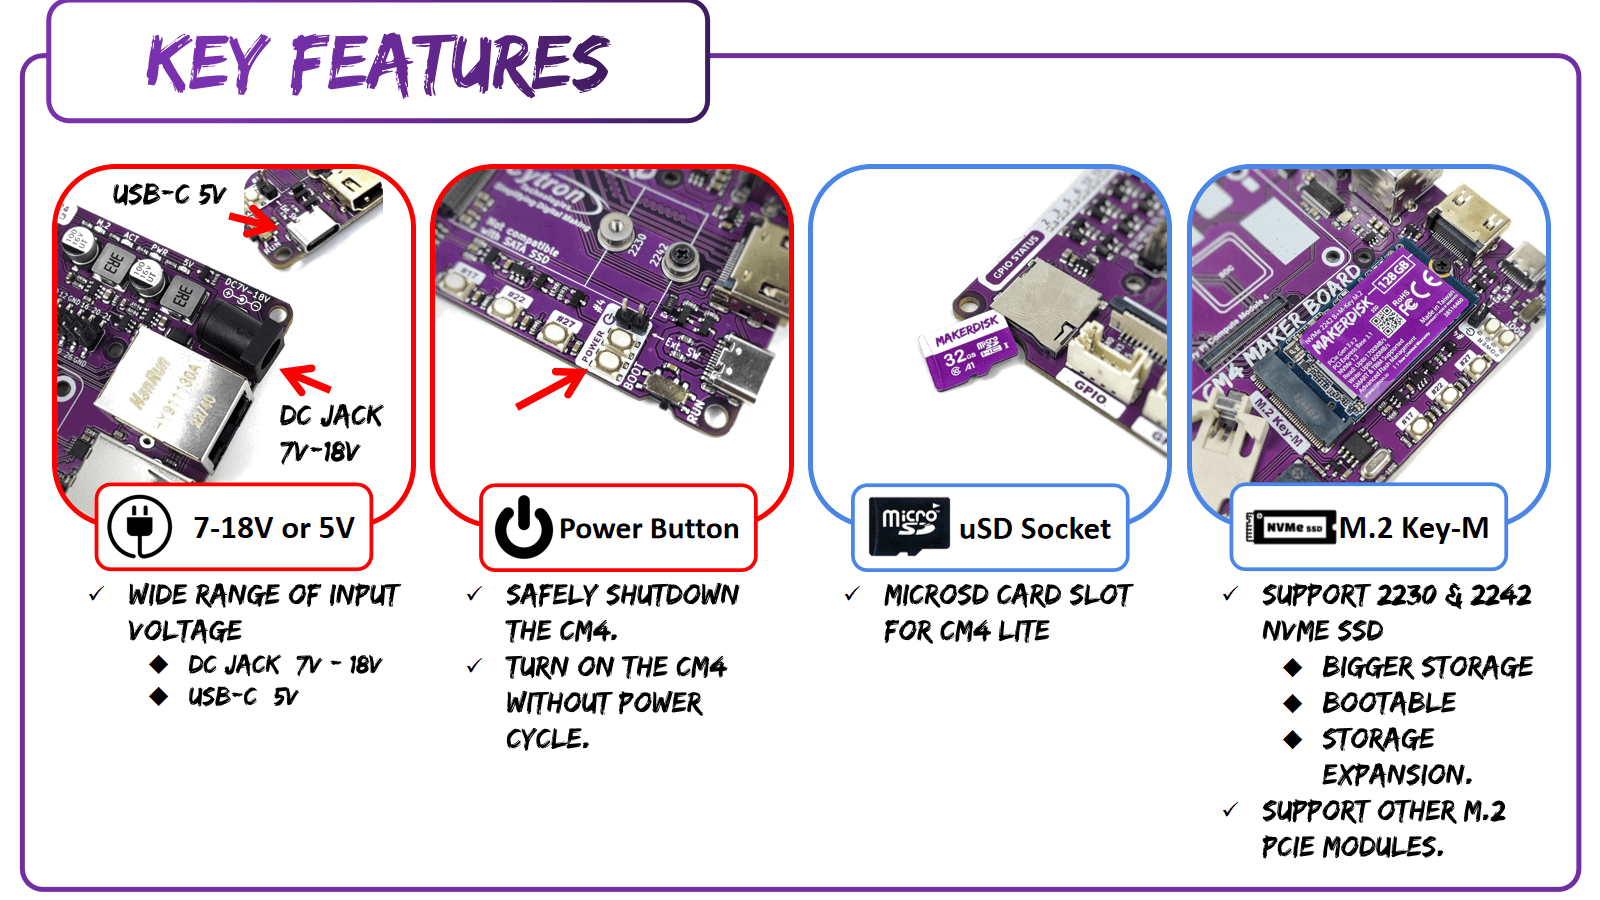
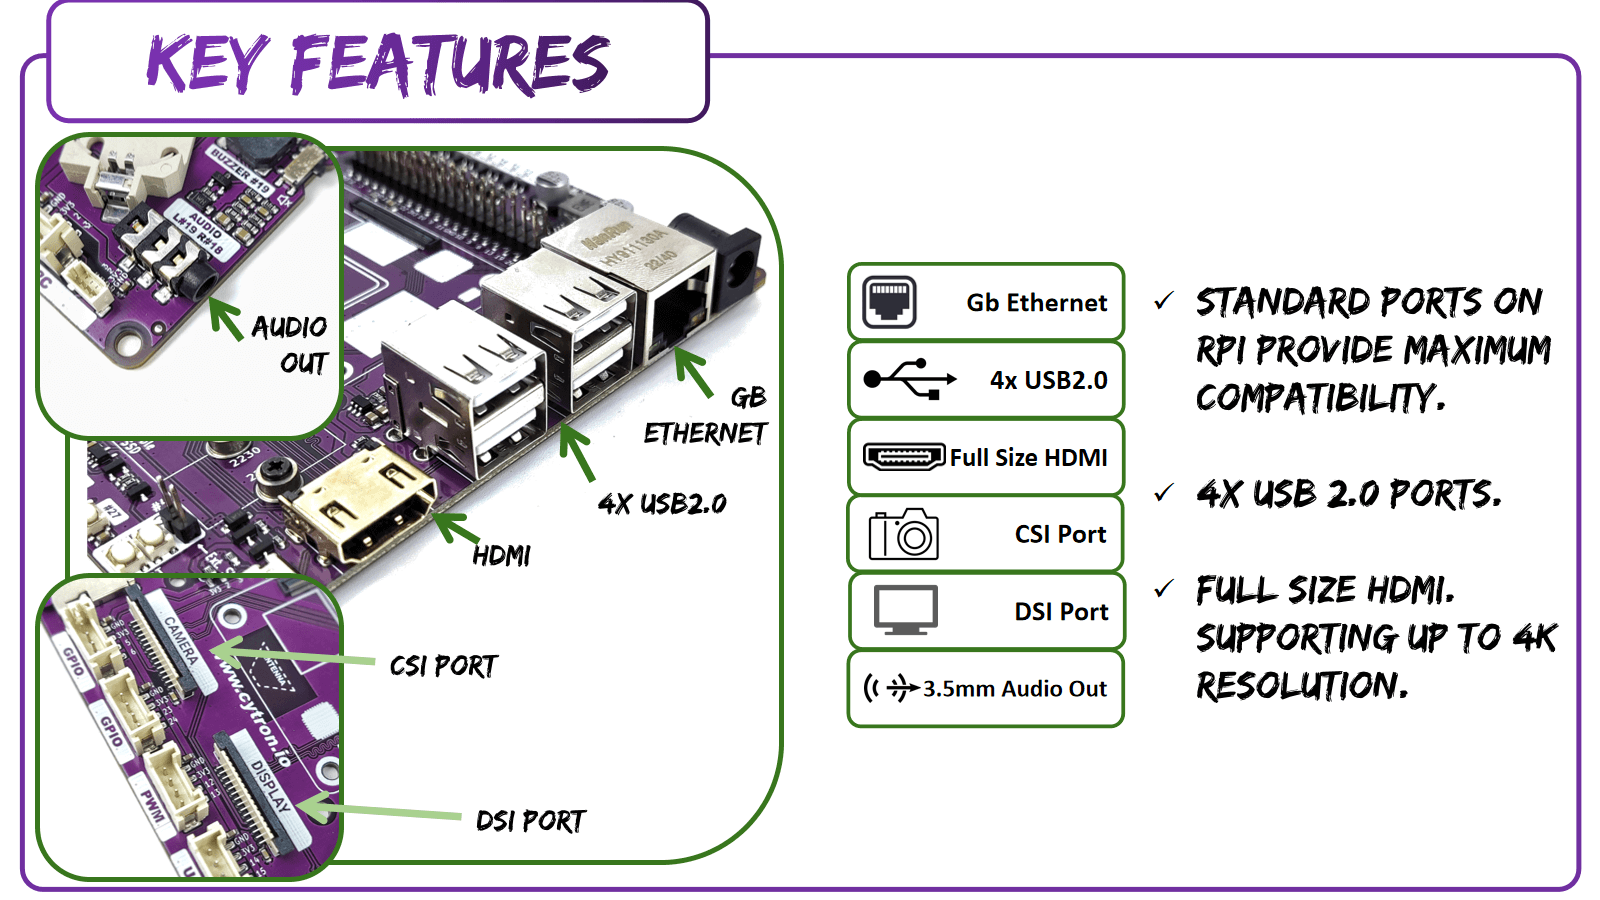
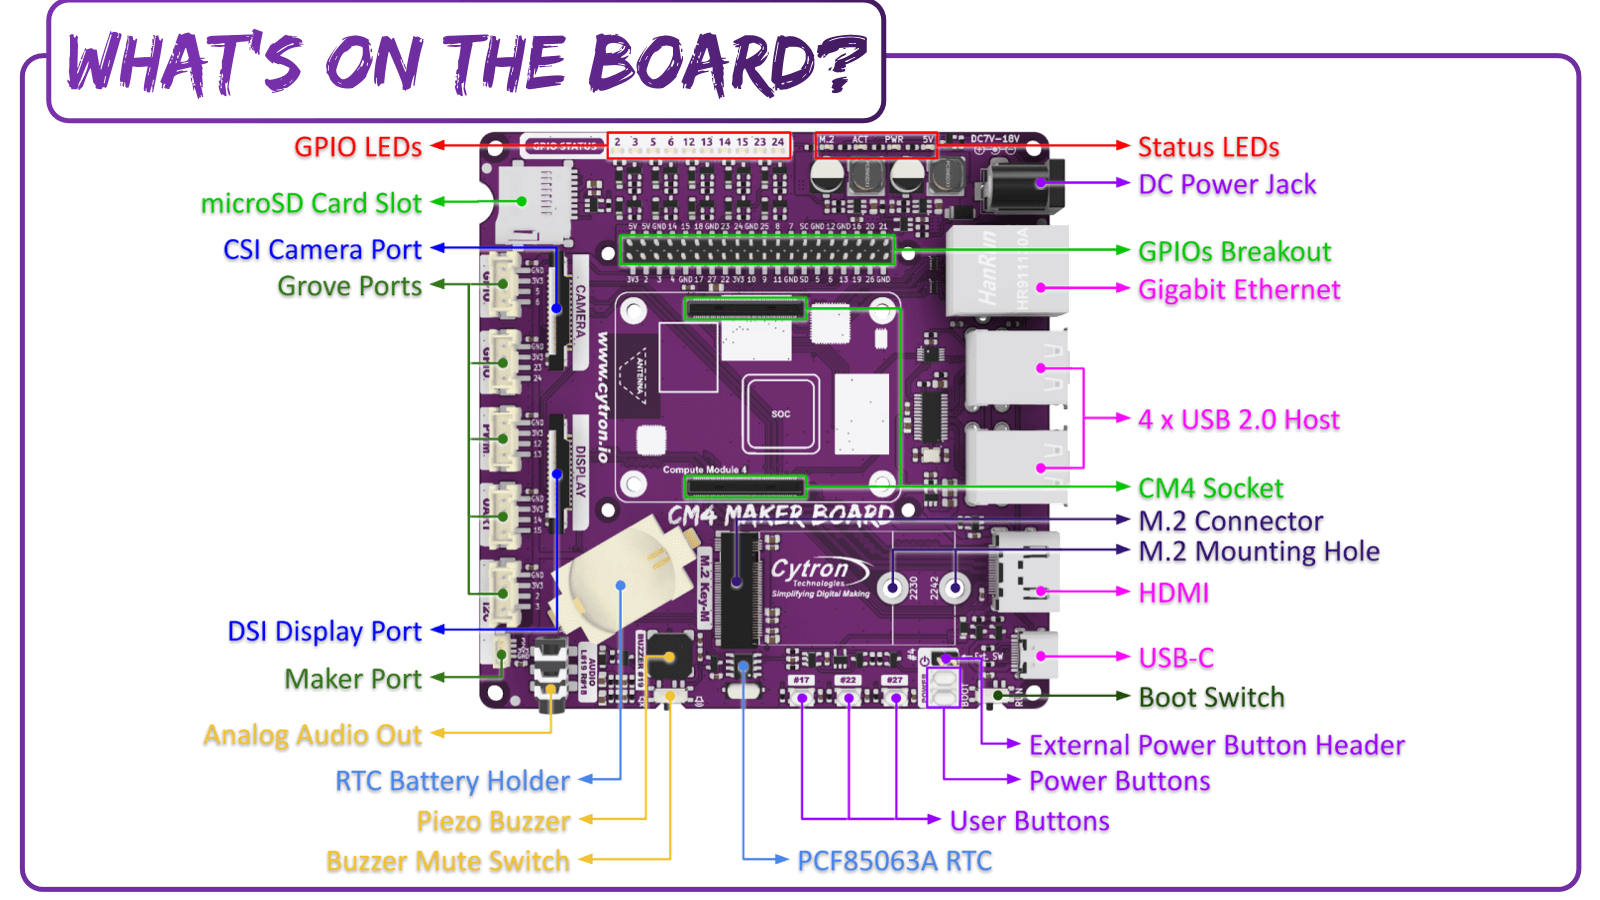
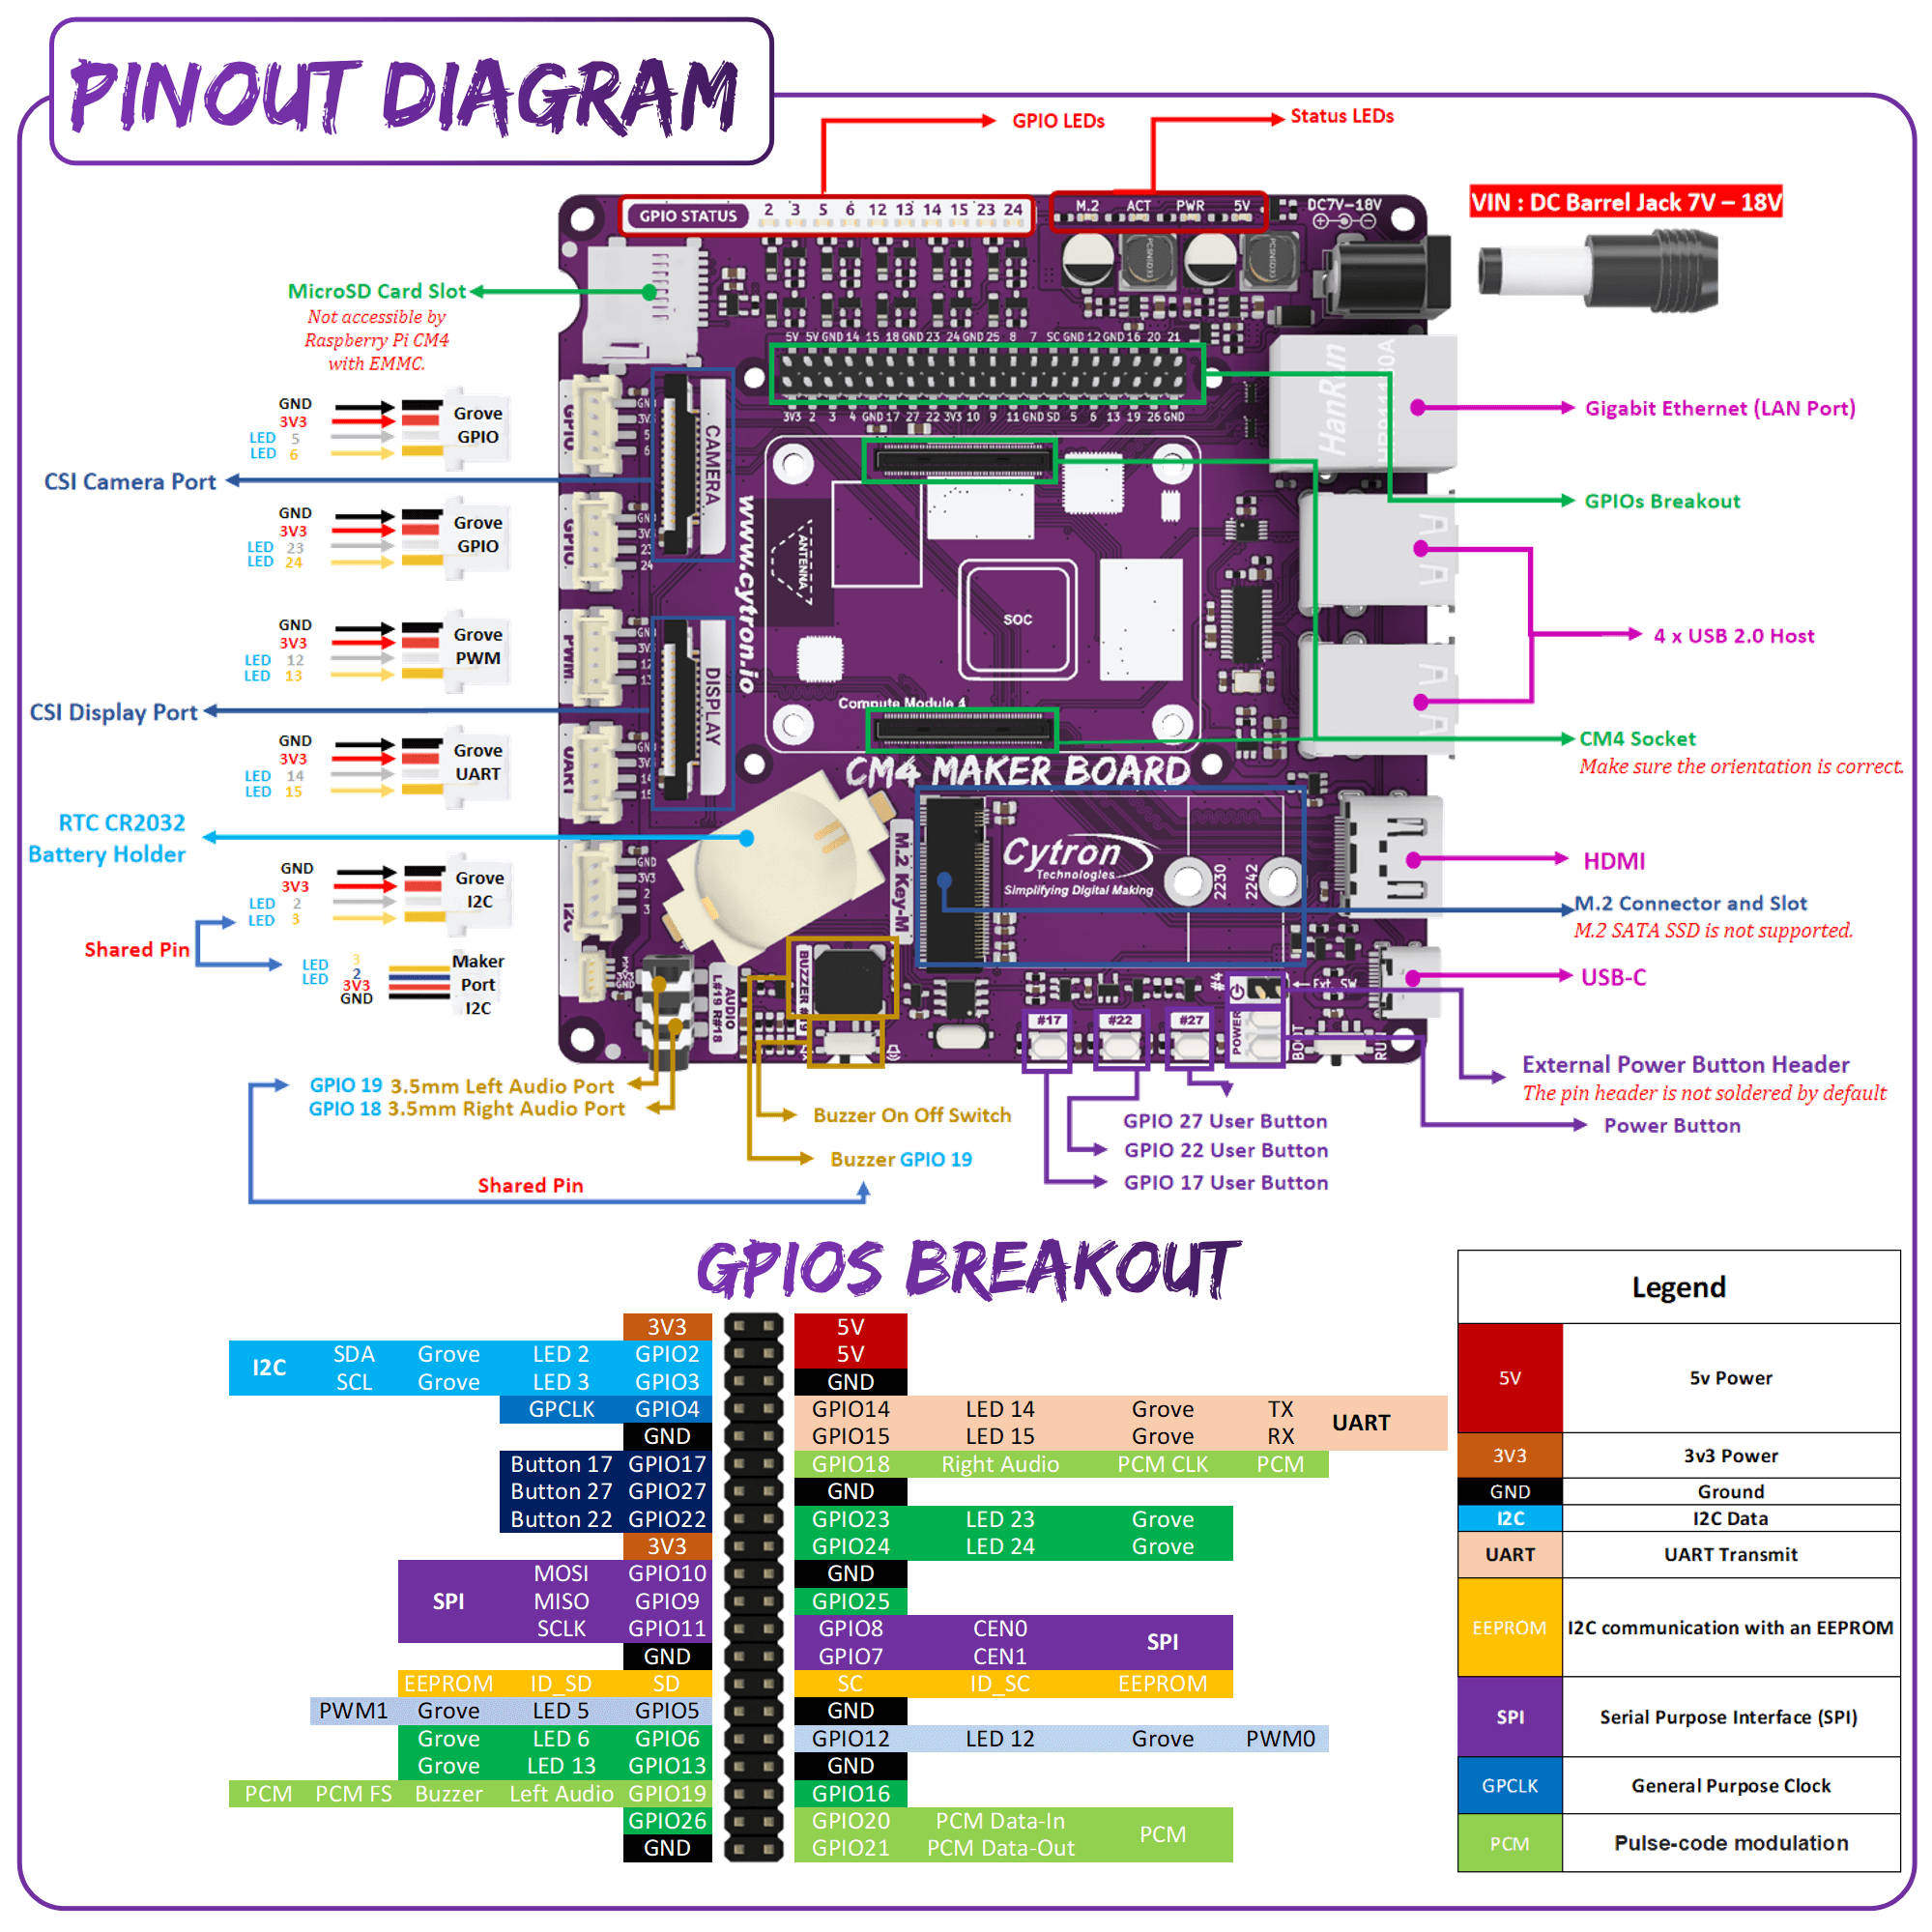
What's on the Board?
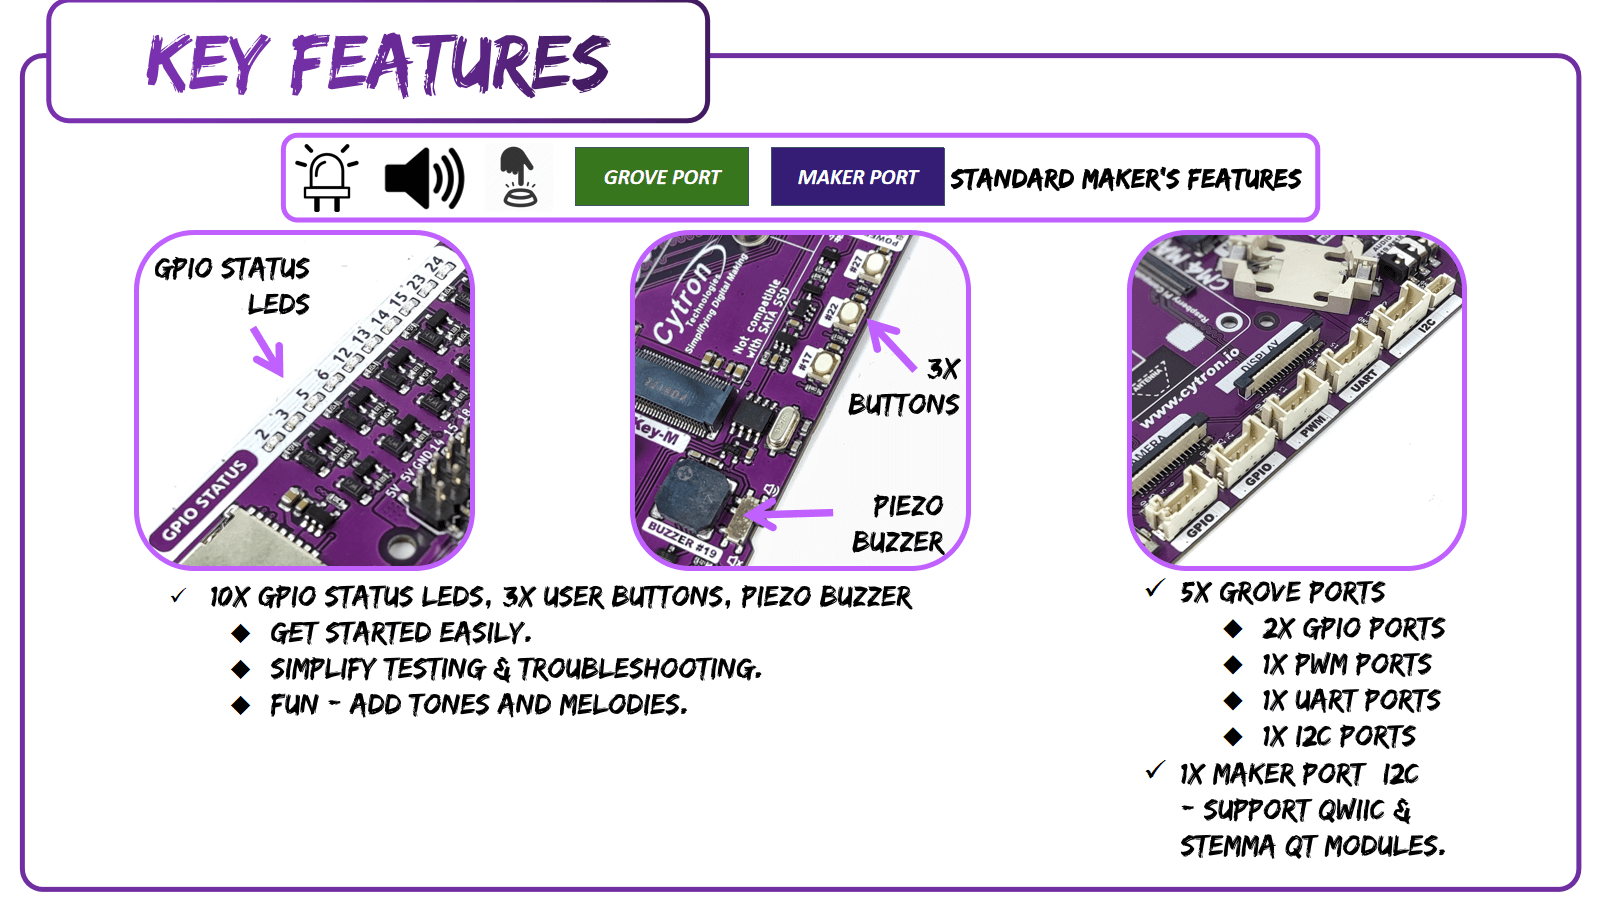
- 10x GPIO LED
- 1x microSD Card Slot
- 1x CSI Camera Port
- 1x DSI Display Port
- 5x Grove Ports
- 2x GPIO Ports (GPIO 5, 6 & 23, 24)
- 1x PWM Port (GPIO 12, 13)
- 1x UART Port (GPIO 14, 15)
- 1x I2C Port (GPIO 2, 3)
- 1x Maker Port (JST-SH 4-Ways Connector)
- 3x User Buttons
- 1x Analog Audio Out
- 1x Piezo Buzzer
- 1x Buzzer Mute Switch
- 2x Power Buttons
- 1x RTC Battery Holder
- 1x PCF85063A RTC
(Note: DSI & CSI are prohibited when using RTC) - 1x External Power Button Header
- 1x Boot Switch
- 1x M.2 Connector
- 2x M.2 Mounting Hole
- 1x USB-C
- 1x HDMI
- 4x USB 2.0 Host
- 1x Gigabit Ethernet
- 1x CM4 Socket
- GPIOs Breakout
- 1x DC Power Jack
- 4x Status LEDs

What's in the box?
1 x CM4 Maker Board
4 x Silicone Bumper feet
Resources
- Getting Started Guide with CM4 Maker Board
- CM4 Maker Board Datasheet
- CM4 Maker Board CAD File
- Compute Module 4 Product Brief
- Compute Module 4 datasheet
- Compute Module 4 CAD file
- Compute Module 4 Lite (without eMMC) CAD file
- Raspberry Pi Getting Started by raspberrypi.org

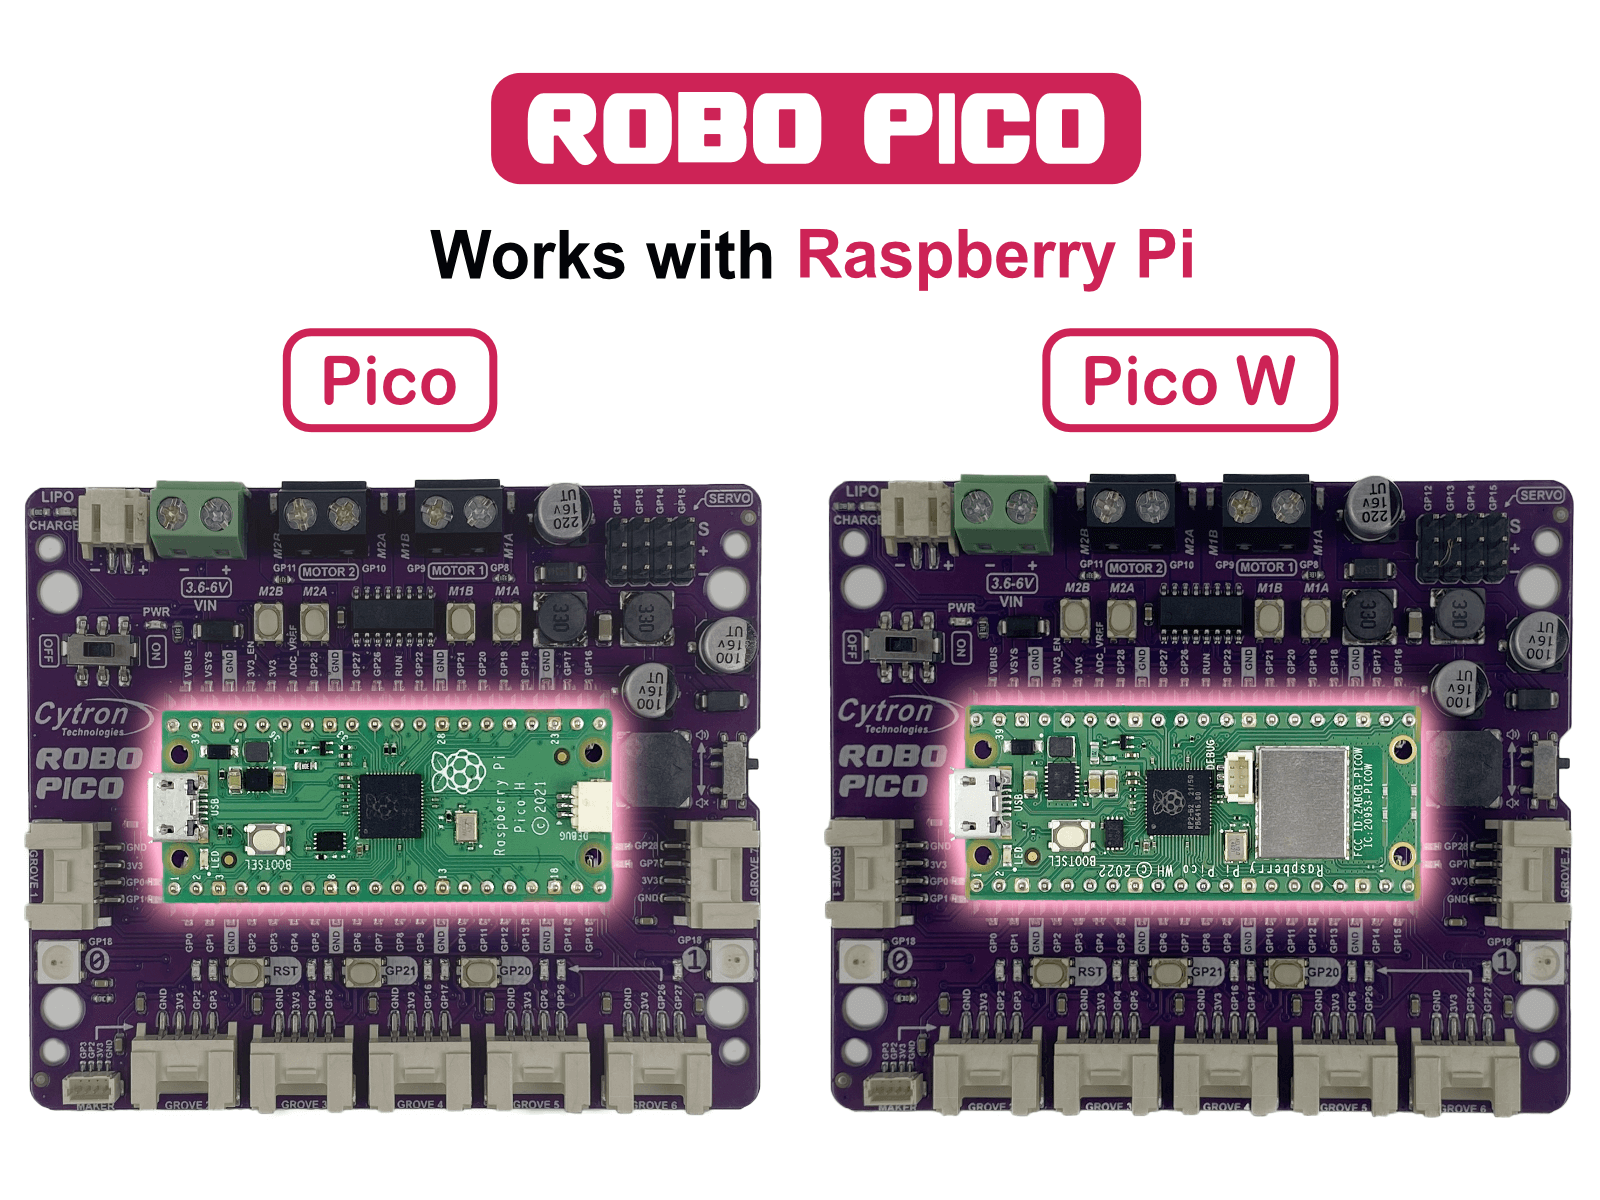
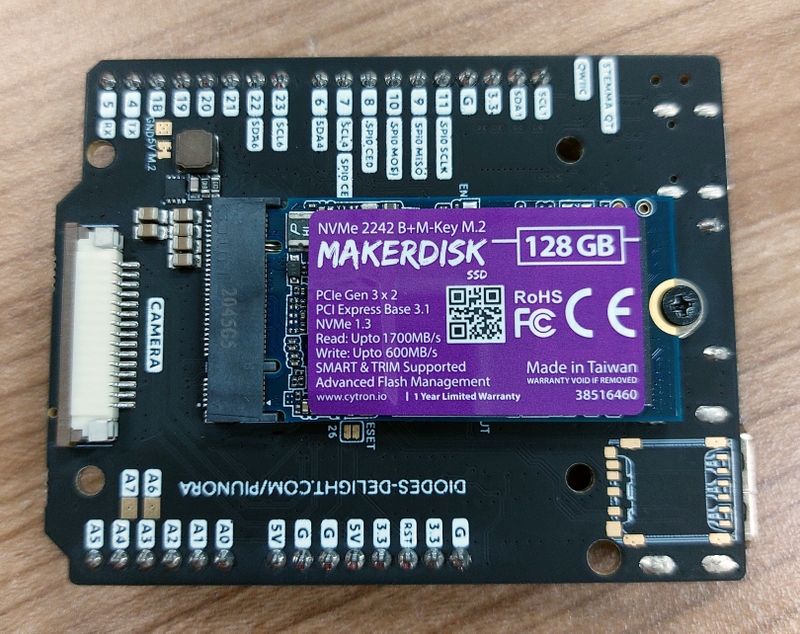
Your new best friend in crafting imaginative projects. Designed to integrate effortlessly with the Raspberry Pi Pico and Pico W, it’s equipped with a 2-channel DC motor driver, 4 servo motor ports, and 7 Grove I/O connectors. Whether you're designing a WiFi-controlled robot car or building a smart IoT project system, Robo Pico is here to make it an enjoyable journey.
Works with Raspberry Pi Pico and Pico WThe Robo Pico doesn't just use any controller - it leverages the power of the Raspberry Pi Pico and Pico W. The Raspberry Pi Foundation's robust controllers are ready to take your projects to the next level. Whether you're an experienced maker or a curious beginner, you'll appreciate the versatility they offer.
Unleash Your Creative Potential with Exciting Features
The Robo Pico goes beyond being just a board; it becomes a blank canvas for your imaginative masterpieces. With its dual-channel DC motor driver, 4 servo motor ports, 7 Grove ports, a Maker port, two RGB LED NeoPixels, and a piezo buzzer, it offers a limitless playground of possibilities. Picture the mesmerizing light spectacles you can craft, the precise motions you can orchestrate, the distinct sounds you can generate, and the groundbreaking Internet of Things (IoT) projects you can bring to life!
Connections Made Simple
No more stumbling around with tricky wiring or setups. Connections are simple with Robo Pico. All GPIO pins are thoughtfully arranged at the edge through the Grove and Maker ports, which skips the need for soldering and enables quicker connection of any Qwiic, STEMMA QT, or Grove I2C device. Meanwhile, all Raspberry Pi Pico or Pico W pins can be accessed via two 20-way pin headers. With Robo Pico, you only need to press a single button to reset the microcontroller, eliminating the hassle of plugging and unplugging the USB cable repeatedly.
Power Up The Way You Like
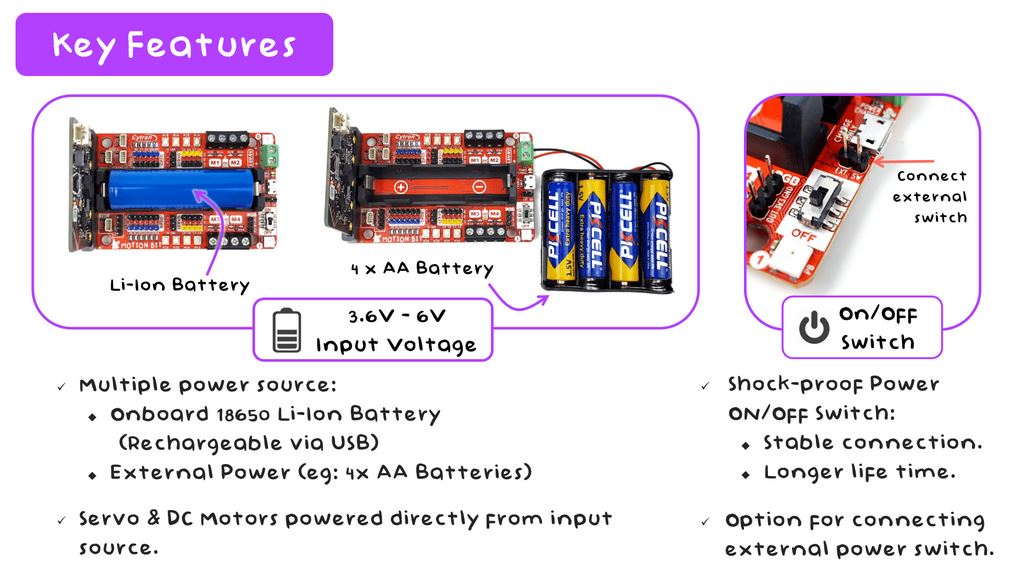
There are three ways to supply power to the Robo Pico - via the Raspberry Pi Pico / Pico W USB (5V) socket, with a single-cell LiPo/Li-Ion battery, or through the VIN (3.6–6V) terminals. However, only one power source is needed to power up both controller board and motors at a time. The power supply from all these power sources can all be controlled with the power on/off switch onboard.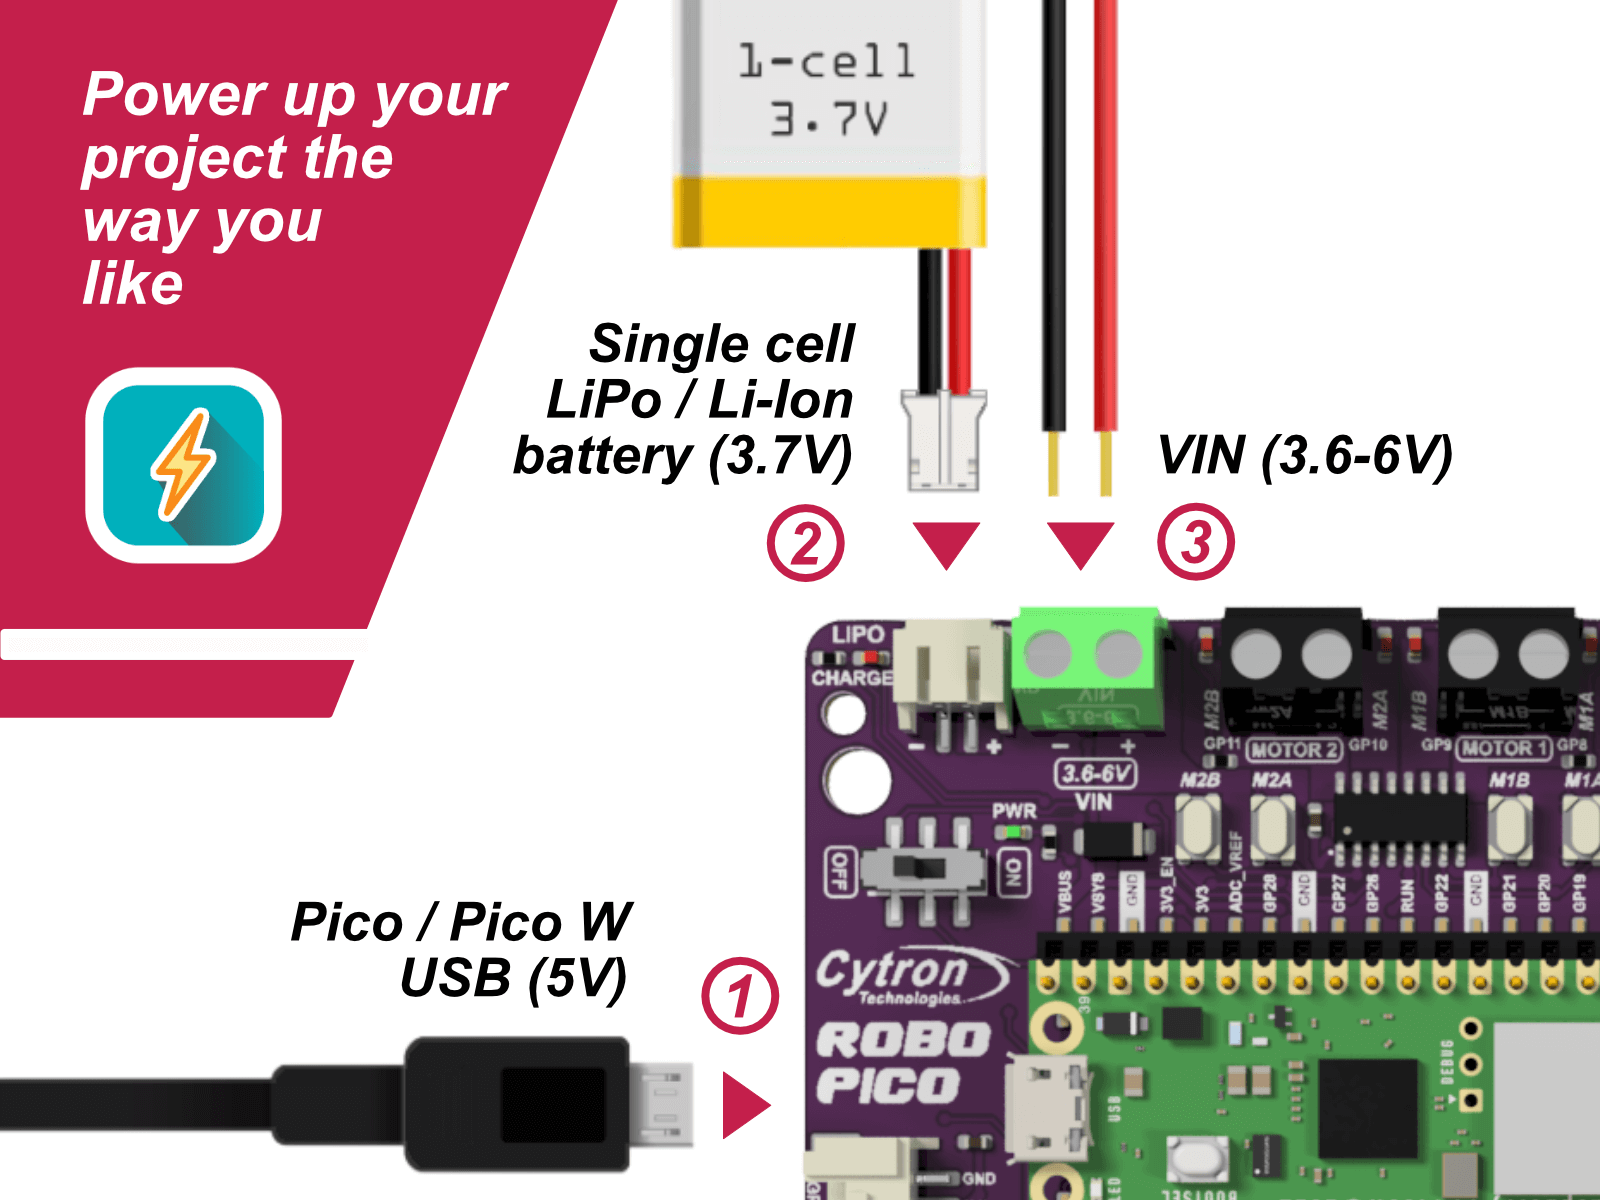
What's on the Board?
|
|
What's in the box?
1 x Robo Pico: Simplifying Robotics for Raspberry Pi Pico / Pico W (not included)
You can add a Pico WH to your order here
- Robo Pico Datasheet
- Robo Pico Getting Started Guide using CircuitPython (Cytron Tutorial Site)
- Robo Pico Getting Started Guide using CircuitPython (Github)
- 3D CAD
- Official Raspberry Pi Pico Page
- Getting started with Raspberry Pi Pico
- Raspberry Pi Pico Datasheet (pdf)
- Raspberry Pi Pico W Datasheet (pdf)
- Raspberry Pi Pico Python SDK
- Raspberry Pi Pico C/C++ SDK

This is a Raspberry Pi HDMI to CSI-2 Module with Toshiba TC358743XBG chip, HDMI input supports up to 1080p25fps. This module does not support OctoPi.
Many have used this module as KVM (Kernel-based Virtual Machine), or sometimes is called Keyboard Video Mouse :) This device helps to manage servers or workstations remotely, regardless of the health of the operating system or whether one is installed. You can fix any problem, configure the BIOS, and even reinstall the OS using the virtual CD-ROM or Flash Drive.
Pinout
Features
- Input signal: HDMI
- Output signal: CSI
- HDMI Input:
- 720p50
- 720p60
- 1080i50
- 1080p25
- Function: HDMI to CSI-2
- Limitation: HDMI input supports up to 1080p25fps
- Usage: Same as standard Raspberry Pi camera
- Chip: Toshiba TC358743XBG
- Compatible with Raspberry Pi-based KVM over IP.
Compatible with
- Raspberry Pi 5 (would need different FFC cable for Pi 5)
- Raspberry Pi 4B
- Raspberry Pi 3 Model B,
- Raspberry Pi 3 Model B+
- Raspberry Pi 2
- Raspberry Pi Zero (would need different FFC cable for Pi Zero)
Dimensions
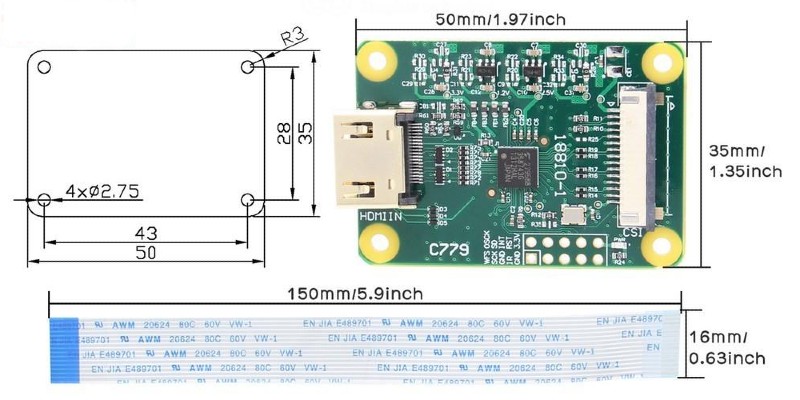
What's in the box?
1 x Pi-KVM V2 HDMI to CSI adapter with standard CSI FFC
Resources
- Toshiba TC358743XBG datasheet, pdf file
- Pi-KVM.org, Open and cheap DIY IP-KVM on Raspberry Pi
- Github, by Pi-KVM.org
- https://youtu.be/9YhPWjWv5gw
- https://youtu.be/plP9Y1likRg

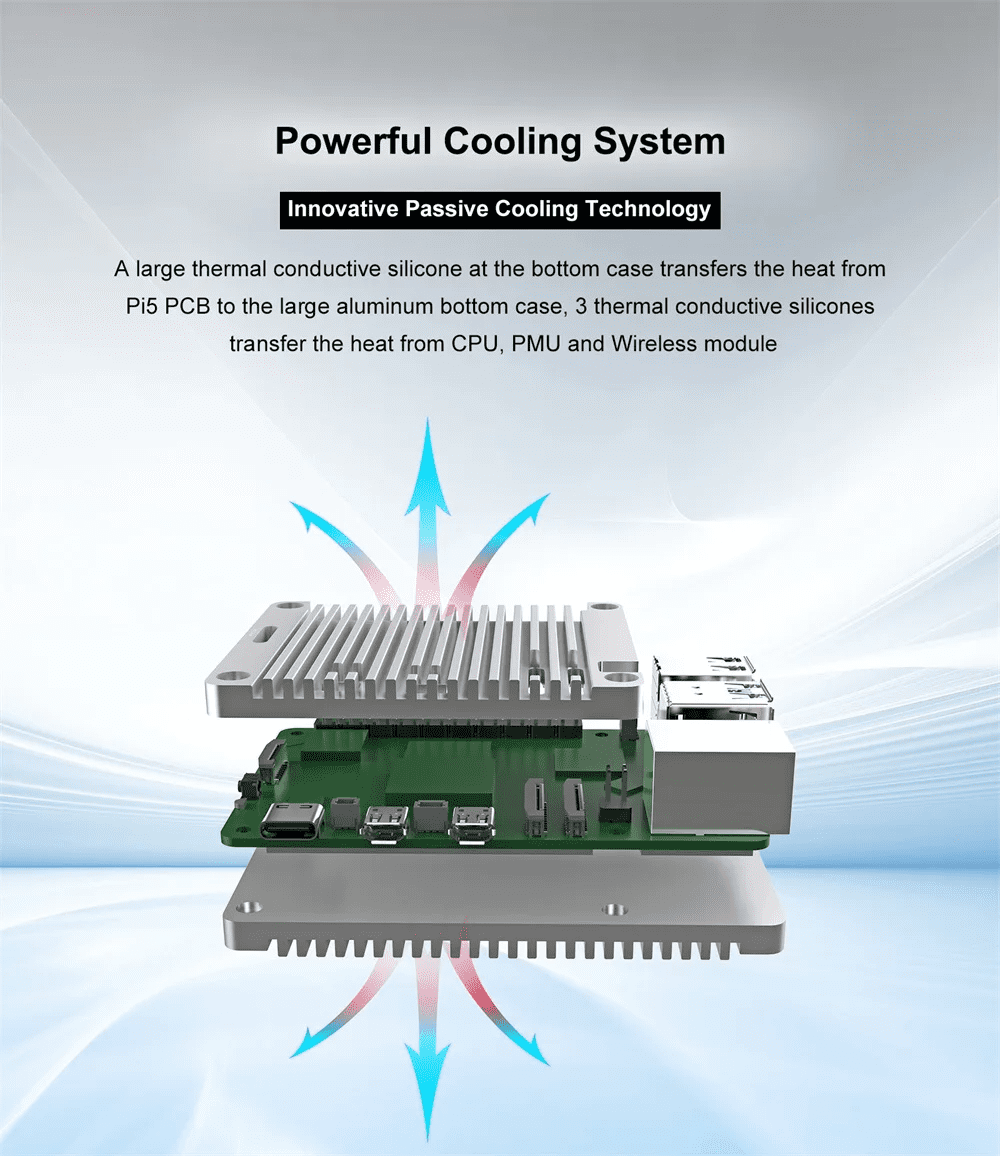
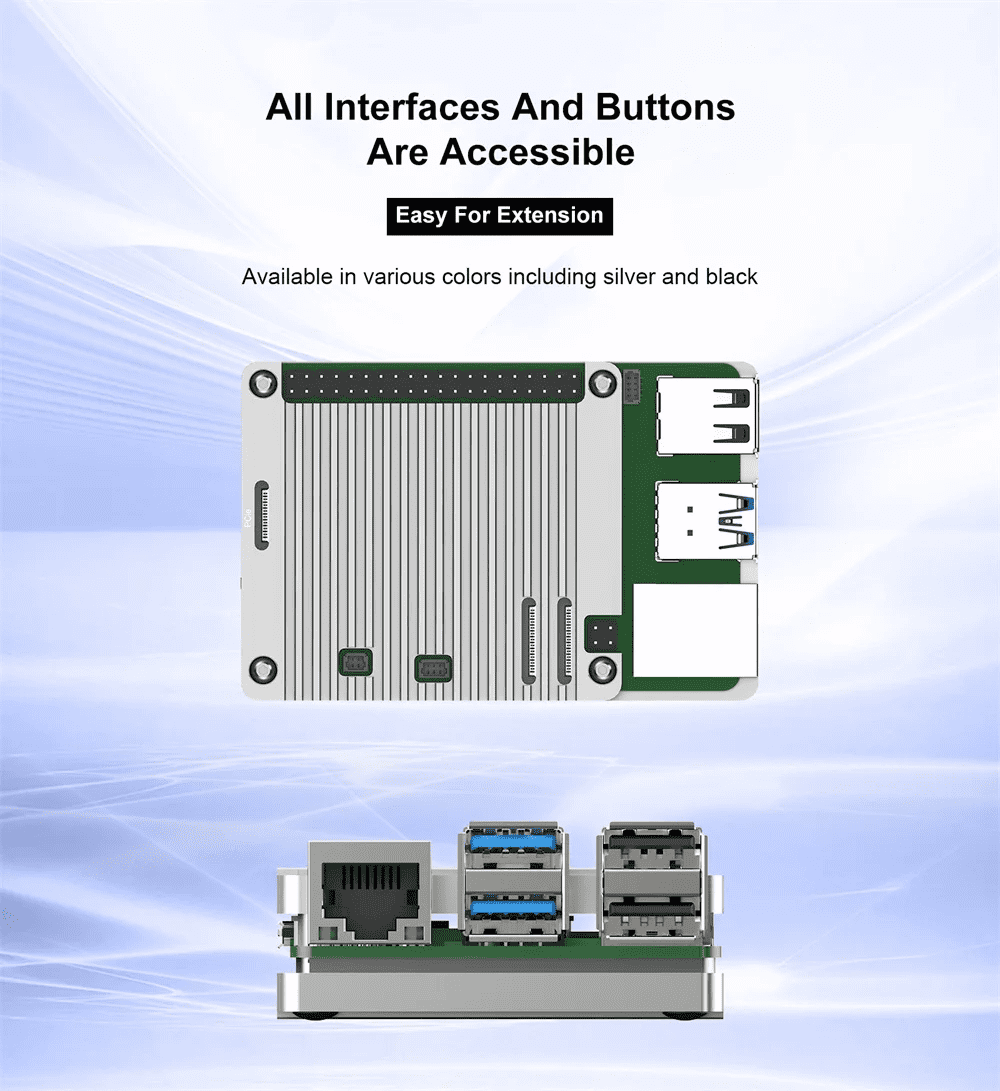
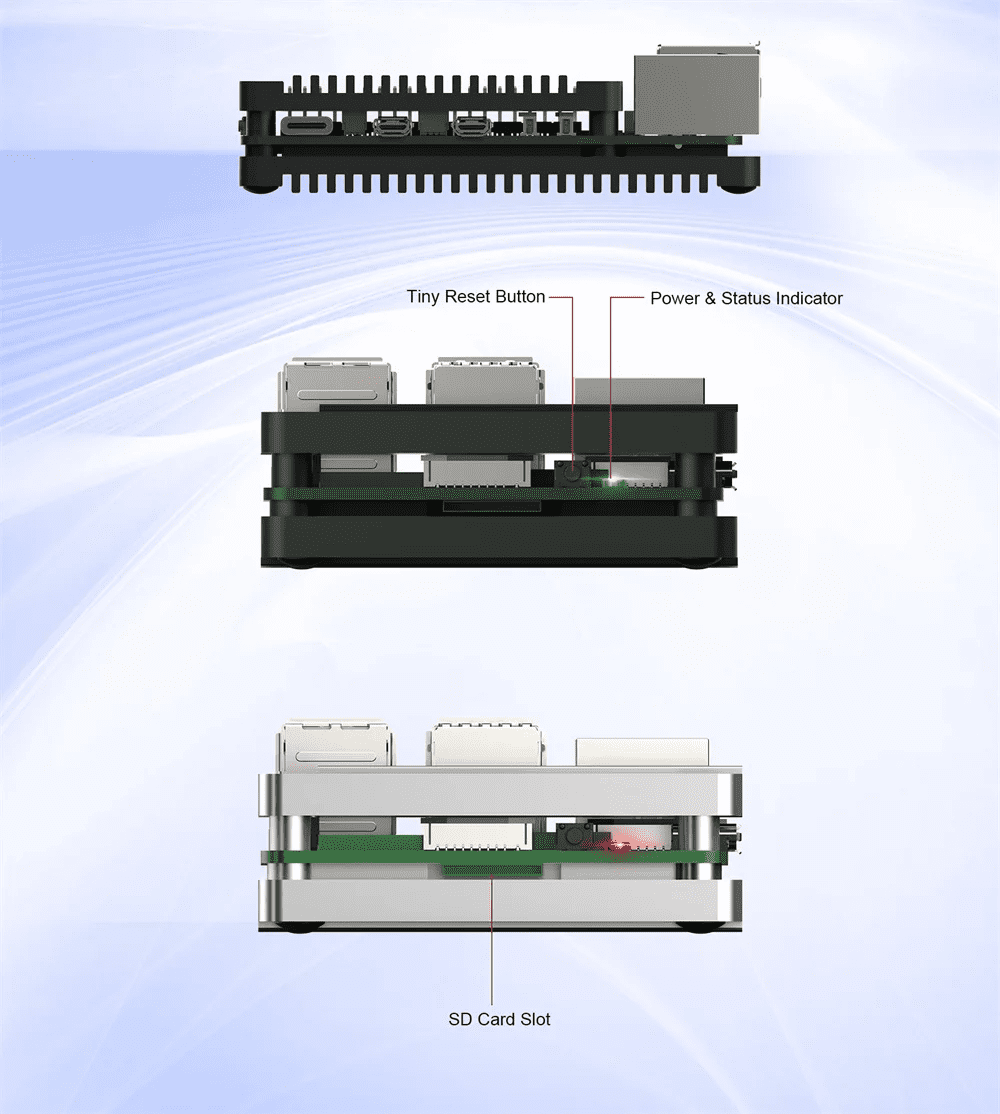
Full Aluminum Passive Cooling Open Case for Raspberry Pi 5


What's in the box?
1 x Full Aluminum Case for Raspberry Pi 5
Resources:
Intsallation Guide: https://youtu.be/uOdaYrvMqxc

- NVMe (Non-Volatile Memory express) SSD, normally via PCIe bus. These are NOT SATA SSD
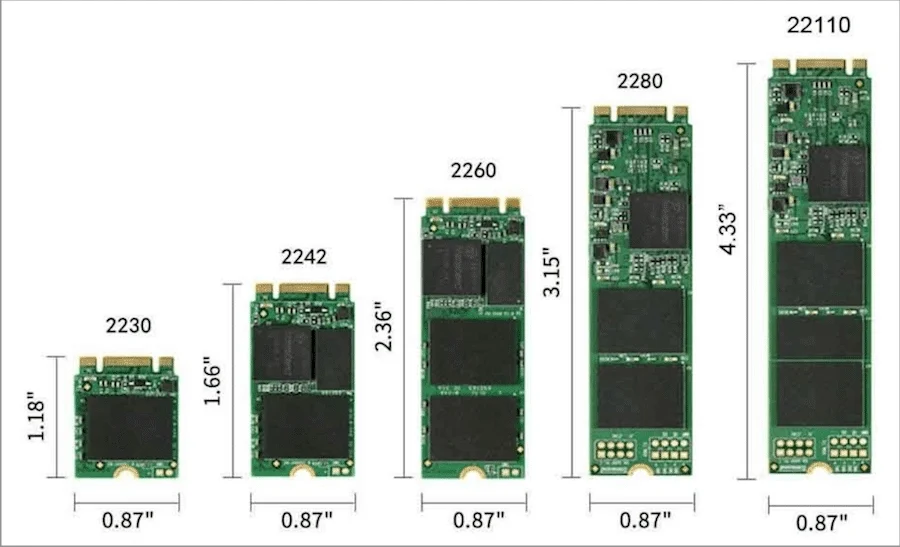
- 2242, mechanical size/dimension, please ensure the size fits the board
- M.2 M-Key (Only 128GB is B+M-Key), please make sure the M.2 socket supports M-key
- Comes Pre-loaded with Raspberry Pi OS and is ready to boot up on
- Raspberry Pi 5 (with the latest bootloader firmware and a PCIe to M.2 HAT. To update the bootloader, please refer to this tutorial)
- Raspberry Pi 4 Model B (with the latest bootloader firmware)
- Raspberry Pi 400
- Compute Module 4 (CM4) with NVMe SSD carrier board.
- Please DO NOT format it if you intend to use it with the Raspberry Pi board.
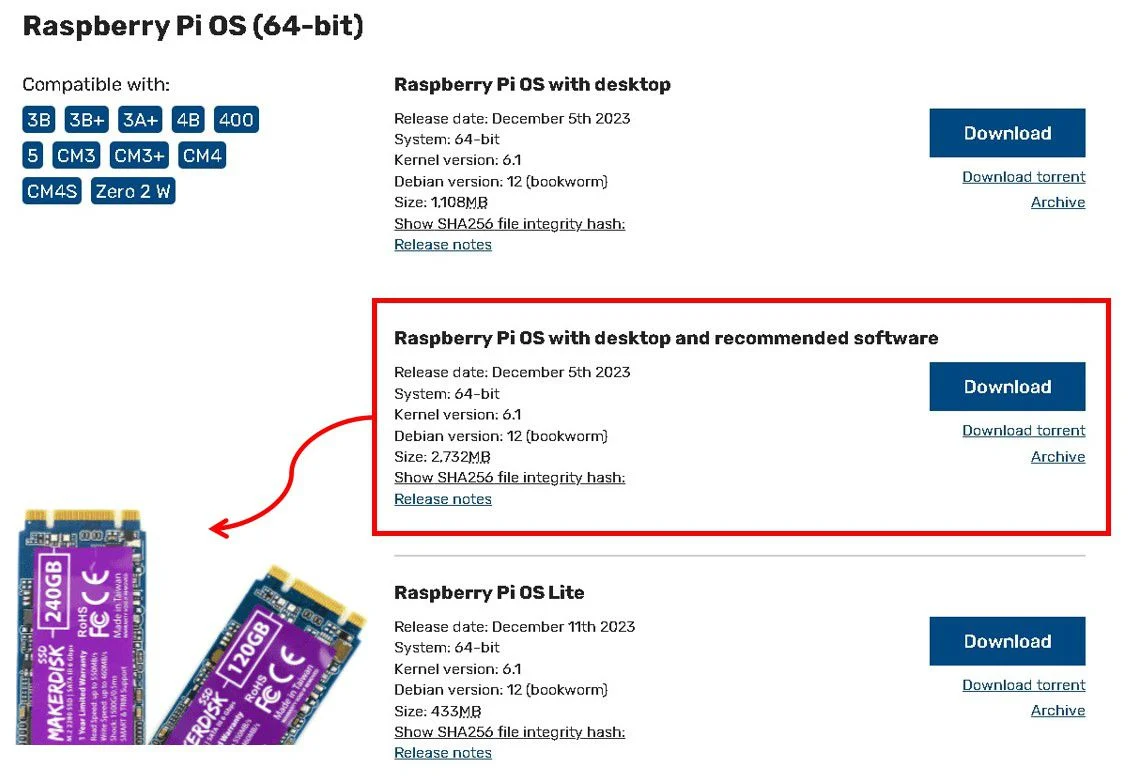
Note: NVMe 2242 M-Key MakerDisk SSD 512GB, 256GB, and 128GB shipped from January 2024 onwards are loaded with the latest Raspberry Pi OS (64-bit) - Bookworm (release date: 5th December 2023).
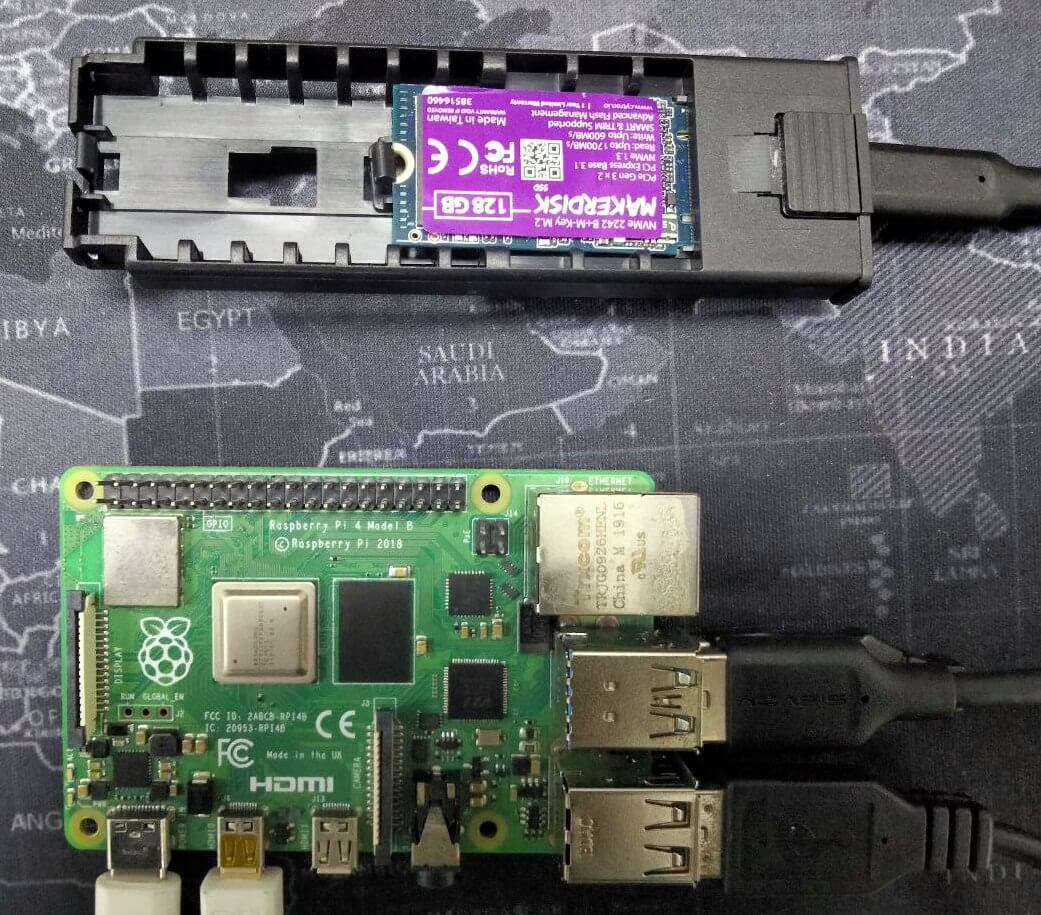
M.2 2242 M-Key NVMe SSD for Raspberry Pi 5 & Raspberry Pi 4
Cytron Technologies, is pretty excited about the PCIe extension on Raspberry Pi 5 and Jeff Geerling has helped to verify that the MakerDisk NVMe (particularly 2242) works on Raspberry Pi 5, booting into Raspberry Pi OS without any hassle. Of course, you can use it to boot up Raspberry Pi 4 with USB to NVMe adapter. With Compute Module 4 (CM4), the PCIe Gen2 bus is extended out on some carrier boards such as the CM4 Maker Board or Mini Base (A). Furthermore, the NVMe boot is also officially released by Raspberry Pi. This is a native NVMe SSD boot via PCIe bus, it does not go through to any USB to NVMe adapter.
This NVMe SSD is in the M.2 2242 (M Key) form factor. We called it MakerDisk! A Disk from Makers to Makers :) It is an M.2 2242, M-Key, NVMe Solid State Drive (SSD) with 512GB, 256GB, and 128GB capacity. And it is preloaded with Raspberry Pi OS.
Do check out Jeff Gerling talking about CM4 boots off an NVMe SSD, natively in this video:
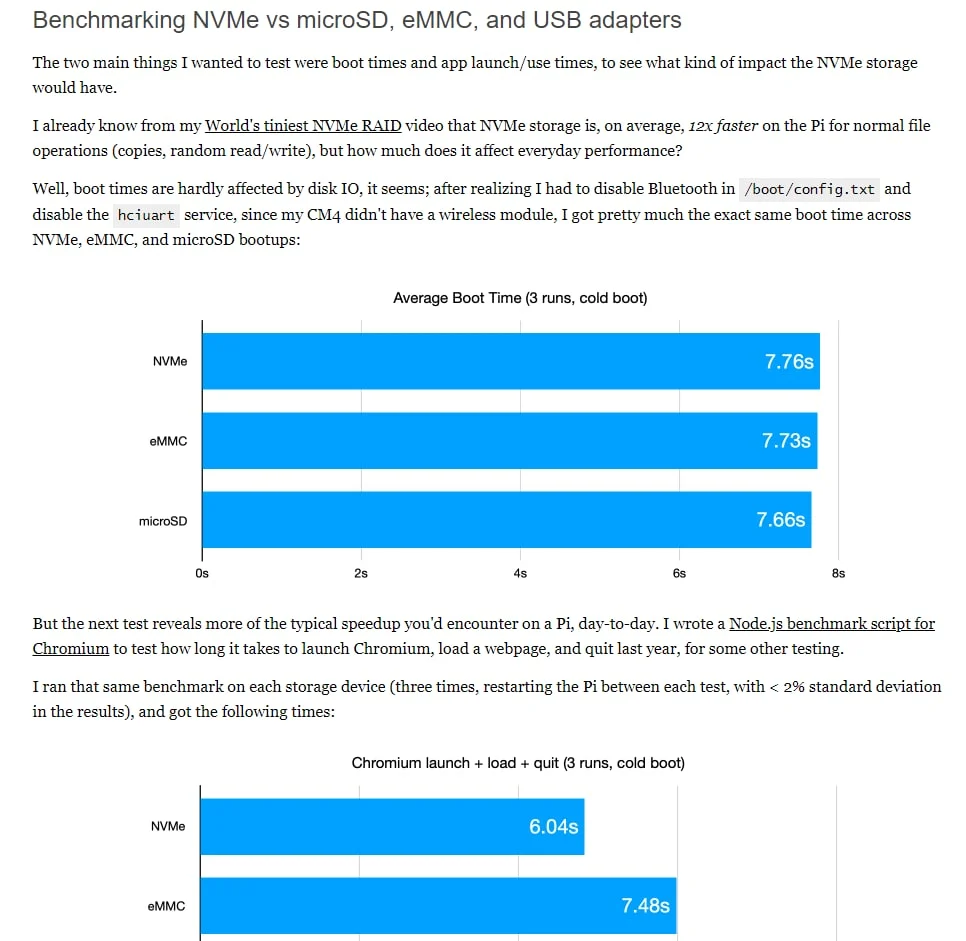
If you prefer to read the article, welcome to check out the blog by Jeff Gerling here: The Raspberry Pi can boot of NVMe SSDs now.
From Jeff's benchmarking with eMMC, microSD card, and USB 3.0 (UASP) adapter, the native NMVe interface is 12x faster on the Pi for normal file operations that include: copies, and random read/write. And that also improves day-to-day performance.
Of course, we have also done some speed tests using the built-in Raspberry Pi Diagnosis. Here are the speed test results that we get based on the SSD Capacity:
Capacity - 256GB
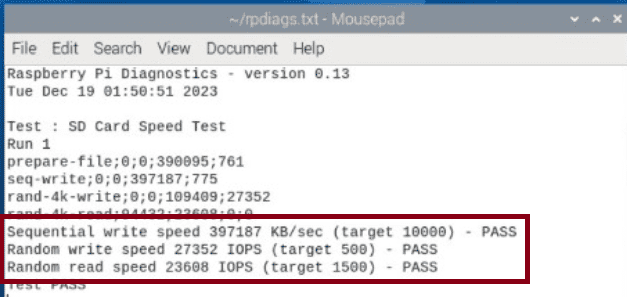
- Sequential write speed 397187 KB/sec (target 10000) - PASS, over 38 times faster than the target
- Random write speed 27352 IOPS (target 500) - PASS, over 50 times faster than the target
- Random read speed 23608 IOPS (target 1500) - PASS, nearly 15 times faster than the target
Here is a comparison table between the Native MakerDisk NVMe (2280 and 2242) boot on CM4 Lite, eMMC on CM4, and microSD card boot (normal) on Raspberry Pi 4 Model B: The data are taken from Raspberry Pi Diagnosis
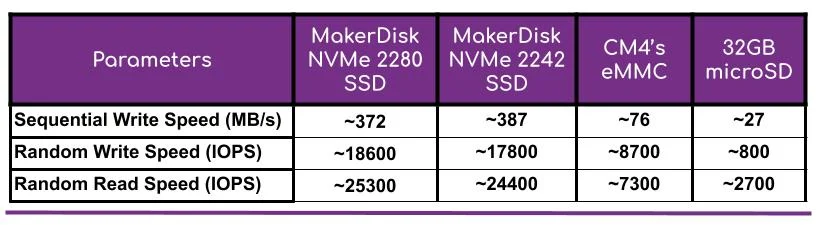
Note: Raspberry Pi Diagnosis result depends on many factors (New memory or used memory, interface, SATA interface, USB interface, USB cable, etc). It should be taken as a reference only.
As for the size, please make sure the carrier board or adapter supports M.2 2242, M-Key:
As far as we have tested, this NVMe SSD is compatible with:
- PCIe to M.2 HAT for Raspberry Pi 5
- CM4 Maker Board, and of course, you will need a CM4 Lite (No eMMC) version.
- Argon One NVMe Base will need manual adjustment of M.2 mounting spacer and screw to 2242
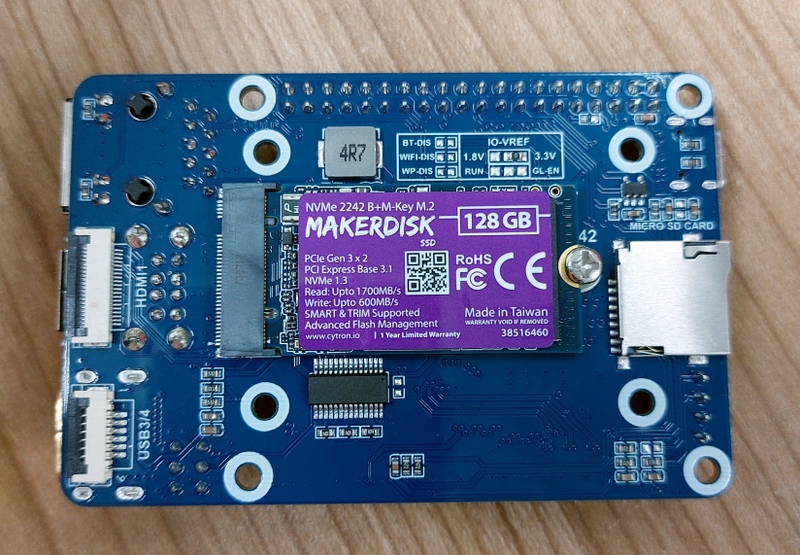
The NVMe 2242 B+M-Key (128GB only) MakerDisk SSD on the bottom of CM4 Mini Base (A), is perfect!
The combination of MakerDisk 2242 NVMe SSD and the latest Argon ONE NVMe Expansion Base is another perfect match:
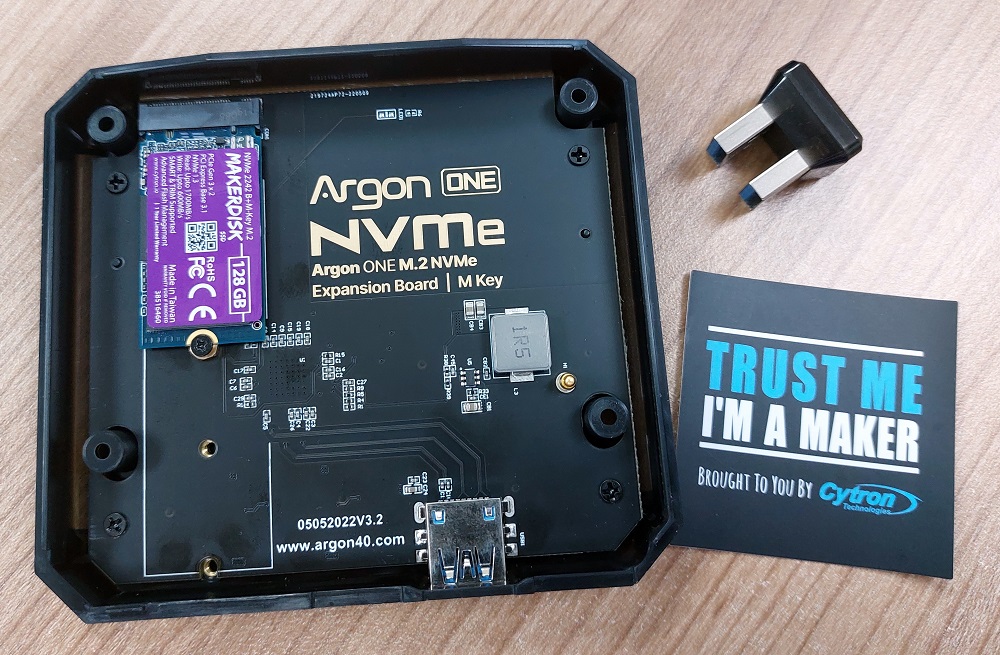
Note: You will need to shift/relocate the SSD mounting spacer to the 2242 hole on the NVMe base to mount the shorter NVMe drive.
Setup of Raspberry Pi 4 Model B booting from MakerDisk NVMe (2242) SSD via a USB3.0 to NVMe Adapter.

Setup of Raspberry Pi 5 booting from MakerDisk NVMe (2242) SSD via a PCIe to M.2 HAT.
This NVMe M.2 2242MakerDisk SSD has a maximum sequential read and write speed of up to 1700MB/s and 600MB/s respectively. The above results are limited by the PCIe lane on CM4 and the USB3.0 to NVMe interface. It works perfectly and boots up without any issue in Argon One NVMe Case.
Note: This MakerDisk SSD is PRE-LOADED with the Raspberry Pi OS, it can boot into Raspberry Pi OS right out of the box with the:
- Raspberry Pi 5 & Raspberry Pi 4 Model B, and of course, you will need a USB to NVMe adapter, or expansion board such as Argon One NVMe base
- Raspberry Pi 400, you will also need a USB to NVMe adapter
- CM4, the Lite version will be great as it should auto-boot from either microSD or NVMe SSD. Of course, it will also require a carrier board that has NVMe 2280 M.2 M-Key, or both key slots.
Is Your Raspberry Pi Ready with USB Boot?
Most of the latest Raspberry Pi comes with the latest USB bootable firmware. In case you have an older version of the Raspberry Pi board, or you are not sure, just check it using one of these methods:
Option 1: Do it from Raspberry Pi OS desktop with a monitor, keyboard, and mouse, going into the raspi_config, by leepspvideo:
After the Raspberry Pi Imager loads the EEPROM firmware into the microSD card, insert it into your Raspberry Pi 4 Model B's microSD card slot and power it up. After just 3 seconds, the EEPROM is updated with new firmware and it is ready for USB boot.
Option 3: Boot it directly if your Raspberry Pi 4 Model B comes with the latest firmware in the EEPROM, nothing needs to be updated :)
You can always reload the image/Operating System into this NVMe SSD using a USB3.0 to M.2 NVMe Adapter. We recommend using the official imager: Raspberry Pi Imager. Please check this video out on how to use the Advance features:
What's in the box?
1 x NVMe 2242 M-Key MakerDisk SSD (Preloaded with Raspberry Pi OS) - 512GB / 256GB / 128GB (Based on your selection)
Resources

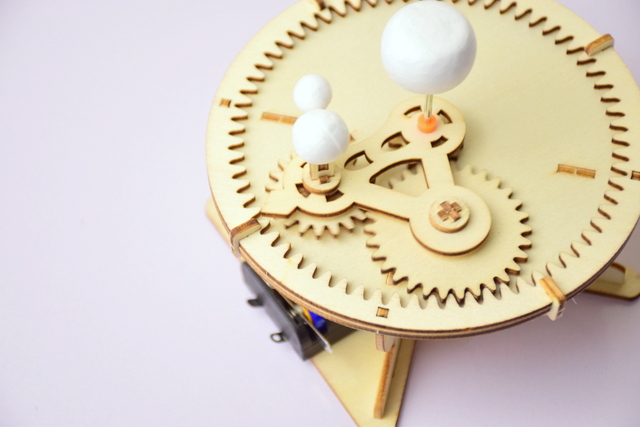
The Solar System is the gravitationally bound system of the Sun and the objects that orbit it. In this kit, you will be able to demonstrate and visualize how the earth orbits the sun and how the moon orbits the earth. While you're at it, let your children build it themselves while learning how to hook up some gears and DC motors.
Note: Download the softcopy instruction manual (English) here. 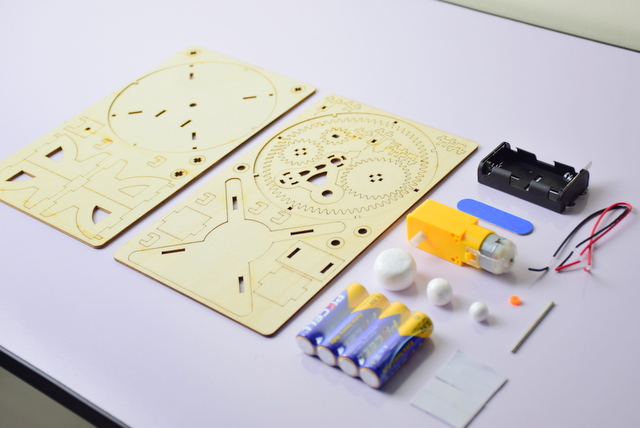
The kit is also paintable which makes it exciting! Let your children paint the planets after assembling the wooden structure.
Features:
- Do It Yourself Wooden Sun Earth-Moon Orbit
- Suitable for age 6 years old and above
- Come with everything needed to assemble the solar system project
- Learn about our solar system with Sun, Earth and Moon.
What's in the box?
- Wooden parts for the rotating gear structure
- Some double-sided tape
- 1 x orange stopper
- 3 x Wires
- 1 x AA battery holder
- 1 x Wooden filer (For sanding)
- 1 x DC motor
- 1 x Metal rod
- 3 x Different size circular foam
Resources:
- Simple Instruction Manual (pdf) available at https://drive.google.com/file/d/12UEnyVX-RVcuwOicUKkkN3ibxSEkhKYA/view?usp=sharing
- Assembly instructions video available at https://www.youtube.com/watch?v=vPWX-8htBts