
Cytron Technologies


- Coding & Electronics made easy with built-in:{ 12x LEDs; 1x buzzer; 1x button; }
- Troubleshooting made easy with LED indicators.
Students/Makers can skip the hassle of constructing the basic electronic circuit which is boring and time-consuming. Although it is equally important to learn about basic electronics, it can always come later after they have experienced how easy it is to create an awesome project. Start with fun and excitement. Start coding right away and see your board lights up and plays the melody with the press of a button.
For experienced makers, this is also useful to quickly test your code without having to connect any other devices.
With the conventional Arduino boards, makers also face another common problem - difficulty in troubleshooting their circuit. This is because when it doesn't work, we do not know whether the problem is due to wire connection or coding.
With Maker UNO, the problem is solved! Not only do the onboard LEDs work as outputs, they can also act as indicators, clearly showing what's happening on that pin. When the pin is used as input, you can clearly see whether the signal is received by just looking at changes on the LEDs.
Additional features
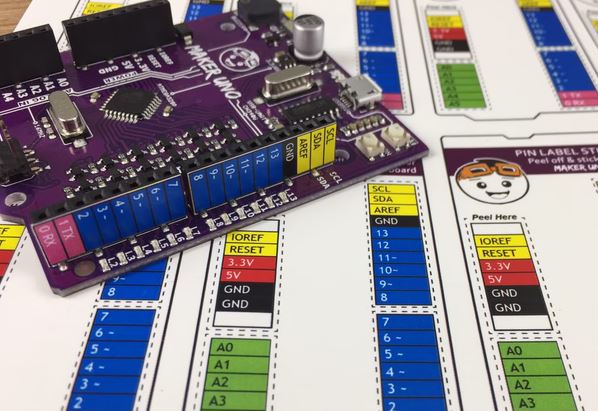
One of the brilliant features of the official Arduino Uno is the label printed on its pin headers. It saves us a lot of time when we want to connect the I/O pins to the external circuit. So, we include a set of these label stickers for pin headers in each of the Maker UNO! (Please note that you need to peel off the stickers and stick them on your Maker UNO by yourself)
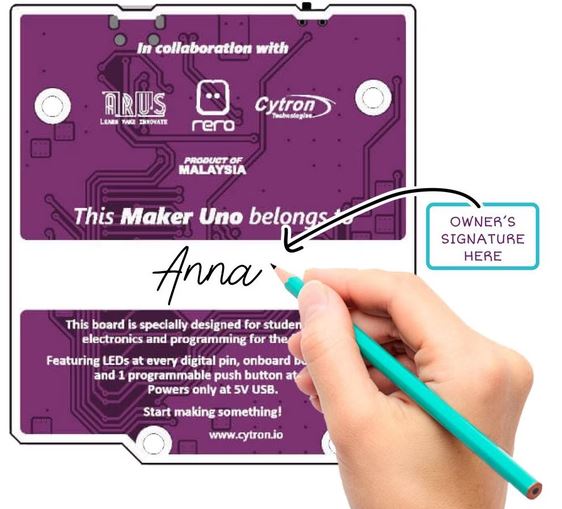
Students always get their boards mixed up. With Maker UNO, you can write your name on the board. Problem solved!
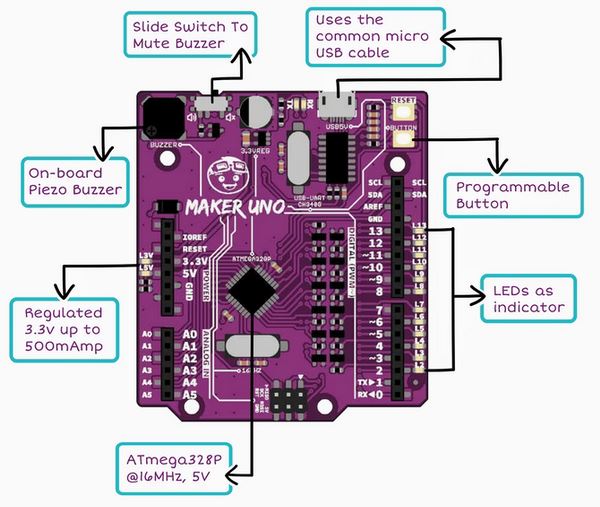
Maker UNO uses the common Micro USB cable which is basically everywhere.
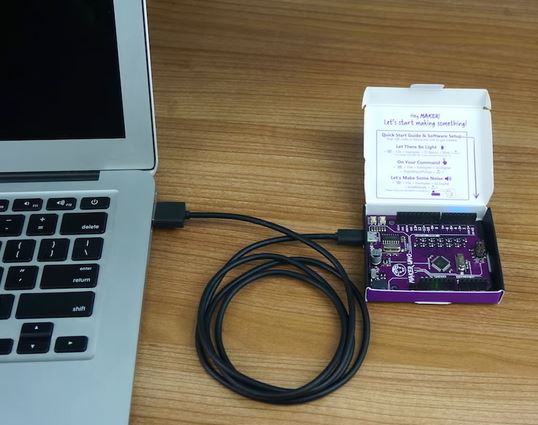
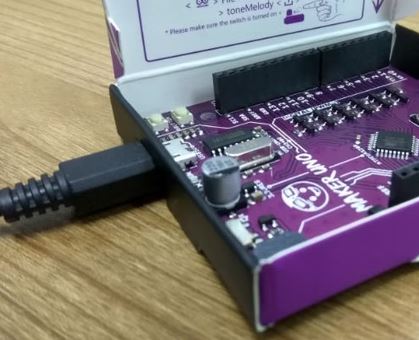
Don't throw your box away! There is a small opening on the box for you to plug the USB cable so that you can keep your Maker UNO safely in the original box, no additional casing required.
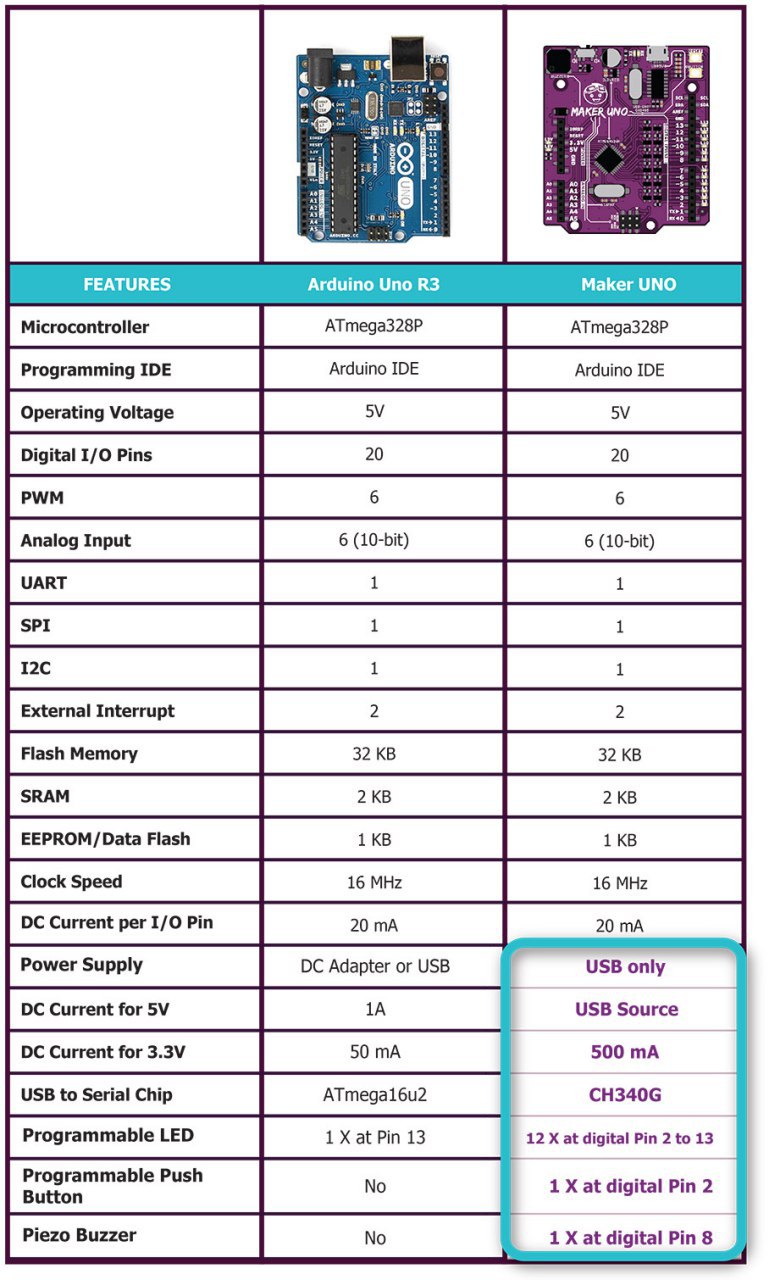
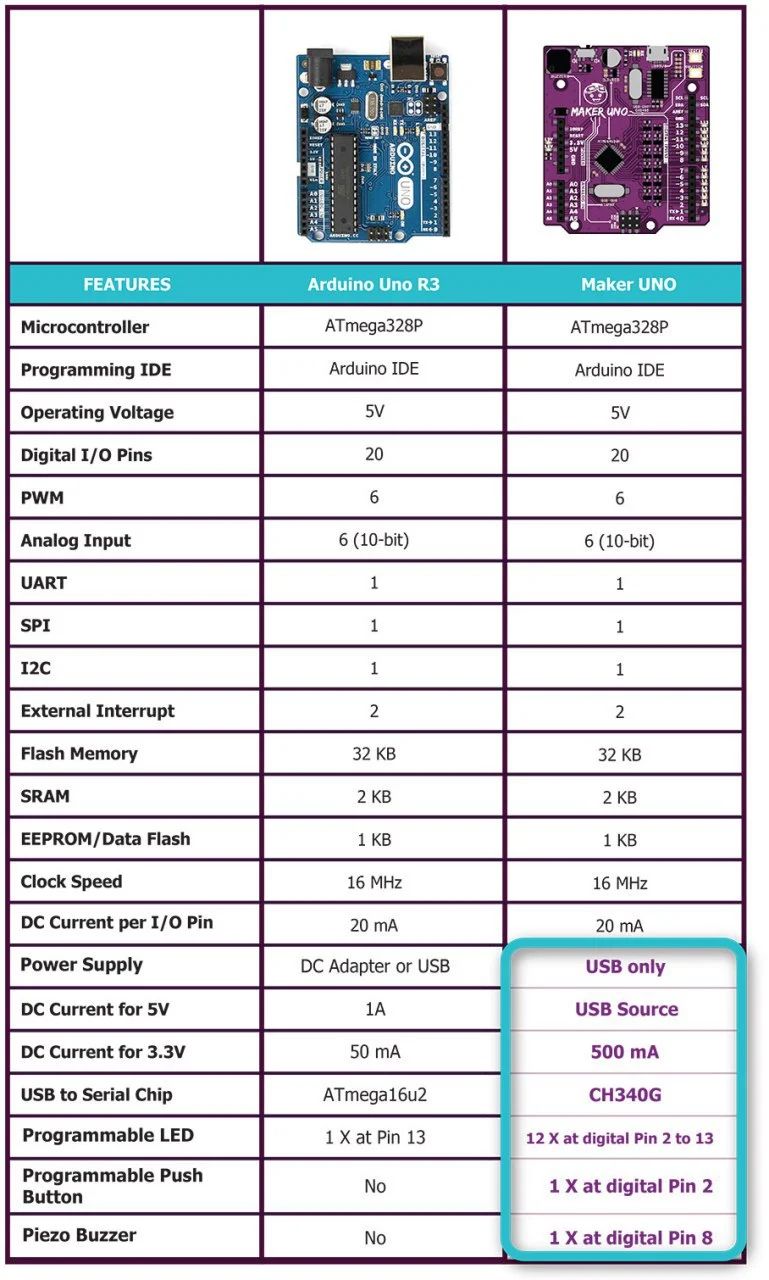
Maker UNO is fully compatible with Arduino. You can share the same library and code. We put in 12x LEDs, 1x piezo buzzer and 1x programmable button on the Maker UNO. We have removed the DC jack power input socket as most of the boards used in classes are powered using USB. We have also replaced the ATmega16u2 with CH340 to bring down the cost.
What's in the box?
1 x Maker Uno board
Resources
- Maker UNO User's Manual
- Maker UNO Edu Kit Getting Started Module
- Maker-UNO Schematic
- Maker-UNO Fritzing File
- Maker-UNO 3D file(IGS and STEP files)
- CH34X driver (Please ensure the Maker UNO is plug into computer USB port during driver installation)
- Windows (V3.5 Mar2019)
- Mac OS (V1.5 Mar2019)
- Linux (V1.5 Mar2019) (Normally is readily installed)
- CH34X Driver - Get the latest driver from the factory
Tutorials
Related Links
- Maker UNO's Default Program
- Arduino IDE Download
- How To Program Arduino (Maker UNO) Using Atmel Studio
- Introduction Atmel Studio 7 is the integrated development platform (IDP) for developing and debugging all AVR® and SAM microcontroller applications. The Atmel Studio 7 IDP gives you a seamless and easy-to-use environment to write, build and debug your applications written in C/C or assembly code.
- Program Maker UNO using Chromebook
Attachment
| Description | Date Added | Size | Action |
|---|---|---|---|
| CH341 Driver (Windows 10) | 08/12/2021 | N/A | Download |
| CH341 Driver (Mac OS) | 08/12/2021 | N/A | Download |
| Maker UNO Schematic | 08/12/2021 | N/A | Download |
| Maker UNO Fritzing File | 08/12/2021 | N/A | Download |
| Maker UNO PCB Eagle File | 08/12/2021 | N/A | Download |
| Arduino IDE | 08/12/2021 | N/A | Download |
| MAKER-UNO User's Manual | 08/12/2021 | N/A | Download |

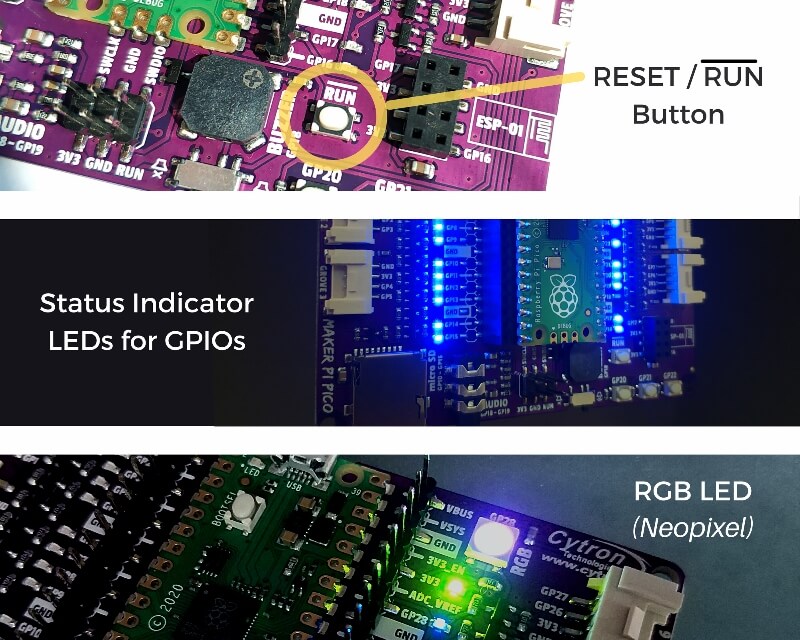
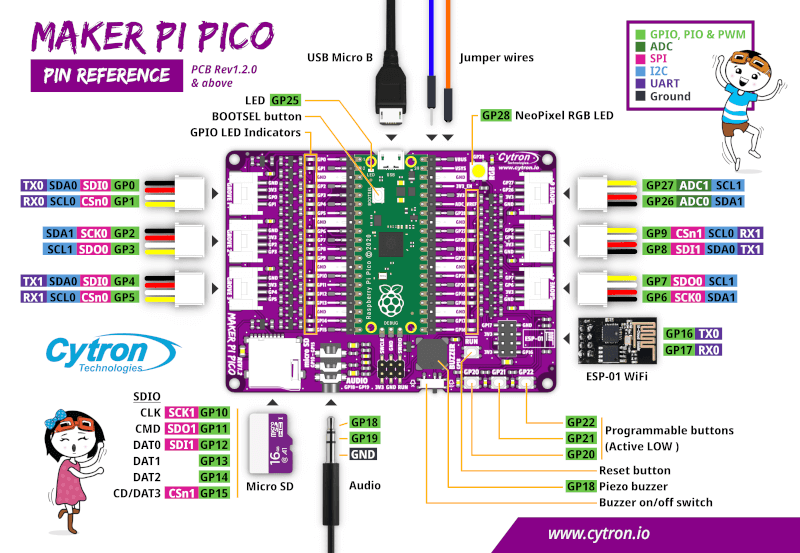
Maker Pi Pico Base incorporates the most wanted Reset button for your Raspberry Pi Pico and gives you access to all GPIO pins on two 20 ways pin-headers, with clear labels. Each GPIO is coupled with an LED indicator for convenient code testing and troubleshooting. The bottom layer of this board even comes with a comprehensive pinout diagram showing the function of each pin.
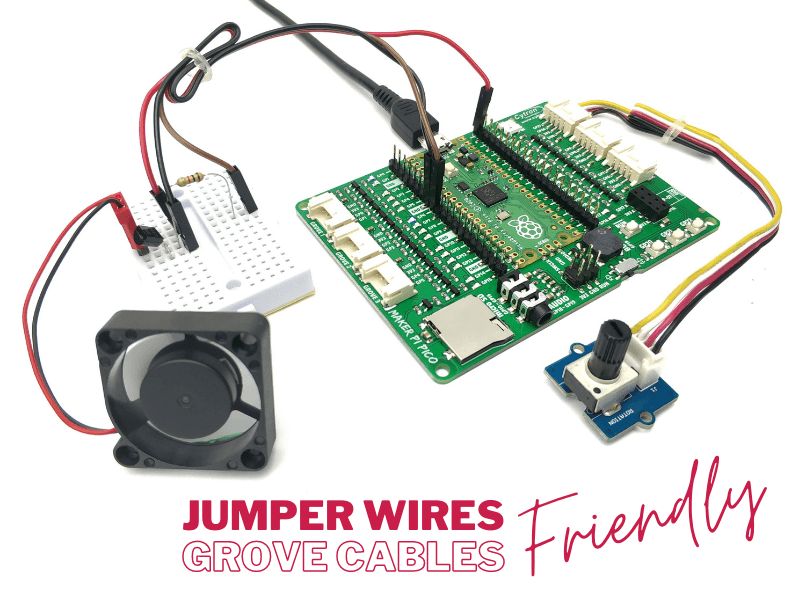
It is a compact yet feature-packed board designed to sit at the heart of your STEM & robotics projects. Just use the jumper wires and/or Grove cables to connect any sensor and output modules to expand its capability. No soldering required!
Maker Pi Pico Base can be programmed with CircuitPython, MicroPython & C/C . Just connect to any computer (including Raspberry Pi SBC) via USB, then drag and drop the file onto it to upload the program. It's as easy as copying a file into your thumb drive!
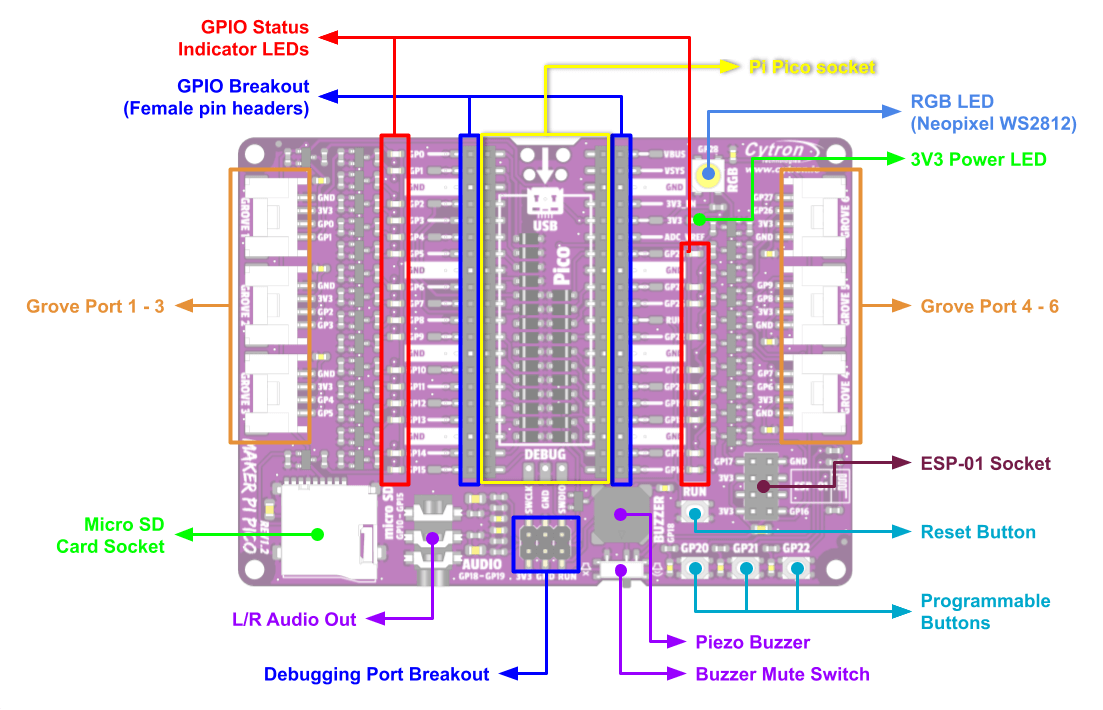
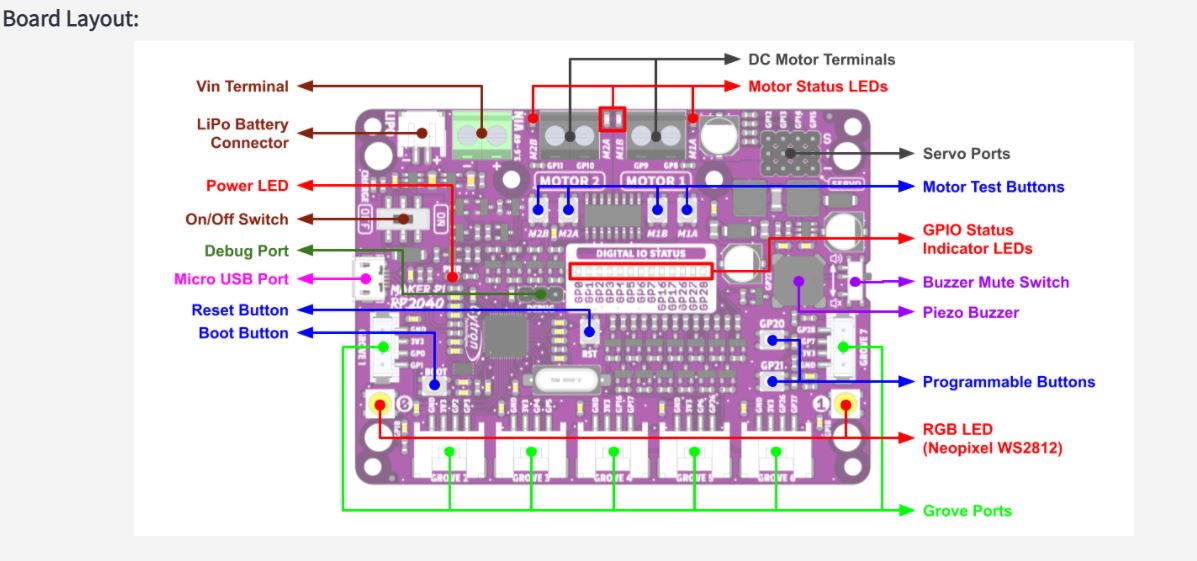
Board Layout
Features
- Work out-of-the-box. No soldering!
- Access to all Raspberry Pi Pico's pins on two 20 ways pin headers
- LED indicators on all GPIO pins
- 3x programmable push button (GP20-22)
- 1x RGB LED - NeoPixel (GP28)
- 1x Piezo buzzer (GP18)
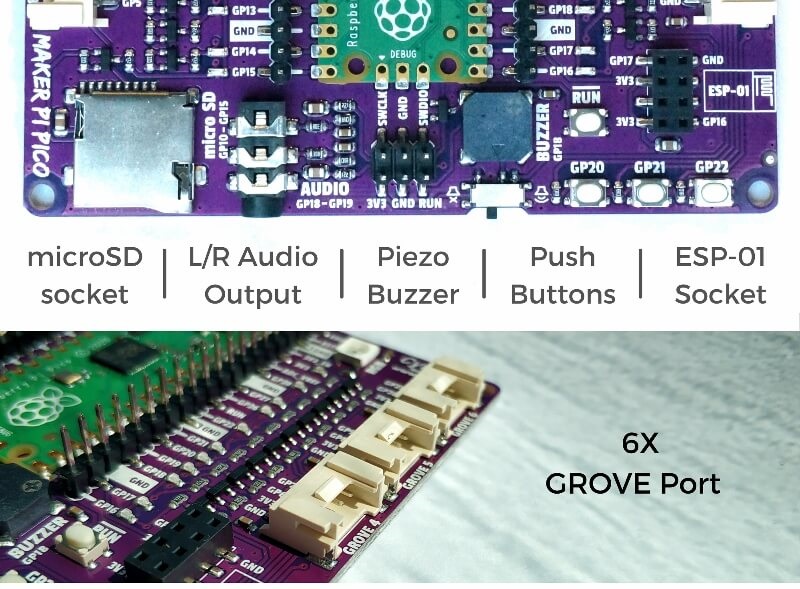
- 1x 3.5mm stereo audio jack (GP18-19)
- 1x Micro SD card slot (GP10-15)
- 1x ESP-01 socket (GP16-17)
- 6x Grove port
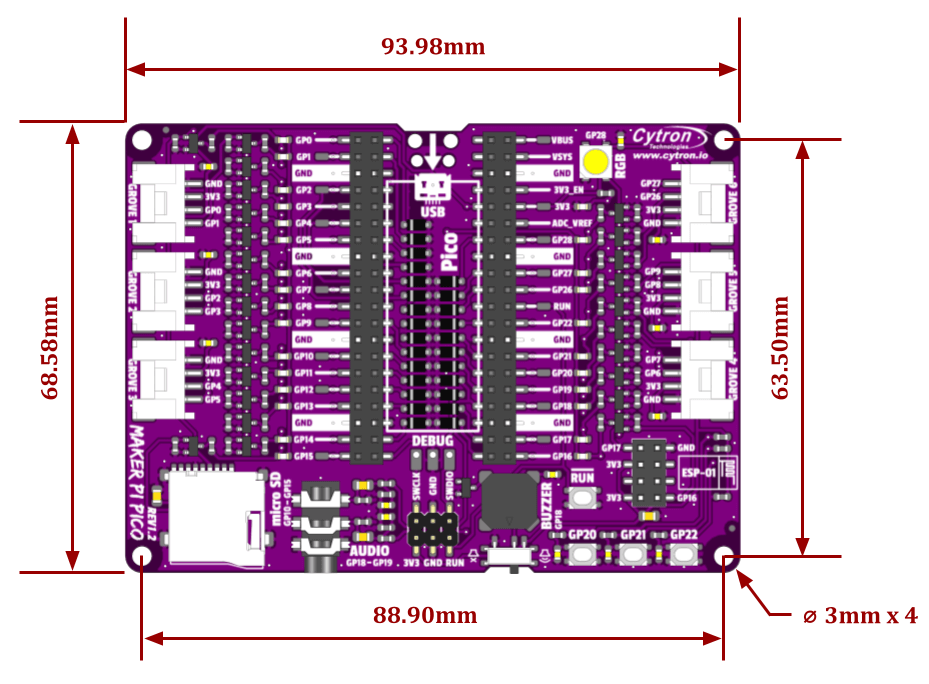
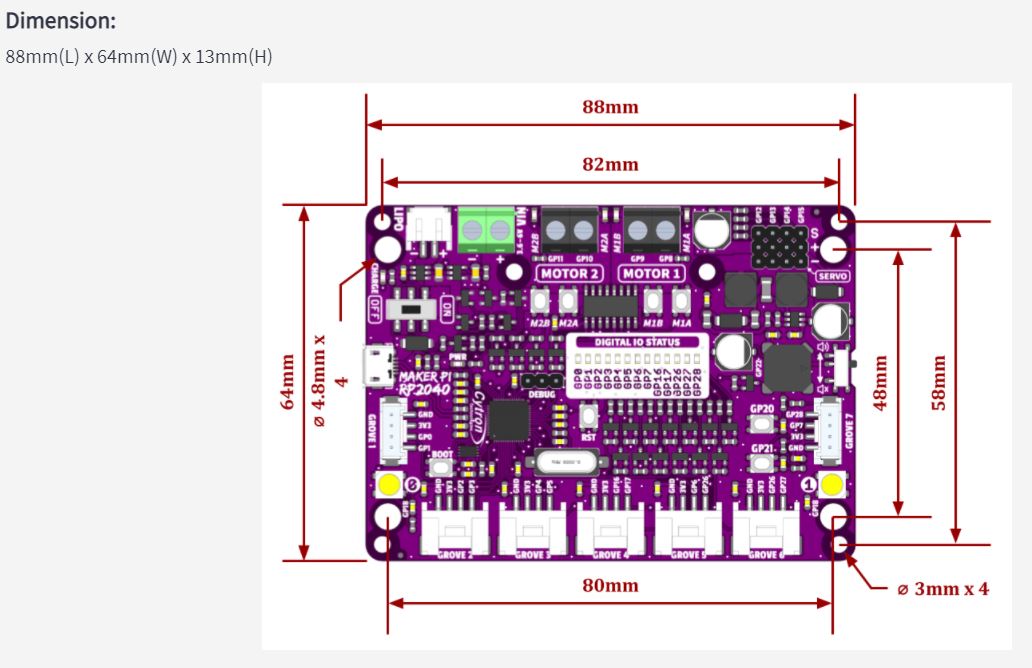
Dimensions
 What's in the box?
1 x Maker Pi Pico
Note Raspberry Pi Pico NOT included. Please purchase separately here.
Resources

https://youtu.be/X6qFEwy2X2w
New to Mobile Robot & Coding?
Don't worry! This kit comes with a booklet covering all the hands-on lessons you need to get started. Every step is explained clearly with the help of images. We make sure that the common issues when building and coding the Arduino mobile robot are properly addressed in this booklet. Besides it comes with fun facts to feed the curious minds too.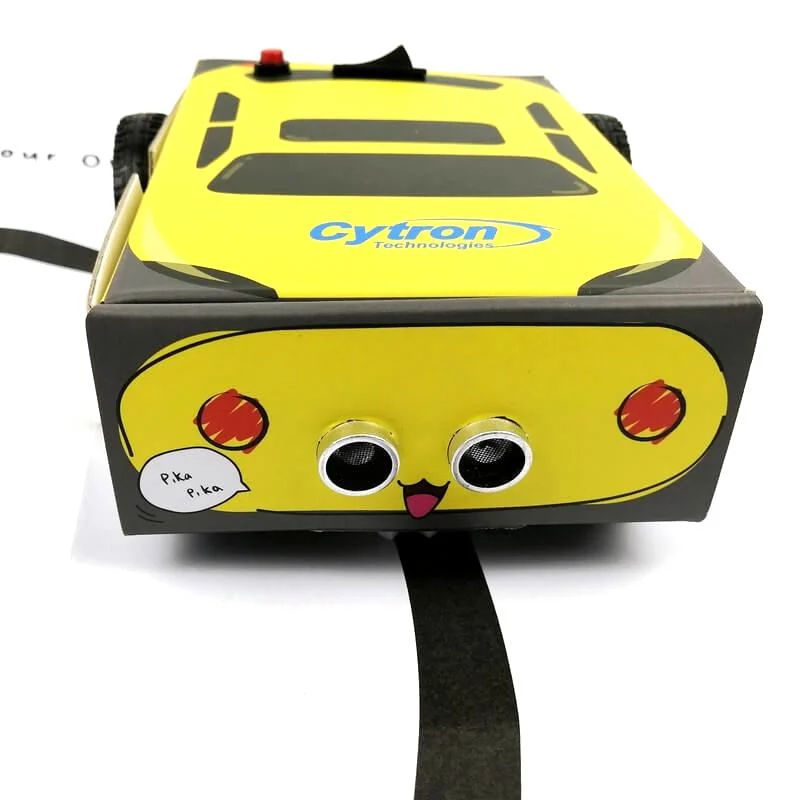
No Soldering! Just Jumper Wires
There is no soldering involved in order for more young makers to take part in the building process. To make things even simpler, the detailed schematic diagram and mounting location of the parts are printed inside the box. Hence you can build and connect with greater confidence as you embark on this digital making journey.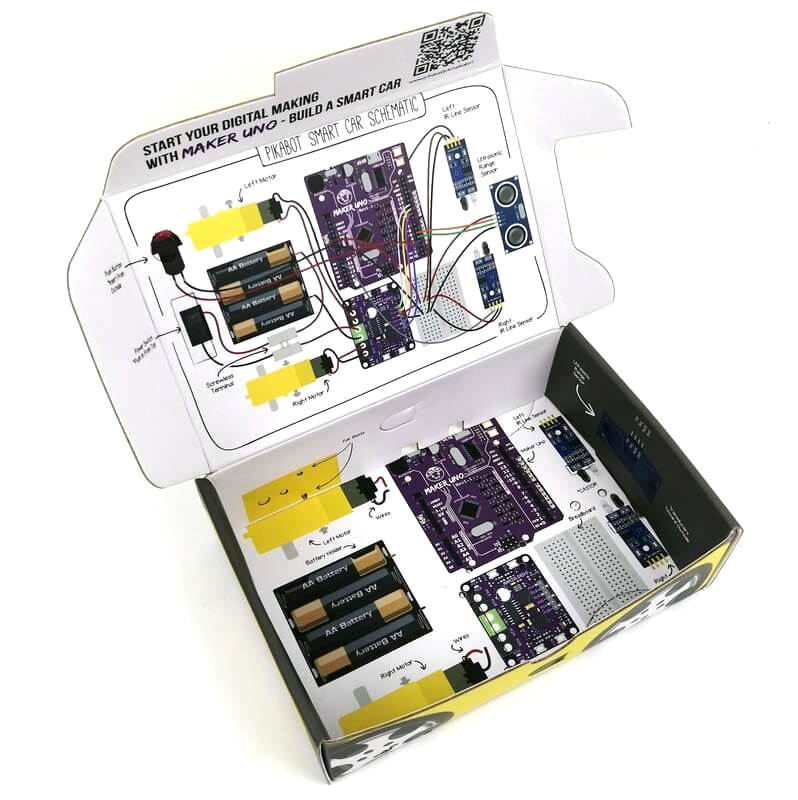
This mobile robot kit is based on Maker UNO (Arduino Uno compatible).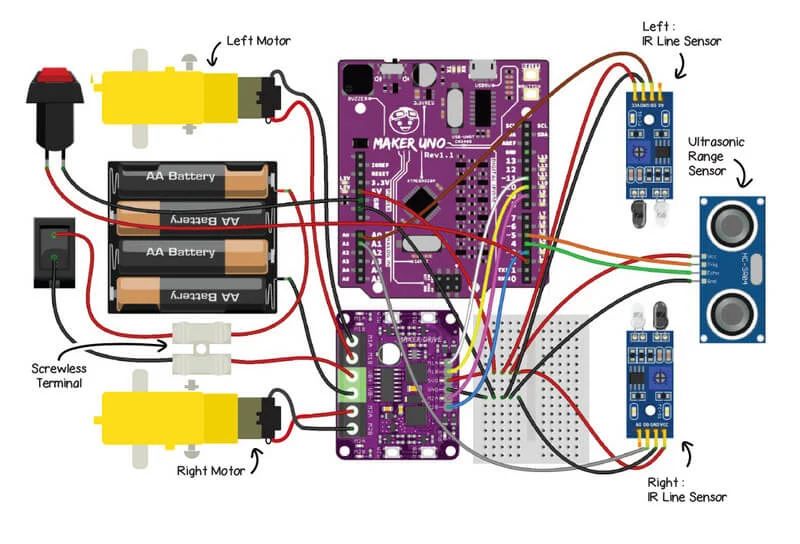
Box = Mobile Robot Base
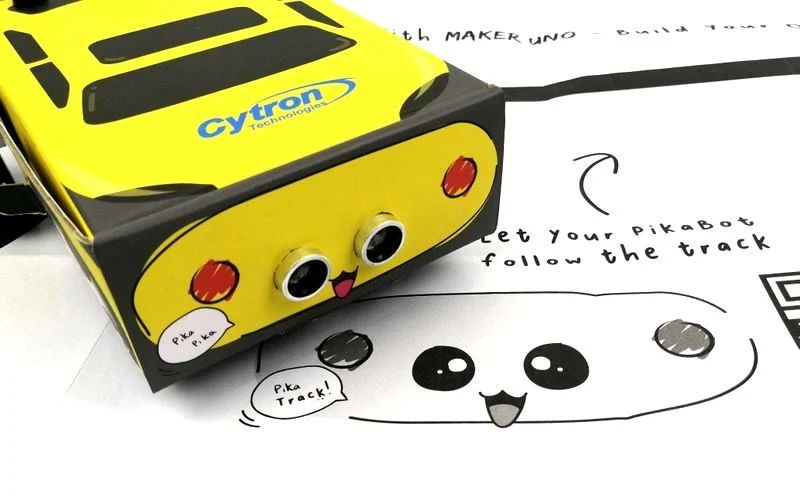
We designed the packaging box of PikaBot to be reusable. Not only that it's used for packing the complete set of components needed for the project, it serves as the robot base and cover of your PikaBot mobile robot too.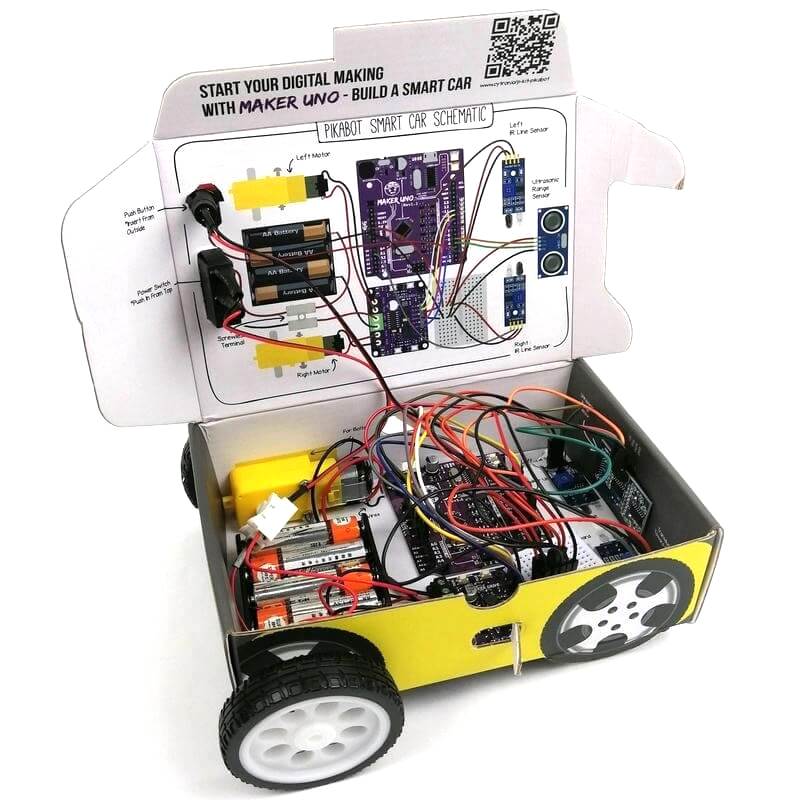
Line Following & Obstacle Avoidance
What can your PikaBot do? It can follow line, simple yet practical navigation that is widely used in AGV (Automated Guided Vehicle) and many robot competition. The kit comes with a pair of infrared sensors which you can calibrate & program to recognize black and white surfaces. PikaBot also includes an ultrasonic distance sensor so it can detect obstacles in front of it.
mBlock Graphical Programming Interface
Besides using the Arduino IDE as taught in our user guide booklet, you can also program PikaBot with mBlock block-based programmming interface. Check out this tutorial to learn more.
https://youtu.be/S-xbk-PoiWY
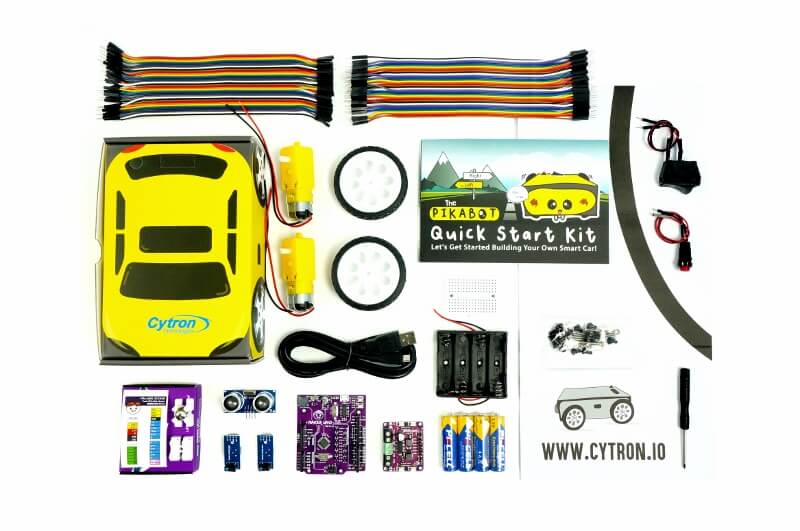
With the beginner-friendly Maker UNO as the controller, everyone can build and program this mobile robot. We have also included
- Dual-channel motor driver - Maker Drive
- Two "TT" brush motor with pre-solder wires
- 4 x AA battery to power the controller and motor
- Of course, it comes with two IR Line Tracking Module for line following
- An Ultrasonic Distance Sensor for obstacle avoidance
- Accessories for the smart car to work :)
- Everything is packed in a nicely designed paper box which will be utilized as the base of the mobile robot too
To make life even easier, we have prepared:
- A printed copy of Step by Step Guide for you to build this kit (Softcopy here)
- Sample code for line following, obstacle avoidance and melody in Arduino Sketch in Github (coming soon)
- Video to assemble the robot is in the making, check it out
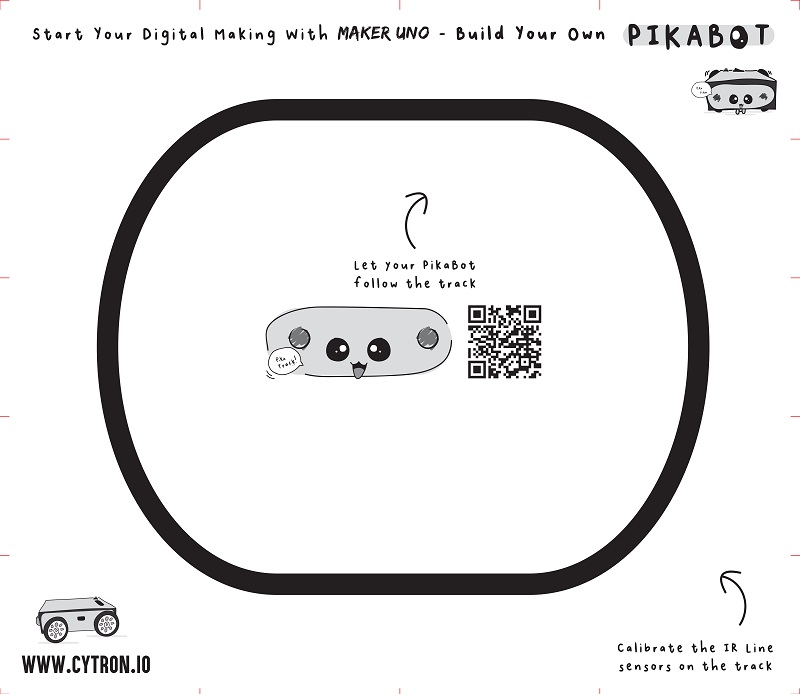
Line Following Track for line following.
Features
- Mobile Robot Kit
- Do It Yourself (DIY) mobile robot kit
- No soldering needed, only requires to connect jumper wires :)
- Controller: Maker UNO
- Motor Driver: Maker Drive dual-channel DC brush motor driver
- Driven by two TT motor with pre-solder wires
- Power both controller and motor with 4 x AA battery, with battery holder too
- Comes with IR Line Sensor module, for line following
- Open-source example code, free to modify and learn coding
- Panel mount rocker switch as power activation switch
- Panel mount push button as a start button
- The paper box is creatively designed as the container and also body for mobile robot.
- Everything needed is packed in this kit!
- Box Dimension: 127mm x 55mm x 19mm (not including motor shafts and wheels)
What's in the box?
1 x Maker Drive: Dual H-Bridge Motor Driver for Beginner
2 x 3 - 6VDC Dual Axis TT Gear Motor (with pre-solder wires)
2 x Rubber Wheel for TT Gear Motor (63mm x 15mm)
2 x IR Line Tracking Module
1 x HC-SR04 Ultrasonic Ranging Module
1 x 4xAA Batteries
1 x 4xAA battery holder
1 x Breadboard Mini (35mmx42mm) - White
1 x 40 ways Male to Female Jumper Wire
1 x 40 ways Male to Male Jumper Wire
1 x USB Micro B cable
1 x mBot N20 Vacuum Steel Ball Castor
1 x Tiny Phillips Screwdriver - 85mm
4 x Bolt M3x25mm
4 x M3 Nut
1 x CH2 Quick Wiring Terminal Press Type
1 x Rocker Switch with wires
1 x Push Button with wires
14 x Plastic Rivet (M3)
2 x Plastic Rivet (M4)
1 x PikaBot Track
1 x PikaBot Booklet - A step-by-step guide to build & program PikaBot.
1 x PikaBot Paper Box
Resources
- Softcopy (PDF) of PikaBot Booklet (Hardcopy comes with the kit)
- Arduino sample code
- PikaBot is now programmable with mBlock, a tutorial on Hackster.io. Now you can use block(graphical) programming to program PikaBot.
- CH34X driver (Please ensure the Maker UNO is plug into computer USB port during driver installation)
- Windows (V3.5 Mar2019)
- Mac OS (V1.5 Mar2019)
- Linux (V1.5 Mar2019) (Normally is readily installed)
- CH34X Driver - Get the latest driver from the factory
- Arduino IDE Download
Telegram Stickers!
Last but not least, we've designed some expressive PikaBot stickers for Telegram messenger for all you PikaBot lovers! If you are a Telegram user, grab the sticker pack here: https://t.me/addstickers/cytron_pikabot. Have fun!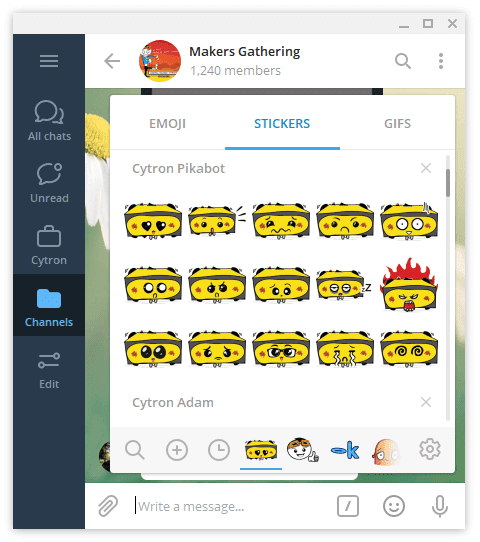

1. Most of the students do not have basic knowledge in electronics.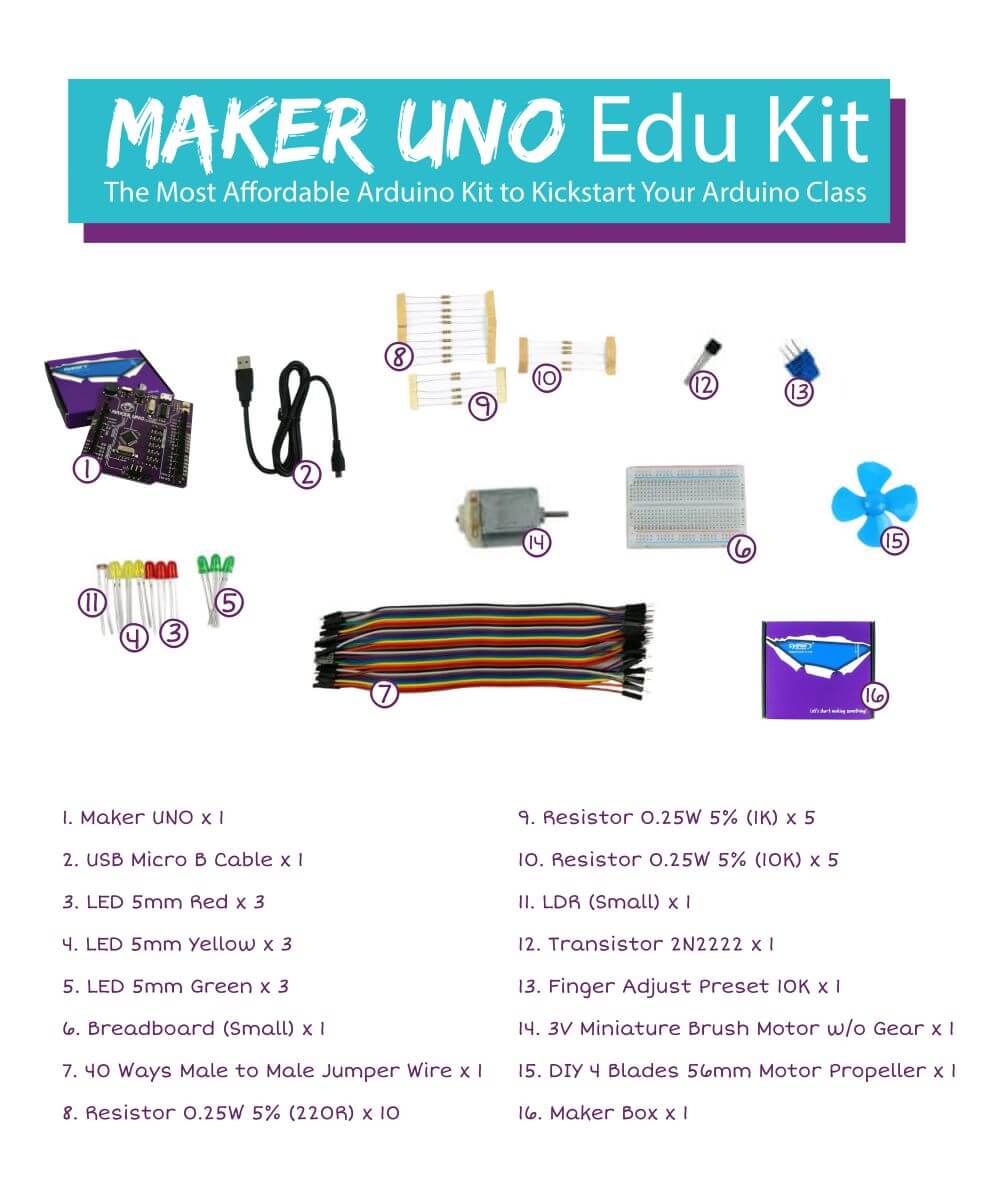
2. They do not understand the circuit diagram at the beginning of the Arduino lesson. They will spend a substantial amount of time just to connect the wires and troubleshoot the connections.
3. It's a mess after every class. The teacher has to sort and make sure nothing is missing. What a tedious job and a waste of time!
Students can skip the hassle of constructing the basic electronic circuit which is boring and time consuming. Although it is equally important for them to learn about basic electronics, it can always come later after they have experienced how easy it is to create awesome project. Start with fun and excitement. Start coding right away and see your board lights up and plays melody with the press of a button. 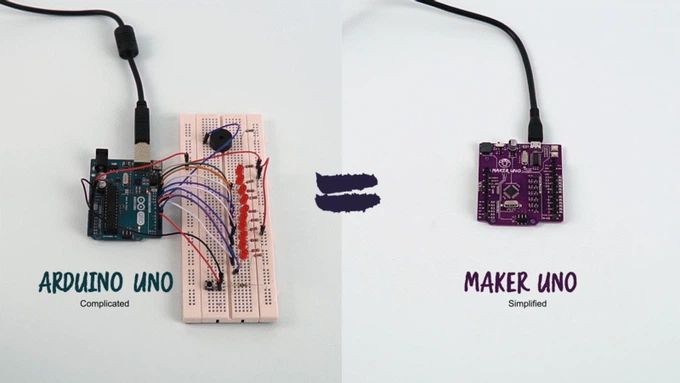
With the conventional Arduino boards, students also face another common problem - difficulty in troubleshooting their circuit. This is because when it doesn't work, we do not know whether the problem is due to wire connection or coding.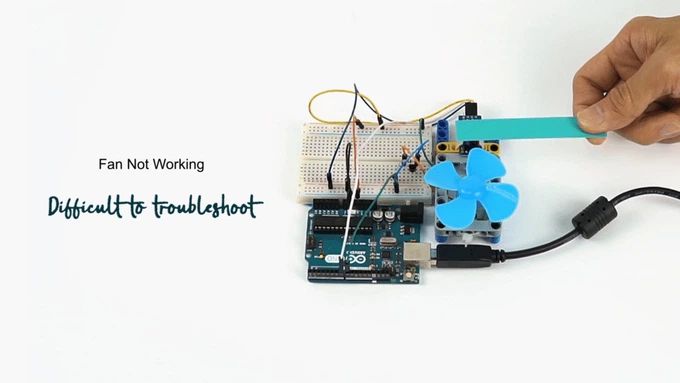
With Maker UNO, the problem is solved! Not only do the onboard LEDs work as outputs, they can also act as indicators, clearly showing what's happening on that pin. When the pin is used as input, you can clearly see whether the signal is received by just looking at changes on the LEDs. 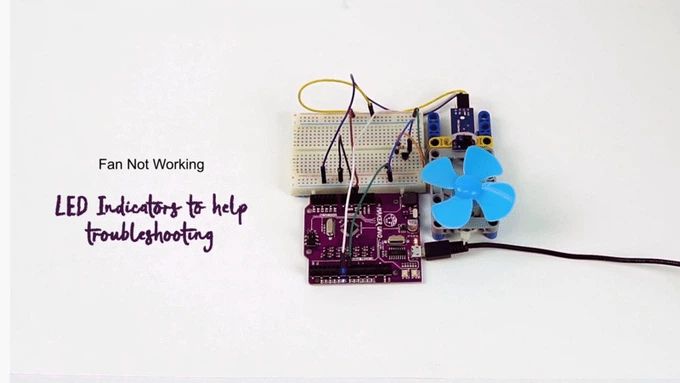
Additional Features
One of the brilliant features of the official Arduino Uno is the label printed on its pin headers. It saves us a lot of time when we want to connect the I/O pins to the external circuit. So, we include a set of these label stickers for pin headers in each of the Maker UNO! (Please note that you need to peel off the stickers and stick them on your Maker UNO by yourself)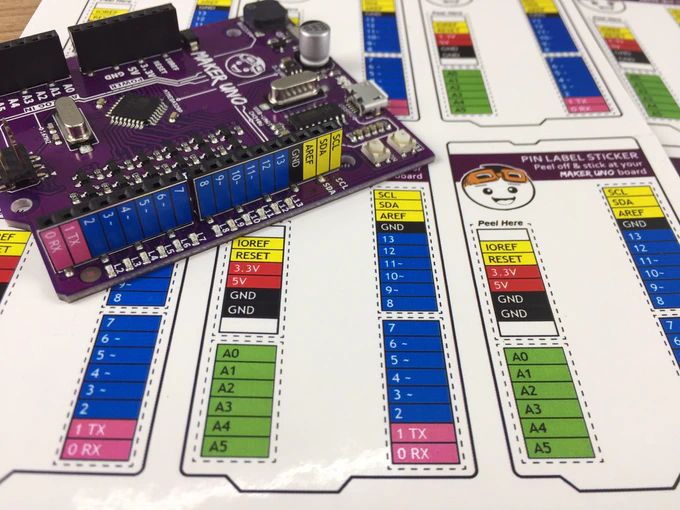
Students always get their boards mixed up. With Maker UNO, you can write your name on the board. Problem solved!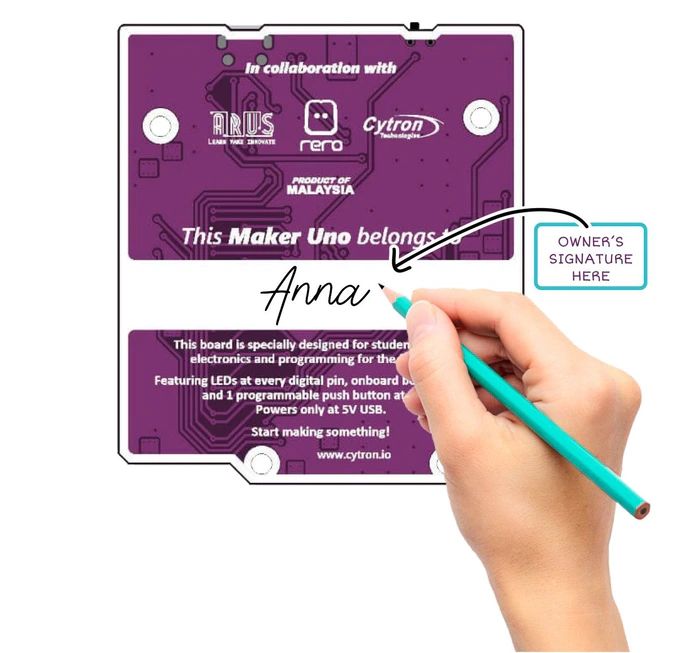
Maker UNO uses the common Micro USB cable which is basically everywhere.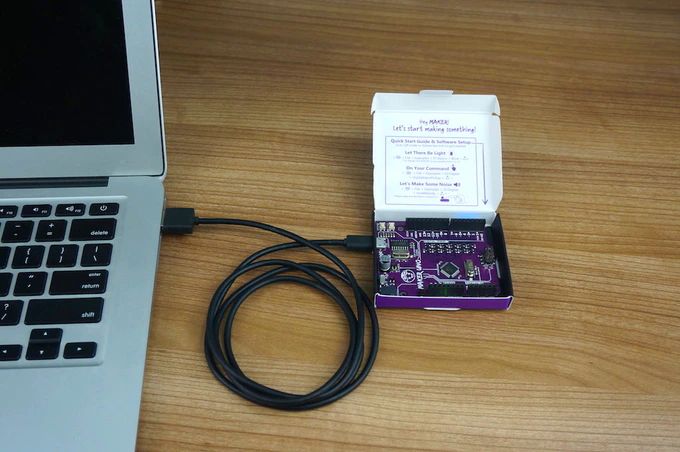
Don't throw your box away! There is a small opening on the box for you to plug the USB cable so that you can keep your Maker UNO safely in the original box, no additional casing required.
Specifications
Maker UNO is fully compatible with Arduino. You can share the same library and code. We put in 12x LEDs, 1x piezo buzzer and 1x programmable button on the Maker UNO. We have removed the DC jack power input socket as most of the boards used in classes are powered using USB. We have also replaced the ATmega16u2 with CH340 to bring down the cost.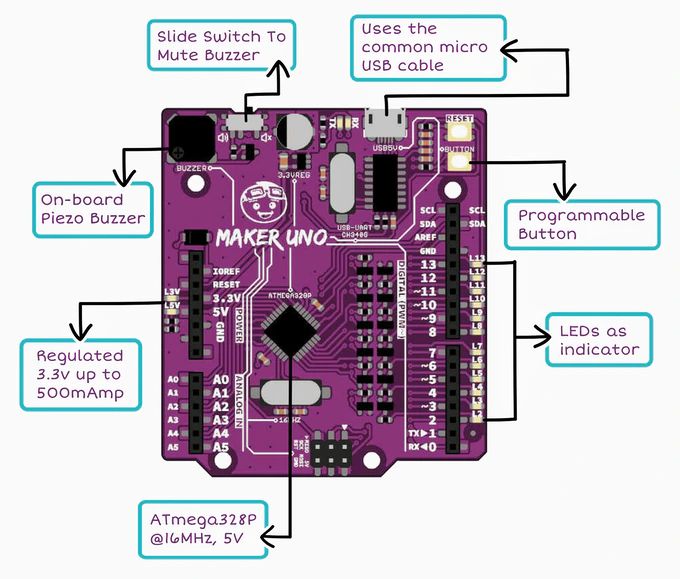
Documents:
- Maker UNO User's Manual
- Maker UNO Edu Kit Getting Started Module
- Maker-UNO Schematic
- Maker-UNO Fritzing File
- CH341 driver
Tutorials:
Related links:
- Maker UNO's Default Program
- Arduino IDE Download
- How To Program Arduino (Maker UNO) Using Atmel Studio
- Introduction Atmel Studio 7 is the integrated development platform (IDP) for developing and debugging all AVR® and SAM microcontroller applications. The Atmel Studio 7 IDP gives you a seamless and easy-to-use environment to write, build and debug your applications written in C/C or assembly code.
- Program Maker UNO using Chromebook

The Typical Problem Faced by Beginners in Learning Electronics on Raspberry Pi
- Hard to get started without additional devices (monitor, keyboard, and mouse). Beginners will either need to use additional devices or follow many steps just to get started. This may confuse them. For techies that want to know why, this is because it lacks an onboard USB to UART communication for your computer to get the IP address for SSH (headless), or to kick start configuration directly.
- Hard to get started with electronics. It doesn't come with any inputs or outputs, you will need to connect additional accessories to use it. Most beginners do not have basic knowledge of electronics. They will have a problem to understand the circuit diagram and connections needed when they first started learning. They will spend a substantial amount of time just to connect the wires and troubleshoot the connections.
- Hard to troubleshoot the GPIO. With just the raspberry pi, beginners face a common problem when learning electronics- difficulty in troubleshooting their circuit. This is because when it doesn't work, we do not know whether the problem is due to wire connection or coding.
- Access to GPIO is kind of difficult. There is no label on the pins, you need to search online to get the designated pin and know which pin to connect. For beginners, this definitely will make it harder for them to make the connection correctly.
- No easy way to properly shutdown using a switch. There is no programmable push button to enable proper shutdown through hardware. If the beginner turns off the power without properly shutting it down, the raspberry pi may not work the next time.
Introducing Our Solution: Maker pHAT
Maker pHAT solves all these. It is designed to:
- Simplify to get started with Raspberry Pi without additional monitor, keyboard or mouse (Headless). Go headless with a few simple steps as it enables users to remote access Raspberry Pi through serial.
- Simplify learning electronics. Beginners can skip the hassle of constructing the basic electronic circuit which is boring and time-consuming. Although it is equally important for them to learn about basic electronics, it can always come later after they have experienced how easy it is to create an awesome project. Start with fun and excitement. Start coding right away and see your board lights up and plays sound with the press of a button. It comes with onboard LEDs, pushbuttons, and a buzzer to easily learn how to control input and output. No messy wiring needed and no additional components needed.
- Simplify troubleshooting and prototyping. Not only do the onboard LEDs work as outputs, but they can also act as indicators, clearly showing what's happening on that pin. When the pin is used as input, you can clearly see whether the signal is received by just looking at changes on the LEDs. The pre-soldered header pins come with nice labels. This helps the user to easily connect inputs and outputs to the right pins. This will further assist them in interfacing with sensors and actuators.
- Simplify proper shutdown using pushbutton. You can easily follow the steps and choose one of the pushbuttons as the power button to properly shutdown the Raspberry Pi. Just press the button and it will shut down.
Video: https://youtu.be/EJWxLi7fLSo
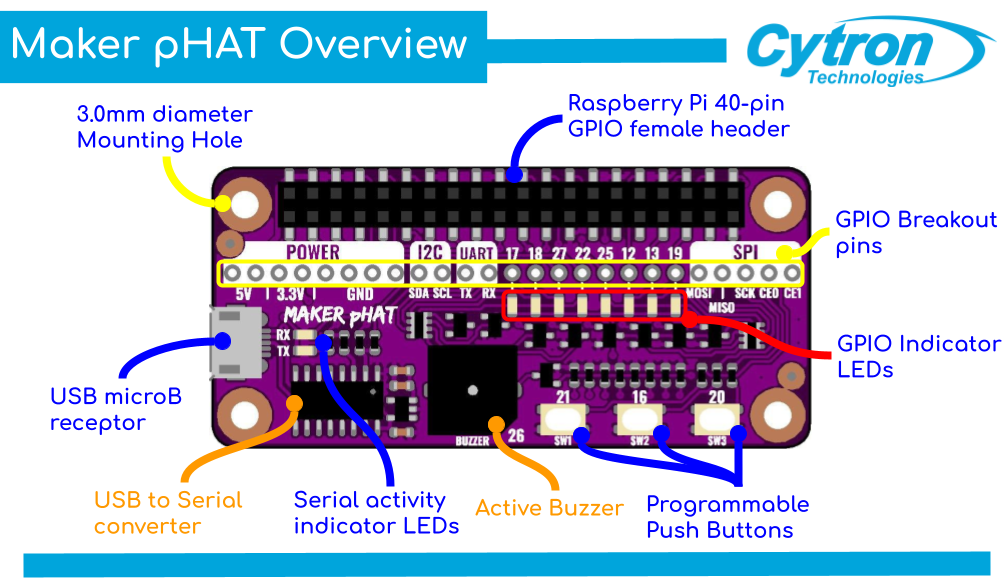
Maker pHAT for Raspberry Pi
Maker pHAT is designed to be the same size as Raspberry Pi Zero board, it stacks perfectly on top of Rpi Zero with the four mounting holes aligned. (What is a HAT? Read this to know more) We do advise getting Raspberry Pi Zero WH (pre-solder header pin) for beginner because it is not an easy work to solder the 40-pin GPIO, don't forget you'll need to have the soldering tools too.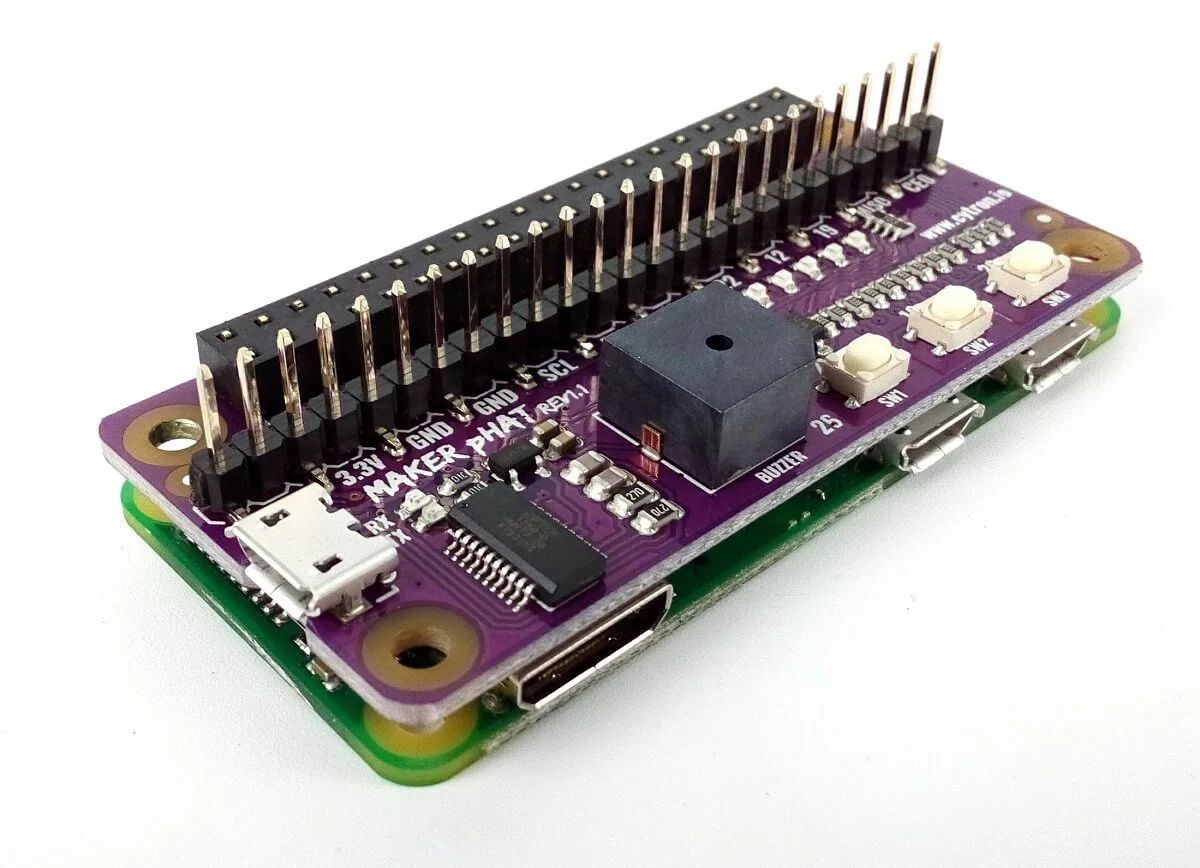
Maker pHAT is also compatible with Raspberry Pi 3B, 3B , 3A , and of course the latest 4B too. You just need to insert the 2x20 stacking header(included), as photo shows: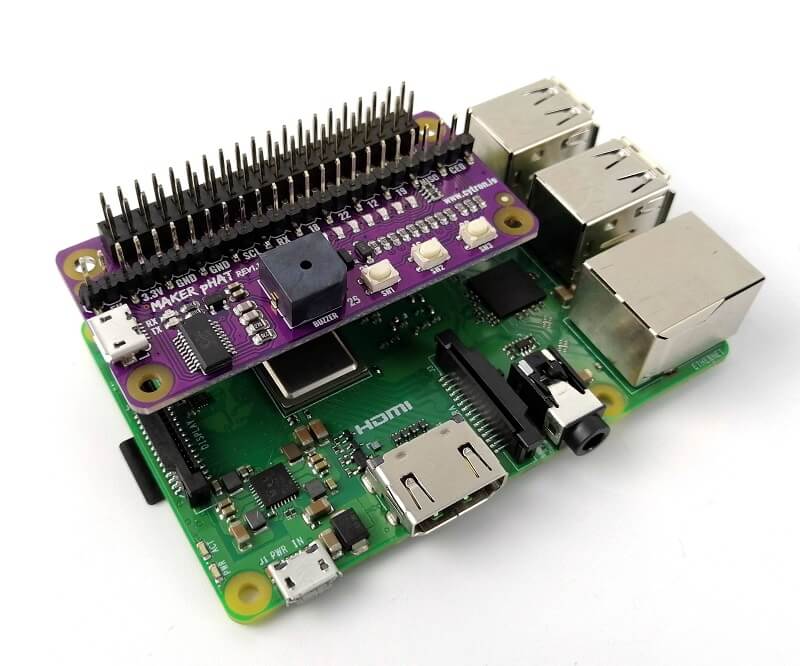
Maker pHAT is compatible with:
- Raspberry Pi Zero V1.3 (will need to solder 2x20 header pin - NOT included can consider Straight Pin Header (Male) 2x40 Ways)
- Raspberry Pi Zero W (will need to solder 2x20 header pin - NOT included can consider Straight Pin Header (Male) 2x40 Ways)
- Raspberry Pi Zero WH (Ready for plug and use)
- Raspberry Pi 1 https://www.pishop.co.za/store/raspberry-pi-model-aModel A (Will need 2x20 stacking header)
- Raspberry Pi 3 Model A (Will need 2x20 stacking header)
- Raspberry Pi 3 Model B (Will need 2x20 stacking header)
- Raspberry Pi 3 Model B (Will need 2x20 stacking header)
- Raspberry Pi 4 Model B 1GB (Will need 2x20 stacking header)
- Raspberry Pi 4 Model B 2GB (Will need 2x20 stacking header)
- Raspberry Pi 4 Model B 4GB (Will need 2x20 stacking header)
Features:
- Raspberry Pi Zero size, stack perfectly on to Pi Zero Series of SBC (Single Board Computer).
- Compatible with standard size Raspberry Pi 3B/3B /4B1GB/4B2GB/4B4GB, medium size Raspberry Pi 3A and smaller size Raspberry Pi Zero/W/WH.
- Standard Raspberry Pi GPIO footprint.
- LED array for selected GPIO pins (GPIO 17, 18, 27, 22, 25, 12, 13, 19).
- 3x onboard programmable push buttons (GPIO 21, 19 and 20, need to configure as input pull up).
- Onboard active buzzer (GPIO 26).
- Proper label for all GPIOs, including SPI, UART, I2C, 5V, 3.3V, and GND.
- Utilize USB Micro-B socket for 5V input and USB to UART communication.
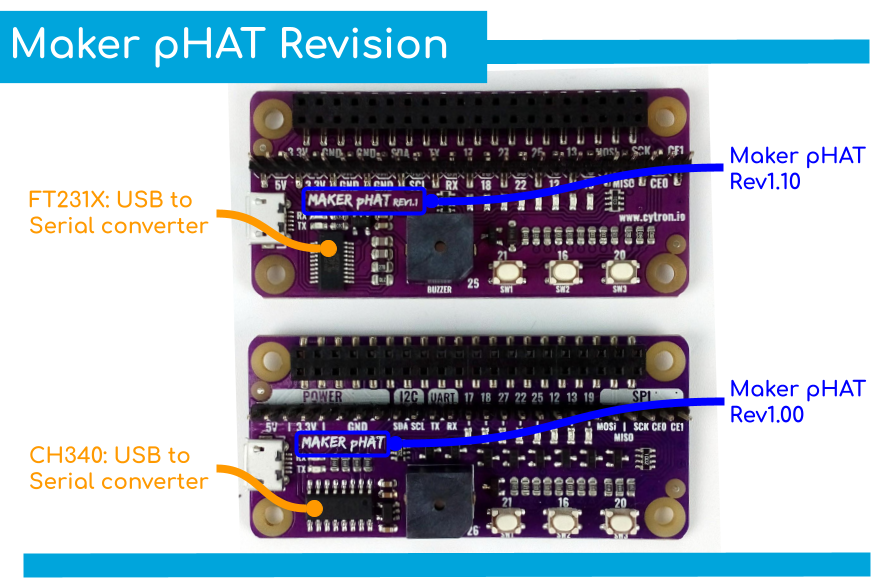
- USB serial facilitated by the CH340, Rev1.10 uses FT231X as the USB to UART
- Input voltage: USB 5V, from the computer, power bank or standard USB adapter.
- PURPLE PCB!
Documents/Tutorials:
- User's Manual
- Schematic Rev1.00 (pdf)
- Schematic Rev1.10 (pdf)
- Sample Python Code (Github)
- CH340 Driver (Windows)
- CH340 Driver (MacOS)
- CH340 Driver (Linux) - Pre-installed
- FT231X Driver on Rev1.10 (Windows, Linux, and macOS)
- PuTTY - For serial terminal
- Raspberry Pi: Mengawal LED di Maker pHAT
Packing List:
- 1 x Maker pHAT
- 1 x 2x20 Stacking Header

What's in the box?
1 x Relay
1 x Grove connector

Grove - Temperature Sensor uses a thermistor to measure ambient temperature. The resistance of thermistor changes based on ambient temperature. This resistance value alters the output of a voltage divider which is measured by an analog input pin and converted to a temperature value. The operating range is -40 to 125°C , with an accuracy of 1.5°C.
For all Grove users (especially beginners), we provide you guidance PDF documents. Please download and read through Preface - Getting Started and Introduction to Grove before your use of the product.
Ready to use with microcontrollers as a digital input. This product also has a compact modular design Plug-and-play grove compatible interface.
Based on the picture above, the grove shield for Arduino is stacked with Seeeduino V4.2. Of course you can use that shield with Arduino board too :)
You can get grove HAT for Raspberry Pi and the Maker Pico board
Features and specifications:
- Grove compatible interface
- Arduino library ready
- Operating voltage: 3.3~5V
- Zero power resistance: 100 KΩ
- Resistance Tolerance: ±1%
- Thermistor: NCP18WF104F03RC (NTC)
- Nominal B-Constant: 4250 ~ 4299K
- Operating temperature range: -40°C to 125°C
- Temperature Accuracy: ± 1.5°C
Packing List:
- 1 x Grove - Temperature Sensor
- Grove 4 Pin Buckled 20cm Cable
Resources:
- Grove - Introduction to Grove
- Grove - Temperature Sensor interface with Arduino and Raspberry pi by wiki.seeedstudio
- Grove - Temperature Sensor Eagle File
- Grove - Temperature Sensor schematic
- NCP18WF104F03RC datasheet

Compared with traditional ultrasonic modules HC-SR04, this module integrates a single-chip microcomputer, and the transmitting signal and the receiving signal share one pin by time division multiplexing, so only one I/O pin is occupied. Another difference is that HC-SR04 only supports 5V voltage, while this module supports 5V and 3.3V. As we know, the Raspberry pi I/O only supports 3.3V. Therefore, this Grove - Ultrasonic Distance Sensor can be directly connected to the I/O of the Raspberry Pi, but HC-SR04 needs to use a voltage conversion circuit.
- 3.3V / 5V compatible, wide voltage level: 3.2V~5.2V
- Only 3 pins needed, save I/O resources
- Wide measurement range: 3cm ~ 350cm
- Easy to use: grove connector, plug and play
- Arduino library ready
Specifications
- Operating Voltage: 3.2~5.2V
- Operating Current: 8mA
- Ultrasonic Frequency: 40kHz
- Measuring Range: 3cm to 350cm
- Resolution: 1cm
- Measurement Angle: 15 degree
- Dimensions: 50mm x 25mm x 16mm
What's in the box?
1 x Grove - Ultrasonic Ranger1 x Grove 4 Pin Buckled 20cm Cable
Resources
- Grove - Introduction to Grove
- Grove - Ultrasonic Ranger interface with Arduino and Raspberry pi by wiki.seeedstudio
- Grove - Ultrasonic Ranger schematic
- Grove - Ultrasonic Ranger library
- CDC file

Comes in black colour with the slogan of TRUST ME I'M A MAKER, embroidered at the front of the cap.
Specifications
- Coming from makers to makers :)
- Unisex, suitable for both male and female maker :)
- 100% fabric, super comfortable
- Black color fabric with TRUST ME I'M A MAKER slogan
- With adjustable silver metal belt buckle strap, adjustable size
What's in the box ?
1 x Maker Baseball Cap


Visit our blog to get more info on what you can do with your Pico
This is a Raspberry Pi Pico Basic Kit by Cytron for the very first MCU launched by Raspberry Pi Foundation. The kit includes almost everything you need to kickstart your way in digital making and start learning MicroPython with Raspberry Pi Pico !
Please note: This kit comes without Raspberry Pi Pico.
You can grab your Raspberry Pi Pico from here
What's in the box?
1 x Breadboard 16.5x5.5cm (830 Holes)
1 x Buzzer-PCB Mount
1 x Finger Adjust Preset Potentiometer 10K
2 x LED 5mm Red
2 x LED 5mm Green
2 x LED 5mm Yellow
2 x LED Super Bright 5mm Blue
2 x PIR Sensor
3 x 6x6x1 Push Button 4Pin
5 x Resistor 0.25W 5% (330R)
10 x Male to Female Jumper Wire
20 x Male to Male Jumper Wire
Resources
- Getting Started with Raspberry Pi Pico (pdf), C/C Development with the Pico and other RP2040-based microcontroller boards.
- Raspberry Pi Pico Datasheet (pdf), An RP2040-based microcontroller board
- Pico Python SDK (pdf), A MicroPython Environment for the RP2040 Microcontroller
- Pico C/C SDK (pdf), Libraries and Tools for C/C Development on the RP2040 Microcontroller
- RP2040 Datasheet (pdf), A microcontroller by Raspberry Pi
Check out some of the video tutorials that you can learn using this kit:

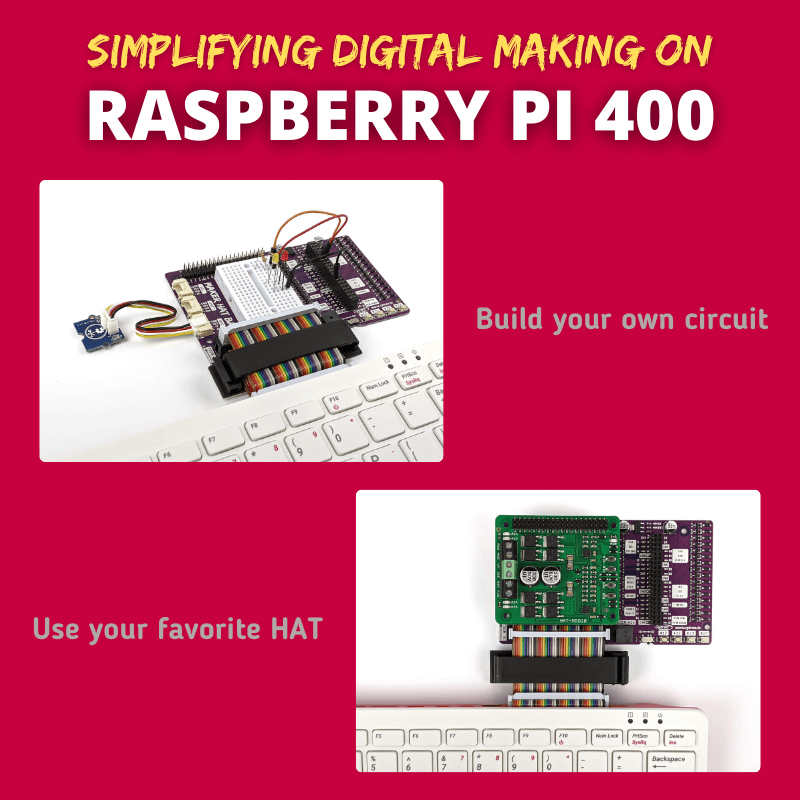
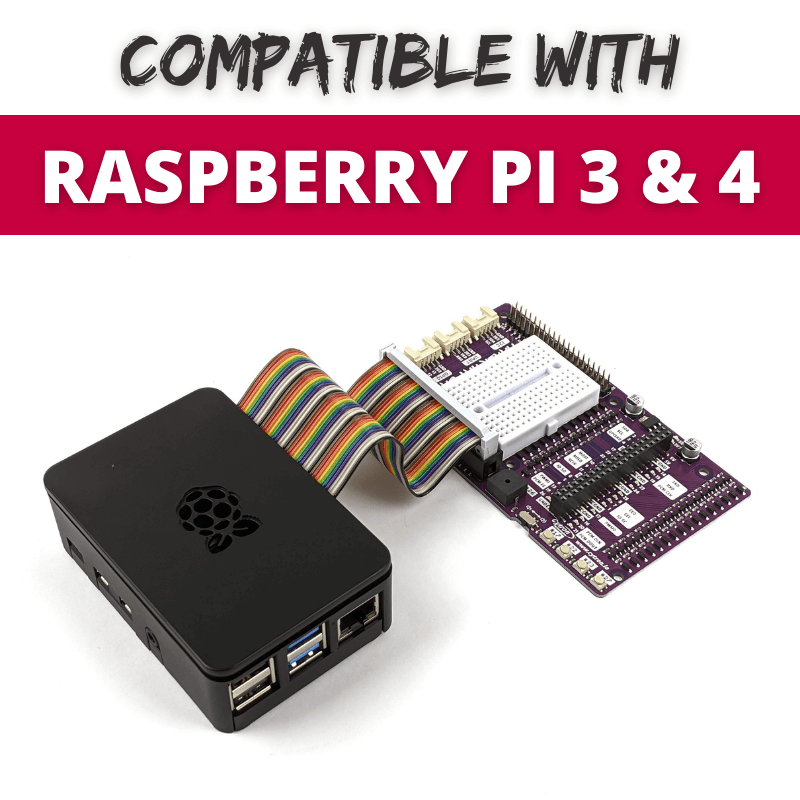
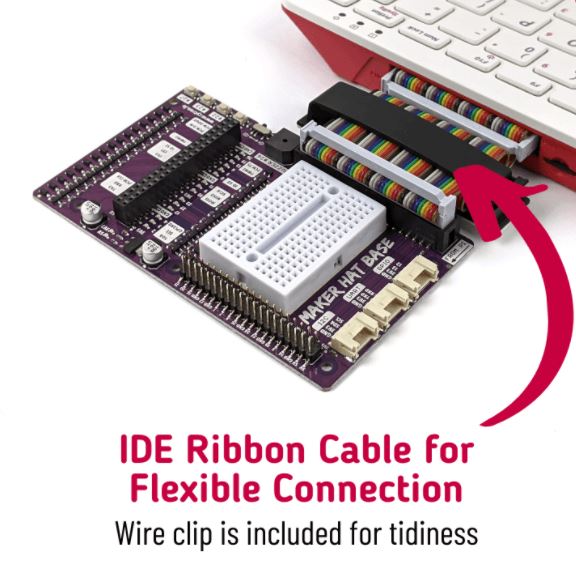
Since a ribbon cable is used for the connection, the Maker Hat Base is compatible with the Raspberry Pi 3 and Pi 4 too. This is especially useful when the Raspberry Pi is enclosed in a case and you want to extend its GPIOs out for HAT.
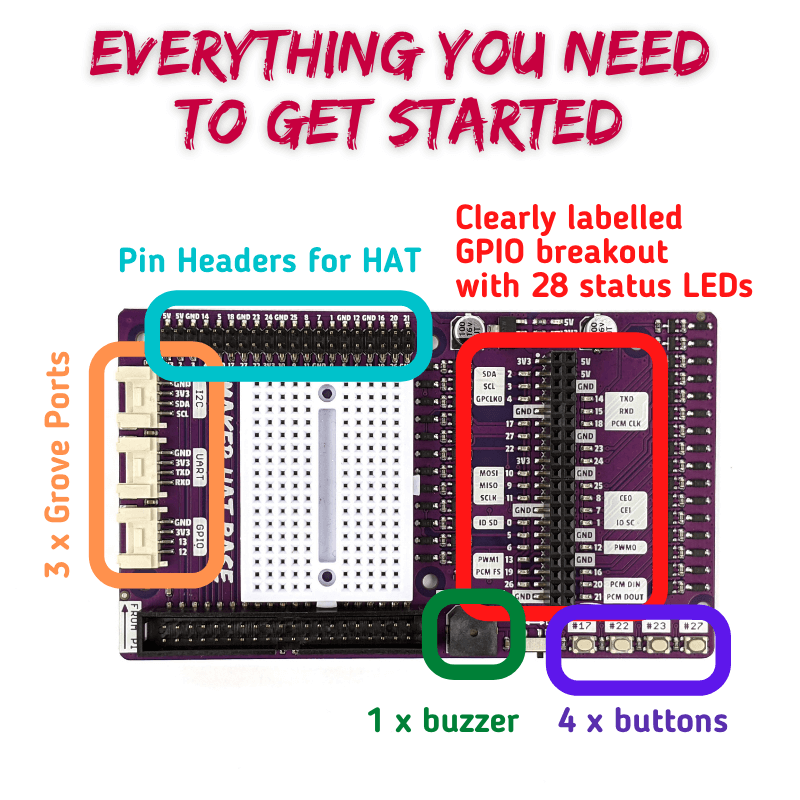
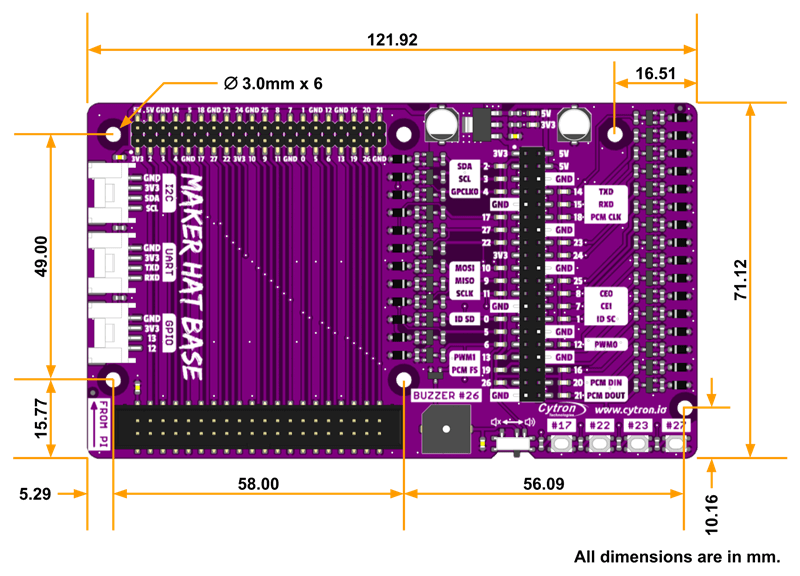
Each GPIO pin is clearly labelled and its status LED is definitely helpful during testing and troubleshooting. The onboard buzzer and push buttons will get you start coding in no time without the need of building your own circuit. Wanna connect to some external sensors/ modules? Worry not! The onboard Grove ports (GPIO, UART & I2C) is there for you.
Features
- Specially designed for Raspberry Pi 400.
- Compatible with Raspberry Pi 3 & 4.
- Extension pins for HAT.
- Clearly labelled GPIOs breakout for jumper wires.
- Status LEDs for each GPIOs.
- 1 x programmable buzzer.
- 4 x programmable push buttons.
- 3 x Grove ports (GPIO, UART & I2C) for external modules.
- Onboard 3.3V regulator provides extra current up to 800mA.
What's in the box ?
- 1 x Maker Hat Base
- 1 x Mini Breadboard (Random Color)
- 1 x 40 Ways Female to Female IDE cable (10cm)
- 1 x Flat Cable Clamper with Adhesive (60mm)
- 4 x Silicone Bumper
Resources

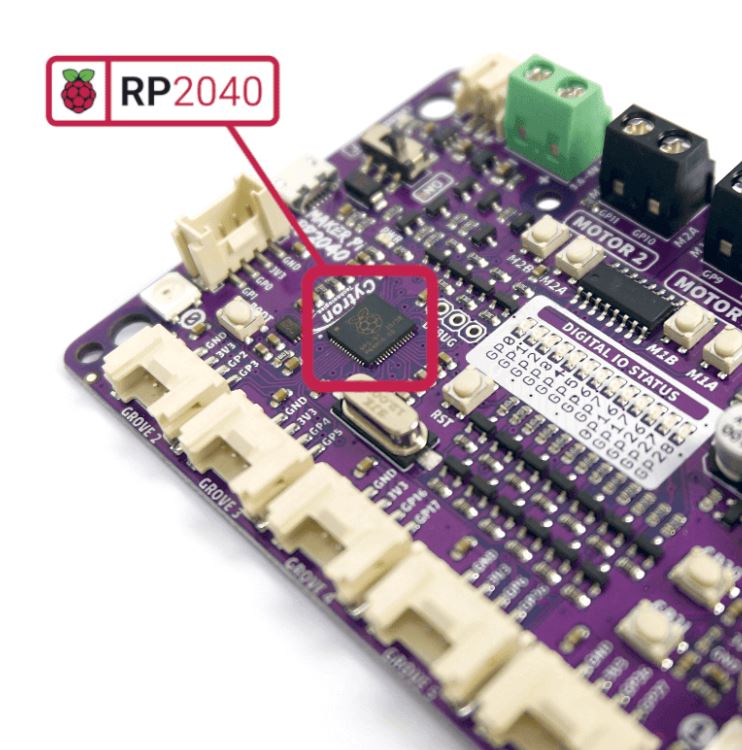
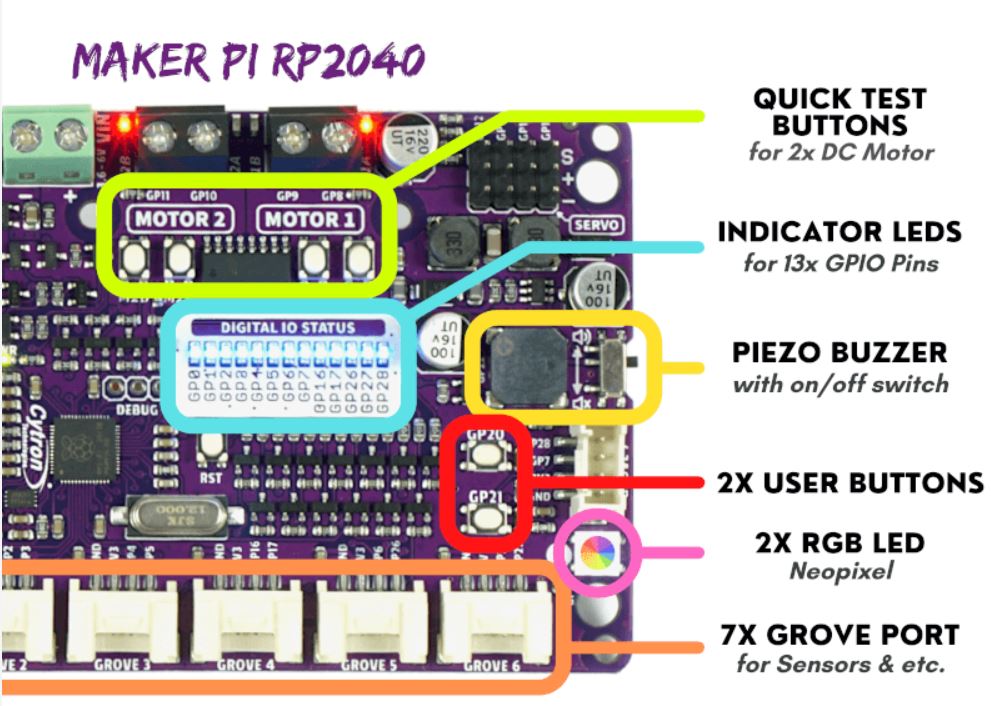
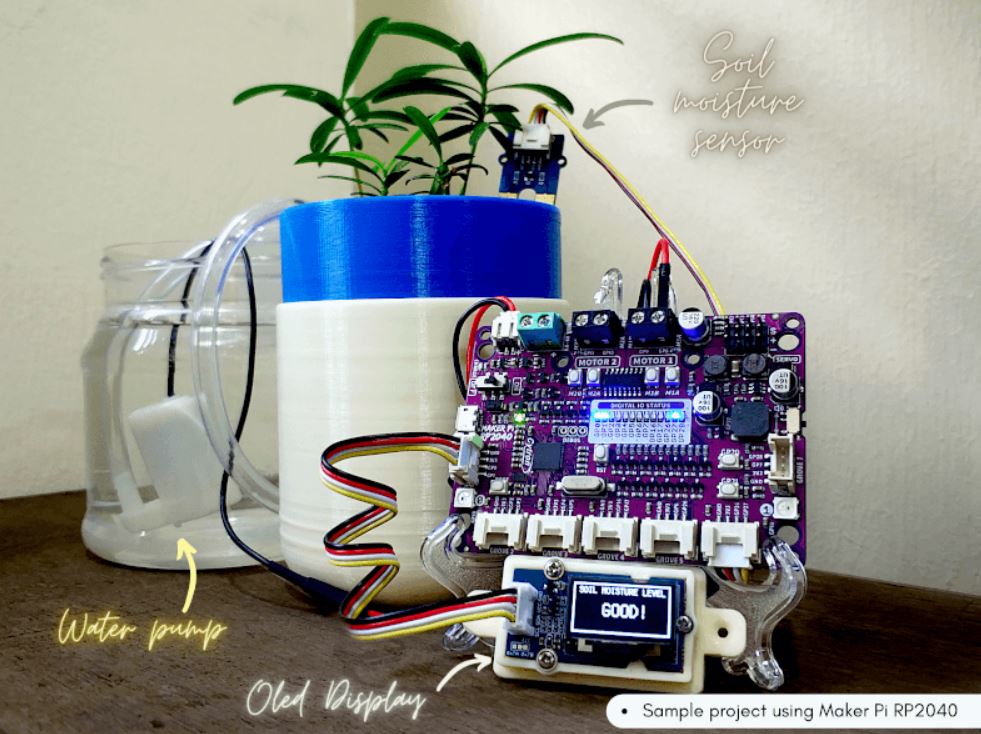
Cytron Maker Pi RP2040 features the first microcontroller designed by Raspberry Pi - RP2040, embedded on a robot controller board. This board comes with dual channel DC motor driver, 4 servo motor ports and 7 Grove I/O connectors, ready for your next DIY robot / motion control project. Now you can build robot, while trying out the new RP2040 chip.
The DC motor driver onboard is able to control 2x brushed DC motors or 1x bipolar/unipolar stepper motor rated from 3.6V to 6V, providing up to 1A current per channel continuously. The built-in Quick Test buttons and motor output LEDs allow functional test of the motor driver in a quick and convenient way, without the need of writing any code. Vmotor for both DC and servo motors depends on the input voltage supplied to the board.
Features:
- Powered by Rapberry Pi RP2040
- Dual-core Arm Cortex-M0 processor
- 264KB internal RAM
- 2MB of Flash memory
- the exact same specifications with Raspberry Pi Pico
- Robot controller board
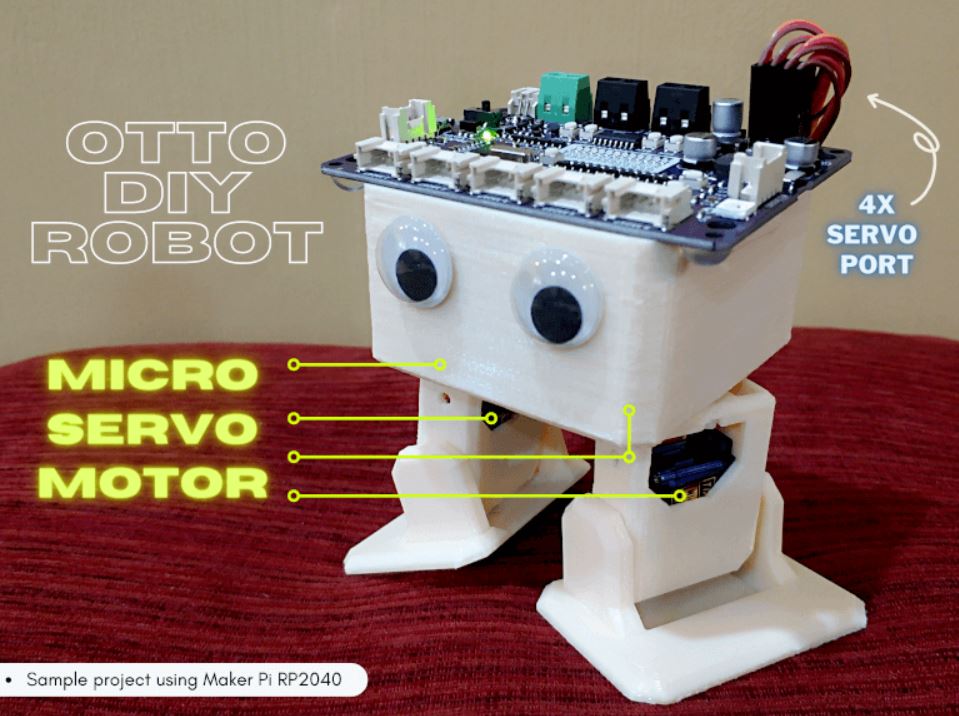
- 4x Servo motors
- 2x DC motors with quick test buttons
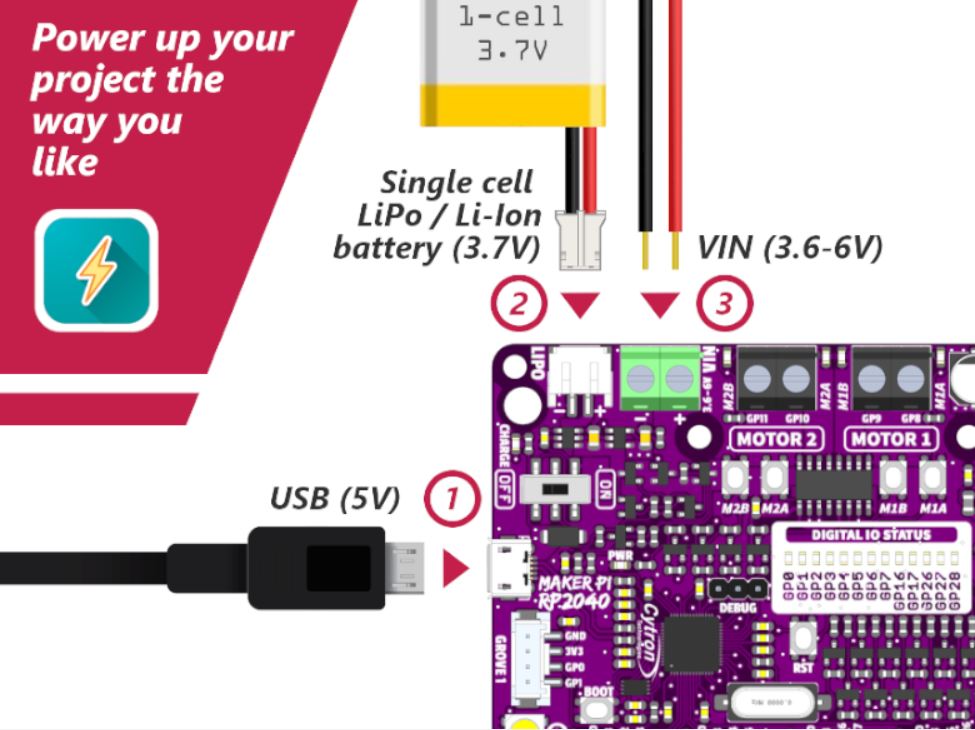
- Versatile power circuit
- Automatic power selection: USB 5V, LiPo (1-cell) or Vin (3.6-6V)
- Built-in 1-cell LiPo/Li-Ion charger (over-charged & over-discharged protection)
- Power on/off switch
- 13x Status indicator LEDs for GPIO pins
- 1x Piezo buzzer with mute switch
- 2x Push button
- 2x RGB LED (Neopixel)
- 7x Grove ports (flexible I/O options: digital, analog, I2C, SPI, UART...)
- Preloaded with CircuitPython by default
- Mouting holes
- 4x 4.8mm mounting hole (LEGO® pin compatible)
- 6x M3 screw hole
What's in the box ?
- 1x Maker Pi RP2040
- 4x Grove to Female Header Cable
- 1x Mini Screwdriver
- 1x Silicone Rubber Feet (Pack of 4)
Resources:
- Getting Started with Maker Pi RP2040 & Example Code
- Maker Pi RP2040 Datasheet
- Maker Pi RP2040 Schematic
- Maker Pi RP2040 VS. Maker Pi Pico comparison table
- CircuitPython for Maker Pi RP2040
- 3D CAD
- Getting Started with RP2040 (Raspberry Pi official page)
- RP2040 Datasheet
Powering the Maker Pi 2040
There are three ways to supply power to the Maker Pi RP2040 - via USB (5V) socket, with a single cell LiPo/Li-Ion battery or through the VIN (3.6-6V) terminals. However only one power source is needed to power up both controller board and motors at a time. Power supply from all these power sources can all be controlled with the power on/off switch onboard.
Maker Pi RP2040 features all the goodness of Cytron's Maker series products. It too has lots of LEDs useful for troubleshooting (& visual effects), is able to make quite some noise with the onboard piezo buzzer and comes with push buttons ready to detect your touch.
Simple Robotic projects done
(* Only includes the Maker board - All other contents are for idea / advertising purposes only*)

Your kids can always follow the video to build the fan or if you prefer the step by step guide in a document, we have also produced an instruction manual in English:

Note: Not suitable for children under 4 years old!
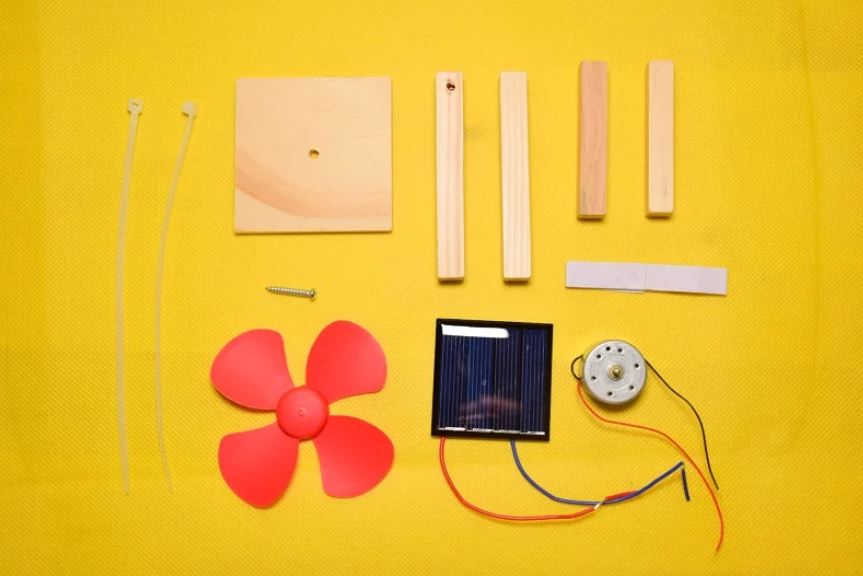
Note: The solar panel is meant for OUTDOOR actual sunlight, indoor lighting will NOT generate significant electric power.Features
- Do It Yourself wooden kit - Solar-powered fan for kids
- Simple and yet educational
- Suitable for age 4 years old and above
- Come with everything needed to assemble as a solar-powered fan.
- Powered by Solar panel
- No soldering is needed
- Learn about renewable energy, solar power, electric motor :)
What's in the box ?
Wooden parts for the fan structure
1 x Small Solar Panel
1 x Small DC Motor
1 x Small Propeller
1 x Small screw
Some double-sided tape
Some cable ties
Resources:
- Simple Instruction Manual (pdf) available at https://drive.google.com/file/d/1K09MvVAe6tJLdO5RsUI_s4Pwgs1dpiW3/view
- Assembly instructions available at https://www.youtube.com/watch?v=ss2Oe9W8oy0

Get this kit to keep your kids occupied with hands-on activities while enjoying the simple DC brushed motor from this kit when it is completed. This DIY kit is simple enough to be built by 4 years old children, with parent's help. And children 6 years old and above can build it by themselves! Let's them explore the fundamental of DC brushed motor, and also electromagnetic. What causes the coil to generates a magnetic field to push or pull the coil itself?
- In case you want to learn about DC brush motors:
https://www.youtube.com/watch?v=LAtPHANEfQo
- Your kids can always follow the video to build the motor or if you prefer the step by step guide in a document, we have also produced an instruction manual in English:
Note: Not suitable for children under 4 years old!
Features:
- Do It Yourself wooden magnetic DC motor for kids
- Suitable for age 4 years old and above
- Come with everything needed to assemble it
- Powered with two (2) AA-size battery (not included in this kit)
- No soldering is needed
- Learn about the electromagnetic principal
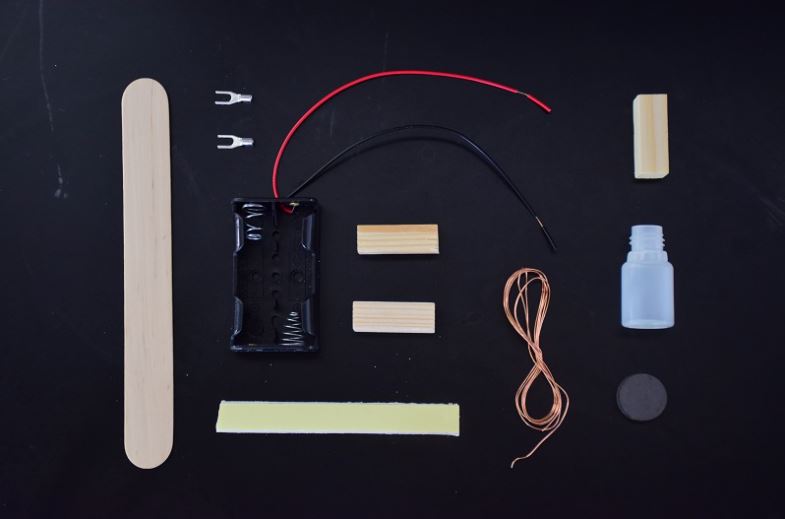
What's in the box?
- 1 x Ice cream stick
- 2 x Wire terminal as the brush motor coil
- 1 x AA battery holder with blade switch
- 2 x Wooded pole with hole
- 1 x Double-sided tape
- 1 x Wooded pole without hole
- 1 x 7. 2cm diameter plastic bottle
- 2 x Magnet Disc
Resources:
- Simple Instruction Manual (pdf) available at https://drive.google.com/file/d/1p0UPU8ADLOGYka_lz3OWIxzmNDq9jBUb/view
- Assembly instructions video available at https://youtu.be/UH1eYEZLvHc

A couple of things you should know about the Solar Project Kit:
- NO Hot Soldering Gun nor Hot Glue Gun is needed to complete the project!
- NO Screwdriver to connect components or wires! Press-fit terminals are included.
- Everything you need in one box - The box is part of the project too!
- Comes with an instruction manual - Sync to Standard 5 school textbook!
- Designed to fuel creativity! - When combined with basic materials.
Cytron Simplify the digital making :)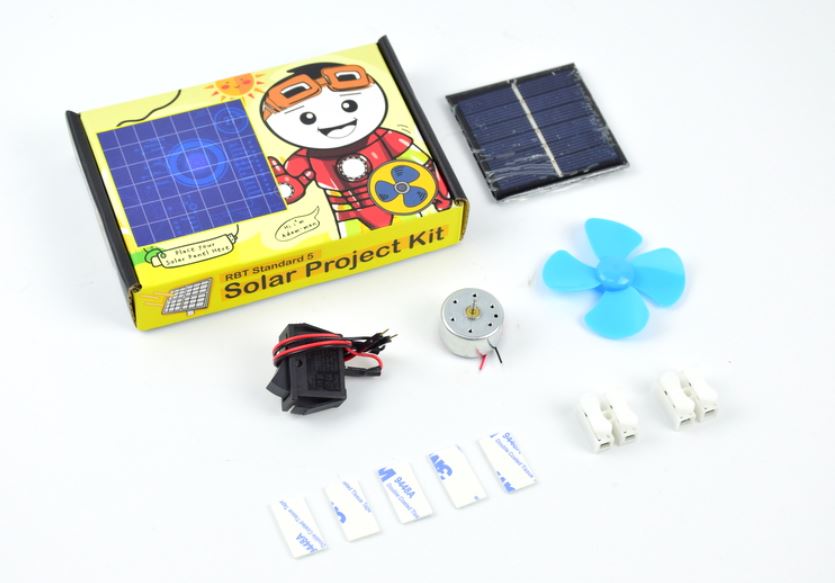
Solar Project Kit - Fan Edition
Take a closer look at what's in the box and how easy it is to get started with the Solar Project Kit - Fan Edition:
The fan will cool you under the hot sun. The energy to drive the fan is renewable, no carbon emission and is green! We should embrace and appreciate renewable energy. Together, let's make a better world and conserve the environment for our future generation.
What's in the Box?
1 x 300C 1.5-6VDC 7mm Shaft Motor with Wires
2 x CH-2 Quick Wiring Terminal Press Type
1 x DIY 4 Blades 56mm Motor Propeller (Blue)
1 x Rocker Switch with Wire-20CM
1 x Double Sided Tape 12 x 24 x 1mm (5 pcs)
1 x Instruction Manual for RBT 5 Solar - Fan
2 x 5mm Red LED *added for kit shipped after 19th March 2021*
Resources:
- Instruction Manual for RBT 5 Solar Fan available at https://drive.google.com/file/d/1RIsswXKObc_VaxY3xT2ik_0KQFzQMRLg/view?usp=sharing
- Assembly instructions video available at https://www.youtube.com/watch?v=UXxQlkyuetM

Once again, Cytron Technologies presents the in-house selected and packed do-it-yourself (DIY) Solar Project Kit. The kits are specially designed for Malaysia Primary School students and teachers who have to undergo a new subject known as Reka Bentuk & Teknologi (RBT). RBT is also a compulsory tech subject introduced to Secondary schools to enhance learning through practicality and hands-on. 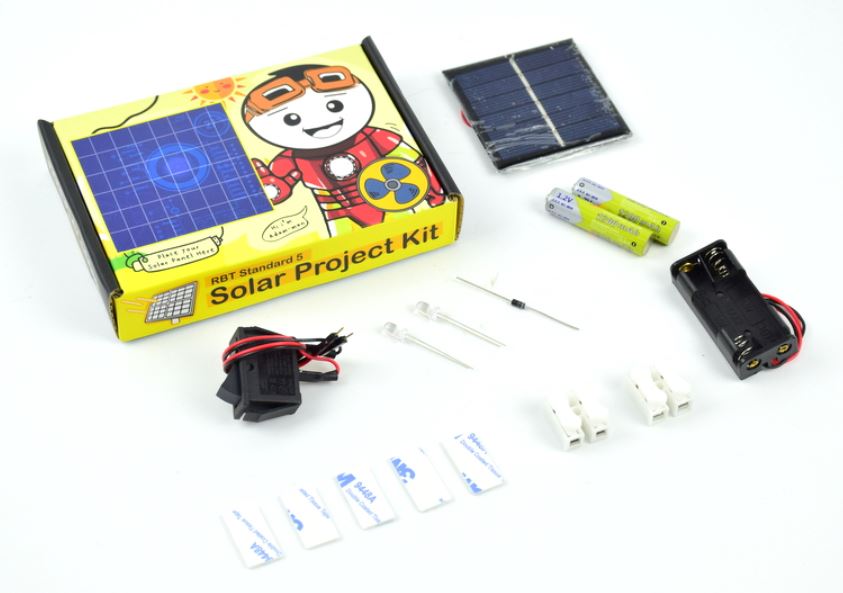
A couple of things you should know about the Solar Project Kit:
- NO Hot Soldering Gun nor Hot Glue Gun is needed to complete the project!
- NO Screwdriver to connect components or wires! Press-fit terminals are included.
- Everything you need in one box - The box is part of the project too!
- Comes with an instruction manual - Sync to Standard 5 school textbook!
- Designed to fuel creativity! - When combined with basic materials.
What's in the box ?
1 x Solar Cell/Panel 3V 160mA (0.48W) Wire Soldered
2 x CH-2 Quick Wiring Terminal Press Type
1 x Rocker Switch with Wire-20CM
1 x Double Sided Tape 12 x 24 x 1mm (5 pcs)
2 x LED Super Bright 5mm Red
1 x Diodes 1N4007
1 x AAAx2 Battery Holder
1 x PKCELL NiMH Rechargeable AAA 1200mAh Battery (2 Pcs)
1 x Instruction Manual for RBT 5 Solar - Light
Resources
- Assembly instructions video available at https://www.youtube.com/watch?v=E8YMGuFnWsA

Get this kit to keep your kids occupied with hands-on activities while enjoying the "robot" crawling when it is completed. This DIY kit is simple enough to be built by 4 years old children, with parent's help. And children 6 years old and above can build it by themself! Let's them explore the fundamental mechanical structure of the mechanical machine, and the concept of electric motor :)
Your kids can always follow the video to build the robot or if you prefer the step by step guide in a document, we have also produced an instruction manual in English: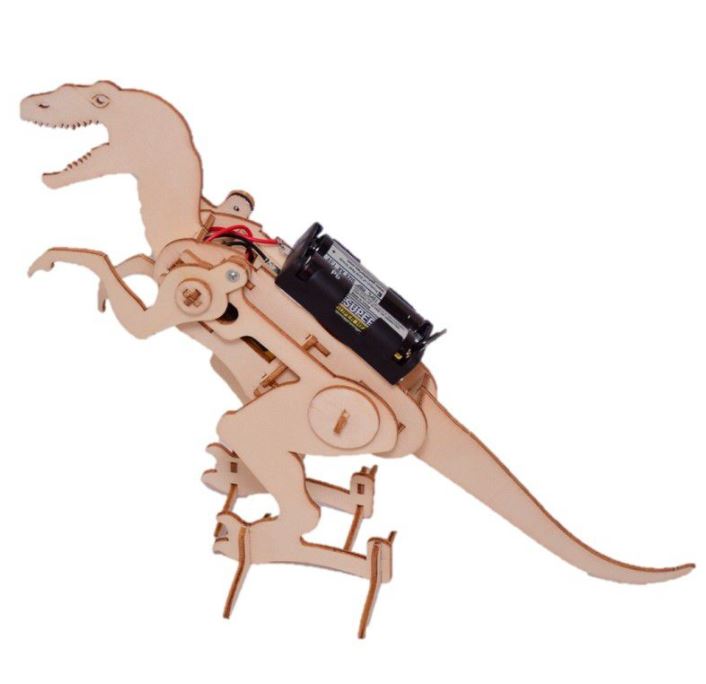
Note: Download the softcopy instruction manual (English) here.
Note: Not suitable for children under 4 years old!
Features:
- Do It Yourself wooden kit Crawling Robot for kids
- Mimic Worm Crawling
- Suitable for age 6 years old and above
- Come with everything needed to assemble as a moving robot
- Powered with two (2) AA-size batteries
- No soldering is needed
- Moveable or crawlable :)
- Learn the basic structure of the simple robot
What's in the box ?
- Wooden parts for the robot body structure
- 1 x Small DC motor
- 1 x 2xAA size battery holder with wires (Black and Red)
- Some double-sided tape
- Some screws
Resources:
- Simple Instruction Manual (pdf) available at https://drive.google.com/file/d/1WVc-3-I95Tl47QOWyyM2g2u_bAEDCkqH/view
- Assembly instructions video available at https://www.youtube.com/watch?v=d9xpB2ExP6M

For full instructions see our blog
Brushed motor is the most widely used motor because it is easy to use. Just supply the two terminals with DC power, the motor will start rotating! If you want to control its speed and direction using a controller, usually you will use an L298N Motor Driver. But if you want an easy and beginner-friendly motor driver, you are on the right page! Maker Drive is designed for simplicity and with the beginner in mind!
Motor Driver for Beginner- Maker Drive
Maker Drive is not an Arduino Shield, but it is compatible with different models of Arduino main board such as:
Not to forget that it accepts 1.8V, 3.3V & 5V logic(for control) and is compatible with controllers such as Raspberry Pi, micro:bit, Raspberry Pi Pico, ESP etc.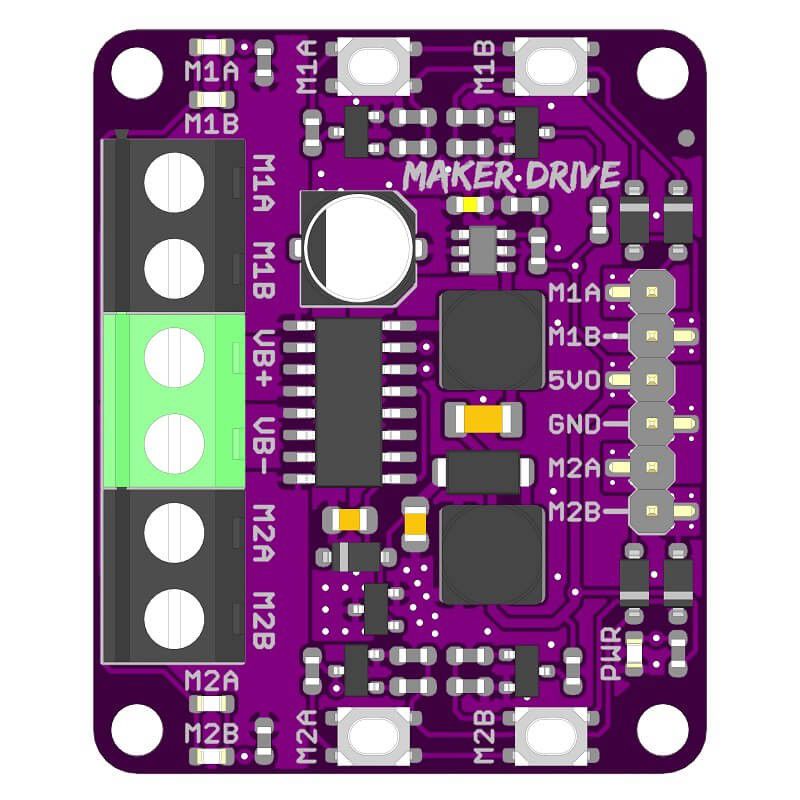
Since you have Maker Drive, you will need suitable DC brushed motors besides the controller, right? So which motor is suitable for Maker Drive? Well, as long as the motor is...
- DC Brush motor (Two Terminals)
- Operating voltage from 2.5V to 9.5VDC
- Rated Current ≤ 1.0A
- Peak Current ≤ 1.5A

Example of suitable DC brush motor for Maker Drive (Not limit to):
These are the suggested power sources for Maker Drive:
- 2, 3 or 4 x AA/AAA batteries (2 x 1.5V = 3.0V) Battery holder
Specifications:
- Dual-channel, Bi-directional control motor driver
- Support motor voltage from 2.5V to 9.5VDC
- Maximum current up to 1.0A continuous and 1.5A peak (less than 5 seconds)
- 5V Output (200mA) to power the controller.
- Inputs compatible with 1.8V, 3.3V and 5V logic (Arduino, Raspberry Pi, etc).
- Solid-state components provide faster response time and eliminate the wear and tear of mechanical relay
- Regenerative Braking
- Speed control PWM frequency up to 20KHz (Actual output frequency is the same as input frequency)
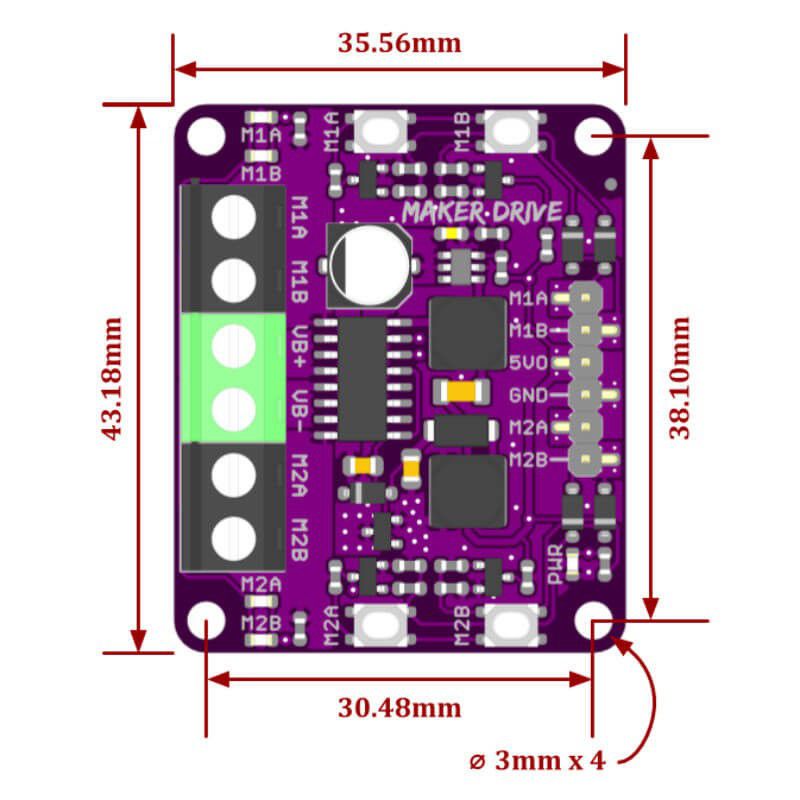
- Dimension: 43mm(W) x 35mm (L) x 14mm (H)

What's in the box:
1 x Maker Drive board
Resources:
- Datasheet
- Arduino Sketch (Github), please select PWM_PWM_DUAL under example
- Tutorial: Line Following Robot using Arduino and Maker Drive
- Fritzing files
- Maker Drive 3D files (IGs and STEP)

Pictures are for reference only
Have some fun with this 3D printing pen, this 3D printing pen is also suitable and safe for kids. They can now develop their hands-on skills and mental development ability.
By using the 3D pen can actually help kids developing their artistic skills, spatial thinking, and can be a great creative outlet that engages their minds as they create. Besides, this 3D printing pen has a stable performance. It is more stable, safe and reassuring. Let your child fall in love with 3D printing.
Specifications
- Electrical Parameter: 5VDC 2A
- Comes with a USB cable. Can be charged and used remotely.
Note: A power adapter is NOT included. - Can be used everywhere
- 3D printer for hand use
- Compatible with ABS and PLA filaments
- Diameter of filaments: 1.75mm
- Nozzle diameter: 0.7mm
- Heating Temperature: 160ºC - 210ºC (PLA), 210ºC - 235ºC (ABS)
- LCD for display filament type and temperature
- Adjustable filament feeding speed
- Ergonomic design, lightweight design, easy to operate
- Dimensions: 184mm x 31mm x 46mm
What's in the box ?
1 x 5V 3D Pen V2 with PLA Filament - Yellow
1 x 3D Printing Pen stand
1 x USB cable
1 x Packet filament (3 random colors, 3 meters in total)
1 x User Manual/Operation Instruction
Check this link out to see what some people come up with :
3D printing pen

Want to print a spool holder that clips onto your 3D pen?
Check out Thingiverse
This device allows you to store and use lengths of 1.75mm filament for a 3D pen. The unique mini spool is designed to prevent the filament from unraveling under its own spring tension. The parts can be welded together with your 3D pen.

Images are for reference only
Have some fun with this 3D printing pen, this 3D printing pen is also suitable and safe for kids. They can now develop their hands-on skills and mental development ability.
By using the 3D pen can actually help kids developing their artistic skills, spatial thinking, and can be a great creative outlet that engages their minds as they create. Besides, this 3D printing pen has a stable performance. It is more stable, safe and reassuring. Let your child fall in love with 3D printing.
Specifications
- Electrical Parameter: 5VDC 2A
- Comes with a USB cable. Can be charged and used remotely.
Note: A power adapter is NOT included. - Can be used everywhere
- 3D printer for hand use
- Compatible with ABS and PLA filaments
- Diameter of filaments: 1.75mm
- Nozzle diameter: 0.7mm
- Heating Temperature:
- 160ºC - 210ºC (PLA)
- 210ºC - 235ºC (ABS)
- LCD for display filament type and temperature
- Adjustable filament feeding speed
- Ergonomic design, lightweight design, easy to operate
- Dimensions: 184mm x 31mm x 46mm
What's in the box?
1 x 3D Printing Pen with PLA filament - Pink
1 x 3D Printing Pen stand
1 x USB cable
1 x Packet filament (3 random colors, 3 meters in total)
1 x User Manual/Operation Instruction
Check this link out to see what some people come up with :
3D printing pen
Want to print a spool holder that clips onto your 3D pen?
Check out Thingiverse
This device allows you to store and use lengths of 1.75mm filament for a 3D pen. The unique mini spool is designed to prevent the filament from unraveling under its own spring tension. The parts can be welded together with your 3D pen.