
Generic1


Specifications
- Module Type: Buck converter
- Input: 8V to 90V
- Output: 5V
- Output current: 5A(max)
- Conversion efficiency: up to 96%
- Size: 46mm x 32mm x 18mm
1 x 5V 5A Power Adapter
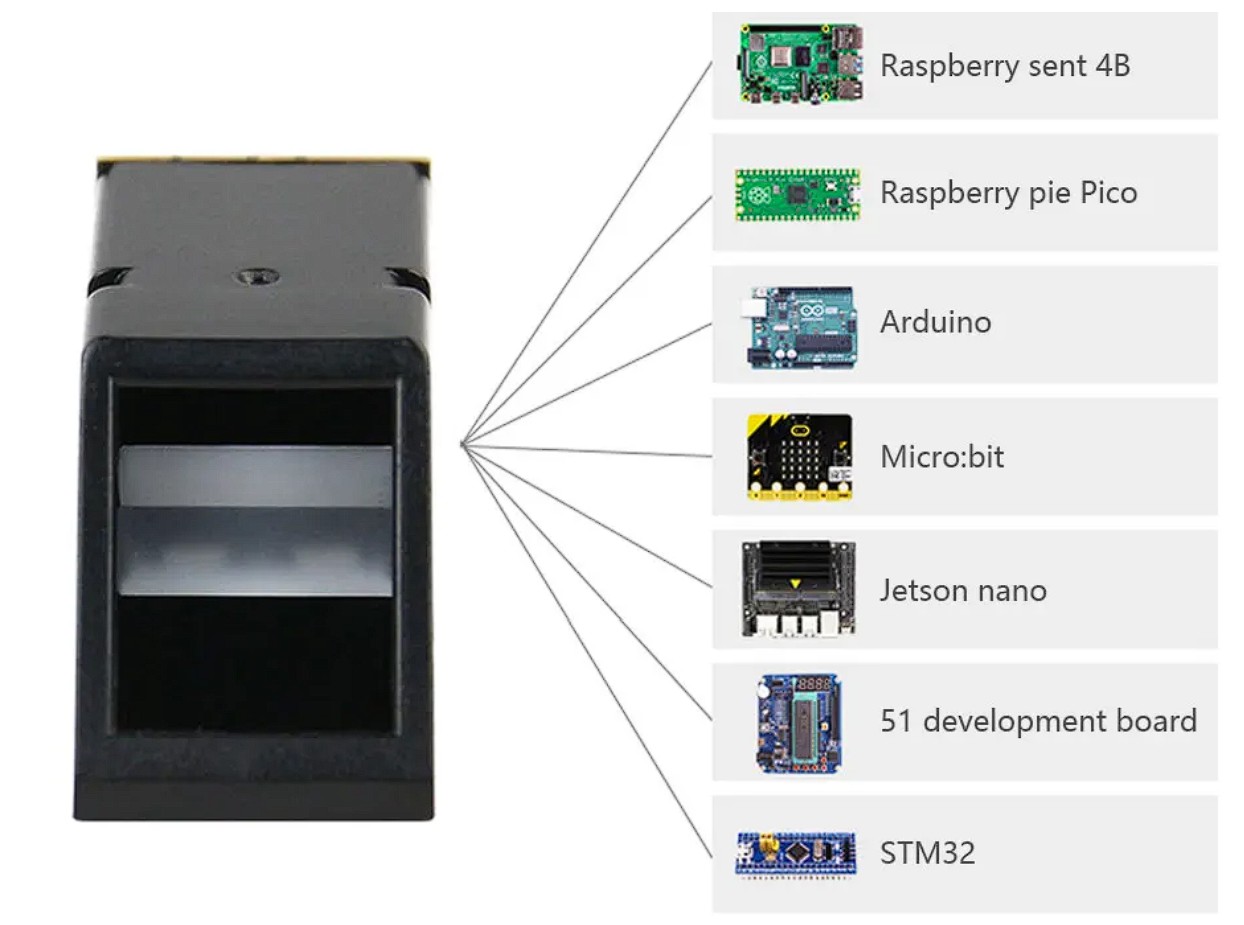
The AS608 Optical Fingerprint Scanner is a highly versatile, all-in-one biometric module favored by makers for its built-in processing power. Unlike simpler sensors, the AS608 handles the "heavy lifting" (image rendering, feature finding, and searching) on its own onboard DSP chip, allowing it to work seamlessly with even low-power microcontrollers like an Arduino Uno.
Key Features
- All-in-One Processing: Integrated optical sensor and high-speed DSP handle enrollment and matching internally.
- Onboard Storage: Can store and manage between 162 to 255 fingerprint templates (depending on the specific firmware version) in its internal flash memory.
- Two-Phase Security: Supports both 1:1 Matching (verifying a specific user) and 1:N Searching (identifying a user from the entire database).
- Visual Feedback: Features a built-in LED (usually green or red) that lights up during the scanning process.
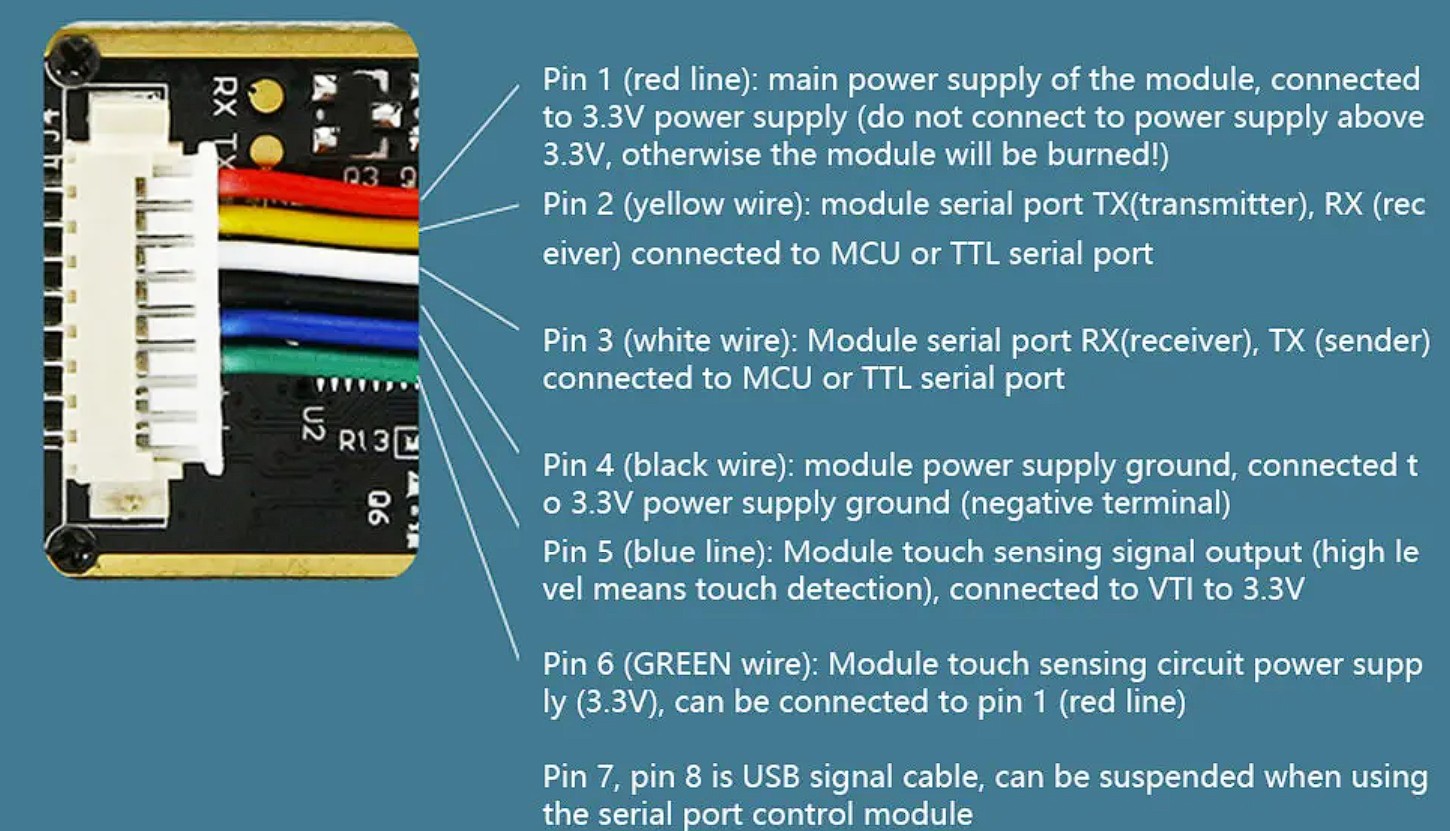
- Flexible Interface: Uses a standard TTL Serial (UART) interface, making it "plug-and-play" with Raspberry Pi, Arduino, ESP32, and PCs.
Best Use Cases
- Biometric Door Locks: Perfect for home automation or safe boxes.
- Attendance Systems: Creating a "clock-in" station for offices or classrooms.
- User Identity for DIY Projects: Restricting access to a Raspberry Pi terminal or an arcade machine
| Parameter | Specification |
| Supply Voltage | 3.6V to 6.0V DC (Standard 5V recommended) |
| Operating Current | <120mA (Peak 150mA) |
| Interface | UART (TTL Logic Level) |
| Resolution | 500 DPI |
| Imaging Time | < 1.0 Seconds |
| False Acceptance Rate (FAR) | < 0.001% |
| False Rejection Rate (FRR) | < 1.0% |
| Window Dimensions | 14mm x 18mm |
| Module Dimensions | ~56mm x 20mm x 21mm |
What's in the box?
1 x fingerprint scanner with connecting wires
Resources
The GY-BMI160 is a highly integrated, low-power 6-axis inertial measurement unit (IMU) designed for precise motion tracking. It combines a 16-bit digital, 3-axis accelerometer and a 3-axis gyroscope into a single compact module, making it an ideal choice for space-constrained and battery-sensitive applications.
At its core lies the Bosch BMI160 sensor, which features advanced internal power management, intelligent interrupt engines, and precise synchronization capabilities, allowing it to deliver high-performance motion sensing with minimal power consumption.
Key Features
Integrated Sensing: Combines a 3-axis accelerometer and a 3-axis gyroscope on a single chip.
Low Power Consumption: Optimized for wearable devices and battery-operated electronics.
High Precision: 16-bit data output with selectable full-scale ranges for both the accelerometer and gyroscope.
Integrated Features: Includes on-chip interrupt engines for motion detection (step detection, tap/double-tap, any-motion, orientation).
Communication Interfaces: Supports both I2C and SPI digital interfaces for easy integration with microcontrollers like Arduino, ESP32, or STM32.
Compact Design: The module form factor is designed for easy breadboarding and integration into prototyping projects.
Technical Specifications
| Parameter | Detail |
| Sensor Model | Bosch BMI160 |
| Supply Voltage | 3.3V – 5V DC |
| Communication | I2C (up to 1MHz) / SPI (up to 10MHz) |
| Accelerometer Range | ±2, ±4, ±8, ±16 g |
| Gyroscope Range | ±125, ±250, ±500, ±1000, ±2000 °/s |
| Interface Levels | Digital |
Typical Applications
Wearable Technology: Smartwatches, fitness trackers, and health monitoring devices.
Robotics & Drones: Balancing, orientation tracking, and navigation.
Human-Machine Interaction: Gesture recognition and motion-controlled interfaces.
IoT Devices: Activity monitoring and motion-triggered logging.
Note: The GY-BMI160 is a sensitive component. When mounting the module in your project, ensure it is firmly attached to the chassis; vibrations or loose connections may introduce significant noise into the sensor data.
What's in the box?
1 x GY-BMI160 6DOF Module
1 x 12 pin header
Resources
Using with Raspberry Pi
Using the GY-BMI160 with a Raspberry Pi is a straightforward process, as the module supports the standard I2C communication protocol, which is natively supported by the Raspberry Pi GPIO header.
Wiring Guide
You will need to connect the module to the Raspberry Pi's I2C pins. Ensure you are using the 3.3V pin on the Pi, as the BMI160 is a 3.3V device.
| GY-BMI160 Pin | Raspberry Pi Pin (GPIO Header) |
| VCC | 3.3V (Pin 1) |
| GND | GND (Pin 6 or 9) |
| SCL | SCL (Pin 5) |
| SDA | SDA (Pin 3) |
Step-by-Step Setup
Enable I2C:
Open your terminal on the Raspberry Pi.
Run
sudo raspi-config.Navigate to Interface Options > I2C and select Yes to enable it.
Reboot your Pi:
sudo reboot.
Verify Connection:
Install the I2C tools:
sudo apt-get install i2c-tools.Run the detection command:
i2cdetect -y 1.You should see a device address (typically
0x68or0x69) appear in the grid. This confirms the Pi sees the sensor.
Install Python Libraries:
The most common way to interface with this sensor is using Python. You will need the
smbus2library or a specific BMI160 wrapper.Install smbus:
sudo apt-get install python3-smbus.You can then search for available GitHub repositories for "BMI160 Python Raspberry Pi" to find pre-written drivers that handle the register communication for you.
Reading Data:
Once you have the library installed, you can run a simple test script to read the acceleration and gyroscope values (X, Y, Z axes).
Tip: Remember that the raw data requires scaling based on the range you set (e.g., ±2g, ±250°/s) to convert the values into meaningful units like $m/s^2$ or degrees per second.
Important Considerations
Logic Levels: Always ensure you are using 3.3V for the signal lines. Connecting to 5V pins can damage the sensor or the Raspberry Pi.
Interrupts: If you need to use the advanced features like "step detection," you will need to connect the INT1 or INT2 pins of the module to one of the Raspberry Pi's GPIO input pins and configure an interrupt handler in your code.
Calibration: IMUs often require a calibration routine to remove "bias" or "offset" errors when the device is stationary.
Please make sure you are selecting the correct fan for your model of the Pironman case. This is the 2 wire option.
Keep your Pironman 5 Max or Pironman 5 Mini running cool and looking sharp with this official SunFounder replacement RGB fan. Purpose-built to match the exact size, connector, and RGB lighting integration of the case's original cooling fan, it's a drop-in replacement for a worn-out, noisy, or damaged unit — no modification required.
This compact 40 x 40 x 10mm fan delivers reliable airflow to support your Raspberry Pi 5 under sustained loads, whether you're running a NAS, AI workload, or always-on home server. Built with a durable hydraulic bearing for a long service life, and finished with vibrant RGB lighting that syncs seamlessly with your case's existing lighting effects.
Key Specs
- Dimensions: 40 × 40 × 10 mm
- Weight: 13.5 ± 5 g
- Rated Voltage: 5V DC
- Rated Speed: 3500 ± 10% RPM
- Max Airflow: 2.46 CFM
- Noise Level: 22.31 dBA
- Operating Temp: -10°C to +70°C
Compatibility: Pironman 5 Max, Pironman 5 Mini
Note: This fan is designed specifically for the Pironman 5 Max and Mini. If you own the original Pironman 5, you'll need the separate RGB Fan for Pironman 5 instead, as it uses a different control scheme.
Please make sure you are selecting the correct fan for your model of the Pironman case. This is the 4 wire option.
Keep your Pironman 5 Max or Pironman 5 Mini running cool and looking sharp with this official SunFounder replacement RGB fan. Purpose-built to match the exact size, connector, and RGB lighting integration of the case's original cooling fan, it's a drop-in replacement for a worn-out, noisy, or damaged unit — no modification required.
This compact 40 x 40 x 10mm fan delivers reliable airflow to support your Raspberry Pi 5 under sustained loads, whether you're running a NAS, AI workload, or always-on home server. Built with a durable hydraulic bearing for a long service life, and finished with vibrant RGB lighting that syncs seamlessly with your case's existing lighting effects.
Key Specs
- Dimensions: 40 × 40 × 10 mm
- Weight: 13.5 ± 5 g
- Rated Voltage: 5V DC
- Rated Speed: 3500 ± 10% RPM
- Max Airflow: 2.46 CFM
- Noise Level: 22.31 dBA
- Operating Temp: -10°C to +70°C
Compatibility: Pironman 5 Max, Pironman 5 Mini
Note: This fan is designed specifically for the Pironman 5 Max and Mini. If you own the original Pironman 5, you'll need the separate RGB Fan for Pironman 5 instead, as it uses a different control scheme.

Feature
- Rated power: 80W
- Temperature adjustment range: 180 ℃ - 500 ℃
- Heating method: internally heated ceramic core
- Electric soldering iron wire length: 1.3m
- Product weight: 90g
- Power plug: EU
- Product function: ° C/° F switching
What's in the box?
1 x 908S Soldering Iron
A DC-to-DC converter is an electronic circuit or electromechanical device that converts a source of direct current (DC) from one voltage level to another. It is a type of electric power converter.
Ideal for reading high 5V sensors on your SBC or Microcontrollers, or sending signals to 5V input devices
Specifications
- Mutual conversion between 3V and 5V, It's convenient for PI connected to external 5V sensors or modules
- Supports total of 8 channels
- Range of voltage converted: 1.6V~5.5VDC
What's in the box?
1 x Voltage Converter Module