
Generic2


The universal Ball Bearings is great for you to replace the damaged Ball Bearings in your devices to improve efficiency and save energy.
Widely used in home appliances, industrial, low noise and high speed electric motors, construction machinery, automotive components, pumps, and machinery. Smooth moving, low friction, high rigidity and long life. Economical, easy to maintain replace.
Specifications :
Model : SC8UU
Material : Steel, Aluminum
Size : Approx. 34 x 30 x 22cm / 1.34 x 1.18 x 0.87"
Inner Diameter : Approx. 8mm / 0.31"
Package included :
1x SC8UU Linear Motion Ball Bearing

6pcs 1/2 Inch Shaft Round Over Edging Router Bit
Specifications:
Name :1/2" Round Over Router Bits
| Size | Cutter Diameter | Total length |
| 1/2" R | 1.25’’ | 2.40’’ |
| 7/16R | 1.12’’ | 2.31’’ |
| 3/8" R | 1.01’’ | 2.31’’ |
| 5/16" R | 0.99’’ | 2.24’’ |
| 1/4" R | 0.88’’ | 2.04’’ |
| 1/8" R | 0.77’’ | 2.04’’ |
-Great for combined plunge-cutting and pattern/template routing.
6 x 1/2" Round Over Router Bit

Dual signal output (analog output, and TTL level output);
TTL output valid signal is low, can be connected directly to the microcontroller;
0 ~ 5V analog output voltage, the higher the concentration the higher the voltage;
Has a high sensitivity and good selectivity to ethanol vapor;
Has a long life and reliable stability;
Rapid response recovery characteristics;
Features
- The main chip: LM393, MQ-3 gas sensor
- Operating voltage: DC3-5V
- Response time: ≤10s
- Recovery time: ≤30s
- Heating resistance: 31Ω±3Ω
- Heating Current: ≤180mA
- Heating Voltage: 5V±0.2V
- Heating Power: ≤900mW
- Detect Voltage: ≤15V
- Ambient Temperature: -10℃ to 65℃,
- Humidity: ≤95%RH
- Storage conditions: Temperature:-20℃-70℃,Humidity:≤ 70%RH
Applications
For motor vehicle drivers and other non-drinking and operating personnel on-site testing, also used in other places of ethanol vapor detection, detection of alcohol: detection range of 10 to 1000ppm
What's in the box?
1 X Alcohol sensor module
Resources
Analog to Digital converter not included
Wiki

Give your next microcontroler project a nose for gasses with the MQ2 Gas Sensor Module. This is a robust Gas sensor suitable for sensing LPG, Smoke, Alcohol, Propane, Hydrogen, Methane and Carbon Monoxide concentrations in the air. If you are planning on creating an indoor air quality monitoring system; breath checker or early fire detection system, MQ2 Gas Sensor Module is a great choice.
Features
- Using high-quality dual-panel design, with power indicator and TTL signal output instructions
- There are four screw holes for easy positioning
- Analog output voltage with the higher concentration of higher voltage
- TTL output valid signal is low. (Low-level signal when the output light can be directly connected to the microcontroller or relay module)
- The switching signal having a DO (TTL) output and analog output AO
Special note
After the sensor is powered, wait about 20S until measured data becomes stable.
Heat in the sensor is a normal phenomenon due to the internal heating wire.
Specifications
- Size: 32mmX22mmX27mm
- Chip: LM393, ZYMQ-2 gas sensors
- Working voltage: DC 5V
- AO output :0.1-0 .3 V (relative to pollution), the maximum concentration of a voltage of about 4V
- DO output: TTL digital 0 and 1 (0.1 and 5V)
- Input voltage: DC 5V 150mA
What's in the box?
1 x MQ-2 Gas Sensor Module
Resources
Getting started with MQ-x
Analog to Digital converter not included

Specifications
- Size: 5mm
- Length: 37mm
- Emitted colour: Infrared
- Lens color: Black/Clear
- wavelength: 940nm
- Forward voltage (V): 1.2-1.4V
- Forward current (mA): 100mA
- Transmitting and receiving distance: about 7-8 Meters
What's in the box?
5 x Emitter IR Infrared Diode
5 x Receiver IR Infrared Diode
The sensor uses FR-04 high-quality double-sided material, King Size 5.0 * 4.0CM, and with a surface of nickel plating treatment against oxidation for superior performance and longevity;
The output is in the form of digital switching outputs (0 and 1) and analog AO voltage output;Sensitivity can be adjusted via the potentiometerLED lights up when there is no rain, output is high.
Specifications
Small board PCB size: 32mm x 14mm
Operating voltage: 3.3V-5V
How to use
Connected to 5V power supply, the power indicator will light up.
With no water droplets, DO output is high, LED turns off.
Dropping on a drop of water, DO output is low, the indicator light switch on,Brush off the the above water droplets, has returned to output high state. . . .
Connection mode
1, VCC: positive power supply (3-5V)
2, GND: negative one.
3, DO: TTL switching signal output
4, AO: Analog signal output
What's in the box?
1 x Rain sensing board
1 x Control board
5 x 20cm Dupont Line
Resources
Features
- Work surface to perform detailed DIY projects.
- Pre-Printed grid designed to help you keep parts organized.
Specifications
- Heat-resistant Repair Pad Size: approx. 350mm x 250mm x 5mm
- Gross weight: approx. 260g
- Heat resistance: 350 °C
1 x Heat-resistant Repair Pad

Specifications:
Comprehensive error: 0.05% F.S
Rated output temperature drift: ≤ 0.15% F.S / 10 ℃
Output Sensitivity: 1.0 ± 0.1 mV / V
Zero drift: 0.05% F.S (1 minute)
Zero point temperature drift: 0.2% F.S / 10 ° C
Zero output: ± 0.1 mV / V
Input impedance: 1000 ± 50Ω
Output impedance: 1000 ± 50Ω
Overload capacity: 150% F.S
Recommended excitation voltage: 5-10V
Operating temperature range: -10 ~ 50 ℃
Application:
For high-precision small-scale weighing for micro-automatic testing equipment, micro-weighing equipment, pushing and pulling equipment, pull pressure test
Red: E
Black: E-
White: A-
Green: A
What's in the box?
1 x Weighing Sensor Load Cell
1 x HX711 Module
Resources:
Building a Raspberry Pi weight scale
Python Library
Building an Arduino weight scale

- Size: 56mm x 21mm x 11mm
- Fixing hole: 3mm
- Pitch: 15mm
- Colour: red yellow green
- LED: 5mm x 3
- Brightness: Normal brightness
- Voltage: 5V
- Input: Digital level
- Interface: common cathode, red, yellow and green separate control
- Platform: Arduino, microcontroller

Product Name : Fan Metal Finger Guard
Material : Metal
Fit for Fan Size : 80mm x 80mm / 3.15" x 3.15"(L*W);
Total Size : 90mm x 90mm
Colour : Silver Tone
Net Weight : 12g
We use these as speaker covers on the arcades we build.
What's in the box?
1 x grill
Specifications
- Type : CP-2015
- Length : 1.5M
- Width : 2.0mm
What's in the box?
1 x 2.0mm 1.5m Desoldering Wick CP-2015
Resources
How to desolder
How to use
1.Place the desoldering wick over the solder to be removed,then put the heated soldering iron tip onto the desoldering wick.The solder will be absorbed.
2.Remove the desoldering wick after the solder has been absorbed.
3.Cut off the used section of the wick using nippers.
4.Repeat steps 1,2 and 3 if the solder is not removed completely.
Absorption may differ depending on the type of solder.Sn63% and 60% (tin content) have good absorption ability.
Usage Examples
How Much Power Does my Fridge Use - with the Battery connected to the SOURCE side and Car Fridge (or other accessory) connected to the LOAD side. The Watt Meter shows the current into the Fridge, voltage and power at the battery and accumulates the Ah and Wh while the fridge is running.
How much charge is going into my battery - With a battery charger (or alternator) connected to the SOURCE side and the aux battery connected to the LOAD side, the Watt Meter shows the charging current into the battery, the voltage and charging power at the battery and accumulates the charge (Ah) and energy (Wh) into the battery.
What is the output of my solar panel - With a solar panel connected to the SOURCE side and solar regulator connected to the LOAD side, the Watt Meter shows the charging current into the regulator, the voltage and charging power at the solar panel and accumulates the charge (Ah) and energy (Wh) into the regulator.
How much charge is my solar panel putting into my battery - Now with a solar regulator connected to the SOURCE side and battery connected to the LOAD side, the Watt Meter shows the charging current into the battery, the voltage and charging power at the regulator and accumulates the charge (Ah) and energy (Wh) into the battery.
Specifications
| Item Name | Watt Meter and Power Analyzer |
| Item NO. | FT08 |
| Operation Voltage | 4.8V-60V |
| Measures Range | 0-130A, resolution 0.01A; 0-60V, resolution 0.01v; 0-6554W, resolution 0.1w; 0-65Ah,resolution 0.001An; 0-6441Wh,resolution 0.1Wh; |
| LCD | 16 x 2, backlit LCD display |
| Size | 85 mm x 43 mm x 25 mm (3.35 in x 1.69 in x 0.98 in) |
| Weight | 82g |
| Colour | Black |
What's in the box?
1x 130A High Precision Battery Watt Meter And Power Analyzer
Resources
English Manual please click here

Specifications
| Lead screw | |
| Material | stainless steel |
| Diameter | 8mm |
| Pitch | 2mm |
| Lead | 4 |
| Total Length | 400mm |
Screw nut | |
| Material | brass |
Diameter | 8mm |
| Pitch | 2mm |
| Lead | 4 |
Mounted ball bearing | |
| Material | zinc alloy |
| Bore diameter8 mm | 8mm |
| Total length | 55mm |
| Height | 29mm |
Shaft coupling | |
| Material | aluminium |
| Shaft | 6.35 x 8 mm |
| Length | 25 mm |
| Diameter | 20mm |
Motor | |
| Voltage | 24V |
| Step angle | 1.8° |
| Accuracy of step angle | ±5% |
| Accuracy of resistance | ±10% |
| Accuracy of inductance | ±20% |
| Insulation resistance | 100mΩmin 500VDC |
| Radial clearance | 0.02Max |
| Axial clearance | 0.08Max |
| Radial maximum tolerance | 28N |
| Axial maximum tolerance | 10N |
- 3D printer T8 400mm Stainless Steel Lead Screw Screw nut Mounted ball bearing Shaft coupling Motor.
- Screw mainly use for Stepping motor driving guide rail,machine tool, and other equipment.
- Screw without processing, direct connected to bearing.
- T shape design, make of high quality stainless steel material.
- Easy to install and convenient to use.
- Fine producing and practical.
- Suitable for Industrial automation equipment, stepper motor rails;
- Fit for 3D printer; engraving machine; XYZ module; slider; lifts ect.
What's in the box?

Although the reader does not read the information on the NFC card, it is triggered by a 125 khz NFC card
2x16 Character LCD is most popular display component for small controller like Arduino, but most of these LCD uses parallel interface. In most of the cases, you will need 10 pins to control it or to display message on it. 8-pin are for the data, Enable and Latch pin for signal control. Minimum, you will need 6-pin for 4-bit mode interface. Still a lot of pins being used up :(
This I2C module for LCD will help you save all those precious pins. This module will only need 2 GPIO pins (specifically I2C pins) to send message to Character LCD.
This module uses an I2C communication interface. Including the I2C pins: SCL and SDA, it only require two more pins for power, VCC and GND. It saves 4 to 8 pins on Arduino or any other controller. The pins are breakout into standard right angle header (2.54mm spacing), you can connect with female jumper wires directly.
It comes with potentiometer for LCD contrast adjustment, and configurable I2C Address through A0, A1 and A2 pads. Anyway, the default address is 0x3F or 0x27. There is also a mini jumper to activate or deactivate the backlight.
- I2C connector: VCC, GND, SCL, SDA
- Compatible with Arduino/Genuino UNO, Leonardo, Mega, 101 (Intel Curie), Micro, Nano, Mini
- I2C Address:0x27 or 0x3F
- Supply voltage: 5V
- Interface:I2C/TWI x1,Gadgeteer interface x2
- Adjustable contrast via potentiometer
- Size:82x35x18 mm (3.2x1.4x0.7 in)
What's in the box?
1 x I2C Module for Character LCD


Use box-type bearing module, the maximum extent to ensure the stability of operation of the print head, while ensuring stability in the premise, as far as possible to simplify the design and reduce the weight of the printhead mounting base on the maximum.
Aluminum alloy, surface sandblasting treatment, more texture.
Suitable for Reprap Prusa i3 3D printers use, shaft pitch can be adjusted to ensure suitability mounting base and prints.
After sandblasting surface treatment products more attractive, scratch-resistant.
Specifications:
Type: E3D V6
Material: Metal
Bracket Width: 35.6mm
Holder Height: 50mm
Holder Depth: 33.6mm
Fit for: 3D Printer Extruder
Package Includes:
1x E3D V6 Bracket

This is a Panel Meter that measures Voltages and Current. The display can measure voltages from 0v to 100v dc and measure current from 0 to 10 Amps. The display has 3 segments and can simultaneously calculate the power consumption in watts.
Specifications
- Voltage 0.0V to 100V
- Current 0A to 10A
- Working voltage DC 4 to 30V
- Working current <20mA
- Size 48mm x 29mm x 22mm
What's in the box?
1 x Digital Voltmeter Ammeter
Resources
For a load of 10A or more you will have to use a shunt as per diagram 3 and 4.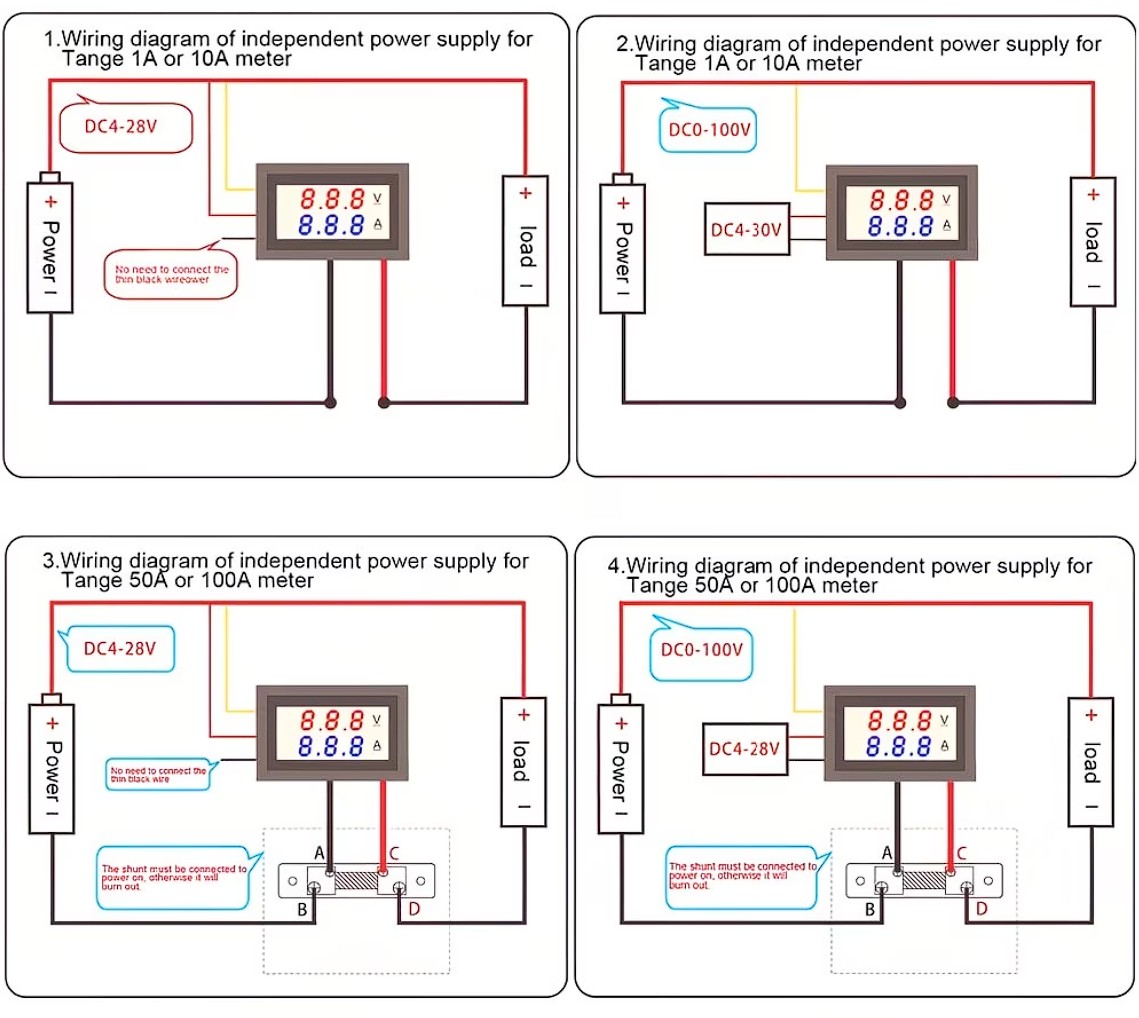

INA219-40 c to 85 c temperature range and can realize the maximum error of 1% accuracy, maximum offset of 100 uV.The advantage of the high precision of the product in combination with 12 resolution, can help clients as much as possible, reduce the pressure drop on the shunt resistor, which can minimize the power loss and power consumption, and saving board space.The device epic of 26 bus voltage range of 0 V to V.
Features
- Calibration programmable registers can directly read its unit of measure is the ampere current, and power in watts per read.
- For as many as 128 sampling averaging, in order to realize filter in noise environment.
- The I2C interface has a timeout, not only can avoid the bus lock, but also can provide high-speed mode, meet the communication requirements of up to 3.4 MHz.
- All features are support software programmable INA219.
- Using single power supply, the working voltage between 3.0 to 5.5 V.
What's in the box?
1 x INA219 board

These connectors are made from high-temp nylon with gold-plated spring pins or sockets molded in. The shape of this generic XT60 prevents reverse polarity, and when plugged in the connection is super-solid. Perfect for applications up to 65A continuous draw.
- Solid and durable.
- Ensures high-amp connection.
- Low resistance for high current capacity.
- Superior technology suited to today's high power applications.
- Ergonomically designed and easy to grip.
- Easy to un-solder and reuse.
- Used in RC battery and motor projects
Specifications
- Model: XT60
- Colour: Yellow (as picture)
- Size: Approx. 23mm x 16mm
- Material: Copper PA66
1 x pair XT60 Bullet Connector Plugs(1 x Male 1 x Female)