Generic2


Take total control of your addressable lighting without needing a motherboard software suite or a complex microcontroller setup. This compact, USB-powered inline controller is the ultimate plug-and-play solution for driving 3-pin 5V addressable RGB (ARGB) LED strips, rings, and matrices.
Simply connect the controller to any standard 5V USB power source (such as a PC port, power bank, or phone charger), plug in your ARGB hardware, and immediately toggle through dozens of dynamic color effects using the tactile onboard buttons.
Features
- Plug-and-Play Simplicity: Powered directly by a standard 5V USB Type-A connection. No coding, flashing firmware, or driver installations required.
- Universal 3-Pin Compatibility: Features a standard 3-pin JST/SM style addressable connector, making it natively compatible with WS2812B, SK6812, WS2811, and standard PC ARGB ecosystem components.
- Onboard Mode Toggles: Three tactile inline buttons allow you to seamlessly cycle through dynamic modes (rainbow chases, fades, breathing pulses, solid colors), adjust effect speeds, and fine-tune overall brightness levels.
- Compact Inline Profile: The lightweight, low-profile design tucks away neatly behind PC monitors, under desks, or inside custom enclosures without adding cable clutter.
Specifications
- Input Voltage: 5V DC (via USB Type-A)
- Output Voltage: 5V DC
- Supported ICs: WS2812B, WS2811, SK6812, and similar 3-pin digital logic protocols
- Interface Type: 3-Pin Female Connector (+5V, Data, GND)
- Max Load Capacity: Drives up to 100–150 pixels smoothly depending on the amperage output of your USB host port (Recommended: Use a 2A or greater USB wall brick for longer strips).
What's in the box?
1 x USB RGB 3 pin controller

- Product: MG90S Servo
- Torque: 2.0kg/cm(4.8V), 2.8kg/cm(6V)
- Speed: 0.11s/60°(4.8V), 0.09s/60°(6V)
- Rotate angle: 180°
- Operating voltage: 4.8 ~ 6V
- Gear: metal
- Dead band: 5us
- Weight: 12.2g
- Dimension: 22.8mm × 12.2mm × 28.5mm
What's in the box?
1 x MG90S Servo

Features:
Size: 33mm x20mm / 1.29 " x0.78 "
Range:5kg
Operating temperature:-20℃~ >85℃
Ambient Humidity:10%-80RH
Voltage range: 2.6~5.5V
Weight: 32g
What's in the box?
1 x Weighing Sensor
1 x HX711 Module
Resources:
Building a Raspberry Pi weight scale
Python Library
Building an Arduino weight scale
HX711 is an electronic scale module, whose working principle is to convert the measured changes in resistance value changes, through the conversion circuit into electrical output.
Features
- Size: 33mm x20mm / 1.29 " x0.78 "
- Range:5kg
- Operating temperature:-20℃~ >85℃
- Ambient Humidity:10%-80RH
- Voltage range: 2.6~5.5V
- Weight: 32g
What's in the box?
1 x Weighing Sensor
1 x HX711 Module
Resources
Building a Raspberry Pi weight scale
Python Library
Building an Arduino weight scale

What's in the box?
1 x USB adapter

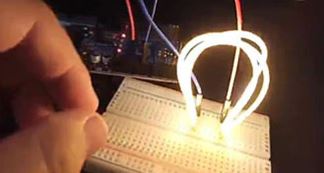
Example using the white LED filament on a breadboard
Specifications
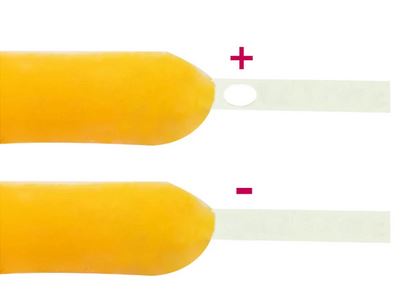
CRI:≥80
Voltage : DC3V
Current : 100mA
Lumen:80lm/W
Colour : As per Product Name
Length = 300mm=290mm+5mm positive interface +5mm negative interface
What's in the box?
1 x 300mm LED filament
You might also need...
If you do not already have a power supply you can use one of the below in order to power your LED
3V 2xAA Transparent Battery Box with Crocodile Clips and Switch
OR
3V 2xAA Black Battery Box with Crocodile Clips and Switch
You will find our selection of batteries here
Q&A
1. Does the LED flexible filament need a heatsink?
The LED filament does not need a heatsink. The LED uses a current of ≤10mA, and does not require heat dissipation.
2. Can the LED flexible filament be powered with an 18650 battery (DC3.7V)?
No, the LED filament voltage is standard DC3V.
If you use DC3.7V, the voltage is too high and the filament temperature will be very high, which will burn out the lamp beads.
3. Where is the LED flexible filament used?
Generally used in light bulbs, DIY hand-made toys, DIY decoration designs and home projects.
4. Can the flexible LED filament bend 90 degrees?
No. Maximum bending angle of LED filament≥30°
5. Can the flexible LED filament be freely cut to length?
No. If it is cut, it will not light up.
6. Can the length of the LED flexible filament be customized according to customer requirements?
No. The length is fixed.
7. Can LED flexible filament work in water?
No. But you can DIY by yourself and put the LED filament in a sealed transparent plastic tube to make it work in water.
8. What is the CRI of the LED flexible filament?
CRI≥80
9.What is the maximum current of the 130mm and 300mm LED flexible filaments?
130mm and 300mm maximum current must be ≤100mA
10. How do I light up the LED flexible filament?
Connect two AA batteries in series = 3V to light up the filament. Or use a 3V button battery CR2032. You will find what you need in our battery and enclosure collections.

Example using the white LED filament on a breadboard
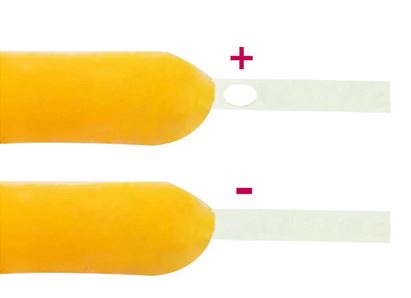
Specifications
CRI:≥80
Voltage : DC3V
Current : 100mA
Lumen:80lm/W
Colour : As per Product Name
Length = 300mm=290mm+5mm positive interface +5mm negative interface
What's in the box?
1 x 300mm LED filament
You might also need...
If you do not already have a power supply you can use one of the below in order to power your LED
3V 2xAA Transparent Battery Box with Crocodile Clips and Switch
OR
3V 2xAA Black Battery Box with Crocodile Clips and Switch
You will find our selection of batteries here
Q&A
1. Does the LED flexible filament need a heatsink?
The LED filament does not need a heatsink. The LED uses a current of ≤10mA, and does not require heat dissipation.
2. Can the LED flexible filament be powered with an 18650 battery (DC3.7V)?
No, the LED filament voltage is standard DC3V.
If you use DC3.7V, the voltage is too high and the filament temperature will be very high, which will burn out the lamp beads.
3. Where is the LED flexible filament used?
Generally used in light bulbs, DIY hand-made toys, DIY decoration designs and home projects.
4. Can the flexible LED filament bend 90 degrees?
No. Maximum bending angle of LED filament≥30°
5. Can the flexible LED filament be freely cut to length?
No. If it is cut, it will not light up.
6. Can the length of the LED flexible filament be customized according to customer requirements?
No. The length is fixed.
7. Can LED flexible filament work in water?
No. But you can DIY by yourself and put the LED filament in a sealed transparent plastic tube to make it work in water.
8. What is the CRI of the LED flexible filament?
CRI≥80
9.What is the maximum current of the 130mm and 300mm LED flexible filaments?
130mm and 300mm maximum current must be ≤100mA
10. How do I light up the LED flexible filament?
Connect two AA batteries in series = 3V to light up the filament. Or use a 3V button battery CR2032. You will find what you need in our battery and enclosure collections.

Example of using the white LED filament on a breadboard
Specifications
CRI:≥80
Voltage : DC3V
Current : 100mA
Lumen:80lm/W
Colour : As per Product Name
Length = 300mm=290mm+5mm positive interface +5mm negative interface
What's in the box?
1 x 300mm LED filament
You might also need...
If you do not already have a power supply you can use one of the below in order to power your LED
3V 2xAA Transparent Battery Box with Crocodile Clips and Switch
OR
3V 2xAA Black Battery Box with Crocodile Clips and Switch
You will find our selection of batteries here
Q&A
1. Does the LED flexible filament need a heatsink?
The LED filament does not need a heatsink. The LED uses a current of ≤10mA, and does not require heat dissipation.
2. Can the LED flexible filament be powered with an 18650 battery (DC3.7V)?
No, the LED filament voltage is standard DC3V.
If you use DC3.7V, the voltage is too high and the filament temperature will be very high, which will burn out the lamp beads.
3. Where is the LED flexible filament used?
Generally used in light bulbs, DIY hand-made toys, DIY decoration designs and home projects.
4. Can the flexible LED filament bend 90 degrees?
No. Maximum bending angle of LED filament≥30°
5. Can the flexible LED filament be freely cut to length?
No. If it is cut, it will not light up.
6. Can the length of the LED flexible filament be customized according to customer requirements?
No. The length is fixed.
7. Can LED flexible filament work in water?
No. But you can DIY by yourself and put the LED filament in a sealed transparent plastic tube to make it work in water.
8. What is the CRI of the LED flexible filament?
CRI≥80
9.What is the maximum current of the 130mm and 300mm LED flexible filaments?
130mm and 300mm maximum current must be ≤100mA
10. How do I light up the LED flexible filament?
Connect two AA batteries in series = 3V to light up the filament. Or use a 3V button battery CR2032. You will find what you need in our battery and enclosure collections.

Example using the white LED filament on a breadboard
Specifications
CRI:≥80
Voltage : DC3V
Current : 100mA
Lumen:80lm/W
Colour : As per Product Name
Length = 300mm=290mm+5mm positive interface +5mm negative interface
What's in the box?
1 x 300mm LED filament
You might also need...
If you do not already have a power supply you can use one of the below in order to power your LED
3V 2xAA Transparent Battery Box with Crocodile Clips and Switch
OR
3V 2xAA Black Battery Box with Crocodile Clips and Switch
You will find our selection of batteries here
Q&A
1. Does the LED flexible filament need a heatsink?
The LED filament does not need a heatsink. The LED uses a current of ≤10mA, and does not require heat dissipation.
2. Can the LED flexible filament be powered with an 18650 battery (DC3.7V)?
No, the LED filament voltage is standard DC3V.
If you use DC3.7V, the voltage is too high and the filament temperature will be very high, which will burn out the lamp beads.
3. Where is the LED flexible filament used?
Generally used in light bulbs, DIY hand-made toys, DIY decoration designs and home projects.
4. Can the flexible LED filament bend 90 degrees?
No. Maximum bending angle of LED filament≥30°
5. Can the flexible LED filament be freely cut to length?
No. If it is cut, it will not light up.
6. Can the length of the LED flexible filament be customized according to customer requirements?
No. The length is fixed.
7. Can LED flexible filament work in water?
No. But you can DIY by yourself and put the LED filament in a sealed transparent plastic tube to make it work in water.
8. What is the CRI of the LED flexible filament?
CRI≥80
9.What is the maximum current of the 130mm and 300mm LED flexible filaments?
130mm and 300mm maximum current must be ≤100mA
10. How do I light up the LED flexible filament?
Connect two AA batteries in series = 3V to light up the filament. Or use a 3V button battery CR2032. You will find what you need in our battery and enclosure collections.

Example using the white LED filament on a breadboard
Specifications
CRI:≥80
Voltage : DC3V
Current : 100mA
Lumen:80lm/W
Colour : As per Product Name
Length = 300mm=290mm+5mm positive interface +5mm negative interface
What's in the box?
1 x 300mm LED filament
You might also need...
If you do not already have a power supply you can use one of the below in order to power your LED
3V 2xAA Transparent Battery Box with Crocodile Clips and Switch
OR
3V 2xAA Black Battery Box with Crocodile Clips and Switch
You will find our selection of batteries here
Q&A
1. Does the LED flexible filament need a heatsink?
The LED filament does not need a heatsink. The LED uses a current of ≤10mA, and does not require heat dissipation.
2. Can the LED flexible filament be powered with an 18650 battery (DC3.7V)?
No, the LED filament voltage is standard DC3V.
If you use DC3.7V, the voltage is too high and the filament temperature will be very high, which will burn out the lamp beads.
3. Where is the LED flexible filament used?
Generally used in light bulbs, DIY hand-made toys, DIY decoration designs and home projects.
4. Can the flexible LED filament bend 90 degrees?
No. Maximum bending angle of LED filament≥30°
5. Can the flexible LED filament be freely cut to length?
No. If it is cut, it will not light up.
6. Can the length of the LED flexible filament be customized according to customer requirements?
No. The length is fixed.
7. Can LED flexible filament work in water?
No. But you can DIY by yourself and put the LED filament in a sealed transparent plastic tube to make it work in water.
8. What is the CRI of the LED flexible filament?
CRI≥80
9.What is the maximum current of the 130mm and 300mm LED flexible filaments?
130mm and 300mm maximum current must be ≤100mA
10. How do I light up the LED flexible filament?
Connect two AA batteries in series = 3V to light up the filament. Or use a 3V button battery CR2032. You will find what you need in our battery and enclosure collections.

The LM2596 is a commonly used popular step-down switching regulator IC. The adjustable version can take in input voltage from 4.5V to 40V and convert it to variable voltage sourcing up to of 3A of continues current. Because of its high current capability is commonly used in power modules to power/control heavy loads
Specifications
- Input voltage range: 4-40 v (40 v highest voltage limit)
- Output voltage range:1.3V - 37V (input voltage must 2 V above output)
- Output current: 2 A continuous output
- Output power: maximum 15 w
- Ripple frequency: 150 KHZ
- Grain wave peak: 100 mv
- Voltmeter precision: ± 5 ‰
- Weight: 33g
- Size: 7cm x 4cm
Wiring terminals
IN : input positive
IN - : input negative
OUT : output positive
OUT - : output negative
What's in the box?
1 x LM2596 voltage regulator converter module
Release Notes: As from 19/09/2024 this unit has only one button

Note: This is the beginner kit for Arduino UNO R3 lovers. It comes with everything (except computer) that you need to learn Arduino :)
Arduino is an open-source physical computing platform based on a simple i/o board and a development environment that implements the Processing/Wiring language. Arduino can be used to develop stand-alone interactive objects or can be connected to software on your computer (e.g. Flash, Processing, MaxMSP). The open-source IDE can be downloaded for free (currently support Mac OS X, Windows, and Linux).
Now, with this comprehensive beginner kit which includes the famous UNO R3 compatible as the main controller. All the applications and projects you want can be done with this set.
This kit is suitable for:
- Engineering students: Controller and Electronics are a must-have topic in all engineering courses, Electronics, Mechanical, or even Civil Engineering. This kit is perfect for you to understand the basics of controller, electronics, sensors, actuator, and programming.
- Teachers: Perfect for student-teacher projects, for example in RBT (Reka Bentuk Teknologi)
- Electronic enthusiasts: Kickstart your next project utilizing all the components in this kit.
- Robot Builders: All the sensors and actuators are suitable in robotics.
- Software Engineers: Arduino will be an excellent platform for establishing interfaces on the computer to receive data from the outside world and for communication applications.
Features
- Comes with UNO R3 Compatible (CH340) board
- Pack in a two layers plastic case, suitable for long usage and tidy storage
- Includes various type of sensors, and actuators (motors, LEDs, buzzer)
- Perfect for learning Arduino ecosystem, electronics, and programming
- You only need a computer to get started
- Power everything from your USB port which is needed for program loading in any case.
What's in the box?
1 x USB Type B Cable, to power and program loading into UNO R3 CH340 board, 40cm length
1 x 30 pcs Jumper Cable Male to Male
1 x 10 ways Dupont Male to Female wire
1 x Large Size Breadboard, 830 holes
1 x Four segments 7 Segment Display
1 x Single 7 Segment Display
1 x 8 x 8 Dot matrix module
1 x Parallel LCD 16 * 2 Character
1 x UNL2003 Driver board
5 x 5mm Red LED
5 x 5mm Green LED
5 x 5mm Yellow LED
1 x 28BJJ Unipolar Stepper Motor
1 x SG90 Servo Motor
1 x 9V Battery Clip Arduino Compatible
5 x 220R Resistor
5 x 10K Resistor
5 x 1K Resistor
1 x 10K potentiometer/variable resistor
1 x Male Header 1 x 40, for solder 2x16 Character LCD
1 x Active Buzzer
1 x Passive Buzzer
4 x Yellow Cap Push Button
1 x LM35 Temperature sensor
1 x Tilt sensor
1 x Flame sensor
1 x Water sensor
2 x 5mm LDR
1 x IR sensor (LED shape)
1 x Infrared Remote Control Receiver
1 x IR Remote (battery CR2025 is included)
1 x 74HC595N IC, Serial to Parallel IC for Output pin expansion
1 x 4 x 4 Key button
1 X RFID RC522 Mifare Module
1 X RFID Mifare keychain
1 X RFID Mifare card
1 x Joystick module
1 x Sound module
1 x Relay module
1 x 9V battery snap to DC Barrel Jack (9V battery is NOT included)
1 x RTC module (coin cell battery is included)
1 x Small SMD parts case
Resources
- Download Arduino IDE
- Official Arduino Site
- CH34X driver (Please ensure the Maker UNO is plug into computer USB port during driver installation)
- Windows (V3.5 Mar2019)
- Mac OS (V1.5 Mar2019)
- Linux (V1.5 Mar2019) (Normally is readily installed)
- CH34X Driver - Get the latest driver from the factory

Great for learning feedback events when you are just getting started, and looks good enough to implement in all projects.
Specifications
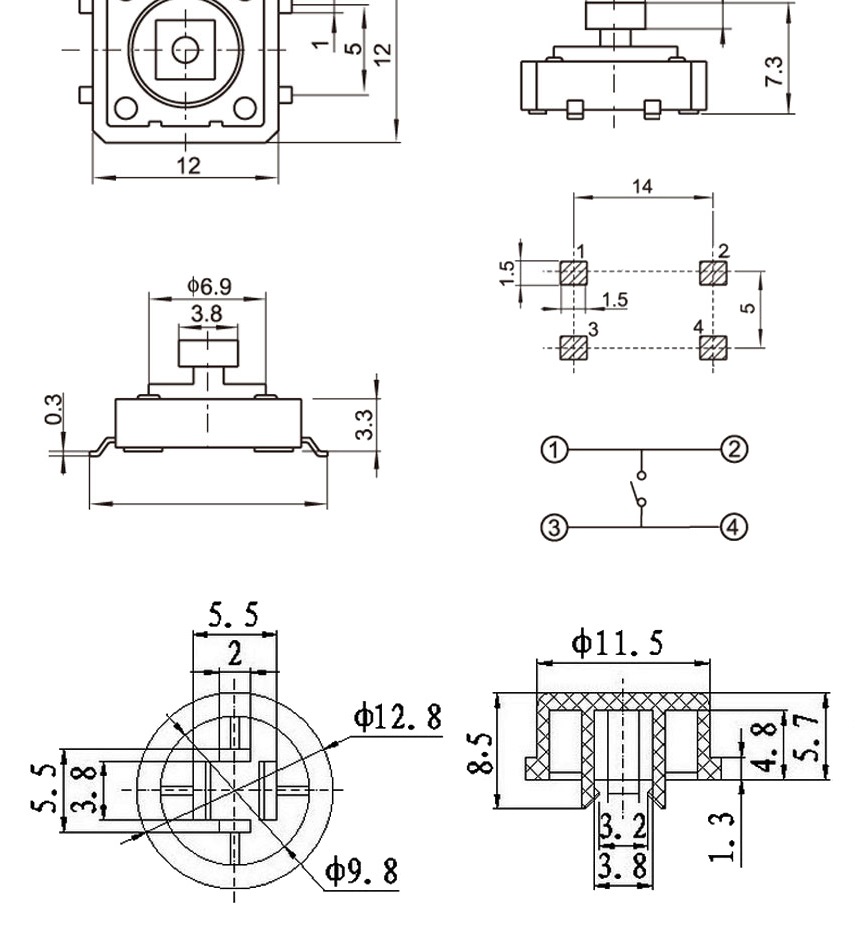
- 12 x 12 x 7.3mm push buttons with caps
- 5 colours
- Red, black, white, blue and yellow
What's in the box?
25 x Tactile Push Button Switches
25 x Caps(Red black white blue yellow) Each color 5pcs
Resources
Read the Docs
BME280 is a high-precision, small-volume, low-energy pressure sensor that can be used in mobile devices. Its performance is excellent, the absolute accuracy can be as low as 0.2Pa, and the power consumption is very low, only 2.7uA. The BMP280 uses a powerful 8-pin ceramic leadless chip in a thin carrier (LCC) package, which can be directly connected to various microprocessors through I2C and SPI buses.
Features
- Pressure range: 300~1100hPa (altitude 9000m~-500m) Power supply voltage: 1.71V~3.6V
- LCC8 Package: Lead-Free Ceramic Carrier Package (LCC)
- High precision: 0.06hPa (0.5m) resolution in low power mode, 0.2Pa (1.7cm) resolution in high linear mode temperature output
- 12C interface, SPI interface temperature compensation
- Temperature compensation
- Size: 1.5cmx 1.15cm
- Low power consumption: 2.7uA
- No external clock circuit required
Typical application
- GPS precise navigation (dead reckoning, upper and lower bridge detection, etc.) indoor and outdoor navigation
- Monitoring weather forecast for leisure, sports and health care
- Vertical Speed Indication (Rise/Sink Speed) Fan Power Control
Specifications
- Supply Voltage: 1.8 - 5V DC
- Interface: I2C (up to 3.4MHz), SPI (up to 10 MHz)
Operational Range:
- Temperature: -40 to +85°C
- Humidity: 0-100%
- Pressure: 300-1100 hPa
Resolution:
- Temperature: 0.01°C
- Humidity: 0.008%
- Pressure: 0.18Pa
Accuracy:
- Temperature: +-1°C
- Humidity: +-3%
- Pressure: +-1Pa
I2C address
- SDO LOW : 0x76
- SDO HIGH: 0x77
What's in the box?
1 x bme280 sensor
1 x header
Resources
The Raspberry Pi Foundation Project
Single-cell lithium base battery charger & protection module. The charging will be via a micro B connector. Lithium base battery includes Li-po and Li-ion battery as the charging and discharging characteristic is similar.
The USB micro B connector power input offers direct charging using widely available nowadays with power bank and also Android phone charger. With a maximum charging current of 1A, your battery can be charged faster and of course, do make sure the 5V input has sufficient power to provide more than 1A.
It comes with a TP4056 charging IC.
Using the module
- Connect micro USB cable for power, or 5V DC to pads marked IN+ and IN- on left-hand side of the module
- Connect cell to charge to B+/B- pads on right-hand side of module
- A load (something for the battery to power) can be connected to the OUT+/OUT- pads on the right-hand side
- Important! Disconnect load when charging
- The red LED indicates chaging in progress, green LED indicates charging has finished.
- Never charge your battery at a rate greater than 1C.
- Single Cell Lithium-based battery charger.
- USB Micro B connector for power input
- 5V input pads for DIY/custom input.
- Input Voltage: 5VDC
- Charging voltage limit: 4.2VDC
- Minimum discharge voltage: 2.5VDC
- Maximum discharge current: 3A
What's in the box?
1 x 1A LIPO Charger Module with Protection
DIY: Lithium 18650 Cells Charger by Using TP4056 Modules, in Instructables with video, by Well Done Tips

Example using the white LED filament on a breadboard
Specifications
CRI:≥80
Voltage : DC3V
Current : 100mA
Lumen:80lm/W
Colour : As per Product Name
Length = 300mm=290mm+5mm positive interface +5mm negative interface
What's in the box?
1 x 300mm LED filament
You might also need...
If you do not already have a power supply you can use one of the below in order to power your LED
3V 2xAA Transparent Battery Box with Crocodile Clips and Switch
OR
3V 2xAA Black Battery Box with Crocodile Clips and Switch
You will find our selection of batteries here
Q&A
1. Does the LED flexible filament need a heatsink?
The LED filament does not need a heatsink. The LED uses a current of ≤10mA, and does not require heat dissipation.
2. Can the LED flexible filament be powered with an 18650 battery (DC3.7V)?
No, the LED filament voltage is standard DC3V.
If you use DC3.7V, the voltage is too high and the filament temperature will be very high, which will burn out the lamp beads.
3. Where is the LED flexible filament used?
Generally used in light bulbs, DIY hand-made toys, DIY decoration designs and home projects.
4. Can the flexible LED filament bend 90 degrees?
No. Maximum bending angle of LED filament≥30°
5. Can the flexible LED filament be freely cut to length?
No. If it is cut, it will not light up.
6. Can the length of the LED flexible filament be customized according to customer requirements?
No. The length is fixed.
7. Can LED flexible filament work in water?
No. But you can DIY by yourself and put the LED filament in a sealed transparent plastic tube to make it work in water.
8. What is the CRI of the LED flexible filament?
CRI≥80
9.What is the maximum current of the 130mm and 300mm LED flexible filaments?
130mm and 300mm maximum current must be ≤100mA
10. How do I light up the LED flexible filament?
Connect two AA batteries in series = 3V to light up the filament. Or use a 3V button battery CR2032. You will find what you need in our battery and enclosure collections.

A key point is that BMP280 is compatible with two digital interfaces, I2C and SPI. This digital barometer has some interesting applications. By measuring the absolute pressure of the environment and converting this into altitude. you will have a reliable sensor for determining the height of your robot, plane or projectile. This sensor is capable of achieving an accuracy of 1m, with noise of only 17cm in ultra-high resolution. The device will operate at only 0.3uA meaning low current draw for battery powered applications.
Specifications
- 1.8V to 3.6V Supply Voltage
- Low power consumption - 0.5uA at 1Hz
- I2C interface
- Max I2C Speed: 3.5 MHz
- Very low noise - up to 0.02hPa (17cm)
- Fully calibrated
- Pressure Range: 300hPa to 1100hPa ( 9000m to -500m)
- Weight: 1.18g
- Size: 21mm x 18mm
What's in the box?
1 x BMP280 Digital Barometric Pressure Sensor Board Module
1 x Male to Male 4 pin header
Resources
Using the BMP280 with Raspberry Pi

Resistors play an important role in an electronic circuit design. A major benefit of the Resistor Assortment Kit is that it includes all commonly used resistance values. Having the resistor kit on hand will ensure that needed resistors are readily available when constructing and testing your electronic circuit.
The Plusivo Resistor Assortment Kit contains a large assortment of resistors. It includes 30 commonly used resistance values which are:
10 Ω, 22 Ω, 47 Ω, 100 Ω, 15 Ω, 200 Ω
220 Ω, 270 Ω, 330 Ω, 470 Ω, 510 Ω, 680 Ω
1 kΩ, 2 kΩ, 2.2 kΩ, 3.3 kΩ, 4.7 kΩ, 5.1 kΩ
6.8 kΩ, 10 kΩ, 20 kΩ, 47 kΩ, 51 kΩ, 68 kΩ
100 kΩ, 220 kΩ, 300 kΩ, 470 kΩ, 680 kΩ, 1 MΩ
With a total of 600 resistors (all 0.25W), you'll never run out of resistors to use for your electronic projects!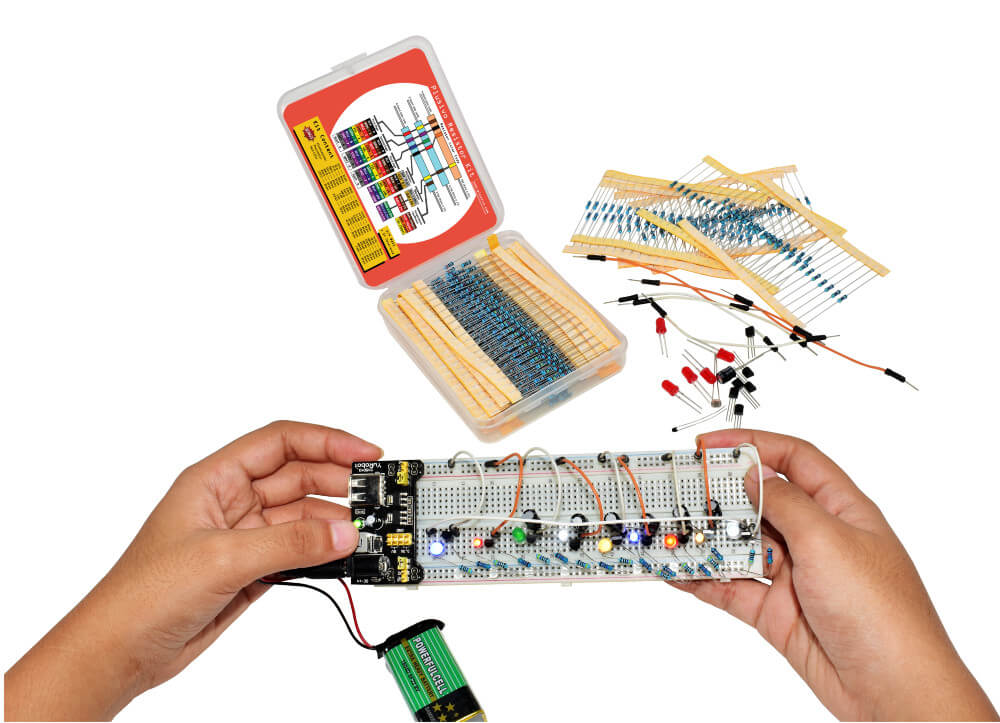
This Resistor Assortment Kit is a joy to use. It comes with a plastic storage box that allows you to easily store the resistors. Just open the box and pick up the resistor you need. Now you have one less problem to worry about. :)
- Premium assorted resistors
- It includes the most common resistor values from 10 Ω to 1 MΩ. High quality assorted ¼ watt-metal film resistors with 1% tolerance
- Resistor assortment set with 600 pcs
- 30 commonly used resistance values, 20 pieces each value
- Durable plastic storage box
- It helps you to always keep the resistors organized, provides storage whenever you want to stock up and helps you to easily transport the kit anywhere - forget about the hassle of finding your needed resistor value.
- Box Dimension: 11.7cm x 9cm x 2.6cm
- Weight: 100g
What's in the box?
20 x Resistor 10 Ω
20 x Resistor 22 Ω
20 x Resistor 47 Ω
20 x Resistor 100 Ω
20 x Resistor 150 Ω
20 x Resistor 200 Ω
20 x Resistor 220 Ω
20 x Resistor 270 Ω
20 x Resistor 330 Ω
20 x Resistor 470 Ω
20 x Resistor 510 Ω
20 x Resistor 680 Ω
20 x Resistor 1 kΩ
20 x Resistor 2 kΩ
20 x Resistor 2.2 kΩ
20 x Resistor 3.3 kΩ
20 x Resistor 4.7 kΩ
20 x Resistor 5.1 kΩ
20 x Resistor 6.8 kΩ
20 x Resistor 10 kΩ
20 x Resistor 20 kΩ
20 x Resistor 47 kΩ
20 x Resistor 51 kΩ
20 x Resistor 68 kΩ
20 x Resistor 100 kΩ
20 x Resistor 220 kΩ
20 x Resistor 300 kΩ
20 x Resistor 470 kΩ
20 x Resistor 680 kΩ
20 x Resistor 1 MΩ
Add an ear to your project with this well-designed electret microphone amplifier. This fully assembled and tested board comes with a 20-20KHz electret microphone soldered on. For the amplification, we use the Maxim MAX4466, an op-amp specifically designed for this delicate task! The amplifier has excellent power supply noise rejection, so this amplifier sounds really good and isn't nearly as noisy or scratchy as other mic amp breakouts we've tried!
This breakout is best used for projects such as voice changers, audio recording and audio-reactive projects that use FFT. On the back, we include a small trimmer pot to adjust the gain. You can set the gain from 25x to 125x. That's down to be about 200mVpp (for normal speaking volume about 6" away) which is good for attaching to something that expects 'line level' input without clipping, or up to about 1Vpp, ideal for reading from a microcontroller ADC. The output is rail-to-rail so if the sounds gets loud, the output can go up to 5Vpp!
What's in the box?
1 x GY-MAX4466 Electret Microphone Amplifier Module
Resources
Using it is simple
Connect GND to ground, VCC to 2.4-5VDC.
For the best performance, use the "quietest" supply available (on an for Arduino, this would be the 3.3V supply). The audio waveform will come out of the OUT pin. The output will have a DC bias of VCC/2 so when its perfectly quiet, the voltage will be a steady VCC/2 volts (it is DC coupled). If the audio equipment you're using requires AC coupled audio, place a 100uF capacitor between the output pin and the input of your device. If you're connecting to an audio amplifier that has differential inputs or includes decoupling capacitors, the 100uF cap is not required. The output pin is not designed to drive speakers or anything but the smallest in-ear headphones- you'll need an audio amplifier (such as 3.7W stereo amp) if you want to connect the amp directly to speakers. If you're connecting to a microcontroller pin, you don't need an amplifier or decoupling capacitor - connect the OUT pin directly to the microcontroller ADC pin. For audio-reactive projects, we suggest using an FFT driver library which can take the audio input and 'translate' it into frequencies.

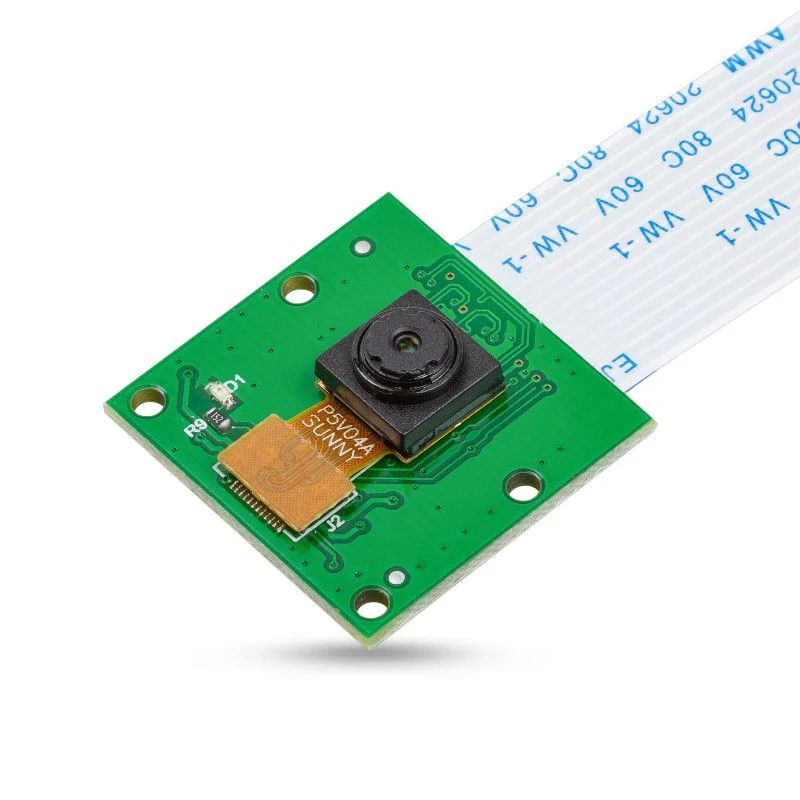
This is the most affordable camera module available in the market! It is custom-designed to be used with Raspberry Pi single-board computers.
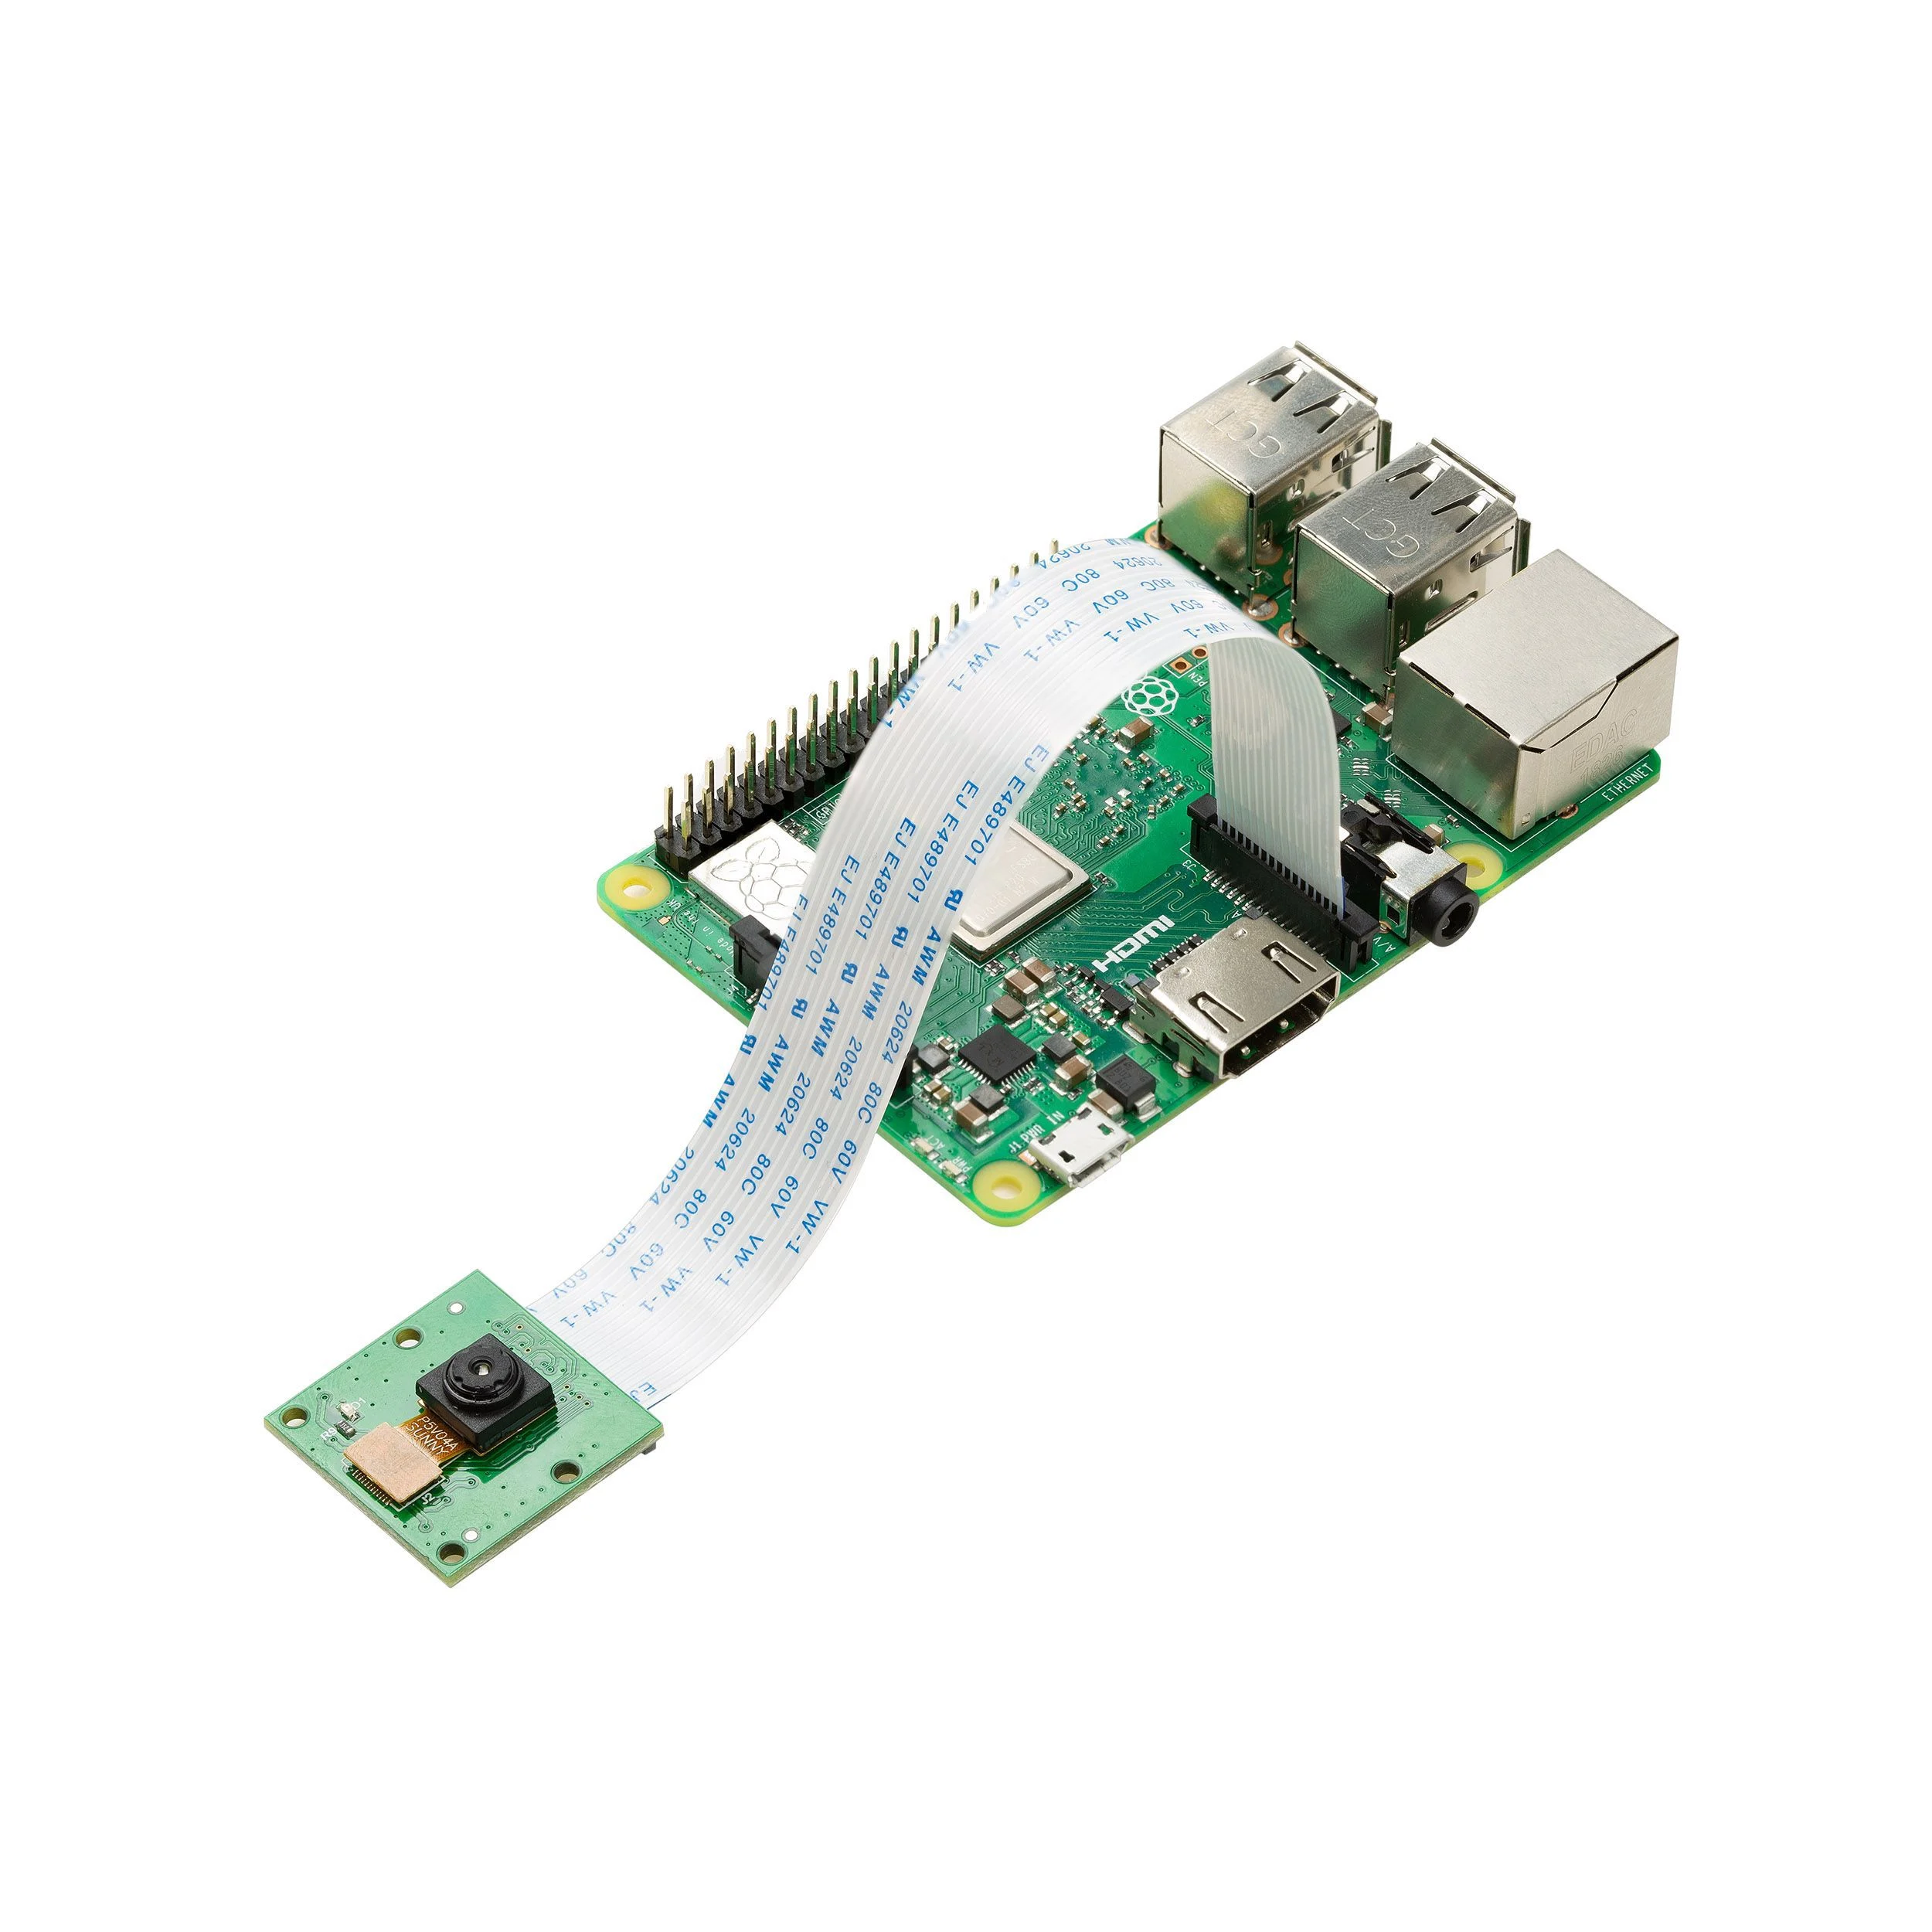
In the example above the camera is connected to a Raspberry Pi 3(Raspberry Pi is not included)
This camera module is compatible with:
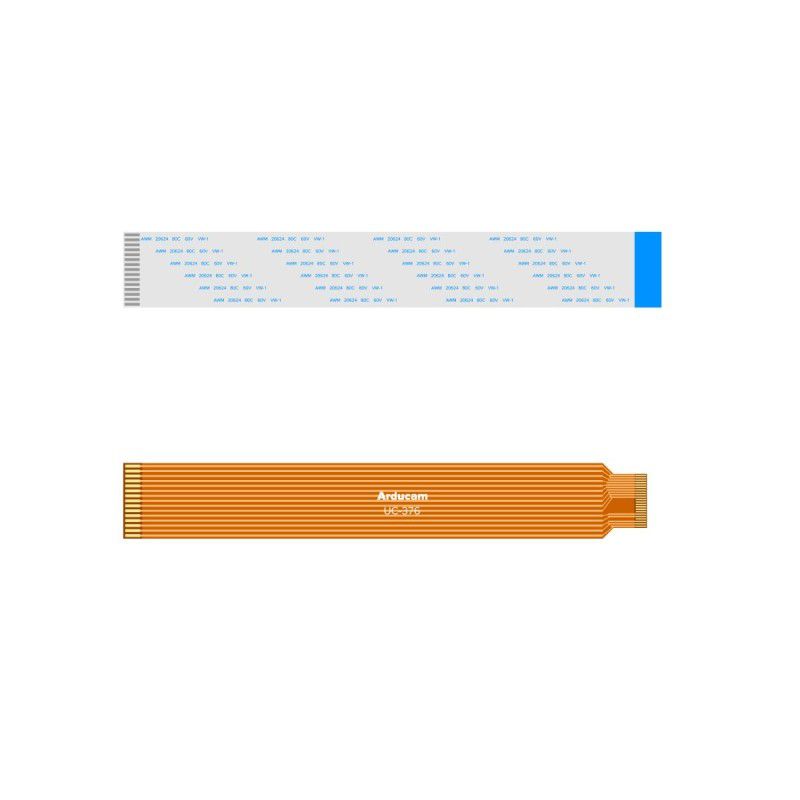
The board itself is tiny, at around 25mm x 20mm x 9mm. It also weighs just over 3 grams, making it perfect for mobile or other applications where size and weight are important. The camera is connected to the CPU on the Raspberry Pi via the CSI bus. This bus travels along the cable (FFC - Flexible Flat Cable) that attaches the camera board to the Pi.
The sensor itself has a native resolution of 5 megapixels and has a fixed focus lens onboard. In terms of still images, the camera is capable of 2592 x 1944 pixel static images and also supports 1080p @ 30fps, 720p @ 60fps, and 640x480p 60/90 video.
Specifications
- Sensor: Omnivision OV5647 sensor
- Sensor Size: 1/4” (OV5647)
- Resolution: 5MP 2592×1944
- Video:
- 1080p 30 fps
- 720p 60fps
- 480p 90fps
- Field of View (FOV): 54°(H), 41°(V)
- Focus Type: Fixed Focus
- Focus Length: 3.60mm
- Focus Distance: 1 m to infinity
- Full-frame SLR lens Equivalent: 35 mm
- Peak Current: 300mA
- Dimension: 25mm x 24mm
What's in the box?
1 x 5MP Camera Module
1 x 15cm 15-15pin FPC cable for Raspberry Pi 2,3,4
1 x 15cm 15-22pin FPC cable for Raspberry Pi 5 and Zero series
Resources
- User Guide
- How to use Arducam OV5647 Camera Module for Raspberry Pi
- Troubleshooting Arducam OV5647 Cameras for Raspberry Pi
- Raspberry Pi Zero W and Pi Camera Application - Use OpenCV
- 3D printable Adjustable Holder - CAD files
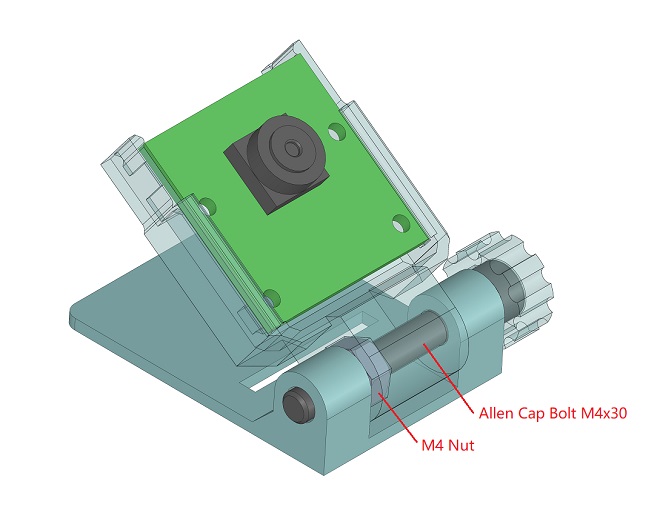
- 3D printable Adjustable Holder - Printable Files (3D printer files)