
Generic2


Premium Passive Cooling Case for Raspberry Pi 5 – Matte Black Aluminium
Upgrade your Raspberry Pi 5 setup with the ultimate blend of silent performance and rugged protection. Designed specifically for the high-power requirements of the Pi 5, this Black Anodised Aluminium Case transforms the entire enclosure into a massive, efficient heatsink.
Forget about fan noise or mechanical failure. This passive cooling solution uses precision-engineered internal thermal columns to pull heat directly away from the CPU, RAM, and Power Management IC (PMIC), ensuring your Pi 5 stays cool even under heavy computational loads.
Why Choose Passive Cooling?
- 100% Silent Operation: Ideal for home media centres (Kodi/LibreELEC), recording studios, or bedroom labs where fan whirring is a distraction.
- Zero Maintenance: With no moving parts, there’s no fan to clog with dust or fail over time—perfect for remote IoT deployments or industrial "set-and-forget" projects.
- Superior Durability: The sandblasted aluminium alloy provides a "tank-like" shell that protects your board against drops, static, and everyday wear and tear.
Key Features
- Precision CNC Cutouts: Provides unhindered access to all dual micro-HDMI ports, USB 3.0/2.0 ports, Ethernet, and the new PCIe FPC connector.
- Integrated Power Button: Includes a tactile extension so you can use the Pi 5’s new onboard power button without opening the case.
- Warning: Case might interfere with Wi-Fi and Bluetooth signals.
Technical Specifications
- Material: High-grade Anodised Aluminium Alloy
- Colour: Matte Black
- Cooling Type: Passive (Conductive Thermal Heat Dissipation)
- Compatibility: Raspberry Pi 5 all variants
- Dimensions: ~91mm x 64mm x 32mm
What's in the box?
1 x Top & Bottom Aluminium Shells
1 x High-Conductivity Thermal Pad Set (Pre-sized for Pi 5 components)
1 x Bolt pack
1 x Allen Key for quick assembly
Pro Tip for PiShop Customers: Passive cooling is excellent for standard desktop use and media streaming. However, if you plan on heavy 24/7 video encoding or extreme overclocking, consider our Active Cooler for maximum thermal headroom.
Specifications
- Chip: WS2812B (built-in LED)
- LED: 5050 package RGB full-color highlight
- Voltage: 5V
- Port: digital
Main features
●The IC control circuit and the LED point light source share a power supply.
The control circuit and the RGB chip are integrated in a 5050 package component to form a complete externally controlled pixel point.
·Built-in signal shaping circuit, any pixel point receives the signal and then outputs it after waveform shaping, ensuring that the line waveform distortion will not accumulate.
●Built-in power-on reset and power-off reset circuits.
●The three primary colors of each pixel point can achieve 256 levels of brightness display, and complete the full-color display of 16777216 colors.
●Port scanning frequency 2KHz/S
Serial cascade interface, which can complete data reception and decoding through a signal line,
·No need to add any circuit when the transmission distance between any two points does not exceed 5 meters.
●When the refresh rate is 30 frames/second, the number of cascades is not less than 1024
Main application areas
●LED full-color luminous character light string, LED full-color soft light bar hard light bar, LED guardrail.
●LED point light source, LED pixel screen, LED special-shaped screen, various electronic products, electrical equipment marquee.
What's in the box?
1 x WS2812 LED 5050 RGB 8x8 LED Matrix board

Proximity switch, also known as non-contact proximity switch, is the ideal electronic switch sensor. Used for detecting metal in proximity. It does not require any contact or pressure. It will accurately reflect the position of a moving mechanism. The proximity switch is easy to install, adjustable, and suitable for harsh environments.
Specifications
- Model : LJ12A3-4-Z/BX
- Operating Voltage : DC 6-36V
- Output Type : NPN
- Output Status : Normally Open
- Detection object : metal objects
- Detection distance : 4 mm
- Output Current : 300 mA
- Response Frequency : 0.5KH
- Working temperature : Temperature range -30 ° to 60 °
- Dimensions : 12 mm screw diameter
- Cable length : about 115 cm
- Material : Metal and plastic
What's in the box?
1 x LJ12A3-4-Z/BX NPN Sensor Detection Switch
Resources
Brown - Live
Blue - Ground
Black - Signal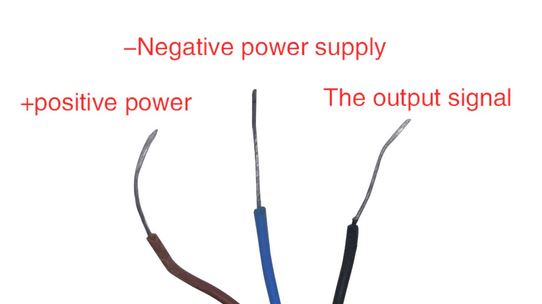
Note: This logic level shifter breakout comes with loose headers. You will have to solder them yourself.
If you have ever tried to connect a 3.3V device to a 5V system, you know what a challenge it can be! The logic level converter is a small device that safely steps down 5V signals to 3.3V AND steps up 3.3V to 5V at the same time. Each level converter can convert 4 pins on the high side to 4 pins on the low side, with power supply pins on each side.
The usage of the level converter is very straightforward. The board needs to be powered from the two voltage sources (high voltage and low voltage) that your system is using. High voltage (5V for example) to the "HV" pin, low voltage (3.3V for example) to "LV", and ground from the system to the "GND" pin.
This module requires you to supply it with power from both the higher voltage level and the lower voltage level. Connect the higher voltage source to pin "HV" and its ground to pin "GND" near the "HV" pin. Also, connect the lower voltage source to pin "LV" and its ground to pin "GND" near the "LV" pin.
For example, if you were connecting your Arduino (5V signals) to an ESP8266 (3.3V signals), you would connect the "HV" pin on the module to the 5V supply pin on your Arduino and the "GND" pin near the "HV" pin to the "GND" pin on your Arduino. Then, you would connect the "LV" pin on the module to the 3.3V power source that is supplying power to the ESP8266 and connect the "GND" pin near the "LV" pin to the 3.3V power supply's ground. You would then connect the signal pin from your Arduino to one of the signal pins on this module (for example, pin "HV1"), and then you would connect the desired signal pin on the ESP8266 to the corresponding pin on this module ("LV1" if the higher voltage signal is connected to "HV1").
These are 4 Channel devices (works great for I2C or SPI) and will work with all microcontrollers, Arduino, Raspberry Pi, Intel Edison, etc. Use this module to connect two devices of different digital voltage levels. For example: connecting an Arduino (5V device) to an ESP8266 (3.3V device).
The logic level converter comes complete with loose header pins and can be used directly on a breadboard.
- Convert 4 pins on the high side to 4 pins on the low side or vice versa
- With 2 rows, 6 pins per row
- No. of channels: 4
- Power from two voltage sources (high and low); high voltage goes to the HV pin and low voltage to the LV pin
- Mutual transform between 3.3V and 5V
- Digital Logic only, NOT Analog voltage.
- Useful for IIC Protocol communication
- Compatible with Arduino, PIC, Raspberry Pi, etc
- Breadboard Compatible
- Pinout labeled on modules
- Dimensions (excluding pins): 15.2mm (0.6") length x 12.7mm (0.5") width x 2.5mm (0.1") height
- Weight: 1.2g (0.04oz)
What's in the box?
1 x 4-Channel Logic Level Shifter
This Black Aluminium case is designed to passively cool and protect your Raspberry Pi Zero 2 W and Zero 2 WH
Features
- Colour: Matte Black
- Material: Aluminum Alloy
- Use for Raspberry Pi Zero 2 W and Zero 2 WH
What's in the box?
1 x 2 parts Black case for RPi Zero W
1 x Screw set with thermal pads
The LD2410C is a high-sensitivity 24GHz millimeter-wave (mmWave) radar module designed for advanced human presence detection. Unlike traditional PIR sensors that only detect movement, this FMCW (Frequency-Modulated Continuous Wave) radar can sense the tiny chest movements of a stationary person (breathing), making it the ultimate solution for "smart room" occupancy.
Why choose mmWave over PIR?
- Stationary Presence: Detects sitting, standing, and even lying down. Your lights will never turn off while you're reading or watching TV again.
- Environmental Immunity: Not affected by temperature, light, smoke, or humidity.
- Invisible Installation: The radar can penetrate plastic shells and glass, allowing it to be hidden inside a project box or behind a thin wall for a clean aesthetic.
Key Features
- Long-Range Sensing: High-precision detection up to 5–6 meters.
- Wide Coverage: Broad ±60° detection angle ensures full room coverage.
- Smart Tuning (Bluetooth & Serial): Easily configure "Gate" sensitivity, distance zones, and delay times via the HLKRadarTool App (iOS/Android) or a serial debugging tool.
- Fine-Grained Zones: Divide the sensing range into intervals and shield interference from objects outside the target area (e.g., a fan or a window).
- Compact Design: Ultra-small footprint (16mm x 22mm) for easy integration.
- Wide Voltage Support: Reliable performance with a 5V to 12V power supply.
Technical Specifications
- Operating Frequency: 24GHz (ISM Band)
- Detection Type: Motion, Micro-motion (Breathing), and Stationary Presence
- Voltage: 5V – 12V (Average current ~80mA)
- Output: High/Low GPIO (3.3V Logic) and UART Serial (256,000 baud)
- Mounting: Supports Ceiling or Wall mounting
- Regulations: FCC and CE compliant
Ideal Applications
Smart Lighting: Energy-saving control for homes and offices.
AIoT Wake-up: Automatically wake up advertising screens or tablets when a person approaches.
Safety & Security: Detect intruders or prevent UV lamps from turning on while people are present.
Smart Appliances: Power down TVs or Aircons when a room is truly unoccupied.
What's in the box?
1 x LD2410C Human Presence Sensor Module (Bluetooth Enabled)
Resources
Pro-Tip for Home Assistant Users: This module is fully compatible with ESPHome. By connecting the TX/RX pins to an ESP32, you can bring real-time distance and occupancy data directly into your dashboard with no complex coding required.
To use the LD2410C with a Raspberry Pi (like the Pi 4 or Pi 5), you have two main ways to set it up: a Simple Digital method (Quick & Easy) or a UART Serial method (Advanced Data).
1. The Hardware Hookup (Wiring)
The LD2410C has 5 pins. You only need 3 of them for basic operation.
| LD2410C Pin | Raspberry Pi Pin | Description |
| VCC | Pin 2 or 4 (5V) | Power (Supports 5V - 12V) |
| GND | Pin 6 (GND) | Ground |
| OUT | Pin 7 (GPIO 4) | Digital Output (High when presence detected) |
| TX | Pin 10 (GPIO 15 / RXD) | UART Transmit (For advanced data) |
| RX | Pin 8 (GPIO 14 / TXD) | UART Receive (For advanced data) |
Method A: Simple Digital Setup (The Easiest Way)
The OUT pin on the sensor behaves like a traditional PIR sensor. It goes HIGH (3.3V) when it detects a person and LOW when the room is empty.
Python Code (Digital):
from gpiozero import DigitalInputDevice
from signal import pause

# LD2410C OUT pin connected to GPIO 4
sensor = DigitalInputDevice(4)

def person_detected():
    print("Presence Detected! (Stationary or Moving)")

def room_empty():
    print("Room is now empty.")

sensor.when_activated = person_detected
sensor.when_deactivated = room_empty

pause()
Method B: UART Serial Setup (For Distance & Zones)
If you want to know how far away the person is or differentiate between "moving" and "stationary" targets, you must use the UART pins.
1. Enable Serial on your Pi:
- Run
sudo raspi-config. - Go to Interface Options > Serial Port.
- Select No for "login shell" and Yes for "serial port hardware".
- Reboot.
2. Python Library:
The easiest way to handle the complex radar data is using the aio-ld2410 library.
pip install aio-ld24103. Python Code (UART):
import asyncio
from aio_ld2410 import LD2410

async def main():
    # /dev/ttyAMA0 is the default hardware serial port on Pi
    async with LD2410('/dev/ttyAMA0') as device:
        print("Connected to LD2410C")
        async for report in device.get_reports():
            print(f"Target: {report.target_state}")
            print(f"Moving Distance: {report.moving_target_distance}cm")
            print(f"Static Distance: {report.static_target_distance}cm")

asyncio.run(main())
Important Tips for Raspberry Pi Users:
- Power: While the Pi can power the module from its 5V pins, the LD2410C can draw up to 80-100mA. Ensure your Pi power supply is reliable (especially on the Pi 5).
- Bluetooth Conflicts: The LD2410C has Bluetooth. You can use the HLKRadarTool app on your phone to calibrate the sensor while it is still connected to the Pi. This is the best way to set your sensitivity "Gates" without writing a single line of config code.
- Logic Levels: The LD2410C uses 3.3V Logic for its TX/RX and OUT pins, which is perfectly safe for the Raspberry Pi's GPIO pins.
Diffused LEDs shine through a semi-transparent cover, absorbing the light and bouncing it through in different directions. Instead of seeing the individual LED light up, the whole bulb shines instead, giving a more uniform light spread over a greater area.
There are 5 colours of 5MM LEDs included. Red, Green, Yellow, Blue and White 200Pcs each with a total of 1000Pcs
Working current: 20 (mA)
Working voltage:
- Red: 2.0V-2.2V
- Yellow: 1.9V-2.1V
- Blue: 2.8V-3.0V
- Green: 3.0V-3.2V
- White: 3.2V-3.4V
What's in the box?
1000 x 5MM LED Diode
Resources
Features
- Versatile Voltage Range: This photosensitive sensor module operates effectively within a supply voltage range of DC 3.3-5V, making it suitable for various applications and systems requiring different power levels.
- Sensitive Light Detection: Utilizing a highly sensitive photoresistor sensor, the module can accurately detect ambient light intensity, triggering microcontrollers or relay modules to respond appropriately to changing light conditions.
- Adjustable Brightness Sensitivity: Featuring an adjustable potentiometer, users can easily fine-tune the sensitivity of light detection, allowing for customized performance based on specific environmental requirements.
- Clear Signal Output: The module provides a clean digital output signal with strong driving capability exceeding 15mA,reliable communication with microcontrollers for precise monitoring of light levels.
- Easy Installation: The module features screw mounting holes for easy installation and includes a power indicator for quick status checking, enhancing usability in a variety of settings.
Specifications
- Part Name: Light Sensor Module
- Material: PCB
- Size: 32 x 14 mm
- Colour: Blue
What's in the box?
1 x Photosensitive Sensor Module
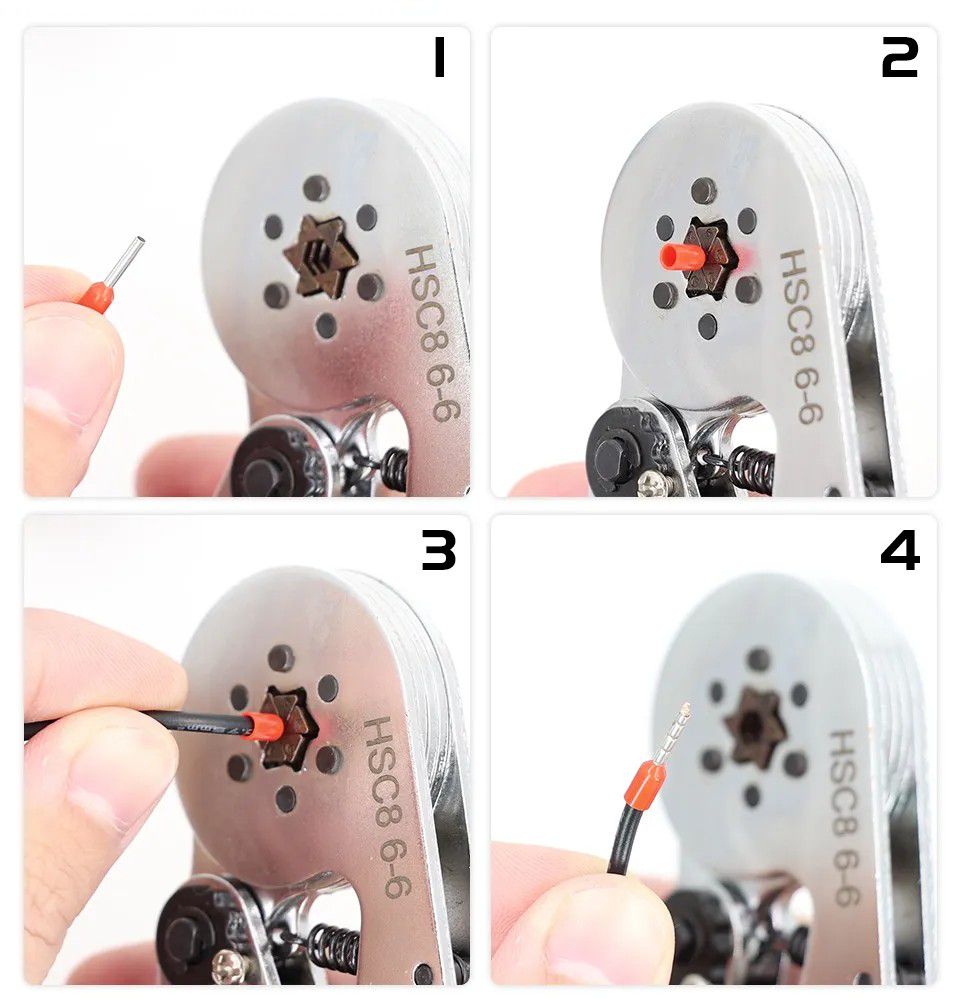
The Ferrule Kit can tidy up your wire ends and make it easy to use with other electrical headers and terminals, especially in industrial applications. The kit comes with a total of 1200 pieces for 8 different wire sizes so that you have plenty of options to tidy up your wire ends.
You will find the rest of our lugs selection here
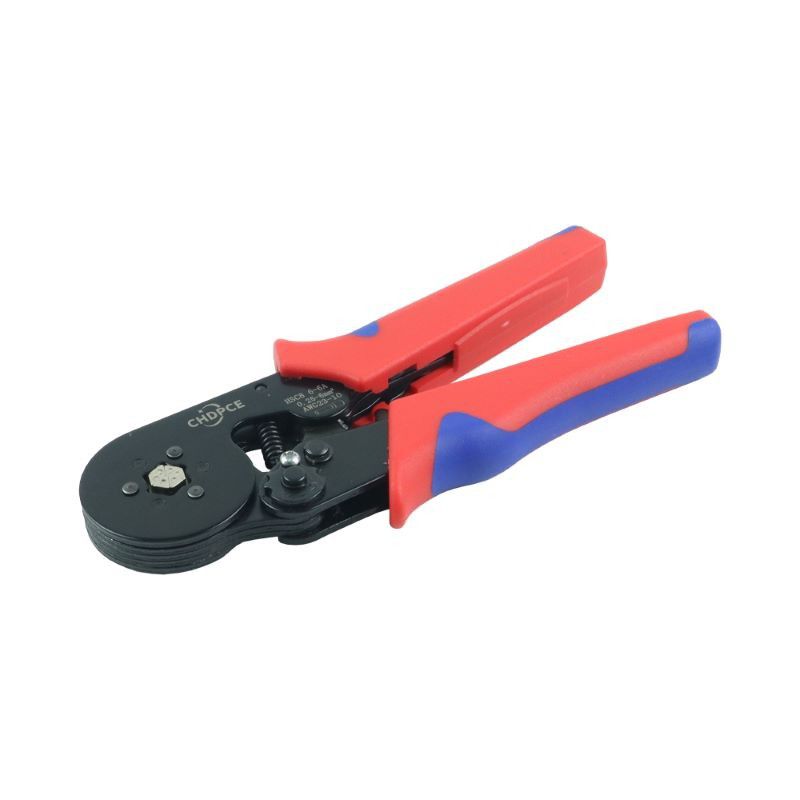
To use the Ferrule Kit, you need to use a Crimping Plier. So you can use the below HSC6-6 Crimping Plier with your Ferrule Kit. This crimping plier comes with a hexagonal crimper and adjustable pressure regulator. It is also designed to have a soft ergonomic handle for a comfortable grip.
What's in the box?
1200 x terminals (lugs)
Resources
This Multifunctional Smart Meter is a compact, all-in-one solution designed for real-time tracking of power metrics. Whether you're managing an control panel, a DIY solar setup, or monitoring home appliance efficiency, this meter provides the data you need at a glance.
Comprehensive Data Monitoring
Track six essential electrical parameters simultaneously on a single, high-clarity display:
Voltage (V)
Current (A)
Active Power (W)
Frequency (Hz)
Power Factor (PF)
Total Energy Consumption (kWh)
4. This is an entry level measuring solution. Do not expect 100% accuracy.
What's in the box?
1 x Multifunctional Smart Meter

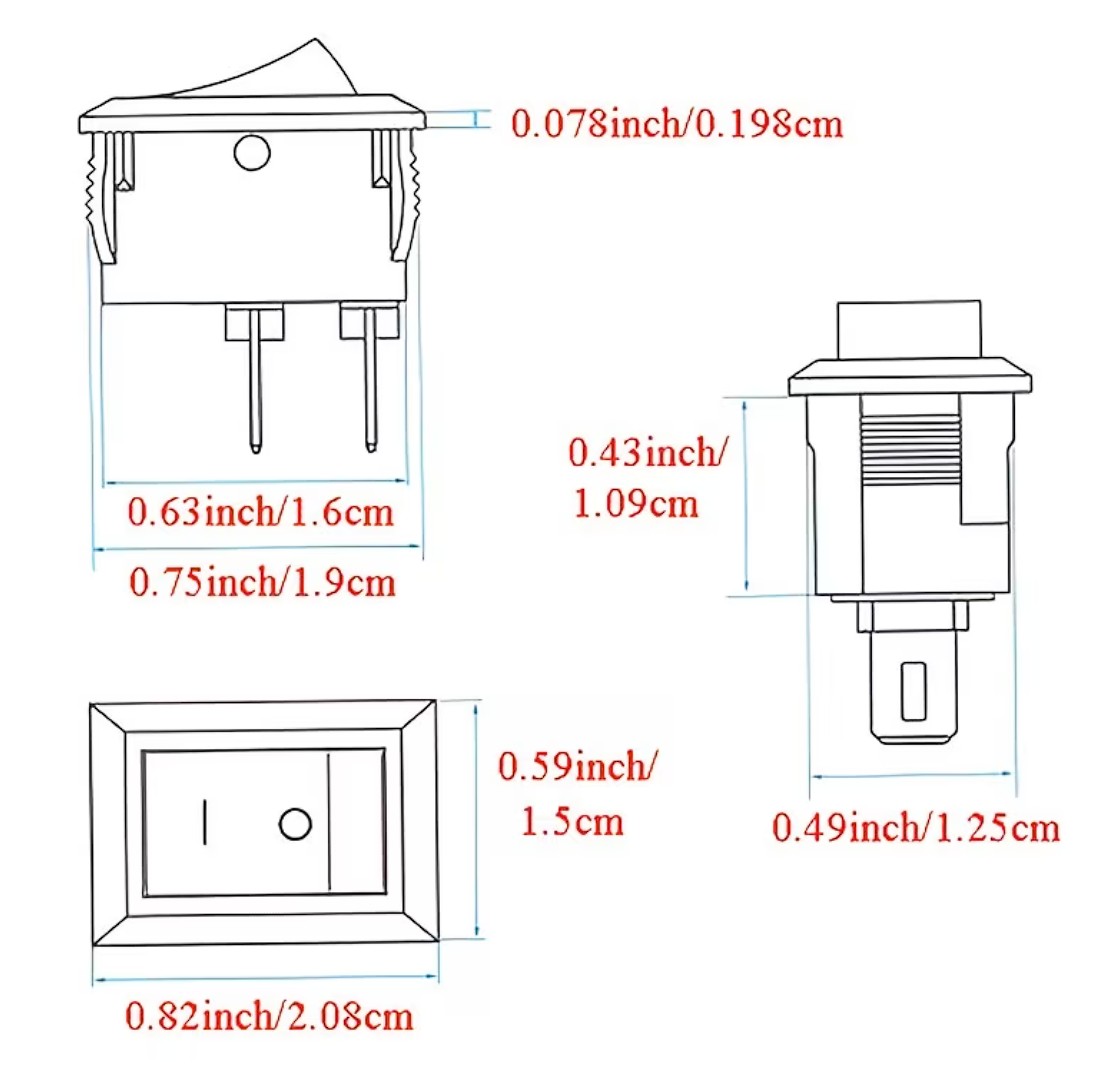
Rocker Switches house a button for operation that can be pressed on either end like a seesaw to connect or disconnect an electrical circuit. They are often used as ON/OFF switches on the main power supplies for electronic devices.
Specifications
- 250 V
- 3A
- 21mm x 15mm at the top
What's in the box?
1 x Rocker Switch
Resources
Python library
Introduction to Buttons and Switches
Types of buttons and switches
Please note: Servo is not included with this product
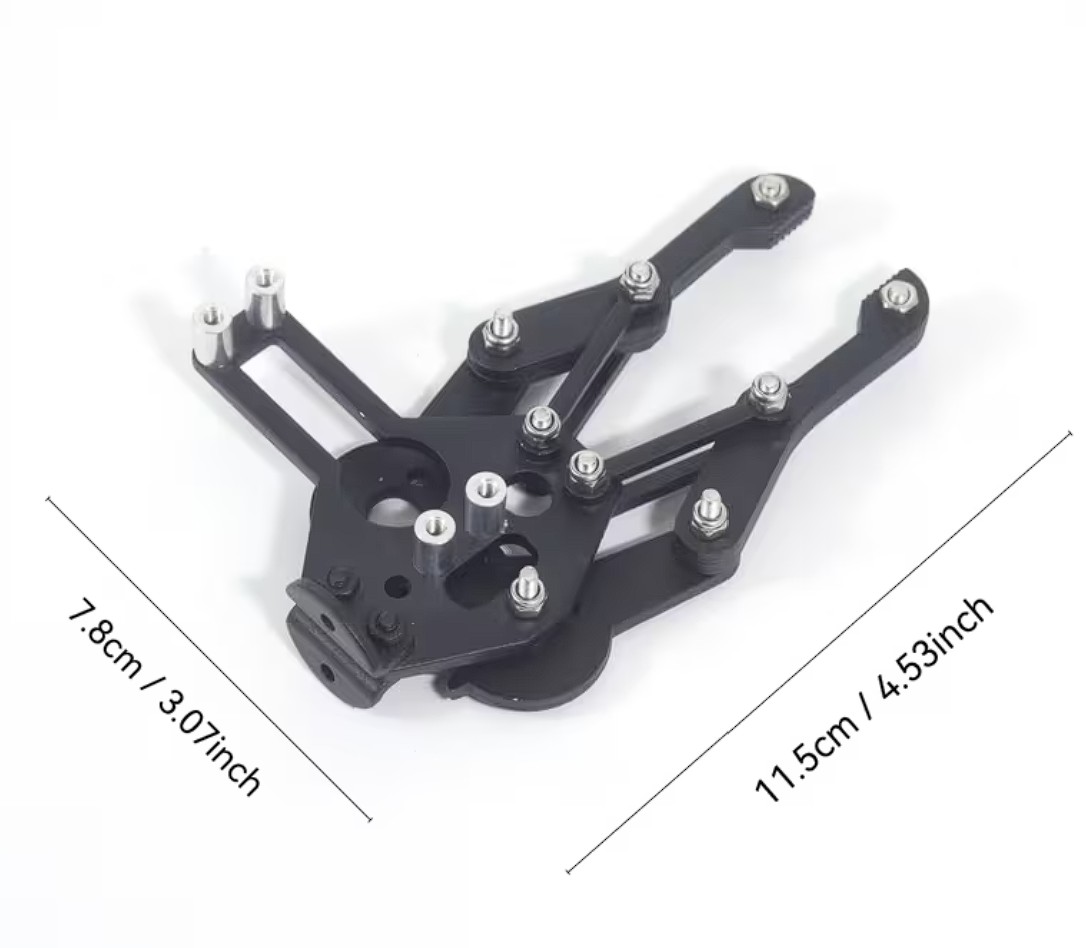
Elevate your robotics and mechanical projects with our High-Strength Metal Servo Arm, engineered specifically for high-torque applications. Whether you are building an industrial prototype or an advanced classroom project, this component provides the rigid connection necessary for precision movement.
Key Features
- Perfect Compatibility: Designed specifically for use with MG995 Servo Motors (and other standard 25T spline servos), ensuring a snug, slip-free fit.
- Maximum Durability: Made of high-strength metal components, this arm won't flex or stripped under pressure like standard plastic alternatives.
- Project Ready: Ideally suitable for educational science kits, DIY robotics, and STEM curriculum where reliability and longevity are essential.
What's in the box?
1 x Servo controlled Robotic Mechanical Claw
Resources

This battery box is designed for use as a nice switchable, portable power pack, and fits any four alkaline or rechargeable AAA batteries in series. The body is moulded in black ABS Resin and has a slide on detachable lid which can be locked for extra security through use of a small provided screw. It even includes a very useful miniature on-off slide switch which is very handy for wiring to projects that don't have a switch! Connection is via two flexible stranded red (positive) & black (negative) 26AWG wire leads, which are approximately 150mm in length.
- Battery Cell Size AAA
- Number of Cells 4
- Body Material ABS Resin
- Height 19.0 mm, Length 69.0 mm, Width 64.5 mm
- Terminal Type Wire Lead
- Type Battery Box
- Weight 0.03300 kg
What's in the box?
1 x switched battery box
Need batteries? You will find our battery selection here

PLEASE NOTE: Misusing or mishandling a lithium-ion battery may cause a FIRE or EXPLOSION which can result in INJURY or DEATH.
PD 20W LCD fast universal battery charger with professional discharge capacity testing function, capable of displaying capacity. The 18650 battery charger is suitable for 3.7V lithium batteries and 1.2V Ni MH Ni CD AA AAA batteries
You will need a suitable USB-C Power supply for this charger. We suggest our 27W power supply.
What's in the box?
1 x Liitokala Lii-402 Micro USB 4Slots Battery Charger
1 x USB-C male to USB A male Cable
You will also need a power supply for this charger or plug it into another device like your laptop or PC
- Power supply: 5V
- Switching type: Bistable(Latch)
- Onboard button: test trigger load on or off
- Triggering sensor modules can also be used to trigger the load on/off, as long as the trigger is low voltage.
- Relay control load maximum: 250V 10A (AC) and 30V 10A (DC)
- LED Indicator lights
- Size: 6cm x 3.5cm
What's in the box?
1 x bistable relay module
1 x trigger wire
These clips are great for protecting your fingers whilst assembling sewing projects. Why limit yourself to fabric though, we could also see them coming in useful for papercraft projects, taming uncooperative cables or combining with some string to make a snazzy photo display.
They come in a handy storage tub with 100 clips in a mix of 8 colours (pink, red, orange, yellow, green, blue, purple and clear). The flat side of the clips has guide markings 5, 7 and 10mm in from the edge, which helps keep your seams precisely lined up.
Specifications
- Width: 10mm
- Length: 27mm
- Clip thickness (fully open): approx. 90mm
What's in the box?
1 x tub of 100 clips
Add touch control to your electronics projects in seconds! The BMT Capacitive Touch Module is a "plug-and-play" sensor that works just like a smartphone screen. With just three pins (VCC, GND, and Signal), it is incredibly easy to wire to any microcontroller. It replaces old-fashioned clicky buttons with a modern touch surface that never wears out. Perfect for school projects, smart mirrors, and custom LED controllers!
Features
- Touch sensor module sensor
- When touching, S outputs a high; touch again, S will output low
- Power Range: 3-5V
- Current: 5MA
- Interface: G (GND), V (vcc), S (signal)
What's in the box?
1 x TTP223B Touch Sensor Module
The 4-pin TCRT5000 module is significantly more versatile than the 3-pin version because it provides both a Digital Output (D0) and an Analog Output (A0).
The Digital pin is perfect for "Yes/No" detection (like staying on a line), while the Analog pin allows you to see the intensity of the reflection, which is useful for measuring varying shades of gray or very small changes in distance.
Features
- Compatibility: Perfectly designed for Arduino projects, ensuring seamless integration and operation.
- Advanced Sensing: Utilizes IR technology with TCRT5000 sensors for accurate detection of reflective materials or barriers.
- Easy to Use: Simplified setup, suitable for beginners and professionals alike.
- Versatility: Ideal for a wide range of applications including line tracking robots, object detection, and automatic control systems.
- Optimized Design: Compact form factor for efficient performance.
Specifications
- Colour: Blue
- Material: ABS
Due to different batches, there may be differences in product printed text, which will not affect use.
What's in the box?
1 x Infrared Reflective Sensor
The 4-pin TCRT5000 module is significantly more versatile than the 3-pin version because it provides both a Digital Output (D0) and an Analog Output (A0).
The Digital pin is perfect for "Yes/No" detection (like staying on a line), while the Analog pin allows you to see the intensity of the reflection, which is useful for measuring varying shades of gray or very small changes in distance.
1. Hardware Connections (4-Pin Module)
| Module Pin | Raspberry Pi Pin | Physical Pin # | Function |
| VCC | 3.3V Power | Pin 1 | Power for the IR LED and comparator. |
| GND | Ground | Pin 6 | Common ground. |
| D0 | GPIO 17 | Pin 11 | Goes LOW when a reflection is detected. |
| A0 | See Note Below | — | Provides a voltage (0V to 3.3V) based on reflection. |
Important: The Raspberry Pi does not have a built-in Analog-to-Digital Converter (ADC). You cannot plug the A0 pin directly into a Pi GPIO and read its value. You have two choices:
- Ignore A0: Use only D0 for simple line following.
- Use an ADC Chip: Connect A0 to an MCP3008 chip if you need precise reflection data.
Python Code (gpiozero):
from gpiozero import DigitalInputDevice
from signal import pause
# TCRT5000 D0 is connected to GPIO 17
# pull_up=True because the sensor output is Active Low
sensor = DigitalInputDevice(17, pull_up=True)

def detected():
   print("Reflection Detected! (LED on module should be lit)")

def cleared():
   print("Reflection Lost.")

sensor.when_activated = detected
sensor.when_deactivated = cleared

print("Starting TCRT5000 Digital Test...")
pause()Wiring A0 through an ADC:
Connect A0 from the sensor to CH0 on the MCP3008.
Connect the MCP3008 to the Pi via the SPI pins (GPIO 8, 9, 10, 11).
Python Code (gpiozero with MCP3008):
from gpiozero import MCP3008
import time

# Create a reference to the Analog sensor on Channel 0 of the ADC
reflectivity = MCP3008(channel=0)

while True:
   # Value will be between 0.0 (no reflection) and 1.0 (max reflection)
   print(f"Reflection Intensity: {reflectivity.value:.2f}")
   time.sleep(0.1)
Sensitivity Tuning: You can use the D0 pin for a fast interrupt-based response (like emergency stops) while simultaneously using A0 to log data or calibrate your robot's speed based on how well it sees the line.
Dual Monitoring: The onboard LED on the 4-pin module typically follows the D0 state. This makes it much easier to "sight in" your sensor by eye before you even write a single line of code.
Carbon dioxide is a critical indicator of indoor air quality that can affect human cognitive
abilities and well-being. The SCD40/SCD41 are Sensirion's next-generation miniaturized CO2 sensors, offering high precision and cost-effectiveness. These modules feature a 2.54mm pitch pin header interface for power supply and communication connections. On-chip temperature and humidity compensation is achieved through built-in sensors for humidity and temperature measurement. The SCD40/SCD41 can intelligently regulate indoor ventilation systems based on C02 concentration levels, thereby maintaining a healthy and efficient environment with low C02 levels over time. This makes the SCD40/SCD41 ideal for applications focused on improving indoor air quality.
Features
- 2.4-5.5V
- Detects CO2 Carbon Dioxide 400-2000ppm
- Detects Temperature
- Detects Humidity
- I2C Communication
Specifications
- Reference Accuracy and Range: SCD40: 400-2000 ppm
- Supply Voltage Range: 2.4-5.5 V
- High Accuracy: ±(40 ppm + 5%)
- Digital Interface: 12C
- Integrated Temperature and Humidity Sensor
- Low Power Consumption
- Typical Accuracy 50ppm +-5% reading
- Pin Definitions
GND: Ground input terminal
VDD: Positive power supply input terminal
SCL: 12C clock terminal
SDA: 12C data terminal
What's in the box?
1 x SCD40 sensor
Resources
The SCD40 and SCD41 are high-performance "True" CO2 sensors. Unlike cheaper VOC sensors that estimate CO2 levels, these use photoacoustic technology to measure the actual concentration of CO2 in the air.
The setup for the Raspberry Pi 5 (and older models) involves the I2C interface.
1. Hardware Connections (I2C)
The module communicates via I2C, which only requires four wires. Note that while these sensors can handle 5V power, the Raspberry Pi's logic pins are 3.3V. Ensure your module's I2C lines are compatible (most breakout boards from Adafruit/PiShop have 3.3V regulators/shifters built-in).
| Sensor Pin | Raspberry Pi Pin | Physical Pin # |
| VIN / VCC | 3.3V (or 5V if supported) | Pin 1 (3.3V) or Pin 2 (5V) |
| GND | Ground | Pin 6 |
| SCL | I2C Clock (GPIO 3) | Pin 5 |
| SDA | I2C Data (GPIO 2) | Pin 3 |
2. Enable I2C on the Raspberry Pi
Before you can read the data, you must enable the I2C port:
Run
sudo raspi-configin the terminal.Navigate to Interface Options > I2C.
Select Yes to enable it.
Reboot your Pi.
(Optional) Check if the sensor is detected by running
i2cdetect -y 1. The SCD4x should appear at address 0x62.
3. Install the Python Library
The easiest way to interact with the SCD4x in 2026 is via the Adafruit CircuitPython library, which is fully compatible with standard Raspberry Pi OS.
# It is recommended to use a virtual environment on the Pi 5mkdir co2_project && cd co2_projectpython3 -m venv .venvsource .venv/bin/activate# Install the librarypip3 install adafruit-circuitpython-scd4x

4. Python Example Code
This script initializes the sensor and prints the CO2, Temperature, and Humidity readings every two seconds.
import timeimport boardimport adafruit_scd4x# Initialize I2C bus and sensori2c = board.I2C()scd4x = adafruit_scd4x.SCD4X(i2c)print("Serial number:", [hex(i) for i in scd4x.serial_number])# Start the sensor's internal measurement cyclescd4x.start_periodic_measurement()print("Waiting for first measurement (takes ~5 seconds)...")try:    while True:        if scd4x.data_ready:            print(f"CO2: {scd4x.CO2} ppm")            print(f"Temperature: {scd4x.temperature:.1f} °C")            print(f"Humidity: {scd4x.relative_humidity:.1f} %")            print("-" * 20)        time.sleep(2)except KeyboardInterrupt:    # Important: Stop measurements to save power/sensor life    scd4x.stop_periodic_measurement()    print("Measurements stopped.")

Key Differences for SCD41 Users
If you specifically have the SCD41, you have a few extra features:
- Single Shot Mode: The SCD41 can take a single measurement and go back to sleep, which is better for battery-powered projects. The SCD40 must remain in "periodic" mode.
- Extended Range: The SCD41 reads up to 5,000 ppm (and even up to 40,000 ppm in "extended" mode), whereas the SCD40 is optimized for indoor air quality up to 2,000 ppm.
Pro Tips
If you are using this sensor for a commercial project in South Africa (like a school ventilation monitor), look into Automatic Self-Calibration (ASC). By default, these sensors calibrate themselves based on the lowest CO2 reading they see every week. If your room is never fully ventilated (never hits 400ppm), the sensor's readings will "drift." You can disable ASC in the code if you prefer to do a manual calibration outdoors.
Carbon dioxide is a critical indicator of indoor air quality that can affect human cognitive
abilities and well-being. The SCD40/SCD41 are Sensirion's next-generation miniaturized CO2 sensors, offering high precision and cost-effectiveness. These modules feature a 2.54mm pitch pin header interface for power supply and communication connections. On-chip temperature and humidity compensation is achieved through built-in sensors for humidity and temperature measurement. The SCD40/SCD41 can intelligently regulate indoor ventilation systems based on C02 concentration levels, thereby maintaining a healthy and efficient environment with low C02 levels over time. This makes the SCD40/SCD41 ideal for applications focused on improving indoor air quality.
Features
- 2.4-5.5V
- Detects CO2 Carbon Dioxide 400-5000ppm
- Detects Temperature
- Detects Humidity
- I2C Communication
Specifications
- Reference Accuracy and Range: SCD40: 400-5000 ppm
- Supply Voltage Range: 2.4-5.5 V
- High Accuracy: ±(40 ppm + 5%)
- Digital Interface: 12C
- Integrated Temperature and Humidity Sensor
- Low Power Consumption
- Typical Accuracy 50ppm +-5% reading
- Pin Definitions
GND: Ground input terminal
VDD: Positive power supply input terminal
SCL: 12C clock terminal
SDA: 12C data terminal
What's in the box?
1 x SCD41 sensor
Resources
The SCD40 and SCD41 are high-performance "True" CO2 sensors. Unlike cheaper VOC sensors that estimate CO2 levels, these use photoacoustic technology to measure the actual concentration of CO2 in the air.
The setup for the Raspberry Pi 5 (and older models) involves the I2C interface.
1. Hardware Connections (I2C)
The module communicates via I2C, which only requires four wires. Note that while these sensors can handle 5V power, the Raspberry Pi's logic pins are 3.3V. Ensure your module's I2C lines are compatible (most breakout boards from Adafruit/PiShop have 3.3V regulators/shifters built-in).
| Sensor Pin | Raspberry Pi Pin | Physical Pin # |
| VIN / VCC | 3.3V (or 5V if supported) | Pin 1 (3.3V) or Pin 2 (5V) |
| GND | Ground | Pin 6 |
| SCL | I2C Clock (GPIO 3) | Pin 5 |
| SDA | I2C Data (GPIO 2) | Pin 3 |
2. Enable I2C on the Raspberry Pi
Before you can read the data, you must enable the I2C port:
Run
sudo raspi-configin the terminal.Navigate to Interface Options > I2C.
Select Yes to enable it.
Reboot your Pi.
(Optional) Check if the sensor is detected by running
i2cdetect -y 1. The SCD4x should appear at address 0x62.
3. Install the Python Library
The easiest way to interact with the SCD4x in 2026 is via the Adafruit CircuitPython library, which is fully compatible with standard Raspberry Pi OS.
# It is recommended to use a virtual environment on the Pi 5mkdir co2_project && cd co2_projectpython3 -m venv .venvsource .venv/bin/activate# Install the librarypip3 install adafruit-circuitpython-scd4x

4. Python Example Code
This script initializes the sensor and prints the CO2, Temperature, and Humidity readings every two seconds.
import timeimport boardimport adafruit_scd4x# Initialize I2C bus and sensori2c = board.I2C()scd4x = adafruit_scd4x.SCD4X(i2c)print("Serial number:", [hex(i) for i in scd4x.serial_number])# Start the sensor's internal measurement cyclescd4x.start_periodic_measurement()print("Waiting for first measurement (takes ~5 seconds)...")try:    while True:        if scd4x.data_ready:            print(f"CO2: {scd4x.CO2} ppm")            print(f"Temperature: {scd4x.temperature:.1f} °C")            print(f"Humidity: {scd4x.relative_humidity:.1f} %")            print("-" * 20)        time.sleep(2)except KeyboardInterrupt:    # Important: Stop measurements to save power/sensor life    scd4x.stop_periodic_measurement()    print("Measurements stopped.")

Key Differences for SCD41 Users
If you specifically have the SCD41, you have a few extra features:
- Single Shot Mode: The SCD41 can take a single measurement and go back to sleep, which is better for battery-powered projects. The SCD40 must remain in "periodic" mode.
- Extended Range: The SCD41 reads up to 5,000 ppm (and even up to 40,000 ppm in "extended" mode), whereas the SCD40 is optimized for indoor air quality up to 2,000 ppm.
Pro Tips
If you are using this sensor for a commercial project in South Africa (like a school ventilation monitor), look into Automatic Self-Calibration (ASC). By default, these sensors calibrate themselves based on the lowest CO2 reading they see every week. If your room is never fully ventilated (never hits 400ppm), the sensor's readings will "drift." You can disable ASC in the code if you prefer to do a manual calibration outdoors.