
Generic3


This is the perfect extension for Raspberry Pi's GPIO to breadboard, with clear GPIO labeling. This is the assembled version of the Pi T-Cobbler. It works with the:
- Raspberry Pi Model Zero WH
- Raspberry Pi 3A+
- Raspberry Pi 3B
- Raspberry Pi 3B+
- Raspberry Pi 4B 1GB (Discontinued, but compatible)
- Raspberry Pi 4B 2GB
- Raspberry Pi 4B 4GB
- Raspberry Pi 5
- Any Raspberry Pi board with 40-pin GPIO (2x20 connector) pre-soldered.
The Raspberry Pi has landed on the Maker World like a 40-GPIO pinned, quad-USB ported, credit card sized bomb of DIY joy. And while you can use most of our great Model B accessories by hooking up our downgrade cable, it's probably a good time to upgrade your set up and accessorize using all of the 40 pins. That's why we now carry the Assembled Pi T-Cobbler - Breakout + Cable for Raspberry Pi. This Cobbler is in a fancy T-shape, which is not as compact but is a little easier to read the labels. It breaks out all those tasty power, GPIO, I2C and SPI pins from the 40-pin header onto a solderless breadboard. This set will make "cobbling together" prototypes with the Pi super easy.
Each order comes with a 40 pin ribbon cable and assembled T-Cobbler. You can plug the 40-pin GPIO cable between the Pi computer and the T-Cobbler breakout. The T-Cobbler can plug into any solderless breadboard. The T-Cobbler PCB has all the pins labeled nicely so you can go forth and build circuits without keeping a pin-out printout at your desk. We think this will make it more fun to expand the Pi and build custom circuitry with it.
Note: Fully assembled, no soldering required!
- Extend 40-pin GPIO of Raspberry Pi out to Breadboard friendly PCB and header pin
- Fully Assembled, plug and use
- GPIO is nicely labeled
- 40-way IDE/IDC rainbow cable, polarized, ~30cm length
1 x 40-way IDE/IDC Rainbow cable

- Ribbon of 40 x 200mm
- Male to Male
Features
- Tested for Compatibility with the Raspberry Pi
- Breadboard compatible
- Colour: Multi-coloured
What's in the box?
40 x 200mm Male to Male Jumper cables

In a motherboard (or any other circuit board), a jumper is a pair of prongs that are electrical contact points set into the board or an adapter card . When you set a jumper, you place a plug on the prongs that completes a contact. In effect, the jumper acts as a switch by closing (or opening) an electrical circuit.
Specifications
- Type: Shorting Jumper with tail
- Pitch: 2.54mm.
- Number of Pins: 2.
- Contact Material: Copper Alloy.
- Current Rating: 2A.
- Housing Material: Thermoplastic.
- Operating Temperature: -25°C to 105°C.
What's in the box?
10 x 2.54mm jumper cap with tail

This module adopts an 8-bit MCU as the main control chip, it can be applied in distance measurement, testing the performance of the HC-SR04 ultrasonic module. Plus, you can use this module in two ways since it supports Serial Port Display and Digital Tube Display.
Specifications
- Integrated STM8S103 High-Performance Microprocessor
- Interfaces:
- Digital Tube Display
- Serial Port Data Output
- Input Voltage: 5V
- LiPo Connector: 2.54mm socket (5V power supply)
- Measuring Distance: 3cm - 400cm
- Plate Size: 25mm x 35mm
- Weight: 7g
How To Use
Measured distance can be displayed via the digital tube or serial port:
- Digital Display: directly connect ultrasonic sensor and provide 5V power supply (using wire jumpers or LiPo battery).
- Serial Port Output: connect the display module pins (VCC, TX, RX, GND) to USB to TTL converter pins (5V, RX, TX, GND) respectively. Select 9600 baud transmission rate and the output format is "D: XXX", where XXX represents the distance in centimeters.

Note: No code is required to use this module! Plug and play, very easy to use for beginners.
Additional Notes
When measuring the distance, the area of the measured object should not be less than 0.5 square meters, and it should be smooth and have strong reflectivity. Failure to do so will affect the test result.
Valid measuring distance: 3-400cm. If it is longer than this range, it will result in incorrect data or shows a 000 screen.

This is the Standalone USB MP3 Player Decoder Module with a 2W mono amplifier onboard. If you are looking for a device that can directly connect to your headphones or external audio, this is the one that you should try!
- Power range: 3.7~5.5V
- It is recommended to use a 5V power supply with USB Hard Disc mode because some USB Hard Disc does not support a 3.7V power supply.
- Product size: 45mm*36mm
- Support Micro SD (mobile phone memory card) and USB Hard Disc play mode
- Connect directly with the speaker (recommendation 4 Ω 3W speakers)
- Onboard 3.5mm gold plated headphone jack for headphones or external audio
- Easy wiring, no soldering with speaker terminals needed.
- Support MP3 format, playing power on automatically.
- Adjustable up and down button to control songs, volume up and down, pause or play, mode switching.
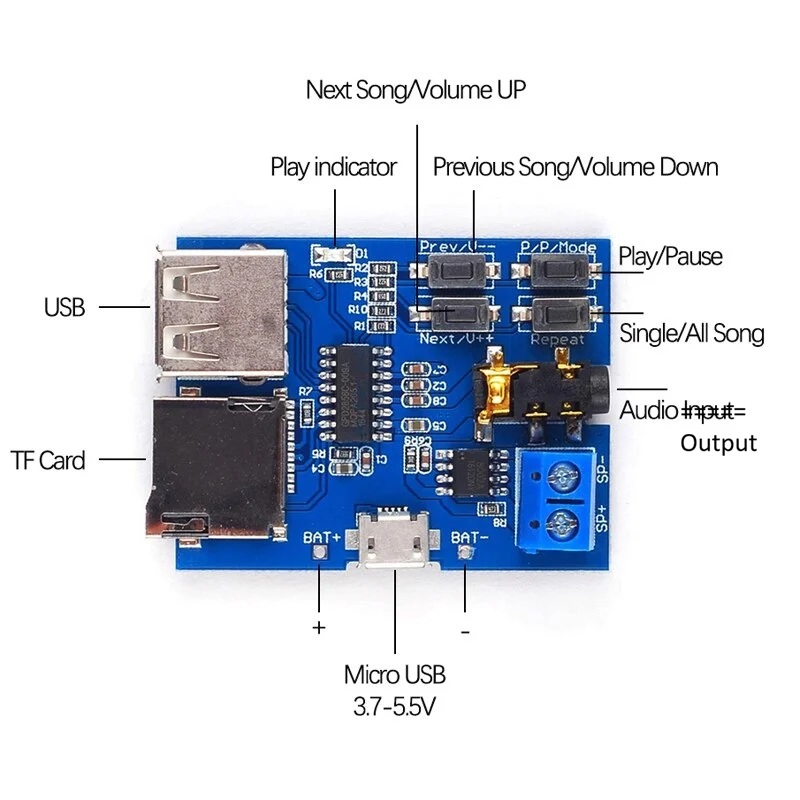
Key Operating Instructions
- "Prev / V--" button: "Press" for switching the previous song, "long press" for volume down
- "Next/v++" button: "Press" for switching next song, "long press" for volume up.
- "P / P / Mode" button: "Press" for the "Play/Pause" Switch, "long press" for USB Hard Disc, TF (SD card) card mode.
- "Repeat" button: "Press" for “single/all song" mode(no long press)
- "Long press" approximate 2S.
What's in the box?
1 x Standalone USB MP3 Player Decoder Module

This holder provides greater power for electronic projects
Features
- Battery holder for 18650 sized battery
- Single slot
- Material: recycle plastic
- Battery sold separately
What's in the box?
1 x single slot 18650 battery holder
Need batteries? You will find our battery selection here

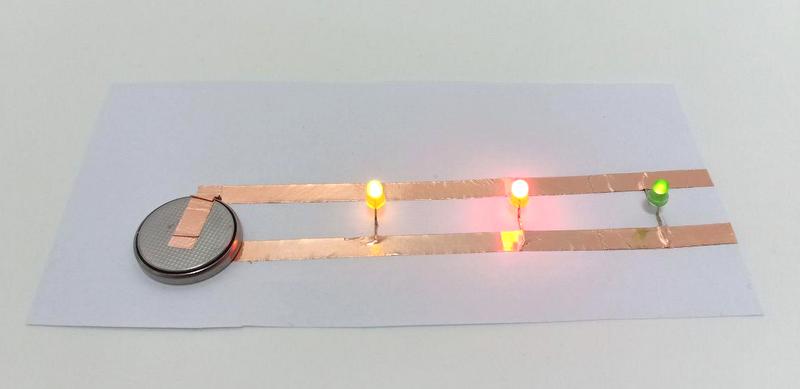
Copper tape can be an interesting addition to your maker toolbox. The tape itself is made of thin pure copper so it's extremely flexible and can take on nearly any shape. You can solder to it, and the tape itself can carry current just like a normal wire. On the back is an electrically conductive adhesive. The adhesive can't carry significant current, but it is very handy for sensing applications where you don't want to solder the copper tape.
We've seen such tape used for EMI shielding, working with EL, making capacitive touch pads, ultra-thin wiring needs, etc.
It comes in a roll 25 meters long, and this tape is 5mm wide and .07mm thick. The tape has conductive adhesive on one side and a protective paper backing over the adhesive.
This is an example of a circuit made of Copper Foil Tape connected to the LED:
- Conductive Copper Tape
- Tape width: 5mm
- Tape Length: 25 meters
- Tape thickness: 0.07mm
- Adhesive on one side
What's in the box?

The chip's fairly small so it comes on a breakout board with ferrites to keep the AVDD and AGND quiet. Interfacing is done via I2C. The address can be changed to one of four options (see the datasheet table 5) so you can have up to 4 ADS1115's connected on a single 2-wire I2C bus for 16 single-ended inputs. For example, your Raspberry Pi can read voltage from load cell:
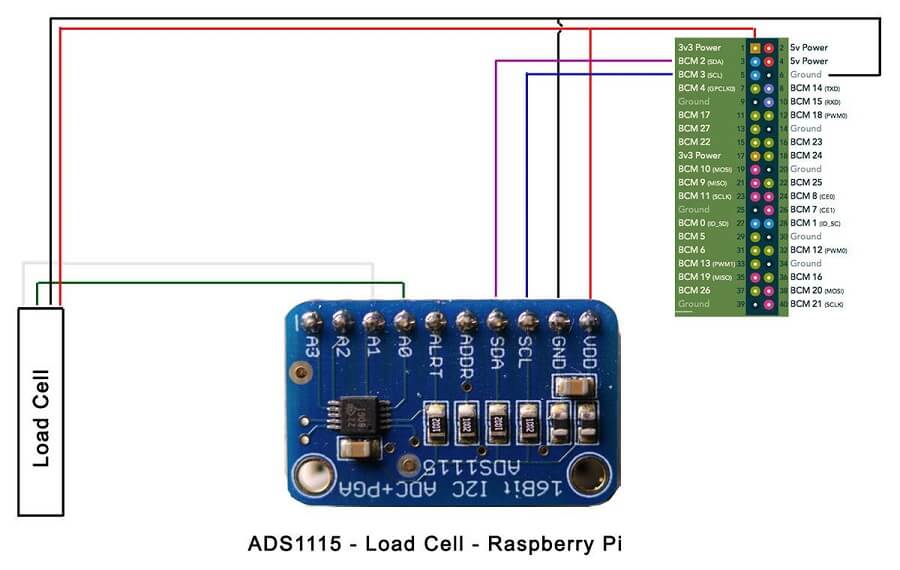
To get you started, here is example code for both the Raspberry Pi (in Adafruit Pi Python library), Arduino (in ADS1X15 Arduino library repository) and CircuitPython. Simply connect GND to ground, VDD to your logic power supply, and SCL/SDA to your microcontroller's I2C port and run the example code to start reading data.
- Breakout board with standard header spacing (2.54mm)
- Uses ADS1115 ADC converter IC
- Up to
16-bitresolution, we can only get 12-bit resolution. - Wide Operating Voltage Range: 2.0V to 5.5V
- Compatible with both 5V system like Arduino
- And 3.3V system like Raspberry Pi
- Low Current Consumption:
- Continuous Mode: Only 150µA
- Single-Shot Mode: Auto Shut-Down
- Programmable Data Rate: 8SPS to 860SPS
- Internal Low-Drift Voltage Reference
- Internal Oscillator
- Internal PGA
- I2C interface, only 4 wires needed to Raspberry Pi or Arduino
- Pin Selectable I2C Addresses
- Four Single-Ended or Two Differential Inputs
- Programmable Comparator
- This board/chip uses I2C 7-bit addresses between 0x48-0x4B, selectable with jumpers
What's in the box?
1 x 10-ways header pin
- ADS1115 4-Channel ADC Uses I2C with Raspberry Pi, by Lewis Loflin
- Raspberry Pi Analog to Digital Converter, tutorial by Adafruit
- ADS1115 Datasheet
- ADS1115 Python Library by Adafruit
- ADS1115 library for Arduino by Adafruit

Simple ON and OFF switch. This is a panel-mount SPDT (single pole double throw) toggle switch.
This 3 pins toggle switch is great for any project where you have two options to select between. Maybe you'll be selecting between two voltages? Two audio outputs? Two sensor inputs? It's up to you! It's short, sweet, blue, and to the point! The part is marked at 3A 250VAC and 6A 125VAC but we haven't tested it at such high current/voltages and don't recommend it for more than 2A at 24V.
- SPDT 3 Terminal ON-ON 2 - Position Latching Toggle Switch.
- Each switch is assembled with two hex nuts, a flat and a locking washer.
- Easy installation, fits into any 6mm hole.
- Stated Electrical Spec: 3A 250VAC or 6A 125VAC, but we recommend using it at 2A at 24V

Relays are always good to have especially for electronics projects. The relay itself offers two main benefits:
- Isolation of low voltage system against high voltage system, example 5VDC and 240VAC
- Allow electronics with low voltage to control high power load, for example from Arduino to AC light bulb.
This is not an ordinary Relay breakout. It comes with 1 (single) channel 3.3V activation relay, ready to control 250VAC at 10A. Extra isolation with optocoupler at the front of control and the activation logic for the relay is configurable via a mini jumper. In simple words, the relay can be configured as 3.3V(High) activation or 0V(Low) activation. This is the universal Relay breakout board and we like it.
It comes with three (3) screw terminals for the relay output:
NO (Normally Opened),
NC (Normally Closed),
COM (Common),
and screw terminals for the control signal from a microcontroller such as Arduino or micro:bit. The control signal is optoisolated, protected. It even comes with power and activation indicator LEDs for the relay. Easy to use and suitable for beginners, and of course students too.
Input power and signal:
- DC+ = +3.3VDC
- DC- = GND (Ground or 0V)
- In1 = Control signal, 3.3V as logic High; 0V as logic Low
If you need to control AC or high current, high voltage load, this will be the perfect board.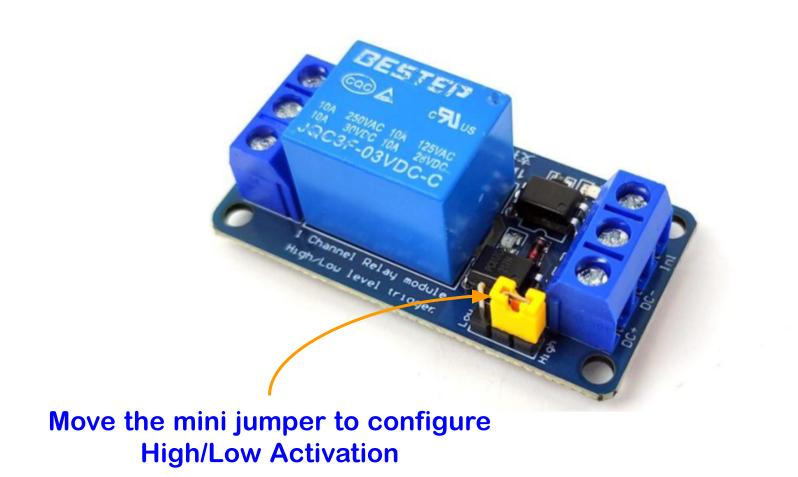
Note: We notice the DC+ and DC- need to be 3.3V and the In1 (control signal) needs to be 3.3V or Ground to make it works properly.
- 3.3V One (single) channel relay module
- Configurable Activation Logic, High or Low, via mini jumper
- Maximum Current Rating: 10A
- Maximum Voltage Rating: AC 250V
- Can control various appliances with large current and high voltage
- Can be controlled directly by 3.3V microcontrollers such as Arduino, micro:bit.
- Build-in an Opto-Isolator for extra isolation and protection to the controller.
- A power indicator LED, and another relay activation indicator LED
![]() Warning
Warning
Exercise proper caution when connecting mains driven equipment or appliances to relay module as lethal current will be present.

Relays are always good to have especially for electronics projects. The relay itself offers two main benefits:
- Isolation of low voltage system against high voltage system, example 5VDC and 240VAC
- Allow electronics with low voltage to control high power load, for example from Arduino to AC light bulb.
This is not an ordinary Relay breakout. It comes with 2 channels 3.3V activation relays, ready to control 250VAC at 10A. Extra isolation with optocoupler at the front of control and the activation logic for the relay is configurable via a mini jumper. In simple words, the relay can be configured as 3.3V(High) activation or 0V(Low) activation. This is the universal Relay breakout board and we like it.
It comes with three (3) screw terminals for each relay output:
NO (Normally Opened),
NC (Normally Closed),
COM (Common),
and screw terminals for the control signal from a microcontroller such as Arduino or micro:bit. The control signal is optoisolated, protected. It even comes with power and activation indicator LEDs for the relay. Easy to use and suitable for beginners, and of course students too.
Input power and signal:
- DC+ = +3.3VDC
- DC- = GND (Ground or 0V)
- In1 = Control signal, 3.3V as logic High; 0V as logic Low
- In2 = Control signal, 3.3V as logic High; 0V as logic Low
If you need to control AC or high current, high voltage load, this will be the perfect board.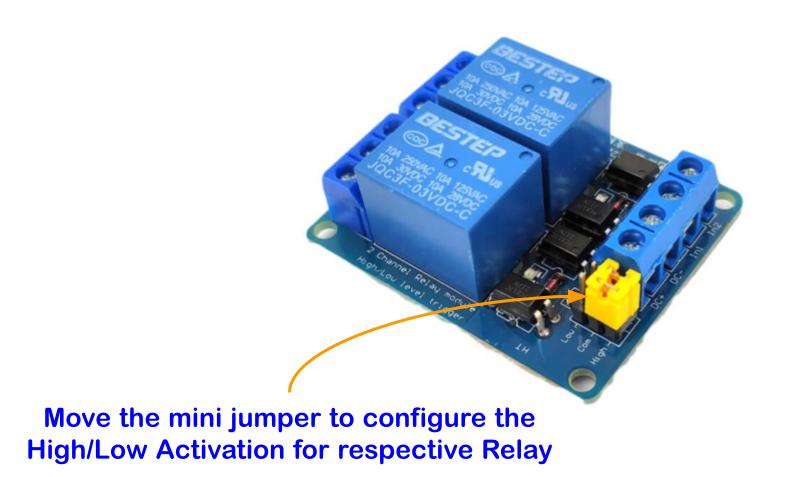
Note: We notice the DC+ and DC- need to be 3.3V and the In1 (control signal) needs to be 3.3V or Ground to make it works properly.
- 3.3V One (single) channel relay module
- Configurable Activation Logic, High or Low, via mini jumper
- Maximum Current Rating: 10A
- Maximum Voltage Rating: AC 250V
- Can control various appliances with large current and high voltage
- Can be controlled directly by 3.3V microcontrollers such as Arduino, micro:bit.
- Build-in an Opto-Isolator for extra isolation and protection to the controller.
- A power indicator LED, and another relay activation indicator LED
![]() Warning
Warning
Exercise proper caution when connecting mains driven equipment or appliances to relay module as lethal current will be present.

This rotary grinder is designed for carving, engraving, grinding, removing, sharpening, sanding, polishing, drilling etc. It's suitable for 3D printed part post-processing to clear unwanted material like printing support, elephant legs issues, hole clearance and so on. Very convenient to hand carry since lightweight and its power input of 5V (USB Type A), you can get power sources easily nowadays, like phone chargers, power banks, USB ports on your laptop/PC or even inside your car.
Note: The 5V power adapter is NOT INCLUDED
Product Detail
- Product Weight: 130g
- Power Source: DC 5V (USB Type A)
- Speed: 3000 - 20000 rpm (adjustable)
- Body Material: ABS
1. Durable And Reliable - Small size, lightweight, easily carried, comfortable grip handle, offers better control while drilling or grinding, convenient to use.
2. Adjustable Speed - Min speed 3000rpm, can up to 20000rpm.
3. Heat dissipation design with front and rear cooling holes, fast heat dissipation and prolonged lifespan.
4. Power jack/socket for USB power supply is more convenient, USB to plug cable is given
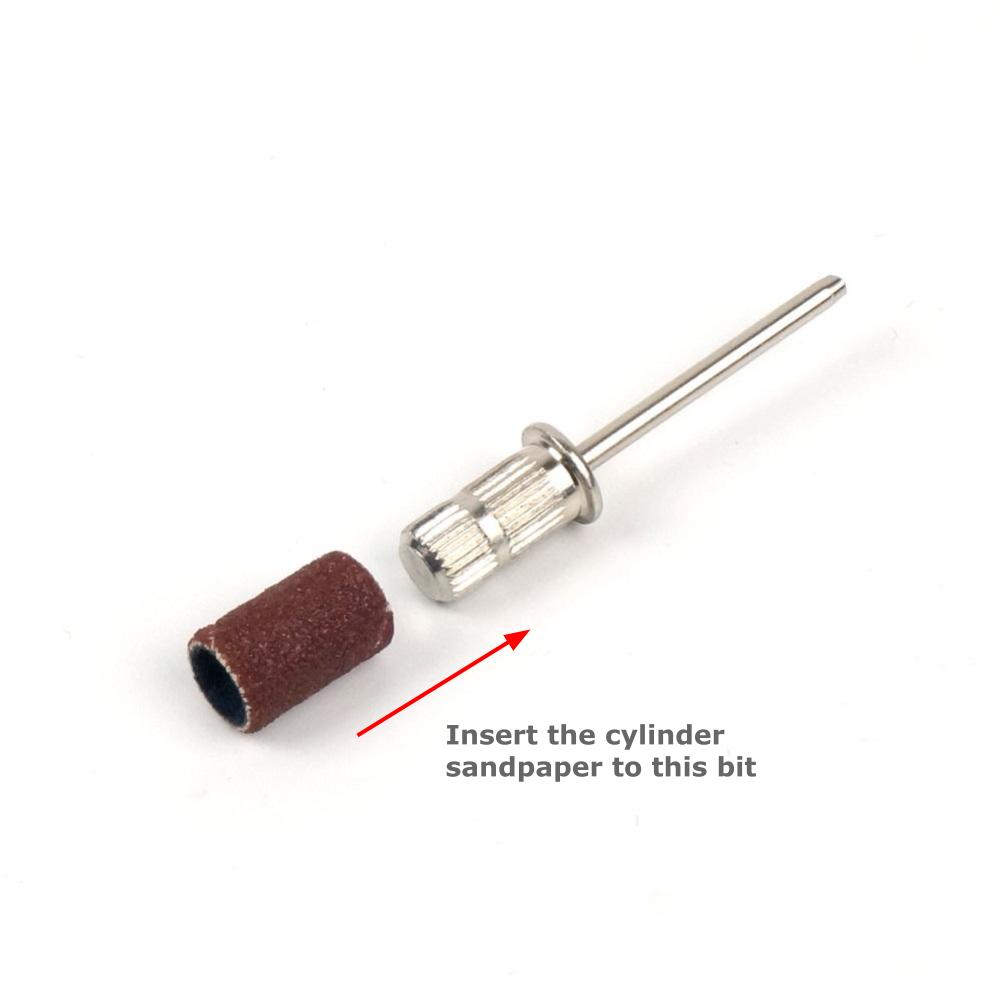
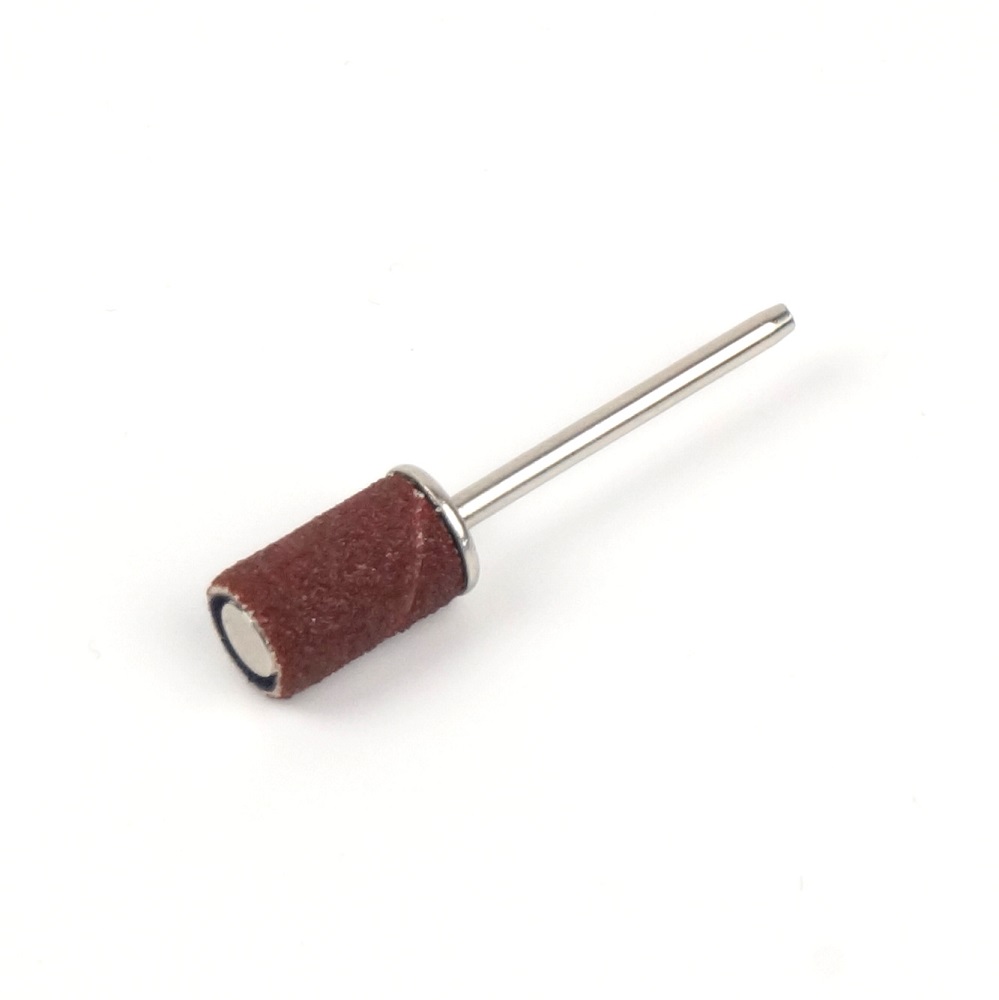
5. Direct insert drill bit socket design, just insert the drill bit directly without any tightening
6. Come with 6 different types of bits and 6 pcs of cylinder sandpapers (2pcs coarse, 2pcs medium, 2pcs fine)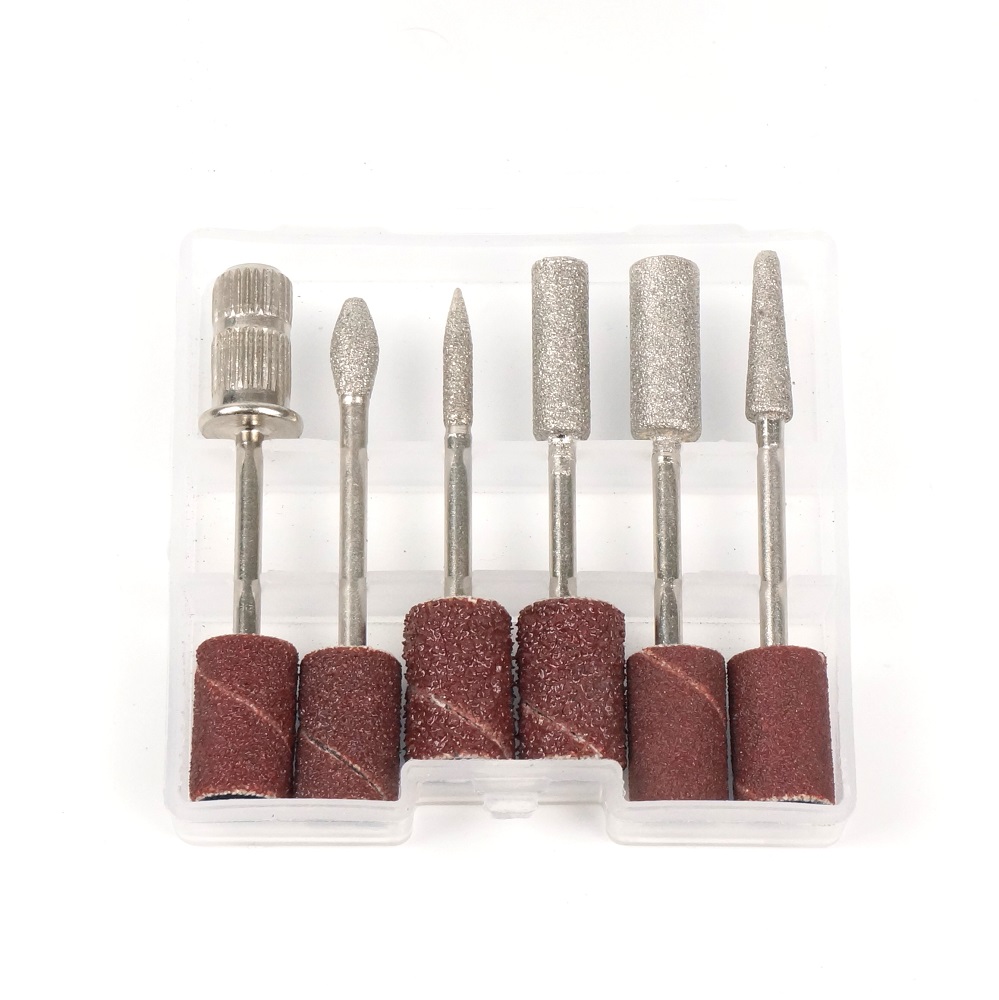
7. This rotary grinder kit is necessary for DIY carving and grinding. It is suitable for wood carving, grinding aluminium plate, thin copper board, plastic board, chipboard, printed circuit board, and epoxy board
1 x USB to Power Plug Cable
1 x Grinder Bit Set
- 6 x different type bits
- 6 x cylinder sandpapers (2 x coarse, 2 x medium, 2 x fine)

This Deburring Tool includes a 360 rotational handle with a stainless steel blade that has the optimal profile for deburring 3D-printed plastic parts. If you buy with a blade set, you will get an extra 10pcs blade.
Note: To change the blade and open the top cover, you need to press the button in the red circle.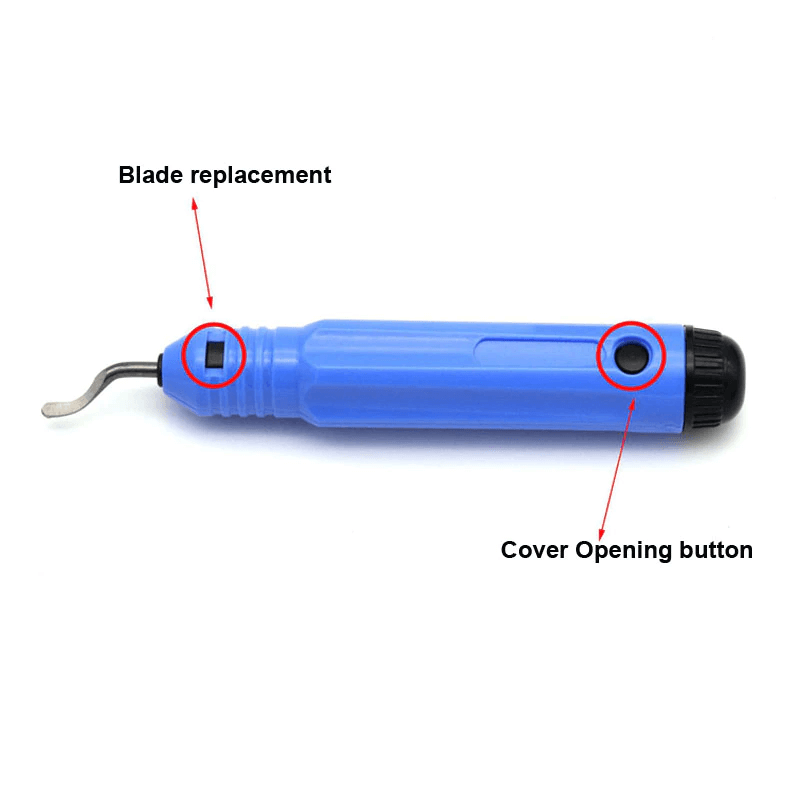
- Sharp & Durable Material - The blades are made of HSS high-speed steel. You could deburr pipes and assorted machined parts such as PVC or ABS pipes, Soft Metal (Aluminum, Copper), and Wood
- Rotary Blades & Comfortable Handle - Rotary blade is specifically designed for cross holes, deep holes, straight edges, and curved edges. Plus, the aluminum alloy handle makes it easy to finish your cutting
- Greatest Hand Deburring Tool - It is a nice little tool for a lathe. It is quicker than a grinder and can get into tight angles. So every craftsman is worth having a deburring tool set
- Wide Application - Suitable for home use, plumbing applications or as a professional workshop tool.
Specifications
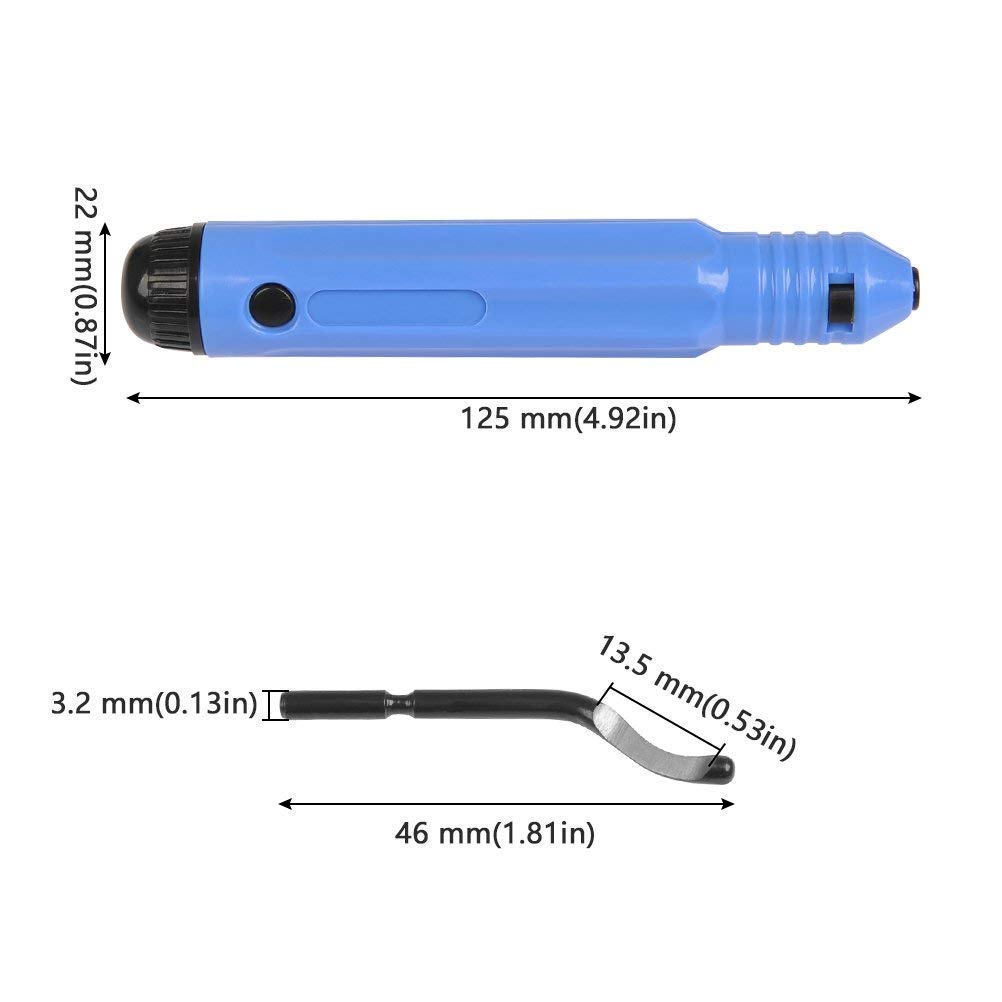
- Material: Plastic
- Color: Blue
- Size: 125mm x 22mm
- Weight: 26.3g
Blade
- Material: M2 High-Speed Steel (HSS)
- Hardness: 63RC
- Blade Including Angle: 40 degree
- Blade Lenght: 46mm
- Blade Diameter: 3.2mm
- Weight: 2.6g
What's in the box?
1 x Deburring tool
10 x blades
Replacement blades are available
Resources
How to use and reviews from My Tech Fun
You might also like this 3D printable case to keep all your blades safe.

Check out how can you use it with Arduino, by Maker Tutor:
So you can also use it with Arduino, Raspberry Pi or micro:bit
- This is a piezo buzzer or passive buzzer.
- It requires pulses with certain frequency to produce tones.
- Come with easy to use jumper housing
- Operating voltage: 5V DC
- Found normally on computer motherboard, act as speaker to produce audio feedback of computer status/problem.
What's in the box?

The Push Button Panel Mount 10mm with Wire-20cm is a versatile and reliable button that is perfect for a variety of applications. Its bright red color makes it easy to locate, and its compact 10mm size makes it perfect for tight spaces. This button comes with a 20cm wire, making it easy to connect to your circuitry.
The panel mount design of this button ensures a secure and stable connection, and its easy-to-use design makes it perfect for both beginners and professionals alike. With its momentary action, this switch is ideal for applications where you need a temporary connection.
The button is a normally-open micro-switch. When pressed, the contacts short closed and completes the circuit :) The diameter of the body is 10mm so if you want to poke a hole for mounting it, make sure the hole size fits it. No screw needed for mounting, just press and fit into the hole.
- Normally Open Momentary Push Button
- Red Button
- Press Fit type
- Rated voltage: 24VDC
- Rated current: 2A continuous
- Total height: 31.7mm
- Body diameter: 10mm
- Recommended Mounting Hole Diameter: 10.5mm
- Pre-soldered with 20 cm jumper wire terminated with male header pin
Whats in the box?
1 x Push Button (Red) Panel Mount 10mm with Wire-20cm
Resources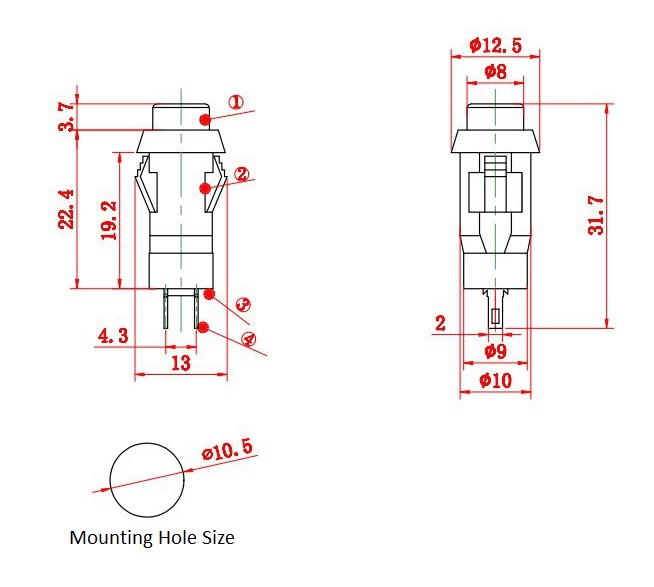

This is a 5-in-1 wrench multi-functional tool for a 3D Printer, suitable for MK8 MK10 UM2 E3D Nozzle Heater Block.
The opening size is: 6mm, 7mm, 8mm, 9mm, and 20mm, suitable for nozzles of various sizes.
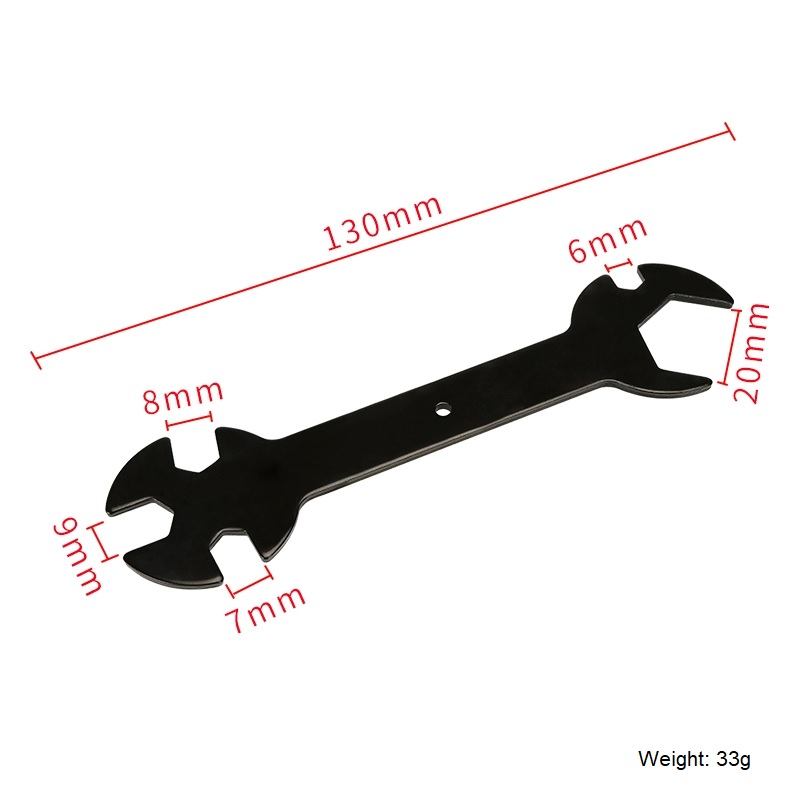
Made of high-quality iron, surface treatment electrophoresis, high hardness, not easy to rust, no deformation, wear resistance and long service life.
With a 5-in-1 function used to replace nozzles and heating blocks for FDM 3D printers. Small in size, light in weight, easy to carry and store, and does not take up extra space.
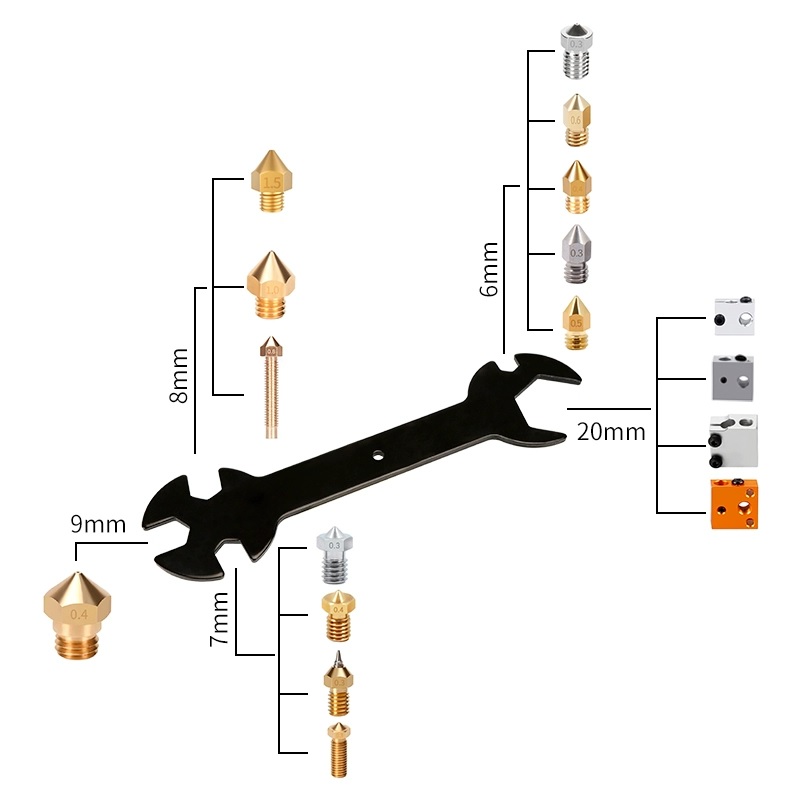
What's in the box?
1 x 3D Printer Heat Block and Nozzle Wrench (5 in 1)

Our 4xAA battery holder is perfect for hobbyists looking for a reliable power source for their DIY electronics projects. Made from durable materials, it's easy to install and use with simple connections. Its compact design makes it portable, so you can work on your projects anywhere. Order yours today and take your projects to the next level!
What's in the box?
1 x Quad AA Battery Holder
Need batteries? You will find our battery selection here

Following the strictest quality standards, and using the highest quality raw materials, take your 3D printing experience to a new level!
With a 2.0mm inner diameter and 4.0mm outer diameter, it is compatible with all 1.75mm PLA, ABS, and other filaments. It is also durable enough to stand the 3D printer's high printing temperature.
Features
- Compatible with 3D Printers:
- Material: Durable PTFE
- Safe and odorless
- Size: Inner diameter: 2mm ± 0.05mm, Outer diameter: 4mm
- High-temperature resistance: 190℃ to 260℃
- Colour: Blue
What's in the box?
1 x Blue PTFE Tube (1m)

Specifications
- Resistance: 5K
- Voltage rating: 300 Volt (max.)
- Power rating: 0.5 Watt
- Tolerance: 10%
- RoHS: Yes
1 x Finger adjust Preset Potentiometer
Resources
Python Library
Definition, Types, And Working Principle
Specifications
- Resistance: 10K
- Voltage rating: 300 Volt (max.)
- Power rating: 0.5 Watt
- Tolerance: 10%
- RoHS: Yes
1 x Finger adjust Preset Potentiometer
Resources
Python Library
Definition, Types, And Working Principle