
Special Offers


This is the ICE tower PLUS for Raspberry Pi 5 - because bigger is always better!
The good folks at 52Pi took the standard ICE Tower and shoved it through the GrowBig-5000 - this is the result - a HUGE 80mm tall dual-copper heatpipe cooler complete with a chunky metal cooling baseplate for the final word in Raspberry Pi 5 cooling!
The massive stack of cooling fins rests on a chunky aluminium block which is attached to your Raspberry Pi 5 via the included mounting plates and thermal pads. The 60mm fan uses the Pi 5's JST fan header to only kick in when temperatures hit 60°C, keeping your setup quiet when temperatures are in a good place.
The thick black metal baseplate has its own large thermal pad to draw heat from the underside of the board as well - there's just no escaping this thing!
Above all - it really does look awesome. Your little computer now has big computer looks, and the cooling performance to match. We also stock a low-profile version here!
Raspberry Pi 5 not included
Features
- Efficient Cooling: The dual-copper pipe design ensures effective heat dissipation, keeping your Raspberry Pi 5 operating at optimal temperatures even under heavy loads.
- Stylish Design: The metallic fins enhance cooling performance and add 'big computer' looks to your Raspberry Pi setup.
- Durable Construction: Constructed from high-quality materials, the ICE Tower Plus is built to last
- Easy Installation: With a standard 4-pin JST Pi 5 fan connector, installation is quick and hassle-free
- Compatibility: Designed specifically for Raspberry Pi 5
- Enhanced Performance: By effectively dissipating heat, the ICE Tower Plus helps prevent thermal throttling, ensuring consistent performance
What's in the box?
1 x ICE Tower Plus Cooler for Raspberry Pi 5
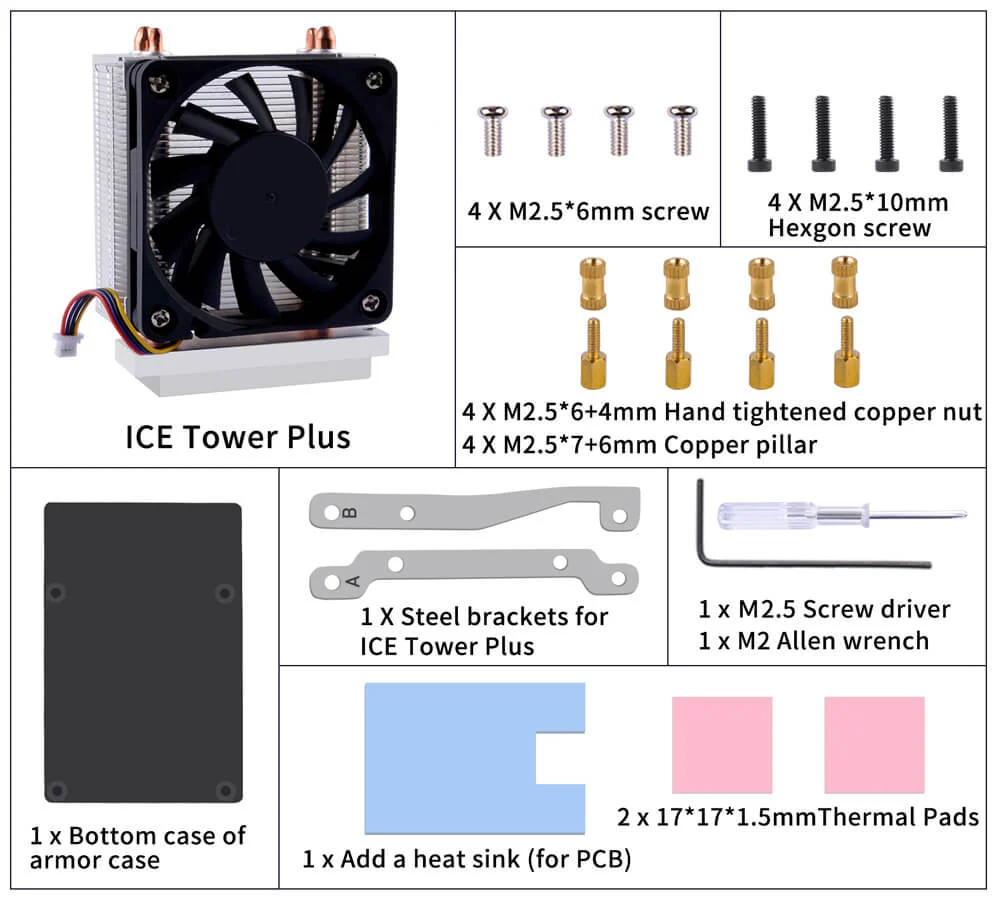
Resources
- Product Wiki
- Assembly instructions (paper version included in the package)
Note: The fan will not spin until your Raspberry Pi 5 hits 60°C, and will then gradually increase speed with the temperature. This is controlled by the Raspberry Pi OS kernel.
Please Note: These batteries are bought in bulk and are supplied loose without backing cards or any other form of packaging.
Reliable 9V power for your electronics projects and everyday devices. The Energizer 9V Alkaline (6LR61) provides long-lasting, leak-resistant power, making it ideal for Arduino projects, multimeters, smoke detectors, guitar pedals, wireless mics, and other low to medium drain devices. It pairs perfectly with our 9V battery clip connectors for quick and easy prototyping.
What's in the box?
1 x 9V battery
You will find loads of info, lessons, projects and other resources at https://microbit.org/get-started/first-steps/introduction/
Are you a teacher that need assistance or material to improve your classes? Have a look at the free resources for teachers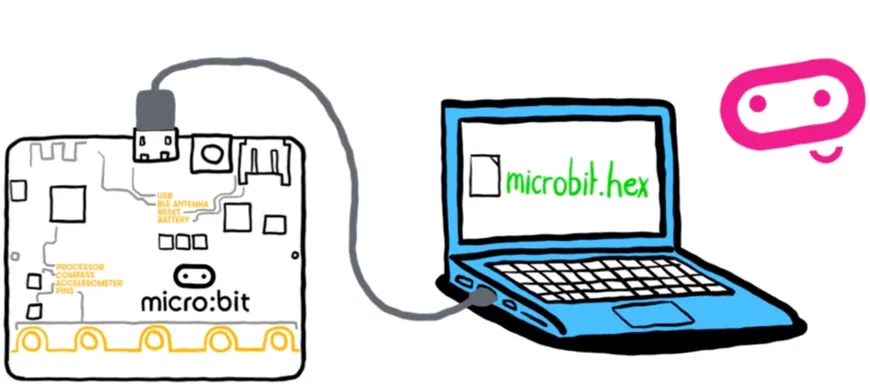
The BBC micro:bit is a pocket-sized codeable computer with motion detection, a built-in compass, LED display, and Bluetooth technology built in.
It measures 4cm by 5cm, is available in a range of colours, and designed to be fun and easy to use. It can be coded with something simple in seconds – like lighting up its LEDs or displaying a pattern – with no prior knowledge of computing.
It also connects to other devices, sensors, kits and objects, and is a companion to Arduino, Galileo, Kano, littleBits and Raspberry Pi, acting as a spring board to more complex learning.
Each element is completely programmable via easy-to-use software on a dedicated website that can be accessed from a PC, tablet or mobile.
- Microprocessor: 32-bit ARM® Cortex™ M0 CPU
- A 5x5 LED matrix with 25 red LEDs to light up and can display animiated patterns, scrolling text and alphanumeric characters
- Two programmable buttons. Use them as a games controller, or control music on a smart phone
- On-board motion detector or 3-AXIS digital accelerometer that can detect movement e.g. shake, tilt or free-fall
- A built-in compass, 3D magnetometer to sense which direction you're facing and your movement in degrees and detect the presence of certain metals and magnets
- Bluetooth® Smart Technology. Connect the micro:bit to other micro:bits, devices, phones, tablets, cameras and other everday objects
- 20 pin edge connector: This allows the micro:bit to be connected to other devices such as Raspberry Pi, Arduino, Galileo and Kano through a standard connector
- Micro-USB controller: This is controlled by a separate processor and presents the micro:bit to a computer as a memory stick
- Five Ring Input and Output (I/O) including power (PWR), ground (GRD) and 3 x I/O.
- System LED x 1 (yellow)
- System push button switch x 1
Applications
- Embedded Design & Development
- Education
What's in the box?
1 x micro:bit V2.2 board
1 x USB cable
1 x 2xAAA Battery holder OR 2xAA Battery holder (depending on stock availability)
1 x set of 10 crocodile cables
2 x Duracell Alkaline AAA OR AA batteries depending on applicable battery holder
Resources
Using the micro:bit V2.2
Sensors
The micro:bit V2.2 has no less than six sensors onboard to create awesome projects:
More Resources
The BBC micro:bit is a pocket-sized computer that introduces you to how software and hardware work together. It has an LED light display, buttons, sensors, a speaker, microphone and many other input/output features that, when programmed, let it interact with you and your world.
Visit What is the micro:bit? to find out more or explore all the features in depth through short videos.
You will need a computer, tablet or phone to write and send code to the micro:bit, but once the code is on the micro:bit it works as a standalone device with just the battery pack. Visit getting started for support taking your first steps with the micro:bit.
The Micro:bit Educational Foundation produces free coding tools and teaching resources to support you as you explore the potential of the micro:bit:
- Choose your perfect programming tool in Let's Code:
- Run whole class coding sessions easily with micro:bit classroom
- Teach block-based coding with Microsoft MakeCode or text-based coding with the micro:bit Python Editor
- Explore our free resources for teachers including:
- Quick projects for beginners and more advanced users
- Curriculum-linked lessons and units of work
- Professional development courses and events like webinars and code-alongs
- Classroom resources such as student handouts, reward certificates and posters
As well as givings students a hands-on approach to coding, the micro:bit is an engaging classroom tool that gives students confidence to try new things and get creative with technology.

Features
- Upgraded processor (nRF52833)
- 64MHz Arm Cortex-M4 FPU (over 4 times faster!)
- 512KB Flash storage on board
- 128KB RAM
- MEMS Microphone with LED indicator and on-board speaker
- 5x5 LED matrix display
- Touch sensitive logo "button"
- Accelerometer/compass
- Light and temperature sensors
- Sleep/off mode for batteries powered projects (w/ LED indicator)
- Up to 200mA of current for external accessories
- Bluetooth 5.0 radio allowing micro:bits to talk to each other
- Notched edge connector (easier to connect things like crocodile clips and conductive thread)
- Dimensions: 52mm x 42mm x 11.7mm
Applications
Embedded Design & Development
10 x micro:bit V2.2 boards(please note we cannot select the colour of the micro:bit you will receive)
10 x USB cables
10 x battery holders
20 x AAA batteries.
Resources
Program micro:bit using Raspberry Pi at https://projects.raspberrypi.org/en/projects/getting-started-with-microbit
User Guide at https://microbit.org/guide/
The micro:bit pins http://microbit.org/guide/hardware/pins/
Explore the many features of micro: bit at http://microbit.org/guide/features/
And loads more great links available at http://microbit.org/index/
Using the micro:bit V2.2
Sensors
The micro:bit V2.2 has no less than six sensors onboard to create awesome projects:
More Resources
The BBC micro:bit is a pocket-sized computer that introduces you to how software and hardware work together. It has an LED light display, buttons, sensors, a speaker, microphone and many other input/output features that, when programmed, let it interact with you and your world.
Visit What is the micro:bit? to find out more or explore all the features in depth through short videos.
You will need a computer, tablet or phone to write and send code to the micro:bit, but once the code is on the micro:bit it works as a standalone device with just the battery pack. Visit getting started for support taking your first steps with the micro:bit.
The Micro:bit Educational Foundation produces free coding tools and teaching resources to support you as you explore the potential of the micro:bit:
- Choose your perfect programming tool in Let's Code:
- Run whole class coding sessions easily with micro:bit classroom
- Teach block-based coding with Microsoft MakeCode or text-based coding with the micro:bit Python Editor
- Explore our free resources for teachers including:
- Quick projects for beginners and more advanced users
- Curriculum-linked lessons and units of work
- Professional development courses and events like webinars and code-alongs
- Classroom resources such as student handouts, reward certificates and posters
As well as givings students a hands-on approach to coding, the micro:bit is an engaging classroom tool that gives students confidence to try new things and get creative with technology.
Get started with the Raspberry Pi with one of our pre-boxed kits for home, industry and education.
These kits are perfect for beginners that are just just getting exposed to the Raspberry Pi, Media enthusiasts looking to stream online content with Kodi, developers looking to exploit the many advantages of the RPI's GPIO pins and anybody looking to get some cool goodies at a great price! They contain all of the essential items that you need to get up and running in no time.
Please Note: These kits are pre-boxed and cannot be modified at all, we do however keep stock on all of the individual items so if you have a special need simply feel free to browse through the rest of our product offerings and select the items that you'd like.
What's in the box?
1 x Official 5.1V 5A 27W USB-C PD Power Supply in White
1 x 1m micro HDMI cable
1 x 32GB preloaded Kioxia micro SD card with 64bit Raspberry Pi OS pre-loaded
1 x Full Acrylic cooler case(A)
1 x active cooler fan
Want to take your kit to the next level?
Turn your RPI into a Media Centre
Grab yourself a remote control, install LibreELEC or OSMC when setting up your RPI and you'll be streaming in no time. You can even add a wireless keyboard, mouse or other similar controllers
Want a cheap eco-friendly PC
Grab a Keyboard and Mouse, select Raspbian when setting up your RPI and you'll be browsing the web, sending emails, editing spreadsheets and watching videos just like you're used to with a desktop/laptop.
We know you love retro gaming!
RetroPie allows you to turn your Raspberry Pi into a retro-gaming machine Check out our Arcade section, whether you just want a retro control or a mini DIY arcade cabinet we have what you're looking for.
Did somebody say Robotics?
We've got some cool beginner's items in our robotic section
Our Kits come with the latest version of Raspberry Pi OS pre-installed, While we will certainly try our best to assist with any software related questions we cannot offer any kind of official support on community driven, open source, or non-PiShop produced proprietary software.
NOOBS, Raspbian, RetroPie, LibreELEC and OSMC are all examples of open-source software, please visit the developer's respective websites for more info.
Resources
A whole bunch of other really cool technical info can be found here.
Where do I start?.........Getting Started with Raspberry Pi
More on the Raspberry Pi 5
These kits are perfect for beginners that are just just getting exposed to the Raspberry Pi, Media enthusiasts looking to stream online content with Kodi, developers looking to exploit the many advantages of the RPI's GPIO pins and anybody looking to get some cool goodies at a great price! They contain all of the essential items that you need to get up and running in no time.
Please Note: These kits are pre-boxed and cannot be modified at all, we do however keep stock on all of the individual items so if you have a special need simply feel free to browse through the rest of our product offerings and select the items that you'd like.
What's in the box?
1 x Raspberry Pi Zero 2 WH
1 x 32GB preloaded Kioxia micro SD card with 64bit Raspberry Pi OS pre-loaded
1 x Official Raspberry Pi Red & White Case
1 x Official Raspberry Pi micro USB power supply White 5.1V 2.5A
1 x Official Raspberry Pi male mini HDMI to female HDMI adapter
1 x Official Raspberry Pi OTG male micro USB to female USB A adapter
You might also want a standard HDMI cable that connects to the adapter or a mini HDMI cable that connects directly to the Zero.
Want to take your kit to the next level?
Turn your RPI into a Media Centre
Grab yourself a remote control, install LibreELEC or OSMC when setting up your RPI and you'll be streaming in no time. You can even add a wireless keyboard, mouse or other similar controllers
Want a cheap eco-friendly PC
Grab a Keyboard and Mouse, select Raspbian when setting up your RPI and you'll be browsing the web, sending emails, editing spreadsheets and watching videos just like you're used to with a desktop/laptop.
We know you love retro gaming!
RetroPie allows you to turn your Raspberry Pi into a retro-gaming machine Check out our Arcade section, whether you just want a retro control or a mini DIY arcade cabinet we have what you're looking for.
Did somebody say Robotics?
We've got some cool beginner's items in our robotic section
Our Kits come with the latest version of Raspberry Pi OS pre-installed, While we will certainly try our best to assist with any software related questions we cannot offer any kind of official support on community driven, open source, or non-PiShop produced proprietary software.
NOOBS, Raspbian, RetroPie, LibreELEC and OSMC are all examples of open-source software, please visit the developer's respective websites for more info.
A whole bunch of other really cool technical info can be found here.
Where do I start?.........Getting Started with Raspberry Pi
These kits are perfect for beginners that are just just getting exposed to the Raspberry Pi, Media enthusiasts looking to stream online content with Kodi, developers looking to exploit the many advantages of the RPI's GPIO pins and anybody looking to get some cool goodies at a great price! They contain all of the essential items that you need to get up and running in no time.
Please Note: These kits are pre-boxed and cannot be modified at all, we do however keep stock on all of the individual items so if you have a special need simply feel free to browse through the rest of our product offerings and select the items that you'd like.
What's in the box?
1 x Raspberry Pi Zero 2 WH
1 x 32GB preloaded Kioxia micro SD card with 64bit Raspberry Pi OS pre-loaded
1 x Zero 2 W Acrylic case
1 x Official Raspberry Pi micro USB power supply White 5.1V 2.5A
1 x Official Raspberry Pi male mini HDMI to female HDMI adapter
1 x Official Raspberry Pi OTG male micro USB to female USB A adapter
You might also want a standard HDMI cable that connects to the adapter or a mini HDMI cable that connects directly to the Zero.
Want to take your kit to the next level?
Turn your RPI into a Media Centre
Grab yourself a remote control, install LibreELEC or OSMC when setting up your RPI and you'll be streaming in no time. You can even add a wireless keyboard, mouse or other similar controllers
Want a cheap eco-friendly PC
Grab a Keyboard and Mouse, select Raspbian when setting up your RPI and you'll be browsing the web, sending emails, editing spreadsheets and watching videos just like you're used to with a desktop/laptop.
We know you love retro gaming!
RetroPie allows you to turn your Raspberry Pi into a retro-gaming machine Check out our Arcade section, whether you just want a retro control or a mini DIY arcade cabinet we have what you're looking for.
Did somebody say Robotics?
We've got some cool beginner's items in our robotic section
Our Kits come with the latest version of Raspberry Pi OS pre-installed, While we will certainly try our best to assist with any software related questions we cannot offer any kind of official support on community driven, open source, or non-PiShop produced proprietary software.
NOOBS, Raspbian, RetroPie, LibreELEC and OSMC are all examples of open-source software, please visit the developer's respective websites for more info.
A whole bunch of other really cool technical info can be found here.
Where do I start?.........Getting Started with Raspberry Pi
These kits are perfect for beginners that are just just getting exposed to the Raspberry Pi, Media enthusiasts looking to stream online content with Kodi, developers looking to exploit the many advantages of the RPI's GPIO pins and anybody looking to get some cool goodies at a great price! They contain all of the essential items that you need to get up and running in no time.
Please Note: These kits are pre-boxed and cannot be modified at all, we do however keep stock on all of the individual items so if you have a special need simply feel free to browse through the rest of our product offerings and select the items that you'd like.
What's in the box?
1 x Official 5.1V 5A 27W USB-C PD Power Supply in Black
1 x 1m micro HDMI cable
1 x 32GB preloaded micro SD card with 64bit Raspberry Pi OS pre-loaded
1 x Official Pi5 Black/Grey Case with fan and heatsink
Want to take your kit to the next level?
Turn your RPI into a Media Centre
Grab yourself a remote control, install LibreELEC or OSMC when setting up your RPI and you'll be streaming in no time. You can even add a wireless keyboard, mouse or other similar controllers
Want a cheap eco-friendly PC
Grab a Keyboard and Mouse, select Raspbian when setting up your RPI and you'll be browsing the web, sending emails, editing spreadsheets and watching videos just like you're used to with a desktop/laptop.
We know you love retro gaming!
RetroPie allows you to turn your Raspberry Pi into a retro-gaming machine Check out our Arcade section, whether you just want a retro control or a mini DIY arcade cabinet we have what you're looking for.
Did somebody say Robotics?
We've got some cool beginner's items in our robotic section
Our Kits come with the latest version of Raspberry Pi OS pre-installed, While we will certainly try our best to assist with any software related questions we cannot offer any kind of official support on community driven, open source, or non-PiShop produced proprietary software.
NOOBS, Raspbian, RetroPie, LibreELEC and OSMC are all examples of open-source software, please visit the developer's respective websites for more info.
Resources
A whole bunch of other really cool technical info can be found here.
Where do I start?.........Getting Started with Raspberry Pi
More on the Raspberry Pi 5
These kits are perfect for beginners that are just just getting exposed to the Raspberry Pi, Media enthusiasts looking to stream online content with Kodi, developers looking to exploit the many advantages of the RPI's GPIO pins and anybody looking to get some cool goodies at a great price! They contain all of the essential items that you need to get up and running in no time.
Please Note: These kits are pre-boxed and cannot be modified at all, we do however keep stock on all of the individual items so if you have a special need simply feel free to browse through the rest of our product offerings and select the items that you'd like.
What's in the box?
1 x Raspberry Pi 4 Model B 2GB
1 x Black oneninedesign case
1 x 1m micro HDMI cable
1 x 32 GB Kioxia Micro SD card with Raspberry Pi OS pre-installed
1 x Official Pi4 black 5.1V 3A Power Supply
Want to take your kit to the next level?
Turn your RPI into a Media Centre
Grab yourself a remote control, select LibreELEC or OSMC when setting up your RPI and you'll be streaming in no time. You can even add a wireless keyboard, mouse or other similar controllers
Want a cheap eco-friendly PC
Grab a Keyboard and Mouse, select Raspbian when setting up your RPI and you'll be browsing the web, sending emails, editing spreadsheets and watching videos just like you're used to with a desktop/laptop.
We know you love retro gaming!
Check out our Arcade section, whether you just want a retro control or a mini DIY arcade cabinet we have what you're looking for.
Did somebody say Robotics?
We've got some cool beginner's items in our robotic section
Our Kits come with the latest version of Raspberry Pi OS pre-installed, While we will certainly try our best to assist with any software related questions we cannot offer any kind of official support on community driven, open source, or non-PiShop produced proprietary software.
NOOBS, Raspbian, LibreELEC and OSMC are all open-source software, please visit the developer's respective websites for more info.
A whole bunch of other really cool technical info can be found here.
Getting Started with Raspberry Pi
These kits are perfect for beginners that are just just getting exposed to the Raspberry Pi, Media enthusiasts looking to stream online content with Kodi, developers looking to exploit the many advantages of the RPI's GPIO pins and anybody looking to get some cool goodies at a great price! They contain all of the essential items that you need to get up and running in no time.
Please Note: These kits are pre-boxed and cannot be modified at all, we do however keep stock on all of the individual items so if you have a special need simply feel free to browse through the rest of our product offerings and select the items that you'd like.
What's in the box?
1 x Official 5.1V 5A 27W USB-C PD Power Supply in Black
1 x Official 1m micro HDMI cable
1 x Kioxia 32GB micro SD card with 64bit Raspberry Pi OS pre-loaded
Want to take your kit to the next level?
Turn your RPI into a Media Centre
Grab yourself a remote control, install LibreELEC or OSMC when setting up your RPI and you'll be streaming in no time. You can even add a wireless keyboard, mouse or other similar controllers
Want a cheap eco-friendly PC
Grab a Keyboard and Mouse, select Raspbian when setting up your RPI and you'll be browsing the web, sending emails, editing spreadsheets and watching videos just like you're used to with a desktop/laptop.
We know you love retro gaming!
RetroPie allows you to turn your Raspberry Pi into a retro-gaming machine Check out our Arcade section, whether you just want a retro control or a mini DIY arcade cabinet we have what you're looking for.
Did somebody say Robotics?
We've got some cool beginner's items in our robotic section
Our Kits come with the latest version of Raspberry Pi OS pre-installed, While we will certainly try our best to assist with any software related questions we cannot offer any kind of official support on community driven, open source, or non-PiShop produced proprietary software.
NOOBS, Raspbian, RetroPie, LibreELEC and OSMC are all examples of open-source software, please visit the developer's respective websites for more info.
Resources
A whole bunch of other really cool technical info can be found here.
Where do I start?.........Getting Started with Raspberry Pi
More on the Raspberry Pi 5
These kits are perfect for beginners that are just just getting exposed to the Raspberry Pi, Media enthusiasts looking to stream online content with Kodi, developers looking to exploit the many advantages of the RPI's GPIO pins and anybody looking to get some cool goodies at a great price! They contain all of the essential items that you need to get up and running in no time.
Please Note: These kits are pre-boxed and cannot be modified at all, we do however keep stock on all of the individual items so if you have a special need simply feel free to browse through the rest of our product offerings and select the items that you'd like.
What's in the box?
1 x Official 5.1V 5A 27W USB-C PD Power Supply in Black
1 x Official 1m micro HDMI cable
1 x Kioxia 32GB micro SD card with 64bit Raspberry Pi OS pre-loaded
Want to take your kit to the next level?
Turn your RPI into a Media Centre
Grab yourself a remote control, install LibreELEC or OSMC when setting up your RPI and you'll be streaming in no time. You can even add a wireless keyboard, mouse or other similar controllers
Want a cheap eco-friendly PC
Grab a Keyboard and Mouse, select Raspbian when setting up your RPI and you'll be browsing the web, sending emails, editing spreadsheets and watching videos just like you're used to with a desktop/laptop.
We know you love retro gaming!
RetroPie allows you to turn your Raspberry Pi into a retro-gaming machine Check out our Arcade section, whether you just want a retro control or a mini DIY arcade cabinet we have what you're looking for.
Did somebody say Robotics?
We've got some cool beginner's items in our robotic section
Our Kits come with the latest version of Raspberry Pi OS pre-installed, While we will certainly try our best to assist with any software related questions we cannot offer any kind of official support on community driven, open source, or non-PiShop produced proprietary software.
NOOBS, Raspbian, RetroPie, LibreELEC and OSMC are all examples of open-source software, please visit the developer's respective websites for more info.
Resources
A whole bunch of other really cool technical info can be found here.
Where do I start?.........Getting Started with Raspberry Pi
More on the Raspberry Pi 5
These kits are perfect for beginners that are just just getting exposed to the Raspberry Pi, Media enthusiasts looking to stream online content with Kodi, developers looking to exploit the many advantages of the RPI's GPIO pins and anybody looking to get some cool goodies at a great price! They contain all of the essential items that you need to get up and running in no time.
Please Note: These kits are pre-boxed and cannot be modified at all, we do however keep stock on all of the individual items so if you have a special need simply feel free to browse through the rest of our product offerings and select the items that you'd like.
What's in the box?
1 x Official 5.1V 5A 27W USB-C PD Power Supply in White
1 x 1m micro HDMI cable
1 x 64GB preloaded micro SD card with 64bit Raspberry Pi OS pre-loaded
1 x Official Pi5 Red/White Case with fan and heatsink
Want to take your kit to the next level?
Turn your RPI into a Media Centre
Grab yourself a remote control, install LibreELEC or OSMC when setting up your RPI and you'll be streaming in no time. You can even add a wireless keyboard, mouse or other similar controllers
Want a cheap eco-friendly PC
Grab a Keyboard and Mouse, select Raspbian when setting up your RPI and you'll be browsing the web, sending emails, editing spreadsheets and watching videos just like you're used to with a desktop/laptop.
We know you love retro gaming!
RetroPie allows you to turn your Raspberry Pi into a retro-gaming machine Check out our Arcade section, whether you just want a retro control or a mini DIY arcade cabinet we have what you're looking for.
Did somebody say Robotics?
We've got some cool beginner's items in our robotic section
Our Kits come with the latest version of Raspberry Pi OS pre-installed, While we will certainly try our best to assist with any software related questions we cannot offer any kind of official support on community driven, open source, or non-PiShop produced proprietary software.
NOOBS, Raspbian, RetroPie, LibreELEC and OSMC are all examples of open-source software, please visit the developer's respective websites for more info.
Resources
A whole bunch of other really cool technical info can be found here.
Where do I start?.........Getting Started with Raspberry Pi
More on the Raspberry Pi 5
Please note: You will have to buy a different DSI cable to use with Raspberry Pi 5.
This seven-inch, 800 x 480 touchscreen display lets you create interactive Raspberry Pi projects like tablets, entertainment systems, and information dashboards. It’s powered from your Raspberry Pi; no separate power supply is required.
Raspberry Pi OS provides touchscreen drivers with support for ten-finger touch and an on-screen keyboard, giving you full functionality without the need to connect a keyboard or mouse.
The display connects to Raspberry Pi via an adapter board that handles power and signal conversion. Only two connections to your Raspberry Pi are required: power from the GPIO port, and a ribbon cable that connects to the DSI port on all Raspberry Pi computers except for Raspberry Pi 400 and the Raspberry Pi Zero line.
Specifications
- Display size (diagonal): 7 inches
- Display format: 800 (RGB) × 480 pixels
- Active area: 154.08mm × 85.92mm
- Touch panel: True multi-touch capacitive touch panel with up to 10 points of absolution
What's in the box?
1 x 7” Touchscreen Display with Adapter Board
1 x DSI Ribbon cable
4 x screws (used to mount the Raspberry Pi board to the back of the display
2 x jumper wires (used to connect the power from the Adapter Board and the GPIO pins on the Pi so the power is shared across both units)
Please Note. The Raspberry Pi Board and accessories are not included with this product.
Resources

Hack this component to form part of your weather station.
Specifications
| Sensor | 3-cup anemometer |
| Measurement Description | Wind speed |
| Range | 0 to 45 m/s (0 to 100 mph) |
| Starting Threshold | 0.45 m/s (1.0 mph) |
| Accuracy | 0.11 m/s (0.25 mph) or 1.5% |
| Contact Rating | 10 mA (maximum) |
| Operating Temperature Range | -50° to 70°C |
| Distance Constant |
|
| Cable Description | Quick-connect connector with vinyl jacketed, shielded cable |
What's in the box?
1 x Anemometer
Resources

The SanDisk Industrial SD™ and microSD™ cards deliver superior endurance and reliability for demanding industrial applications across a wide range of operational requirements. Typical applications include commercial surveillance cameras, drones, Industrial IoT gateways, factory automation, and network equipment. These hard-working, connected devices can now take advantage of a powerful suite of features available in our industrial-grade flash storage solutions
Specifications
- Fast Read/Write performance enables high bit-rate video streams for commercial imaging applications such as surveillance and Industrial IoT
- “Smart” features including Health Status Monitor for proactive device status monitoring, and Automatic Read Refresh to prevent flash storage from being corrupt
- Class 10
- 16GB
- SDA 3.0 High Speed
- -25°C to 85°C
What's in the box?
1 x Industrial micro SD 16GB C10
Resources
Getting Started with your Raspberry Pi
Latest image available from the Raspberry Pi Foundation Downloads

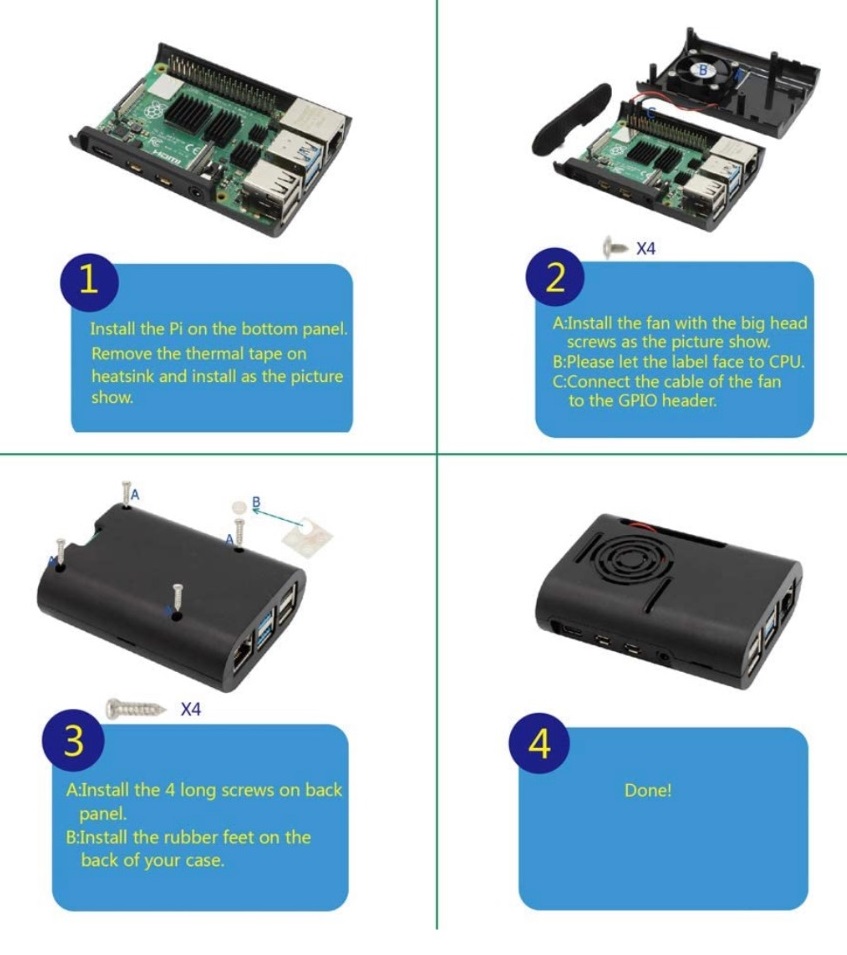
This is a new design ABS case to protect your Raspberry Pi 4 Model B computer, it is only compatible with your Raspberry Pi 4 Model B, does not support other versions. Also supports a dc 5v cooling fan.
Features
- ABS material.
- Easy to install.
- All ports and slots of the case match with Raspberry Pi 4 Computer Model B perfectly.
- Supports a DC 5v extractor cooling fan.
What's in the box?
1 x ABS Case for Raspberry Pi 4 Model B
1 x Cooling Fan 30mm x 30mm x 7mm
4 x Heat Sinks(new add on to this case)
Resources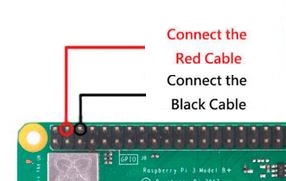

This sensor module is the most suitable to receive the ambient light data for adjusting LCD and other related projects. It is possible to detect wide range at High resolution.
The sensor is a calibrated digital light sensor that measures the intensity of the ambient light and stores it as a 16-bit number.
Specifications
- Type: GY - 302
- Size: 13.9 mm X 18.5 mm
- The original BH1750FVI ROHM chip
- Power supply: 3-5 V
- Data range: 0-65535
- Sensor built-in and bitad converter
- Direct digital output, bypassing the complicated calculation, omit calibration
- Do not distinguish between ambient light
- Close to the visual sensitivity of spectral characteristics
What's in the box?
1 x GY-302 Module
This tiny but powerful 30mm fan can be used in any electronic projects, with MCUs, and even to keep your Raspberry Pi cool.
Now with a narrower form factor to fit a wider range of enclosures
Specifications
- Dimensions: 30x30x07mm
- Bearing Type: Sleeve
- Connector: 2PIN
- Rated Voltage: DC 5V, Rated Current: 0.1A
- Airflow: 4.2CFM
- Fan Blade: 7 Blades
- Fan Speed: 5000RPM±10%
- Noise Level: <16dBA±10%
What's in the box?
1 x DC Fan 30x30x7mm
4 x M2.5 x 14 screws
4 x M2.5 nuts
Resources
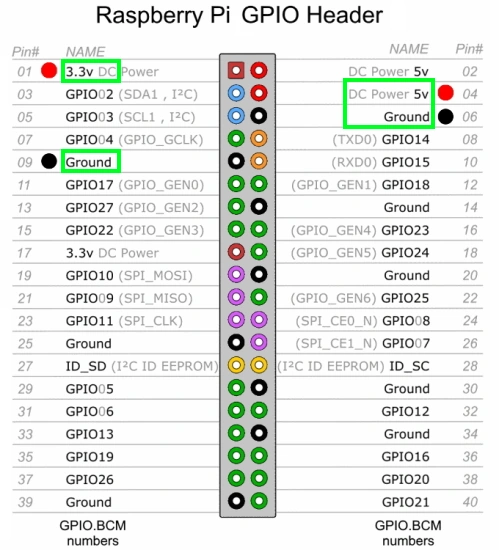
3.3V connection to the GPIO on the left and 5V on the right.

Features
- Automatically sleep after 10 minutes.
- Automatically shut down after 20 minutes.
- Temperature reach 480°C in 1 minute.Build in PID system equipped.
- 9 shortcut range to adjust temperature by button
- Products use LCD display
Specifications
- Voltage: AC220V
- Temperature range:250~480°C
- Temperature stability:±1°C
- Temperature offset range:±10°C
- Temperature Unit:°C/℉
- Heater: Four-core PTC ceramic heater
- Power - Model Number:65W -ST-2065D
- Colour:black
- Material:ABS metal
- Size:25*2*3cm
What's in the box?
1 x ATTEN ST-2065D Soldering Iron

- Designed with nixie tube display.
- MCU controlled temperature calibration with PID system equipped, adjustable
- Temperature selection using knob, easy to operate.
- Combined soldering station with soldering stand.
- The handle structure is ergonomically designed for comfortable grip.
- The heating wire and sensor are made of PTC material, which is quick in
- Temperature rise and precise in temperature control.
Specifications
- Voltage: 110/220 VAC
- Power: 80W
- Temp Range 80°C ~ 480°C
What's in the box?
1 x Atten ST-2090D Soldering Station