
Special Offers


These kits are perfect for beginners that are just just getting exposed to the Raspberry Pi, Media enthusiasts looking to stream online content with Kodi, developers looking to exploit the many advantages of the RPI's GPIO pins and anybody looking to get some cool goodies at a great price! They contain all of the essential items that you need to get up and running in no time.
Please Note: These kits are pre-boxed and cannot be modified at all, we do however keep stock on all of the individual items so if you have a special need simply feel free to browse through the rest of our product offerings and select the items that you'd like.
What's in the box?
1 x Raspberry Pi 4 Model B 2GB
1 x Black oneninedesign case
1 x 1m micro HDMI cable
1 x 32 GB Kioxia Micro SD card with Raspberry Pi OS pre-installed
1 x Official Pi4 black 5.1V 3A Power Supply
Want to take your kit to the next level?
Turn your RPI into a Media Centre
Grab yourself a remote control, select LibreELEC or OSMC when setting up your RPI and you'll be streaming in no time. You can even add a wireless keyboard, mouse or other similar controllers
Want a cheap eco-friendly PC
Grab a Keyboard and Mouse, select Raspbian when setting up your RPI and you'll be browsing the web, sending emails, editing spreadsheets and watching videos just like you're used to with a desktop/laptop.
We know you love retro gaming!
Check out our Arcade section, whether you just want a retro control or a mini DIY arcade cabinet we have what you're looking for.
Did somebody say Robotics?
We've got some cool beginner's items in our robotic section
Our Kits come with the latest version of Raspberry Pi OS pre-installed, While we will certainly try our best to assist with any software related questions we cannot offer any kind of official support on community driven, open source, or non-PiShop produced proprietary software.
NOOBS, Raspbian, LibreELEC and OSMC are all open-source software, please visit the developer's respective websites for more info.
A whole bunch of other really cool technical info can be found here.
Getting Started with Raspberry Pi
These kits are perfect for beginners that are just just getting exposed to the Raspberry Pi, Media enthusiasts looking to stream online content with Kodi, developers looking to exploit the many advantages of the RPI's GPIO pins and anybody looking to get some cool goodies at a great price! They contain all of the essential items that you need to get up and running in no time.
Please Note: These kits are pre-boxed and cannot be modified at all, we do however keep stock on all of the individual items so if you have a special need simply feel free to browse through the rest of our product offerings and select the items that you'd like.
What's in the box?
1 x Official 5V 3A Power Supply in White
1 x 64GB preloaded micro SD card with 64bit Raspberry Pi OS pre-loaded
Want to take your kit to the next level?
Turn your RPI into a Media Centre
Grab yourself a remote control, install LibreELEC or OSMC when setting up your RPI and you'll be streaming in no time. You can even add a wireless keyboard, mouse or other similar controllers
Want a cheap eco-friendly PC
Grab a Keyboard and Mouse, select Raspbian when setting up your RPI and you'll be browsing the web, sending emails, editing spreadsheets and watching videos just like you're used to with a desktop/laptop.
We know you love retro gaming!
RetroPie allows you to turn your Raspberry Pi into a retro-gaming machine Check out our Arcade section, whether you just want a retro control or a mini DIY arcade cabinet we have what you're looking for.
Did somebody say Robotics?
We've got some cool beginner's items in our robotic section
Our Kits come with the latest version of Raspberry Pi OS pre-installed, While we will certainly try our best to assist with any software related questions we cannot offer any kind of official support on community driven, open source, or non-PiShop produced proprietary software.
NOOBS, Raspbian, RetroPie, LibreELEC and OSMC are all examples of open-source software, please visit the developer's respective websites for more info.
A whole bunch of other really cool technical info can be found here.
Where do I start?.........Getting Started with Raspberry Pi
These kits are perfect for beginners that are just just getting exposed to the Raspberry Pi, Media enthusiasts looking to stream online content with Kodi, developers looking to exploit the many advantages of the RPI's GPIO pins and anybody looking to get some cool goodies at a great price! They contain all of the essential items that you need to get up and running in no time.
Please Note: These kits are pre-boxed and cannot be modified at all, we do however keep stock on all of the individual items so if you have a special need simply feel free to browse through the rest of our product offerings and select the items that you'd like.
What's in the box?
1 x Official 5.1V 5A 27W USB-C PD Power Supply in Black
1 x Official 1m micro HDMI cable
1 x 64GB preloaded micro SD card with 64bit Raspberry Pi OS pre-loaded
1 x Black OneNine case
Want to take your kit to the next level?
Turn your RPI into a Media Centre
Grab yourself a remote control, install LibreELEC or OSMC when setting up your RPI and you'll be streaming in no time. You can even add a wireless keyboard, mouse or other similar controllers
Want a cheap eco-friendly PC
Grab a Keyboard and Mouse, select Raspbian when setting up your RPI and you'll be browsing the web, sending emails, editing spreadsheets and watching videos just like you're used to with a desktop/laptop.
We know you love retro gaming!
RetroPie allows you to turn your Raspberry Pi into a retro-gaming machine Check out our Arcade section, whether you just want a retro control or a mini DIY arcade cabinet we have what you're looking for.
Did somebody say Robotics?
We've got some cool beginner's items in our robotic section
Our Kits come with the latest version of Raspberry Pi OS pre-installed, While we will certainly try our best to assist with any software related questions we cannot offer any kind of official support on community driven, open source, or non-PiShop produced proprietary software.
NOOBS, Raspbian, RetroPie, LibreELEC and OSMC are all examples of open-source software, please visit the developer's respective websites for more info.
Resources
A whole bunch of other really cool technical info can be found here.
Where do I start?.........Getting Started with Raspberry Pi
More on the Raspberry Pi 5
Get started with the Raspberry Pi with one of our pre-boxed kits for home, industry and education.
These kits are perfect for beginners that are just just getting exposed to the Raspberry Pi, Media enthusiasts looking to stream online content with Kodi, developers looking to exploit the many advantages of the RPI's GPIO pins and anybody looking to get some cool goodies at a great price! They contain all of the essential items that you need to get up and running in no time.
Please Note: These kits are pre-boxed and cannot be modified at all, we do however keep stock on all of the individual items so if you have a special need simply feel free to browse through the rest of our product offerings and select the items that you'd like.
What's in the box?
1 x Official 5.1V 5A 27W USB-C PD Power Supply in White
1 x 1m micro HDMI cable
1 x active cooler fan
Want to take your kit to the next level?
Turn your RPI into a Media Centre
Grab yourself a remote control, install LibreELEC or OSMC when setting up your RPI and you'll be streaming in no time. You can even add a wireless keyboard, mouse or other similar controllers
Want a cheap eco-friendly PC
Grab a Keyboard and Mouse, select Raspbian when setting up your RPI and you'll be browsing the web, sending emails, editing spreadsheets and watching videos just like you're used to with a desktop/laptop.
We know you love retro gaming!
RetroPie allows you to turn your Raspberry Pi into a retro-gaming machine Check out our Arcade section, whether you just want a retro control or a mini DIY arcade cabinet we have what you're looking for.
Did somebody say Robotics?
We've got some cool beginner's items in our robotic section
Our Kits come with the latest version of Raspberry Pi OS pre-installed, While we will certainly try our best to assist with any software related questions we cannot offer any kind of official support on community driven, open source, or non-PiShop produced proprietary software.
NOOBS, Raspbian, RetroPie, LibreELEC and OSMC are all examples of open-source software, please visit the developer's respective websites for more info.
Resources
A whole bunch of other really cool technical info can be found here.
Where do I start?.........Getting Started with Raspberry Pi
More on the Raspberry Pi 5
These kits are perfect for beginners that are just just getting exposed to the Raspberry Pi, Media enthusiasts looking to stream online content with Kodi, developers looking to exploit the many advantages of the RPI's GPIO pins and anybody looking to get some cool goodies at a great price! They contain all of the essential items that you need to get up and running in no time.
Please Note: These kits are pre-boxed and cannot be modified at all, we do however keep stock on all of the individual items so if you have a special need simply feel free to browse through the rest of our product offerings and select the items that you'd like.
What's in the box?
1 x Official 5.1V 5A 27W USB-C PD Power Supply in White
1 x 1m micro HDMI cable
1 x 64GB preloaded micro SD card with 64bit Raspberry Pi OS pre-loaded
1 x Official Pi5 Red/White Case with fan and heatsink
Want to take your kit to the next level?
Turn your RPI into a Media Centre
Grab yourself a remote control, install LibreELEC or OSMC when setting up your RPI and you'll be streaming in no time. You can even add a wireless keyboard, mouse or other similar controllers
Want a cheap eco-friendly PC
Grab a Keyboard and Mouse, select Raspbian when setting up your RPI and you'll be browsing the web, sending emails, editing spreadsheets and watching videos just like you're used to with a desktop/laptop.
We know you love retro gaming!
RetroPie allows you to turn your Raspberry Pi into a retro-gaming machine Check out our Arcade section, whether you just want a retro control or a mini DIY arcade cabinet we have what you're looking for.
Did somebody say Robotics?
We've got some cool beginner's items in our robotic section
Our Kits come with the latest version of Raspberry Pi OS pre-installed, While we will certainly try our best to assist with any software related questions we cannot offer any kind of official support on community driven, open source, or non-PiShop produced proprietary software.
NOOBS, Raspbian, RetroPie, LibreELEC and OSMC are all examples of open-source software, please visit the developer's respective websites for more info.
Resources
A whole bunch of other really cool technical info can be found here.
Where do I start?.........Getting Started with Raspberry Pi
More on the Raspberry Pi 5
These kits are perfect for beginners that are just just getting exposed to the Raspberry Pi, Media enthusiasts looking to stream online content with Kodi, developers looking to exploit the many advantages of the RPI's GPIO pins and anybody looking to get some cool goodies at a great price! They contain all of the essential items that you need to get up and running in no time.
Please Note: These kits are pre-boxed and cannot be modified at all, we do however keep stock on all of the individual items so if you have a special need simply feel free to browse through the rest of our product offerings and select the items that you'd like.
What's in the box?
1 x Official 5.1V 5A 27W USB-C PD Power Supply in Black
1 x 1m micro HDMI cable
1 x 64GB preloaded micro SD card with 64bit Raspberry Pi OS pre-loaded
1 x Official Pi5 Black/Grey Case with fan and heatsink
Want to take your kit to the next level?
Turn your RPI into a Media Centre
Grab yourself a remote control, install LibreELEC or OSMC when setting up your RPI and you'll be streaming in no time. You can even add a wireless keyboard, mouse or other similar controllers
Want a cheap eco-friendly PC
Grab a Keyboard and Mouse, select Raspbian when setting up your RPI and you'll be browsing the web, sending emails, editing spreadsheets and watching videos just like you're used to with a desktop/laptop.
We know you love retro gaming!
RetroPie allows you to turn your Raspberry Pi into a retro-gaming machine Check out our Arcade section, whether you just want a retro control or a mini DIY arcade cabinet we have what you're looking for.
Did somebody say Robotics?
We've got some cool beginner's items in our robotic section
Our Kits come with the latest version of Raspberry Pi OS pre-installed, While we will certainly try our best to assist with any software related questions we cannot offer any kind of official support on community driven, open source, or non-PiShop produced proprietary software.
NOOBS, Raspbian, RetroPie, LibreELEC and OSMC are all examples of open-source software, please visit the developer's respective websites for more info.
Resources
A whole bunch of other really cool technical info can be found here.
Where do I start?.........Getting Started with Raspberry Pi
More on the Raspberry Pi 5
Quickly and easily get started with learning electronics using the Arduino Starter Kit, which have a universal appeal to STEAM fans at home, businesses in STEAM industries, and schools alike. No prior experience is required, as the kits introduce both coding and electronics through fun, engaging, and hands-on projects. You can use the starter kit to teach students about current, voltage, and digital logic as well as the fundamentals of programming. There’s an introduction to sensors and actuators and how to understand both digital and analog signals. Within all this, you’ll be teaching students how to think critically, learn collaboratively, and solve problems.
Projects you can make:
- 01 GET TO KNOW YOUR TOOLS an introduction to the basics
- 02 SPACESHIP INTERFACE design the control panel for your starship
- 03 LOVE-O-METER measure how hot-blooded you are
- 04 COLOR MIXING LAMP produce any color with a lamp that uses light as an input
- 05 MOOD CUE clue people in to how you're doing
- 06 LIGHT THEREMIN create a musical instrument you play by waving your hands
- 07 KEYBOARD INSTRUMENT play music and make some noise with this keyboard
- 08 DIGITAL HOURGLASS a light-up hourglass that can stop you from working too much
- 09 MOTORIZED PINWHEEL a colored wheel that will make your head spin
- 10 ZOETROPE create a mechanical animation you can play forward or reverse
- 11 CRYSTAL BALL a mystical tour to answer all your tough questions
- 12 KNOCK LOCK tap out the secret code to open the door
- 13 TOUCHY-FEEL LAMP a lamp that responds to your touch
- 14 TWEAK THE ARDUINO LOGO control your personal computer from your Arduino
- 15 HACKING BUTTONS create a master control for all your devices!
Once you’ve mastered this knowledge, you’ll have a palette of software and circuits that you can use to create something beautiful, and make someone smile with what you invent. Then build it, hack it and share it. You can find the Arduino code for all these projects within the Arduino IDE, click on File / Examples / 10.StarterKit.
Have a look at these video tutorials for a project by project walk-through.
Pictures shown are for illustration purpose only. Actual product may vary due to product enhancement.
What's in the box?
1 x Projects Book (170 pages),
1 x Arduino Uno,
1 x USB cable,
1 x Breadboard 400 points,
70 x Solid core jumper wires,
1 x Easy-to-assemble wooden base,
1 x 9v battery snap,
1 x Stranded jumper wires (black),
1 x Stranded jumper wires (red),
6 x Phototransistor,
3 x Potentiometer 10kOhms,
10 x Pushbuttons,
1 x Temperature sensor [TMP36],
1 x Tilt sensor,
1 x alphanumeric LCD (16x2 characters),
1 x LED (bright white),
1 x LED (RGB),
8 x LEDs (red),
8 x LEDs (green),
8 x LEDs (yellow),
3 x LEDs (blue),
1 x Small DC motor 6/9V,
1 x Small servo motor,
1 x Piezo capsule [PKM17EPP-4001-B0],
1 x H-bridge motor driver [L293D],
1 x Optocouplers [4N35],
2 x Mosfet transistors [IRF520],
5 x Capacitors 100uF,
5 x Diodes [1N4007],
3 x Transparent gels (red, green, blue),
1 x Male pins strip (40x1),
20 x Resistors 220 Ohms,
5 x Resistors 560 Ohms,
5 x Resistors 1 kOhms,
5 x Resistors 4.7 kOhms,
20 x Resistors 10 kOhms,
5 x Resistors 1 MOhms,
5 x Resistors 10 MOhms
Resources
Need Help?
- On the Software on the Arduino Forum
- On the Product itself through our Customer Support

What sets the Arduino UNO R4 WiFi apart and makes it truly remarkable?
The Arduino UNO line is renowned for its user-friendly, robust, and accessible platform, and with the UNO R4 WiFi, it raises the bar even higher, establishing a new standard for prototyping and learning tools. Featuring a 32-bit microprocessor with increased memory, connectors, and connectivity options compared to previous generations, coupled with WiFi and Bluetooth Low Energy capabilities, a fully-addressable LED Matrix, Qwiic I2C connector, real-time clock (RTC), and diagnostics for runtime errors, the UNO R4 WiFi is the ideal solution for all your prototyping requirements.
Impressive New Features
The UNO R4 WiFi introduces a host of remarkable peripherals, including a 12-bit digital-to-analog converter (DAC), Controller Area Network (CAN) BUS, operational amplifier (OP AMP), and Serial Wire Debug (SWD) port. These additions unlock a realm of new possibilities, allowing makers to create innovative solutions and advanced projects.
Seamless Wireless Connectivity
With the UNO R4 WiFi, you can effortlessly embark on IoT projects. Equipped with the remarkable ESP32-S3-MINI coprocessor that enhances the capabilities of the RA4M1 microcontroller, the UNO R4 WiFi enables easy connection to the internet through its built-in WiFi and Bluetooth Low Energy functionality.
Onboard LED Matrix
The UNO R4 WiFi features a vibrant 96-dot LED matrix, perfectly suited for creative projects involving animations or visualizing sensor data without the need for additional hardware.
Qwiic I2C Connector
Including an industry-standard Qwiic I2C connector, the UNO R4 WiFi facilitates rapid prototyping. Not only that, it enables compatibility with a wide range of modules that can be connected via I2C, significantly expanding the capabilities of the UNO R4 and allowing for the effortless creation of customized projects.
Diagnostics for Runtime Errors
The UNO R4 WiFi incorporates a built-in error detection mechanism that alerts you to any operations that could potentially cause the board to crash. This ensures you can develop your solutions with peace of mind and minimize the risk of issues.
Backward Compatibility
UNO R4 maintains the same pinout and 5V operating voltage as the UNO R3, enabling easy migration of existing shields or projects to the UNO R4.
Ample Memory and Enhanced Clock Speed
With 16 times more memory and a clock speed three times faster, the UNO R4 Minima excels at precise calculations and effortlessly handles complex projects.
Reliable and Robust Device
UNO R4 boards incorporate several protective features, such as overcurrent protection on the pins of the RA4M1, and the circuitry is designed to prevent wiring errors, reducing the risk of board damage. Furthermore, the board can be powered up to 24V.
Efficient Debugging
The UNO R4 Minima boasts an onboard SWD port, offering a straightforward and reliable method for debugging any issues by simply connecting a third-party debugging probe.
Technical specifications
- MCU: R7FA4M1AB3CFM#AA0 (Arm cortex M4)
- Memory: 256KB Flash / 32KB SRAM
- Operating Voltage: 5V
- Input Voltage 6-24V
- Clock Speed: 48 MHz
- Programming Port: USB-C
- WiFi/BLE: ESP32-S3-MINI
- LED Matrix: 12x8 (96 red LEDs)
- Additional Connections: Qwiic Connector, OFF Pin, VRTC Pin
- Digital Pins: 14
- PWM: 6
- ADC: 6
- DAC: 1 (12 bit)
- SPI: 1
- I2C: 1
- CAN: 1
What's in the box?
1 x Arduino Uno Rev 4 WiFi
Resources
Take your creative projects to a whole new level with the Creality Falcon2 Pro S 22W—a compact but powerful professional diode laser engraver built for efficiency, precision, and safety.
Key Features:
Smart Focus at the Push of a Button
Intelligent autofocus automatically adjusts focus for sharp, clean cuts—no manual calibration required.
Fast & Robust Engraving
Laser speeds up to 600 mm/s on a rigid, aerospace-certified aluminum frame for wobble-free performance.
Optimal Work Area
A 355mm × 390 mm working surface suits small-series batch jobs or one-off large-format designs.
Enhanced Air Quality
Built-in air purification system with dual fans and optional HEPA/activated carbon filtration keeps smoke and fumes at bay.
Integrated Air assist
The integrated air assist system continuously clears smoke and debris from the engraving path, improving cut quality and reducing surface burn marks. This is particularly valuable when producing signage, decorative items or fine-detail engravings where edge quality matters
Smart Camera Assistance
Integrated camera enables on-screen positioning and preview via Falcon Design Space, LightBurn, or LaserGRBL—helps eliminate material waste.
Why It Stands Out:
This Pro S model combines ultra-fast engraving, smart focus, and advanced air filtration in a compact machine—ideal for professionals, makers, and small business environments. With reduced maintenance and intelligent positioning, it’s built for repeatable precision.
Specifications
| Product Name | Creality Falcon2 Pro S |
| Machine Power (MAX) | 120W | 240W |
| Optical Power | 22W | 40W |
| Product Size | 664*570*328mm |
| Equipment Weight | 18.8kg | 19.6kg |
| Input Voltage | 100-240V~ 50-60Hz |
| Output Voltage | DC 24.0V 5.0A | DC 24.0V 10.0A |
| Operating Temperature | 5℃ – 35℃ |
| Engraving Area | 355mm x 390mm |
| Laser Source | Diode Laser |
| Laser Spot | 0.08*0.1mm | 0.08*0.12mm |
| Laser Wavelength | 455±15nm |
| Laser Class | Class 1 (FDA) |
| Laser Engraving Software | Falcon Design Space, LightBurn, LaserGRBL |
| Operating System | Windows / MacOS |
| Supported File Formats | Jpeg, jpg, png, bmp, svg, dxf, etc. |
| Supported Materials | Cardboard, wood, bamboo, rubber, leather, fabric, acrylic, plastic, etc. |
| Certifications | FDA, CE, ROHS, FCC, PSE |
| Gross Weight | 26.88KG | 27.88KG |
| Package Size | 770*645*340mm |
What's in the box?
1 x Creality Falcon2 22W PRO S Laser
Resources

Note: This kit comes unassembled. So you will need to assemble it yourself, referring to the Assembly Guide.
This is a Pan Tilt Servo Kit for Camera (Unassembled). It is basically a versatile 2-degree of freedom Servo Holder, perfect for securing your Raspberry Pi Camera, small gripper, or any other compact device essential for your project.
The kit comprises 2 units of high-quality 180 Degree SG90 Servo Motors, allowing for easy assembly and immediate use. Think of it as a mini robotic arm that is ideal for educational purposes and practical learning experiences.
Unleash your creativity by incorporating this servo holder kit into Artificial Intelligence (AI) projects. Seamlessly integrate a camera for applications like auto-targeting or object-following functionalities.
Features
- 2-Degree of Freedom Pan Tilt Servo Kit
- 2 x 180 Degree Servo Motor included
- Simple and Compact robotic arm
- Compatible with Raspberry Pi Camera
- Materials: ABS Plastics
What's in the box?
1 x Pan Tilt Servo Kit
2 x 180 Degree SG90 Servo Motors
1 x Small Phillip Screwdriver
Resources
You can use this device from 3.5-7VDC input voltage (although most USB devices tend to hover around 4.75 to 5.25) and up to 3A of current. It displays both voltage and current readouts. It's a very handy tool for testing USB devices, checking load levels and debugging battery chargers and boost converters.
Specifications
Voltage range: 3.3V-9V
Current range: 0-3A
Voltage display: red
Current display: blue
Out put : 2 USB
Size: 52mm x 34mm x12mm
Weight: 16g
Shell color: Dark black
What's in the box?
1 x Voltage Tester Dual USB
This digital temperature and humidity module is a digital output signal containing a calibrated temperature and humidity combined sensor.
It uses dedicated digital module capture technology and temperature and humidity sensor technology to ensure that products has high reliability and excellent long-term stability. Sensor includes a capacitive humidity sensing element and a high-precision temperature measurement device, and with a high-performance 8-bit microcontroller connected. Therefore, the product has excellent quality, fast response, anti-interference ability, low cost and other advantages. Ultra-small size, low power consumption, signal transmission distance up to 20 meters. Making it the best choice for all kinds of applications and even the most demanding applications.
Applications
HVAC (Heating Ventilation Air Conditioning), dehumidifiers, testing and inspection equipment, consumer goods, automotive, automation, data loggers, home appliances, humidity regulator, medical, weather stations and other related humidity detection control.
Specifications
- Dimensions: 40 x 23mm
- Weight: 4g
- Working voltage: 3 V - 5.5 V
- Port: digital two-way single bus
- Temperature range: -40 to 80 °C ± 0.5 °C
- Humidity: 20 to 90% RH ± 2% RH
- Platform: Arduino, SBC
What's in the box?
1 x Sensor Module
Resources
How to setup a DHT22 with your Raspberry Pi.The resistor is already on the PCB so you can skip the breadboard part.
- Datasheet (DHT22)
- Example Code (Arduino) (Credit to Adafruit)

- Joystick Size: Approx. 95x60x100mm
- Encoder Board Size: Approx. 85x35mm
- USB Cable Length: Approx. 1.8m
- Colour: Red
We have tested this unit on Raspberry Pi using Retropie and a Windows 7 PC using MAME.
What's in the box?
1 x Encoder Board
1 x USB Cable
1 x 5 pin Cable for Joystick
1 x 5 Pin Joystick
8 x 30mm Push Buttons
2 x 24mm Push Buttons
10 x Cables for Buttons
Resources
Get Retropie on the Raspberry Pi
ModMyPi setup guide

Hack this component to form part of your weather station.
Specifications
| Sensor | 3-cup anemometer |
| Measurement Description | Wind speed |
| Range | 0 to 45 m/s (0 to 100 mph) |
| Starting Threshold | 0.45 m/s (1.0 mph) |
| Accuracy | 0.11 m/s (0.25 mph) or 1.5% |
| Contact Rating | 10 mA (maximum) |
| Operating Temperature Range | -50° to 70°C |
| Distance Constant |
|
| Cable Description | Quick-connect connector with vinyl jacketed, shielded cable |
What's in the box?
1 x Anemometer
Resources

The SanDisk Industrial SD™ and microSD™ cards deliver superior endurance and reliability for demanding industrial applications across a wide range of operational requirements. Typical applications include commercial surveillance cameras, drones, Industrial IoT gateways, factory automation, and network equipment. These hard-working, connected devices can now take advantage of a powerful suite of features available in our industrial-grade flash storage solutions
Specifications
- Fast Read/Write performance enables high bit-rate video streams for commercial imaging applications such as surveillance and Industrial IoT
- “Smart” features including Health Status Monitor for proactive device status monitoring, and Automatic Read Refresh to prevent flash storage from being corrupt
- Class 10
- 16GB
- SDA 3.0 High Speed
- -25°C to 85°C
What's in the box?
1 x Industrial micro SD 16GB C10
Resources
Getting Started with your Raspberry Pi
Latest image available from the Raspberry Pi Foundation Downloads

This is a split-core current transformer which is used as an AC current sensor. It is popularly used for current measurement, monitoring and protection for AC motors, lighting equipment, air compressors, home automation etc.
Features
- Opening size: 13 x 13mm
- Rated input current (RMS): 10% - 120% of that is 1A~100A
- Output voltage(RMS): linear output. when the input current is 100A, the output voltage is 1V
- Linearity: ± 3%
- Output connectors: 3.5mm standard three-pin plug
- Lead length: 1m
What's in the box?
1 x Split-Core Current sensor

Specifications
What's in the box?
1 x CamJam Edukit
Resources
All the worksheets are freely available to download from http://camjam.me/edukit
CamJam Edukit 1 for Raspberry Pi Pico

All you need to do is to add your own chassis, Raspberry Pi (any model) & batteries! Then, follow the worksheets to make your own motorized buggy. Add the included sensors and you will soon be detecting objects in front of your robot and following line courses.
What's in the box?
A custom-designed, pre-soldered motor controller board (with screw terminals)
2 x DC motors (with wires pre-soldered)
2 x custom red wheels (which go extra fast… because they’re red!)
1 x ball castor (used as the ‘third wheel’ to your robot)
1 x small breadboard (to create your circuits)
2 x pieces of strong 3M padded double-sided tape
1 x battery box for 4 AA batteries (batteries not included)
1 x ultrasonic distance sensor (for detecting objects in front of your robot)
1 x line follower sensor (for detecting and following black lines)
Resistors and jumper cables with which to complete your circuits
A strong cardboard box to keep it all in… or to cut into to make your chassis!
Resources
All the worksheets are freely available to download from http://camjam.me/edukit
Got a 3D printer? Daniel Bull has very kindly designed an awesome chassis, available from Thingiverse ..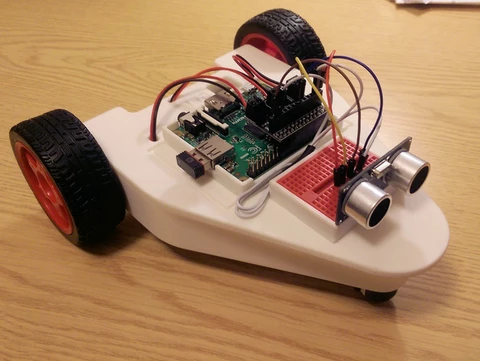
Alex Eames over at Raspi.TV got his hands on a prototype, here's what he did!
https://youtu.be/LJDEV7rGwaM
And here's a fantastic unboxing video from Average Man vs Raspberry Pi!
https://youtu.be/KPYWNXiItwo
And another review! This time from TheRaspberryPiGuy! Thanks Matt!
https://youtu.be/TMjd0UrH2PY

Features
- Automatically sleep after 10 minutes.
- Automatically shut down after 20 minutes.
- Temperature reach 480°C in 1 minute.Build in PID system equipped.
- 9 shortcut range to adjust temperature by button
- Products use LCD display
Specifications
- Voltage: AC220V
- Temperature range:250~480°C
- Temperature stability:±1°C
- Temperature offset range:±10°C
- Temperature Unit:°C/℉
- Heater: Four-core PTC ceramic heater
- Power - Model Number:65W -ST-2065D
- Colour:black
- Material:ABS metal
- Size:25*2*3cm
What's in the box?
1 x ATTEN ST-2065D Soldering Iron

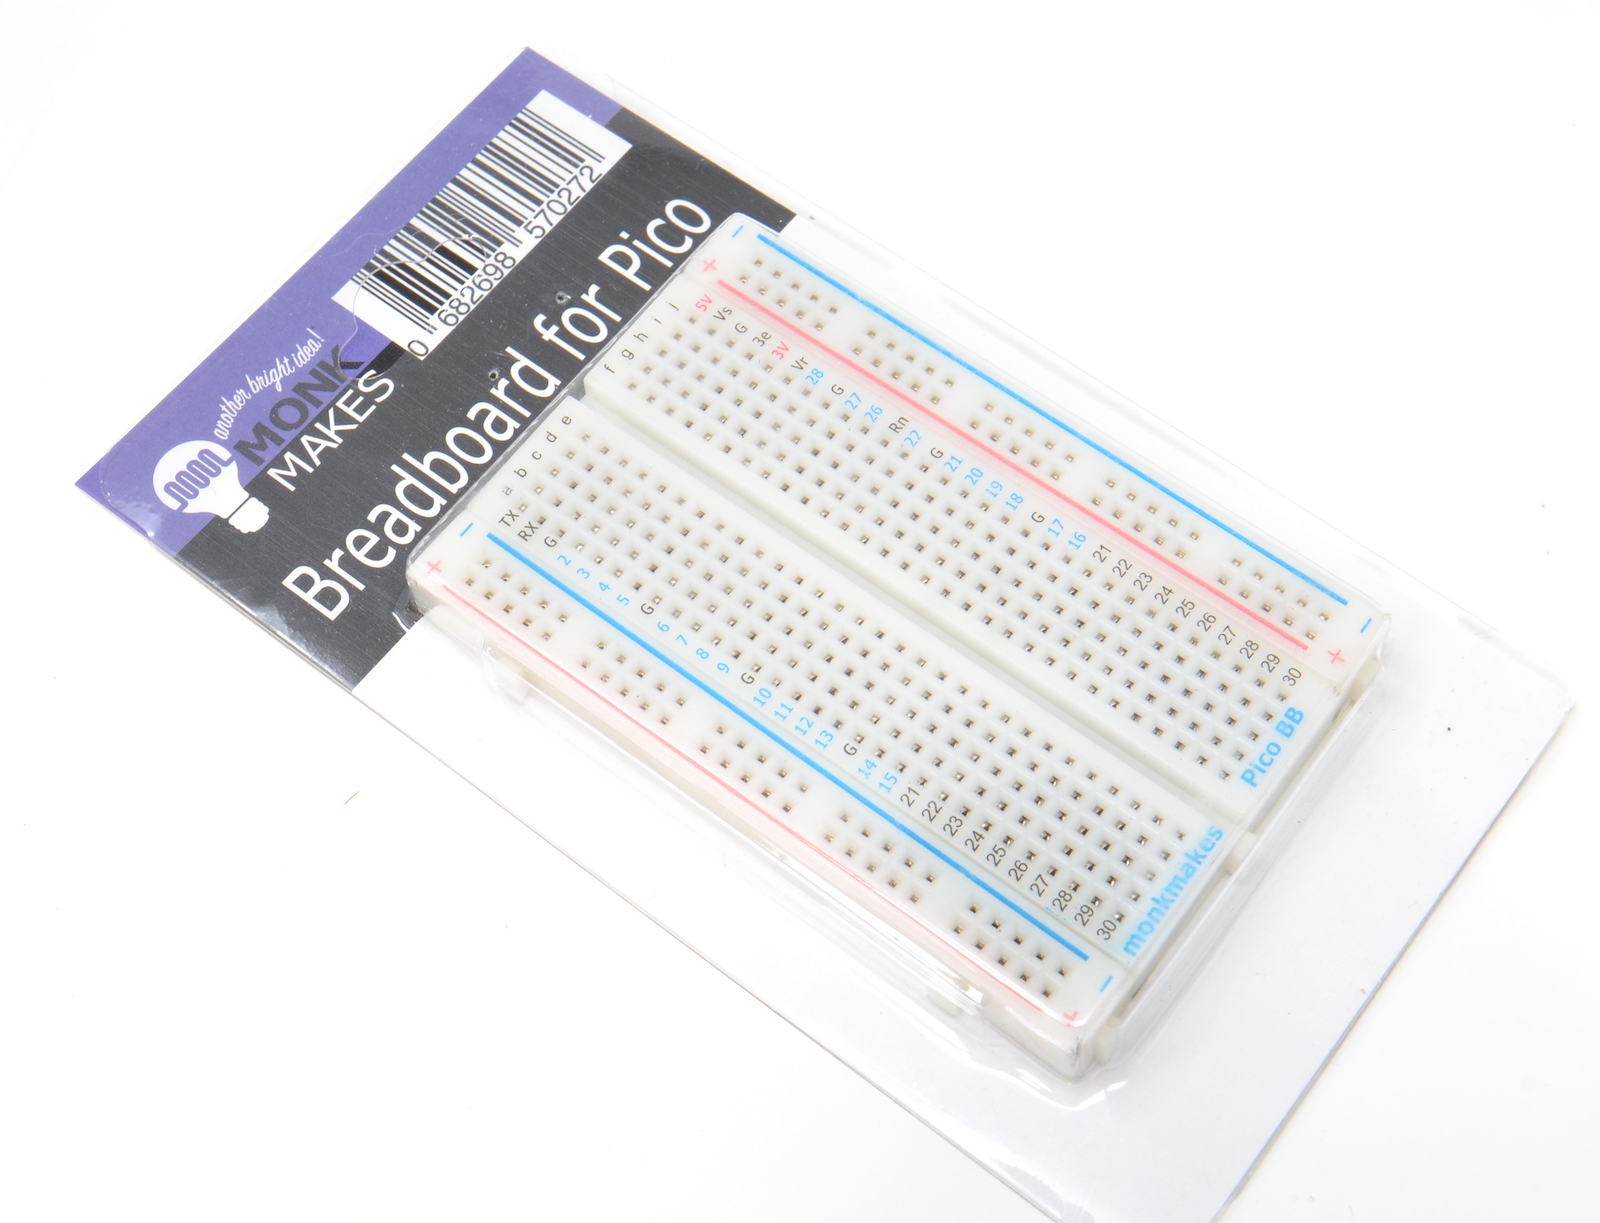
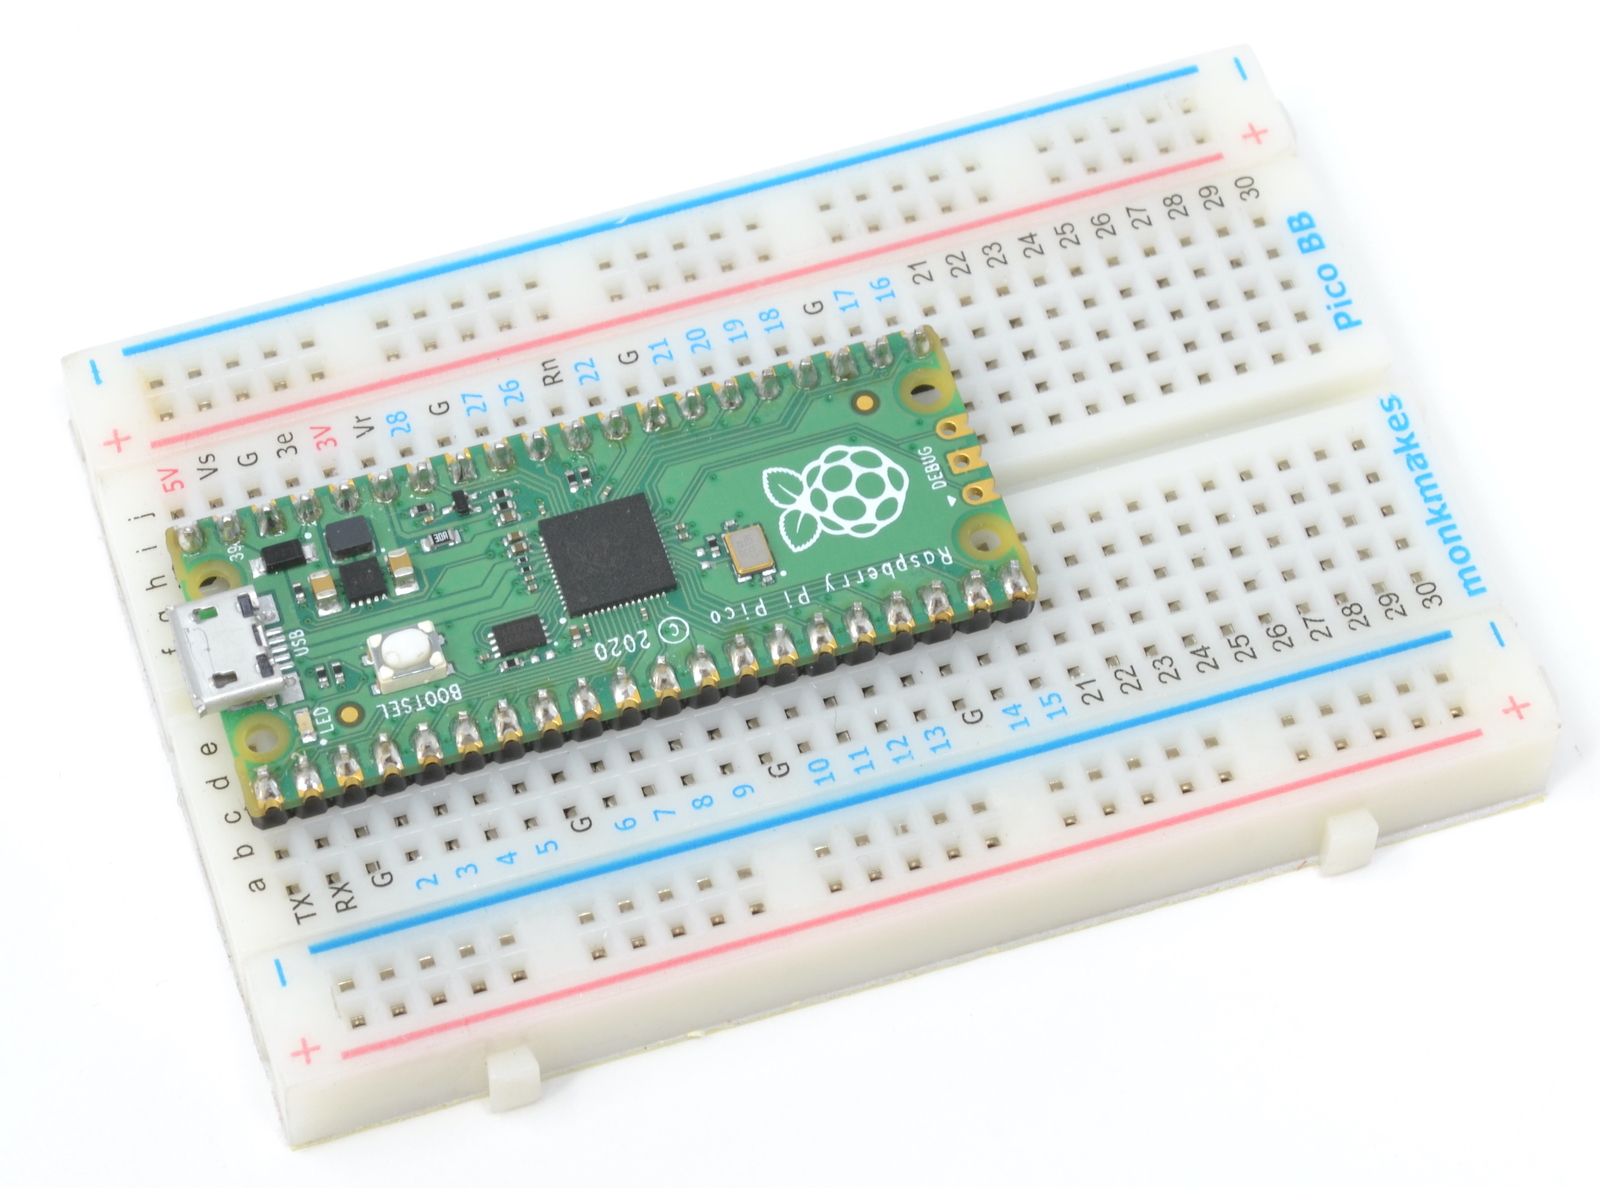
Specifications
- 400 tie point
- 2 power busses
- Size 8.2x5.5x0.85cm
- Self-adhesive back
- Electrical Characteristic Units Accepts wires and legs 20-29 AWG Maximum voltage AC/DC 50 V Maximum Current 2 A
(WARNING: Low voltage, low current usage only. Maximum 50V at 3A.)
What's in the box ?
1 x Breadboard for Raspberry Pi Pico
(*Raspberry Pi Pico not included)
Resources
(*Raspberry Pi Pico not included)