
Learn how to pixel paint mini works of art on your Unicorn HAT using your Pi and a web browser.
Beginner / Unicorn HAT
Special Offers

Solar Experimenters Kit For micro:bit (Solar Experimenters Kit)
Description:
The MonkMakes Solar Experimenters Kit for micro:bit is a project kit that allows you to experiment with harvesting energy from the sun and other light sources. It consists of a solar panel to harvest the energy, a solar store that stores the harvested energy, and a low energy light bulb and a motor that can be driven with the energy that you harvest.
Specifications:
There are three projects that introduce energy harvesting without the micro:bit, followed by 3 bigger projects that use the micro:bit (not provided) as an intelligent controller. The micro:bit monitors and manages the charging and discharging of the solar store.
With this project kit you will learn all about how tiny amounts of energy can be harvested from the sun and stored for later use, using a practical and experiment-led approach.
What's in the Box ?
1 x 10v Solar Panel
1 x Solar Store Board
1 x 3v LED light bulb
1 x Set of alligator clip leads (10 leads)
1 x Small motor with fan
1 x Booklet (A5)
Resources:
- Instructions (PDF)
- Data Sheet (PDF)
Lessons Plans are available here: https://drive.google.com/drive/folders/1o5tRY1PeU4N-NSVctra4NxnCvmP65Huj

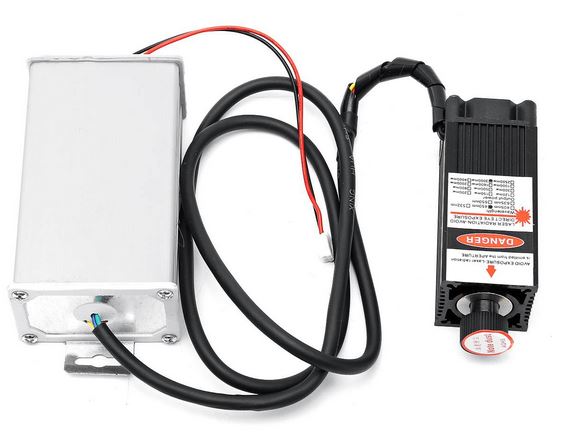
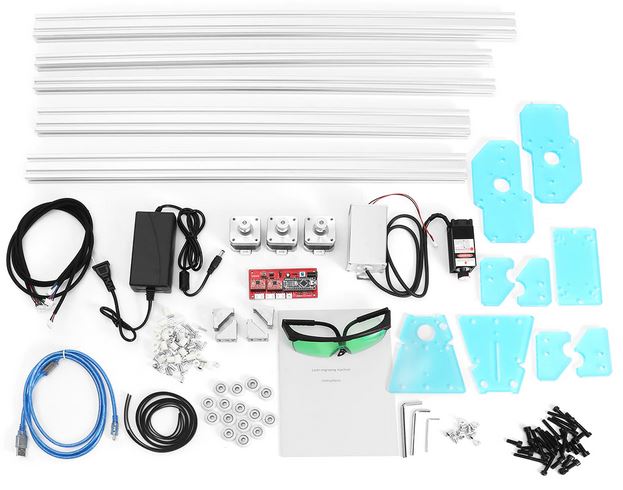
DC 12V 3000MW Laser Engraving Machine DIY Kit for wood (laser engraver kit)
This 3000mW DIY desktop blue laser engraving machine is ideal for amateur laser engraving usage with grayscale printing, low-light positioning and freedom positioning functions. It only needs you to connect it to a computer, then you can print any pictures you like with your own creativity.
Specifications
Control software: benbox software support, power can be adjusted, weak light positioning
Engraving Material Note:
Cutting Material Note:
It can only cut foam, paper, thin leather material.
Please Note:

What's in the box?
1x DIY Desktop Mini Laser Engraving Machine
You might also be interested in....
Assembly instructions
https://www.youtube.com/watch?v=7jj5ea1MvEo
Specifications
- Material:stainless steel and acrylic
- Working Voltage:DC 12V
- Laser Power:3000mW
- Engraving Area:65x50cm(maximum)
- Unit Size:720mm x 630mm
Control software: benbox software support, power can be adjusted, weak light positioning
Engraving Material Note:
- can engrave materials: wood, bamboo, plastic, paper, leather, bank card, rubber
- can not engrave material: metal, stone, ceramic, shell, light-reflecting material, transparent material
Cutting Material Note:
It can only cut foam, paper, thin leather material.
Please Note:
- In the process of using, please ALWAYS wear professional protective glasses to PROTECT YOUR EYES.
- FORBID CHILDREN to use this product.
- Yes, the laser WILL BURN YOUR SKIN! Be very careful while focusing the laser.
- Avoid the use of flammable objects or gasses near the engraver in order to avoid causing a fire or explosion. Never leave the unit unattended while engraving.
- Don't update the firmware.
What's in the box?
1x DIY Desktop Mini Laser Engraving Machine
You might also be interested in....
- A honeycomb bed for your laser engraver
Assembly instructions
https://www.youtube.com/watch?v=7jj5ea1MvEo

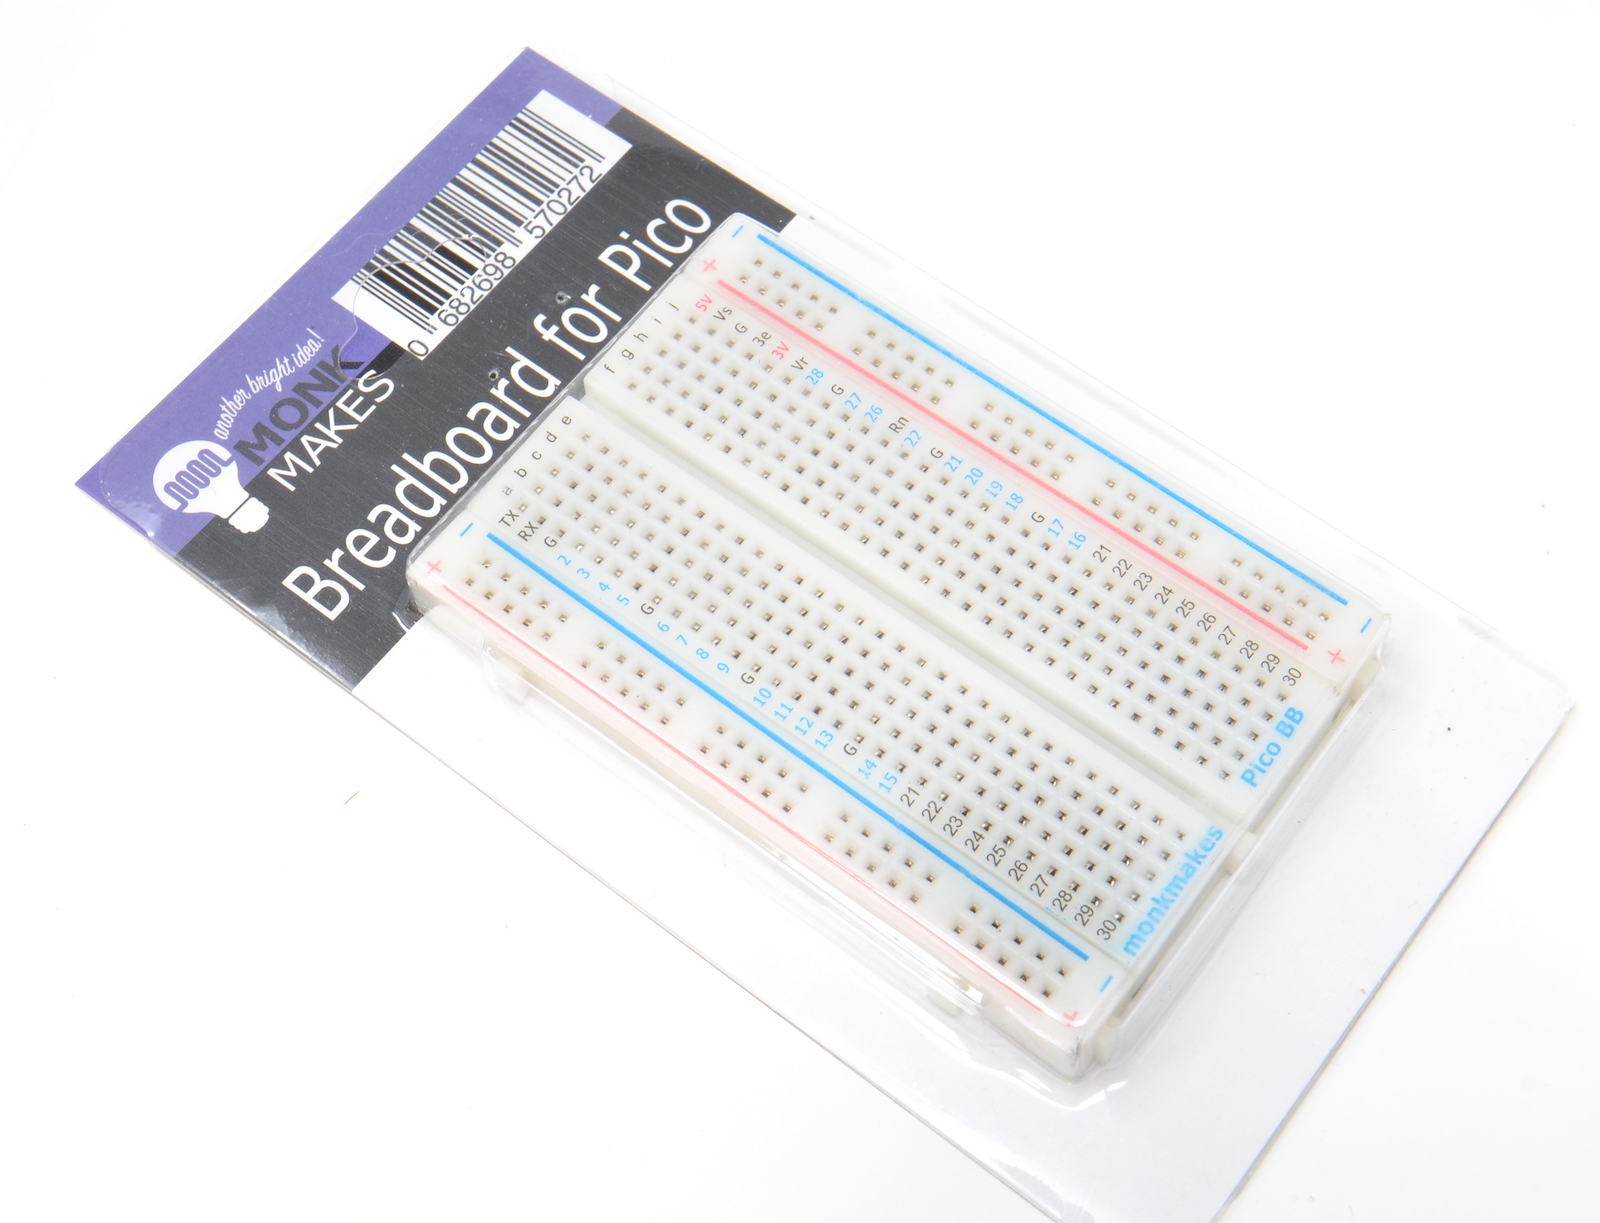
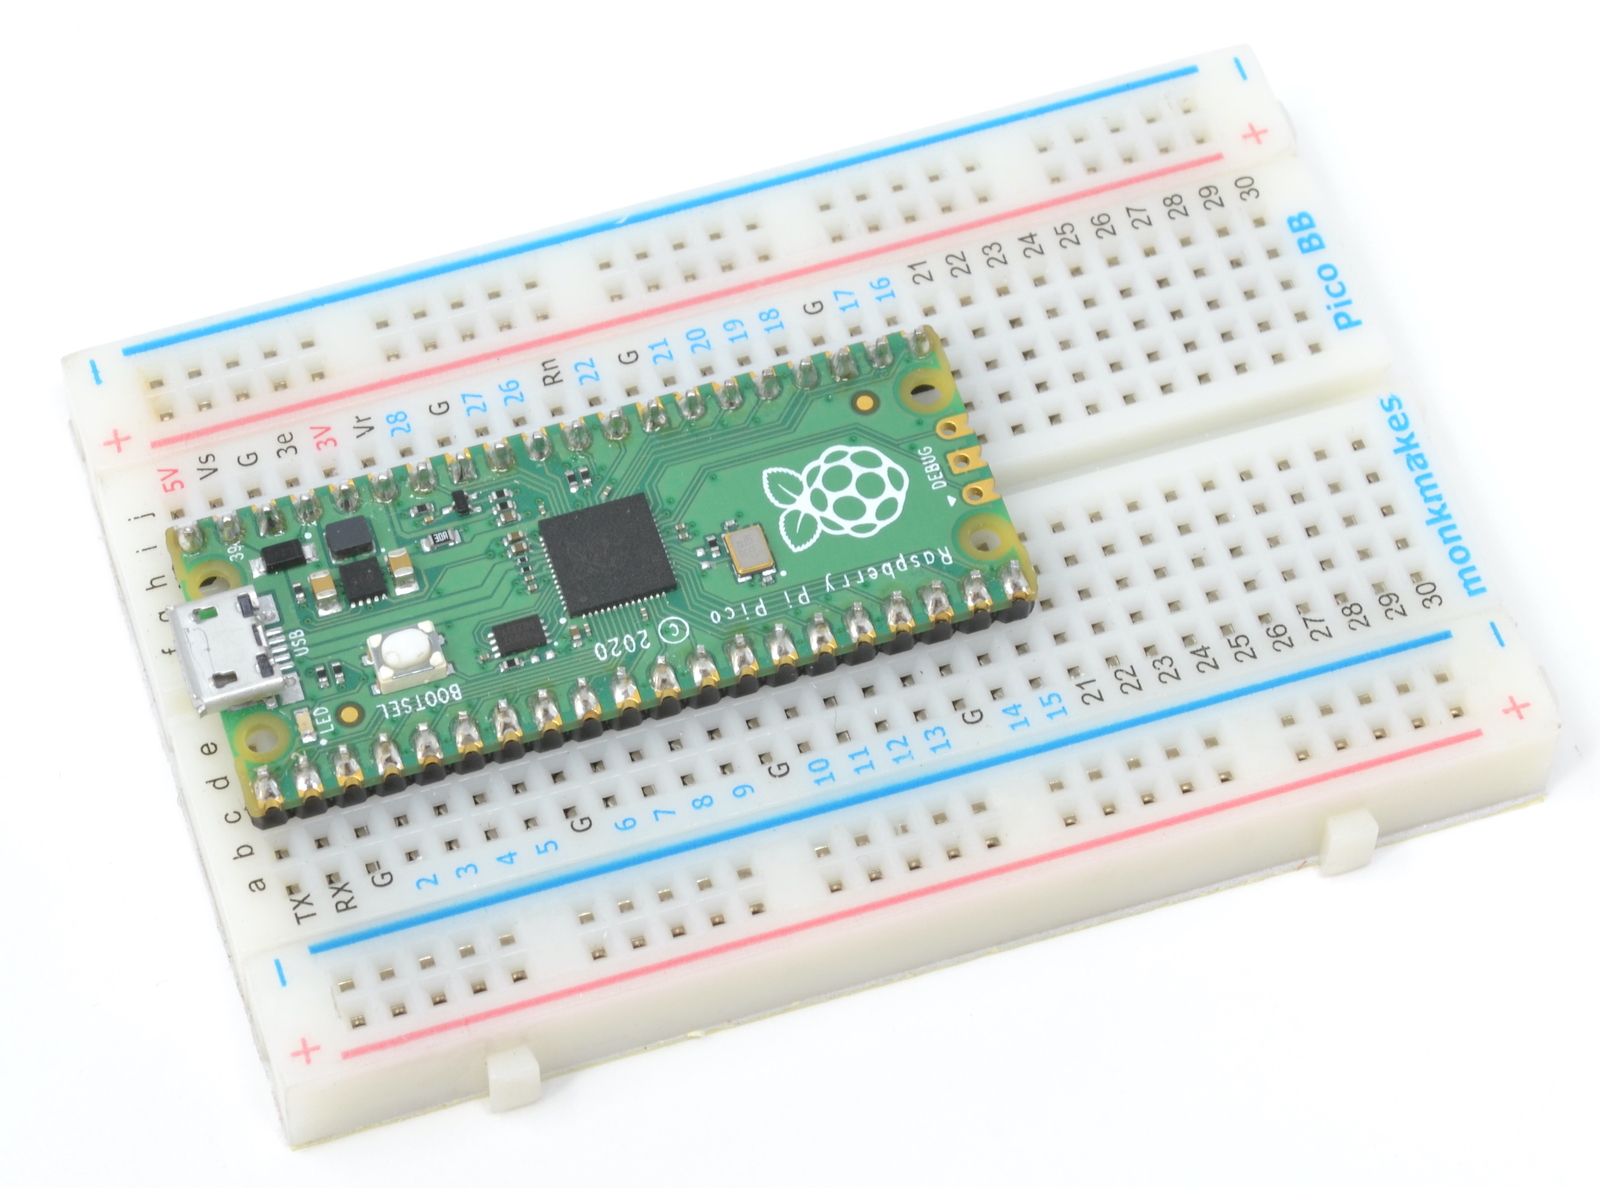
Breadboard for Pico (Breadboard for Pico)
It can be tricky to work out which pin is which when the Raspberry Pi Pico is attached to solderless breadboard.The MonkMakes Breadboard for Pico solves this problem by labelling the Pico pins on the breadboard.
Specifications
(WARNING: Low voltage, low current usage only. Maximum 50V at 3A.)
What's in the box ?
1 x Breadboard for Raspberry Pi Pico
(*Raspberry Pi Pico not included)
Resources
(*Raspberry Pi Pico not included)
Specifications
- 400 tie point
- 2 power busses
- Size 8.2x5.5x0.85cm
- Self-adhesive back
- Electrical Characteristic Units Accepts wires and legs 20-29 AWG Maximum voltage AC/DC 50 V Maximum Current 2 A
(WARNING: Low voltage, low current usage only. Maximum 50V at 3A.)
What's in the box ?
1 x Breadboard for Raspberry Pi Pico
(*Raspberry Pi Pico not included)
Resources
(*Raspberry Pi Pico not included)

Project Box 1 for Raspberry Pi (Project Box 1 for RPi)
The Project Box for Raspberry Pi contains all the components needed, together with easy to follow instruction cards, in order to complete 10 simple projects involving LEDs, thermistor, phototransistor and switches and is an ideal starting point for anyone new to electronics and the Raspberry Pi.
Specifications
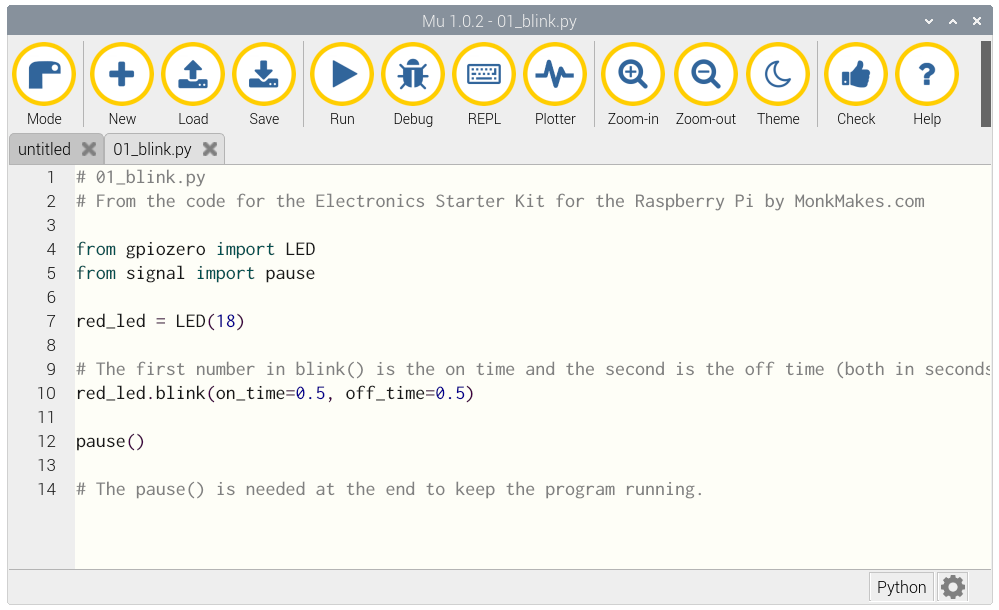
This kit is an improved and updated version of the now retired Electronics Starter Kit for Raspberry Pi
A 40 page booklet by Simon Monk (author of the Raspberry Pi Cookbook and Programming Raspberry Pi) is free to download and explains how to use the kit and build the projects.
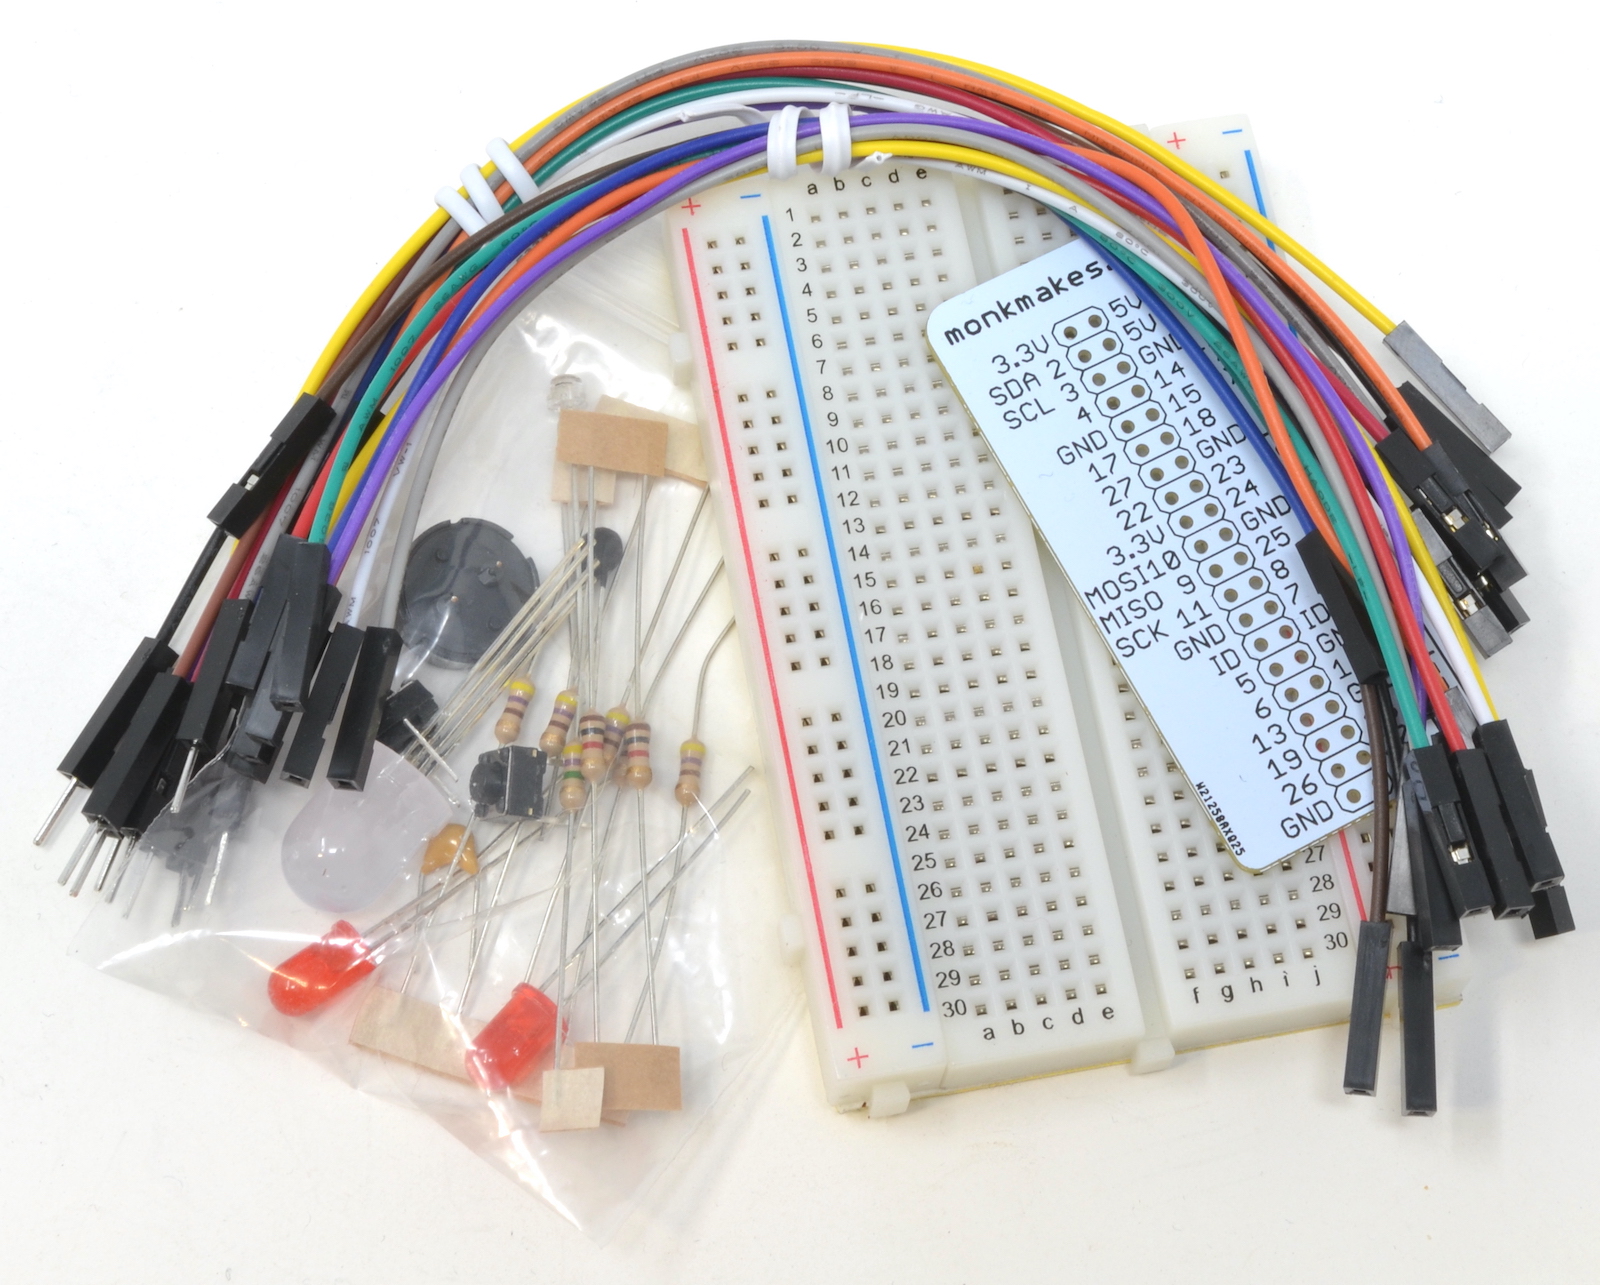
What's in the box ?
1 x Solderless breadboard
1 x Male to male jumper wires
1 x Female to Male Jumper Wires
1 x Raspberry Leaf
5 x 470Ω resistor (yellow, purple, brown stripes)
2 x 1kΩ resistor (brown, black, red)
1 x 4.7MΩ resistor (yellow, purple and green stripes)
1 x 330nF capacitor
2 x Red LED – the longer lead is the (positive) lead
1x RGB LED – the longest lead is the – (negative) lead
2 x Tactile push switch
1 x Phototransistor
1 x Thermistor
1 x Buzzer
You may also need....
Raspberry Pi is NOT INCLUDED
Resources
Instructions (PDF)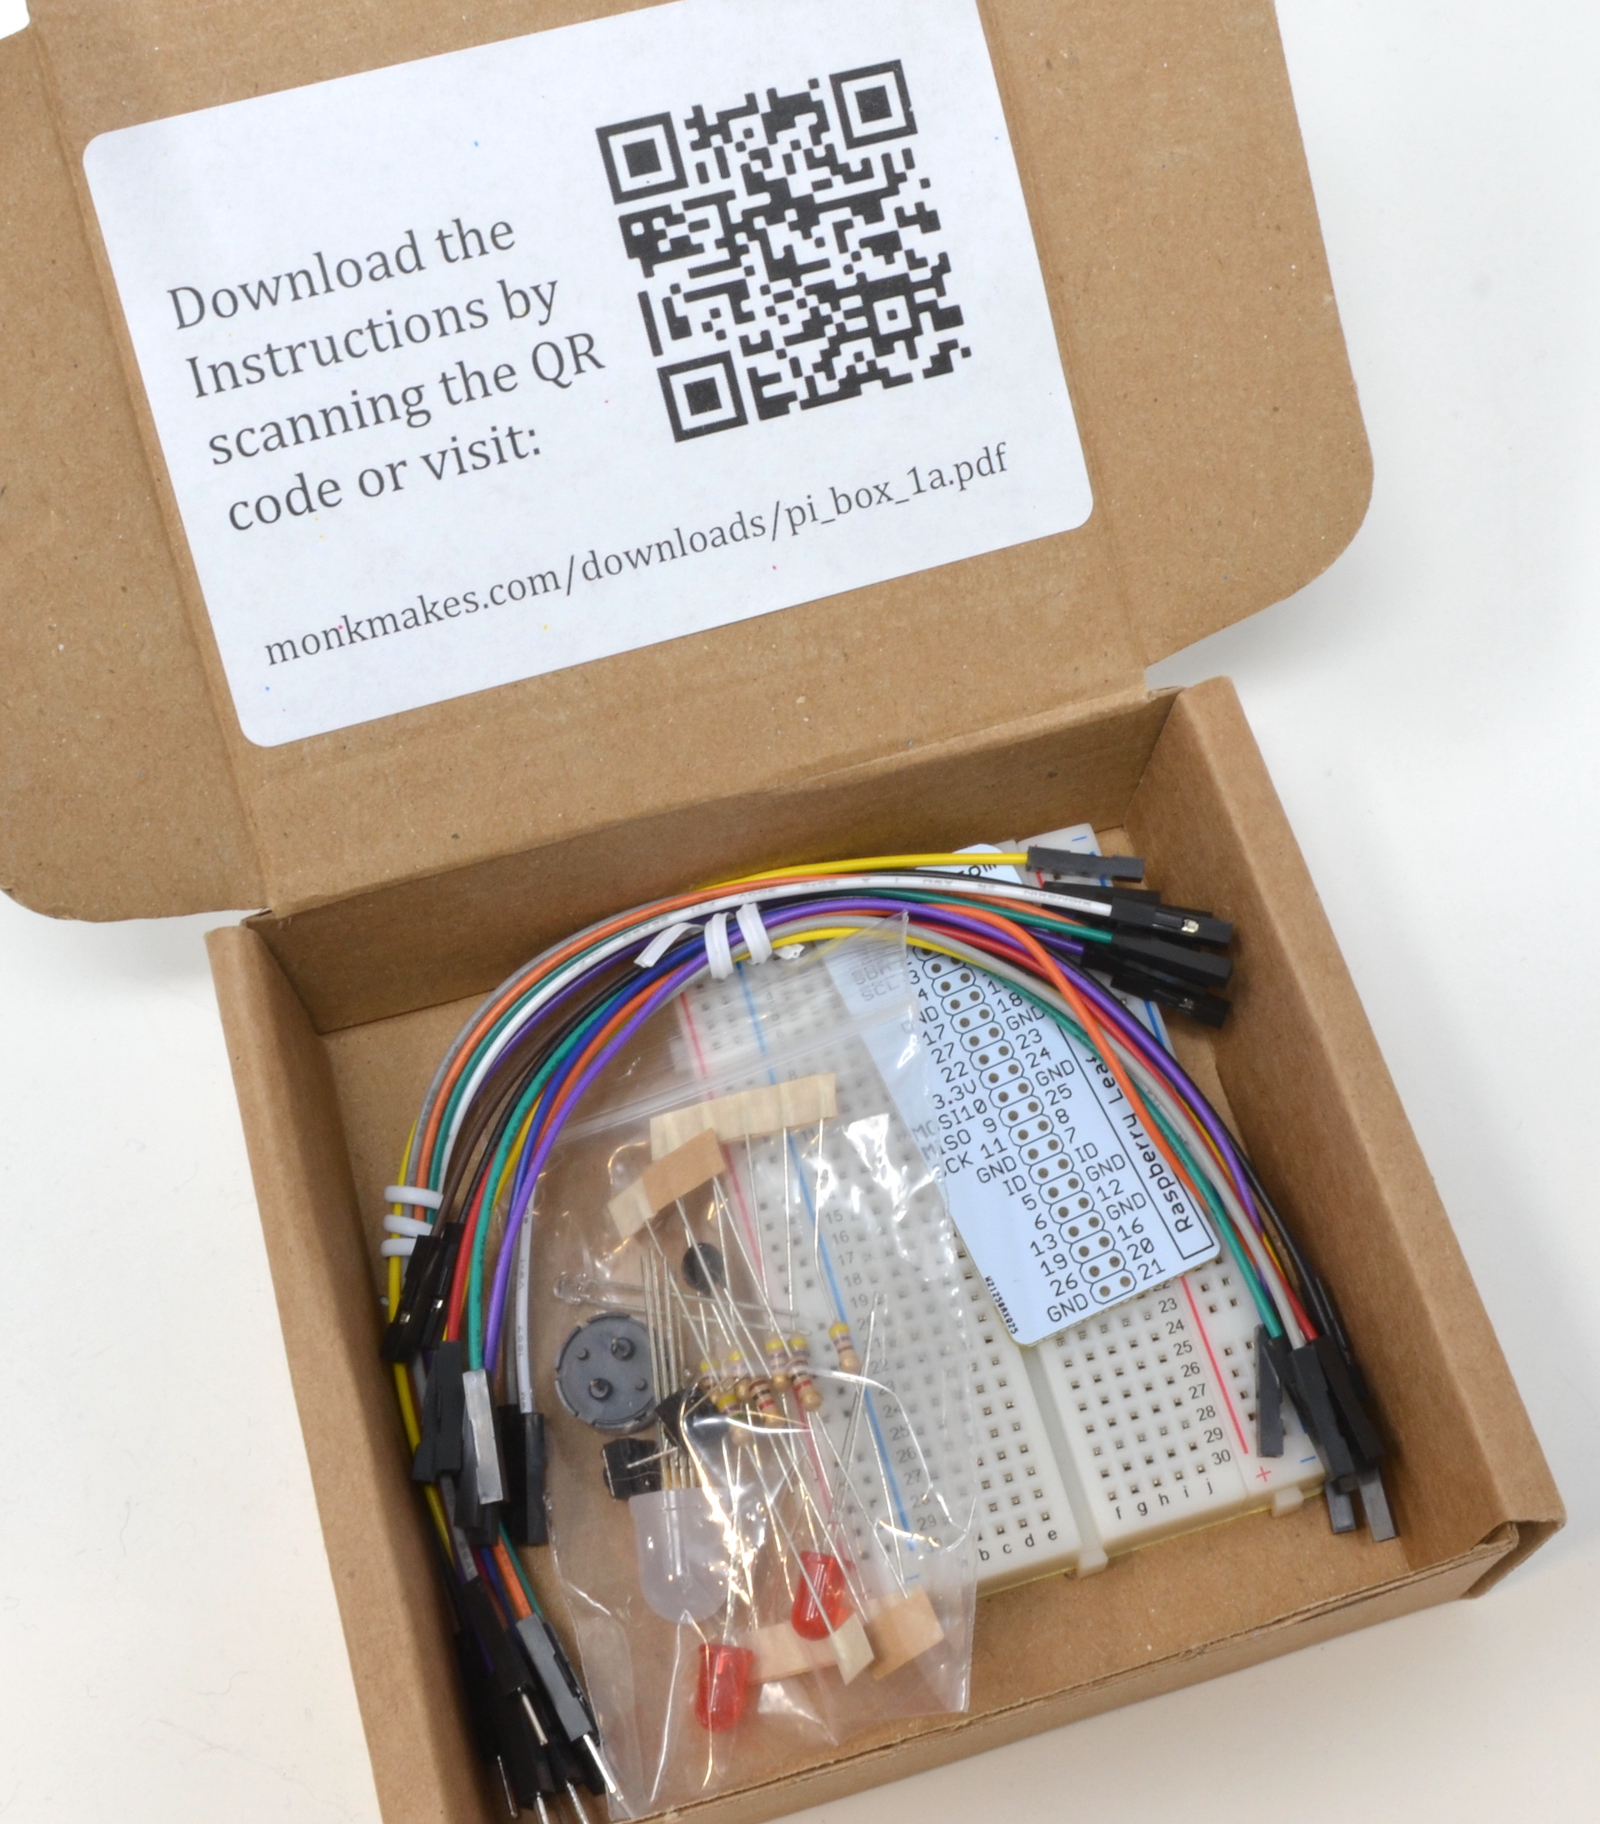

Wireless Soil moisture sensor monitor battery powered with display (wireless soil moisture)
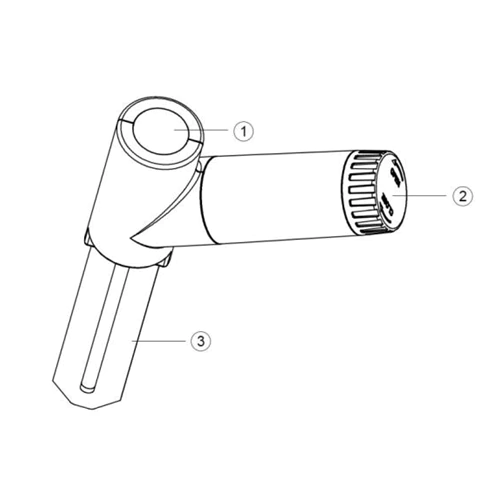
1. LED Indicator (RF transmission)
2. Battery Cap
3. Soil Moisture Sensor
Power requirement:
Specifications
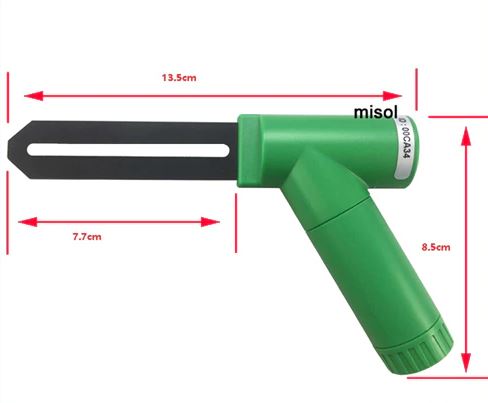
This is a wireless soil moisture sensor with a monitor(display). The soil moisture sensor will detect the data, then transmit to the receiver(display) wirelessly(433Mhz).
Function:
- 12/24hr digital time display
- Current soil moisture.
- Every 70 second the unit will receive soil moisture sensor.
- Wireless Signal Strength Indicator.

1. Time Display
2. Soil Moisture Value Display
3. Soil Moisture Grade Display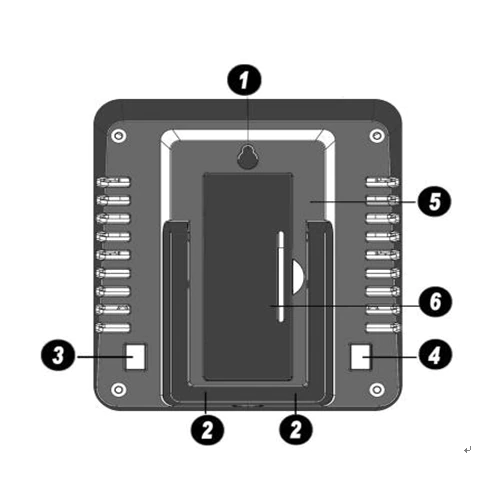
1. Hanging Hole
2. Tabletop Stand
3. ADD+ Button
4. Set Button
5. Battery Compartment
6. Battery Compartment Cover
1. LED Indicator (RF transmission)
2. Battery Cap
3. Soil Moisture Sensor
Power requirement:
- Base station (display console) : 1 x AA 1.5v battery (not included)
- Remote sensor : 1 x AA 1.5v battery (not included)
Specifications
- Moisture Range: 0~100%; Resolution: 1%
- 0% AD setting range: 70~200; Initial value:70
- 100% AD setting range: 0% AD+10~1000; Initial value:500
- Frequency: 433 MHz
- Update Rate: 70 seconds
- Power Consumption: approx. 1 Year battery life.
1 x Soil Moisture Monitor (Receiver)
1 x Soil Moisture Sensor (transmitter)
1 x User Manual(in English)
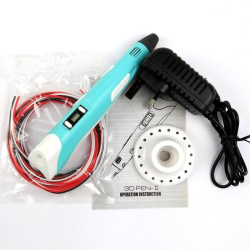
12V 3D Pen V2 with PLA Filament & Adapter - Blue (3D Pen 12v Blue)
Have some fun with this 3D printing pen, this 3D printing pen is also suitable and safe for kids. They can now develop their hands-on skills and mental development ability.
What's in the box ?
1 x 3D Printing Pen with PLA filament - Blu
1 x 3D Printing Pen stand
1 x UK Plug 12V 2A AdapterPLA
1 x Packet filament (3 random colors, 3 meters in total)
1 x User Manual/Operation Instruction
Resources
Want to print a spool holder that clips onto your 3D pen?
Check out Thingiverse
This device allows you to store and use lengths of 1.75mm filament for a 3D pen. The unique mini spool is designed to prevent the filament from unraveling under its own spring tension. The parts can be welded together with your 3D pen.
Check this link out to see what some people come up with :
3D printing pen


By using the 3D pen can actually help kids developing their artistic skills, spatial thinking, and can be a great creative outlet that engages their minds as they create. Besides, this 3D printing pen has a stable performance. It is more stable, safe and reassuring. Let your child fall in love with 3D printing.
Specifications
- Electrical Parameter: 12VDC 2A
- Comes with UK Plug, Universal (AC voltage and frequency) Adapter
- Can be used everywhere
- 3D printer for hand use
- Compatible with ABS and PLA filaments
- Diameter of filaments: 1.75mm
- Nozzle diameter: 0.7mm
- Heating Temperature:
- 160ºC - 210ºC (PLA)
- 210ºC - 235ºC (ABS)
- LCD for display filament type and temperature
- Adjustable filament feeding speed
- Ergonomic design, lightweight design, easy to operate
- Dimensions: 184mm x 31mm x 46mm
What's in the box ?
1 x 3D Printing Pen with PLA filament - Blu
1 x 3D Printing Pen stand
1 x UK Plug 12V 2A AdapterPLA
1 x Packet filament (3 random colors, 3 meters in total)
1 x User Manual/Operation Instruction
Resources
Want to print a spool holder that clips onto your 3D pen?
Check out Thingiverse
This device allows you to store and use lengths of 1.75mm filament for a 3D pen. The unique mini spool is designed to prevent the filament from unraveling under its own spring tension. The parts can be welded together with your 3D pen.
Check this link out to see what some people come up with :
3D printing pen

Kitronik :MOVE Motor for the BBC micro:bit(V1 & V2 NOT INCLUDED) (Kitronik:MOVE Motor)
Develop your coding skills with the Kitronik :MOVE Motor for micro:bit, a fun introduction to buggies and robotics.
CODE IT !
Specifications
Features
What's in the box?
1 x :MOVE Motor chassis.
2 x Wheel and tyres.
1 x Booklet
You will also need....
1 x micro:bit
4 x AA batteries
1 x micro USB cable(to program the :MOVE)
Resources
Develop your coding skills with the Kitronik :MOVE Motor for micro:bit, a fun introduction to buggies and robotics.
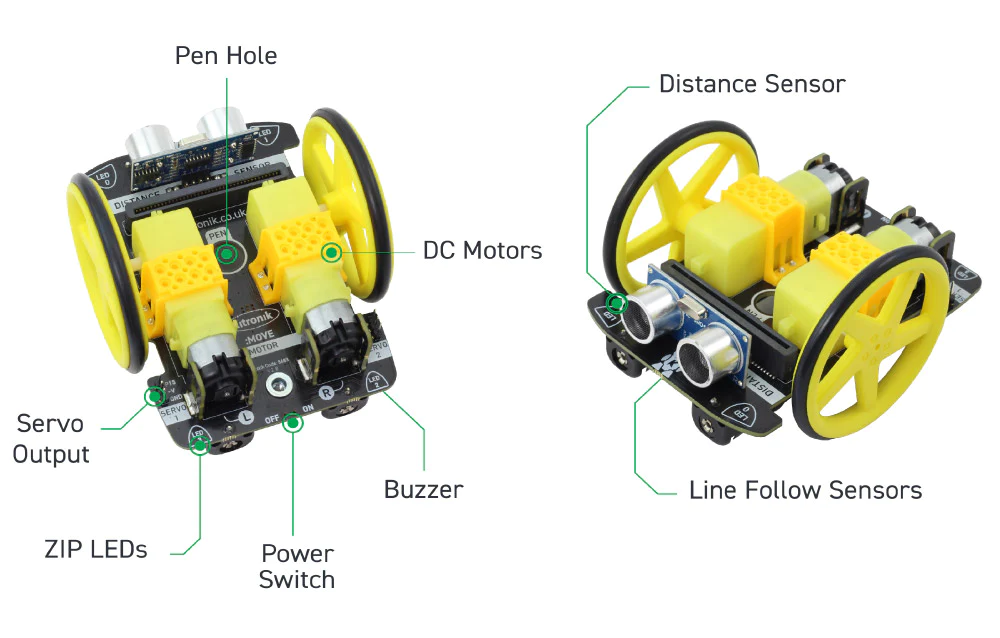
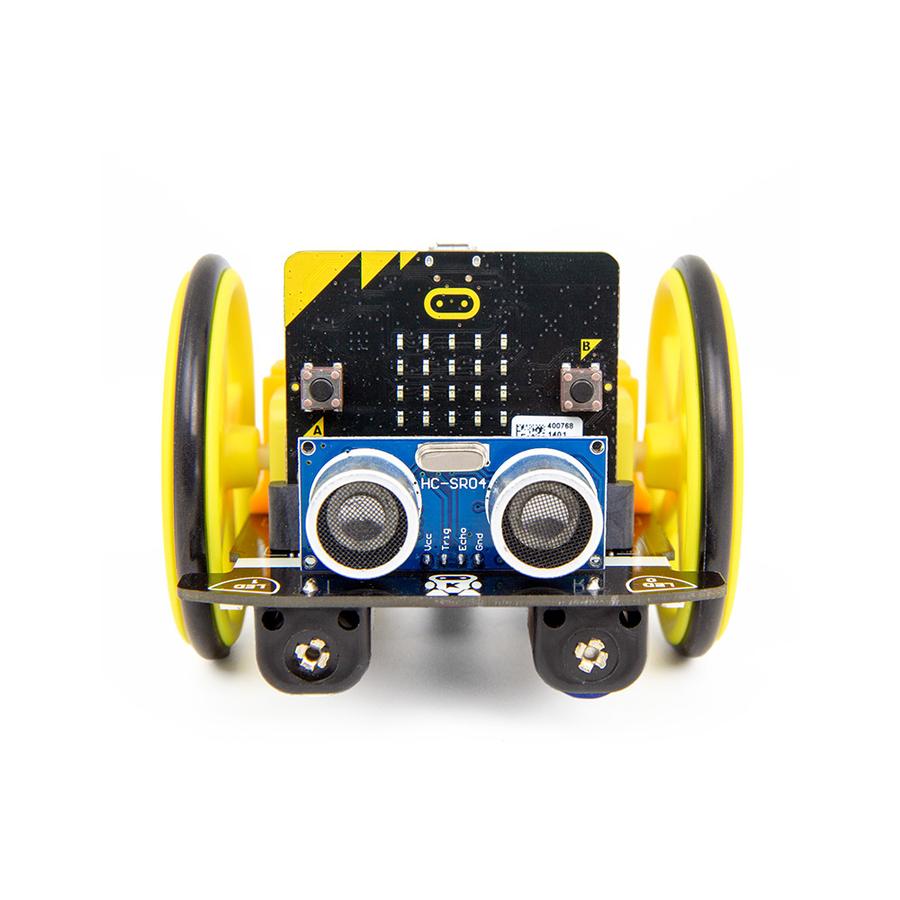
The Kitronik :MOVE Motor for the BBC micro:bit provides a fun introduction to buggy robotics. More than just a programmable buggy, learning to use all of the included features will give the budding roboteer a solid grounding in robotics as a whole.
Learn about movement, how to utilise light and sound, obstacle detection and avoidance, and how to code :MOVE Motor to follow a line. When used in conjunction with the micro:bit's radio features, the possibilities are endless.
Attached to the chassis are two bi-directional DC motors with variable speed control. The wheels have rubber tyres and are a simple push-fit onto the motor shafts. Slot a BBC micro:bit into the edge connector and you are ready to code. There is no other assembly required and no tools required.
There are built-in battery holders for 4x AA batteries. This provides a regulated voltage supply to power the BBC micro:bit which is fed into the edge connector. There is also a power switch to conserve batteries when the buggy is not in use.
The micro:bit slots into the onboard edge connector. Code the micro:bit, plug it into the buggy, switch the power on, and then play.
CODE IT !
:MOVE Motor can be coded using the Microsoft MakeCode editor. Kitronik has produced a set of custom MakeCode blocks to simplify coding the completed buggy. The booklet that comes with the buggy contains more detailed instructions on using the blocks and writing code. If you are feeling more adventurous or relish a challenge, :MOVE Motor can also be coded with Python.
Also within the booklet (that comes inside the box), are some quick tutorials to get you started. There are also additional online tutorials and step by step guides for extra projects.
Note:- This kit does not include a micro:bit, a micro:bit can be obtained from here.
- No soldering is required!
- Minimal assembly required.
Specifications
| Length | 110mm. |
| Width | 90mm. |
| Voltage | Nominal 4.8 - 6V (4xAA batteries). |
| Motors | Pins 19 and 20 (via I2C). |
| Audio Buzzer | Pin 0 (Standard Music Pin). |
| Visual (4x ZIP LEDs) | Pin 8. |
| Line Follow (IR) | Pins 1 (Right) and 2 (Left). |
| Ultrasonic | Pins 13 (Trigger) and 14 (Echo). |
| Servo Connections | 2 on Pins 15 & 16. |
Features
- The Kitronik :MOVE Motor for the BBC micro:bit provides a fun introduction to buggy robotics and coding.
- It is backed up by a range of fun tutorials to introduce you to all of the great features.
- All of the tutorials and resources are free.
- There is no soldering required and assembly is quick and super simple.
- The buggy features two bi-direction DC motors.
- There are ultrasonic distance and line following sensors onboard.
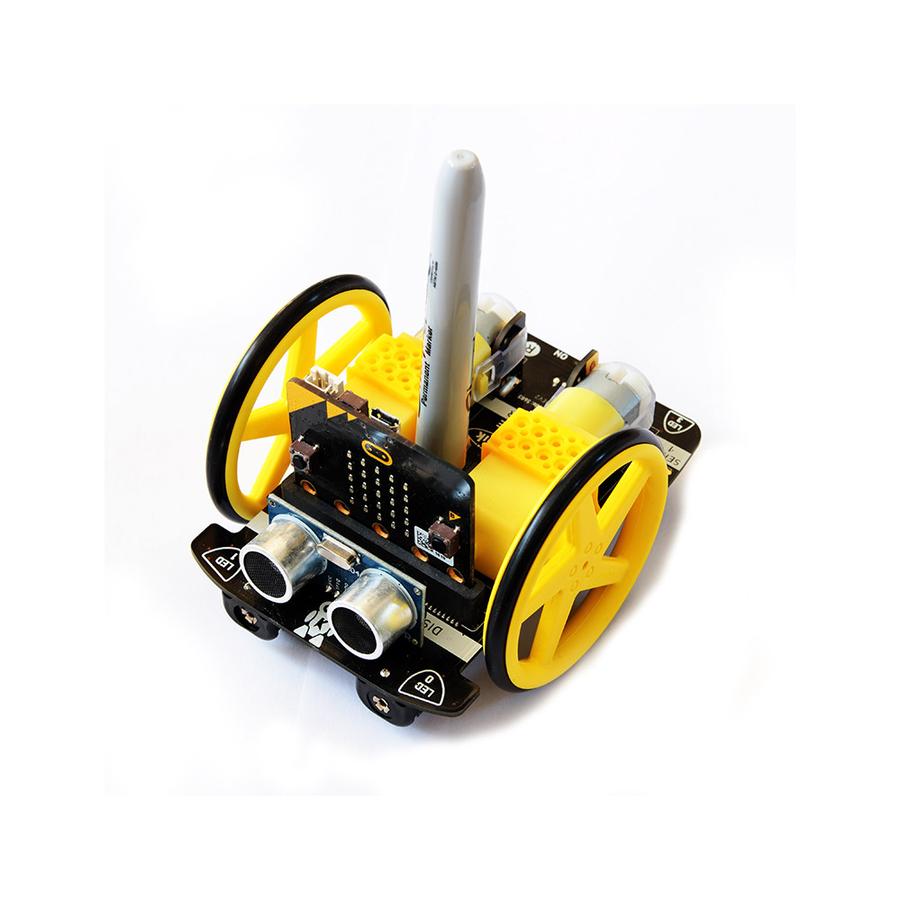
- It also features a Piezo sounder and pen mount.
- There are 4 full-colour programable ZIP LEDs.
- Two pin outputs that are ideal for servo connections (can be used for other inputs and outputs).
- The battery holder is built onto the chassis.
- The buggy is also fitted with a power switch to conserve the batteries.
- There is also an onboard edge connector for the micro:bit, code, plug and play.
- Kitronik has produced custom MakeCode blocks to simplify coding with the MakeCode editor.
What's in the box?
1 x :MOVE Motor chassis.
2 x Wheel and tyres.
1 x Booklet
You will also need....
1 x micro:bit
4 x AA batteries
1 x micro USB cable(to program the :MOVE)
Resources

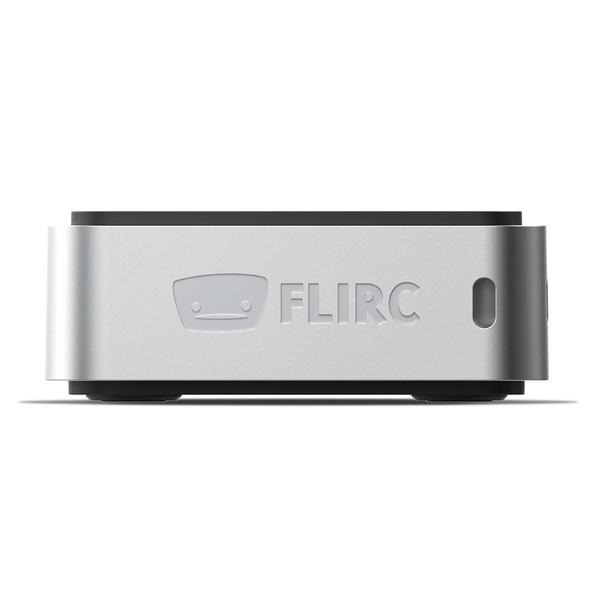
FLIRC Raspberry Pi Zero and Zero 2 Case (Zero Flirc Case)
What's in the box?
1 x FLIRC Zero Aluminum Case
1 x Thermal pad
2 x Top covers (sealed and GPIO access)
1 x Lanyard (pre-installed, removable)
The FLIRC Raspberry Pi Zero Case is finally here - overly engineered, affordable and adorable!
The FLIRC Zero shares the same genetics as the original FLIRC case with some added features. FLIRC have kept everything that makes the original case great, shrunk it down, and added some nice elements that make this mini PC for every day carry.
The familiar aluminium casing with a core heatsink and smooth top is there, offering silent, passive and efficient cooling combined with great looks.
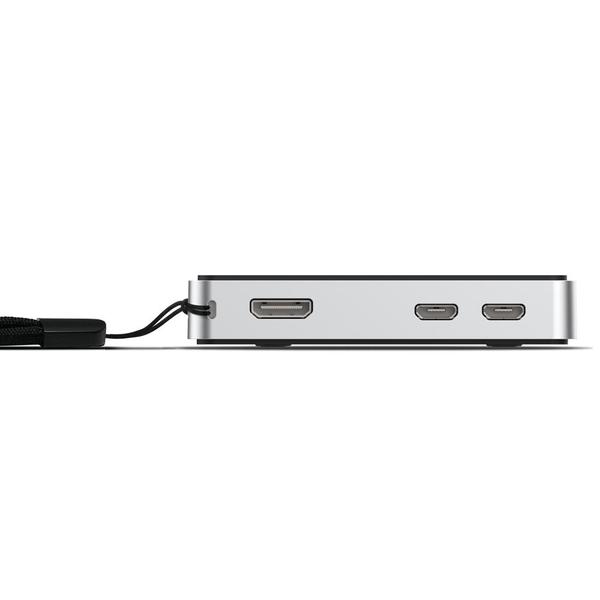
The SD Card is enclosed inside the case so it won't slip out or get stolen. The case needs to be disassembled before the SD card can be removed. There’s even a pre-installed lanyard included in the box in case you want to take your Zero somewhere other than the home.
Two top covers are included with the FLIRC Zero – allowing you to hide away and protect your GPIO, or leave it exposed for prototyping your projects. You can even add a pHAT without worrying about your Zero’s temperature.
What's in the box?
1 x FLIRC Zero Aluminum Case
1 x Thermal pad
2 x Top covers (sealed and GPIO access)
1 x Lanyard (pre-installed, removable)
Notes
1. The Raspberry Pi Zero’s LEDs are not visible with this case
2. Lanyard is removable (but fiddly to get back on)
3. Ships with a thermal pad – fit this to the case heatsink core before fitting your Raspberry Pi Zero
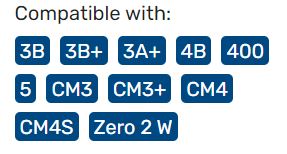
Which Pi Zero Models is the case compatible with?
The case will work with any Raspberry Pi Zero model, including the Raspberry Pi Zero 2 W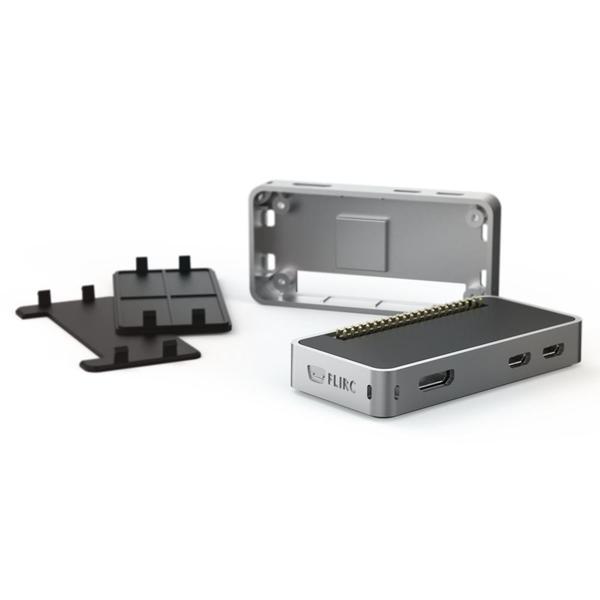


SanDisk Ultra micro USD 64GB preloaded with Raspberry Pi OS 64bit (San 64GB OS64)
- This Micro SD Card Bundle for the Raspberry Pi consists of a SanDisk Class 10 UHS-I Micro SD card preloaded with Raspberry Pi OS
Please Note. This Micro SD Card does NOT come with a SD Card Adapter, it is the Micro SD Card ONLY
The SanDisk 64GB Preloaded Micro SD Card Features:- Superior Random-Access Performance - Perfect for the Raspberry Pi
- Capacity : 64GB
- Weight : Approx 0.2g
- Operating Voltage : 2.7 ~ 3.6V
- Speed Class 10 A1
- preloaded with Raspberry Pi OS 64bit
What's in the box?
1 x Sandisk 64GB preloaded micro SD card
Resources
Latest image available from the Raspberry Pi Foundation Downloads
Raspberry Pi OS documentation
Version updates
20/10/2023 Bookworm 64bit
10/07/2023 Bullseye

6W Stereo USB Power and Signal Speaker-Black (USB stereo black)
This small Computer Speaker is USB-powered and USB communicated, just plug and play. No extra 3.5mm Audio Jack is needed. It is very easy to use. For a Mini Speaker, the sound is loud and beautiful. This USB Desktop Speaker will bring you good audio for you to listen to music, watch films, or play games. The small USB Speaker is energy-saving and environmentally-friendly. This mini Portable Speaker is specially designed for desktop, laptop, notebook, tablet PC, and even Raspberry Pi boards and Jetson.
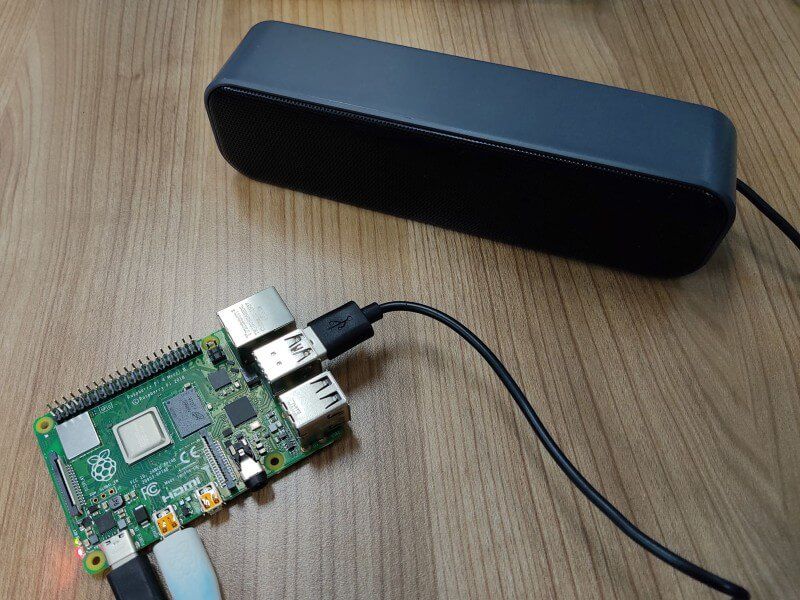
As the new Raspberry Pi 400 keyboard computer does not come with a 3.5mm Audio Barrel for speaker output, this USB powered, and signal is the perfect speaker for it. And we have tested it with Raspberry Pi 400, it works like expected. No driver is needed, plug and use!
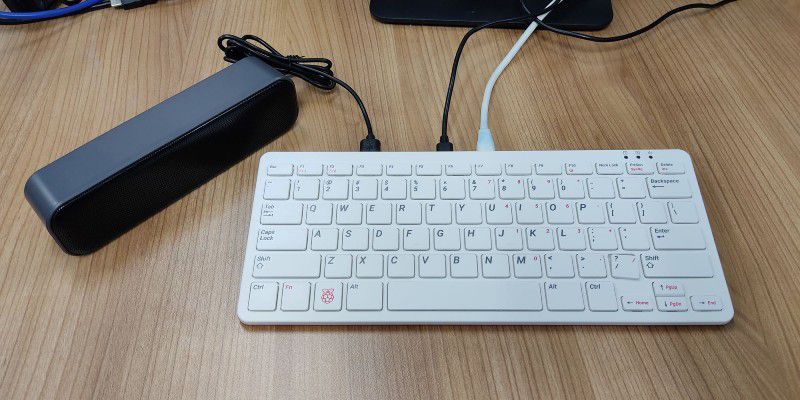
Note: If you're using the speaker with your Raspberry Pi, be sure to change the audio device to USB2.0 Device and change the output to Digital Stereo Output. Else, you will not be able to control the volume.

As the new Raspberry Pi 400 keyboard computer does not come with a 3.5mm Audio Barrel for speaker output, this USB powered, and signal is the perfect speaker for it. And we have tested it with Raspberry Pi 400, it works like expected. No driver is needed, plug and use!
Note: If you're using the speaker with your Raspberry Pi, be sure to change the audio device to USB2.0 Device and change the output to Digital Stereo Output. Else, you will not be able to control the volume.
Features and specifications
- They are small and compact, so they can be brought anywhere.
- Powered by a single USB cable, have NO volume control knob, easy to use.
- Anti-interference and stereo sound.
- Crystal-clear treble.
- Space-saving design, they can be conveniently placed next to your PC monitors without compromising on valuable desk space.
- Built-in 2 speakers, balance and enhance the sound of your laptop, notebook, computer, PC, tablets, good for work, music, movies, games, etc.
- Acoustic quality stereo sound, let your room filled with music, movies, or computer games.
- No driver is needed for Windows, Linux and macOS, just plug and play!
- Great for
- Enhance any media experience while at home, office, kitchen, basement, or on the go.
- Upgrade to your computer's weakened or faint internal speakers. Perfect USB Speakers for Windows PCs, Desktop Computer, Laptop.
- Daily listening, static listening at home or office.
- Material: Plastic
- Output Power: 3W*2
- Channel: 2.0
- Frequency Response Range: 25Hz-20KHz
- Separation: ≥40dB
- Power Supply: USB 5V
- SNR: ≥80dB
- Voltage: 5V
- Connectivity: USB
- Number of speakers: 2
- USB Cable Length: 47 inches
- Connection radius: direct connection
What's in the box?
1 x 6W Stereo USB Power and Signal Speaker-Black
Unicorn HAT HD (Unicorn HAT HD)
Description:
We've stepped up our LED game! Unicorn HAT HD crams 256 RGB LEDs, in a 16x16 matrix, onto a single HAT. High-definition rainbow goodness!
You can still use it for all of the same things as the regular Unicorn HAT, but with 4 times as many pixels it makes much more complex animations possible, including scrolling text, and even low resolution videos.
The bundled ninja diffuser makes the pixels look extra-shiny by providing some subtle diffusion, blurring the lines between each pixel. Simply use four of the nuts to space the diffuser slightly away from the HAT, and the other four to secure it.
The MagPi said that Unicorn HAT HAD had a "real wow factor" and that the "performance is excellent" in their five star review.
Features
- 256 RGB LED pixels in a 16x16 matrix
- Pixels driven by ARM STM32F and three STP16CPC26 LED drivers
- Bundled ninja diffuser, plus nuts and bolts
- Unicorn HAT HD pinout
- Compatible with Raspberry Pi 3, 2, B , A , Zero, and Zero W
- Python library
- Comes fully assembled
The ARM chip on Unicorn HAT HD does all of the heavy lifting, meaning that you can just bung data to it and it'll take care of the rest. It acts as the man-in-the-middle between your Pi and the three STP16CPC26 LED drivers that actually drive the LEDs.
SoftwareOur Python library will have your Unicorn HAT HD pooping out high-definition rainbows in a jiffy. There's a stack of examples too, to show you how to create slick animations, simulate the Game of Life, a forest fire or a flickering candle, and even scroll text!
Notes- Photo-sensitivity warning: flashing, strobing, and patterns of lights may cause epileptic seizures. Always take care and immediately stop using if you feel unwell (dizziness, nausea, affected vision, eye twitching, disorientation).
- Power: Unicorn HAT HD requires a >2A microUSB power supply for your Pi. We recommend the official Raspberry Pi power supply.
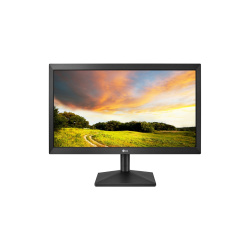
LG 20MK400H 19.5inch monitor with HDMI and D-Sub (LG 19.5 20MK400H)
React Faster to The Action
Dynamic Action Sync mode allows you to instantly react to your opponents and attack them without any display lag. It synchronizes your senses with real-time scenes in fast-paced games by minimizing input lag.
Offers Stable Image
Reducing the flicker level to almost zero, Flicker Safe helps you protect your eyes from exhausting flickers.
Protect Eyes with Reader Mode
Reducing blue light to help lessen eye fatigue, Reader Mode provides optimal condition for reading. With easy joystick control, you can more comfortably read your monitor screen.
Specifications
FEATURES
SW APPLICATION
OnScreen Control (LG Screen Manager): Yes
CONNECTIVITY
POWER
MECHANICAL
DIMENSIONS/WEIGHT
What's in the box?
1 x LG 20MK400H monitor
Dynamic Action Sync mode allows you to instantly react to your opponents and attack them without any display lag. It synchronizes your senses with real-time scenes in fast-paced games by minimizing input lag.
Offers Stable Image
Reducing the flicker level to almost zero, Flicker Safe helps you protect your eyes from exhausting flickers.
Protect Eyes with Reader Mode
Reducing blue light to help lessen eye fatigue, Reader Mode provides optimal condition for reading. With easy joystick control, you can more comfortably read your monitor screen.
Specifications
- Size (Inch): 19.5Inch
- Size (cm): 49.4cm
- Resolution: 1366 x 768
- Panel Type: TN
- Aspect Ratio:16:9
- Pixel Pitch: 0.3177 x 0.3070 mm
- Brightness (Min.): 160 cd/m²
- Brightness (Typ.): 200 cd/m²
- Colour Gamut (Typ.): NTSC 72% (CIE1931)
- Colour Depth (Number of Colors): 16.7M
- Contrast Ratio (Min.): 360:1
- Contrast Ratio (Typ.: 600:1
- Response Time: 2ms (GtG at Faster)
- Viewing Angle (CR≥10): 90˚(R/L), 65˚(U/D)
- Surface Treatment: Anti glare, 3H
FEATURES
- Flicker safe: Yes
- Reader Mode: Yes
- Color Weakness: Yes
- Super Resolution : Yes
- Black Stabilizer: Yes
- Dynamic Action Sync: Yes
- Crosshair: Yes
- Smart Energy Saving: Yes
SW APPLICATION
OnScreen Control (LG Screen Manager): Yes
CONNECTIVITY
- D-Sub: Yes (1ea)
- D-Sub: (Max. Resolution at Hz) 1366 x 768 at 60Hz
- HDMI: Yes (1ea)
- HDMI: (Max. Resolution at Hz) 1366 x 768 at 60Hz
- Headphone out: Yes
POWER
- Type: External Power (Adapter)
- AC Input: 100 - 240Vac, 50/60Hz
- Power Consumption (Typ.): 13.0W 15.0W
- Power Consumption (Sleep Mode): Less than 0.3W
- Power Consumption (DC Off): Less than 0.3W
MECHANICAL
- Display Position Adjustments: Tilt
- Wall Mountable :75 x 75 mm
DIMENSIONS/WEIGHT
- Dimension with Stand (W x H x D) 463.8 x 366.5 x 181.9 mm
- Dimension without Stand (W x H x D) 463.8 x 276.4 x 38.4 mm
- Weight with Stand 2.3kg
- Weight without Stand 2.0kg
What's in the box?
1 x LG 20MK400H monitor

D-Link DGS-1008PE 8 port Unmanaged Switch with POE on 4 of the ports (DL DGS-1008PE 8 port switch)
Description:
Switch type: Unmanaged.
Basic switching RJ-45 Ethernet ports type: Gigabit Ethernet (10/100/1000),
Basic switching RJ-45 Ethernet ports quantity: 8. Full duplex.
MAC address table: 8000 entries,
Switching capacity: 16 Gbit/s.
Networking standards: IEEE 802.3,IEEE 802.3ac,IEEE 802.3af,IEEE 802.3at,IEEE 802.3u,IEEE 802.3x.
Power connector: DC-in jack.
Power over Ethernet (PoE): 4 ports
Power Over Ethernet
The first four ports of the DGS-1008P support the IEEE 802.3at PoE protocol. Each of the four ports can supply up to 30 watts, for a total PoE budget of 68 watts, allowing users to attach an IEEE 802.3at-compliant device to the DGS-1008P that requires no additional power.
What's in the box?
1 x DGS-1008PE unmanaged switch

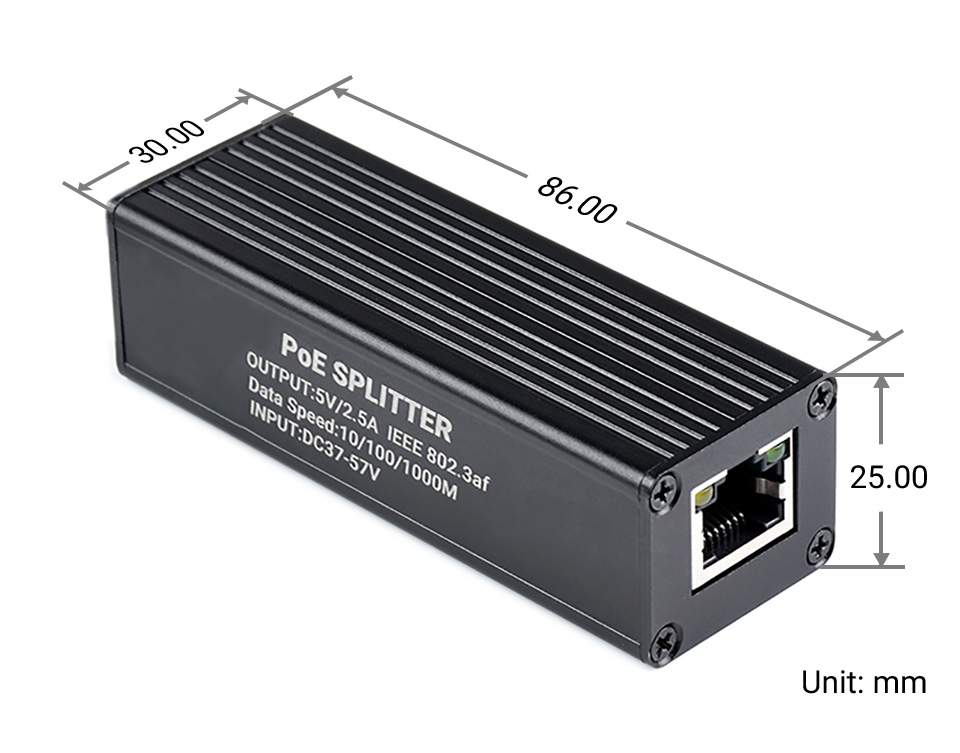
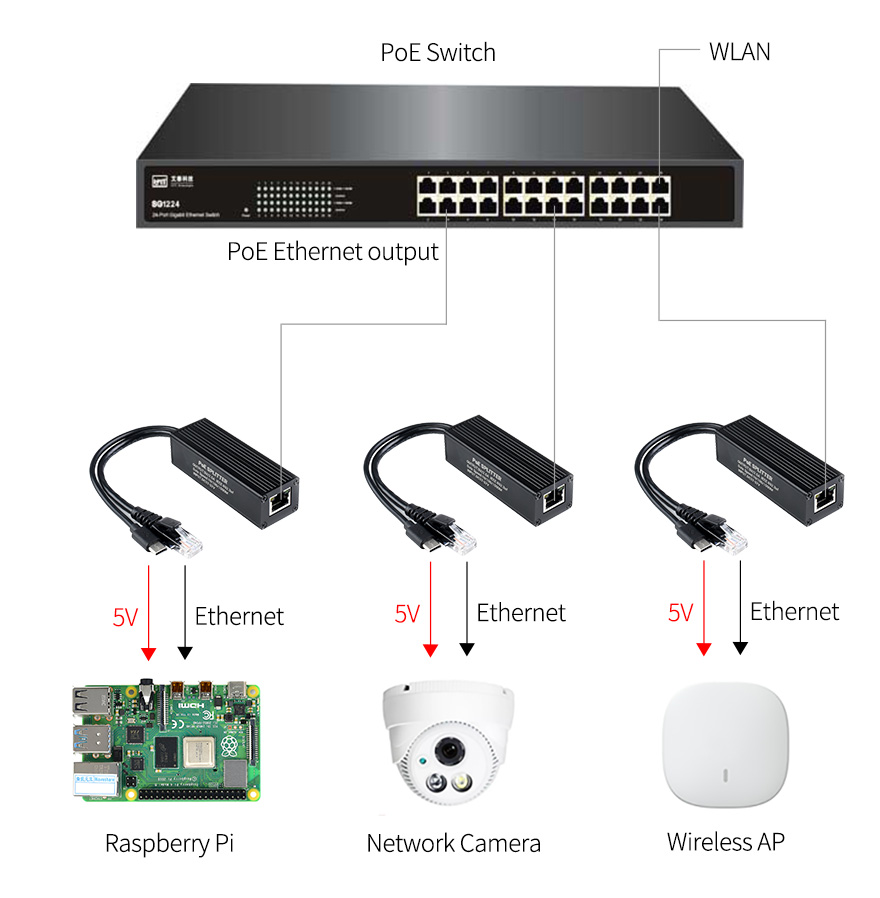
Industrial Gigabit PoE Splitter Metal Case protection 5V 2.5A Type-C Out (WS industrial poe splitter)
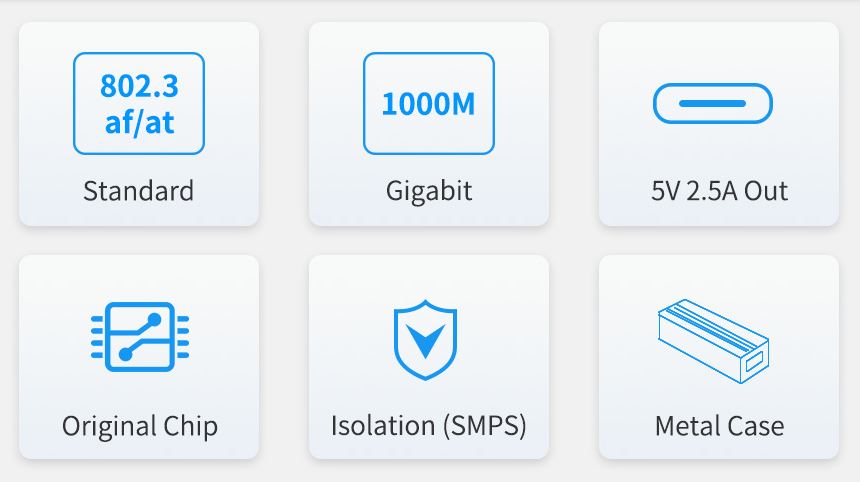
Industrial Gigabit PoE Splitter, 5V 2.5A Type-C power output. IEEE 802.3af/at-compliant Gigabit Ethernet
Features at a glance
Specifications
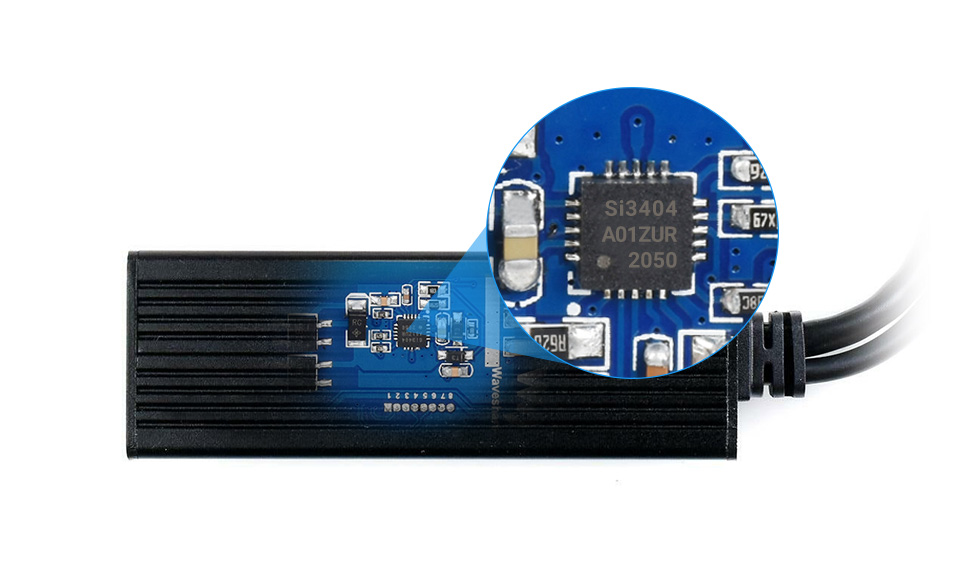
Original chip solution
Incorporates Si3404, high-integration, high-efficiency, more safe and reliable
for reference ONLY, Raspberry Pi and switch are NOT included.
Features at a glance
- Incorporates original chip Si3404, high-efficiency, high-safety, stable-performance
- 10/100/1000Mbps auto-negotiation Ethernet port
- 802.3af/at-compliant PoE (Power over Ethernet) standard
- Isolated SMPS (Switching Mode Power Supply), effectively protecting the powered device
- 5V DC output, suitable for powering Raspberry Pi and other small-scale network devices
- Black dull-polish metal case, sturdy and rugged, higher protection level, better heat dissipation
Specifications
| Power supply | supports 1/2(+); 3/6(-); 4/5(+); 7/8(-) powering |
|---|---|
| PoE input voltage | 37V ~ 57V |
| Type-C output | 5V 2.5A (MAX) |
| Cable | Cat-5 UTP |
| Standard | IEEE 802.3 af/at PoE Ethernet |
| Data rate | 10/100/1000Mbps |
| LED indicator | PoE power input indicator |
| Dimensions | 86 × 30 × 25mm (l × w × h) |
| Operating temperature | -40℃ ~ 85℃ |
Original chip solution
Incorporates Si3404, high-integration, high-efficiency, more safe and reliable
Switching Mode Power Supply (SMPS)
Isolated circuit protection, effectively protecting the powered device
Industrial grade protection case
aluminum alloy case, sturdy and rugged, higher protection level, better heat dissipation 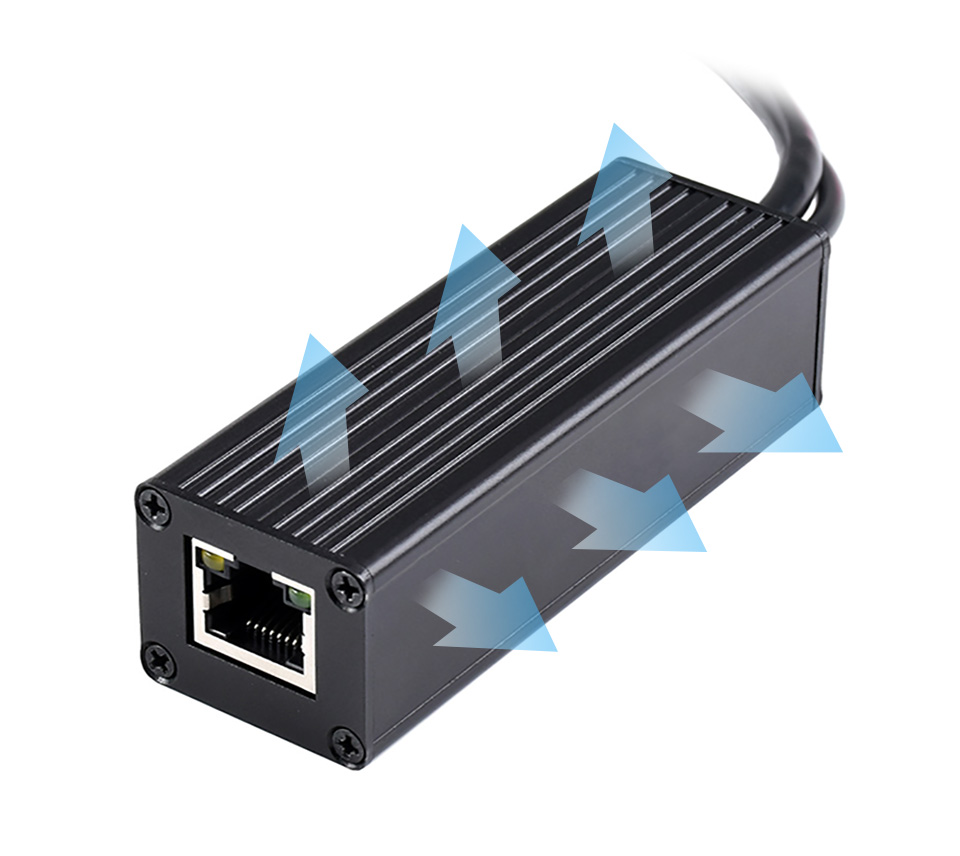
Application examples
Powering the Raspberry Pi or other 5V-powered network devices by PoE switch
for reference ONLY, Raspberry Pi and switch are NOT included.

Unicorn pHAT (Unicorn pHAT)
Description:
What's going to protect your beloved Raspberry Pi from an onslaught of rainbow-coloured fusion? That's right, it's Unicorn pHAT.
Sporting a matrix of 32 (8 x 4) RGB LEDs and powered directly from the Pi, this is the most compact pocket aurora available.
Unicorn pHAT provides a wash of controllable colour that is ideal for mood-lighting, pixel art, persistence of vision effects, status indications, or just blasting colour into your surroundings.
Features
- 32 RGB LEDs (SK6218 - 3.5mm x 3.5mm)
- LED data driven via DMA over PWM
- Unicorn pHAT pinout
- Compatible with Raspberry Pi 3, 2, B , A , Zero, and Zero W
- Python library
- Female header requires soldering
Software
Unicorn pHAT uses the same Python library as Unicorn HAT, so it's super-easy to use, should automatically detect that you're using the pHAT and includes some examples written specially for Unicorn pHAT.
Notes
- Warning: SK6218 LEDs are bright enough to cause eye pain, do not look at them directly when brightly lit. We recommend using Unicorn pHAT at lower brightness levels.
- Photo-sensitivity warning: flashing, strobing, and patterns of lights may cause epileptic seizures. Always take care and immediately stop using if you feel unwell (dizziness, nausea, affected vision, eye twitching, disorientation).
- Power: Unicorn pHAT works best with a >2A microUSB power supply for your Pi. We recommend the official Raspberry Pi power supply.
- Compatibility (audio): as Unicorn pHAT uses PWM and GPIO18, it will interfere with analogue audio playback (random colour patterns and flickering). HDMI should work just fine! :D
Tutorials & Projects
Getting Started with Unicorn Paint Getting Started with Unicorn pHAT Learn how to install and get started with your Unicorn pHAT
Beginner / LEDs
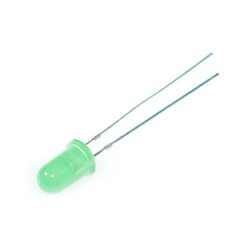
10Pcs 5mm Led Flashing Green Diffused (10Pcs 5mm led flash green)
These are general purpose 5mm Flashing Green LED with diffused lens and good brightness.
Specifications
What's in the box?
10 x Flashing LEDs
Specifications
- Brand: CHANZON
- Lens Size: 5mm Diameter
- Lens: Colour Lens
- Emitting Colour: Green Flash
- Viewing Angle: 20 Degree (Colour Lens)
- Forward Voltage: 3.0-3.2V
- Current: 20mA
- Frequency: 1.5HZ
- Flicker Frequency: 90 Times / Minutes
- Polarity: Anode (Longer Leg) | Cathode (Shorter Leg)
What's in the box?
10 x Flashing LEDs
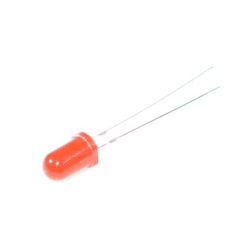
10Pcs 5mm Led Flashing Red Diffused (10Pcs 5mm led flash red)
These are general purpose 5mm Flashing RED LED with diffused lens and good brightness.
Specifications
What's in the box?
10 x Flashing LEDs
Specifications
- Brand: CHANZON
- Lens Size: 5mm Diameter
- Lens: Colour Lens
- Emitting Colour: Red Flash
- Viewing Angle: 20 Degree (Colour Lens)
- Forward Voltage: 3.0-3.2V
- Current: 20mA
- Frequency: 1.5HZ
- Flicker Frequency: 90 Times / Minutes
- Polarity: Anode (Longer Leg) | Cathode (Shorter Leg)
What's in the box?
10 x Flashing LEDs

PiBorg - Motor Controller (Piborg motor controller)
What's in the box?
1 x PiBorg - Motor Controller
The PicoBorg is an ultra compact motor controller for the Raspberry Pi!
With PicoBorg, you can turn on and off fans, motors, solenoids or relays from your Raspberry Pi. There are 4 low side drivers, so you can turn on and off 4 devices, and one device is connected to the Pi's PWM pin, so you can vary the speed of that motor! Motor control is accessed via a simple GUI, which can be installed by following the PicoBorg installation instructions.
Motor power is not taken directly from the Raspberry Pi, so there's no risk of your Pi dropping out. Instead, the PicoBorg utilises a battery pack to drive the motors; meaning you're not restricted to 5V motors, in fact you can drive ANY motors up to 20V!
The PicoBorg is perfect for any small motor project, for example:
- 4 fans on/off control over all and vary speed on one fan
- 4 solenoids
- 4 DC motors (on / off control over all and vary speed on one motor)
- Control one 6 wire stepper motor in both directions
- Rover project!
The PicoBorg Features:
- Drive 4 x DC Motors (on/off) or 1 x 6-Wire Stepper motor (Bi-Direction)
- Allows speed control on 1 x Motor
- Max 20V recommended 12V or less
- Max current 2.5A (stall) or less
- Primarily designed to be used with large resistance, low inductance motors and for learning and experimenting purposes.
What's in the box?
1 x PiBorg - Motor Controller
Warnings:
- As there are no pull up or pull down resistors on the inputs, the picoBorg expects the Pi to be controlling the pins when the power is applied. Power the Pi first, run the software and then apply power to the PicoBorg.
- There is no thermal shutoff, keep an eye on temperature of the FETs and diodes
- There is no current limiting, you must observe current restrictions
- There is no short circuit or reverse voltage protection
- For commercial applications and control of larger motors and lower resistance coils etc, PiBorg or PiBorg nano may be a better solution
- If you are new to electronics and getting started, we recommend you don't use a battery, rather a low current <100mA power supply as this can be more forgiving if you get things wrong
- Be very careful of connections and soldering as mistakes could potentially hurt your picoBorg and Raspberry Pi.

PIR Camera Case for Raspberry Pi 4 (Pi4 cam case pir)
Please note:
Only compatible with the official Raspberry Pi Camera Module Raspberry Pi and camera module not included!
Mounted PIR and Camera Module
The case comes with the PIR module and wires included. The PIR module is neatly mounted to the front of the case and the three PIR wires connect directly to the Raspberry Pi GPIO pins (5V, GND and GPIO 17). The camera module (not included) is also mounted to the front of the case, and connected in the usual way (CSI connector), with the ribbon cable neatly tucked into the case. A clear lens ring protects your camera from any unexpected knocks or bumps.
Easy to Code
Coding the project is super-simple, and to help you get started we've created a GitHub repository dedicated to this case. The GitHub repository takes you through setup, basic commands and full Python project examples showing the PIR module and camera working together.
You can expand on these however you like, adding other functions such as cloud storage upload, video effects, alerts and more!
The PIR Camera Case makes it easy to create a motion-sensing camera project with your Raspberry Pi 4.
It's the perfect case for anyone wishing to make an indoor security camera, pet monitor, baby monitor, office cam or any other project where you'd like to use a camera module to record whoever (or whatever!) moves in front of your camera. The case comes with the PIR module and wires.Please note:
Only compatible with the official Raspberry Pi Camera Module Raspberry Pi and camera module not included!
Mounted PIR and Camera Module
The case comes with the PIR module and wires included. The PIR module is neatly mounted to the front of the case and the three PIR wires connect directly to the Raspberry Pi GPIO pins (5V, GND and GPIO 17). The camera module (not included) is also mounted to the front of the case, and connected in the usual way (CSI connector), with the ribbon cable neatly tucked into the case. A clear lens ring protects your camera from any unexpected knocks or bumps.
Easy to Code
Coding the project is super-simple, and to help you get started we've created a GitHub repository dedicated to this case. The GitHub repository takes you through setup, basic commands and full Python project examples showing the PIR module and camera working together.
You can expand on these however you like, adding other functions such as cloud storage upload, video effects, alerts and more!
Please remember PIR sensors can be temperamental (and can also be impacted by WiFi, heat and other interference) so will need some tweaking to reduce excessive false triggers.
Compatibility
We include two sets of side panels to make this case compatible with both the Raspberry Pi 4.
In the box
- Case panels
- Lens protector ring
- Fixings pack
- PIR sensor
- PIR cable
Example Scripts and Resources
- GitHub Repository
- Assembly guide
- Preparing your Raspberry Pi
- Example code
- Downloading the example scripts to your Raspberry Pi
Case Assembly Guide
Features
- Compatible with the Raspberry Pi 4
- Laser-cut high quality "stealth" matt black perspex
- PIR module and wires included
- Camera protection ring
- Example code available
- Easy assembly
- Enables access to all Raspberry Pi ports
- Includes all required fixings
- Manufactured in the UK
Please note: Raspberry Pi and Camera Module not included. Wall mounting bracket not included.

Pico Proto PCB (pico proto pcd)
Prototyping board designed for the Raspberry Pi Pico with the Pico pinout marked on the PCB.
What's in the box?
1 x Pico Proto PCB
Resources
Instructions
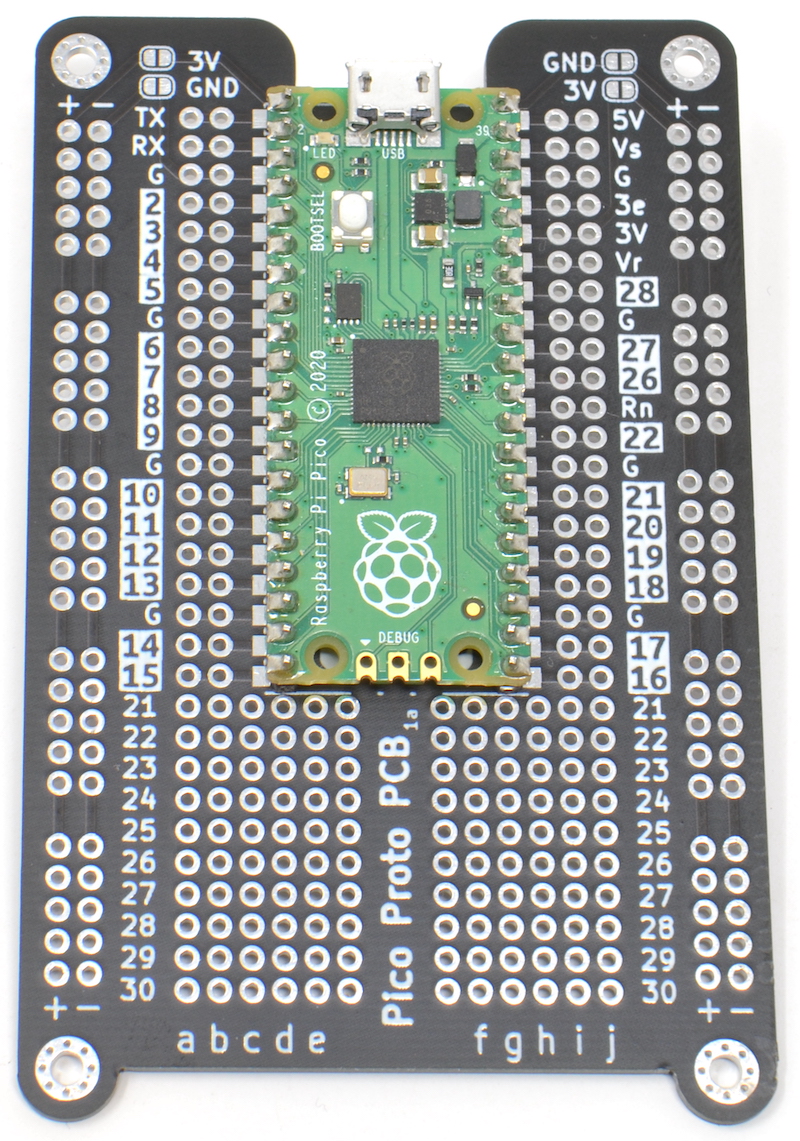
If you done using a breadboard for Pico and are ready to take your prototype to solder, you will love this board.
It can be tricky to work out which pin is which when using a Raspberry Pi Pico
with prototyping board. The MonkMakes Pico Proto PCB solves this problem by
labeling the Pico pins on the PCB.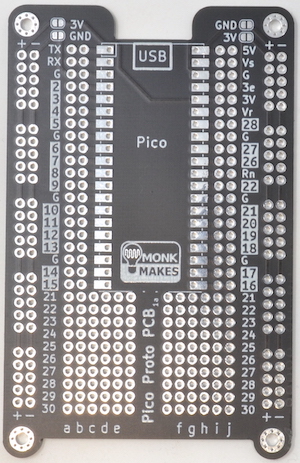
The MonkMakes Pico Proto PCB makes it easy to make soldered prototypes using the Raspberry Pi Pico. You can solder the Pico to the prototyping board using the castelations around the edge of the board, or using header pins, or even solder header sockets onto the Pico Proto PCB so that you can easily swap out the Pico.
Specifications
The layout of the Pico Proto PCB is modelled on a 400-point breadboard, and after the Pico is soldered to the PCB, there are 10 more rows, that can be used for through hole components
WARNING: Low voltage, low current usage only. Maximum 50V at 3A.
What's in the box?
1 x Pico Proto PCB
Resources
Instructions