
Kitronik


The :MOVE mat line following and activity maps - A1 size is an accessory for :MOVE Motor, :MOVE mini and also the Edison V2 Robot. It can be used just for fun, or as part of a project in the classroom. The mat is double-sided, with a line following track on one side and a mock-up of a town on the other.
The line following side offers an attractive alternative to having to create a track by hand. No more fighting with a roll of tape and no more cleaning up adhesive residue afterwards. Level up your line following game today!
The town mock-up side provides a great place to set up traffic projects, where other props can be used. Things such as LAMP:bit, STOP:bit, and also ACCESS:bit can be utilised to great effect.
The mat is A1 in size, which is a generous 594mm x 841mm. When not in use it can either be stored flat or folded up.
Features
- A double-sided accessory mat for :MOVE Motor for micro:bit and Edison V2 robot.
- Great for use at home and in the classroom.
- On one side there is a line following track and on the other a town mock-up.
- No more creating line following tracks with tape and no more clean-up afterwards.
- Create town projects, utilising Kitronik traffic calming type props.
- When not in use it can be stored flat.
What's in the box?
1 x :MOVE mat line following and activity maps - A1 size.
Dimensions
- Length: 841mm.
- Width: 594mm.
The STOP:bit for the BBC micro:bit is the ultimate upgrade for traffic light/pedestrian crossing projects. Not only does it make coding the project a breeze, but the board is also supplied pre-assembled so you don't even need to fire up the soldering iron. Love it or hate it, variations of the pedestrian crossing project have been around for decades. When I did mine, it was on a 6502 EMMA board and coded with Assembly and it also included a level crossing. Thankfully, tapping low-level programming languages into a hexadecimal keypad is now a thing of the past. The Kitronik STOP:bit is a purpose-built accessory that can only lead to a more enjoyable project with a nicer looking end result.
The STOP:bit is a bolt-on/clip-on board for the BBC micro:bit replicating a traffic light. The PCB has been designed to have the same physical features of a traffic light, with the addition of a BBC micro:bit as the pedestrian crossing control box. The STOP:bit has 3 10mm diameter LEDs. Each of these LEDs is driven from one of the BBC micro:bit IO pins. Power to the LEDs is supplied from the BBC micro:bit connections. STOP:bit is supplied with 4 countersunk screws which gives you the option of bolting the microbit directly onto the STOP:bit. Alternatively, crocodile clips can be used between the pads on the STOP:bit and the corresponding pads on the microbit.
If your scope is larger than a single traffic light, you can use the microbits radio module to communicate with other lights if they also have a microbit attached. This is great for exploring traffic management in a town or city.
We have also had some custom blocks added to the MakeCode Editor to make the job of coding this project much more simple. This will allow you to do this project in class with younger students. This is further reinforced by STOP:bit being pre-assembled, so there is no soldering or fiddly mechanical fixings, other than those used to secure the microbit, to worry about. However, you are not confined to using our custom blocks, you can also use the 'digital write pin' block.
To add our custom blocks to the editor; Click on the cog in the top right of the editor and select 'Add Package' from the menu. This will open a dialogue window with a search box. Type Kitronik into the search box and all of our custom blocks will appear as tiles. Scroll down and select the tile titled 'kitronik-stopbit' and it will be added to the blocks menu.
Features
- Upgrade your microbit traffic light/pedestrian crossing projects.
- Code it with the Microsoft MakeCode Editor.
- We have added some custom blocks to the MakeCode Editor to make the job of coding more straightforwards, which opens up the project to younger children.
- Attach the BBC micro:bit directly to STOP:bit for a tidy wireless project.
- It comes pre-assembled and looks great.
- If using multiple STOP:bits you can use radio to coordinate traffic management.
What's in the box?
1 x STOP:bit for the BBC micro:bit
5 x M3 8mm Countersunk Screws.
5 x M3 Hex Full Nut.
You will also need....
- BBC micro:bit.
- Type-A to Micro-B USB Cable.
- MakeCode Editor.
- Teachers Lesson Plans For STOP:bit For microbit.
Resources
- Datasheet.

- Datenblatt - Deutsche Übersetzung.
- Demo Code for programming in MicroPython is available from GitHub.
Online MakeCode tutorials, learn how to code a;
Dimensions
- Length: 120mm.
- Base Width: 38mm.
- Height: 15.6mm.
- PCB Thickness: 1.6mm.

This solar cell kit has been put together to provide a renewable power source for the Kitronik Environmental Control Board or Greenhouse kit. Harness the energy of the sun to power your projects.
The kit comprises 3 x AA Ni-MH 1300mAh Rechargeable Batteries and a 5.0V 130mA Polycrystalline Solar Cell.
The Environmental Control Board comes supplied with its own onboard battery holder and also a terminal block for attaching solar cells. This add on pack provides everything you need to take advantage of these features, enabling you to make use of sunlight as a power source. Firstly, insert the batteries and then attach the solar cell to the terminal block with a small screwdriver. No soldering required.
Features
- This kit provides a renewable power source for the Kitronik Environmental Control Board.
- No soldering required.
- Solar Cell Features:
- Maximum current: 130mA.
- Maximum power: 0.65W.
- Rechargeable Batteries Features:
- The batteries are rechargeable making them a cost-effective and greener way of powering your projects.
- They have a capacity of 1300mAh and a nominal output of 1.2V.
- They are of a Nickel Metal Hydride construction.
- They have no charging memory effect.
- AA Battery type.
What's in the box?
3 x AA Ni-MH 1300mAh Rechargeable Batteries.
1 x 5.0V 130mA Polycrystalline Solar Cell.
Solar Cell Dimensions
- Length: 110mm.
- Width: 56mm.
- Thickness: 3mm.
You may also need...
- 1 x Kitronik Environmental Control Board.
- A small Screwdriver.
Resources

Unlock the secrets of nature with code, engineering, and the Environmental Control Board for micro:bit!
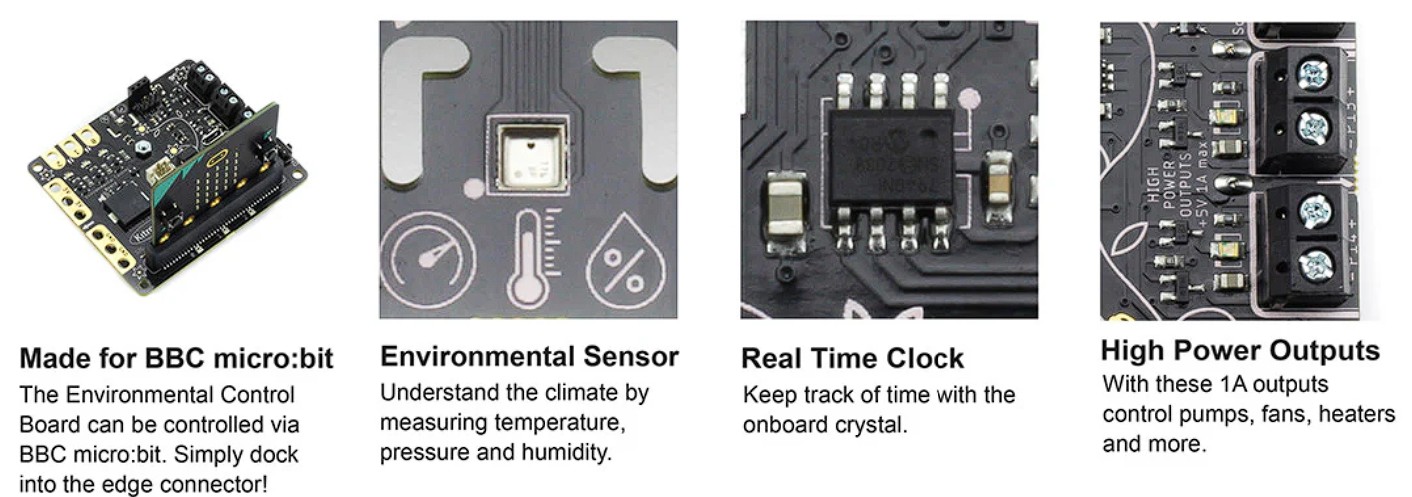
The Kitronik environmental control board provides a variety of sensor inputs and connection points for the BBC micro:bit (V1 & V2) and provides the ability to control outputs for devices such as a water pump, fan, servo or heater pad. This makes it ideal for feedback control systems. This board is also supplied as part of the Kitronik Smart Greenhouse Kit.
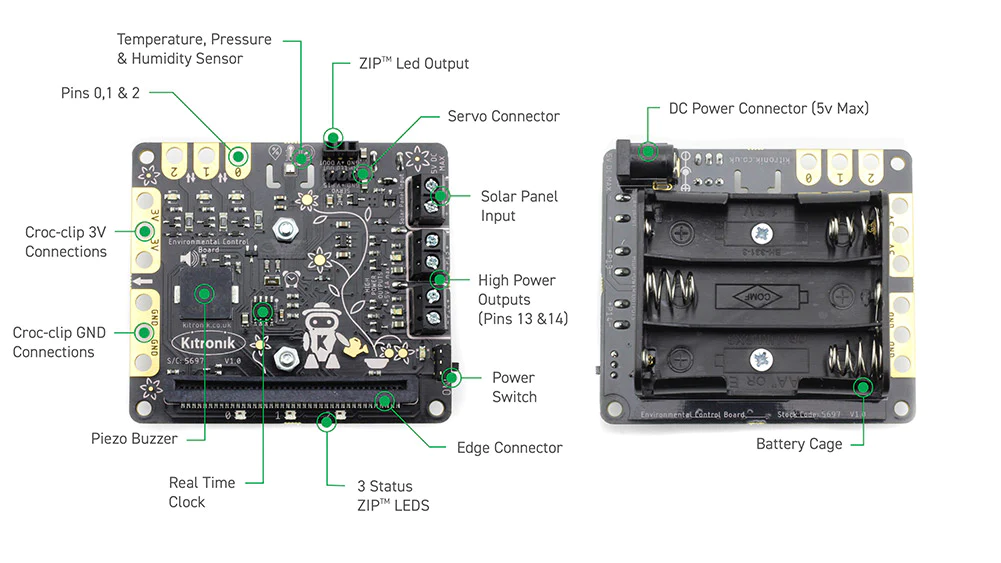
The BBC microbit slots directly into the board via an integrated edge connector. The micro:bit can then read input from the onboard BME 280 environmental temperature, barometric pressure and humidity sensor and also the Real-Time Clock. There is an onboard piezo buzzer, 2 x 1A outputs (ideal for a water pump, heater pads or fan), 3 status ZIP LEDs, a ZIP LED expansion connector and servo output. In addition to these, 3 BBC micro:bit pins are broken out to croc-clip connections as further inputs and outputs, along with pads for 3V and GND.
Power is provided via the onboard 3xAA battery holder or the 2.1mm DC Jack. There is an on/off switch for controlling power supply to the board and there is a green LED to indicate when the board has been turned on. The board also produces a regulated 3V supply which is fed into the edge connector to power the inserted BBC micro:bit, removing the need to power the BBC micro:bit separately.
The board also features a solar cell input and will charge rechargeable batteries if inserted into the onboard battery holder. Renewable energy is becoming increasingly important and this board can be used to help illustrate greener ways of delivering desired outcomes.

The environmental control board can be coded with the MakeCode editor and Kitronik have produced a set of custom blocks to make the job as simple as possible. There are blocks for reading input and for controlling additional devices such as a pump. This can be added via the add Extensions function in the editor by searching “Kitronik” or from https://github.com/KitronikLtd/pxt-kitronik-smart-greenhouse. The supplied datasheet has detailed coding advice, so much so that the beginner will have no difficulties following along.
The board can be coded without using our custom blocks in the MakeCode Blocks, Javascript, and Python workspaces. Coding for some of the board's features, e.g. I2C, requires an in-depth knowledge making it mainly suitable for the more advanced user.
Features
- Build automated systems that react to environmental changes, such as plant watering and greenhouse systems.
- It is compatible with both micro:bit V1 and microbit V2.
- The board features a number of sensor inputs that can be coded to control the board's outputs.
- There is an onboard BME 280 environmental temperature, barometric pressure and humidity sensor and a separate Real-Time Clock (RTC).
- The board also features an onboard piezo buzzer, 2 x 1A outputs (ideal for a water pump, heater pads or fan), 3 status ZIP LEDs, a ZIP LED expansion connector and servo output. In addition to these, 3 BBC micro:bit pins are broken out to croc-clip connections as further inputs and outputs, along with pads for 3V and GND.
- It can be powered via the onboard 3xAA battery holder or the 2.1mm DC Jack, and the power controlled via the on/off switch with an adjacent LED indicator.
- There is also a solar-cell input that can be used in conjunction with rechargeable batteries.
- The board produces a regulated 3V supply for powering the micro:bit via its edge connector i/o connections.
- Code it with MakeCode. Kitronik has produced custom blocks to make the job of coding the board as simple as possible, opening up activities for younger students.
- These custom blocks are optional, the board can be coded without them in the Blocks, JavaScript and Python editors. Opening up activities for those that require more of a challenge.
- This board is also available as part of the Kitronik Smart Greenhouse Kit.
Dimensions
- Length: 74.5mm.
- Width: 66mm.
- Height: 29mm.
What's in the box?
1 x Environmental board for greenhouse kit.
You may also need:
- A BBC micro:bit V1 or microbit V2.
- 3 x AA Batteries or plug-in power supply with USB to DC Jack.
- Optional Extras;
- Water Pump.
- Silicone tubing for the water pump.
- Moisture Sensor (adapted for use with the greenhouse kit).
- Crocodile clips.
- ZIP Stick.
- Solar Cell and Rechargeable Batteries.
- Servo.
- Adding a Solar Panel to the Environmental Control Board.
Resources
- Datasheet.
- Seven online MakeCode tutorials for the Kitronik Smart Greenhouse Kit;
- A - Visual Thermometer.
- B - ZIP LED hue.
- C - Auto-watering.
- D - Growlight.
- E - Timed watering.
- F - Water level sensing.
- G - Datalogging.
This LED produces light that is similar to that of a candle flame. This makes it ideal for mood lighting, toys or ornaments.
Features
- Produces light similar to a candle flame.
- Ideal for mood lighting.
- Does not require a current limit resistor.
Dimensions
- Length: 36mm.
- Height of LED: 9mm.
- Diameter: 6mm.
What's in the box?
1 x Yellow Candle 5mm Water Clear LED - 30deg - 5800mCd.
Take your first steps in Python and physical computing with the Kitronik Discovery Kit for Raspberry Pi Pico (Raspberry Pi Pico not included).
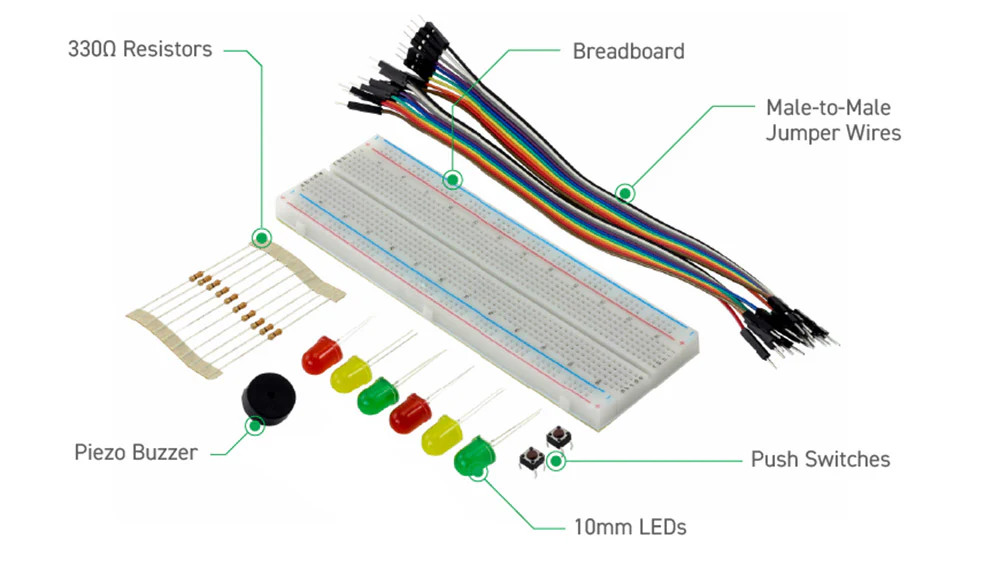
The Kitronik Discovery Kit for Raspberry Pi Pico (Pico not included) is a great way to learn about microcontrollers, Python coding, and physical computing. The kit is supplied with all of the components needed to complete the 7 included experiments, including a large-format breadboard. The kit is packaged in sturdy reusable packaging that can be used to store the kit. This version of the kit is NOT supplied with a Raspberry Pi Pico.
The seven experiments take you from the basics of using the board through to more advanced concepts and using external electronics. The experiments cover key concepts of microcontrollers, such as; basic setup, simple coding, Interrupts, Threads, Digital Inputs, and Analog and Digital Outputs.
The kit ships with a comprehensive guide booklet. The booklet covers the basic setup and then how to complete each of the 7 experiments. Each experiment is complete with detailed circuit diagrams, explanations, and a complete code run-through. This means that you can get started without having to understand too much Python.
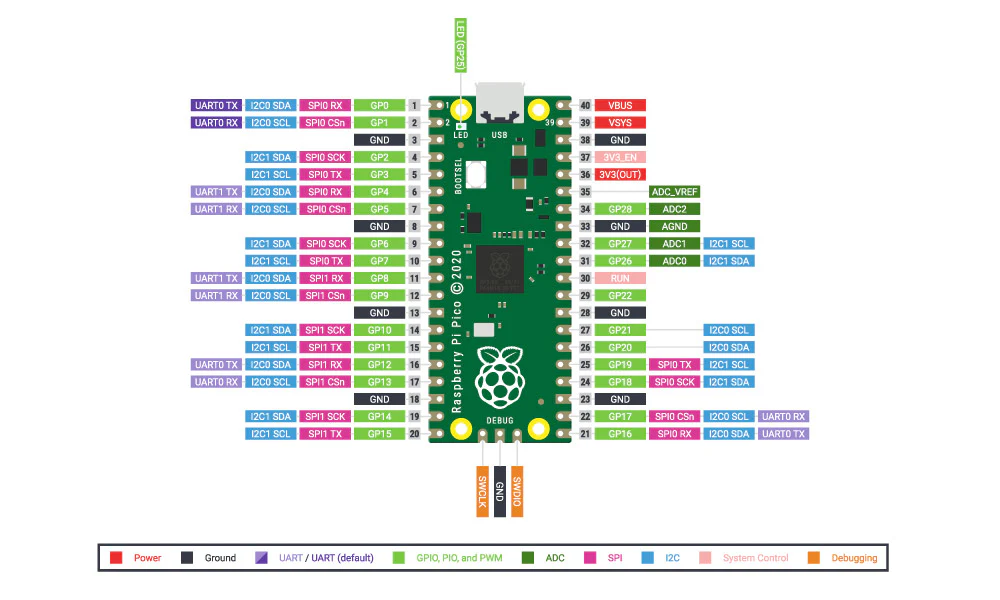
The Raspberry Pi Pico board, a new low cost, high-performance microcontroller. The board features a powerful new, Raspberry Pi designed ARM-based dual-core chip-- the RP2040. The pico also features 64KB of internal RAM and support for up to 16MB of off-chip Flash. A wide range of flexible I/O options includes I2C, SPI, and Programmable I/O (PIO). These support endless possible applications for this small and affordable board.
The kit is programmed using MicroPython. This is a full Python 3 implementation created specifically for small embedded microcontrollers, such as the Pico and the popular BBC micro:bit. You will use the Thonny editor to create your code, which can then be saved directly to the Pico from the editor via USB. Thonny is a Python Editor/IDE designed to allow beginners to get up and running with Python coding with as little fuss as possible.
A power pack is not required as power will be supplied via the USB connection to the computer that the Thonny editor is running on.
Note:
- A USB cable is NOT supplied. USB cables capable of data transfer and power are available separately here.
- The Raspberry Pi Pico is NOT supplied with this kit. The Pico boards are available here.
Features
- This kit offers a great introduction to microcontrollers, Python coding, and physical computing.
- Make the 7 experiments in the step-by-step tutorial book and learn as you go.
- All parts are included to conduct the 7 experiments.
- The kit is supplied with a detailed booklet that covers setup and then how to complete the 7 experiments.
- The experiments explore; simple coding, Interrupts, Threads, Digital Inputs, and Analog and Digital Outputs.
- Once you have completed all of the included experiments, you have the perfect prototyping system for further learning/prototyping with the Raspberry Pi Pico board.
- Included is a large format breadboard for ease of prototyping.
- The kit is supplied in re-usable packaging suitable for long term storage of the kit.
What's in the box?
1 x Large Prototype Breadboard.
2 x Red 5mm LED.
2 x Yellow 5mm LED.
2 x Green 5mm LED.
10 x 330Ω Resistor.
1 x Piezo Element Buzzer.
20 x Male to Male Jumper Wires.
2 x Push Switches.
A booklet guide containing basic setup information and the following 7 experiments;
- Exp. 1 - Show Me The Light.
- Exp. 2 - Control an Input.
- Exp. 3 - Interrupt Me.
- Exp. 4 - Making a Noise.
- Exp. 5 - So Many Interruptions.
- Exp. 6 - Rub Head and Pat Tummy - Threads.
- Exp. 7 - Building a System from the Blocks we have Learnt.
The kit is supplied in re-usable packaging suitable for long term storage of the kit.
You will also need...
Resources
Discovery Kit Extension Experiments: The table below contains links to extension experiments for the Pico Discovery Kit. They have been listed in the order that they should be completed, and they should only be tackled once you have completed the 7 experiments supplied with the kit. Each extension experiment is fully explained and code examples are provided.
| Exp No#. | Experiment Name/Link. |
|---|---|
| 1 | Pico Thermometer. |
| 2 | Storing Data on the Pico. |
| 3 | Live Data Logging on the Pico. |
- MicroPython Code for all 7 Discovery Kit Experiments.
- Get started with MicroPython on Raspberry Pi Pico.
- Tech Talks - live stream playback.
- Raspberry Pi Pico frequently asked questions.
- More information on the Pico.
- About MicroPython.
- About Python.
- The Thonny editor.
- Raspberry Pi pico Datasheet.
- RP2040 Datasheet.
Please note: micro:bit and USB cable are not included.
The Kitronik :VIEW Graphics128 OLED display gives the user the ability to add a monochrome 128x64 display to the BBC micro: bit. The onboard edge connector allows the micro:bit to slot into the board without any additional fixings. The board also features a micro:bit style I/O connector which means it can be slotted into any other micro:bit accessory that has a slot for inserting a micro:bit. All of the pins from the BBC micro:bit are tracked through to provide the edge pads with the full usage of the BBC micro:bit, with the addition of a display. As the micro:bit slots directly into the board, no tools, fixings, or soldering are required.
Kitronik has generated custom blocks and example code for MakeCode and MicroPython (see the datasheet for more details). The blocks can be added via the add Extensions function in the editor by searching “Kitronik”, or from: GitHub. More information about our custom Python functions can also be found at: GitHub.
Power to the board can be provided via the edge connector or from the micro:bit. The board requires a 3V supply and has no voltage protection on the board. The board features an LED to indicate when the board has power. With every display, pixel turned on the board has a maximum power draw of 40mA.
The 128x64 display uses the SSD1306 driver on an I2C interface. At the centre of the board are the breakout pads for the I2C lines, along with two ground pads and a 3V power pad. These pads are on a 2.54mm pitch, which means they will fit either wire or a pin header for jumper cables (not provided). This can be used by those who wish to add more I2C devices and functionality. It is possible to change the default I2C address of the board (see the Selecting Display section of this Datasheet for more details).
Features
- Add a monochrome 128x64 OLED display to the micro:bit.
- The micro:bit slots into the onboard edge connector.
- The board features a micro:bit style I/O connector allowing it to be slotted into other micro:bit accessories.
- It can be coded with MakeCode blocks and with Python.
- Kitronik has created custom MakeCode blocks..
- Kitronik has created a GitHub repo for custom Python functions.
- It can be powered via the edge connector or by the micro:bit.
- Requires a 3V supply.
- The board features a power indicator LED.
- It is possible to change the default I2C address of the board.
- No tools, fixings, or soldering are required.
Dimensions
- Length: 58mm.
- Width: 52mm.
- Height: 11.8mm.
- PCB Thickness: 1.6mm.
What's in the box?
1 x Kitronik :VIEW Graphics128 OLED display 128x64 for BBC micro:bit
You will need a BBC micro: bit
Resources
- 128x64 Display - Text and Line Drawing Tutorial.
- 128x64 Display - Plotting Graphs Tutorial
- Plotting Graphs Code.
- Datasheet.
- GitHub page for custom MakeCode blocks.
- GitHub page for custom Python functions.
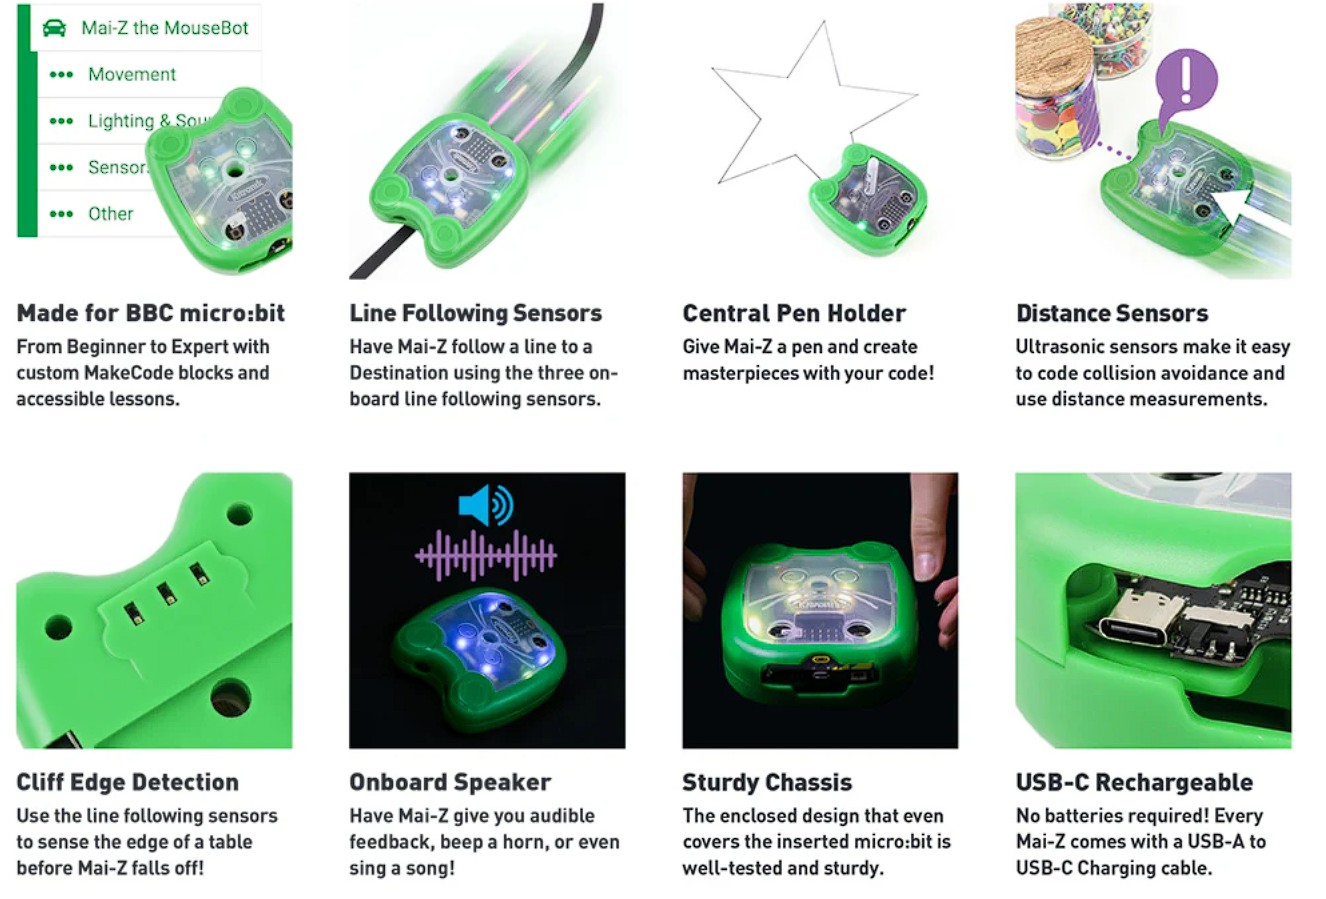
Designed for hands-on learning, the Kitronik Mai-Z is a versatile educational robot built for the BBC micro:bit. Whether you're diving into coding with MakeCode’s block-based editor or exploring a world beyond monitor screens with our exclusive Screen-Free Programming add-on pack, Mai-Z makes STEM learning intuitive and fun. It’s even fully compatible with MakeCode CreateAI, allowing for gesture-based control and AI-powered coding right out of the box. Aligned with UK and US curricula, Mai-Z empowers both learners and teachers to master core computing concepts through interactive, project-based activities.
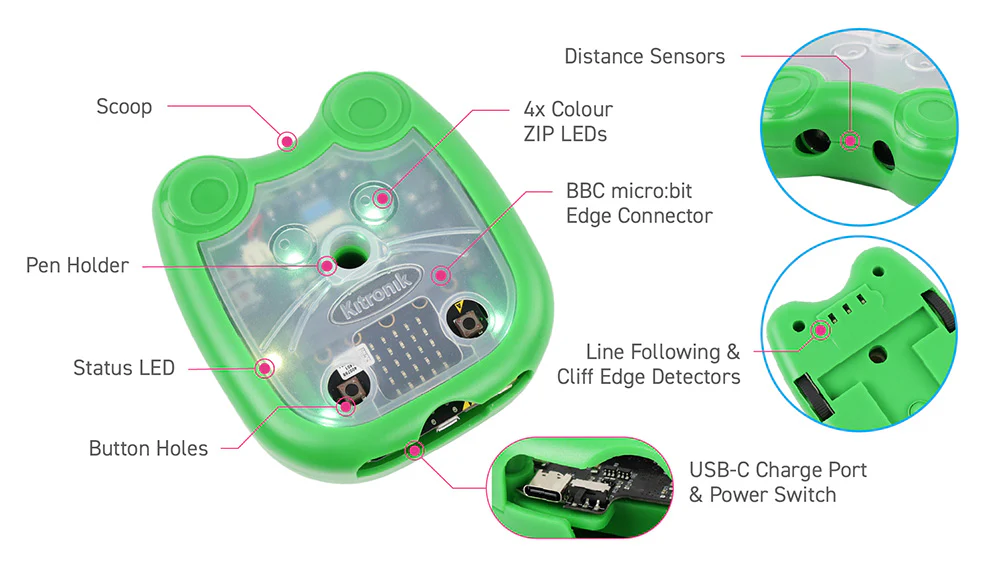
Mai-Z has an impressive array of features, and each feature provides a new and exciting learning opportunity. Features include: Line following sensors, distance sensors, edge detecting sensors, 4 x programmable ZIP LEDs, a pen holder, scoop, button holes for micro:bit A/B button access, BBC micro:bit edge connector, rechargeable LiPo battery, speaker, USB-C charging port, on/off switch, and status LED.
Make full use of your micro:bit’s built-in tech. From accelerometer-based steering to compass-guided driving, Mai-Z makes robotics interactive and exciting. You can even control the Mousebot with gestures via MakeCode CreateAI. The motors driving Mai-Z's wheels are specifically designed for steady straight-line driving, which makes things such as line following and obstacle avoidance a smooth experience.
Mai-Z is a feature-rich, robot Mouse buggy designed to make coding and robotics accessible, hands-on, and engaging for students aged 8–14. Developed for use with the BBC micro:bit, Mai-Z supports both MakeCode block-based programming and screen-free coding via our innovative Screen-Free Programming Pack, perfect for flexible learning environments. Whether you’re teaching in a classroom, running a STEM club, or looking for inclusive, progressive tech tools, Mai-Z offers a low-barrier of entry into computing and robotics, with room to grow into more complex challenges, including AI integration via MakeCode CreateAI.
Mai-Z has been engineered to drive straight, turn precise angles and travel specific controlled distances (unlike many other programmable buggies). We have done this by continuously monitoring motor encoder data, enabling Mai-Z to automatically adjust for any deviations in position or turning speed, ensuring precise and consistent movement. The result? Exceptionally smooth, precise movement that feels effortless and refined.
Power: Mai-Z features a Standard USB-C Charging Port. Mai-Z will charge regardless of the status of the power switch, and can be safely used whilst it is being charged. The charger must be capable of providing 5V, at least 1A over a USB-C Connection.
Features
- Mai-Z, the ultimate programmable robot buggy for young coders aged 8–14!
- Code Mai-Z with MakeCode drag-and-drop block-based coding.
- Code Mai Z with Screen-Free Coding add-on pack: No screens? No problem. Use the code blocks and recorder board for hands-on, unplugged programming, perfect for younger learners.
- Line-following, edge-detecting & distance sensors.
- 4 x programmable ZIP LEDs.
- Onboard speaker + USB-C rechargeable LiPo battery.
- Pen holder & ball scoop for creative and competitive tasks.
- Edge connector for attaching the BBC micro:bit to Mai-z.
- Easy access to micro:bit A/B buttons.
- Status LED, on/off switch & smooth.
- Smooth and accurate motor control.
- Teaching resources are aligned for both US & UK teaching.
- Great for coding clubs, STEM lessons, and home learning.
- Make full use of your micro:bit’s built-in tech. From accelerometer-based steering to compass-guided driving, Mai-Z makes robotics interactive and exciting.
Dimensions
- Length: 117mm.
- Width: 105mm.
- Height: 45mm.
What's in the box?
1 x Kitronik Mai-Z the MouseBot for BBC micro:bit.
1 x 20cm USB A to USB C charging cable.
1 x A6 2-sided fold-out sheet.
- Side 1: Full set of Instructions.
- Side 2: Line following track.
Requires
- 1 x BBC micro:bit
- 1 x 5V Charger and 1 x USB-C cable.
- you might also be interested in the Screen-Free Programming Pack for Mai-Z
Resources
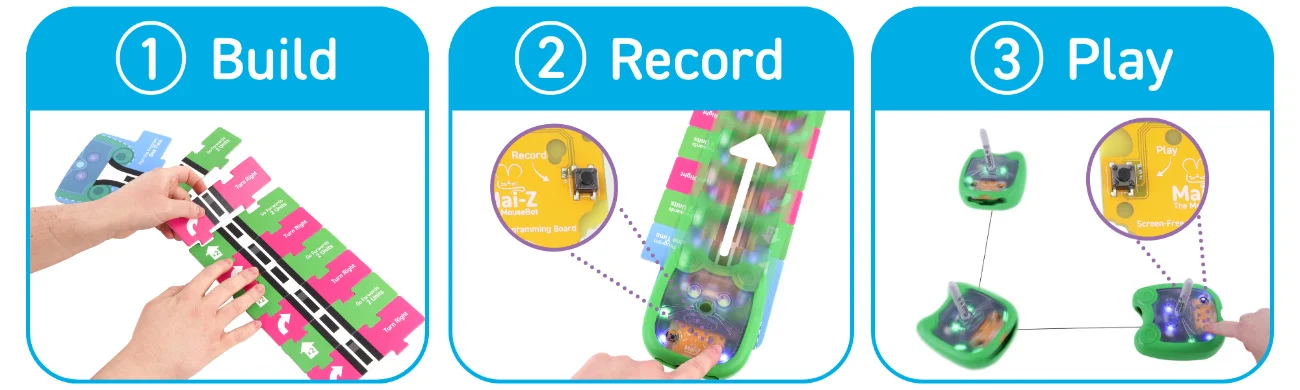
The Kitronik Screen-Free Programming Pack for Mai-Z The MouseBot is an easy and engaging way for children to explore coding without ever touching a screen. Using the colourful instruction blocks, they build a sequence of movements, teach Mai-Z to read them, and then watch their robot bring the program to life. It’s simple, tactile, and instantly rewarding.
Inside the pack you’ll find 53 programming blocks, a double-sided townscape poster for imaginative routes and challenges, a screen-free board that plugs straight into Mai-Z, and a 16-page booklet packed with beginner-friendly lessons and activities. The downloadable datasheet includes everything you need to get started.
The blocks follow the same colour-coding used in Microsoft MakeCode for micro:bit, helping children build transferable coding skills. Blue blocks are start commands, Teal blocks handle obstacle detection, Green blocks control forward movement, Pink blocks turn Mai-Z left or right, Purple blocks set precise angles, and Orange blocks activate indicators and the horn.
Features
- Fully screen-free coding, ideal for reducing screen time while still building real programming skills
- Hands-on, tactile learning that teaches sequencing, logic, and problem-solving
- 53 colour-coded instruction blocks designed to mirror MakeCode concepts
- Simple “Record and Play” system — children build a program, Mai-Z reads it, and the robot performs it
- Double-sided townscape poster for creative routes, challenges, and storytelling play
- Supports drawing and shape-making activities using Mai-Z’s pen holder
- Introduces loops, conditionals, angles, and movement in a child-friendly way
- Encourages independent exploration and open-ended play
- Perfect for home learning, STEM/STEAM enrichment, and early coding confidence
- Includes a 16-page booklet with step-by-step lessons, challenges, and example programs
- No computer, tablet, or app required — everything needed for screen-free coding is in the box
- Quick to set up and easy for children to use on their own
What's in the box?
1 x Set of 53 Instruction Blocks
1 x Double Sided Townscape Poster
1 x Screen-Free PCB
1 x 16 Page Instruction Booklet, containing sample lessons.
You will also need...
- Mai-Z The MouseBot with a micro:bit
- A Sharpie
Resources

This pack is a great way to get started with E-Textiles.
We have selected a number of products from our Electro-Fashion range, including three of our ultra-slim LEDs and two seperate power boards. There are enough components for you get started immediately to create some eye catching E-Textiles projects, the only limit is your imagination.
Features:
- Everything you need to complete two projects.
- Enough Electro-Fashion components to get started immediately with E-Textiles.
- Full instructions for assembly.
- Great project ideas and tutorials.
Contents:
- 2 x Coin Cell Holder.
- 3 x Sewable LEDs White.
- 3 x Flashing LEDs White.
- 1 x Slide Switch.
- 1 x Push Switch.
- 2 x CR2032 Coin Cell Batteries.
- 1 x 6m Conductive Thread.
Dimensions:
- Sewable Coin Cell Holder Length: 34mm.
- Sewable Coin Cell Holder Width: 20mm.
- Sewable Coin Cell Holder Height: 4.5mm.
- Ultra Slim Sewable LED Length: 15mm.
- Ultra Slim Sewable LED Width: 6.5mm.
- Ultra Slim Sewable LED Height: 2.7mm.
- Slide Switch Length: 18mm.
- Slide Switch Width: 8.5mm.
- Slide Button Switch Height: 4mm.
- Push Button Switch Length: 18mm.
- Push Button Switch Width: 8.5mm.
- Push Button Switch Height: 3mm.
- CR2032 Battery Height: 3.2mm.
- CR2032 Battery Diameter: 20mm.
Requires:
- Scissors.
- Needles.
Resources:
Caution:
- The coin cell holders in this pack contain Nickel and should not be used in designs where it will be in prolonged contact with the skin.
The :MOVE Motor Klaw provides a fun and easy to install addition to the Kitronik :MOVE Motor buggy for microbit. It has been carefully designed to have the ability to fit both vertically and horizontally with one bolt. Included are two types of Klaw attachments for each of these builds.
It is controlled by a low voltage servo which is included, this servo is used to open and close the Klaw. The voltage supply and control signal are all from the :MOVE Motor via the pin headers, simply connect the servo lead onto the pin headers.
The :MOVE Motor Klaw can be coded with MakeCode or with MicroPython and we have produced online guides to walk you through both. These guides can be found in the list of resources below along with the build instructions.
Features
- Easily add a gripping Klaw to :MOVE Motor.
- Servo powered opening and closing with the servo included as a part of the kit.
- Fit to :MOVE motor either horizontally or vertically.
- Easy to assemble.
- Code it with MakeCode or with MicroPython.
What's in the box?
1 x Mini 180 Degree Servo with accessories.|
2 x M3 x 16mm Screws.
1 x M3 Steel Washer.
2 x M2 x 12mm Screws.
1 x M4 x 25mm Screw.
6 x Laser Cut Perspex Parts.
Printed assembly instructions.
Resources
Get creative with the Pen Lifter add-on for the :MOVE Motor for BBC micro:bit. This add-on allows you to take full advantage of the pen hole in the Kitronik :MOVE Motor.
Once fitted, the add-on allows you to control when the pen is in use with code. The assembly holds the pen firmly in place and the supplied servo can be used to raise and lower the pen. This will allow the user to create complex patterns without any unsightly travel marks.
The kit comprises a set of 3 laser-cut parts, a single 180-degree servo, a rubber band, and the fixings required to put it together. The kit requires no soldering but there is some simple mechanical assembly. The kit is supplied with a booklet that walks the user through every aspect of the assembly.
We have also created an online MakeCode tutorial, to help you get up and running straight away. Work through the guide, one step at a time, building your code in the editor as you go.
Note:
- This kit is NOT supplied with a pen.
- No soldering is required but there is some simple mechanical assembly.
- This kit is intended for use with the :MOVE Motor for BBC micro:bit.
Features
- Add a pen to the :MOVE Motor for BBC micro:bit, which can be raised or lowered with code.
- Draw complex shapes without unsightly 'travel' lines.
- This add-on is supplied with full assembly instructions.
What's in the box?
1 x 180-degree servo.
1 x M4 x 12mm Pan Head screw.
1 x M3 x 12mm Countersunk screw.
1 x M3 x Hex Steel Nut.
2 x M3 x 10mm Pan Head screw.
1 x Set of laser-cut parts (3 pieces).
1 x Rubber band.
You will also need....
- 1 x :MOVE Motor for BBC micro:bit.
- 1 x BBC micro:bit.
- 1 x Small cross-head screwdriver.
- A Pen.
Resources
Other resources for the Kitronik :MOVE Motor;