
Learn how to pixel paint mini works of art on your Unicorn HAT using your Pi and a web browser
Beginner / Unicorn HAT
Pimoroni


Absolutely no soldering required! All that's needed is a few gentle taps with a hammer and bazinga! Your header is securely attached to your Pi Zero or pHAT.

Take control of and monitor your world with our ultimate jack-of-all-trades Raspberry Pi HAT!

Explorer pHAT is the perfect prototyping side-kick for your Raspberry Pi!

Bring an old radio or set of speakers into the 21st century with Pirate Audio 3W Stereo Amp for Raspberry Pi!

Monitor air pollution cheaply and accurately with this matchbox-sized particulate matter (PM) sensor from Plantower! It senses particulates of various sizes (PM1, PM2.5, PM10) from sources like smoke, dust, pollen, metal and organic particles, and more.
GPIO Hammer Header Jig Kit(Solderless) (hammer header jig kit)
Raspberry Pi Zero not included!
Absolutely no soldering required! All that's needed is a few gentle taps with a hammer and bazinga! Your header is securely attached to your Pi Zero or pHAT.
If your soldering isn't quite up to scratch, or you just don't own a soldering iron yet, then these nifty hammer headers might be just the job. They come in male and female flavours, and use crafty little retaining nubbins to grip tightly into the holes on the PCB.
The installation jig kit contains two acrylic base pieces, onto which your Pi Zero or pHAT sits, two nylon bolts, an acrylic top piece onto which you hammer, and both a male and female header. Make sure you carefully read our guide for fitting hammer headers.
What's in the box?
2 x Nylon nuts and bolts
1 x Installation Jig
1 x Male header
1 x Female header
Resources
We strongly recommend using our installation jig! If you want to try without it then godspeed to you but it is a delicate and tricky process! The female headers are simpler to insert than the male headers as you can hammer straight onto the plastic of the header, but the male ones are particularly tricky without the jig.
Please note: we can't be held responsible for any damage that you may cause to your Pi Zero, pHAT, fingers, or headers while fitting them. If you follow our guide carefully then you should be fine. If this worries you, then get yourself a soldering iron instead!
Loose Male hammer headers are also available.
Tutorial on using the jig
Watch our demo of how to fit the hammer headers on Bilge Tank, below.
Absolutely no soldering required! All that's needed is a few gentle taps with a hammer and bazinga! Your header is securely attached to your Pi Zero or pHAT.
OnOff SHIM (On/Off Shim)
What's in the box?
1 x on/off shim
1 x header
Resources
Our SHIMs (Shove Hardware in the Middle) are a new range of boards designed to be small, affordable, and handy. They're just 1mm thick (the bare board, not including mounted components) and designed to be soldered straight onto the GPIO pins of your Pi, if you wish, so that you can use them with HATs and pHATs on top.
Usage
Just plug your micro-USB power supply into the micro-B connector on OnOff SHIM, and then press the button once to switch on power and boot up your Pi. After installing our software (details below), you can press the button again to initiate a clean shutdown and completely cut the power to your Pi.
Features
- super-small SHIM-format board
- 1mm thick PCB
- can be used with HATs and pHATs
- corner-mounted push button for on/off
- micro-B connector for power supply
- red status LED
- optional breakout pins to connect an external momentary button
- 2x6 female header included
- software daemon to shutdown cleanly
- requires soldering
What's in the box?
1 x on/off shim
1 x header
Resources
Software
We've put together a one-line-installer to install the clean shutdown daemon. It watches the state of BCM pin 17 and, when pulled low (pressed), it initiates a clean shutdown. Last thing, just before your Pi shuts down, BCM pin 4 is pulled low to completely cut power to your Pi.
To install the software, open a terminal and type curl https://get.pimoroni.com/onoffshim | bash to run the one-line-installer.
Add a tiny yet convenient power switch to your Pi with OnOff SHIM!

Unicorn HAT (Unicorn HAT)
Description:
Short video on the Unicorn HAT
What's going to protect your beloved Raspberry Pi from an onslaught of rainbow-coloured fusion? That's right, it's Unicorn HAT.
Sporting a matrix of 64 (8 x 8) RGB LEDs and powered directly from the Pi, this is the most compact pocket aurora available.
Unicorn HAT provides a wash of controllable colour that is ideal for mood-lighting, 8x8 pixel art, persistence of vision effects, status indications, or just blasting colour into your surroundings.
The MagPi said that Unicorn HAT was "one of the coolest HATs around"
Features
- 64 RGB LEDs (WS2812B)
- LED data driven via DMA over PWM
- Unicorn HAT pinout
- Compatible with Raspberry Pi 3, 2, B , A , Zero, and Zero W
- Python library
- Comes fully assembled
Software
We've put together a Unicorn HAT Python library to make it a breeze to use, including lots of beautiful examples of what it can do.
Notes
- Warning: WS2812 LEDs are bright enough to cause eye pain, do not look at them directly when brightly lit. We recommend the use of a diffuser.
- Photo-sensitivity warning: flashing, strobing, and patterns of lights may cause epileptic seizures. Always take care and immediately stop using if you feel unwell (dizziness, nausea, affected vision, eye twitching, disorientation).
- Power: Unicorn HAT requires a >2A microUSB power supply for your Pi. We recommend the official Raspberry Pi power supply.
- Compatibility (audio): as Unicorn HAT uses PWM and GPIO18, it will interfere with analogue audio playback (random colour patterns and flickering). HDMI should work just fine!
Short video on the Unicorn HAT
Tutorials & Projects
Getting Started with Unicorn Paint Make rainbows with Unicorn HAT Learn how to use Unicorn HAT and HSV colour to make awesome rainbows
Intermediate / Unicorn HATGetting Started with Unicorn HAT Learn how to use Unicorn HAT, the vibrant 8x8 pixel colour display for your Pi
Beginner / Unicorn HATUsing Unicorn HAT in IDLE Learn how to use Unicorn HAT in IDLE, the Python IDE
Beginner / Unicorn HAT

GPIO Hammer Header Male (Hammer Header Male only)
Please note: we can't be held responsible for any damage that you may cause to your Pi Zero, pHAT, fingers, or headers while fitting them. If you follow our guide carefully then you should be fine. If this worries you, then get yourself a soldering iron instead!
Absolutely no soldering required! All that's needed is a few gentle taps with a hammer and bazinga! your header is securely attached to your Pi Zero or pHAT.
If your soldering isn't quite up to scratch, or you just don't own a soldering iron yet, then these nifty hammer headers might be just the job. They come in male and female flavours, and use crafty little retaining nubbins to grip tightly into the holes on the PCB.
The installation jig kit contains two acrylic base pieces, onto which your Pi Zero or pHAT sits, two steel bolts, an acrylic top piece onto which you hammer, and both a male and female header. Make sure you carefully read our guide for fitting hammer headers.
We strongly recommend using our installation jig! If you want to try without it then godspeed to you but it is a delicate and tricky process! The female headers are simpler to insert than the male headers as you can hammer straight onto the plastic of the header, but the male ones are particularly tricky without the jig.
What's in the box?
1 x GPIO Hammer Header Male
Automation HAT (Automation HAT)
Description:
Take control of and monitor your world with our ultimate jack-of-all-trades Raspberry Pi HAT!
We've pulled together a great set of features into this home monitoring and automation controller. With relays, analog channels, powered outputs, and buffered inputs (all 24V tolerant) you can now hook up a plethora of goodies to your Raspberry Pi all at once.
Better still each channel has an indicator LEDs which means at a glance you can see what's happening with your setup. Even the analog channels have dimming LEDs that allow you to see the value they are currently sensing - swish!
Ideal for smart home and automation projects, giving your greenhouse intelligent sprinklers, or scheduling your fish feeding!
Features
- 3 x 24V @ 2A relays (NC and NO terminals)
- 3 x 12-bit ADC @ 0-24V
- 3 x 24V tolerant buffered inputs
- 3 x 24V tolerant sinking outputs
- 15 x channel indicator LEDs
- 1 x 12-bit ADC @ 0-3.3V
- 3.5mm screw terminals
- Power, Comms, and Warn! LED indicators
- SPI, TX (#14), RX (#15), #25 pins broken out
- Compatible with all 40-pin header Raspberry Pi models
- Python library
- Comes fully assembled (broken out pins require soldering)
Software
As ever, we've made a super-simple to use Python library to take advantage of Automation HAT's multitudinous functions, with examples to get you started.
Our input, output and relay examples show you how to read the analog and digital inputs, switch the outputs on and off, and control the relays.
Notes
- We recommend you use a set of brass M2.5 standoffs with Automation HAT to avoid pins contacting the HDMI port if the HAT is pushed down
- Loads for the buffered outputs should be switched on the ground side, i.e. 12/24V (from supply) -> load -> output terminal -> ground (from supply)
- The relays can tolerate up to 2A each and should be switched on the high side
Take control of and monitor your world with our ultimate jack-of-all-trades Raspberry Pi HAT!

Picade Console DIY kit (Picade console)
Power-up your TV with Picade Console! It's a compact, Raspberry Pi-powered retro games machine with authentic arcade controls that plugs right into your TV, monitor, or other HDMI display.
Picade Console is fight stick-style arcade console that riffs off our new Picade with the same retro feel, same joystick and buttons, dedicated power button, and driven by the same powerful combo of the Raspberry Pi and Picade X HAT. It's beautifully packaged, comes with stickers and a neon-infused A3 Picade Console poster, and full assembly instructions.
It comes in kit form and takes an hour or two to build. The enclosure is made from powder-coated MDF and acrylic, giving it an authentic arcade look and feel. All you'll need to add is a Raspberry Pi, power supply, HDMI cable, and micro-SD card.
*TV not included! Using a CRT TV requires additional adaptors.
Features
- Black, powder-coated panels
- Acrylic console with retro artwork
- Push-fit arcade buttons
- Joystick with black ball top
- Speaker (3W, 4Ω, 2.5" driver)
- Easy access with removable back panel
- Dedicated illuminated power button
- Grippy rubber feet
- Dimensions (assembled): 245x120x140mm
Picade X HAT features
- Easy DuPont connectors for buttons and joystick
- Push-fit speaker terminals
- I2S audio DAC with 3W amplifier (mono)
- Power management, power switch pins, and power button
- 4-way joystick inputs
- 6 player buttons
- 4 utility buttons
- Metal standoffs to hold your Picade X HAT securely
Extras
- Picade Console poster / assembly instructions
- Picade stickers
What's new?
Picade Console is more compact and easier to build, but has a bunch of new features liked a dedicated power button, better cable routing out the back of the console with a panel-mount micro-USB connector for power, and slick new artwork.
The new buttons in Picade are lower profile, and the new joystick has a single connector rather than the eight spade connectors on our previous Picade joystick.
Picade X HAT is all-new and packed full of useful features. We've moved from more fiddly screw terminals to simple DuPont connectors that just push in, and the speaker terminals are the same easy push-fit connectors that we use on pHAT BEAT.
There's dedicated power management on-board Picade X HAT; just plug your micro-USB power supply into the HAT and it'll power your Pi through its pins. The power button connected to the HAT means that once your Pi is safely shutdown, the power will be cut completely to the Pi. A simple press of the power button will boot your Picade Console up again.
Software setup
We recommend the RetroPie operating system for your Picade. You can download it from the RetroPie website and then burn it to a micro-SD card with Imager.
Connect a USB keyboard to your Pi, and connect to Wi-Fi in the RetroPie menu. Press F4 to exit to the terminal and then type curl https://get.pimoroni.com/picadehat | bash to run the Picade HAT installer.
Reboot your Pi, if it doesn't prompt you to. Press the "Alt" key on your keyboard and then select "Configure input" to configure your Picade Console's controls. You'll find that the sound and power button should both be working now too!
Where to find ROMs for RetroPie (free and legally) https://howchoo.com/g/otiwyjhlnzb/where-to-find-roms-for-retropie
and here http://cvaddict.com/article.php?articleid=15

Four Letter pHAT (four letter phat)
Description:
Use Four Letter pHAT to display... four letter words. Not that sort!
Pi ZERO and case not included!
Four Letter pHAT has four 14-segment displays that you can use to display text, numbers, and a host of other characters. Its LEDs are a beautiful retro green, just like you old digital alarm clock. They're driven by the HT16K33 chip over I2C.
It's perfect as a readout for your projects, displaying temperatures, times, etc. and becomes really useful when combined with some of our other boards like Enviro pHAT or Explorer pHAT to display their sensor values.
Features
- Four 14-segment displays with green LEDs
- HT16K33 driver chip
- Compatible with Raspberry Pi 3, 2, B , A , Zero, Zero W
- Python library
- Female header and display pins require soldering
Software
Our handy one-line installer will install the Four Letter pHAT Python library for you. We've included a bunch of examples too, to show off what you can do with Four Letter pHAT; things like a clock, a countdown timer, or CPU activity monitor.
Use Four Letter pHAT to display... four letter words. Not that sort!

automation:bit (automation:bit)
Control and monitor your world with automation:bit! It's tolerant of up to 24V, with analog and digital inputs, outputs, and a relay, so it's ideal for automating low-voltage systems in your home.
Just slot in your micro:bit, then code automation:bit with the block-based Microsoft MakeCode editor. Hook up buttons to the inputs, use the built-in buttons on micro:bit, or the light-sensing capability of the LED matrix to control devices connected to automation:bit. Or why not use a second micro:bit's radio function as a remote control?
WARNING! automation:bit should not be used with voltages greater than 24V and especially not with mains voltages!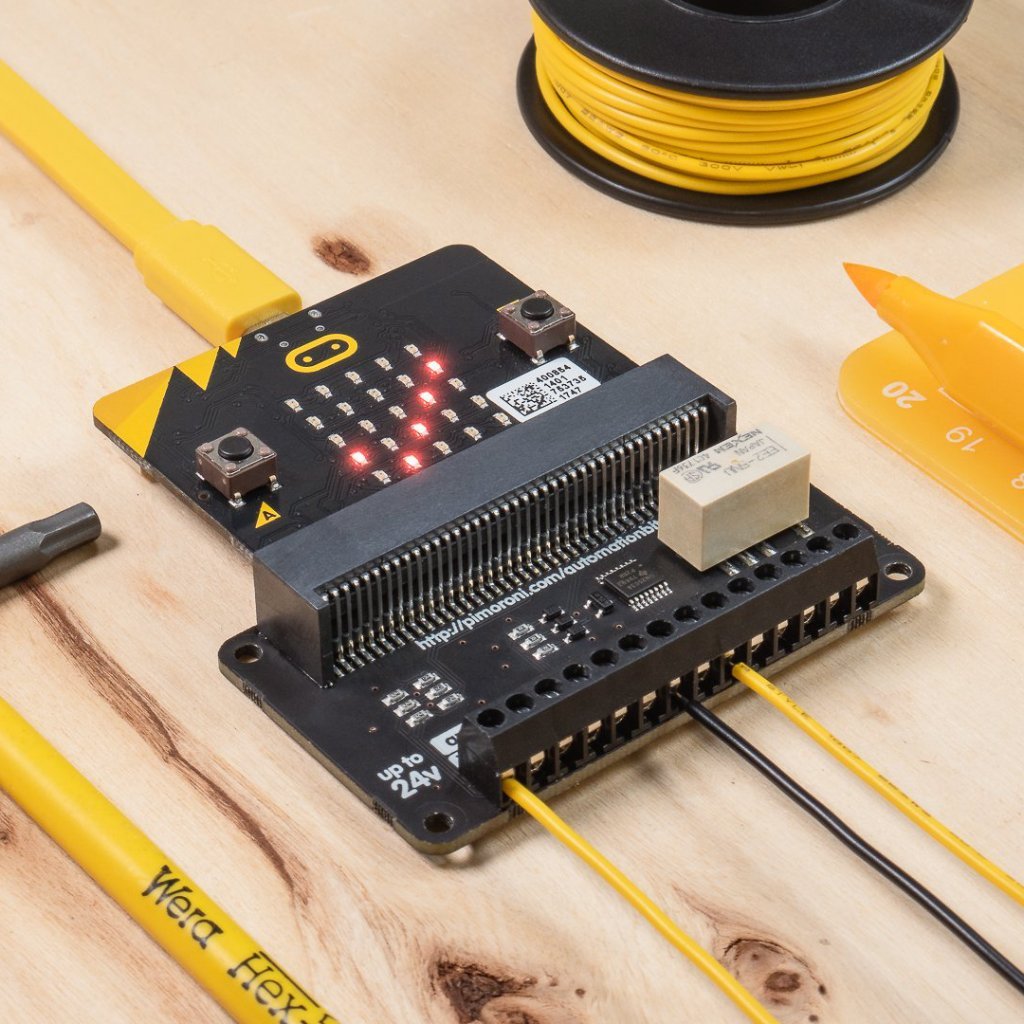
- Comes fully-assembled and ready to use
- 1 x 24V @ 2A relay (NC and NO terminals)
- 3 x ADC channels (0-24V range)
- 3 x 24V tolerant buffered inputs
- 3 x 24V tolerant sinking outputs
- 3.5mm screw terminals
- Compatible with micro:bit
- Microsoft MakeCode support
- No soldering required!
You can code automation:bit with the block-based Microsoft MakeCode editor, that'll get you started with using all of automation:bit's functionality.
To add the automation:bit library in MakeCode, click on the cog at the top right hand corner, then "Add Package", then enter the URL "https://github.com/pimoroni/pxt-automationbit". You can find full instructions at the GitHub repository for the library.
What's in the box?
1 x automation:bit
Explorer pHAT (explorer phat)
Descrption:
Explorer pHAT is the perfect prototyping side-kick for your Raspberry Pi!
A more diminutive version of our popular Explorer Hat Pro, it's cheaper and designed to fit perfectly on a Raspberry Pi Zero!
We've added a heap of useful input and output options that will take your projects to the next level. Great for driving motors, using analog sensors, and interfacing with 5V systems (like Arduino).
Perfect for building a tiny robot, or use it to prototype all sorts of circuits with its LEDs, analog dials, and temperature sensor.
Features
- Four buffered 5V tolerant inputs (perfect for Arduino compatibility)
- Four powered 5V outputs (up to 500mA total across all four channels)
- Four analog inputs
- Two H-bridge motor drivers (up to 200mA per channel; soft PWM control)
- Compatible with Raspberry Pi 3, 2, B , A , and Zero
- Python library
- Female headers require soldering
Software
Explorer pHAT uses the same easy-to-use Python library as Explorer HAT Pro, that includes a bunch of examples to demonstrate Explorer pHAT's functions.
Notes
The inputs use a 5-channel buffer that will accept anything from 2V-5V as logic high.
Tutorials & Projects
Build a firefly light Use a Pi Zero, Explorer pHAT and Zero LiPo to build a pretty firefly light
Explorer pHAT is the perfect prototyping side-kick for your Raspberry Pi!
Fan SHIM for Raspberry Pi (Fan Shim)
Description:
Make your Raspberry Pi seriously cool with Fan SHIM! This 30mm no-solder, controllable CPU fan with RGB LED and tactile switch will give your Raspberry Pi significantly better thermal performance.
Fan SHIM uses a friction-fit header, so it just slips onto your Pi's pins and it's ready to go, no soldering required! Note that, due to the height of the fan, if you want to use HATs or pHATs with Fan SHIM, then you'll need to use a booster header.
The fan can be controlled in software, so you can do crafty things like toggle it on when the CPU reaches a certain temperature. Use the LED as a handy visual indicator to show fan status, CPU load/temperature, whatever! The tactile switch can also be programmed, so you can use it to toggle the fan on or off, or to switch between temperature-triggered or manual mode.
Oh, and it's compatible with our new Pibow Coupé 4 case for Raspberry Pi 4!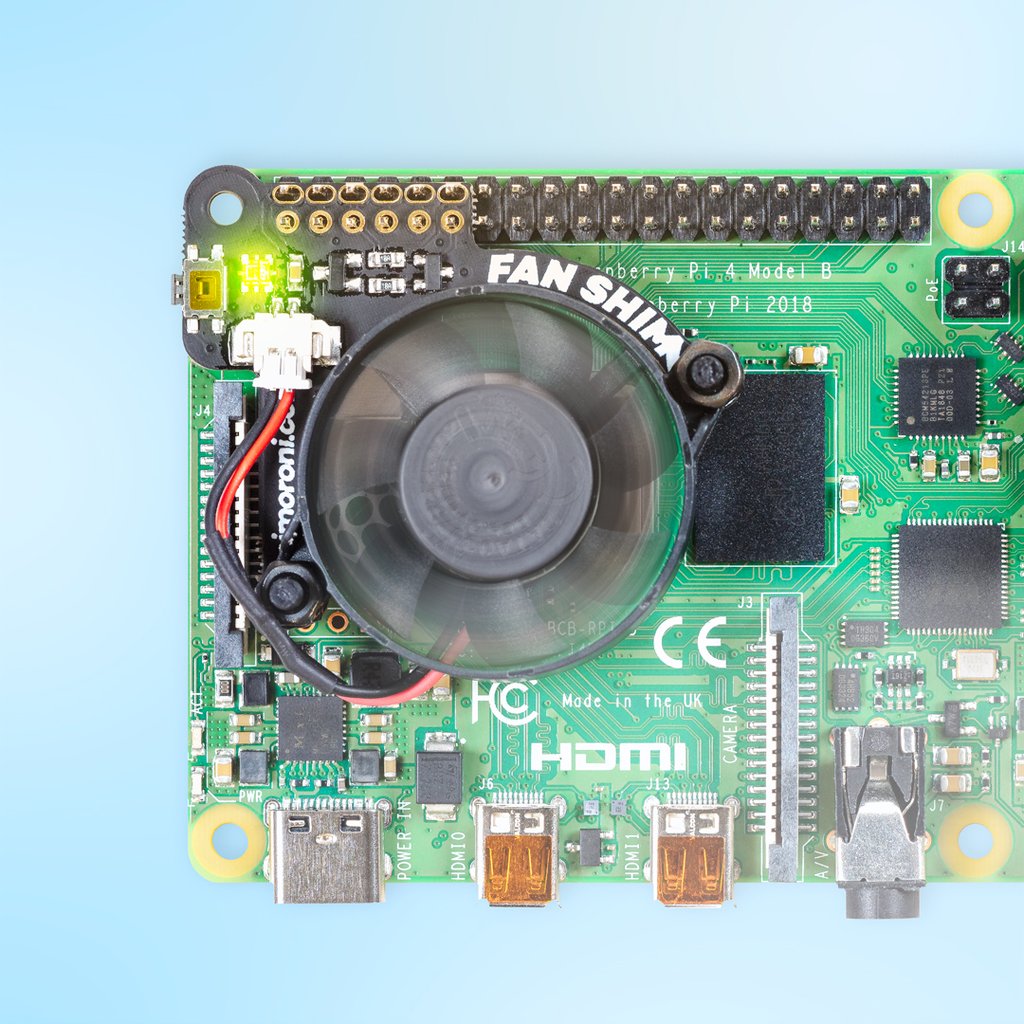
Features
- 30mm 5V DC fan
- 4,200 RPM
- 0.05 m3/min air flow
- 18.6 dB acoustic noise
- Friction-fit header
- No soldering required
- RGB LED (APA102)
- Tactile switch
- Basic assembly required
- Compatible with Raspberry Pi 4 (and 3 B , 3 A )
- Python library and daemon
Kit contains
- Fan SHIM PCB
- 30mm 5V DC fan with JST connector
- M2.5 nuts and bolts
Assembly
Assembly is really easy, and will take less than two minutes.
- With the component side of the PCB facing upwards, push the two M2.5 bolts through the holes from below, then screw on the first pair of nuts to secure them and act as spacers.
- Push the fan's mounting holes down onto the bolts, with the cable side of the fan downwards (as pictured) and the text on the fan upwards. Attach with another two nuts.
- Push the fan's JST connector into the socket on Fan SHIM.
Software
Our Python library lets you control the fan (on/off), RGB LED, and switch. There's a handful of examples to show you how to use each feature, and a script to install a daemon (a service that runs in the background) that runs the fan in automatic mode, triggering it on or off when the CPU reaches a threshold temperature, with a manual override via the tactile switch.
Notes
- When mounting or detaching the fan, or assembled Fan SHIM, do not push on the fan itself, as it is liable to break.
- Not heatsink-compatible!
- Dimensions: 45x39x11mm

Enviro for Raspberry Pi - Enviro board only (enviro board only)
Monitor your world with Enviro for Raspberry Pi! There's a whole bunch of fancy environmental sensors on this board, and a gorgeous little full-colour LCD to display your data. It's the perfect way to get started with citizen science!
Designed for environmental monitoring, Enviro lets you measure air quality (pollutant gases and particulates*), temperature, pressure, humidity, light, and noise level. When combined with a particulate matter sensor*, it's great for monitoring air quality just outside your house (more information below), or without the particulate sensor you can use it to monitor indoor conditions.
Enviro is an affordable alternative to environmental monitoring stations that can cost tens of thousands of pounds and, best of all, it's small and hackable and lets you contribute your data to citizen science efforts to monitor air quality via projects like Luftdaten.
Features
- BME280 temperature, pressure, humidity sensor (datasheet)
- LTR-559 light and proximity sensor (datasheet)
- MICS6814 analog gas sensor (datasheet)
- ADS1015 analog to digital converter (ADC) (datasheet)
- MEMS microphone (datasheet)
- 0.96" colour LCD (160x80)
- Connector only for particulate matter (PM) sensor*(sensor is not included)
- pHAT-format board
- Fully-assembled
- Compatible with all 40-pin header Raspberry Pi models
- Pinout
- Python library
- Dimensions: 65x30x8.5mm
A couple of nice little extras... there's a spare ADC channel broken out on a header if you want to connect another analog sensor, along with I2C pins in the right configuration for plugging one of our Pimoroni I2C breakouts onto!
Citizen science air quality monitoring
We've developed this board in collaboration with the University of Sheffield, with the aim of letting you contribute real-time air quality data from your local area to open data projects like Luftdaten.
The alarming drop in our air quality is something that's really important to understand. Devices like Enviro allow fine-grained, detailed datasets that let us see shifts in air quality through time and across different areas of cities. The more devices that contribute data, the better quality the dataset becomes.
Particulate matter (PM) is made up of tiny particles that are a mix of sizes and types, like dust, pollen, mould spores, smoke particles, organic particles and metal ions, and more. Particulates are much of what we think of as air pollution. They can be measured, in size and quantity, by particulate matter sensors like the PMS5003 that you can connect to Enviro .
The analog gas sensor can be used to make qualitative measurements of changes in gas concentrations, so you can tell broadly if the three groups of gases are increasing or decreasing in abundance. Without laboratory conditions or calibration, you won't be able to say "the concentration of carbon monoxide is n parts per million", for example.
Temperature, air pressure and humidity can all affect particulate levels (and the gas sensor readings) too, so the BME280 sensor on Enviro is really important to understanding the other data that Enviro outputs.
We've got a tutorial (coming soon) that shows you how to use Enviro and a few easily-available bits to build the board into a weather-proof housing that you can mount outside your house to monitor local air quality.
Indoor monitoring
As well as outdoor air quality monitoring, Enviro is really good for indoor monitoring too. The temperature, humidity, light, and noise readings can be used to keep track of conditions in your home and, combined with the LCD to display the data and the proximity sensor for interaction, it makes an ideal headless monitoring device.
Why not combine it with some IoT smarts like an Alexa skill so that you can ask what the temperature or humidity is? Or you could set up a trigger action with IFTTT that turns your Philips Hue lights on when the light level drops below a certain level. There's loads of possibilities!
What's in the box?
1 x Enviro board only
Resources
We've put together a Python library to control all the parts of your Enviro . There's a bunch of examples for each of the individual parts, an all-in-one example that shows you the data from Enviro 's sensors in a visual way. There's also an example that shows you how to contribute data to Luftdaten (requires particulate matter sensor).
Getting Started
Have a read through our (exhaustive!) Getting Started with Enviro tutorial that walks you through how to install the software, how to run the code examples, and how to use the Enviro Python library.

Picade X HAT USB-C (Picade X HAT)
Turn your Raspberry Pi into a retro games console! Picade X HAT includes joystick and button inputs, a 3W I2S DAC/amplifier, and soft power switch. Nice!
Picade X HAT is now Raspberry Pi 4 compatible, with USB-C power!
This HAT has all the same great features as the original Picade HAT but now has no-fuss female Dupont connectors to hook up your joystick and buttons.
Simply pop Picade X HAT onto your Pi, plug a USB-C power supply into the connector on the HAT (it back-powers your Pi through the GPIO, so no need for a separate power supply), wire up your controls, and install our driver! It's ideal for your own DIY arcade cabinet builds, or for interfaces that need big, colourful buttons and sound.
Features
- I2S audio DAC with 3W amplifier (mono) and push-fit terminals
- Safe power on/off system with tactile power button and LED
- USB-C connector for power (back-powers your Pi)
- 4-way digital joystick inputs
- 6x player button inputs
- 4x utility button inputs
- 1x soft power switch input
- 1x power LED output
- Plasma button connector
- Breakout pins for power, I2C, and 2 additional buttons
- Picade X HAT pinout
- Compatible with all 40-pin Raspberry Pi models
The I2S DAC blends both channels of digital audio from the Raspberry Pi into a single mono output. This is then passed through a 3W amplifier to power a connected speaker.
The board also features a soft power switch that allows you turn your Pi on and off safely without risk of SD card corruption. Tap the connected button to start up, and press and hold it for 3 seconds to fully shutdown and disconnect power.
What's in the box?
1 x Picade X HAT
Resources
Software
We've put together a simple one-line installer that'll get everything set up on your Picade X HAT, the controls, safe shutdown, and audio. Open a terminal and type curl https://get.pimoroni.com/picadehat | bash to run the installer. You'll need to reboot once the installation is complete, if it doesn't prompt you to do so.
Our software does not support Raspbian Wheezy
Notes
With USB-C power connected through Picade X HAT you'll need either to tap the connected power button or the button marked "switch" on the HAT to power on your Pi.

Pirate Audio: Line-out for Raspberry Pi (Pirate Audio: Line-out)
Description:
Plug Pirate Audio Line-out for Raspberry Pi into your hi-fi amp or powered speakers, then sit back, relax, and soak in the rich, digital audio. It has a high-quality I2S DAC, high-res colour display, and playback control buttons.
This board is perfect for upgrading an existing hi-fi amp and speakers, or a set of powered monitors, with digital audio from local audio files (MP3, FLAC, etc.) or from streaming services like Spotify. The DAC on Pirate Audio Line-out gives you crisp 24-bit / 192KHz digital audio through its 3.5mm stereo jack.
Pirate Audio is a range of all-in-one audio boards for Raspberry Pi, with high-quality digital audio, beautifully-crisp IPS displays for album art, tactile buttons for playback control, and our custom Pirate Audio software and installer to make setting it all up a breeze.
Features- Line-level digital audio (24-bit / 192KHz) over I2S
- PCM5100A DAC chip (datasheet)
- 3.5mm stereo jack
- 1.3" IPS colour LCD (240x240px) (ST7789 driver)
- Four tactile buttons
- Mini HAT-format board
- Fully-assembled
- Compatible with all 40-pin header Raspberry Pi models
- Pirate Audio software
- Dimensions: 65x30.5x9.5mm
Our Pirate Audio software and installer installs the Python library for the LCD, configures the I2S audio and SPI, and then installs Mopidy and our custom Pirate Audio plugins to display album art and track info, and to use the buttons for playback control.
Here's how to get started:
- Set an SD card up with the latest version of Raspbian.
- Connect to Wi-Fi or a wired network.
- Open a terminal and type the following:
git clone https://github.com/pimoroni/pirate-audio
cd pirate-audio/mopidy
sudo ./install.sh - Reboot your Pi
You can find more detailed instructions here: https://github.com/pimoroni/pirate-audio/tree/master/mopidy
NotesNote that our installer, linked above, does all of the below for you, but if you're an intrepid hacker then you might need to know this stuff!
- The DAC can be configured by adding
dtoverlay=hifiberry-dacto the/boot/config.txtfile. - There is a DAC enable pin—BCM 25— that must be driven high to enable the DAC. You can do this by adding
gpio=25=op,dhto the/boot/config.txtfile. - The buttons are active low, and connected to pins BCM 5, 6, 16, and 20
- The display uses SPI, and you'll need to enable SPI through the Raspberry Pi configuration menu.
- If you want to use these boards with a Pibow Coupé case (either for the Zero / Zero W or Pi 4), then you'll need to use a booster header to raise it up a little.

Pirate Audio: Headphone Amp for Raspberry Pi (Pirate Audio: Headphone)
Description:
The ultimate hackable headphone amp for your desk! Pirate Audio Headphone Amp for Raspberry Pi has an I2S DAC, headphone amplifier, high-res display, and playback control buttons.
Build your own home-brew iPod Nano with Pirate Audio Headphone Amp! It's an all-in-one solution, with gorgeous album art display, track info, and playback controls, for playing your local audio files (MP3, FLAC, etc) or streaming music from Spotify. The DAC and headphone amp give you crisp digital amplified audio through your wired headphones.
Pirate Audio is a range of all-in-one audio boards for Raspberry Pi, with high-quality digital audio, beautifully-crisp IPS displays for album art, tactile buttons for playback control, and our custom Pirate Audio software and installer to make setting it all up a breeze.
Features
- Amplified digital audio (24-bit / 192KHz) over I2S
- PAM8908 headphone amplifier chip (datasheet)
- Low-gain / high-gain switch (high-gain boosts by 12dB)
- PCM5100A DAC chip (datasheet)
- 3.5mm stereo jack
- 1.3" IPS colour LCD (240x240px) (ST7789 driver)
- Four tactile buttons
- Mini HAT-format board
- Fully-assembled
- Compatible with all 40-pin header Raspberry Pi models
- Pirate Audio software
- Dimensions: 65x30.5x9.5mm
Software
Our Pirate Audio software and installer installs the Python library for the LCD, configures the I2S audio and SPI, and then installs Mopidy and our custom Pirate Audio plugins to display album art and track info, and to use the buttons for playback control.
Here's how to get started:
- Set an SD card up with the latest version of Raspbian.
- Connect to Wi-Fi or a wired network.
- Open a terminal and type the following:
git clone https://github.com/pimoroni/pirate-audio
cd pirate-audio/mopidy
sudo ./install.sh - Reboot your Pi
You can find more detailed instructions here: https://github.com/pimoroni/pirate-audio/tree/master/mopidy
Notes
Note that our installer, linked above, does all of the below for you, but if you're an intrepid hacker then you might need to know this stuff!
- The low-gain mode is recommended for most use-cases.
- The DAC can be configured by adding
dtoverlay=hifiberry-dacto the/boot/config.txtfile. - There is a DAC enable pin—BCM 25— that must be driven high to enable the DAC. You can do this by adding
gpio=25=op,dhto the/boot/config.txtfile. - The buttons are active low, and connected to pins BCM 5, 6, 16, and 20
- The display uses SPI, and you'll need to enable SPI through the Raspberry Pi configuration menu.
- If you want to use these boards with a Pibow Coupé case (either for the Zero / Zero W or Pi 4), then you'll need to use a booster header to raise it up a little.
Pirate Audio: 3W Stereo Amp for Raspberry Pi (Pirate Audio: 3W Amp)
Bring an old radio or set of speakers into the 21st century with Pirate Audio 3W Stereo Amp for Raspberry Pi! Get punchy digital audio through the push-fit terminals and control your music with the built-in colour LCD and playback control buttons.
The push-fit connectors on Pirate Audio 3W Stereo Amp make it super-simple to connect up a set of speakers, whether they're bookshelf or floor-standing speakers, or the speakers in an old radio. Play crisp digital audio from local files (MP3, FLAC, etc.) or stream from services like Spotify. The combined DAC and amp gives you crisp 24-bit / 192KHz digital audio through your connected stereo speakers (or mixed-down mono through a single channel).
Pirate Audio is a range of all-in-one audio boards for Raspberry Pi, with high-quality digital audio, beautifully-crisp IPS displays for album art, tactile buttons for playback control, and our custom Pirate Audio software and installer to make setting it all up a breeze.
Features
- MAX98357A DAC / amplifier chip x2 (datasheet)
- Stereo 3W (per channel) audio out
- Push-fit speaker terminals
- Switch for stereo / mixed-down mono modes
- 1.3" IPS colour LCD (240x240px) (ST7789 driver)
- Four tactile buttons
- Mini HAT-format board
- Fully-assembled
- Compatible with all 40-pin header Raspberry Pi models
- Pirate Audio software
- Dimensions: 65x30.5x9.5mm
What's in the box?
1 x 3W Stereo Amp for Raspberry Pi
Resources
Software
Our Pirate Audio software and installer installs the Python library for the LCD, configures the I2S audio and SPI, and then installs Mopidy and our custom Pirate Audio plugins to display album art and track info, and to use the buttons for playback control.
Here's how to get started:
- Set an SD card up with the latest version of Raspbian.
- Connect to Wi-Fi or a wired network.
- Open a terminal and type the following:
git clone https://github.com/pimoroni/pirate-audio
cd pirate-audio/mopidy
sudo ./install.sh - Reboot your Pi
You can find more detailed instructions here: https://github.com/pimoroni/pirate-audio/tree/master/mopidy
Notes
Note that our installer, linked above, does all of the below for you, but if you're an intrepid hacker then you might need to know this stuff!
- The push-fit connectors require you to push gently on the tab to allow the cable to be inserted / removed. Do this carefully, to avoid breaking the clip!
- The DAC can be configured by adding
dtoverlay=hifiberry-dacto the/boot/config.txtfile. - There is a DAC enable pin—BCM 25— that must be driven high to enable the DAC. You can do this by adding
gpio=25=op,dhto the/boot/config.txtfile. - The buttons are active low, and connected to pins BCM 5, 6, 16, and 20
- The display uses SPI, and you'll need to enable SPI through the Raspberry Pi configuration menu.
- If you want to use these boards with a Pibow Coupé case (either for the Zero / Zero W or Pi 4), then you'll need to use a booster header to raise it up a little.
Bring an old radio or set of speakers into the 21st century with Pirate Audio 3W Stereo Amp for Raspberry Pi!

Pirate Audio: Speaker for Raspberry Pi (Pirate Audio: Speaker)
Description:
Pump out some mini beats with Pirate Audio Speaker! This diminutive sound system has an I2S DAC, amp, mini mono speaker, high-res display, and playback control buttons.
Pirate Audio Speaker is perfect for making a Lilliputian radio, sound effect player, or even as a teeny-weeny games console! The built-in 1W speaker isn't the loudest but it's great fun for lots of projects. The display and playback buttons let you control your audio or sound effects in a jiffy. Use our Pirate Audio software (more info below) to play local audio files (MP3, FLAC, etc) or stream from services like Spotify.
Pirate Audio is a range of all-in-one audio boards for Raspberry Pi, with high-quality digital audio, beautifully-crisp IPS displays for album art, tactile buttons for playback control, and our custom Pirate Audio software and installer to make setting it all up a breeze.
Features
- MAX98357A DAC / amplifier chip (datasheet)
- Mono audio
- Mini speaker (1W / 8Ω, attached)
- Push-fit speaker terminals
- 1.3" IPS colour LCD (240x240px) (ST7789 driver)
- Four tactile buttons
- Mini HAT-format board
- Fully-assembled
- Compatible with all 40-pin header Raspberry Pi models
- Pirate Audio software
- Dimensions: 65x30.5x9.5mm
Software
Our Pirate Audio software and installer installs the Python library for the LCD, configures the I2S audio and SPI, and then installs Mopidy and our custom Pirate Audio plugins to display album art and track info, and to use the buttons for playback control.
Here's how to get started:
- Set an SD card up with the latest version of Raspbian.
- Connect to Wi-Fi or a wired network.
- Open a terminal and type the following:
git clone https://github.com/pimoroni/pirate-audio
cd pirate-audio/mopidy
sudo ./install.sh - Reboot your Pi
You can find more detailed instructions here: https://github.com/pimoroni/pirate-audio/tree/master/mopidy
Notes
Note that our installer, linked above, does all of the below for you, but if you're an intrepid hacker then you might need to know this stuff!
- The DAC can be configured by adding
dtoverlay=hifiberry-dacto the/boot/config.txtfile. - There is a DAC enable pin—BCM 25— that must be driven high to enable the DAC. You can do this by adding
gpio=25=op,dhto the/boot/config.txtfile. - The buttons are active low, and connected to pins BCM 5, 6, 16, and 20
- The display uses SPI, and you'll need to enable SPI through the Raspberry Pi configuration menu.
- If you want to use these boards with a Pibow Coupé case (either for the Zero / Zero W or Pi 4), then you'll need to use a booster header to raise it up a little.
PMS5003 Particulate Matter Sensor with Cable (PM particulate sensor)
What's in the box?
1 x PMS5003 Particulate Matter Sensor with Cable
Resources
Software
Monitor air pollution cheaply and accurately with this matchbox-sized particulate matter (PM) sensor from Plantower! It senses particulates of various sizes (PM1, PM2.5, PM10) from sources like smoke, dust, pollen, metal and organic particles, and more.
Pair this particulate matter sensor with our Enviro plus and build your own air quality monitoring station to contribute to citizen science. Just plug the cable into the sensor and then into the connector on the underside of Enviro plus, and away you go!
The sensor has a small fan that sucks air through the sensor and past a laser that can detect both the number (and hence concentration) and size of particles in the surrounding air.
- Plantower PMS5003 Particulate Matter (PM) Sensor (datasheet)
- Detects PM1, PM2.5, PM10 particulates
- 15cm Picoblade cable
- UART serial interface
- Python library
- Dimensions: 50x38x21mm
What's in the box?
1 x PMS5003 Particulate Matter Sensor with Cable
Resources
Software
Our Python library for the PMS5003 sensor lets you read PM1, PM2.5, and PM10 in both standard and environmental units, and numbers of particles of various sizes: >0.3, >0.5, >1.0, >2.5, >5, and >10um.
Note that if you're using this sensor with Raspberry Pi, then you'll need to make a couple of changes to its configuration. Type sudo raspi-config in the terminal and then under "Interfacing options" and "Serial" disable the login shell and enable the serial port hardware. Edit your /boot/config.txt file and add the lines enable_uart=1 and dtoverlay=pi3-miniuart-bt to the bottom of the file.
Our Enviro plus installation script will do all of this configuration for you.
There's a blue protective film that covers the metal casing of the sensor, and you can peel this off before use.
Monitor air pollution cheaply and accurately with this matchbox-sized particulate matter (PM) sensor from Plantower! It senses particulates of various sizes (PM1, PM2.5, PM10) from sources like smoke, dust, pollen, metal and organic particles, and more.

Picade DIY kit - 10 inch display (Picade 10 inch)
The ultimate desktop retro arcade machine! Picade is a Raspberry Pi-powered mini arcade that you build yourself, with authentic arcade controls, a high resolution 4:3 display that's ideal for retro gaming, and a punchy speaker to hear those 8-bit game soundtracks at their best
Picade is now Raspberry Pi 4 compatible and includes a new USB-C version of Picade X HAT!
The all-new Picade has been completely redesigned, from the inside out! There's new artwork, a new display and display driver board, dedicated power button, an all-new Picade X HAT (now with USB-C), easier wiring, easier access to the interior of the cabinet, beautiful new packaging, a bunch of extra goodies (stickers and an enamel Picade pin), and a gorgeous Picade poster and assembly instructions.
Picade comes in kit form, and it'll take around two to three hours to build. The cabinet is made from powder-coated MDF, giving it a quality look and feel similar to a full-size arcade. All you'll need to add is a Raspberry Pi, USB-C power supply, and micro-SD card.
Cabinet features
- Black, powder-coated panels
- Acrylic marquee and console with authentic artwork
- Push-fit arcade buttons
- Joystick with black ball top
- 3" speaker (5W, 4Ω)
- Easy access with removable back panel
- Dedicated illuminated power button
- Grippy rubber feet
- Dimensions: 350x230x210mm
10-inch display features
- 1024x768 (4:3 ratio) IPS (wide viewing angle) display
- Pimoroni-designed and manufactured HDMI display driver board and keypad controls
- Powered by micro-USB cable (included) from your Pi
Picade X HAT features
- Easy DuPont connectors for buttons and joystick
- Push-fit speaker terminals
- I2S audio DAC with 3W amplifier (mono)
- Power management, power switch pins, and power button
- 4-way joystick inputs
- 6 player buttons
- 4 utility buttons
- Metal standoffs to hold your Picade X HAT securely
Extras
- Picade enamel pin badge
- Pimoroni Super Sticker Selection
- Picade poster / assembly instructions
What's new!?
The cabinet is more compact, so it fits more neatly on your desk, but has a higher resolution 8" or 10" display (1024x768). The display is driven by a new Pimoroni-designed and manufactured driver board, with keypad controls. It's an IPS panel, so it looks great from any viewing angle!
The all-new Picade X HAT is packed full of useful features. We've moved from more fiddly screw terminals to simple DuPont connectors that just push in, and the speaker terminals are the same easy push-fit connectors that we use on pHAT BEAT.
There's dedicated power management on-board Picade X HAT; just plug your micro-USB power supply into the HAT and it'll power your Pi through its pins. The power button connected to the HAT means that once your Pi is safely shutdown, the power will be cut completely to the Pi. A simple press of the power button will boot your Picade up again.
The new buttons in Picade are lower profile, and the new joystick has a single connector rather than the eight spade connectors on our previous Picade joystick.
A gorgeous new neon-look Picade logo on the marquee, and rainbow stripes on the console and screen-surround, evoke classic consoles, as do the assembly instructions and poster.
Building your Picade
We hope the included assembly instructions have everything you need to build your Picade, but we've also filmed a complete build video of Picade that you can watch as you build and learn some handy tips and tricks. Find it at https://youtu.be/gTgu1fUVsmw
The sections are also available separately in a playlist here.
We've also put together an online tutorial that incorporates the assembly instructions, important tips and amendments, and the videos for each section, so do check that out!
Software setup
We recommend the RetroPie operating system for your Picade. You can download it from the RetroPie website and then burn it to a micro-SD card with Etcher.
Connect a USB keyboard to your Pi, and connect to Wi-Fi in the RetroPie menu. Press F4 to exit to the terminal and then type curl https://get.pimoroni.com/picadehat | bash to run the Picade HAT installer.
Reboot your Pi, if it doesn't prompt you to. Press the "Alt" key on your keyboard and then select "Configure input" to configure your Picade's controls. You'll find that the sound and power button should both be working now too!
Notes
If your Picade display doesn't show anything when you first power it up, then it could be because the HDMI display is not being detected by the Raspberry Pi. This can happen because power isn't supplied to the USB ports on the Raspberry Pi for the first few seconds of booting. The solution is to edit the /boot/config.txt file on your RetroPie SD card, and add hdmi_force_hotplug=1 on a new line at the bottom of the file.
If you'd like to design your own artwork for your Picade, then we've made a handy PDF that has the outlines and dimensions of the marquee, screen shim, and console. You can download it from the Picade HAT GitHub repo here.
Where to find ROMs for RetroPie (free and legally) https://howchoo.com/g/otiwyjhlnzb/where-to-find-roms-for-retropie
and here http://cvaddict.com/article.php?articleid=15

Pimoroni Pico VGA Demo Base (Pico VGA Demo Base)
What's in the box?
1 x Pimoroni Pico VGA Demo Base
Resources
Getting started
Built especially to showcase the low cost, feature-rich RP2040 chip on the Raspberry Pi Pico, this board has VGA output, an SD card slot, digital I2S audio output, and more!
Based on the reference design by Raspberry Pi, our Pimoroni Pico VGA Demo Base is a great way to start experimenting with Raspberry Pi Pico/RP2040. It's the perfect way to demo of some of the fun things you can achieve with the RP2040 microcontroller such as generating a solid VGA output without taxing the CPU at all!
- Amaze your friends by showing them you still own a D-sub cable!
- Bask in the glory of 15-bit analog video!
- Get teary eyed over the warm, authentic, RC filtered PWM audio!
This board will run the various video example programs that Raspberry Pi have put together to demonstrate features of the RP2040.
Please note that VGA Demo Base only currently works with the C/C Pico SDK!
A Raspberry Pi Pico is not included - click here if you'd like to buy one!
Your Pico will need to have male headers soldered to it (with the pins pointing downwards) to attach to our add-on boards.
Features
- 15-pin VGA (D-sub) connector
- PCM5100A DAC for line out audio over I2S (datasheet)
- PWM audio output
- SD card slot
- Reset button
- Female headers to install your Raspberry Pi Pico
- Three user-controllable switches
- Rubber feet
- Compatible with Raspberry Pi Pico
- No soldering required (as long as your Pico has header pins attached)
- Programmable with C/C
What's in the box?
1 x Pimoroni Pico VGA Demo Base
Resources
Getting started
The pin-out of our board is the same as Raspberry Pi's reference board, you can find it in chapter 3 of Hardware Design with RP2040 along with more general info about the VGA reference board.
To run the audio and video examples in Raspberry Pi's experimental repos, first make sure you have up to date versions of pico-extras and pico-playground. When building the examples, you will need to specify the board configuration so that the examples use the correct pins. You can do this by creating a new build directory and then specifying the board definition when using cmake:
cmake -D"PICO_BOARD=vgaboard" ..
There's more details on about how to build applications with custom board configurations in Appendix D / page 267 of the C/C SDK documentation.
Pinout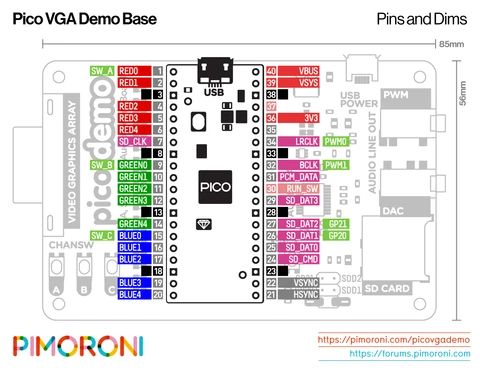

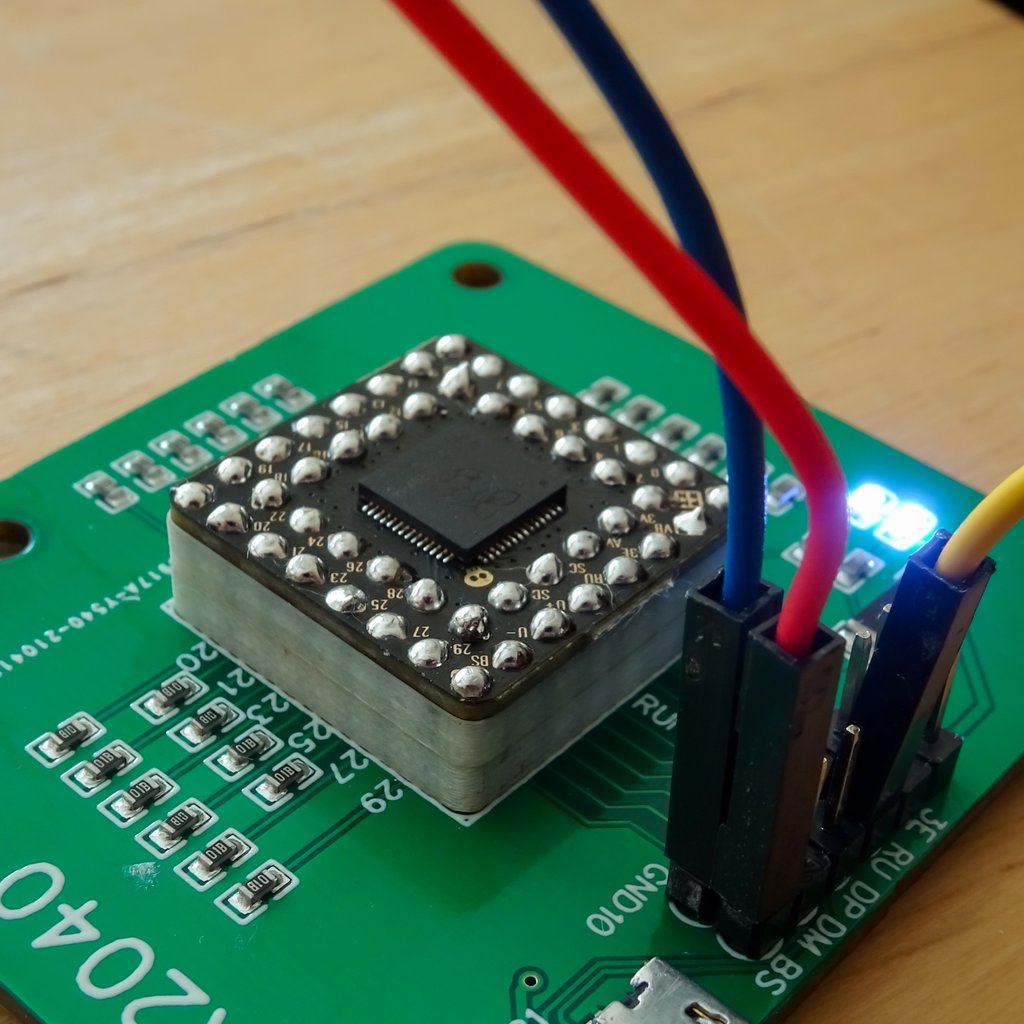
PGA2040 (PGA2040)
PGA2040
Description:
What's in the box ?
1 x PGA2040
Getting Started :
Description:
PGA2040 is a compact RP2040 breakout intended for the most svelte and embeddable of projects. It contains only the components necessary to run the RP2040 (that's the crystal, flash, regulator and essential support circuits) and it has no fripperies like LEDs, buttons and USB connectors - you'll need to attach your own USB connector to be able to program it.
The benefits of all this drastic pruning are a tiny, 21mm square footprint and lots of exposed RP2040 pins to play with! 30 of them can be used as general purpose I/O (that's four more I/O than on a Raspberry Pi Pico) and 4 are ADC-equipped. It also has the cutest little pin labels in the known 'verse, because space is tight on this board.
Header pins are sold separately - you can solder it to standard Pico pin headers (though bear in mind you'll need 48 pins if you want to populate it fully).
Like our other RP2040 boards, PGA2040 is programmable with C , MicroPython or CircuitPython - choose your fighter!
Specifications:
- Powered by RP2040
- Dual ARM Cortex M0 running at up to 133Mhz
- 264kB of SRAM
- 8MB of QSPI flash supporting XiP
- Crystal oscillator
- On-board 3V3 regulator (max regulator current output 300mA)
- 48 pins, arranged with 2.54mm (0.1") spacing in a Pin Grid Array
- 30 multi-function General Purpose IO (4 can be used for ADC)
- 8 GND pins
- Input voltage range 3V - 5.5V (on VB pin only)
- Measurements: approx 21mm x 21mm x 3mm (L x W x H)
- Schematic
- Eagle CAD part
What's in the box ?
1 x PGA2040
Getting Started :
PGA2040 is firmware agnostic! You can program it with C/C or MicroPython in the same way as you would a Raspberry Pi Pico. You can find (lots) more information on how to do that (as well as download links for the firmware/SDK) on the RP2040 landing page.
You can also use CircuitPython on your PGA2040! CircuitPython is an easy to use, well-established ecosystem with lots of example code and drivers for interfacing with different kinds of hardware. Click here to download the CircuitPython firmware for PGA2040 and click here for a getting started guide.
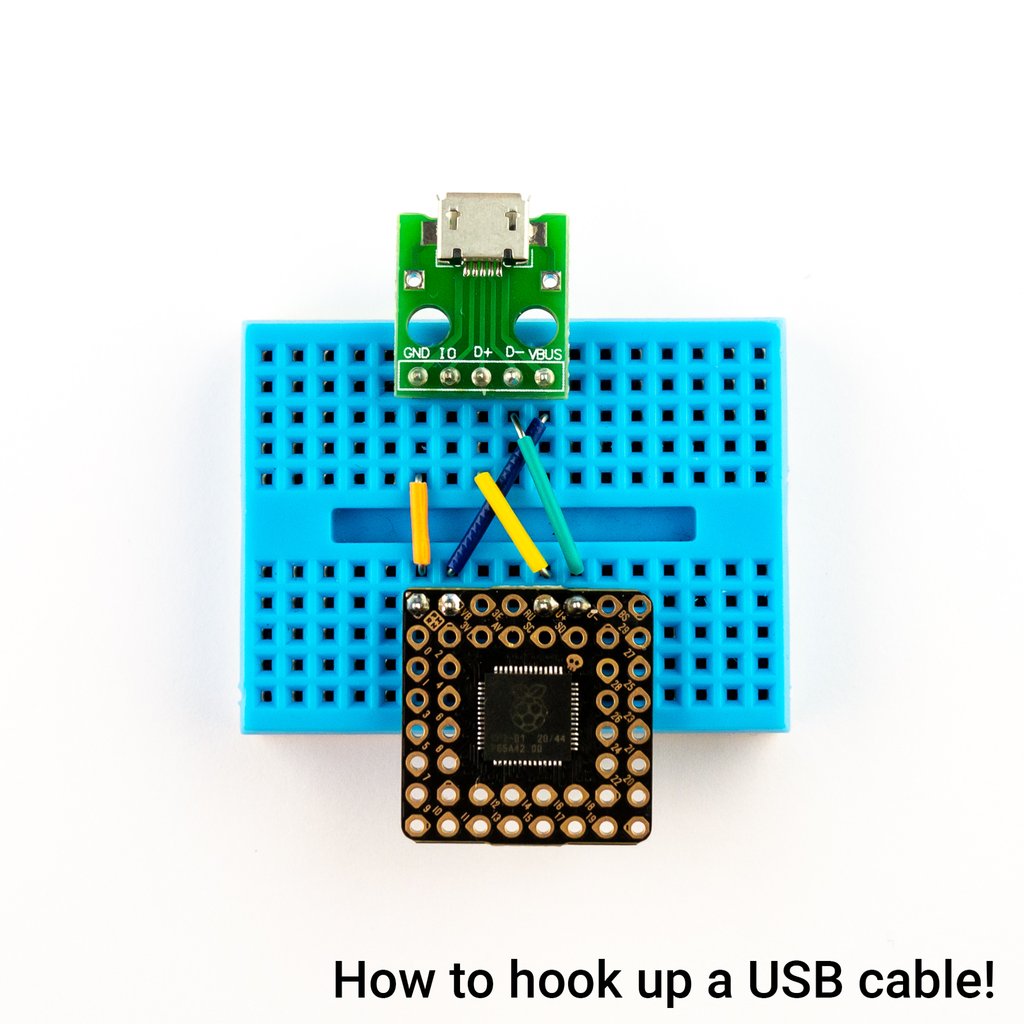
To program PGA2040 via USB you will need to hook wires up to VB, GND, U and U-. Make sure that the 5v only goes to VB on PGA2040, if it ends up elsewhere it will result in a bad time. A USB breakout board is a convenient way of getting at the wires in your USB cable, check out the extras tab for some options!
To get into BOOTSEL mode so you can flash firmware to your PGA2040, connect the BS pin to ground whilst plugging the USB into your computer.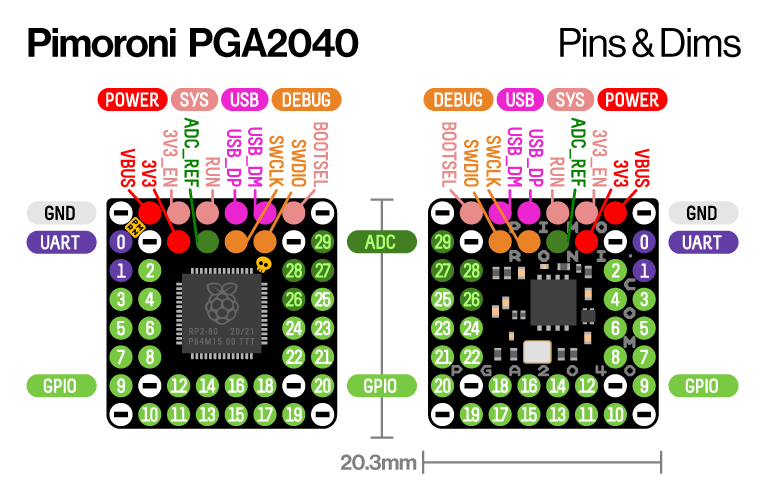
About RP2040
Raspberry Pi's RP2040 microcontroller is a dual core ARM Cortex M0 running at up to 133Mhz. It bundles in 264kB of SRAM, 30 multifunction GPIO pins (including a four channel 12-bit ADC), a heap of standard peripherals (I2C, SPI, UART, PWM, clocks, etc), and USB support.
One very exciting feature of RP2040 is the programmable IOs which allow you to execute custom programs that can manipulate GPIO pins and transfer data between peripherals - they can offload tasks that require high data transfer rates or precise timing that traditionally would have required a lot of heavy lifting from the CPU.