
Pimoroni


ReSpeaker 2-Mics Pi HAT is a dual-microphone expansion board for Raspberry Pi designed for AI and voice applications. This means that you can build a more powerful and flexible voice product that integrates Amazon Alexa Voice Service, Google Assistant, and so on.
The board is developed based on WM8960, a low power stereo codec. There are 2 microphones on both sides of the board for collecting sounds and it also provides 3 APA102 RGB LEDs, 1 User Button, and 2 on-board Grove interfaces for expanding your applications. What is more, 3.5mm Audio Jack or JST 2.0 Speaker Out are both available for audio output.
Note: This product does not include the Pi Zero board!
Features
- Raspberry Pi compatible.
- Supports: Raspberry Pi 5
Raspberry Pi 4
Raspberry Pi 3B+
Raspberry Pi 3B
Raspberry Pi 3A+
Raspberry Pi 2
Raspberry Pi Zero 2
Raspberry Pi Zero
NVIDIA Jetson - Dual-Microphones
- 2 Grove Interfaces: support GPIO and I2C
- Programmable Button and LED: one button and three LEDs
- Stereo Codec with Class D Speaker Driver
- Two types audio output socket : 3.5mm Audio Jack(40mW output ), JST2.0 Speaker Out(providing 1W into 8Ω loads)
- Far-field support (up to 3 meters)
- Application ideas:
- Voice Interaction Application
- AI Assistant
- PCB dimensions: 65mm x30mm x15mm
- Gross weight: 33g
- Product weight: 11.6g
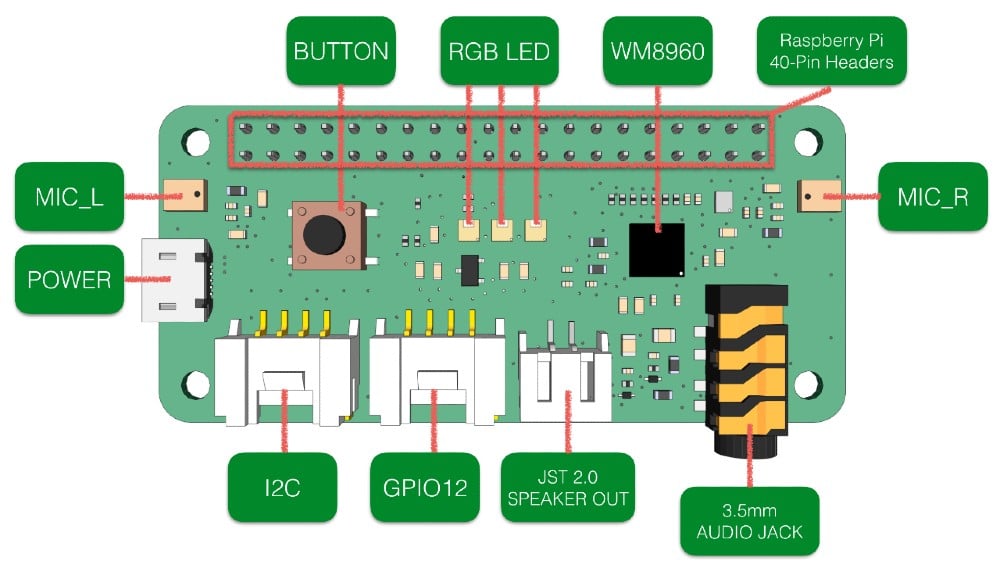
- BUTTON: a User Button, connected to GPIO17
- MIC_Land MIC_R: 2 Microphones on both sides of the board
- RGB LED: 3 APA102 RGB LEDs, connected to SPI interface
- WM8960: a low power stereo codec
- Raspberry Pi 40-Pin Headers: support Raspberry Pi Zero, Raspberry Pi 1 B+, Raspberry Pi 2 B, Raspberry Pi 3 B, and Raspberry Pi 3 B+
- POWER: Micro USB port for powering the ReSpeaker 2-Mics Pi HAT, please power the board for providing enough current when using the speaker.
- I2C: Grove I2C port, connected to I2C-1
- GPIO12: Grove digital port, connected to GPIO12 & GPIO13
- JST 2.0 SPEAKER OUT: for connecting speaker with JST 2.0 connector
- 3.5mm AUDIO JACK: for connecting headphone or speaker with 3.5mm Audio Plug
What's in the box?
1 x ReSpeaker 2-Mics Pi pHAT
Application
- Voice Interaction Learning
- Secondary software Development
- Voice-based remote control cars
Get started with Google Assistant
How to use button to trigger Google Assistant
Resources
- Getting Started, wiki.seeedstudio
- Respeaker 2-Mics Pi HAT SCH, pdf
- Respeaker 2-Mics Pi HAT PCB, pdf
- Respeaker 2-Mics Pi HAT SCH, zipped file
- Respeaker 2-Mics Pi HAT PCB, zipped file
- ReSpeaker 2 Mics Pi HAT 3D, zipped file
- Seeed-Voice Driver, GitHub
- Algorithms includes DOA, VAD, NS, GitHub
- Voice Engine project, provides building blocks to create voice enabled objects, GitHub
- AEC
A sophisticated, hackable, 32x24 pixel thermal camera breakout! Use it to monitor the temperature of your CPU or coffee pot, or to build your own heat-seeking night vision camera. Works with Raspberry Pi or Arduino.
It's perfect for building into projects - industrial, scientific, or just fun - and much more affordable than most thermal cameras. Our breakout makes it easy to use the camera with your Raspberry Pi or Arduino, using I2C and 3-6V supply. And it's available in two different fields of view, 55° (standard) or 110° (wide angle) depending on your preference.
The MLX90640 far-infrared camera is an array of 768 (32x24) thermal sensors that can detect temperatures from -40 to 300°C with approximately 1°C accuracy and up to 64FPS! The applications of this camera are manifold: measure the heat or heat dissipation of devices like CPUs, circuit boards, or electrical appliances; use it to identify thermal inefficiencies in your home; or use it for presence detection to identify bodies in complete darkness.
This breakout is compatible with Qw/ST compatible, which means it can be plugged into microcontroller or HATs with a Qwiic or STEMMA QT connector using a handy STEMMA QT cables.
Features
- Melexis MLX90640 far-infrared sensor array (datasheet)
- 32x24 pixels
- Field of view: 55°x35° or 110°x75°
- Up to 64FPS
- -40 to 300°C detection with approximately 1°C accuracy
- I2C interface (address 0x33)
- 3.3V or 5V compatible
- Reverse polarity protection (on Breakout Garden connector)
- Compatible with Raspberry Pi computers
- Compatible with Raspberry Pi Pico and pin compatible boards (C/C++ only)
- Compatible with certain Arduino models
- Mechanical Drawing
What's in the box?
1 x MLX90640 breakout
1 x 5 male header
1 x 5 female right-angle header
We've designed this breakout board so that you can solder on the piece of right-angle female header and pop it straight onto the bottom left 5 pins on your Raspberry Pi's GPIO header (pins 1, 3, 5, 7, 9).
Resources
Software
We've written software in C (with a Python wrapper) that you can use to generate images and video from the MLX90640 cameras.
A C++ example for use with Raspberry Pi Pico (and compatibles) can be found here.
SparkFun provide an example Arduino/Processing sketch for the MLX90640.
Notes
- Dimensions: 19x19x2.75mm (LxWxH).
- Melexis state that up to 4 of the 768 IR sensor pixels in each array can be dead, with the unit still remaining in spec. Our software will automatically detect and correct for dead pixels by interpolating readings from adjacent sensors - if you are using alternative software we recommend that you configure it to take a similar approach.

Interstate 75 W is a Pico W-based driver board for HUB75-style LED matrices. It's designed to plug neatly into the back of a LED panel, and provides a quick and easy way to whip up some scrolling signage or an eye-catching LED display for sensor outputs. Because it has a Raspberry Pi Pico W aboard you can also use it to display information from the internet!
I75 W is powered from the Pico W's micro-USB port, which should also be able to power a few connected panels happily, assuming you're not planning anything too eye-bleedingly bright. There's also two useful buttons, a reset button and an onboard RGB LED.
Features
- Raspberry Pi Pico W Aboard
- Powered by RP2040 (Dual Arm Cortex M0+ running at up to 133Mhz with 264kB of SRAM)
- 2MB of QSPI flash supporting XiP
- Powered and programmable by USB micro-B
- 2.4GHz wireless
- Compatible with our 32x32, 32x64 and 64x64 LED matrices.
- Sturdy screw terminals for powering the LED panels.
- Qw/ST (Qwiic/STEMMA QT) connector
- Two user buttons
- Reset button
- RGB LED
- Fully-assembled (no soldering required)
- Measurements: approx 64.3 x 40 x 18mm (L x W x H, including connectors)
- C++/MicroPython libraries
- Schematic
Software
Our C++/MicroPython libraries include support for Interstate 75 W. You'll get best performance using C++, but if you're a beginner we'd recommend using our batteries included MicroPython build for ease of getting started. Our HUB75 module lets you draw individual pixels to your matrices and uses RP2040's PIO state machines and DMA to minimise CPU usage and maximise luscious, 10-bit gamma corrected colour depth.
Alternatively, you can draw on your LED matrices using our lightweight PicoGraphics library, which includes convenient functions for displaying text and shapes, and we've provided some examples to get you started. Note that if you're chaining panels, PicoGraphics only currently supports these specific arrangements of matrix panels (WxH):
- 32x32, 64x32, 96x32, 128x32
- 64x64, 128x64, 192x64, 256x64
MicroPython
- (Learn) Getting Started with Interstate 75
- (Readme) Installing MicroPython
- (Readme) MicroPython FAQs (and troubleshooting)
- Download pirate-brand MicroPython (you'll want the `Pico W` .uf2, v 1.19.11 or later)
- MicroPython examples
- Interstate 75 function reference
- Picographics function reference
C/C++
About Pico W Aboard
Our new Pico W Aboard products come with a built in Raspberry Pi Pico W. This means you get all the advantages of a RP2040 microcontroller - a speedy fast dual-core ARM processor, a dynamic, growing ecosystem and a choice of different programming methods to experiment with. Most excitingly though, Pico W has wireless connectivity, so your Pico/RP2040 devices can communicate with each other, and the internet!
You might also need one of our tested 128GB, 256GB or 512GB NVMe drives or a clear acrylic case to protect your RPi5 and NVMe Base.
NVMe Base is a PCIe extension board for Raspberry Pi 5. Simply populate it with an M-key NVMe SSD (2230 to 2280 sizes supported) and mount it under your Pi for a compact and fast storage solution - It even comes with rubber feet!
It's the perfect solution for turning your Raspberry Pi 5 into a file server, media centre, reverse proxy, etc. - really any task that benefits from large amounts of fast storage, especially with random high operations per second (IOPS) workloads. In short it's a game changer!
NVMe base follows the new "PIP" design guidelines provided by Raspberry Pi ensuring that it will be easy to use and be supported long term by updates to Raspberry Pi OS - though it is very early days and things are improving rapidly there!
What's in the box?
1 x NVMe Base PCB with M.2 Slot (M-Key)
1 x 'PCIe Pipe' Flat Flex Cable
4 x Rubber feet
1 x M2 bolt and 2x nuts for SSD mounting
4 x 7mm M2.5 standoffs for base mounting
8 x short M2.5 bolts for base mounting
4 x long M2.5 bolts for 'pass-thru' mounting with a HAT
You might also need...
- a NVMe drive. Make sure you choose one that fits your NVMe board.
- an acrylic case or metal case to house your new setup
Driver compatibility
We have tested NVMe Base with the following M.2 NVMe drives successfully. We have usually tested one drive from one batch, so this is not comprehensive, or an 'Approved' list, but it's a good guide for drives to seek out:
- AData Legend 700
- AData Legend 800
- AData XPG SX8200 Pro
- Axe Memory Generic Drive
- Crucial P2 M.2
- Crucial P3 M.2
- Crucial P3 Plus M.2
- Inland PCIe NVMe SSD
- Kingston KC3000
- Kioxia Exceria NVMe SSD
- Kioxia Exceria G2 NVMe SSD
- Lexar NM620
- Lexar NM710
- Netac NV2000 NVMe SSD
- Netac NV3000 NVMe SSD
- Origin Inception TLC830 Pro NVMe
- PNY CS1030
- Sabrent Rocket 4.0
- Sabrent Rocket Nano
- Samsung 980
- Samsung 980 Pro (500GB/1TB)
- Team MP33
- Western Digital Black SN750 SE (Phison Controller
' Maybe' List. Works with quirks/not ideal.
These drives either needed extra power, were a bit quirky when we tested them or we've had reports of them being problematic. It may just be the drive we had, but they're probably best avoided.
- Kioxia BG4 2230. Performance very patchy. Runs at quite a high temp.
- Patriot P300 - These drives have various controllers, some of which seem to be incompatible at this time.
- Patriot P310 - These drives have various controllers, some of which seem to be incompatible at this time.
- Samsung 970 EVO Plus. Runs at a higher temp. Some user reports of problems under heavy load or not showing up on boot.
- Samsung 980 Pro (250GB). Reports of this size not working.
- WD Blue SN550. Our fresh unit could be used as storage but could not be booted from.
- WD Red SN700. Slow to boot first time, but worked and booted OK.
- WD SN740. Our fresh unit worked well. YMMV.
- WD Black SN770. Our fresh unit worked fine. YMMV.
- Patriot P300. All units we've tested work but we have heard of a 256GB/1TB variant that doesn't.
'Avoid' List. We've had problems or reports of problems.
- Transcend 110Q (TS500GMTE110Q)
- WD Green/Blue/Red/Black not in the above list. Variable results or not working because of quirks of a SanDisk controller/firmware. Our SN350 and SN570 prevented the RPi 5 from booting at all especially.
Otherwise most M.2 NVMe drive (Not SATA!) you have lying around should work fine.
Check out our benchmark results over at pibenchmarks.net!
Resources
- Video: Installing the Pimoroni NVMe Base on Raspberry Pi 5 ????
- Learn: Getting Started with NVMe Base for Raspberry Pi 5 ????
Firmware
For the most hassle-free experience, make sure your Raspberry Pi OS is up to date, and your RPi 5 firmware is updated to 2023-12-06 (Dec 6th) or newer. This supports all the features of the RPi PCIe spec and means you don't have to mess with config files to get started.
Software update on the RPi OS should do this for you, but to force it you can:
- open a Terminal (Ctrl-Alt-T)
- run
sudo raspi-configand choose 'Latest' under Advanced Options > Bootloader Version.
Running sudo rpi-eeprom-update in the Terminal will tell you which version of firmware is running.
PCIe 3 Mode
To enable experimental and not-officially-supported PCIe 3 mode, add the follow line to the [all] section at the end of your Raspberry Pi /boot/firmware/config.txt file like this:
[all]
dtparam=pciex1_gen=3
Save and reboot - your drive is ready to use!
Formatting the NVMe and booting from NVMe
If you want to boot from the NVMe drive, follow these extra steps:
- Make sure your firmware is updated as above!
- Format the drive using Raspberry Pi Imager
- You can do this with your NVMe Base installed by booting the RPi 5 from SD card and running Raspberry Pi Imager from the start menu.
- Open a Terminal (Ctrl-Alt-T).
- Run
sudo raspi-config - Choose NVMe/USB boot under Advanced Options > Boot Order.
- Reboot your RPi 5.
Notes
- Always power off your RPi and disconnect the power supply before installing or uninstalling the NVMe Base.
- NVMe Base offers a general purpose PCIe x1 connection - while we know most people want to add fast storage in theory you can use other devices with it, we just can't help you make them work! :-D What Would Jeff (Geerling) Do?