
Special Offers


These Lithium Batteries are a superior choice due to their combination of long lifespan (2000 cycles), high discharge capabilities (low internal resistance), and advanced safety features (integrated BMS) - all translating into a better investment compared to traditional lead acid batteries they can effectively replace.
Common Applications
- Gate motors
- Alarm panels
- UPS (Uninterrupted Power Supply)
- Toys
- Torches
Specifications
- Capacity in Ah: 8Ah
- Capacity in Wh: 102.4Wh
- Nominal Voltage1: 2.8v
- Maximum Continuous Discharge Current: 16Amps
- Peak Discharge Current (60 sec): 22Amps
- Charge Voltage: 13.8-14.6V
- Maximum Continuous Charge Current: 8Amps
- Short circuit protection: Yes
- Over voltage protection: Yes
- Under voltage protection: Yes
- Over current protection: Yes
- Charge Temperature: 5°C – 45°C
- Discharge Temperature: 0°C – 45°C
- Terminals: F1 – 4.75mm flat
- Weight (net): 1000g
- Dimension (L x W x H): 151 x 65 x 95 mm
- Number of Cycles (minimum) 100% DOD: 2000
What's in the box?
1 x 12.8v 8Ah Lithium Phosphate Battery

This is conductive stainless steel sewing thread. Very thin, strong, smooth and is suited to build wearable products.
Stainless steel fiber yarn has its ability in thermal resistant up to 1300 degrees, and these spun yarn can produce into different kind of electromagnetic shielding fabrics, and in producing permanent shielding and conductive products.
Features
- Thin
- Strong
Specifications
- Material: 100% Stainless Steel Fiber
- Certification: ISO9001:2008
What's in the box?
1 x 5m meter length of thread

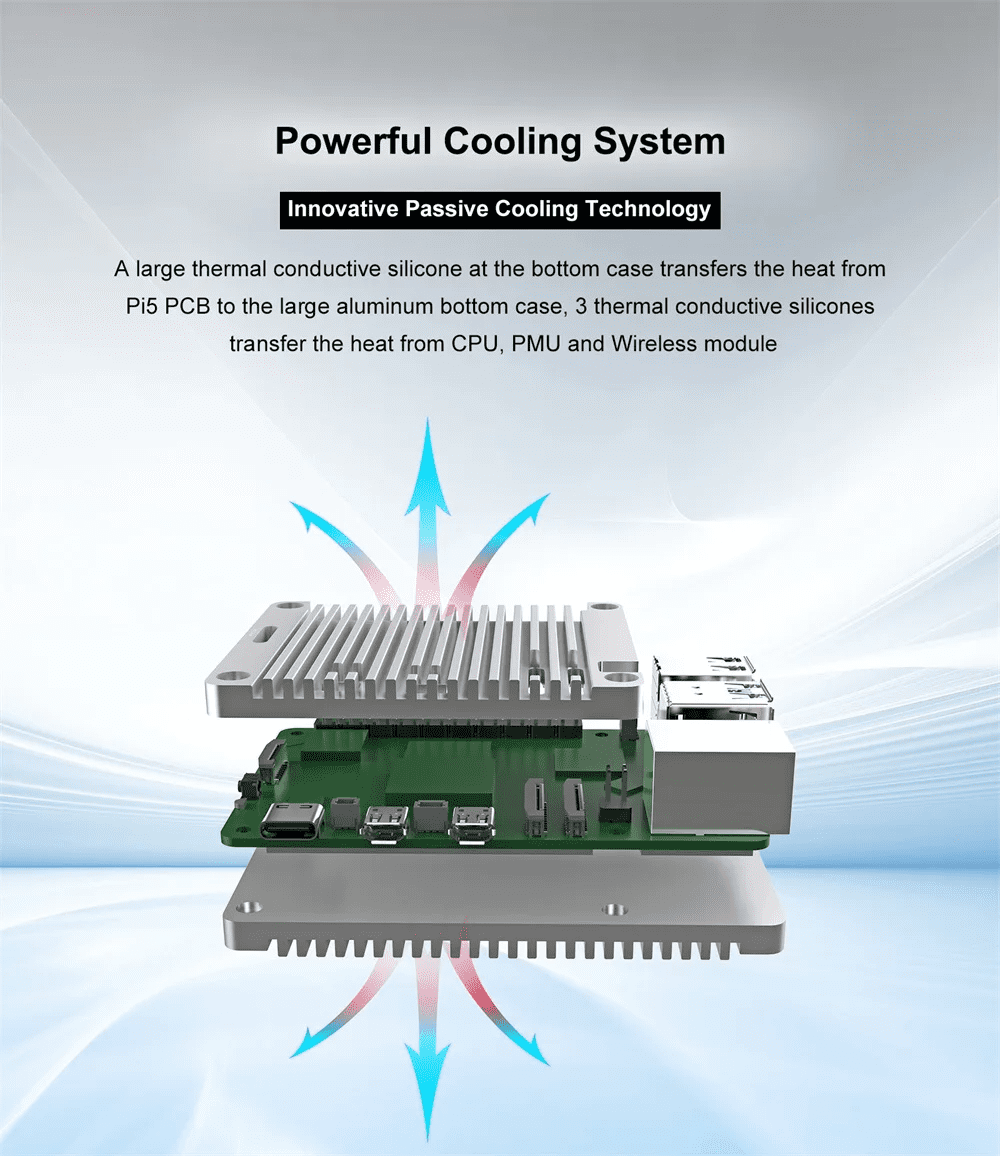
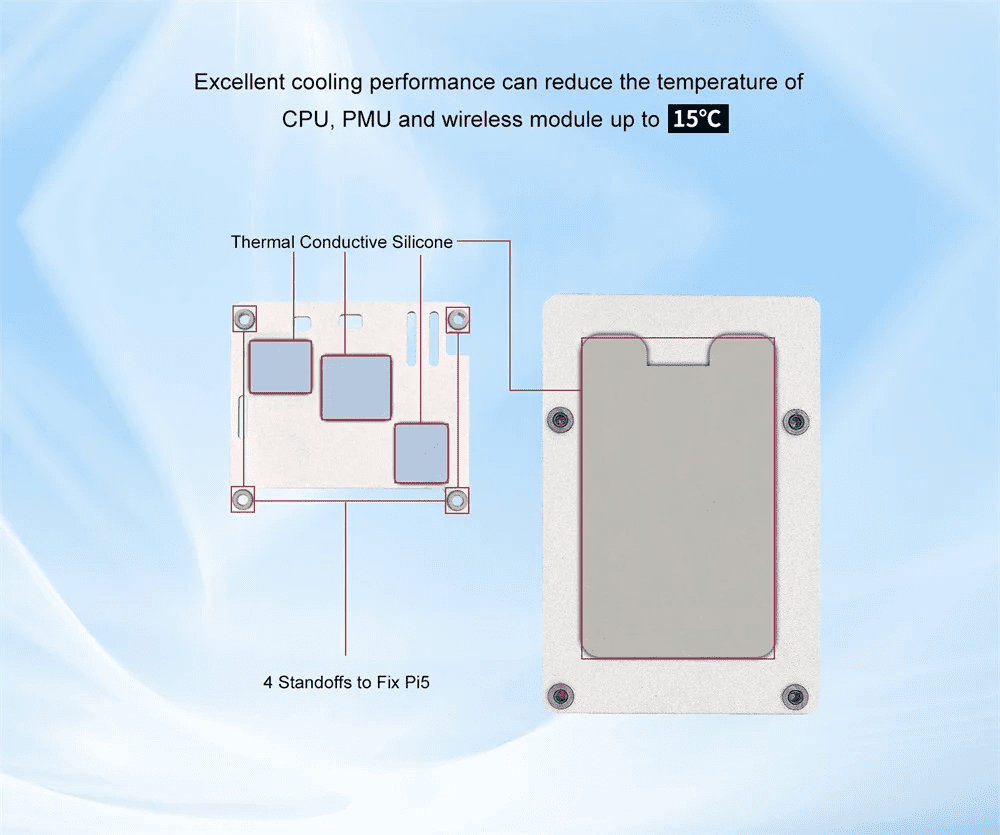
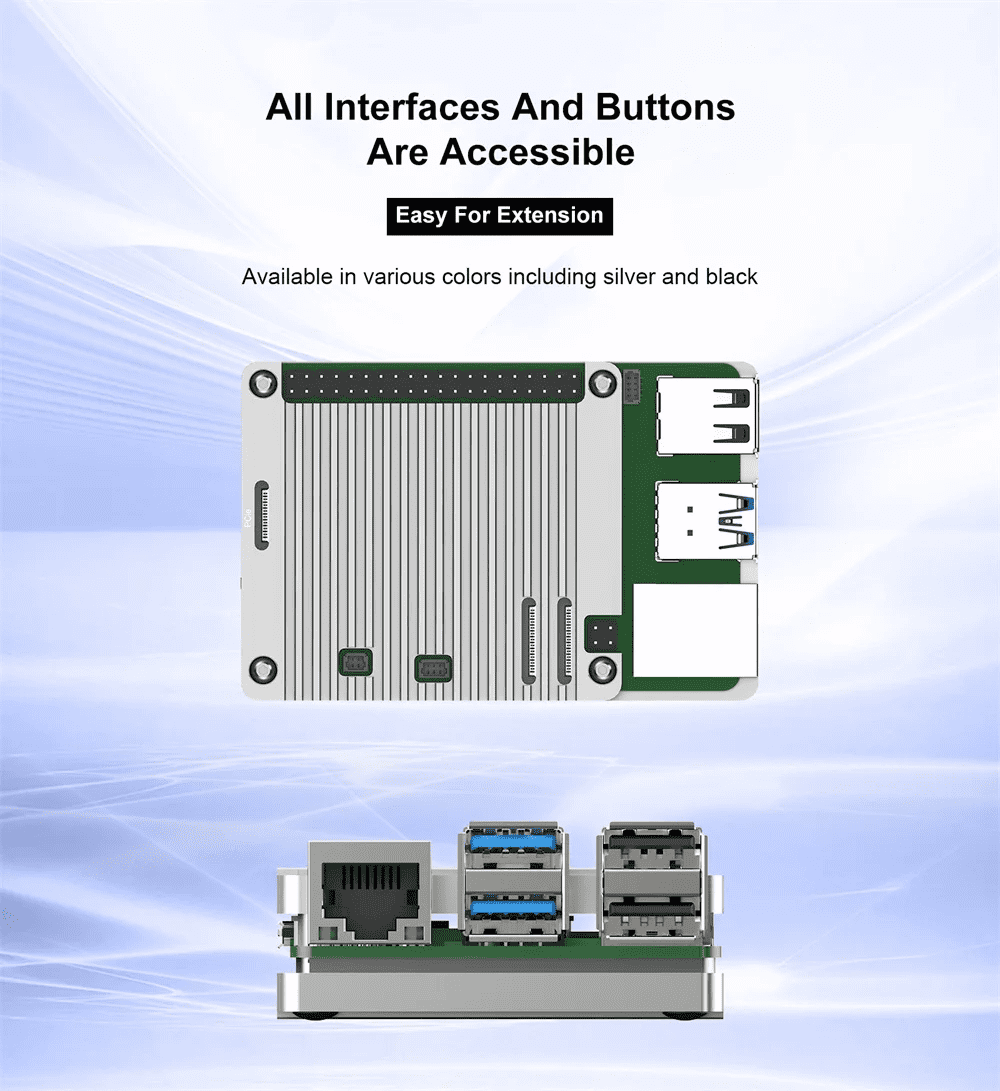
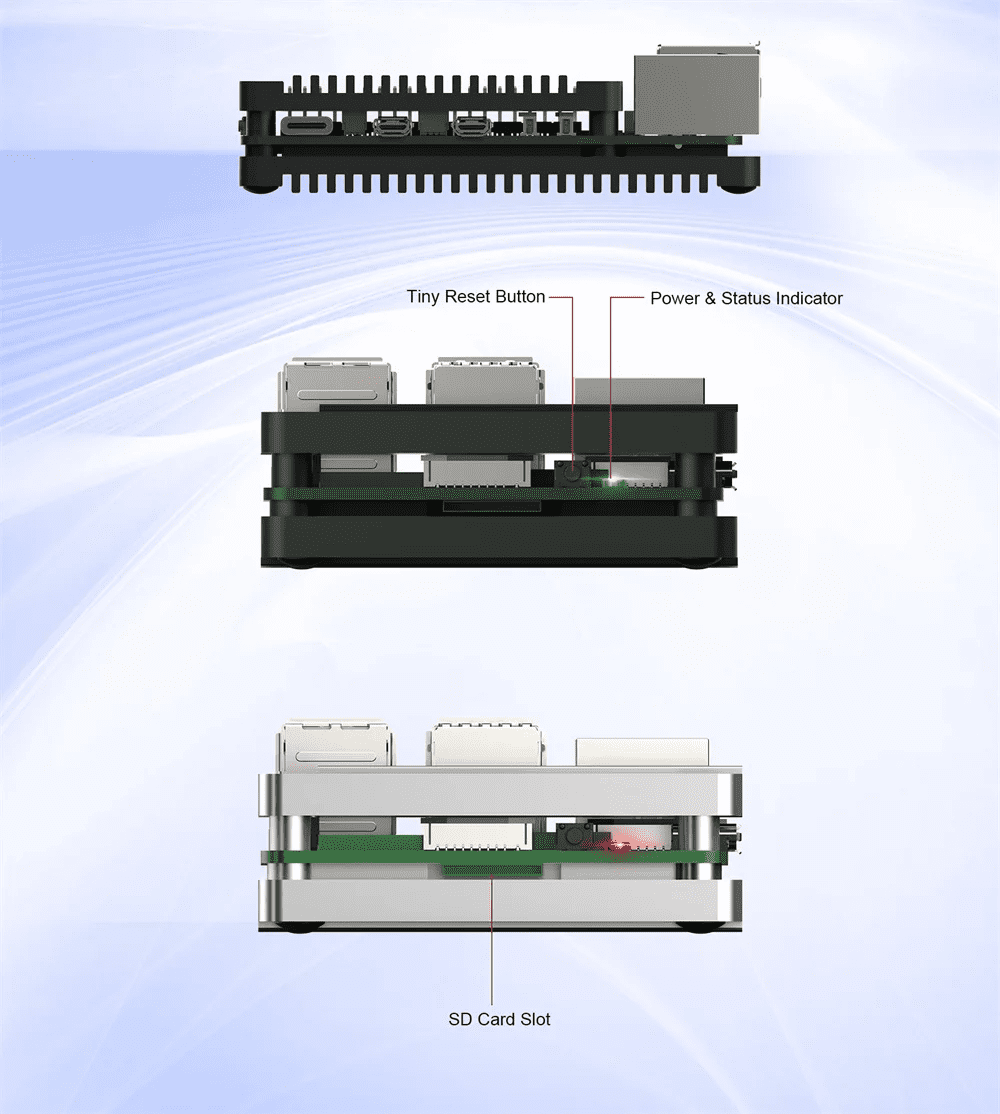
Full Aluminum Passive Cooling Open Case for Raspberry Pi 5

What's in the box?
1 x Full Aluminum Case for Raspberry Pi 5
Resources
Intsallation Guide: https://youtu.be/uOdaYrvMqxc
- Argon NEO 5 M.2 NVME Case further expands your Raspberry Pi 5 potential with included M.2 NVME Expansion Board support.
- Boot your Raspberry Pi 5 from an NVME M.2 Drive.
- Built-in HEATSINK for your M.2 NVME Drive
- Enjoy faster and higher storage access by connecting M.2 NVME drives via the PCIe slot on the Raspberry Pi 5
- Versatile M.2 NVME support compatible with any M.2 NVME with M-Key up to 2280 size
- Greater thermal management on M.2 NVME with included aluminum heatsink specific to M.2 drive to keep it cool, efficient and working longer
- Reliable and consistent data transfer with included FPC impedance controlled cable
What's in the box?
1 x Argon NEO 5 M.2 NVMeCase
Resources
M.2 NVMe Drive Compatibility:
Other drives may also be compatible but we have not tested yet.
Western Digital SN850
Western Digital SN740
Western Digital SN570
Western Digital SN530
Western Digital Black SN750 SE (Phison Controller)
Team MP33
Samsung 980 Pro
Samsung 980
Sabrent Rocket Nano
Sabrent Rocket 4.0
PNY CS1030
Origin Inception TLC830 Pro NVMe
Netac NV3000 NVMe SSD
Netac NV2000 NVMe SSD
Lexar NM710
Lexar NM620
Kioxia Exceria NVMe SSD
Kioxia Exceria G2 NVMe SSD
Kingston KC3000
Kingston SNV2S NV2 Gen4 PCIe NVMe M.2 2280 Solid-State Drive
Inland PCIe NVMe SSD
Crucial P3 Plus M.2
Crucial P3 M.2
Crucial P2 M.2
Axe Memory Generic Drive
- Aluminum enclosure designed for Raspberry Pi Zero 2 W (compatible with other Zero and Zero W Boards)
- Passive Cooling
- Access to all Zero 2 W Ports
- Replaceable ABS Plastic Cover
- Connects seamlessly with the POD HDMI-USB Hub Module and other POD modules
- Power requirement: 5V, 3Amp; via microUSB Port
What's in the box?
1 x Argon POD case only
Resources
Argon POD installation guide
- Aluminum enclosure designed for Raspberry Pi Zero 2 W (compatible with other Zero and Zero W Boards)
- Passive Cooling
- Access to all Zero 2 W Ports
- Replaceable ABS Plastic Cover
- Connects seamlessly with the POD HDMI-USB Hub Module and other POD modules
- Power requirement: 5V, 3Amp; via microUSB Port
- Includes HDMI-USB Module
- Converts Mini HDMI to regular HDMI
- adds 3 additional USB2.0 Ports
What's in the box?
1 x Argon POD case only
Resources
Argon POD installation guide
Please note: The Raspberry Pi 5 is not included
Features
- Argon THRML Radiator Cooler significantly boosts thermal management on the bare Raspberry Pi 5
- Superior heat dissipation away from the Raspberry Pi 5 with copper heat pipe and tower style radiator for enhanced cooling capabilities
- Integrated 60mm PWM blower fan helps cool down the Raspberry Pi 5 faster
- Quick snap on and push pins for easy mounting on Raspberry Pi 5
- Comes with thermal compound and thermal pad for better heat management
- Input voltage: 5V DC supplied via four-pin fan header on Raspberry Pi 5
- Fan speed control: Pulse width modulation control with tachometer
- Maximum airflow: 18.13 CFM
- Maximum fan speed: 5000 RPM +/- 15%
- Product material: Aluminum
What's in the box?
1 x radiator cooler
Introducing the HatNET! 2.5G, the latest network expansion board from Pineberry, engineered to supercharge your Raspberry Pi 5 with 2.5 Gigabit Ethernet capabilities. This board is designed for users who demand higher network throughput and performance, making it an ideal upgrade for advanced computing tasks, server applications, and high-speed data transfers.
Key Features and Specifications
- Optimized for Raspberry Pi 5: The HatNET! 2.5G is specifically designed to complement the Raspberry Pi 5, ensuring seamless integration and optimal performance.
- 2.5 Gigabit Ethernet Performance: Equipped with the Realtek RTL8125BG, this board offers 2.5 Gigabit Ethernet connectivity, significantly enhancing network speed and efficiency over standard Gigabit Ethernet.
- High-Quality Ethernet Plug: Utilizing the same high-quality Trxcom Ethernet plug as the Raspberry Pi, the HatNET! 2.5G guarantees compatibility and reliability in network connections.
- Activity and Link LEDs: Features Activity and Link LEDs that provide real-time visual feedback on network status, facilitating easier monitoring and troubleshooting.
- Dedicated MAC Address Range: Each HatNET! 2.5G board comes with a hardware MAC address from Pineberry Pi's own IEEE-assigned pool, ensuring unique and consistent network identification.
- Designed for Enhanced Networking: This board is tailored for users who require higher bandwidth and lower latency, perfect for network-intensive applications, multimedia streaming, and large file transfers.
- Robust Construction and Longevity: Manufactured with top-grade materials and components, the HatNET! 2.5G is built to last, ensuring sustained performance and reliability for your networking projects.
- Simple Installation and Network Setup: The HatNET! 2.5G is designed for ease of use, offering straightforward installation and network configuration, enabling users to quickly enhance their Raspberry Pi's networking capabilities.
What's in the box?
1 x HatNet
1 x FPC ribbon cable

Retro Gaming with Raspberry Pi shows you how to set up Raspberry Pi 5 to play a new generation of classic games. In this 180-page book, you’ll build a gaming console and full-size arcade cabinet, install emulation software and download original games with full step-by-step guides. Discover a vibrant homebrew scene packed with new games for original consoles and legal access to all those retro games you remember!
- Set up Raspberry Pi for retro gaming
- Emulate classic computers and consoles
- Learn to code retro-style games
- Build a console, handheld, and full-size arcade machine
What's in the box?
1 x Retro Gaming Book
Fun for the whole family to use. Encourage your child's creativity without the mess or use it yourself for lists.
Features and Specifications
- Product Size: 185mm x 280mm x 6.8mm
- Screen Size: 163mm x 23mm
- Net Weight: 210g
- Material: ABS
- Input Pressure: 10 - 20g
- Battery: CR2025
- One-click Erase
- Lock Key
WARNING
- Please do not put too much pressure on the screen, which might damage the product
- Please do not use sharp objects to write on the screen
- Do not get product wet or submerged under water
- Do not disassemble the product
What's in the box?
1 x Volkano Doodle Series Drawing Pad
1 x Writing Stylus
1 x Battery
1 x Instruction Manual

Specifications:
- 5V DC fan for 3D Printers
- 40x40x10mm
What's in the box?
1 x 5V 40mm DC Fan for 3D Printer
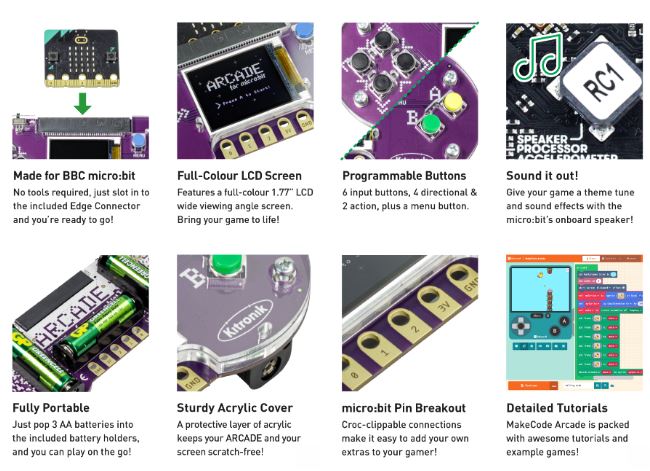
The Kitronik ARCADE for micro:bit is a fully assembled, compact and powerful gamer. The micro:bit(NOT INCLUDED) controls the gamer with a full colour LCD screen, perfect for playing retro games which have been coded and created via the popular MakeCode Arcade block editor!
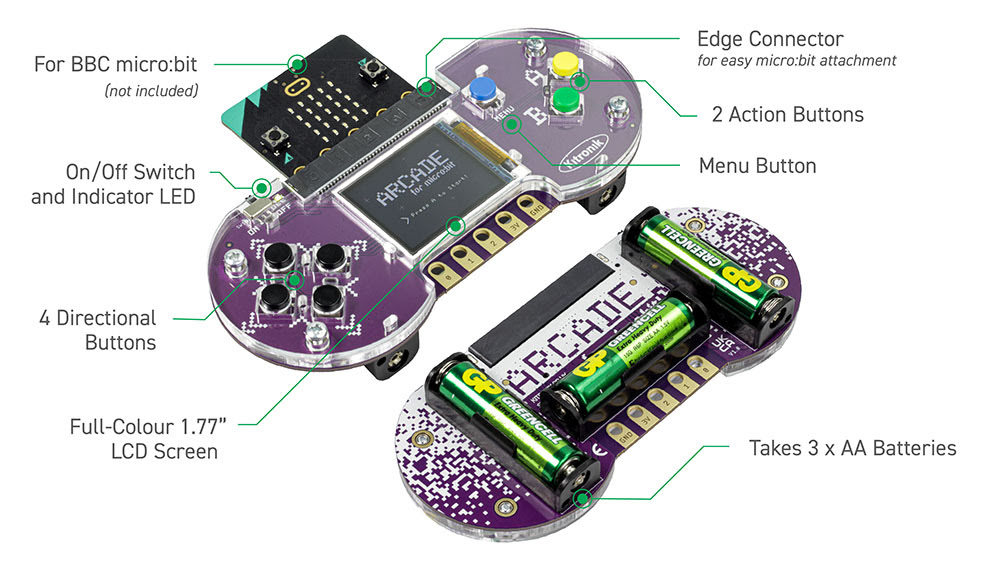
For teachers and students to get started it’s as simple as:
Plug in a micro:bit(NOT INCLUDED),
Download a pre-coded game or let them create their own using the wealth of resources available with the MakeCode ARCADE site
Let them play the lesson away while having fun and learning at the same time!
What's in the box?
1 x Arcade for micro:bit
Resources
- Kitronik Arcade for micro:bit Datasheet
- An extensive range of resources are currently available via the MakeCode ARCADE website

Specifications
| MODEL |
(This product) | (Also available) | |
|---|---|---|---|
| MICROCONTROLLER | R7FA4 (32-bit ARM Cortex-M4) | R7FA4 (32-bit ARM Cortex-M4) | |
| ESP32-S3FN8 (Dual-core 32-bit Xtensa LX7) | |||
| CLOCK FREQUENCY | R7FA4: 48MHz | R7FA4: 48MHz | |
| ESP32-S3FN8: 240MHz | |||
| STORAGE | R7FA4: 256kB Flash, 32kB RAM | R7FA4: 256kB Flash, 32kB RAM | |
| ESP32-S3FN8: 384kB ROM, 512kB RAM, 8MB Flash | |||
| WIRELESS COMMUNICATION | None | 2.4GHz WiFi + Bluetooth LE | |
| OPERATING VOLTAGE | Options for 5V/3.3V, support more shields | ||
| POWER INPUT | 6~24V | ||
| RESET BUTTON | Lateral, easier to use when connecting with shield | ||
| IO PIN OUTPUT CURRENT | 8mA | ||
| DIGITAL PINS | 14 | ||
| ANALOG PINS | 6 | ||
| DAC | 2 | ||
| PWM | 6 | ||
| UART | 1 | ||
| I2C | 1 | ||
| SPI | 1 | ||
| CAN | 1 | ||
| DC JACK | Low profile, shields won't be blocked anymore while connecting | ||
| POWER OUTPUT HEADER | Provides 5V OR 3.3V power output and common-grounding with other boards | ||
| 5V POWER OUTPUT | Up to 2000mA Max, features higher driving capability | ||
| EXPERIMENTAL BOARD | Support, solder pad is provided for DIY interfaces to connect with experimental board | ||

What's On Board?

- R7FA4M1AB3CFM
- AMS1117-3.3
3.3V voltage regulator - MP8759
5V voltage regulator - Arduino interface
compatible with standard Arduino interface, adapting 2.54 pitch solder pad, can be directly connected to experimental board - ICSP interface
- Power output header
3.3V OR 5V, voltage level configured by the onboard power configuration switch, used as power output and common-grounding with other boards
- Power configuration
for configuring R7FA4 PLUS A operating voltage - SWD indicator
- Power indicator
- User LED
- USB Type-C connector
for uploading program OR serial port debugging - Serial port RX/TX indicators
- DC input
6V ~ 24V - Reset button
Pinout Definition
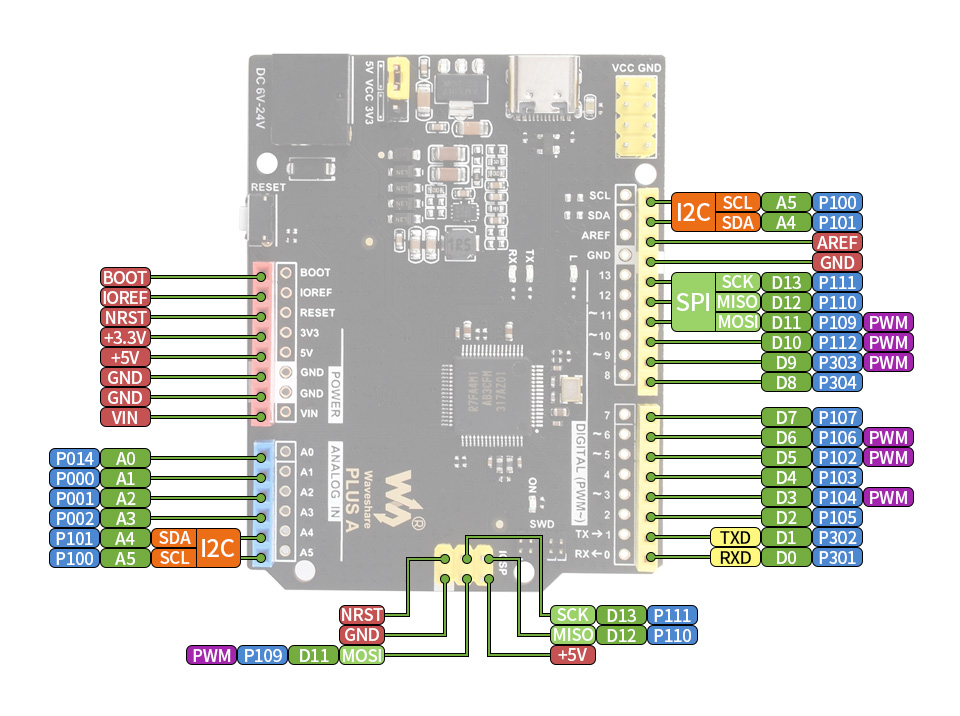
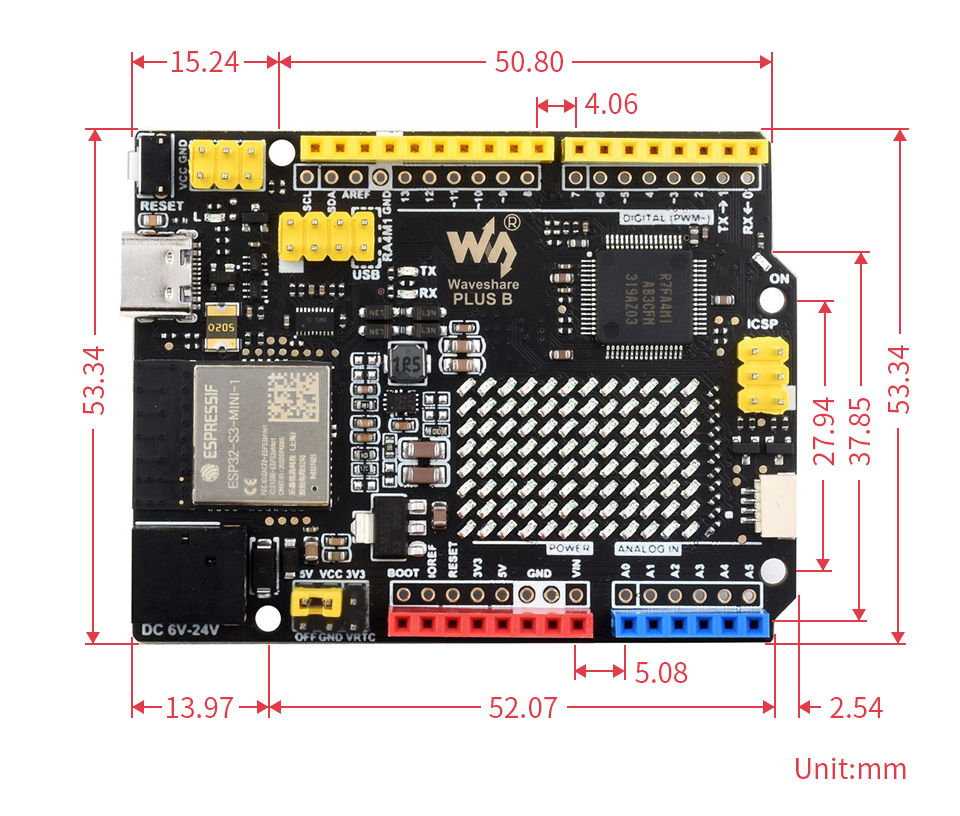
Outline Dimensions
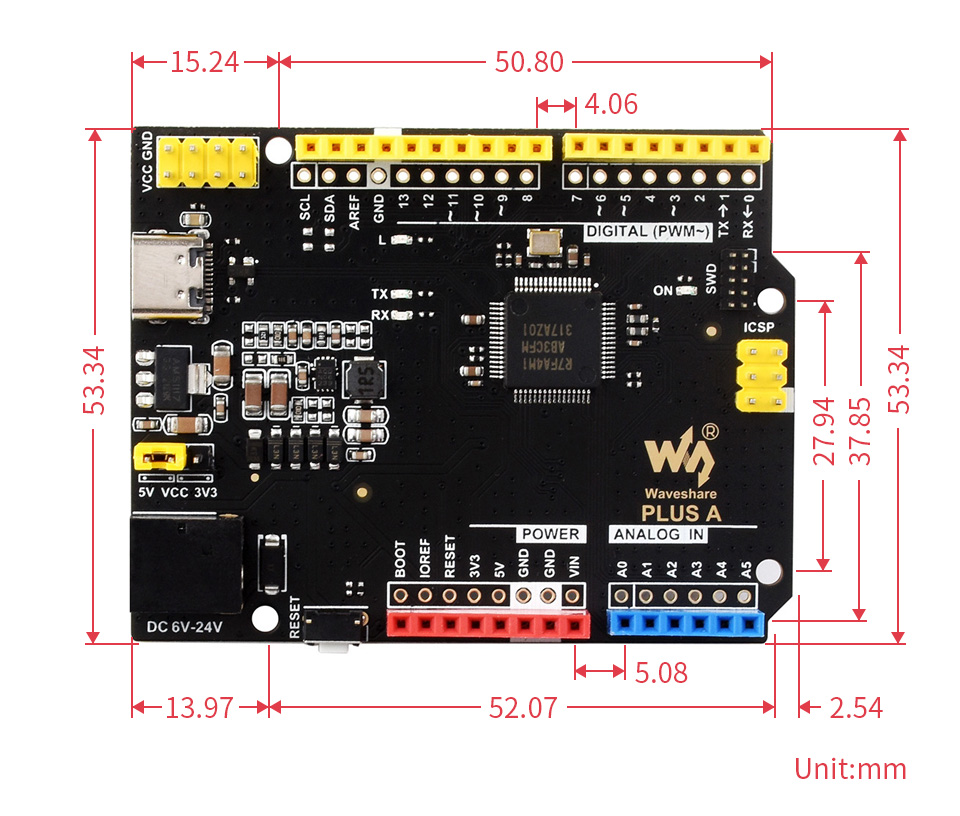
What's in the box?
1 x Arduino Uno Rev 4 compatible
1 x USB Type-A to Type-C cable

Specifications
| MODEL | (This product) |
(Also available) | |
|---|---|---|---|
| MICROCONTROLLER | R7FA4 (32-bit ARM Cortex-M4) | R7FA4 (32-bit ARM Cortex-M4) | |
| ESP32-S3FN8 (Dual-core 32-bit Xtensa LX7) | |||
| CLOCK FREQUENCY | R7FA4: 48MHz | R7FA4: 48MHz | |
| ESP32-S3FN8: 240MHz | |||
| STORAGE | R7FA4: 256kB Flash, 32kB RAM | R7FA4: 256kB Flash, 32kB RAM | |
| ESP32-S3FN8: 384kB ROM, 512kB RAM, 8MB Flash | |||
| WIRELESS COMMUNICATION | None | 2.4GHz WiFi + Bluetooth LE | |
| OPERATING VOLTAGE | Options for 5V/3.3V, support more shields | ||
| POWER INPUT | 6~24V | ||
| RESET BUTTON | Lateral, easier to use when connecting with shield | ||
| IO PIN OUTPUT CURRENT | 8mA | ||
| DIGITAL PINS | 14 | ||
| ANALOG PINS | 6 | ||
| DAC | 2 | ||
| PWM | 6 | ||
| UART | 1 | ||
| I2C | 1 | ||
| SPI | 1 | ||
| CAN | 1 | ||
| DC JACK | Low profile, shields won't be blocked anymore while connecting | ||
| POWER OUTPUT HEADER | Provides 5V OR 3.3V power output and common-grounding with other boards | ||
| 5V POWER OUTPUT | Up to 2000mA Max, features higher driving capability | ||
| EXPERIMENTAL BOARD | Support, solder pad is provided for DIY interfaces to connect with experimental board | ||
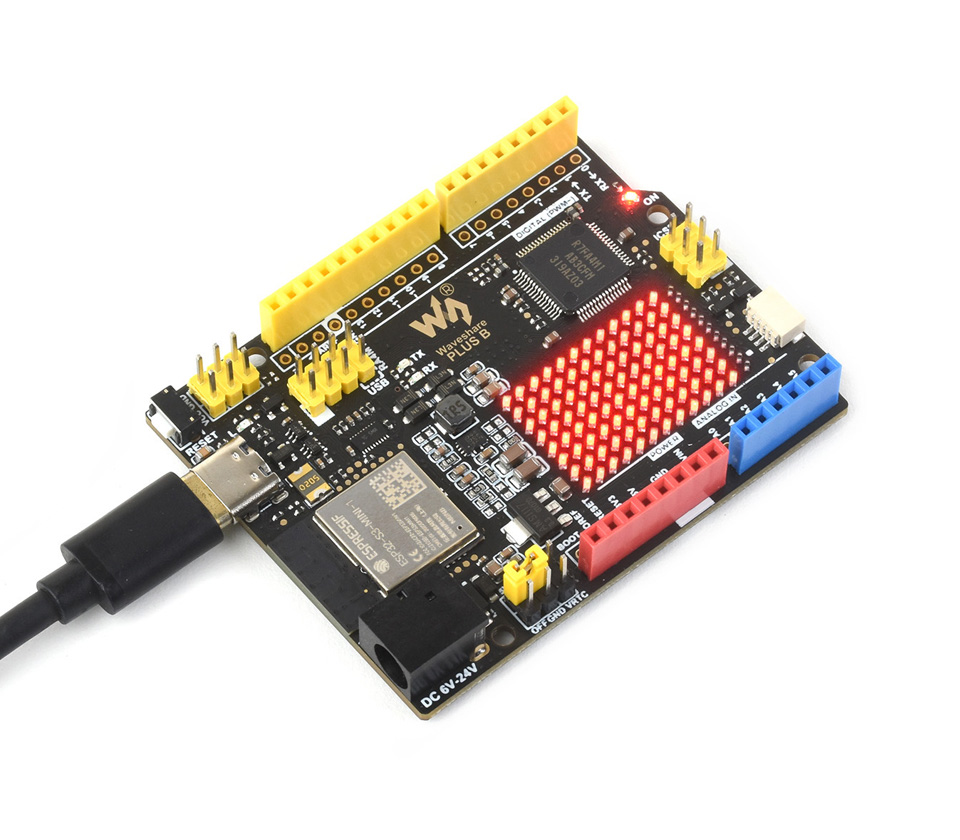
Onboard 12×8 Red LED Matrix
Supports Customisation Of Display Effect
What's On Board?
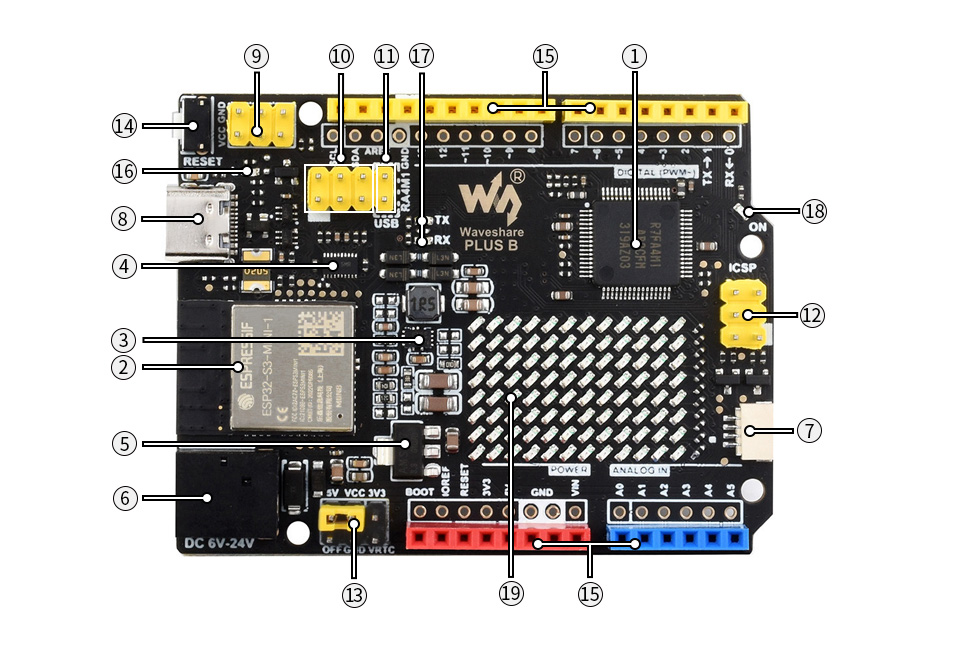
- R7FA4M1AB3CFM
- ESP32-S3-MINI-1 module
- MP8759
5V voltage regulator - TXB0108DQSR
voltage translator, for communication between R7FA4 and ESP32-S3 - AMS1117-3.3
3.3V voltage regulator - DC input
6V ~ 24V - Qwiic connector
for connecting I2C device of Qwiic Eco - USB Type-C connector
for uploading program OR serial port debugging - Power output header
3.3V OR 5V, voltage level configured by the onboard power configuration switch, used as power output and common-grounding with other boards
- ESP32-S3 pinheader
for ESP32-S3-MINI-1 firmware downloading - USB communication selection
- ICSP interface
- Power configuration
for configuring R7FA4 PLUS B operating voltage - Reset button
- Arduino interface
compatible with standard Arduino interface, adapting 2.54 pitch solder pad, can be directly connected to experimental board - User LED
- Serial port RX/TX indicators
- Power indicator
- 12×8 LED matrix
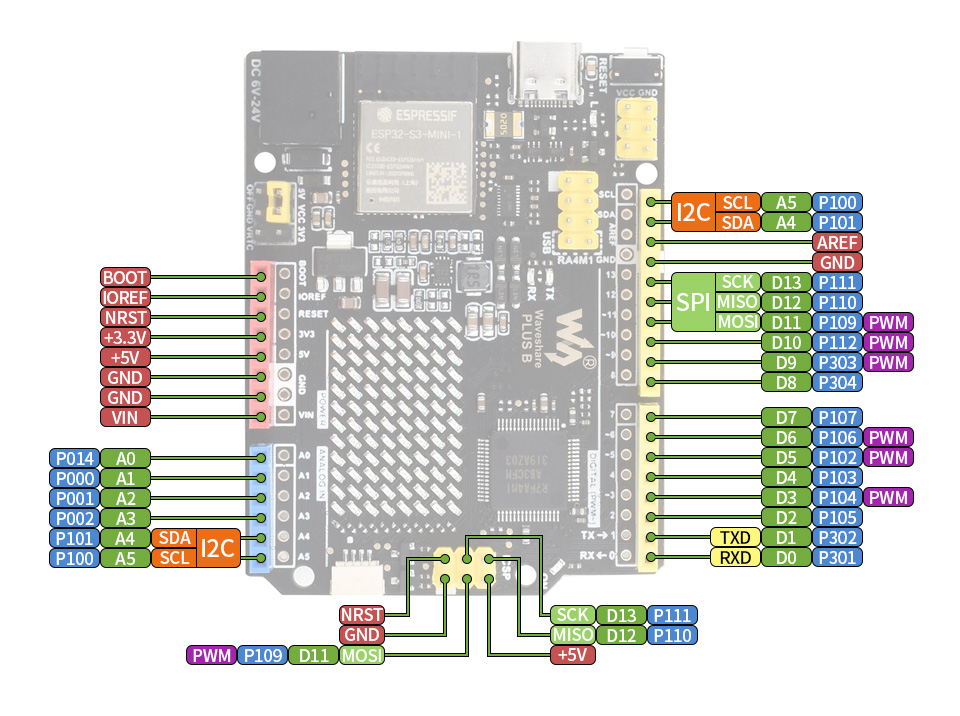
Pinout Definition
What's in the box?
1 x Arduino Uno Rev 4 wifi compatible
1 x USB Type-A to Type-C cable
Resources

Specifications
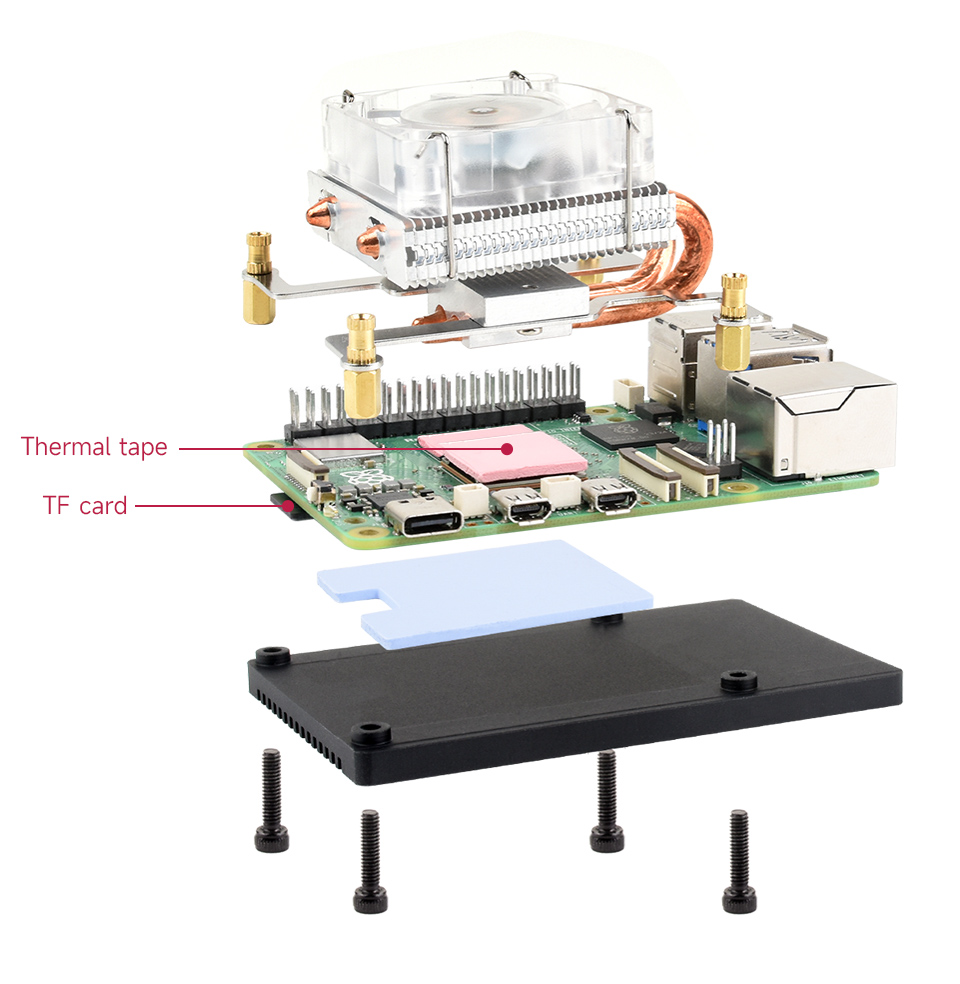
- SUPPORTED PI: Raspberry Pi 5
- POWER SUPPLY: DC 5V input (can be powered from Raspberry Pi)
- STRUCTURE: Low-Profile ICE Tower-style, 5mm copper tube super heat dissipation
- RATED POWER: 0.4W @5V, 0.08A
- FAN: Powerful RGB colorful LED fan
Large Area Cooling Fins And Directly-Contacted Copper Tube, Super Heat Dissipation
Reducing The Temperature Of The Raspberry Pi From 80℃ To 40℃ While Overclocking
More Silent
Rated Power 0.4W @5V, 0.08A, Elaborately Tuned Fan
Lower Noise, Higher Performance
What's in the box?
1 x Low-Profile ICE Tower
Resources
* for reference only, the Raspberry Pi 5 and TF card are NOT included.

LCD Digital Mini Handheld Multimeter AC/DC 750/1000V With Probe
LCD Digital Multimeter AC/DC 750/1000V Handheld multimeter for voltmeter, ammeter Ohm tester meter with probes.
Specifications
- DIY Supplies: ELECTRICAL
- Certification: NONE
- Origin: CN(Origin)
- Model Number: Digital Multimeter
- AC Current: /
- AC Voltage: 2-750V
- Measuring Resistance Range: 20k-2000k
- Operating Mode: Manual
- Measuring Inductance Range: /
- Display Type: Digital Display
- DC Current: 200u-2000u-20m-200m-10A
- DC Voltage: 200m-2000m-20-200-1000V
- Measuring Capacitance Range: /
- Dimensions: 190mm x 90mm x 30mm
- Operating Temperature: 0 - 40 ℃
- Colour: Black/Yellow
What's in the box ?
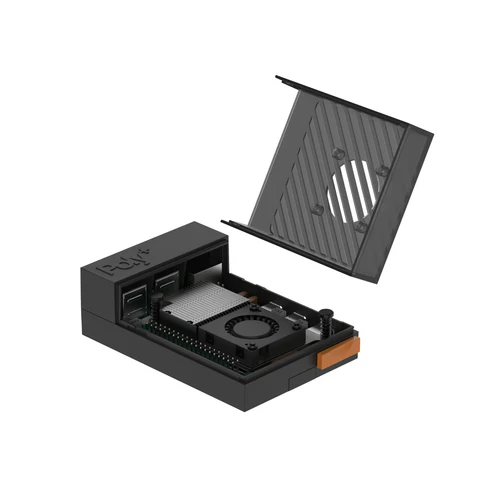
The Game 5Pi Case from 52Pi is a retro gaming enclosure designed for Raspberry Pi 5, offering a retro aesthetic along with epic cooling capabilities!
The case pays homage to consoles of days gone by with its on-point retro gaming styling, complete with an awesome USB/Ethernet flap cover which we just love!
It's not just a pretty face either - the Game 5Pi gives you convenient access to most ports on your Raspberry Pi 5 (including SD access), along with power button access and even soft rubber feet. Cooling is a key priority too (essential for a retro gaming setup). The case comes with an Armour Lite V5 heatsink/fan for the Pi 5, as well as a case exhaust fan to keep the overall enclosure temperature down.
Combine with our NES-Style USB controllers for the ultimate 'good ol' days' retro gaming machine!
Raspberry Pi 5 not included
Features
- Retro gaming case for Raspberry Pi 5
- Armor Lite V5 included - Optimal thermal dissipation for the Raspberry Pi
- Side fan cooling system - In addition to the main heatsink and fan, the case features a side fan cooling system to further enhance airflow and cooling efficiency
- ABS Material - Constructed from high-quality ABS material
- Compact retro design - Visually appealing while maintaining a smaller footprint
- Movable cover - A movable cover protects the unused USB and Ethernet ports
- Easy Installation - Designed for easy and hassle-free installation
- Compatibility - The Game 5Pi Case is specifically designed for Raspberry Pi 5
What's in the box?
1 x ABS Upper
1 x ABS Lower
1 x Armor Lite V5 heatsink/Fan
6 x Thermal Pads
1 x Screw driver
2 x M2.5 Screw
4 x Self-tapping screw
Raspberry Pi5 not included
Resources
The Creality Ender-3 V3 SE is seen as one of the best entry level printers available. It comes with a ton of features like high printing speed up to 250mm/s, auto bed levelling, a full colour screen interface, Creality's Sprite extruder and updated fresh clean look. Assembly and setup is a breeze, the printer is shipped in its flat state, this means the top section is laid flat in the box. This makes setup quick and easy and is usually done in less than 20 minutes.
Specifications
- Printing technology: FDM (Fused Deposition Modeling)
- Build Volume: 220 x 220 x 250mm
- Max printing speed: 250mm/s
- Printing Resolution: 0.1mm
- Nozzle diameter: 0.4mm (Standard)
- Max nozzle temperature: 260 °C
- Max heated bed temperature: 100 °C
- Printing Surface: PC Spring Steel
- Auto Bed Levelling mode: CR Touch
- Connection mode: SD card
- Compatible file format: STL, OBJ, 3MF
- Slicing Software: Creality Slicer / Cura / Repetier-Host / Simplify3D
- Power Input: 200-240V AC, 50/60Hz
- Rated Power: 350W
- Compatible Filaments: PLA, ABS, PETG, TPU, Wood, Nylon
- Filament Diameter: 1.75mm
- Nett Weight: 7.34kg
- Machine size: 400 x 366 x 490mm
What's in the box?
1 x Creality Ender 3D Printer
Resources
Creality Wiki

Digital Video Broadcast (DVB) is a widely adopted standard for transmitting broadcast Television.
Please note: it is the responsibility of the end user to ensure that they have the necessary permissions / license to receive broadcast television in their country
This add-on board lets you receive digital DVB-T2 TV streams on your Raspberry Pi to view them or stream them over a network to other devices
To get started you'll need:
- Any 40-pin Raspberry Pi (including Pi Zero 2, provided they have headers soldered)
- A suitable aerial to receive broadcast TV (not provided)
We've put together a downloadable step-by-step guide to Getting started with the TV HAT, which walks you through the complete setup process.
Specifications
The Raspberry Pi TV HAT has a DVB-T2 and DVB-T tuner on board, which allows you to receive and decode digital television streams on your Raspberry Pi.
- Sony CXD2880 TV tuner
- Supported TV standards:
- Reception frequency: VHF III, UHF IV, UHF V
What's in the box?
1 x Set of mechanical spacers
1 x 40 way GPIO header
1 x Aerial adaptor
Resources
- Raspberry Pi TV HAT product brief
- Raspberry Pi TV HAT mechanical drawing
- More detailed information on Raspberry Pi hardware
Software & OS
Software installation
Operating system
Raspberry Pi OS Stretch (or later) is required for using the TV HAT. Download the latest version of Raspberry Pi OS here.
For how to install Raspberry Pi OS, see our online guide to Getting started with your Pi.
Software
The software we recommend for decoding TV streams and viewing content is TVHeadend. Instructions for setting this up are in our guide to Getting started with the TV HAT.
Media player support
- Kodi
- OMXplayer
- LibreELEC
Compliance
The Raspberry Pi TV HAT has undergone extensive compliance testing and meets the following European standards:
- Electromagnetic Compatibility Directive (EMC) 2014/30/EU
- Restriction of Hazardous Substances (RoHS) Directive 2011/65/EU
View and download global compliance certificates for Raspberry Pi products.
If you purchase a TV HAT, you must have the appropriate licence or approval to receive broadcast television in the country of intended use.

Features
- High grade ABS Plastic
- Snap on assembly
- Slide on, Slide off Top cover
- Built-in SD card cover
- Fits standard RPI5 HAT
What's in the box?
1 x Argon Poly+ 5 red and black case
1 x 30mm PWM fan with Pi 5 header and 2 mounting screws
1 x Black heatsink 19mm x 14mm x 7mm
1 x mini screwdriver
Note: This case has enough space if you rather want to fit the Raspberry Pi Active Cooler (not included) as per below pic.
Resources
Opening the red case top
The red cover slides about 1/2cm away from the USB ports and can then be lifted up.
Fan installation
The label on the fan should be facing you when mounting it to the case top. You will need to apply pressure on the screws when mounting the fan so that they can create a unique thread to hold the fan in place.
Raspberry Pi 5 board installation
To fit your Raspberry Pi into the Poly+ case, there will be plastic tabs on either side of the black rood piece labelled "Poly+" that you need to remove by squeezing both sides together. The Pi can then be inserted, with the Poly+ roof being clipped back into place over the USB ports