
Special Offers


Specifications
| MODEL | (This product) |
(Also available) | |
|---|---|---|---|
| MICROCONTROLLER | R7FA4 (32-bit ARM Cortex-M4) | R7FA4 (32-bit ARM Cortex-M4) | |
| ESP32-S3FN8 (Dual-core 32-bit Xtensa LX7) | |||
| CLOCK FREQUENCY | R7FA4: 48MHz | R7FA4: 48MHz | |
| ESP32-S3FN8: 240MHz | |||
| STORAGE | R7FA4: 256kB Flash, 32kB RAM | R7FA4: 256kB Flash, 32kB RAM | |
| ESP32-S3FN8: 384kB ROM, 512kB RAM, 8MB Flash | |||
| WIRELESS COMMUNICATION | None | 2.4GHz WiFi + Bluetooth LE | |
| OPERATING VOLTAGE | Options for 5V/3.3V, support more shields | ||
| POWER INPUT | 6~24V | ||
| RESET BUTTON | Lateral, easier to use when connecting with shield | ||
| IO PIN OUTPUT CURRENT | 8mA | ||
| DIGITAL PINS | 14 | ||
| ANALOG PINS | 6 | ||
| DAC | 2 | ||
| PWM | 6 | ||
| UART | 1 | ||
| I2C | 1 | ||
| SPI | 1 | ||
| CAN | 1 | ||
| DC JACK | Low profile, shields won't be blocked anymore while connecting | ||
| POWER OUTPUT HEADER | Provides 5V OR 3.3V power output and common-grounding with other boards | ||
| 5V POWER OUTPUT | Up to 2000mA Max, features higher driving capability | ||
| EXPERIMENTAL BOARD | Support, solder pad is provided for DIY interfaces to connect with experimental board | ||

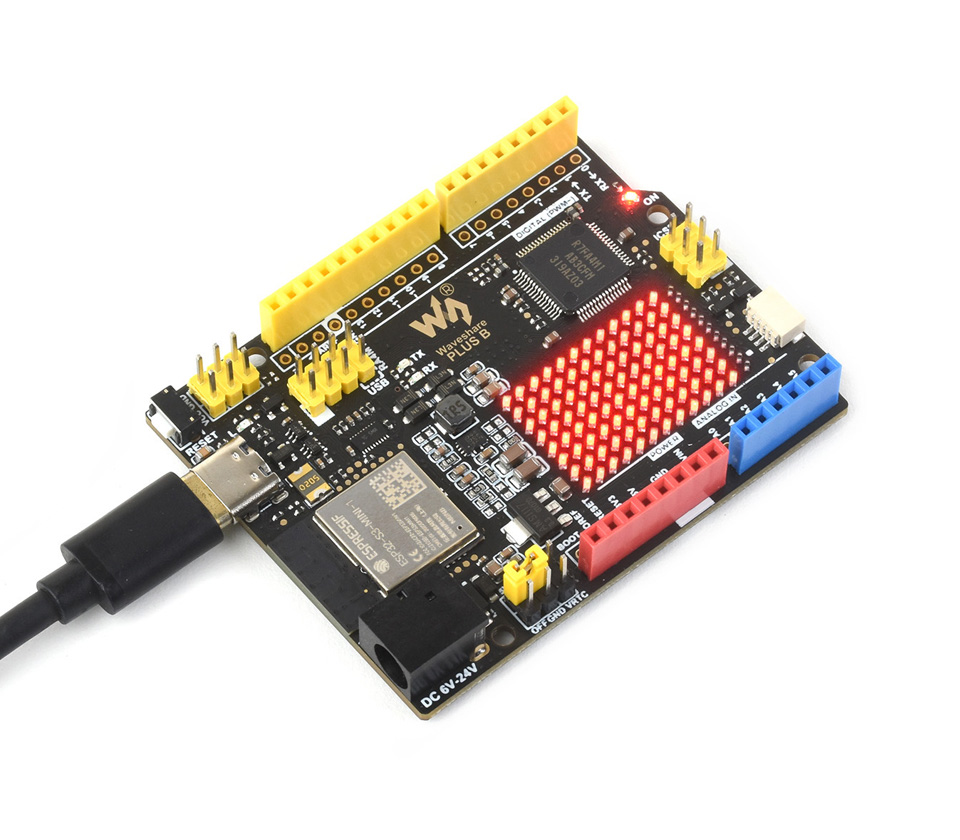
Onboard 12×8 Red LED Matrix
Supports Customisation Of Display Effect
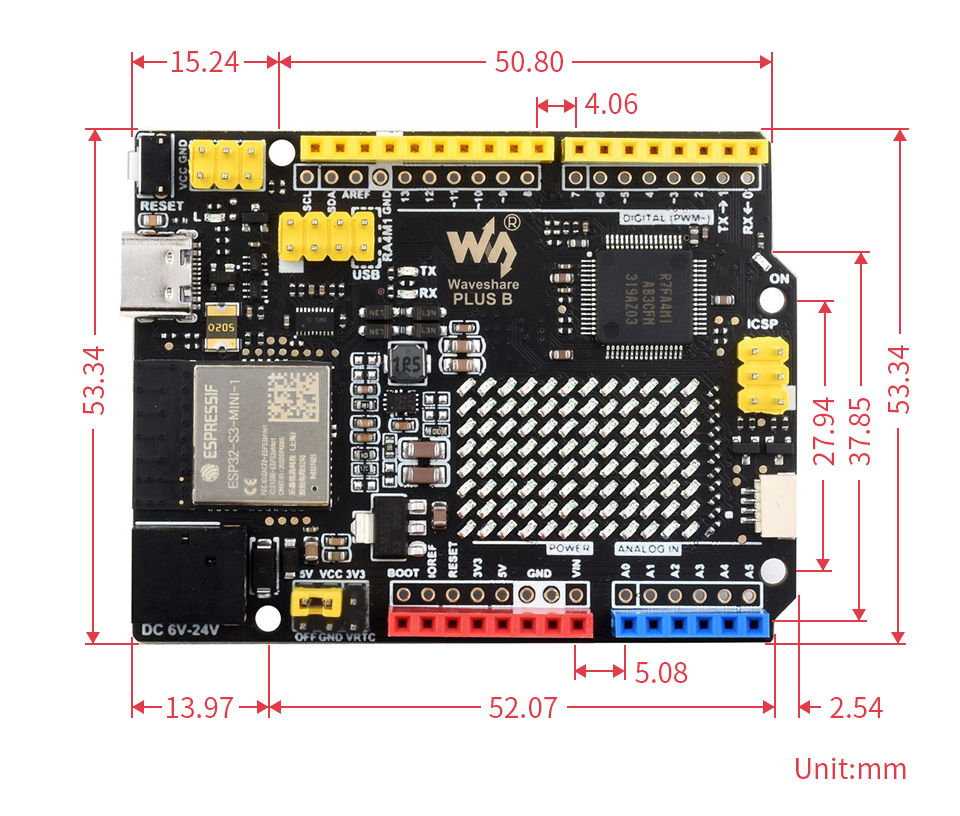
What's On Board?
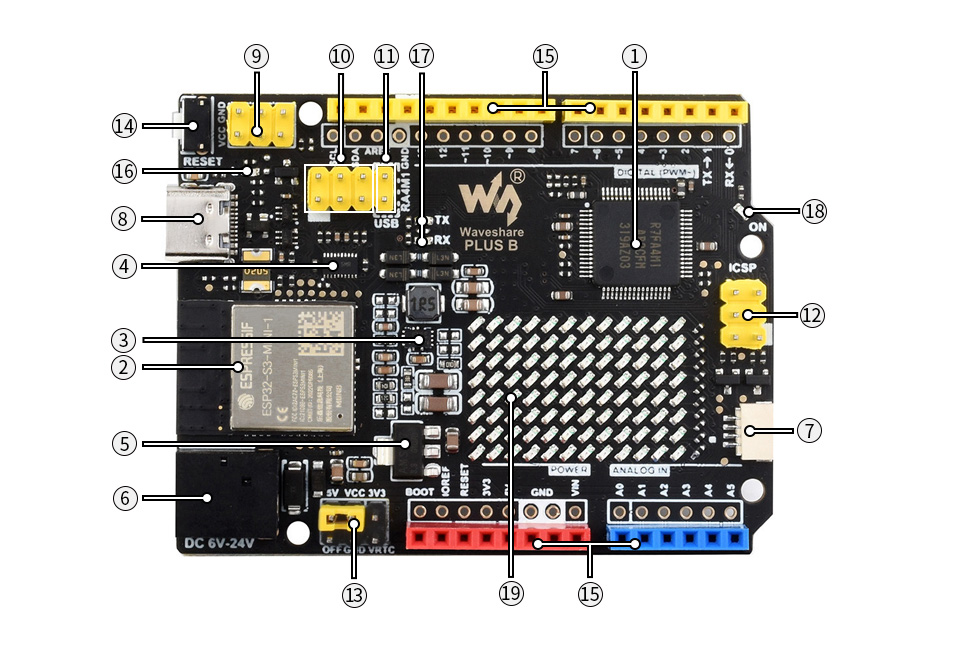
- R7FA4M1AB3CFM
- ESP32-S3-MINI-1 module
- MP8759
5V voltage regulator - TXB0108DQSR
voltage translator, for communication between R7FA4 and ESP32-S3 - AMS1117-3.3
3.3V voltage regulator - DC input
6V ~ 24V - Qwiic connector
for connecting I2C device of Qwiic Eco - USB Type-C connector
for uploading program OR serial port debugging - Power output header
3.3V OR 5V, voltage level configured by the onboard power configuration switch, used as power output and common-grounding with other boards
- ESP32-S3 pinheader
for ESP32-S3-MINI-1 firmware downloading - USB communication selection
- ICSP interface
- Power configuration
for configuring R7FA4 PLUS B operating voltage - Reset button
- Arduino interface
compatible with standard Arduino interface, adapting 2.54 pitch solder pad, can be directly connected to experimental board - User LED
- Serial port RX/TX indicators
- Power indicator
- 12×8 LED matrix
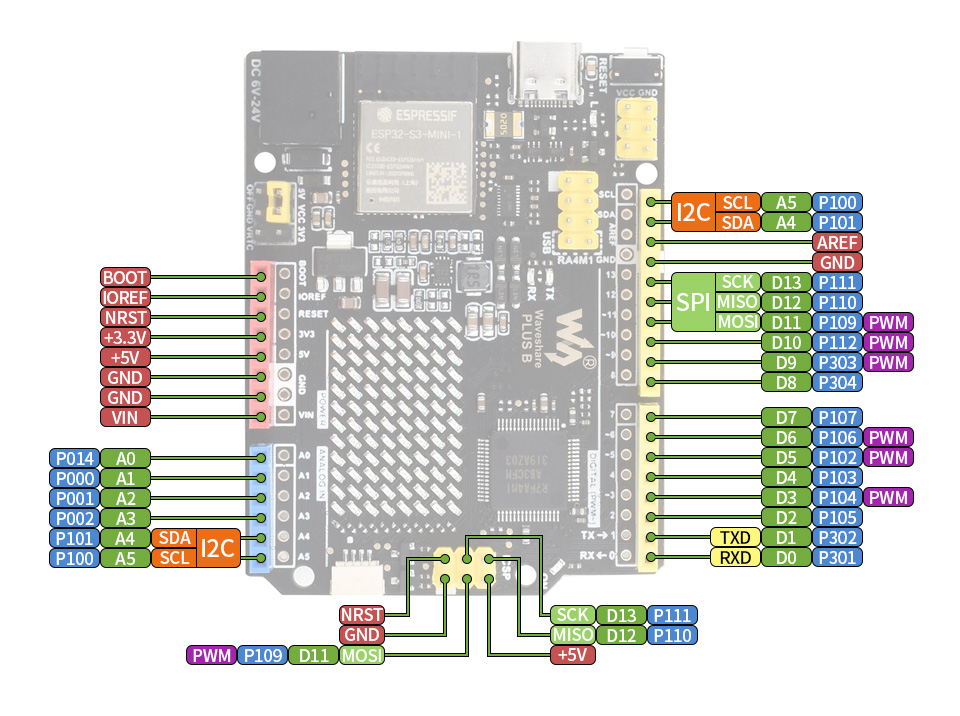
Pinout Definition
What's in the box?
1 x Arduino Uno Rev 4 wifi compatible
1 x USB Type-A to Type-C cable
Resources

Specifications
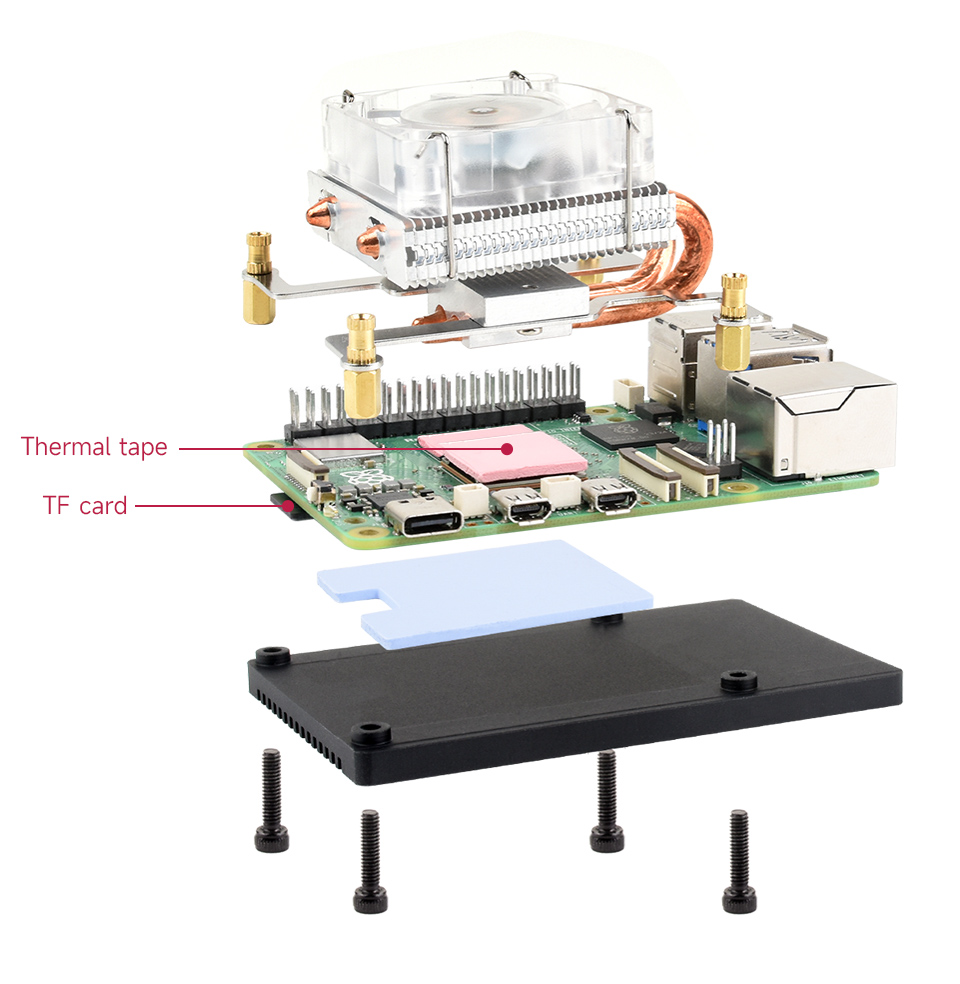
- SUPPORTED PI: Raspberry Pi 5
- POWER SUPPLY: DC 5V input (can be powered from Raspberry Pi)
- STRUCTURE: Low-Profile ICE Tower-style, 5mm copper tube super heat dissipation
- RATED POWER: 0.4W @5V, 0.08A
- FAN: Powerful RGB colorful LED fan
Large Area Cooling Fins And Directly-Contacted Copper Tube, Super Heat Dissipation
Reducing The Temperature Of The Raspberry Pi From 80℃ To 40℃ While Overclocking
More Silent
Rated Power 0.4W @5V, 0.08A, Elaborately Tuned Fan
Lower Noise, Higher Performance
What's in the box?
1 x Low-Profile ICE Tower
Resources
* for reference only, the Raspberry Pi 5 and TF card are NOT included.
The Game 5Pi Case from 52Pi is a retro gaming enclosure designed for Raspberry Pi 5, offering a retro aesthetic along with epic cooling capabilities!
The case pays homage to consoles of days gone by with its on-point retro gaming styling, complete with an awesome USB/Ethernet flap cover which we just love!
It's not just a pretty face either - the Game 5Pi gives you convenient access to most ports on your Raspberry Pi 5 (including SD access), along with power button access and even soft rubber feet. Cooling is a key priority too (essential for a retro gaming setup). The case comes with an Armour Lite V5 heatsink/fan for the Pi 5, as well as a case exhaust fan to keep the overall enclosure temperature down.
Combine with our NES-Style USB controllers for the ultimate 'good ol' days' retro gaming machine!
Raspberry Pi 5 not included
Features
- Retro gaming case for Raspberry Pi 5
- Armor Lite V5 included - Optimal thermal dissipation for the Raspberry Pi
- Side fan cooling system - In addition to the main heatsink and fan, the case features a side fan cooling system to further enhance airflow and cooling efficiency
- ABS Material - Constructed from high-quality ABS material
- Compact retro design - Visually appealing while maintaining a smaller footprint
- Movable cover - A movable cover protects the unused USB and Ethernet ports
- Easy Installation - Designed for easy and hassle-free installation
- Compatibility - The Game 5Pi Case is specifically designed for Raspberry Pi 5
What's in the box?
1 x ABS Upper
1 x ABS Lower
1 x Armor Lite V5 heatsink/Fan
6 x Thermal Pads
1 x Screw driver
2 x M2.5 Screw
4 x Self-tapping screw
Raspberry Pi5 not included
Resources
The Creality Ender-3 V3 SE is seen as one of the best entry level printers available. It comes with a ton of features like high printing speed up to 250mm/s, auto bed levelling, a full colour screen interface, Creality's Sprite extruder and updated fresh clean look. Assembly and setup is a breeze, the printer is shipped in its flat state, this means the top section is laid flat in the box. This makes setup quick and easy and is usually done in less than 20 minutes.
Specifications
- Printing technology: FDM (Fused Deposition Modeling)
- Build Volume: 220 x 220 x 250mm
- Max printing speed: 250mm/s
- Printing Resolution: 0.1mm
- Nozzle diameter: 0.4mm (Standard)
- Max nozzle temperature: 260 °C
- Max heated bed temperature: 100 °C
- Printing Surface: PC Spring Steel
- Auto Bed Levelling mode: CR Touch
- Connection mode: SD card
- Compatible file format: STL, OBJ, 3MF
- Slicing Software: Creality Slicer / Cura / Repetier-Host / Simplify3D
- Power Input: 200-240V AC, 50/60Hz
- Rated Power: 350W
- Compatible Filaments: PLA, ABS, PETG, TPU, Wood, Nylon
- Filament Diameter: 1.75mm
- Nett Weight: 7.34kg
- Machine size: 400 x 366 x 490mm
What's in the box?
1 x Creality Ender 3D Printer
Resources
Creality Wiki

Digital Video Broadcast (DVB) is a widely adopted standard for transmitting broadcast Television.
Please note: it is the responsibility of the end user to ensure that they have the necessary permissions / license to receive broadcast television in their country
This add-on board lets you receive digital DVB-T2 TV streams on your Raspberry Pi to view them or stream them over a network to other devices
To get started you'll need:
- Any 40-pin Raspberry Pi (including Pi Zero 2, provided they have headers soldered)
- A suitable aerial to receive broadcast TV (not provided)
We've put together a downloadable step-by-step guide to Getting started with the TV HAT, which walks you through the complete setup process.
Specifications
The Raspberry Pi TV HAT has a DVB-T2 and DVB-T tuner on board, which allows you to receive and decode digital television streams on your Raspberry Pi.
- Sony CXD2880 TV tuner
- Supported TV standards:
- Reception frequency: VHF III, UHF IV, UHF V
What's in the box?
1 x Set of mechanical spacers
1 x 40 way GPIO header
1 x Aerial adaptor
Resources
- Raspberry Pi TV HAT product brief
- Raspberry Pi TV HAT mechanical drawing
- More detailed information on Raspberry Pi hardware
Software & OS
Software installation
Operating system
Raspberry Pi OS Stretch (or later) is required for using the TV HAT. Download the latest version of Raspberry Pi OS here.
For how to install Raspberry Pi OS, see our online guide to Getting started with your Pi.
Software
The software we recommend for decoding TV streams and viewing content is TVHeadend. Instructions for setting this up are in our guide to Getting started with the TV HAT.
Media player support
- Kodi
- OMXplayer
- LibreELEC
Compliance
The Raspberry Pi TV HAT has undergone extensive compliance testing and meets the following European standards:
- Electromagnetic Compatibility Directive (EMC) 2014/30/EU
- Restriction of Hazardous Substances (RoHS) Directive 2011/65/EU
View and download global compliance certificates for Raspberry Pi products.
If you purchase a TV HAT, you must have the appropriate licence or approval to receive broadcast television in the country of intended use.

Features
- High grade ABS Plastic
- Snap on assembly
- Slide on, Slide off Top cover
- Built-in SD card cover
- Fits standard RPI5 HAT
What's in the box?
1 x Argon Poly+ 5 red and black case
1 x 30mm PWM fan with Pi 5 header and 2 mounting screws
1 x Black heatsink 19mm x 14mm x 7mm
1 x mini screwdriver
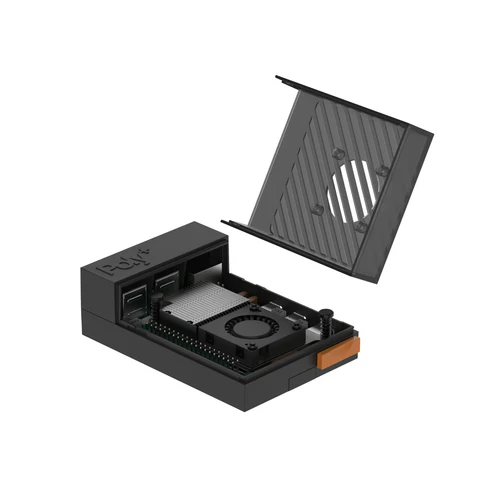
Note: This case has enough space if you rather want to fit the Raspberry Pi Active Cooler (not included) as per below pic.
Resources
Opening the red case top
The red cover slides about 1/2cm away from the USB ports and can then be lifted up.
Fan installation
The label on the fan should be facing you when mounting it to the case top. You will need to apply pressure on the screws when mounting the fan so that they can create a unique thread to hold the fan in place.
Raspberry Pi 5 board installation
To fit your Raspberry Pi into the Poly+ case, there will be plastic tabs on either side of the black rood piece labelled "Poly+" that you need to remove by squeezing both sides together. The Pi can then be inserted, with the Poly+ roof being clipped back into place over the USB ports

This battery holder accepts 3x AA batteries and features a USB (female) output giving you a different way to power your project compared to traditional battery holders. The onboard switch allows convenient power control and the slide-out top cover makes it quick and easy to change batteries.
In terms of voltage, AA batteries are usually available in 1.2V (rechargeable/carbon-zinc) or 1.5V (alkaline), meaning this USB battery holder can offer between 3.6V and 4.5V depending on which battery chemistry is used and their condition.
Whilst this won't power most 5V development boards, it works great with the Raspberry Pi Pico (when combined with a Micro-USB cable) which can accept 1.8V to 5.5V input - so you really can't go wrong no matter which type of battery you use!
We also think this might be super-duper for powering simple circuits and projects (or even other 3.3V devices with a wide input range). Perhaps combine with a USB breakout cable or simply splice one of your old unwanted cables at home?
Features
- 3x AA battery holder
- Can be used with rechargeable or standard AA batteries
- Up to 3.6V to 4.5V output (depending on battery type and condition/charge)
- On/Off switch for power control
- USB-A female output
- Slide-off battery cover (no screw included)
- Dimensions (approximate)
- Battery box: 68mm x 47mm x 17mm
- Cable length (to tip): 90mm
What's in the box?
1 x Triple AA Battery Holder with female USB A
Need batteries? You will find our battery selection here

Take inspiration from the golden age of video games and learn how to write your own modern classics
Code the Classics Volume I not only tells the stories of some of the seminal video games of the 1970s and 1980s, but shows you how to create your own games inspired by them, following examples programmed by Raspberry Pi co-founder Eben Upton. You’ll learn how to install Python, Pygame Zero, and an IDE so you can run and edit the games in this book. You'll also:
- Get game design tips and tricks from the masters
- Learn how to code your own games with Pygame Zero
- Explore the code listings and find out how they work
You'll meet these vintage-inspired games, and learn from their code in between rounds of play:
- Boing!: All it took was a couple of lines and a dot, and gamers would be queuing up to play.
- Cavern: Enduringly popular, the platform game genre is still packed with creative possibilities.
- Infinite Bunner: Play around with the benefits that a top-down perspective can lend to the classic platform genre.
- Myriapod: Some shooters confine the gameplay to a single screen while limiting the player's movement. Restrictions can build challenge and difficulty, making for truly addictive gaming.
- Substitute Soccer: Top-down games of pinball-style soccer built a huge cult following and kicked off a sports genre that's still going strong.
What's in the box?
1 x book(Code the classics V1 2nd edition)
read more at https://www.raspberrypi.com/news/code-the-classics-volume-ii-from-raspberry-pi-press/

Code the Classics Volume II not only tells the stories of some of the seminal video games of the 1980s, but shows you how to create your own games inspired by them, following examples programmed by Andrew Gillett, ably assisted by Raspberry Pi co-founder and CEO Eben Upton along with Sean M. Tracey. In this book, you'll learn how to run and edit the games in this book by installing Python, Pygame Zero, and an IDE. You'll also:
- Get game design tips and tricks from the masters.
- Understand the fundamental tasks needed for every game: display images, play sound effects and receive inputs from the keyboard or a game controller.
- Learn how to code your own games with Pygame Zero, a library that helps automate those tasks.
Explore the code listings and find out how they work.
You'll meet these vintage-inspired games, and learn from their code in between rounds of play:
- Avenger: fly across a scrolling landscape while you save humans from malevolent aliens.
- Beat Streets: fight your way through a level, and defeat a notorious crime boss.
- Eggzy: collect gems and survive as long as possible before time runs out.
- Leading Edge: Race a car on a pseudo-3d race track.
Kinetix: Break bricks with your paddle, and use powerups to avoid various menaces.
What's in the box?
1 x Code the classics Vol2

- Waveshare POE board for RPi5
- Waveshare M.2 HAT+
- Raspberry Pi M.2 HAT+
- Raspberry Pi M.2 HAT+ AI Kit
- we are testing some more HATs....
This DIY case requires assembly. You will need a small precision flathead screwdriver.
Clear 3mm Acrylic Panels to protect your Raspberry Pi 5.
- PCIe
- DSI/CSI Interfaces
- Wall mounting holes
- Airflow Vents On The Top And Front
- With Power On/Off Button
- Easy To Pull & Plug TF Card On The Bottom
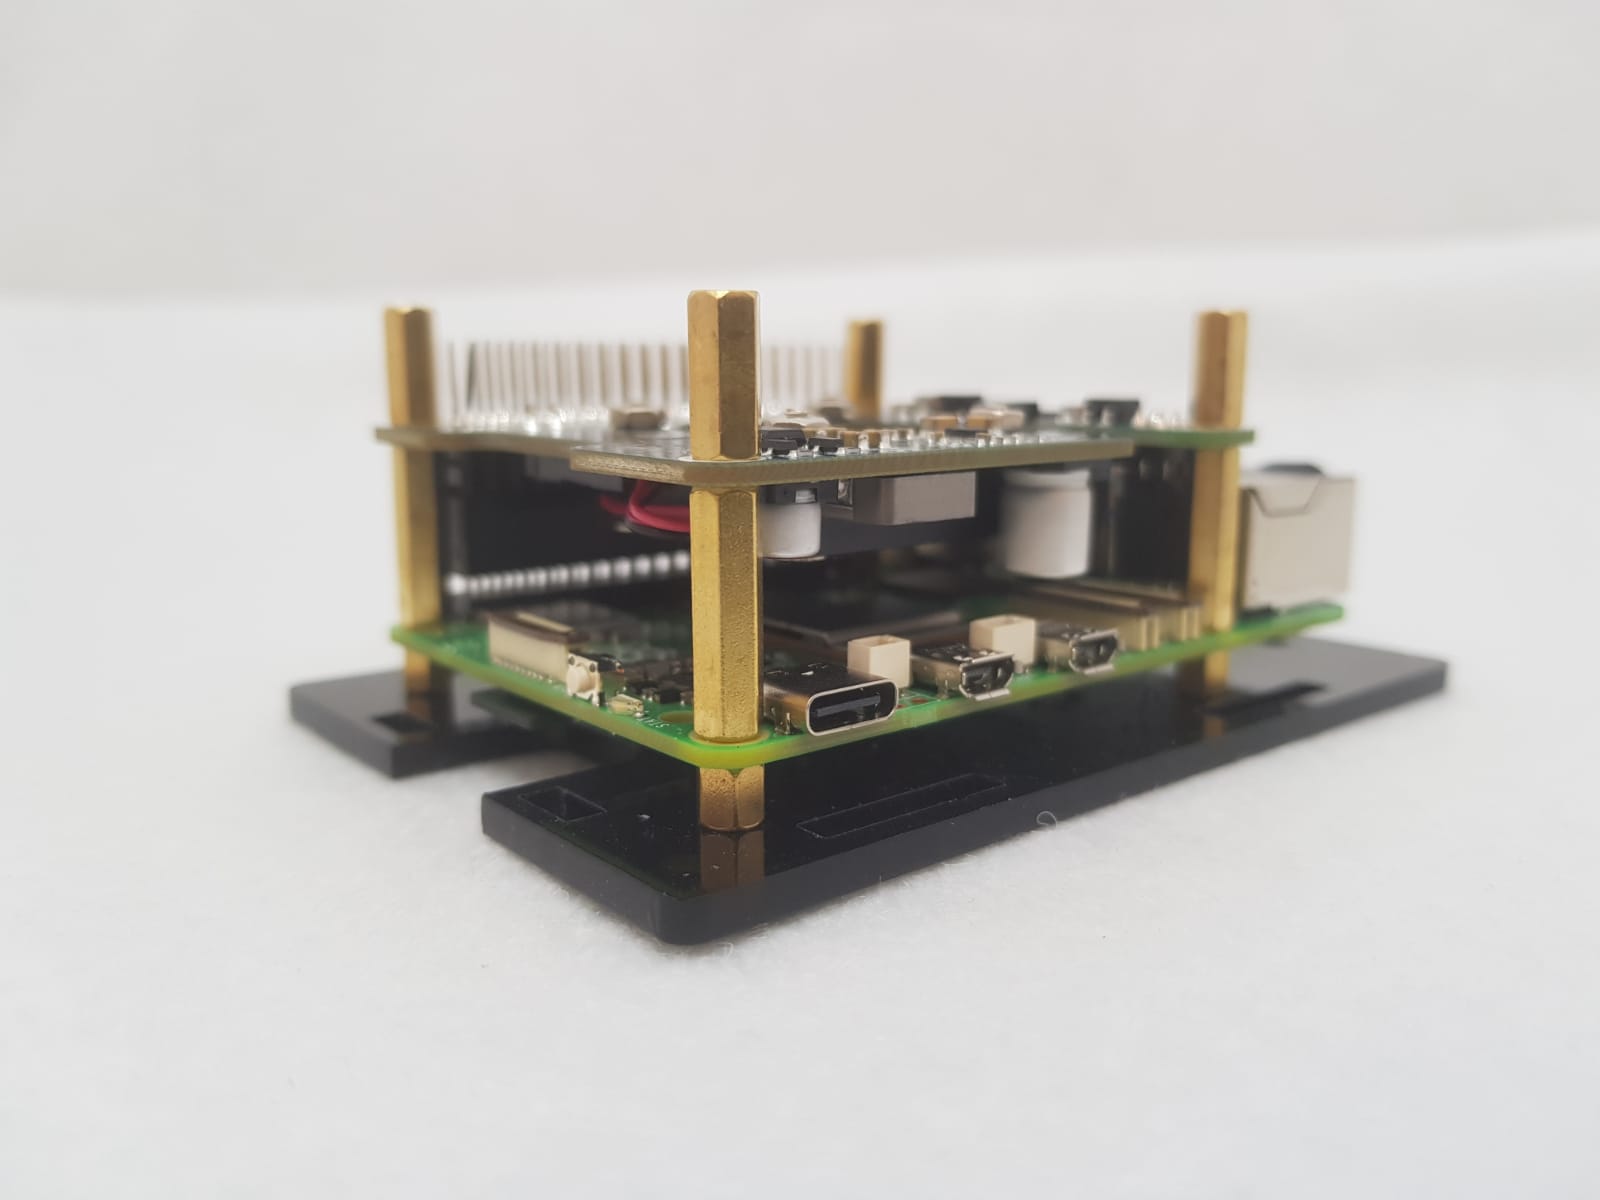
- Ample space to fit the RPi5 heatsink included with the POE board or with most other HATs the Raspberry Pi Active Cooler(not included)
What's in the box?
1 x PI5-CASE-F
1 x Nonskid rubber pad (4PCS)
1 x Screwdriver
1 x Screws and standoffs pack
Resources
Motion 2350 Pro - Advanced Robotics Controller for Beginners
It has been a few years since the first microcontroller by Raspberry Pi, the RP2040, was launched. Now, Raspberry Pi has introduced the latest upgraded processor, the RP2350. Introducing MOTION 2350 Pro, designed by Cytron, leveraging the new RP2350 processor. Built for beginner and intermediate users to experience the Pro version of the board. Ideal for those who want to build an advanced robot, minimize efforts on electronics, and focus on mechanics.
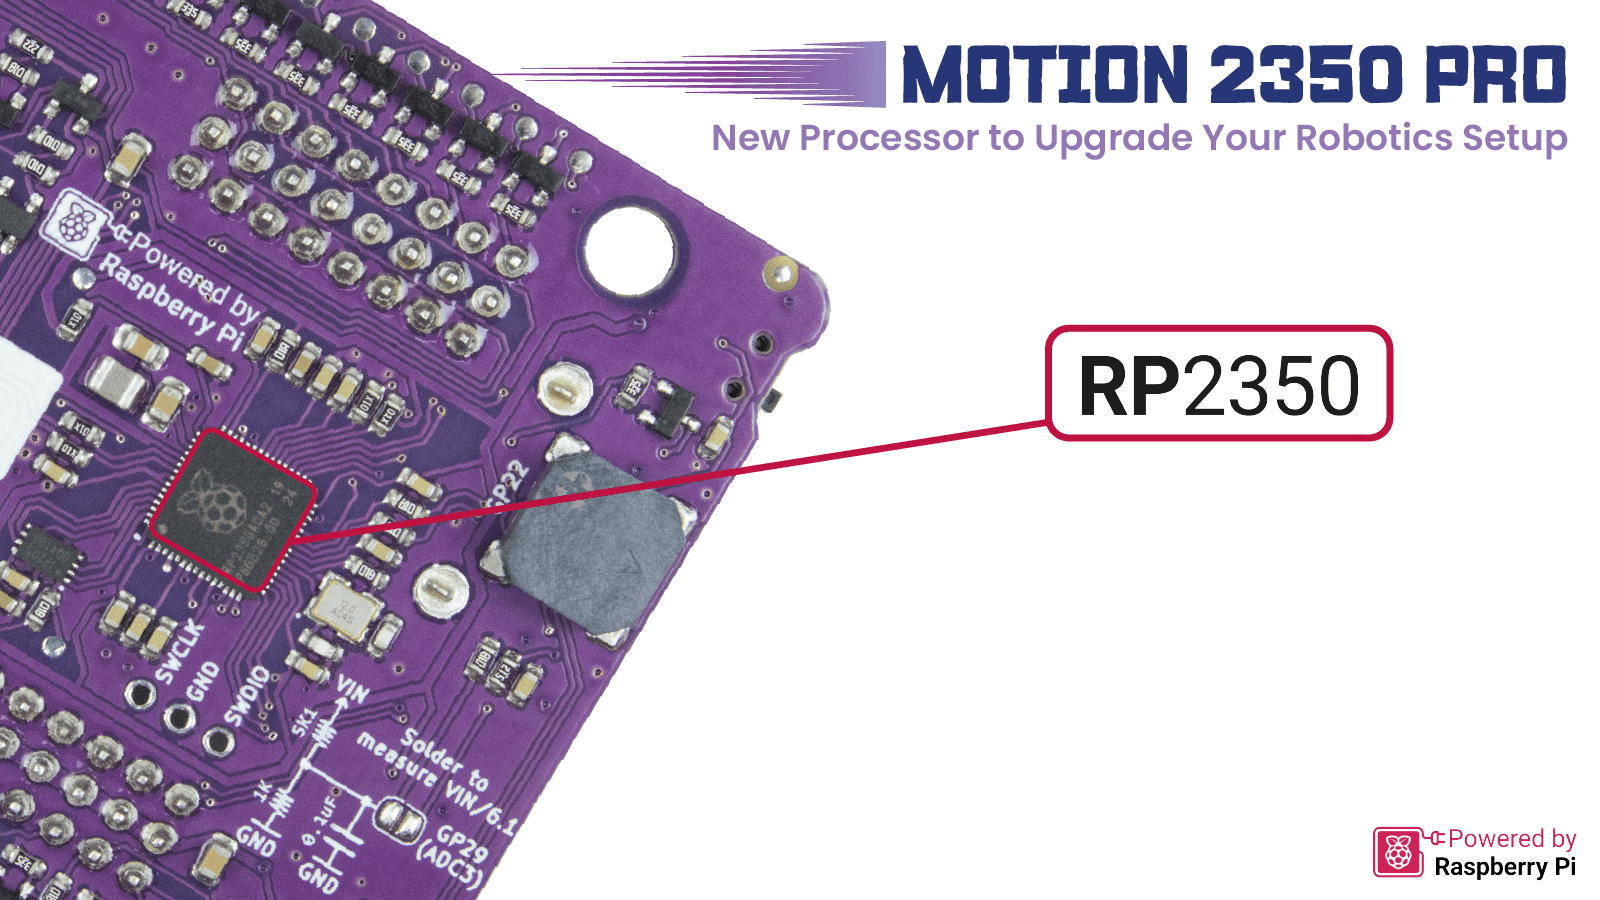
More Power, More Ports, More Connectivity
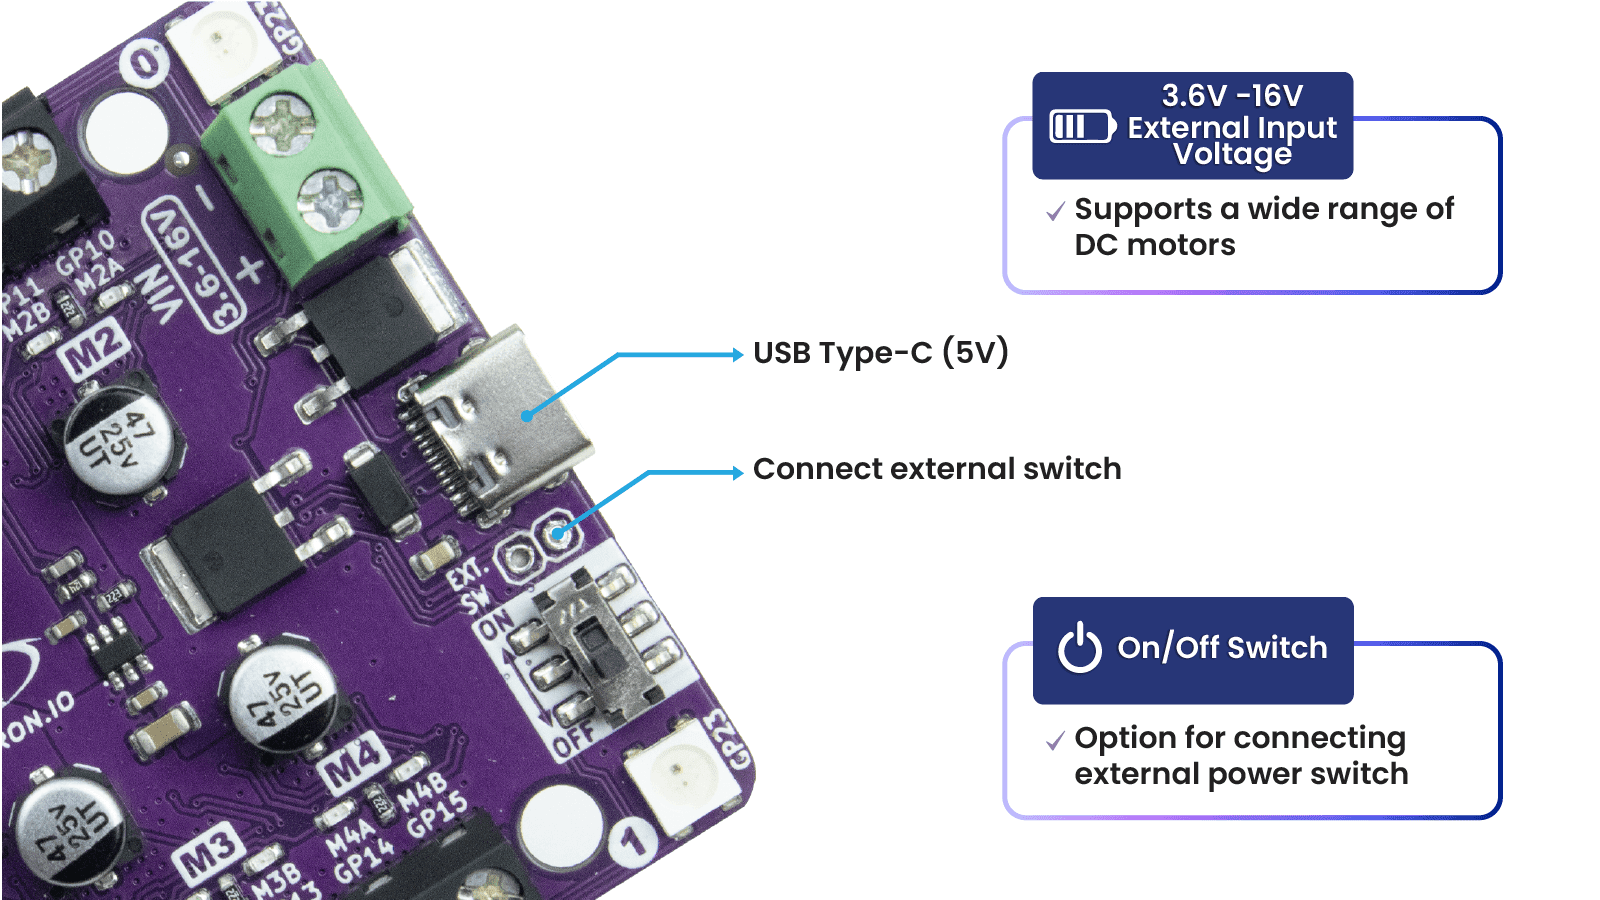
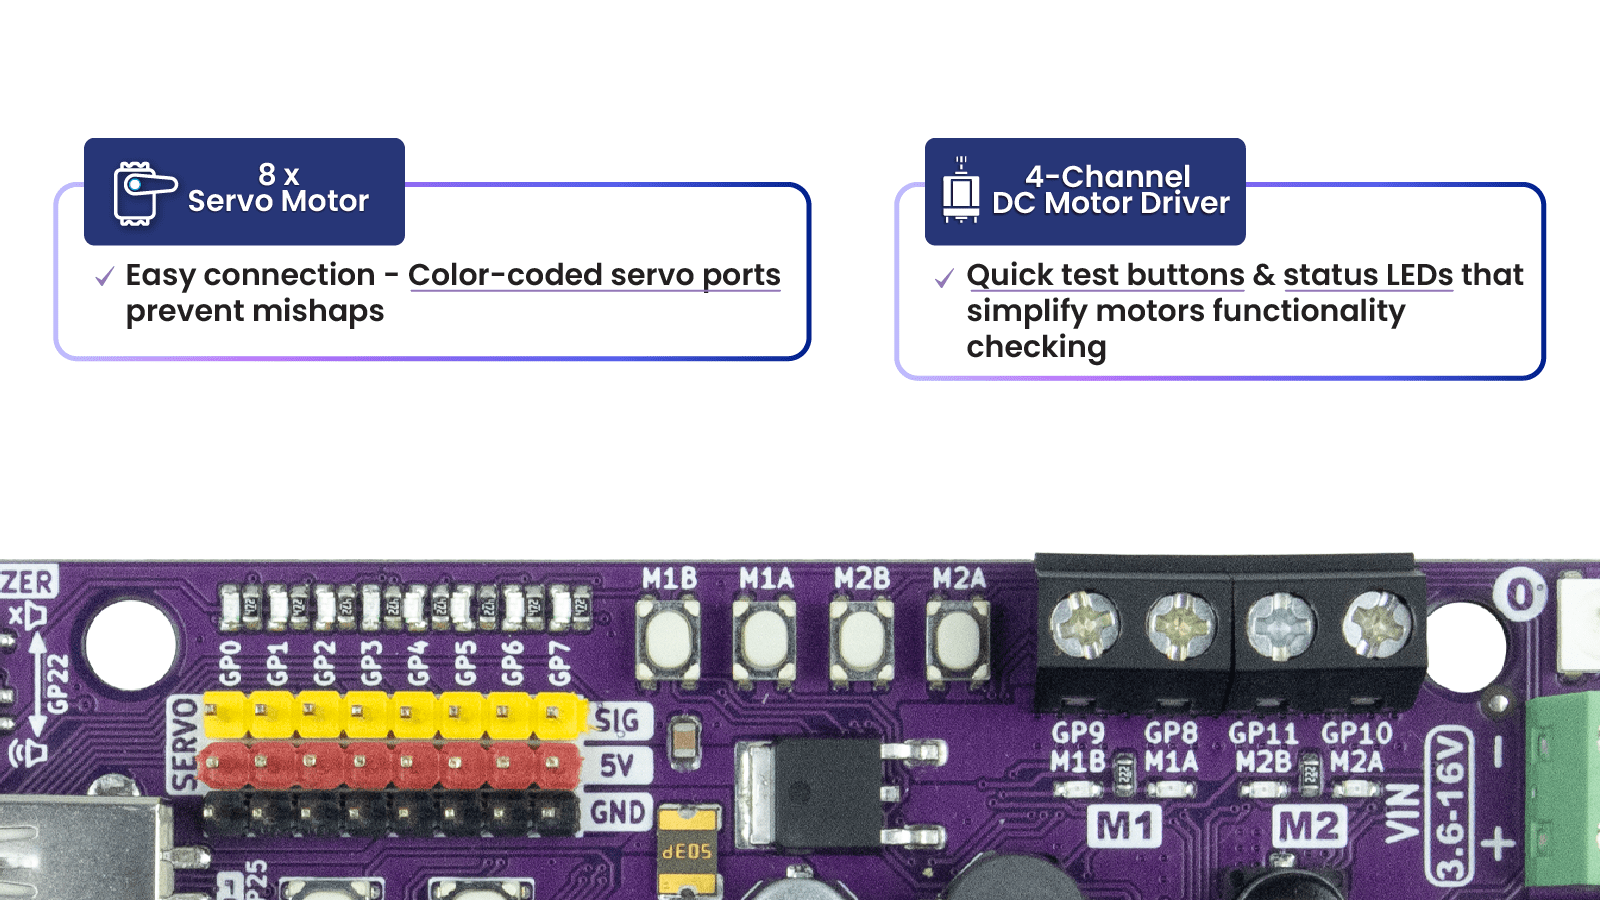
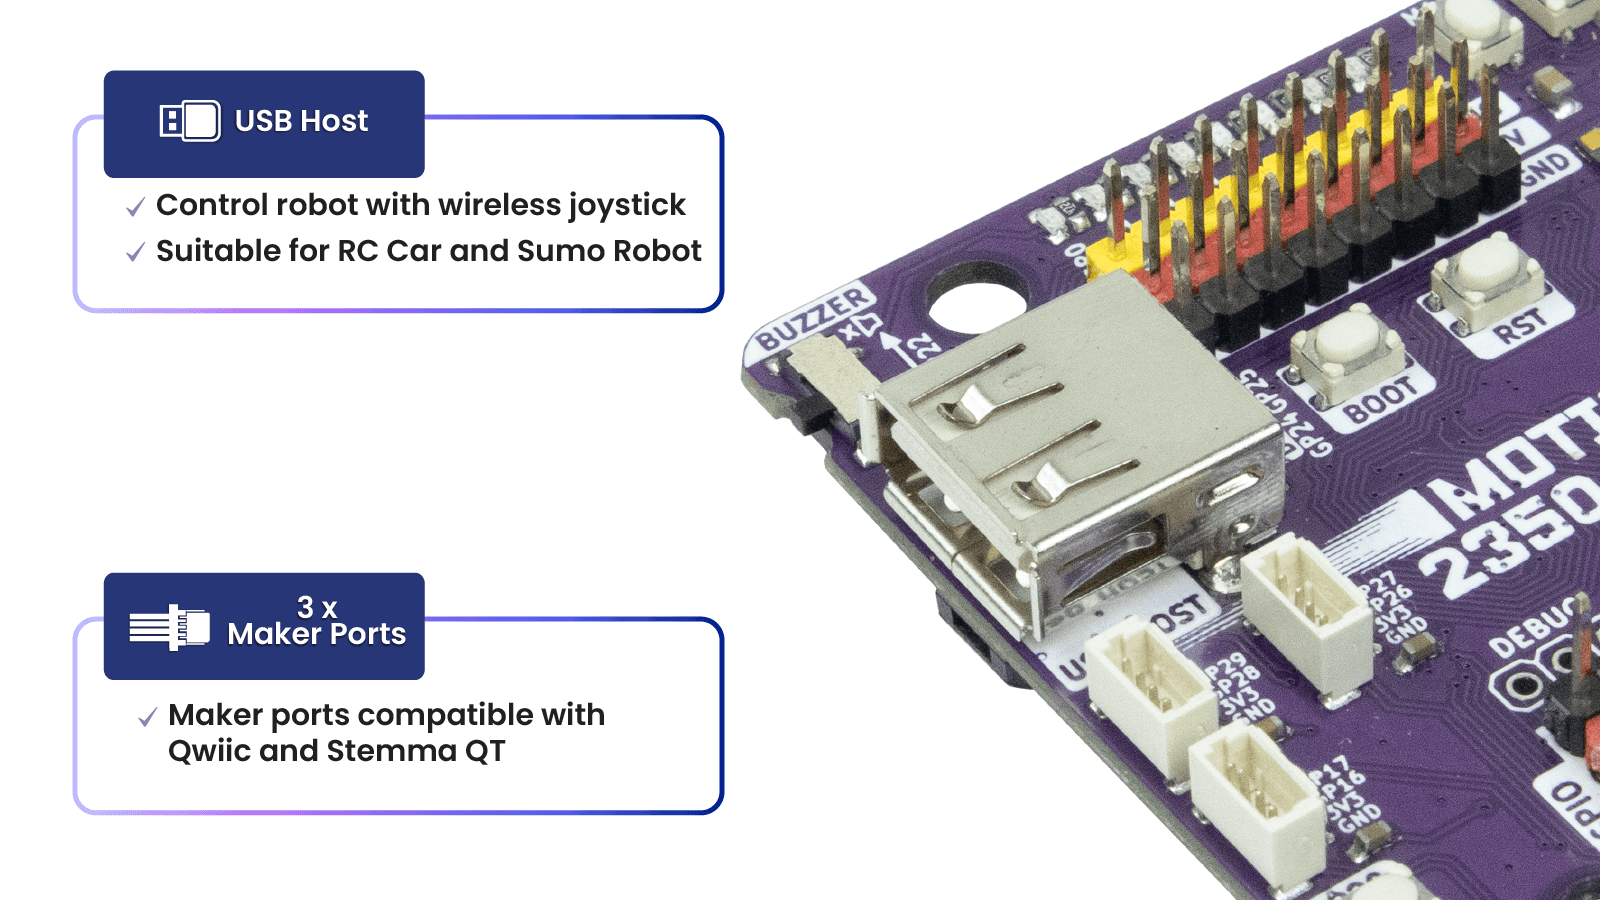
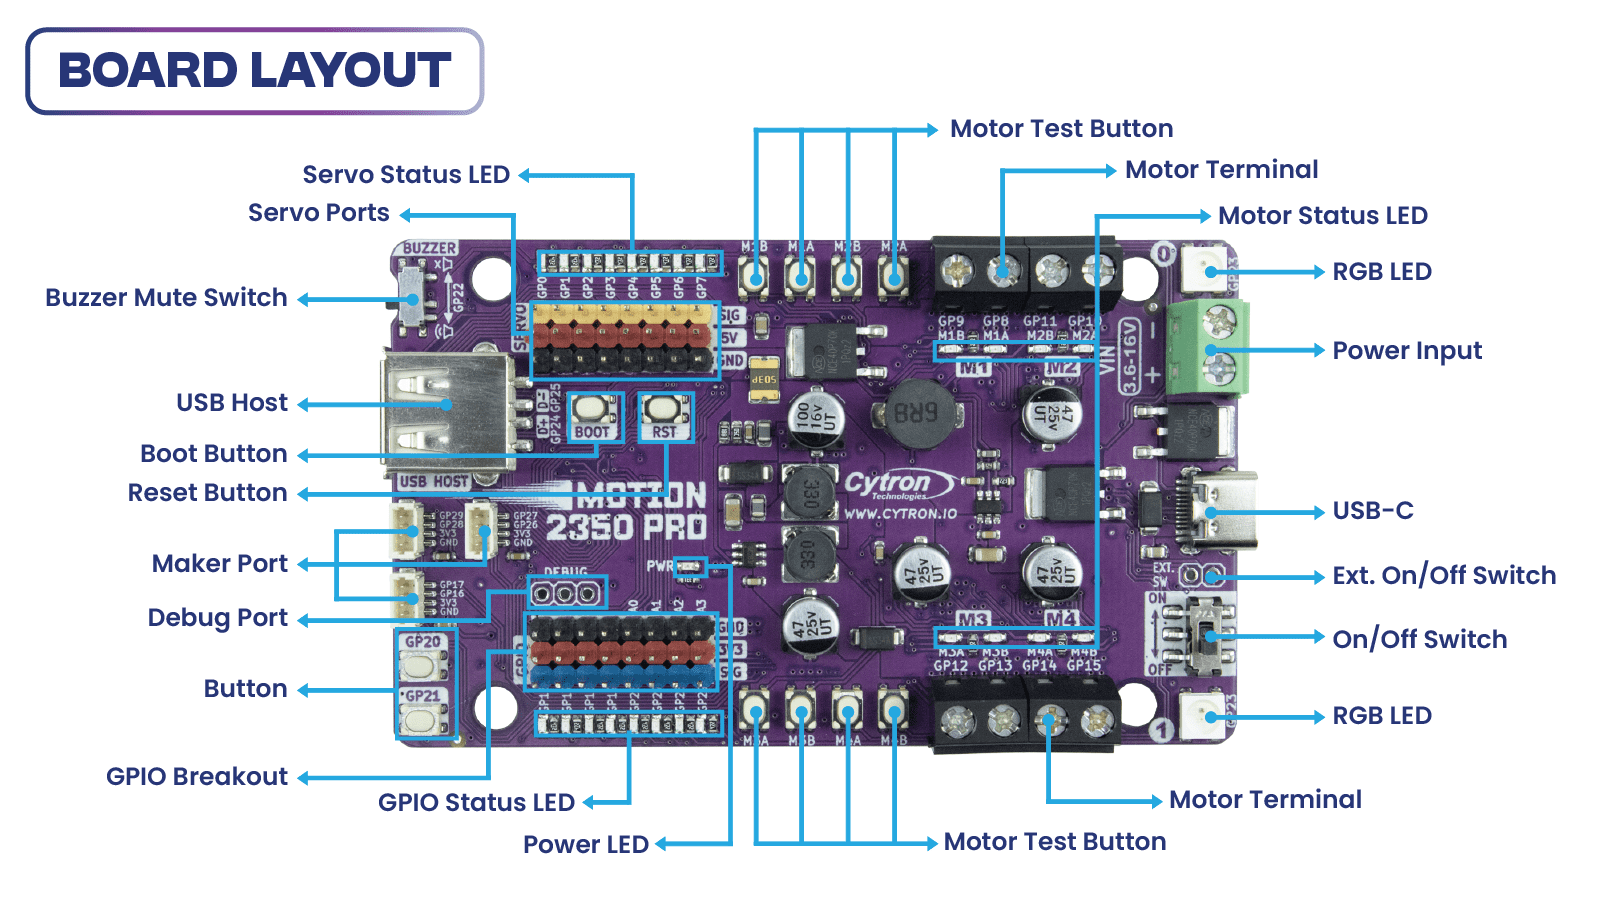
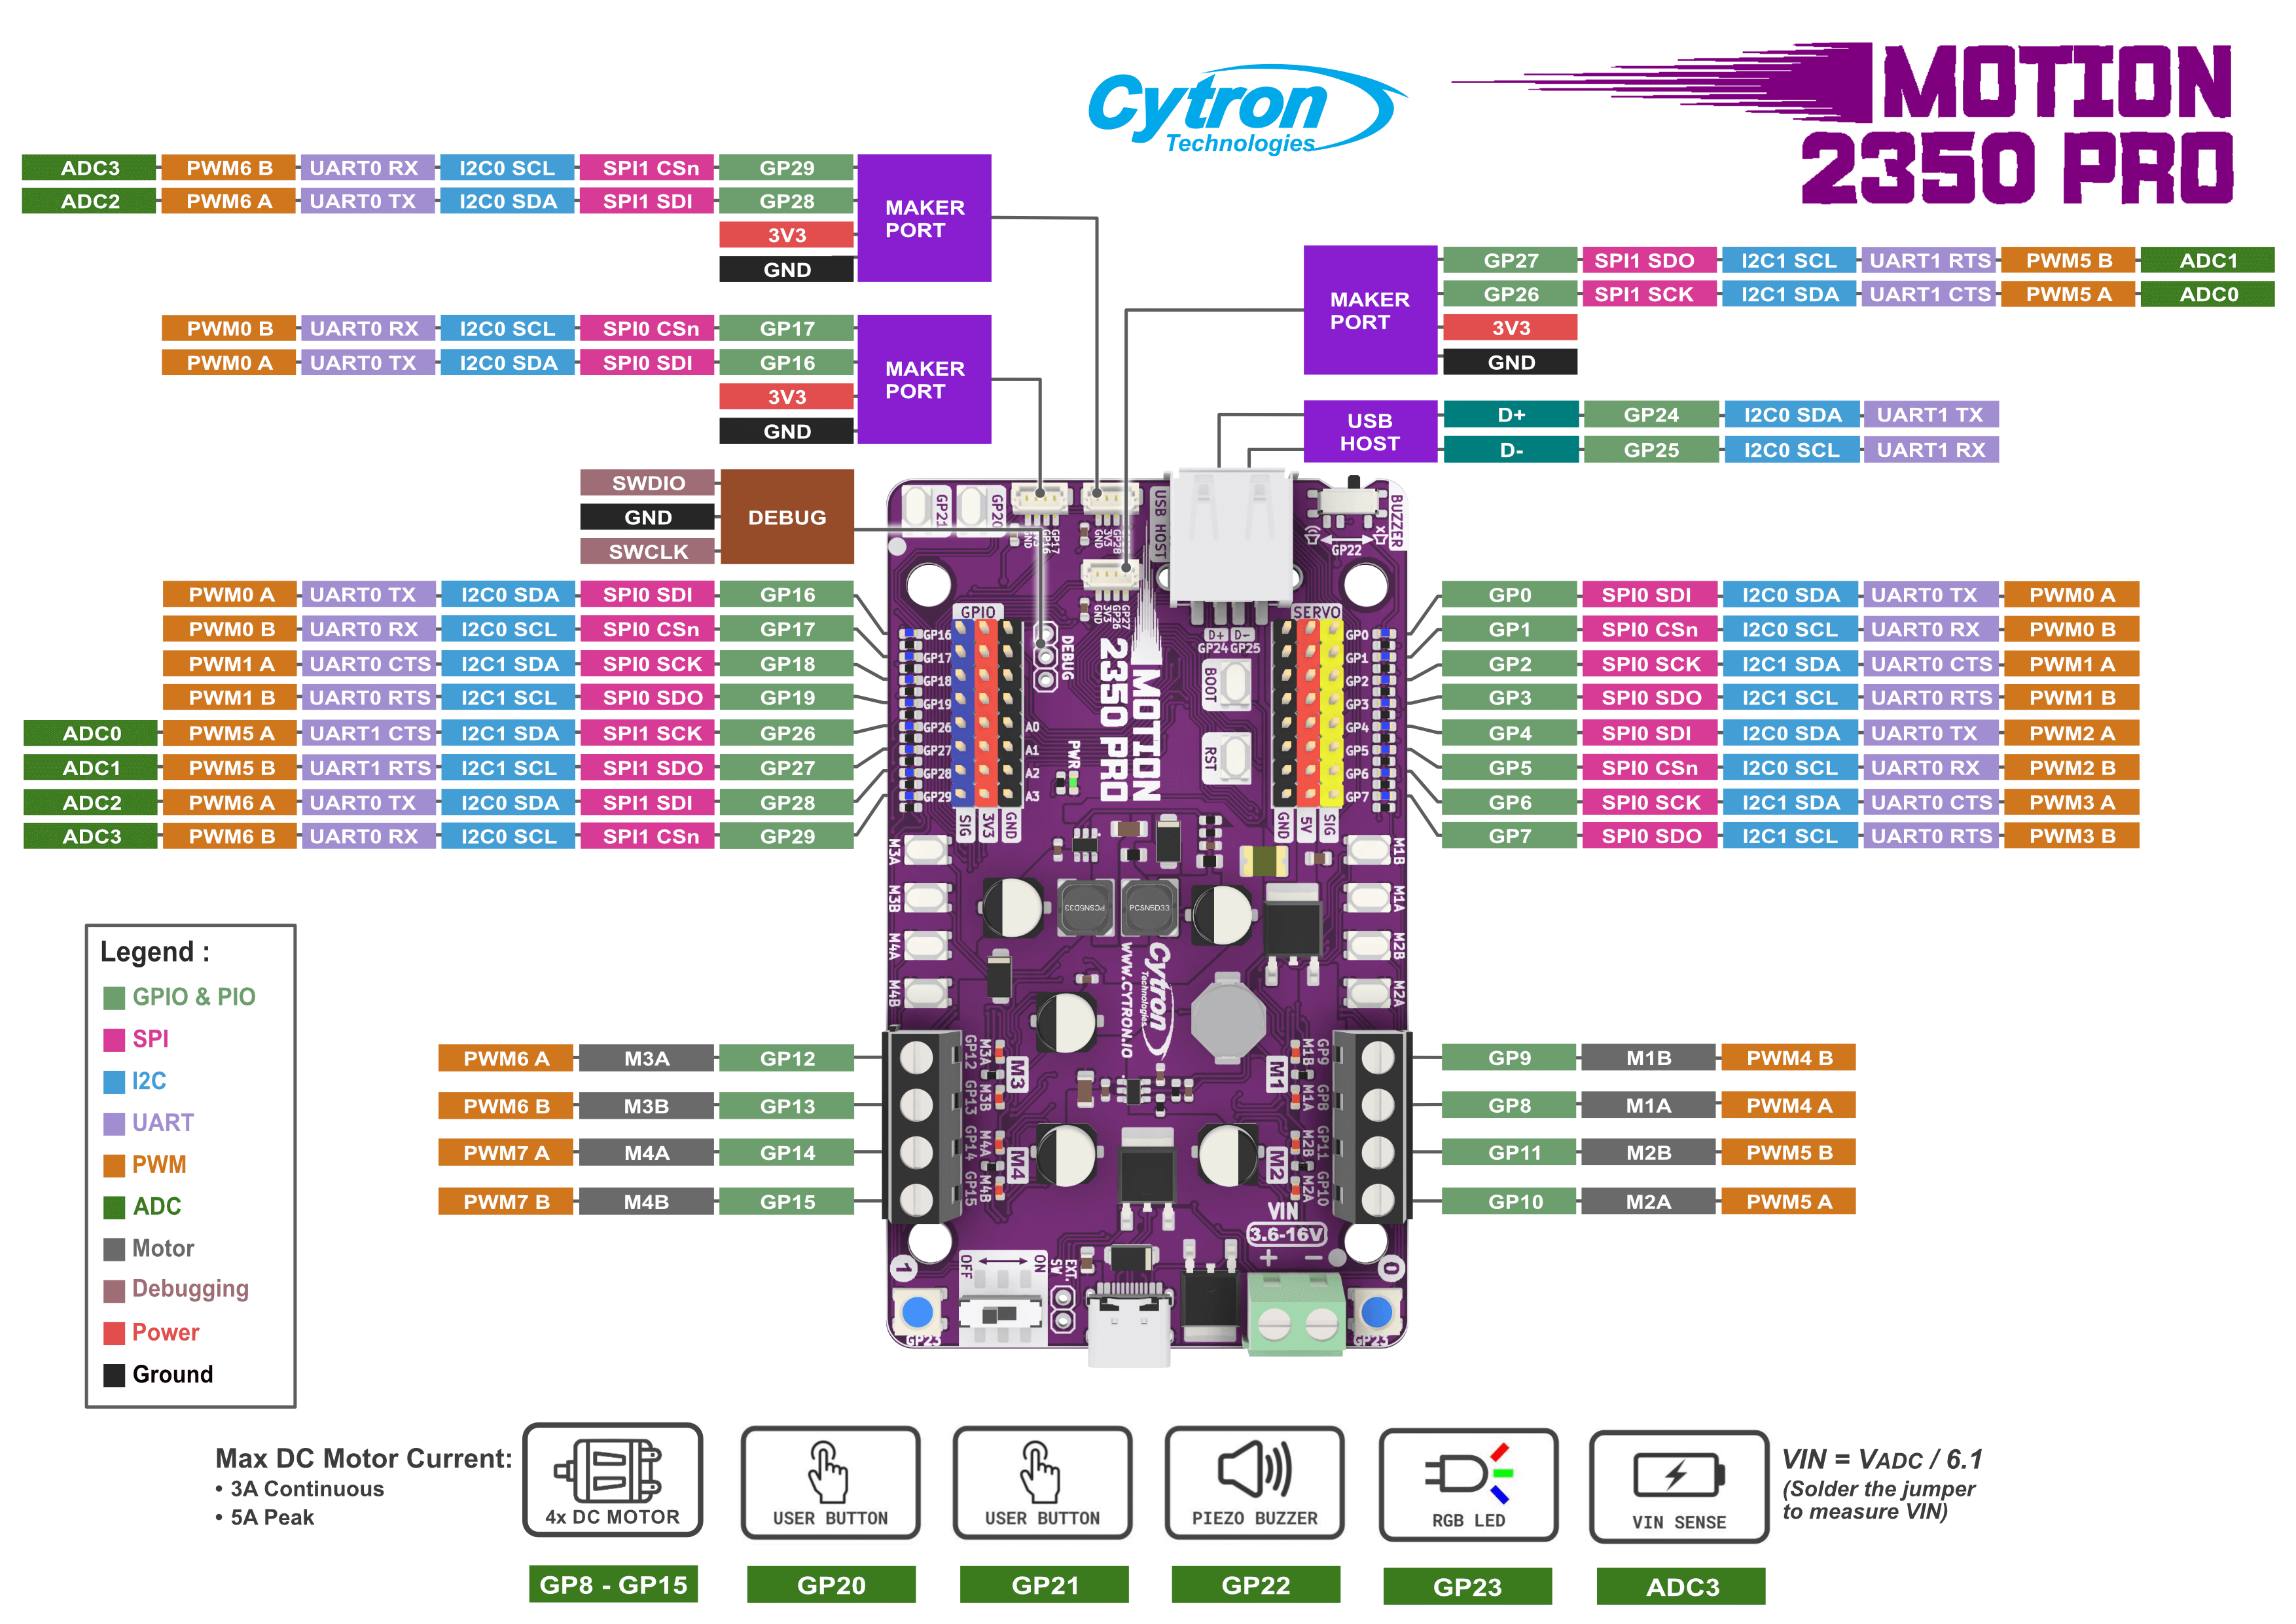
The Motion 2350 Pro features an advanced DC motor driver capable of controlling up to 4 brushed DC motors (3A Max each channel), with voltage ratings from 3.6V to 16V. Building a powerful robot with mecanum wheels has never been easier, thanks to this robust 4-channel driver! Additionally, the controller is equipped with 8-channel 5V servo ports, 8-channel GPIO breakout, and 3 Maker Ports, enabling you to connect a wide array of components and sensors. The highlight? The Motion 2350 Pro comes with a direct USB host for a USB joystick/gamepad, ensuring true plug-and-play convenience.
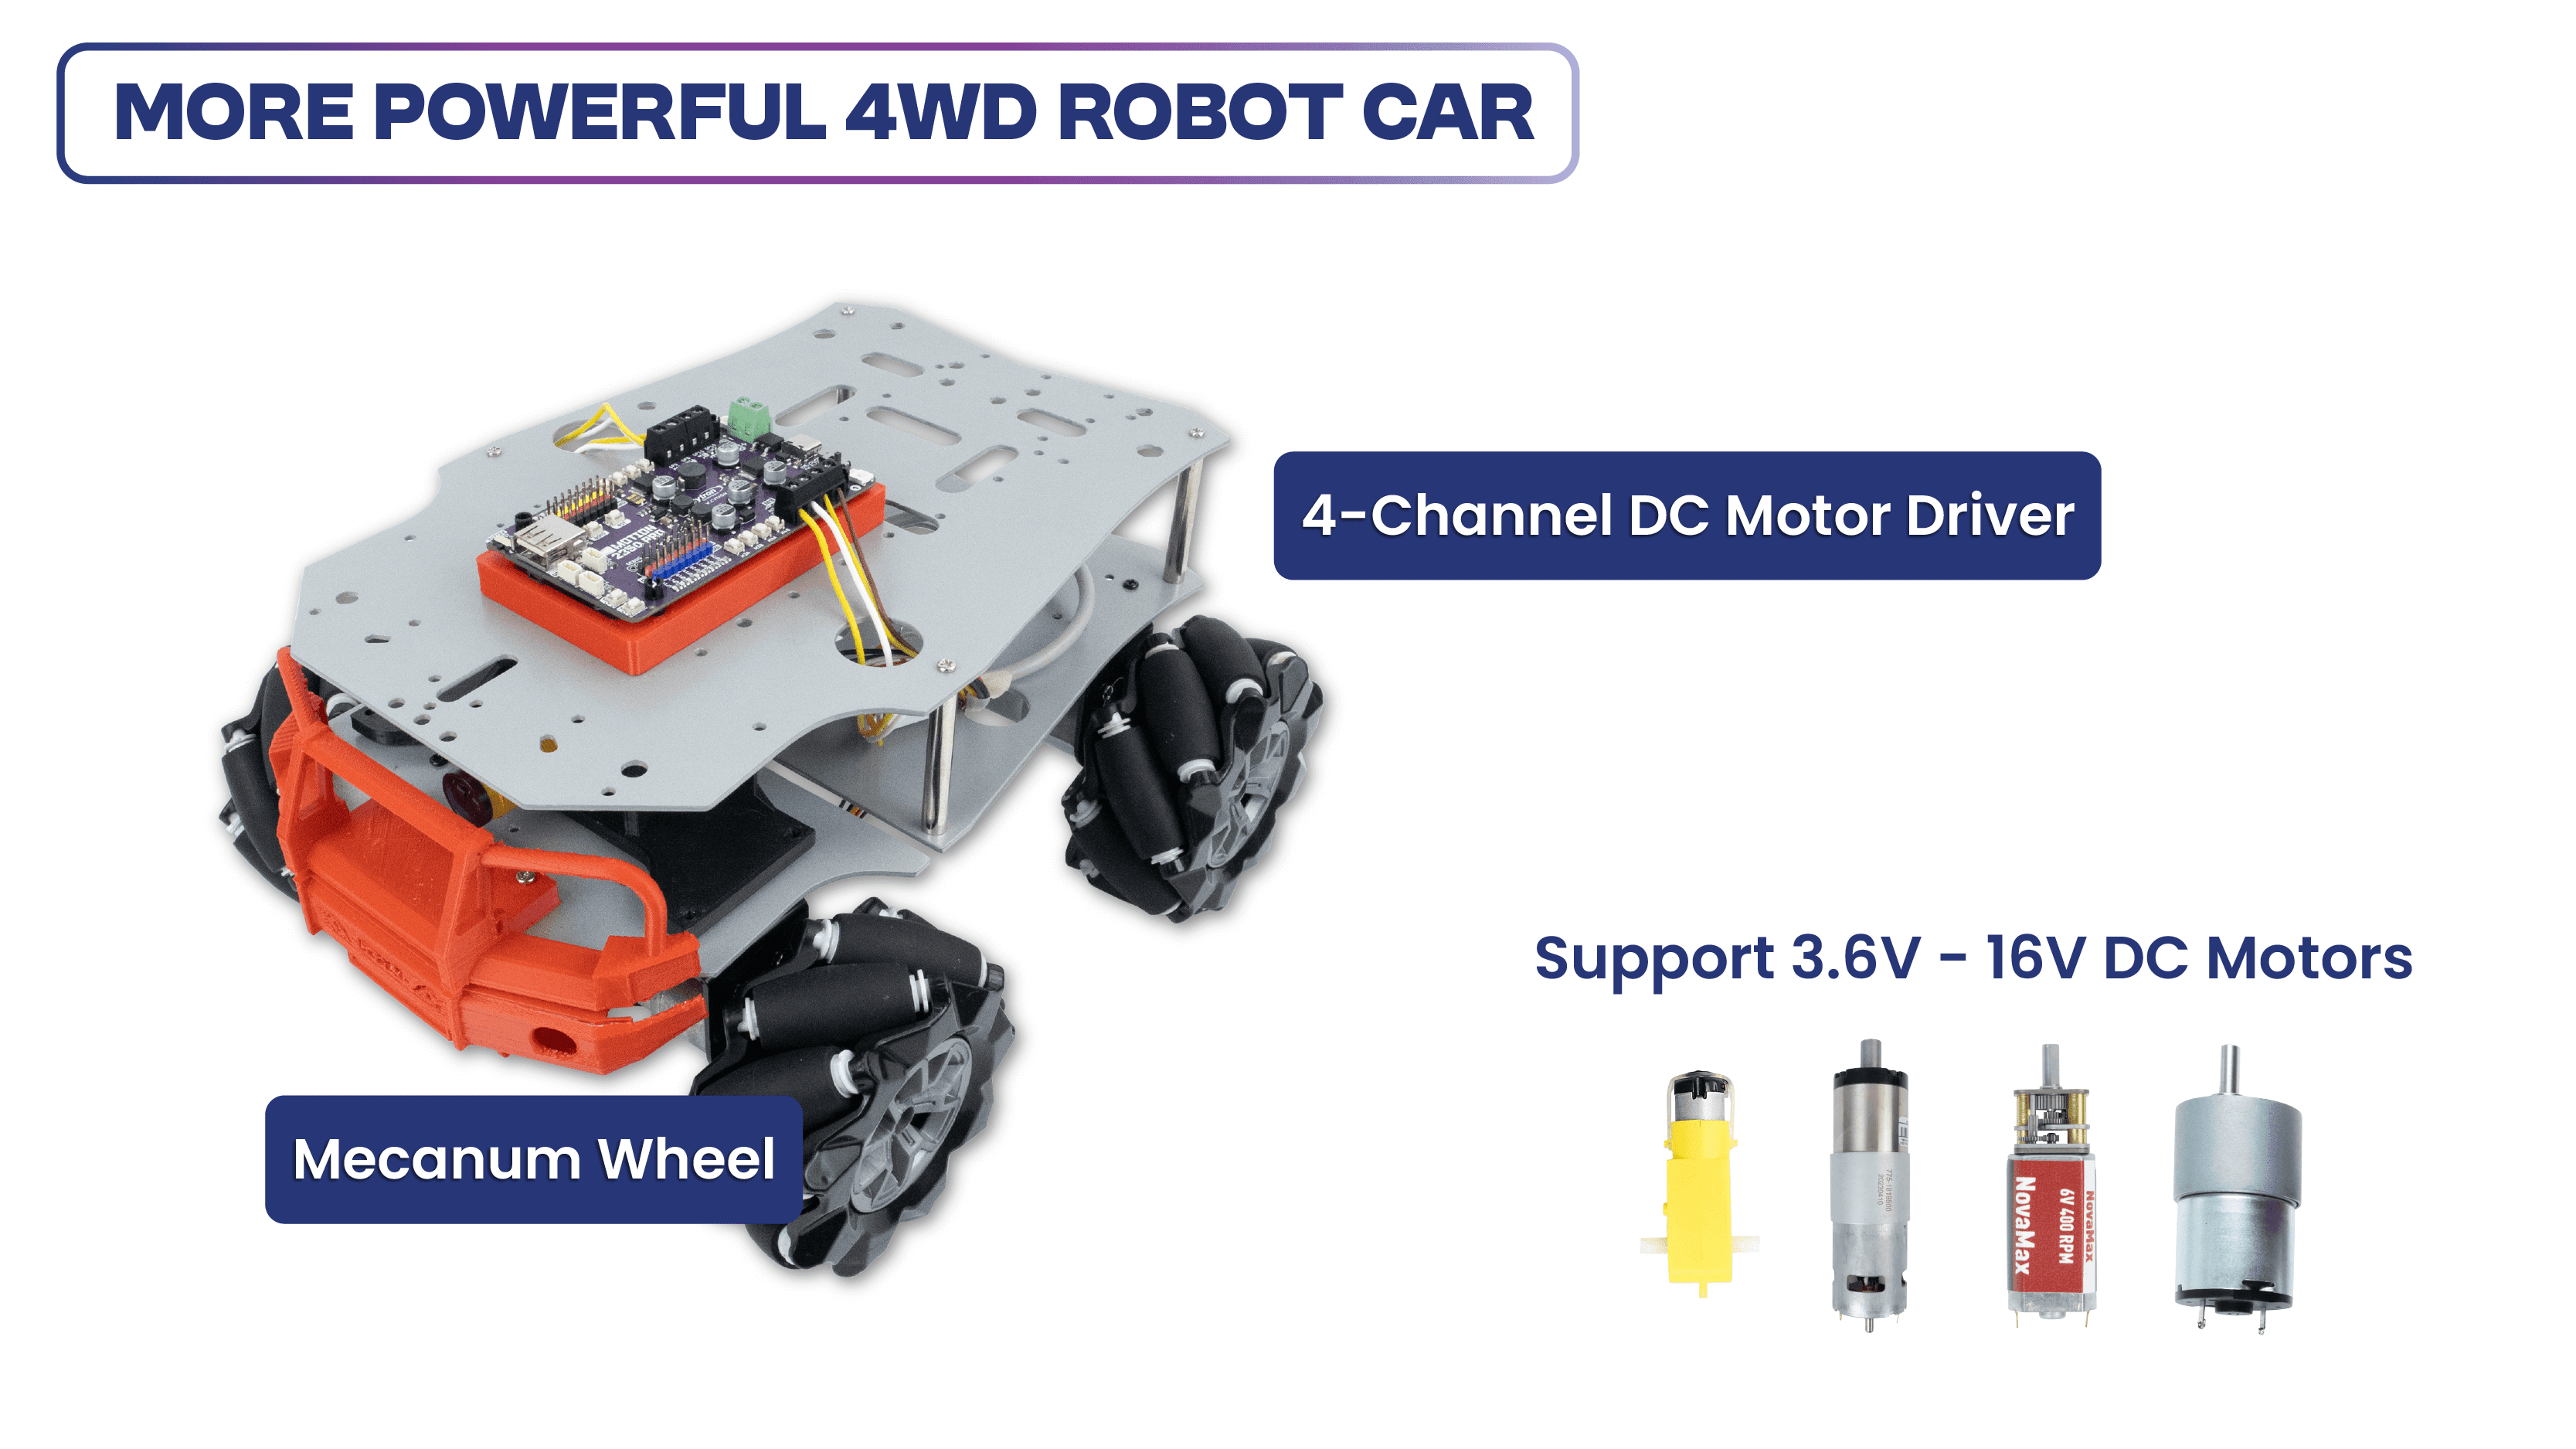
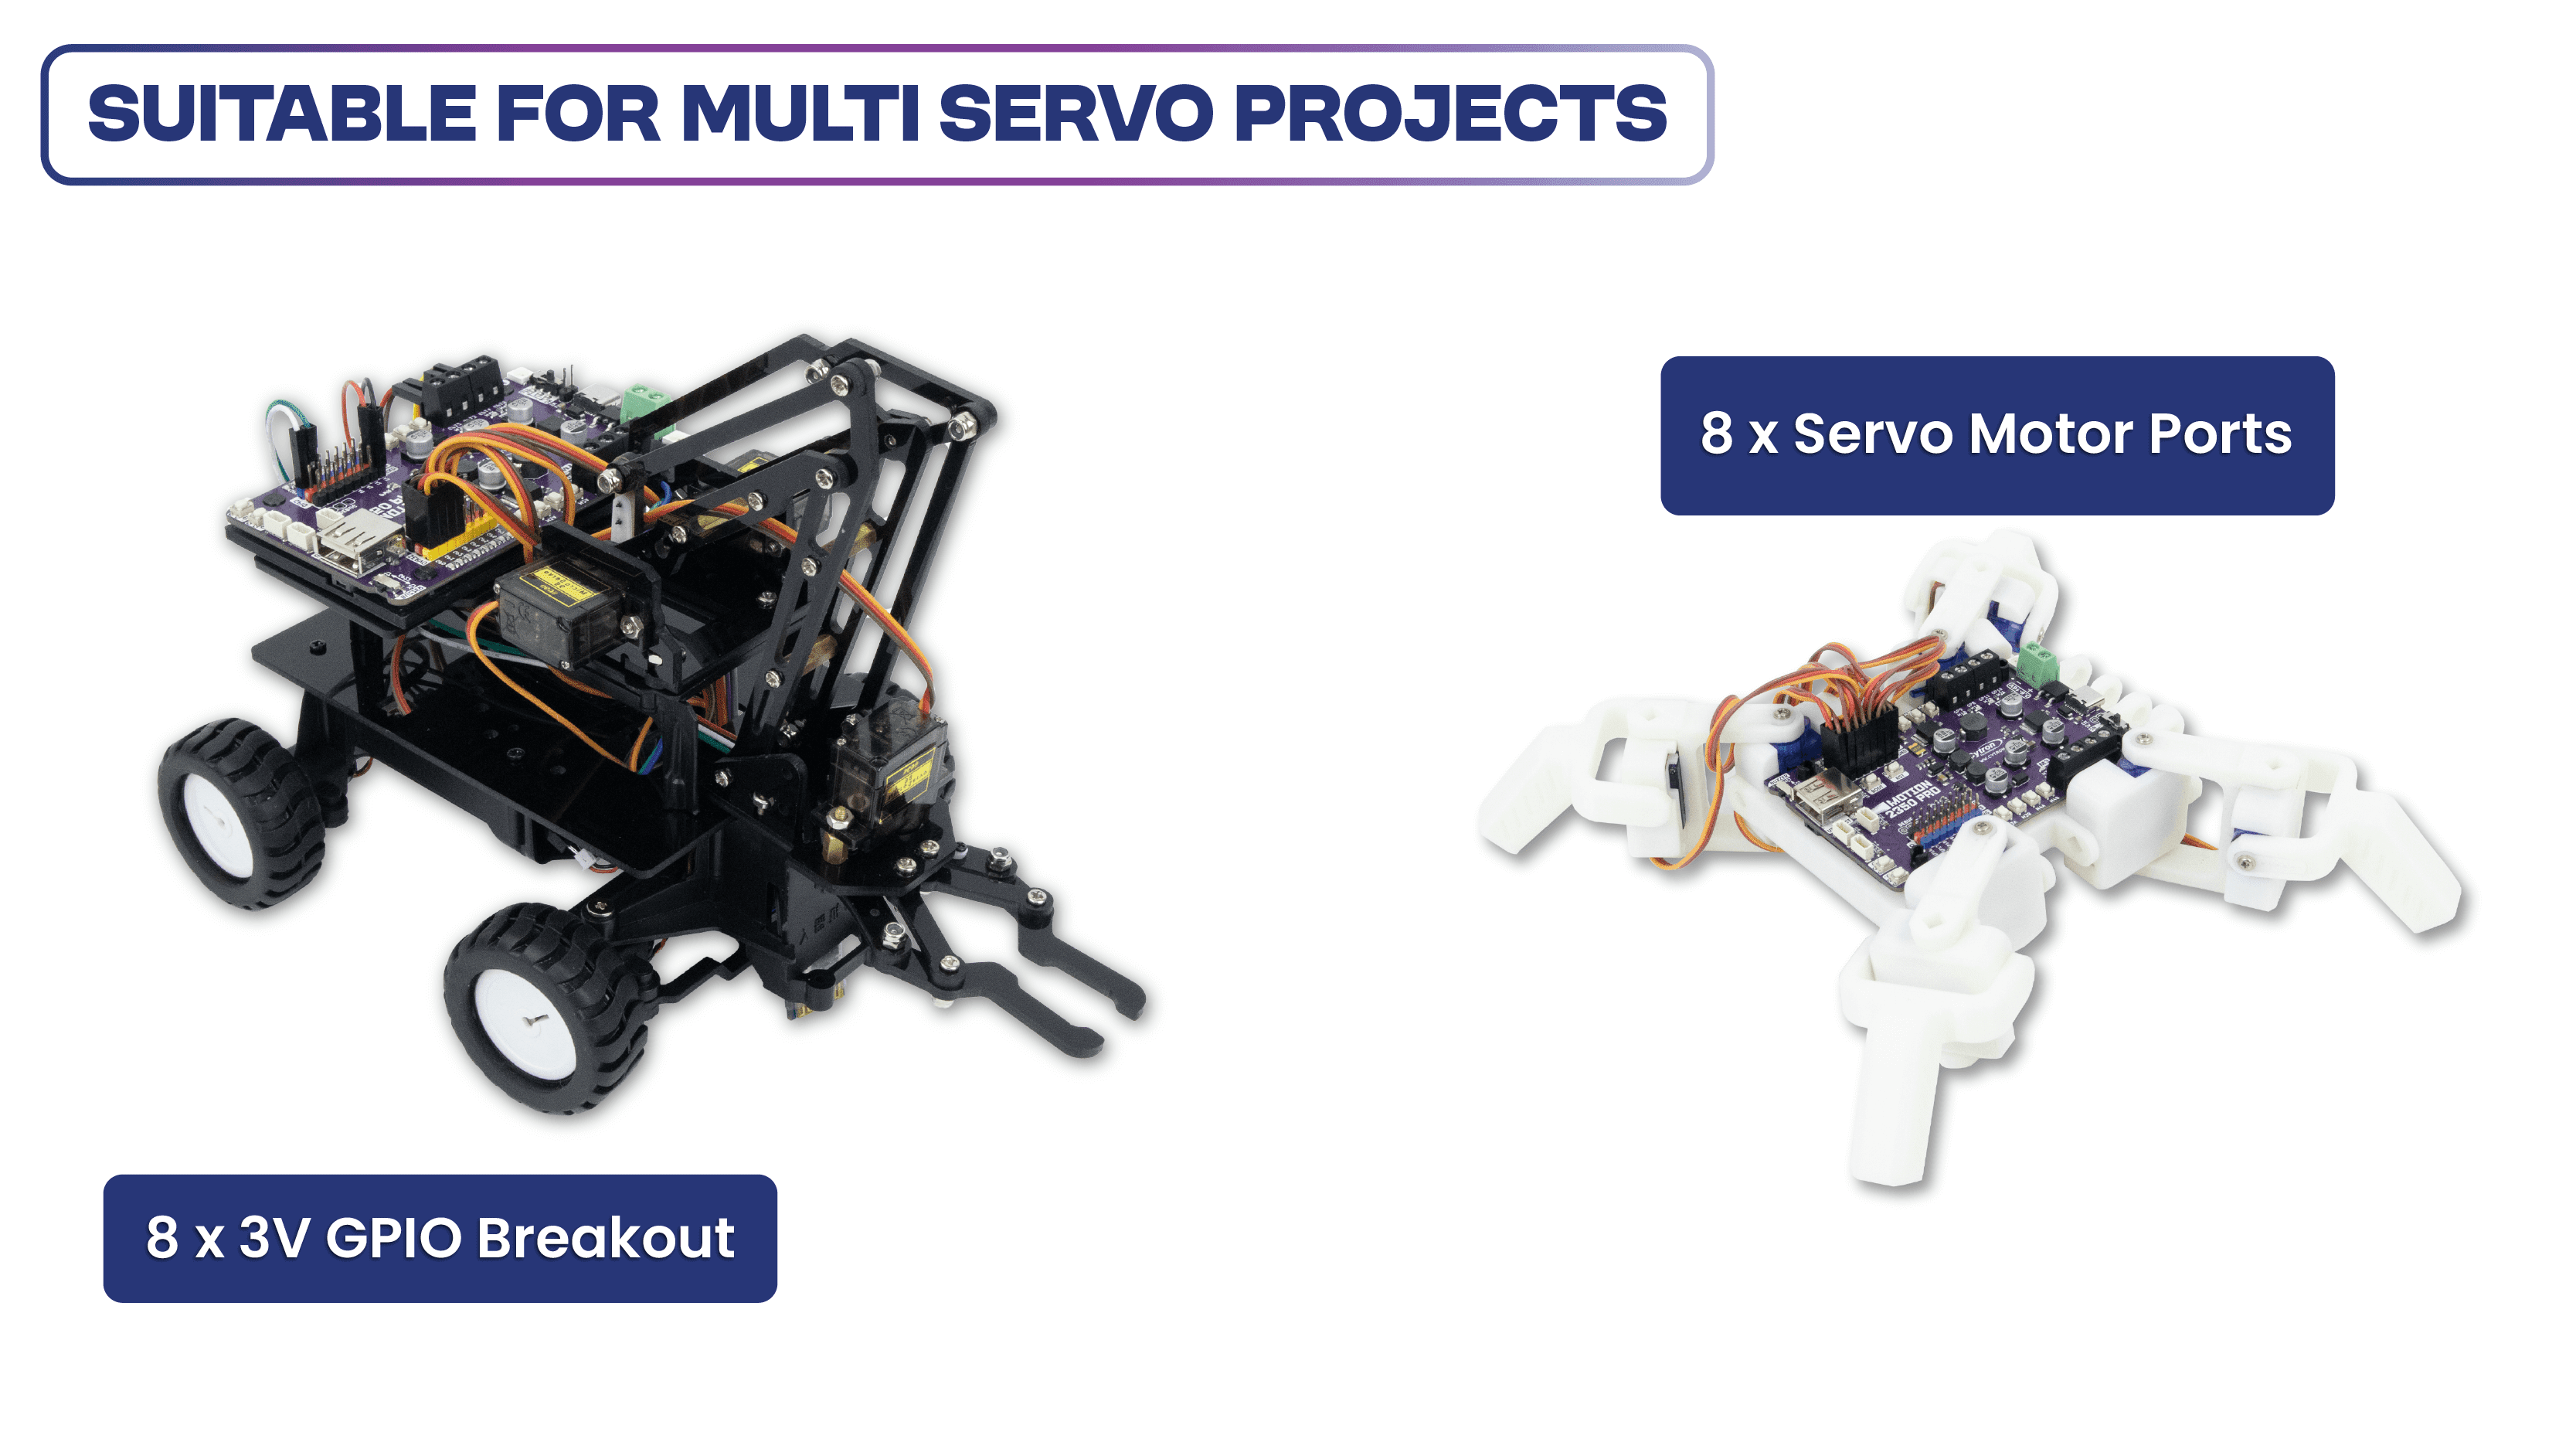
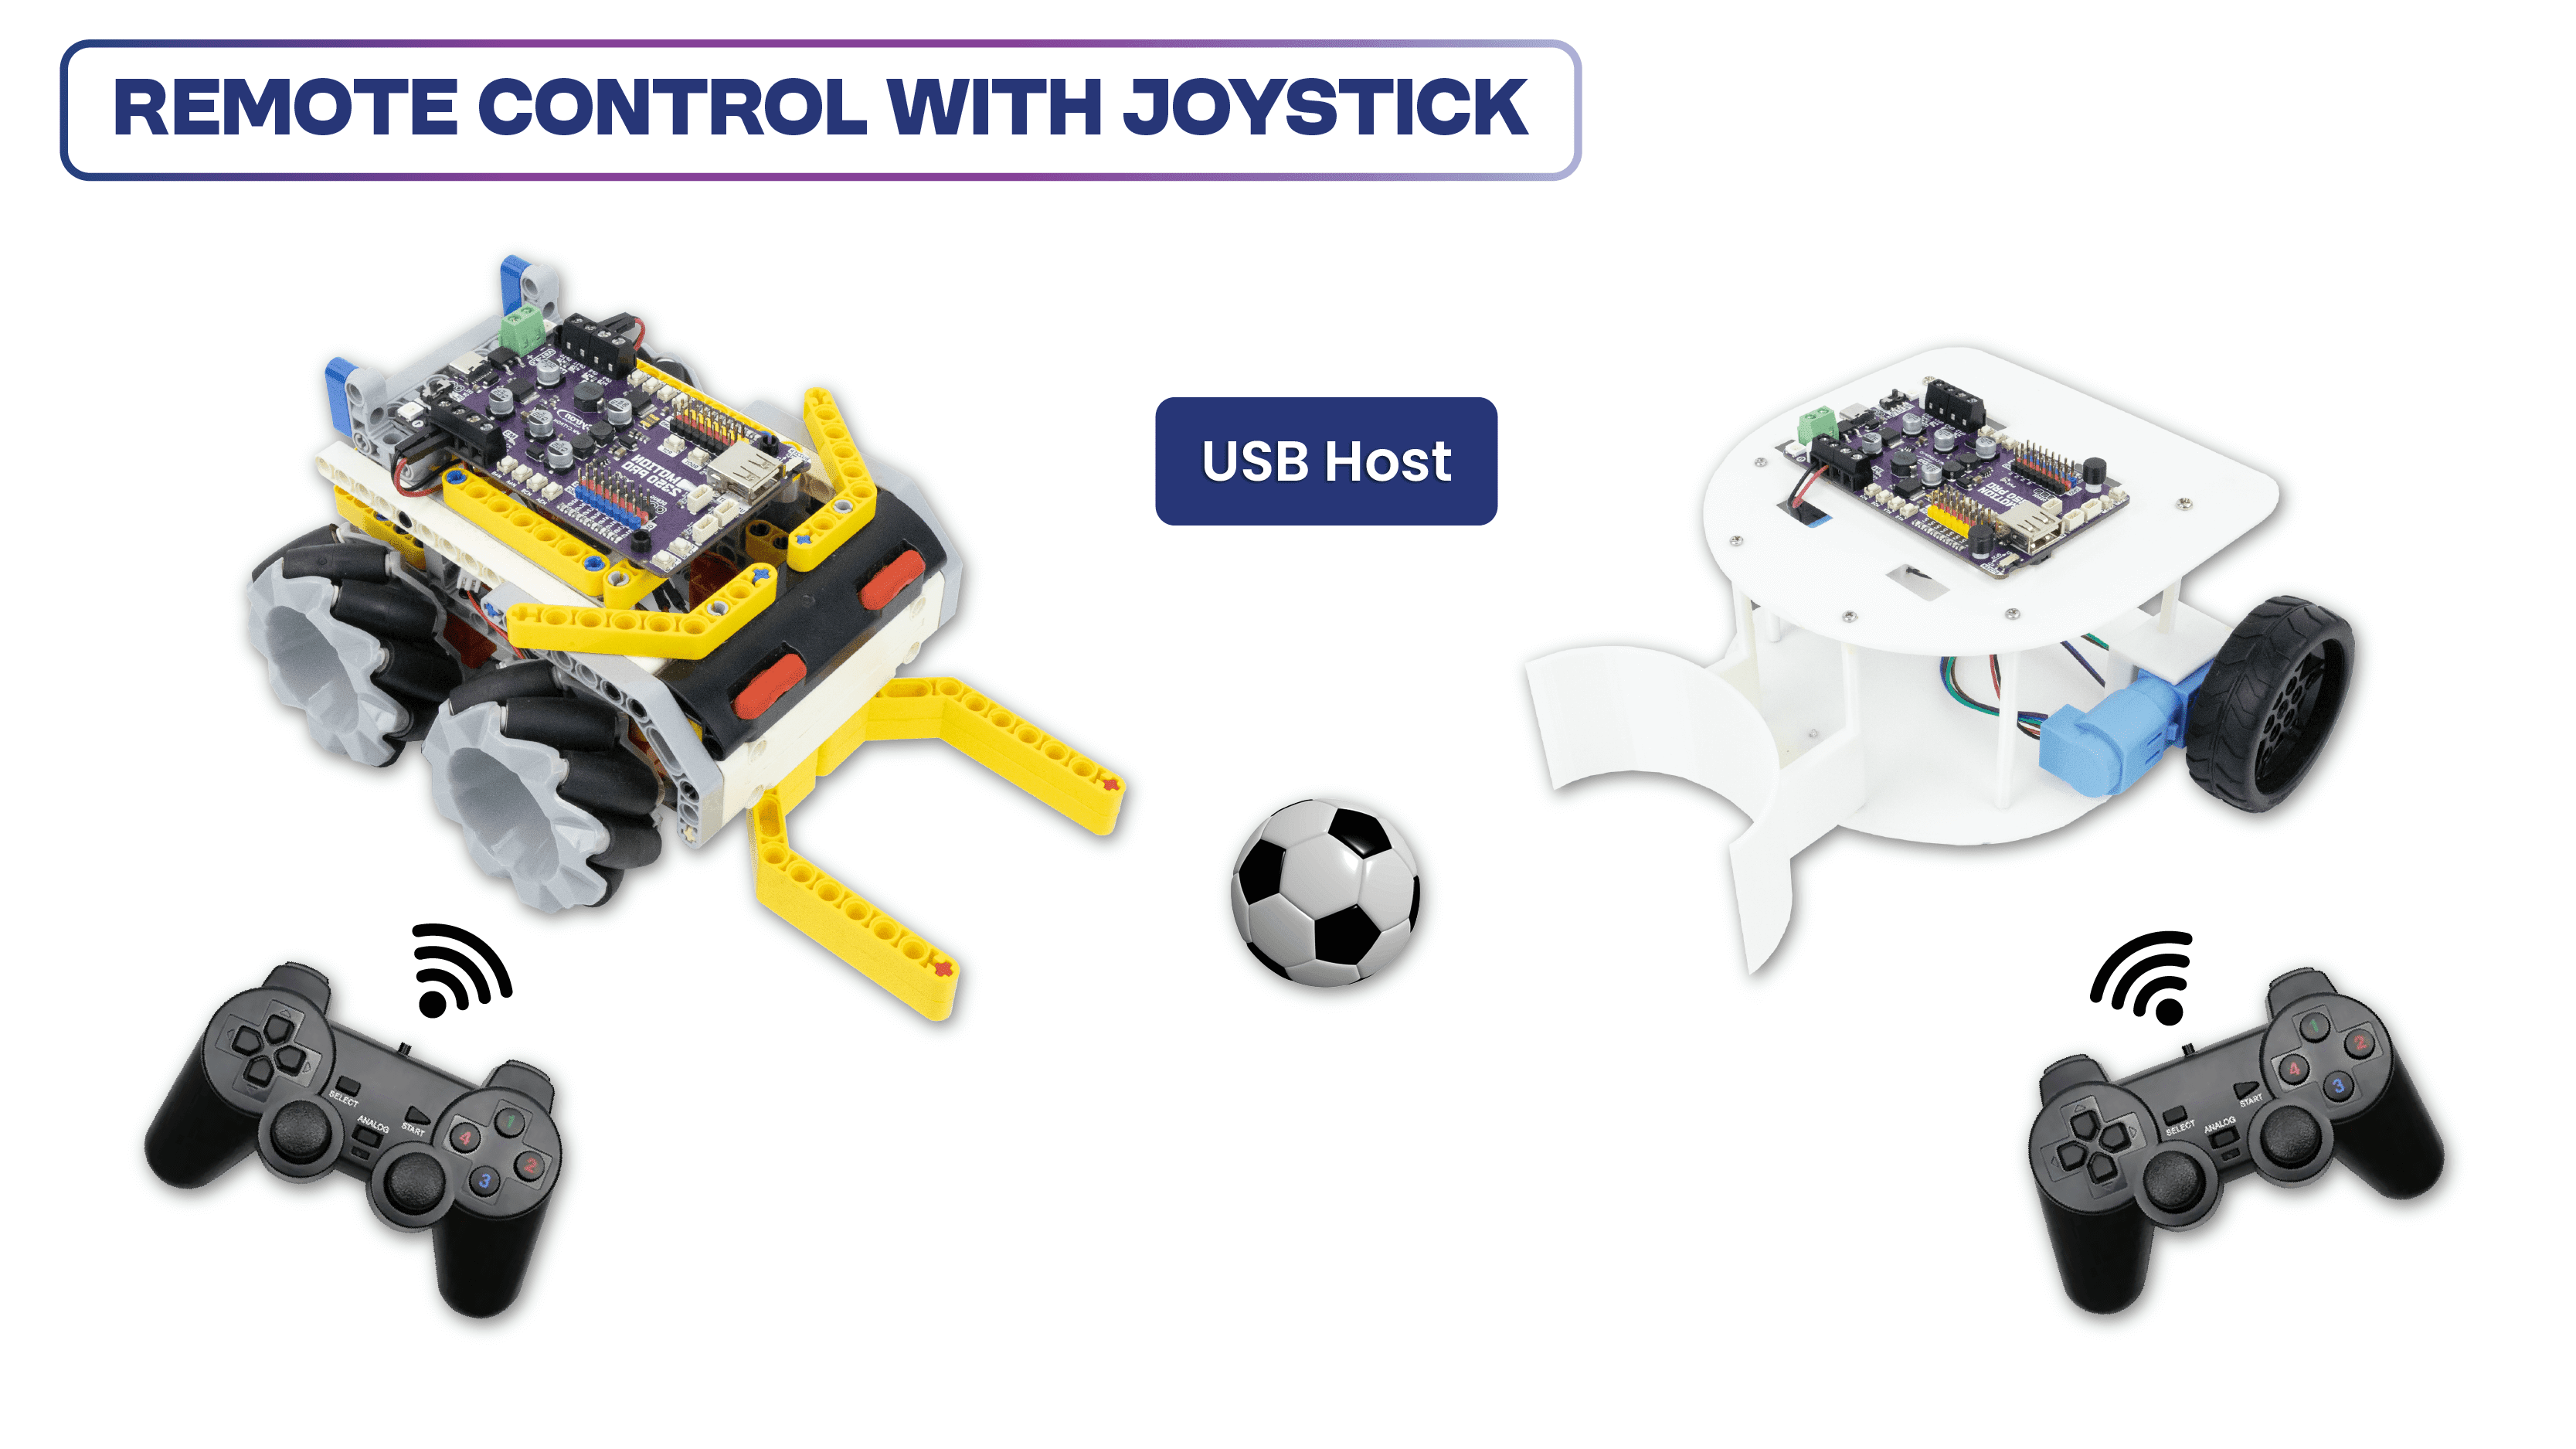
Favourable Maker Features
“Maker” features have been a signature of Cytron products. GPIO references printed on the silkscreen and colored headers help beginners connect components to the correct GPIO pins. The built-in quick test buttons and motor output LEDs allow for quick and convenient functional testing of the motor driver without writing any code. The user buttons and piezo buzzer are also beneficial for running simple commands, eliminating the need for extra wiring! Of course not to forget the LED indicator for each Digitial IO pin.
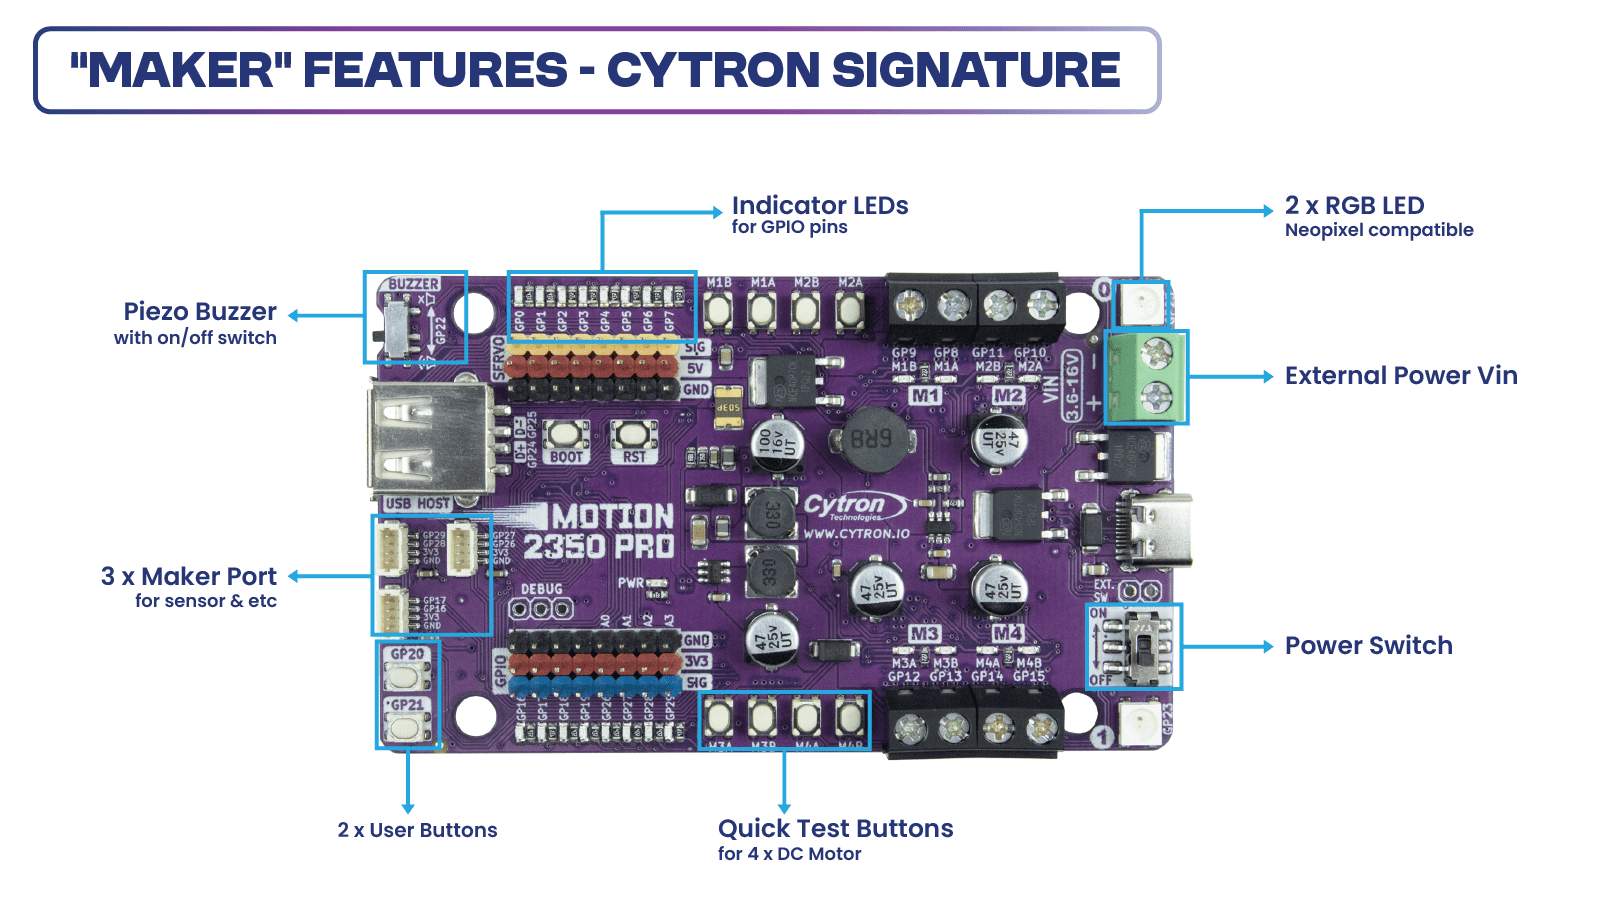
The MOTION 2350 Pro combines the Raspberry Pi Pico 2, the benefits of the Maker series, an advanced robot controller, and other useful features. Therefore, this board is compatible with the existing Raspberry Pi Pico ecosystem. Software, firmware, libraries, and resources developed for Pico should work seamlessly with the MOTION 2350 Pro allowing users to program in familiar environments such as Python (MicroPython, CircuitPython), C/C++, and Arduino IDE (coming soon).
CircuitPython is preloaded on the MOTION 2350 Pro, running a simple demo program right out of the box. Connect it to your computer via a USB-C cable and turn it on. You will be greeted by a melody tune and running LED lights. Press the GP20 and GP21 push buttons to run another demo code. With this demo code and quick test buttons, you can test the board the moment you receive it!
Specifications
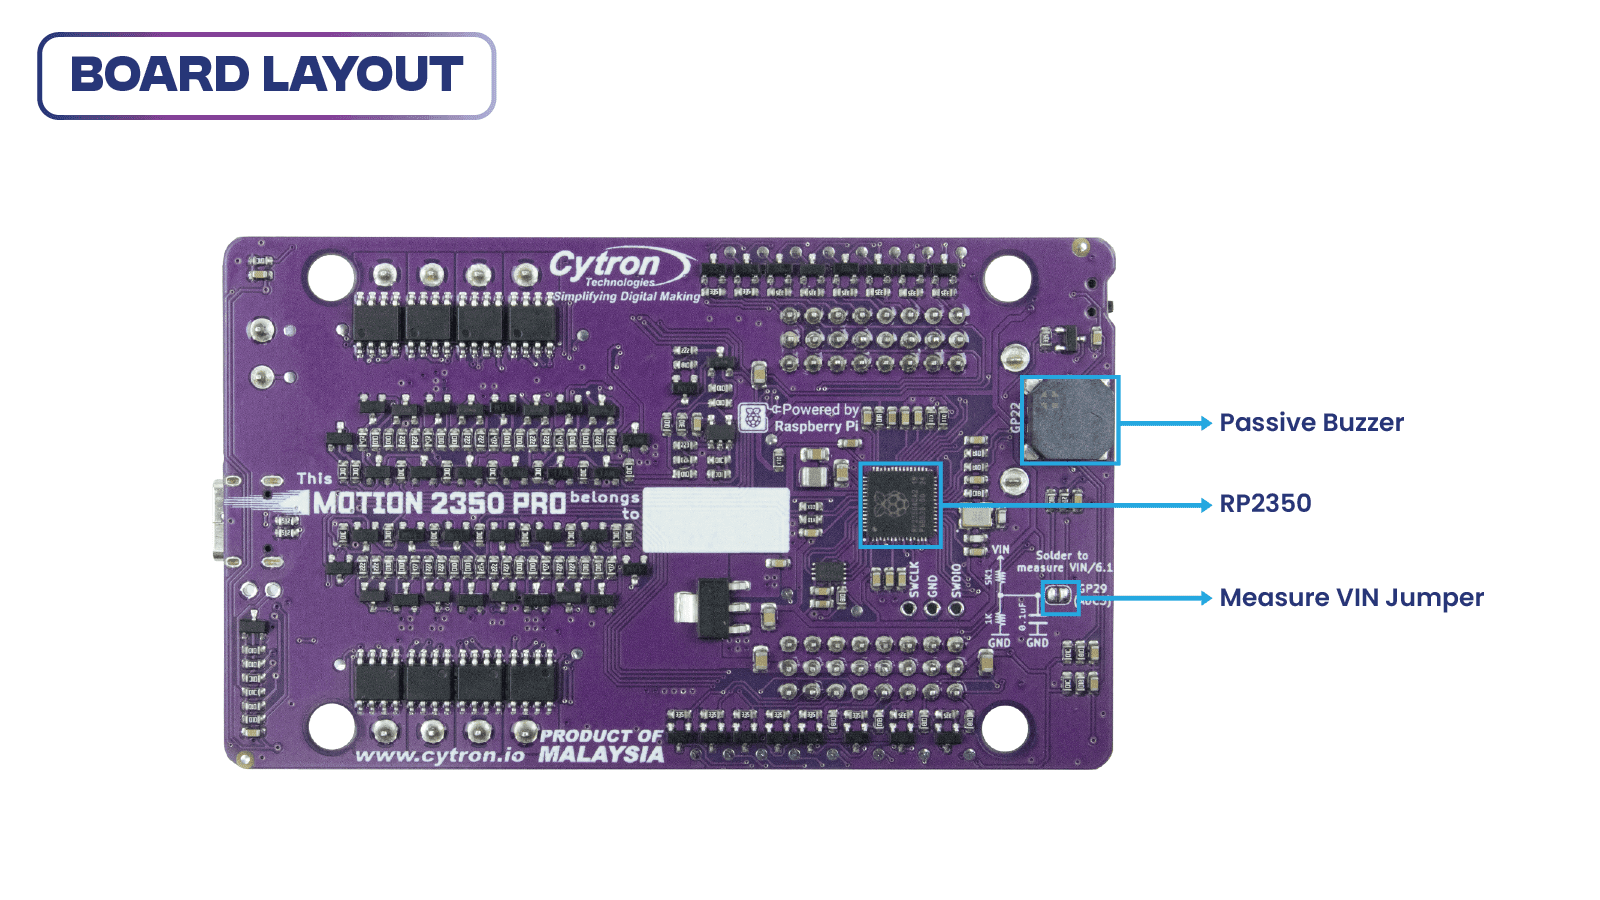
- Powered by Raspberry Pi RP2350
- Dual-core Arm Cortex-M33 processor
- 520KB internal RAM
- 150MHz Frequency Clock
- 2MByte Flash
- Robot Controller Board
- 4 x DC Motor Driver (with quick test buttons)
- 8 x Servo Motor
- 8 x 3V GPIO Breakout
- Input Power
- VIN Terminal: 3.6V - 16V
- USB Type-C: 5V
- Maximum DC Motor Current, each channel
- Continuous: 3A
- Peak: 5A
- 24 x Status indicator LEDs
- 8 x for Servo Port
- 8 x for 3V GPIO Breakout
- 8 x for DC Motor Driver
- 12 x Push Button
- 8 x Quick Test Button for DC Motor
- 2 x User Button
- 1 x BOOT Button
- 1 x RST Button, for reset
- 3 x Maker Port
- 2 x RGB LED (Neopixel Compatible)
- 1 x USB Host
- 1 x Piezo Buzzer (with mute switch)
- 1 x On/Off Switch (with MOSFET Shock-Proof Circuit)
- Preloaded with CircuitPython by default
- Programming Language
- CircuitPython
- MicroPython
- C/C++
- Arduino (coming soon)
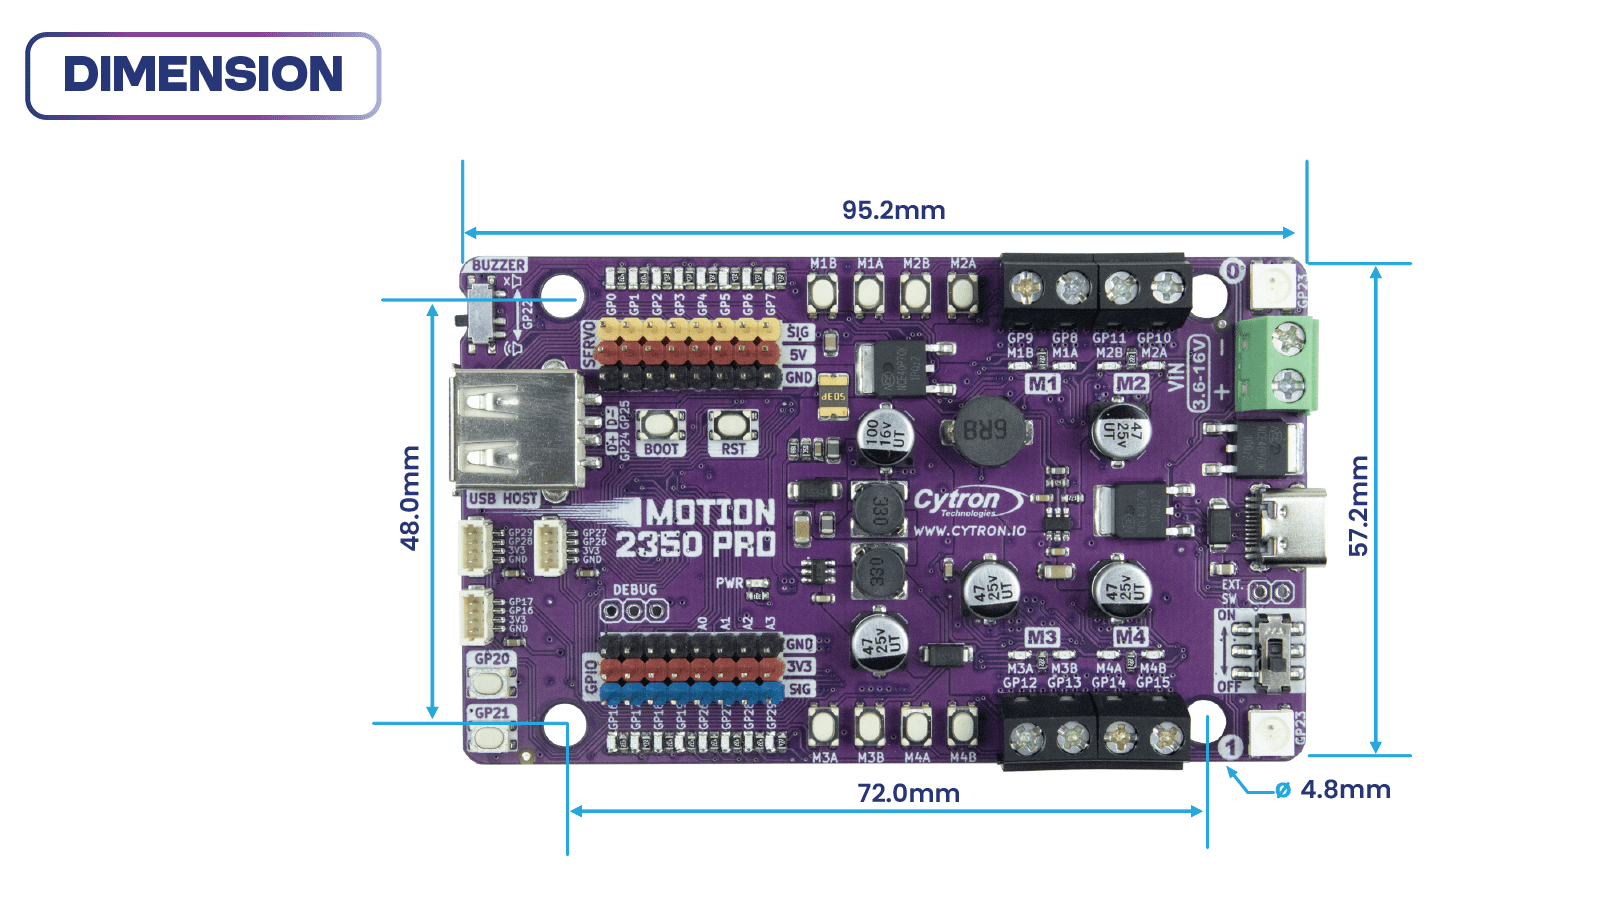
- Board Dimension: 95.2 x 57.2 x 8 (height) mm
What's in the box?
1 x MOTION 2350 Pro
1 x STEMMA QT / Qwiic JST SH 4-pin Cable with Female Sockets (150mm)
2 x Grove to JST-SH Cable (200mm)
1 x Set of Silicone Bumper
4 x Building Block Friction Pin
1 x Mini Screwdriver
Resources
RP2350 Datasheet (pdf), by Raspberry Pi
Getting Started with MOTION 2350 Pro, tutorial by Cytron Technologies
SDK C/C++, from Raspberry Pi
Article by CNX Software
The back for the cover for SmartiPi Touch 2 allows you to cover HAT boards or other additional electronics on the back of the SmartiPi Touch 2.
The covers include four M4 mounting screws that attach the cover to the 75mm VESA mount holes on the back of the case.
Note: The cover does not work with the door or the fan door.
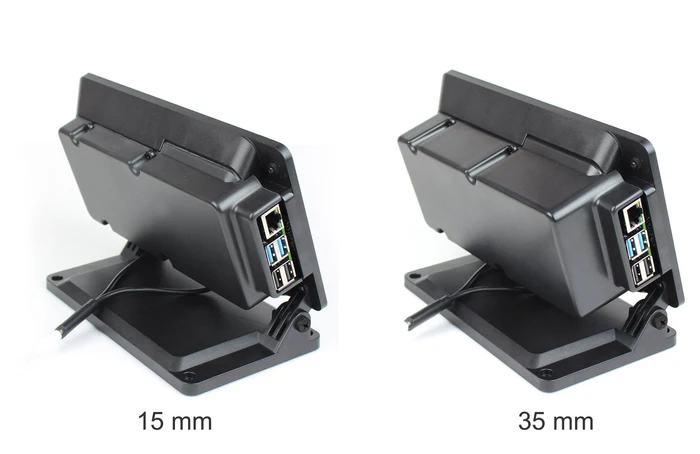
Choose between 35mm and 15mm versions. Dimensions are inside dimensions from the back of SmartiPi Touch. They are made out of ABS plastic.
What's in the box?
1 x Smartipi Touch 2 backcover
The back for the cover for SmartiPi Touch 2 allows you to cover HAT boards or other additional electronics on the back of the SmartiPi Touch 2.
The covers include four M4 mounting screws that attach the cover to the 75mm VESA mount holes on the back of the case.
Note: The cover does not work with the door or the fan door.
Choose between 35mm and 15mm versions. Dimensions are inside dimensions from the back of SmartiPi Touch. They are made out of ABS plastic.
What's in the box?
1 x Smartipi Touch 2 backcover

An all-in-one, USB-C powered controller for WS2812/Neopixel and APA102/Dotstar addressable LED strips.
Plasma 2350 is powered and programmable by USB-C and, because USB-C is capable of drawing up to 3A of power, that's enough to power a healthy chunk of LEDs. There's a useful button that you could use to switch between effects, plus a reset button and an onboard RGB LED. We've also popped a QW/ST connector on there, to make it super easy to plug in Qwiic or STEMMA QT breakouts.
You can buy a Plasma 2350 on its own, or in a kit with a USB-C cable and some super-cool LED stars, so you can get started lighting stuff up right away.
Features
- Powered by RP2350A (Dual Arm Cortex M33 running at up to 150MHz with 520KB of SRAM)
- 4MB of QSPI flash supporting XiP
- Compatible with 5V WS2812/Neopixel/SK6812 and APA102/Dotstar/SK9822 LEDs
- Screw terminals for attaching your LED strip.
- USB-C connector for power and programming (3A max)
- Qw/ST (Qwiic/STEMMA QT) connector
- Intriguing new SP/CE connector
- Reset, BOOT and a user button (the BOOT button can also be used as a user button)
- RGB LED
- Fully-assembled (no soldering required)
- Measurements: approx 61 x 22 x 12mm (L x W x H, including connectors)
- Programmable with C/C++ or MicroPython
STARter Kit contains
- Plasma 2350
- USB-C cable for power and programming
- 10m RGB LED Star Wire
Pintout and Schematic
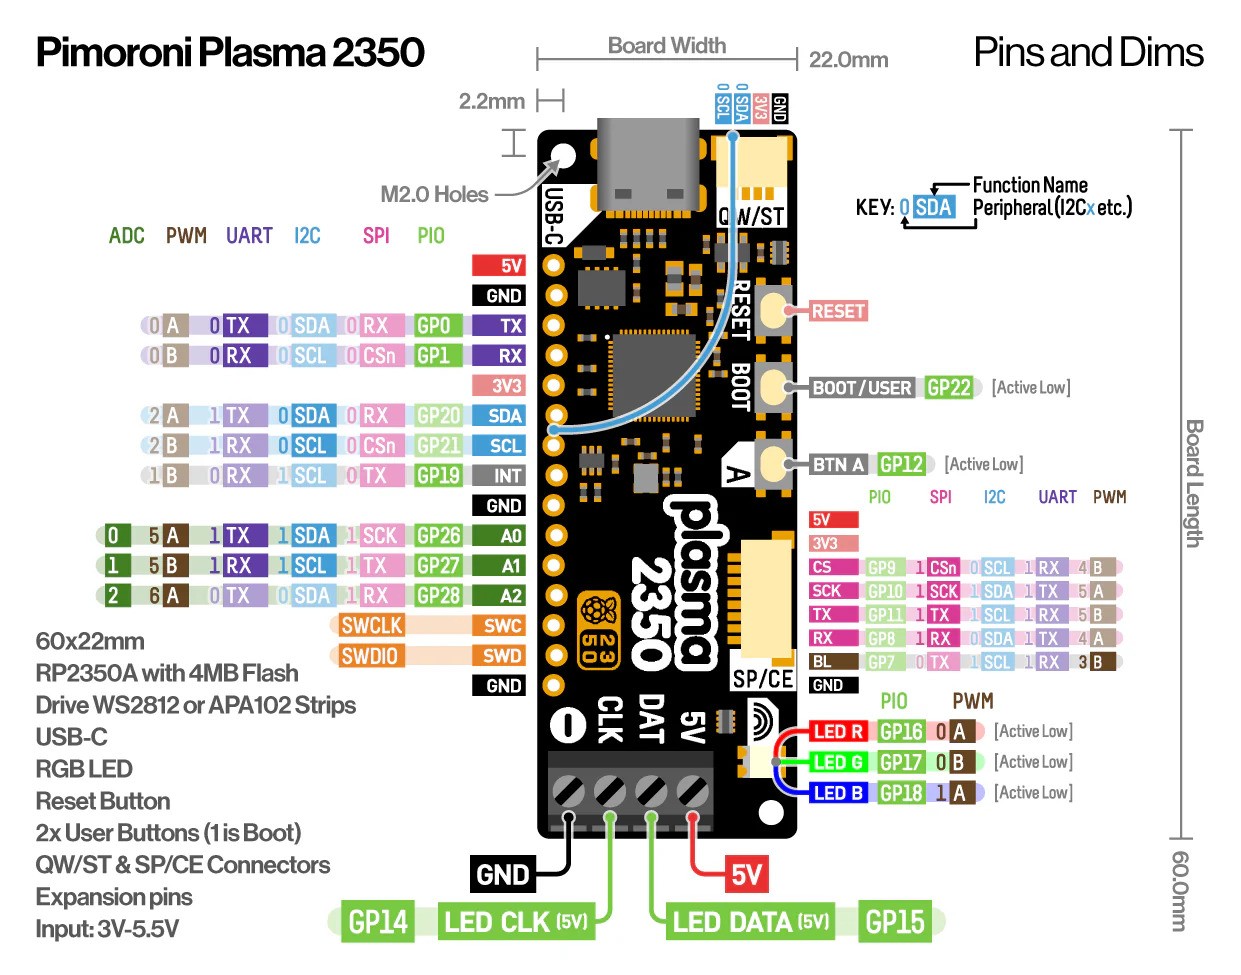
- Download a printable PDF version
- Schematic (coming soon)
Getting Started
Connecting Breakouts
If your breakout has a QW/ST connector on board, you can plug it straight in with a JST-SH to JST-SH cable, or you can easily connect any of our I2C breakouts with a JST-SH to JST-SH cable coupled with a Qw/ST to Breakout Garden adaptor.
We've also broken out the I2C, analog, UART and debug pins so you can solder things like breakouts or analog potentiometers directly to them (or solder on a strip of header and plug the whole shebang into a breadboard).
About RP2350
The RP2350 chip is the Double Quarter Pounder & Fries to the RP2040's Double Cheeseburger and can have one or more RISC-V burgers instead of either of the M33 ARMs, to stretch the metaphor.
In addition to the modern M33 ARM cores, there are sides of: more PIO capability, a variety of low power states for sipping electrons, a whole security system and some sprinklings of specialist digital video circuits to offload DVI/HDMI output.
You can expect a tasty boost in performance - our "real world" MicroPython tests are running up to 2x faster compared to RP2040, and floating point number crunching in C/C++ is up to 20x faster. The extra on-chip RAM will make a big difference when performing memory intensive operations (such as working with higher resolution displays) and even more can be added thanks to external PSRAM support.
RP2350 comes in two flavours - A (standard) and B (all the pins). The B chip has a stonking 48 usable GPIO pins, including 8 ADCs and 24 PWMs, and features on some of our new products.
What's in the box?
1 x Dotstar addressable LED strips
1 x USB to USB-C Cable
1 x Plasma 2350

An electronic adventure playground for physical computing, built around the RP2350 chip. Includes a 2.8" LCD screen, a speaker, a mini breadboard, and much more!
Our Explorer lets you play with circuits, build science experiments and prototype tiny robots and inventions. We've incorporated tinkering essentials like:
- a convenient mini breadboard for wiring up components
- servo headers
- analog inputs
- a built in speaker for making beeps and boops
- plenty of general purpose inputs/outputs
- connectors for attaching crocodile leads
- Qw/ST connectors for attaching I2C breakouts
Next to all that lot, there's a vibrant 320 x 240 pixel IPS LCD screen surrounded by six chunky tactile buttons so you can easily monitor and control what your project is doing. It's all mounted on a nice, sturdy baseboard that's printed with a fancy full colour silkscreen. We've also included some little legs, so you can have it propped up at an angle as well as lying flat, and there's a battery connector on the back so you can keep things portable.
You can buy a Pico Explorer board on its own or as part of a Starter Kit, which also contains a whole bunch of fun components to start tinkering with.
Starter kit contains
- Pimoroni Explorer
- Pimoroni Super Sensor Suite - a fancy new all-in-one Qw/ST stick for environmental, light and movement sensing (featuring BME280, LTR559 and LSM6DS3TR-C)
- A hand picked assortment of components to tinker with - think LEDs, pots, switches, servos, wheels
- Jumper jerky and other cables to connect everything up
- Full kit list coming soon!
Features
- Powered by RP2350B (Dual Arm Cortex M33 running at up to 150MHz with 520KB of SRAM)
- 16MB of QSPI flash supporting XiP
- 2.8” IPS LCD screen (320 x 240 pixels)
- Driver IC: ST7789V
- Luminance: 250 cd/m2
- Active area: 43.2 x 57.5mm
- USB-C connector for programming and power
- Mini breadboard
- Piezo speaker
- 6x user-controllable switches
- Reset and boot buttons
- 6x crocodile clip terminals
- 4x 3-pin servo outputs
- 6x GPIO and 4x ADC easy access headers, plus 3.3V power and grounds
- 2x Qw/ST (Qwiic/STEMMA QT) connector
- 2-pin JST-PH connector for adding a battery
- Lanyard slot!
- Includes 2x desktop stand feet
- Fully-assembled (no soldering required)
- Programmable with C/C++ or MicroPython
- Dimensions: approx 107mm x 85mm x 16mm (H x W x D, assembled)
Connecting Breakouts
If your breakout has a Qw/ST connector on board, you can plug it straight in with a JST-SH to JST-SH cable, or you can easily connect any of our I2C breakouts with a JST-SH to JST-SH cable coupled with a Qw/ST to Breakout Garden adaptor.
About RP2350
The RP2350 chip is the Double Quarter Pounder & Fries to the RP2040's Double Cheeseburger and can have one or more RISC-V burgers instead of either of the M33 ARMs, to stretch the metaphor.
In addition to the modern M33 ARM cores, there are sides of: more PIO capability, a variety of low power states for sipping electrons, a whole security system and some sprinklings of specialist digital video circuits to offload DVI/HDMI output.
You can expect a tasty boost in performance - our "real world" MicroPython tests are running up to 2x faster compared to RP2040, and floating point number crunching in C/C++ is up to 20x faster. The extra on-chip RAM will make a big difference when performing memory intensive operations (such as working with higher resolution displays) and even more can be added thanks to external PSRAM support.
RP2350 comes in two flavours - A (standard) and B (all the pins). The B chip has a stonking 48 usable GPIO pins, including 8 ADCs and 24 PWMs, and features on some of our new products.
What's in the box?
1 x Pimoroni Explorer

A hilariously oversized but fully functional Raspberry Pi Pico 2 for demos, japes and shenanigans.
Psst, haven't you heard? Megacontrollers are the new microcontrollers. Large is the new little. Chonk is the new smol. Pico Jumbo is a giant (3.5x scale) Raspberry Pi Pico 2 that has the following advantages over the standard sized one:
- The holes and castellations in the ridiculous oversized pads are great for connecting up crocodile/alligator clips - very useful for demo-ing in a classroom, workshop or on the Youtubes.
- It has the ultimate best number one all time no notes Pico upgrade - a reset button.
- Things that are the wrong scale are inherently very funny to us.
You can buy a Pico Jumbo on its own or in a starter kit along with a selection of pleasantly chunky components, so you can experience the pure childlike joy of blinking a big ol' LED or wiring up a big ol' button.
Features
- Raspberry Pi Pico 2 Aboard
- CPU: Dual Arm Cortex-M33 or dual RISC-V Hazard3 processors @150MHz
- Memory: 520 KB on-chip SRAM; 4 MB on-board QSPI flash
- Powered and programmable via micro-USB
- Connect up components to the oversized pads with alligator clips!
- It's big
- Really big
- You might think it's a long way down the road to the shops but that's peanuts compared to Pico Jumbo
- Terrible for embedding in devices
- Reset button ????
- Fully-assembled (no soldering required)
- Includes metal legs for display
- Programmable with C/C++ or MicroPython
- Measurements: 180 mm x 73.5 mm x 5.5mm (L x W x D, approx)
Starter Kit contains
- Pico Jumbo
- Crocodile leads
- 10x big (10mm) LEDs
- 10x big resistors
- An arcade button
- A nice clicky on/off switch
- Micro-USB cable
Notes
- Perhaps you'd like to 3D print yourself some oversized pin headers and an oversized micro USB plug to go with your oversized microcontroller?
About RP2350
The RP2350 chip is the Double Quarter Pounder & Fries to the RP2040's Double Cheeseburger and can have one or more RISC-V burgers instead of either of the M33 ARMs, to stretch the metaphor.
In addition to the modern M33 ARM cores, there are sides of: more PIO capability, a variety of low power states for sipping electrons, a whole security system and some sprinklings of specialist digital video circuits to offload DVI/HDMI output.
You can expect a tasty boost in performance - our "real world" MicroPython tests are running up to 2x faster compared to RP2040, and floating point number crunching in C/C++ is up to 20x faster. The extra on-chip RAM will make a big difference when performing memory intensive operations (such as working with higher resolution displays) and even more can be added thanks to external PSRAM support.
RP2350 comes in two flavours - A (standard) and B (all the pins). The B chip has a stonking 48 usable GPIO pins, including 8 ADCs and 24 PWMs, and features on some of our new products.
What's in the box?
1 x Pico Jumbo (Pico 2 Aboard)

We've gathered up our favourite maker projects from the second year of HackSpace magazine in one place – the Book of Making volume two. It's 180 pages of hands-on guides, tips, tricks, and inspiration.
We show you how to build and launch your own rocket, create electronics circuits with Play-Doh, build your own polyphonic synthesizer, and much more. Whether you've got an hour to build something or you're looking for a weekend project, we've got a range of maker projects to choose from.
- Step into the wonderful world of making
- Be inspired by amazing projects from makerspace communities around the world
- Make your own creations with step-by-step guides
- Perfect projects for an hour, an afternoon, or weekend
What's in the box?
1 x Book of Making

Please note: Raspberry Pi board and jumper cables are not included
This Experimental Platform is for Raspberry Pi 2, 3, 4, 5
Size: 132mm x 108mm
Ideal for use with Solderless 400 Point Breadboard.(included)
Acrylic board locally designed and laser cut inhouse.
Shadows engraved on board for easy component placing
What's in the box?
1 x Acrylic plate
4 x M2.5 x 5 Standoffs
4 x M2.5x6 screws
4 x M2.5 nuts
4 x bumper pads
1 x 400 point breadboard

Please note: The phrase "Including Raspberry Pi Pico 2" means that the updates also apply to the Pico 2. However, this does not mean a free Pico 2 is included with this issue.
Dive into the world of Raspberry Pi with this huge book of tutorials, project showcases, guides, product reviews, and much more from the writers of The MagPi, the official Raspberry Pi magazine.
Raspberry Pi Pico 2 joins Raspberry Pi 5 in this, The Official Raspberry Pi Handbook 2025. Pico 2 comes with a faster processor than the original Pico, and uses less power — while still maintaining the same form factor and pinout. With both Pico 2 and Raspberry Pi 5 you can power any project you can imagine.
With 200 pages packed full of maker goodness, you’ll also find inspiration for your Raspberry Pi Zero 2 W, Raspberry Pi 4, or any other Raspberry Pi model you have — there’s something for everyone.
In this handbook you’ll find:
- A get started guide that covers every Raspberry Pi
- Everything you need to know about the brand-new Raspberry Pi Pico 2
- Inspiring projects to spark your next build idea
- Tutorials for makers of all skill levels
- Guides for media centres, game emulators, and more!
- Raspberry Pi Pico 2 Microcontroller not included
This bumper book is your definitive guide to everything Raspberry Pi. It’s essential for any maker with big dreams and a thirst for knowledge.
What's in the box?
1 x RPi 2025 Handbook

Designed For Raspberry Pi 5, Supports IEEE 802.3af/at Network Standard
Adapter For NVMe Protocol M.2 Solid State Drive, High-speed Reading/Writing
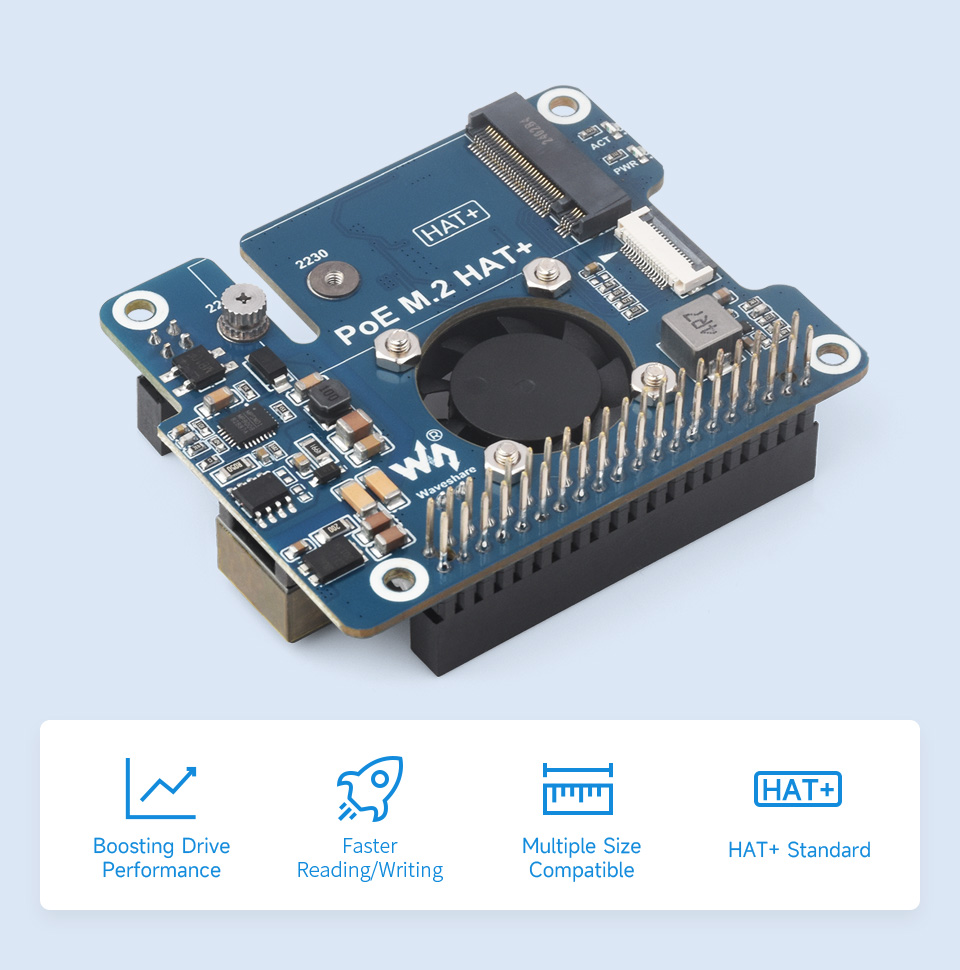
| PoE power input | 37V ~ 57V DC in |
|---|---|
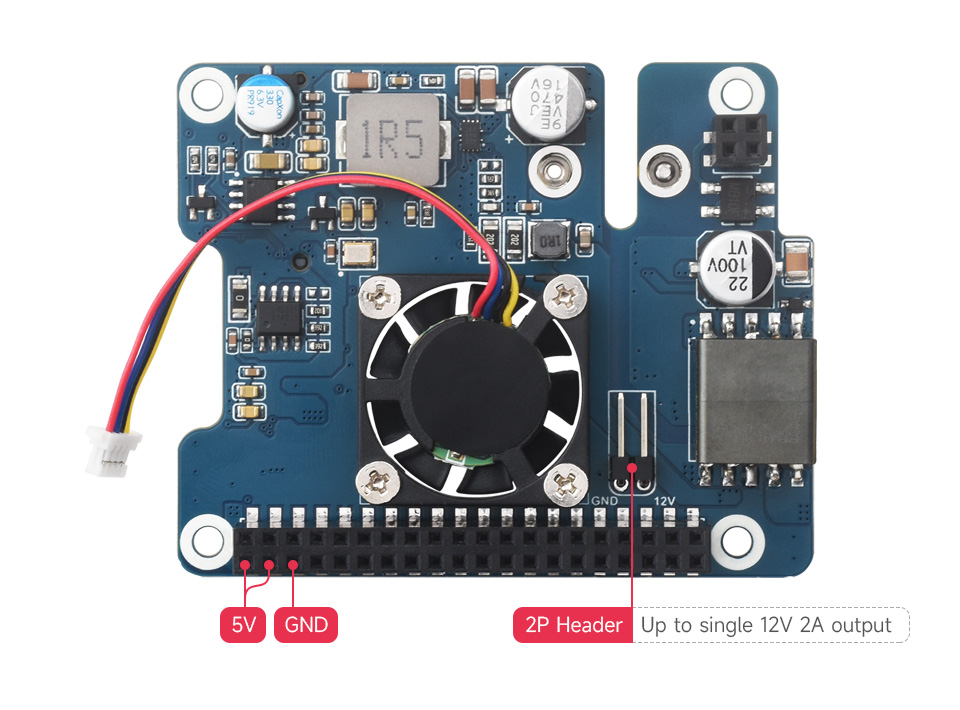
| Power output | GPIO header: 5V 4.5A (MAX) 2P header: 12V 2A (MAX) |
| Dimensions | 56.5 × 70.0mm |
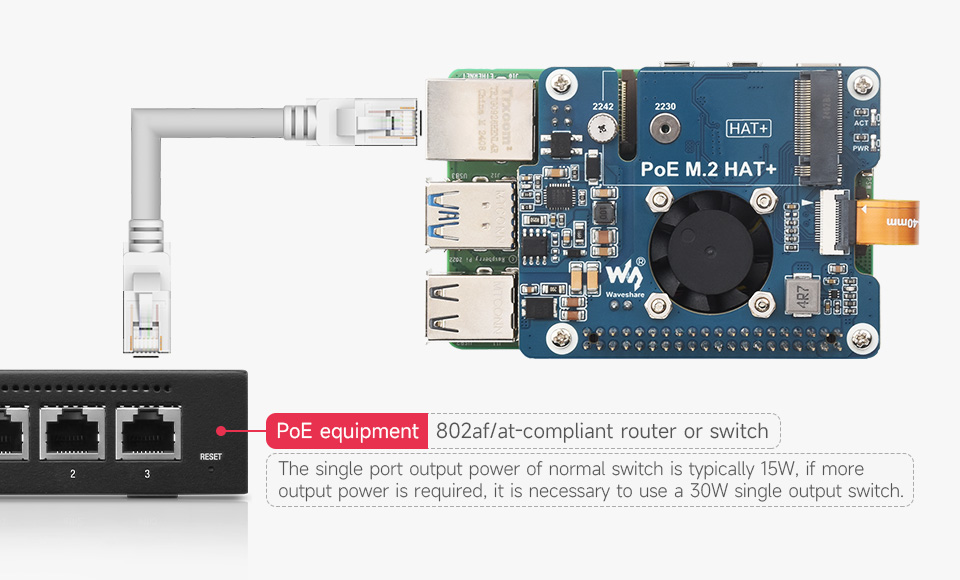
| Network standard | IEEE 802.3af/at PoE |
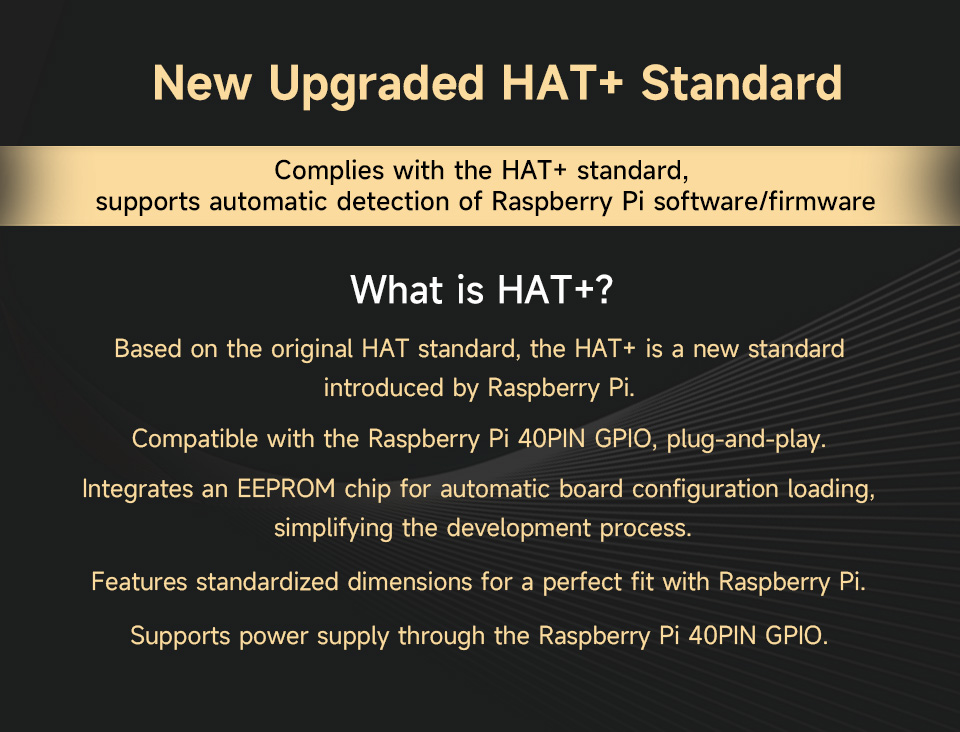
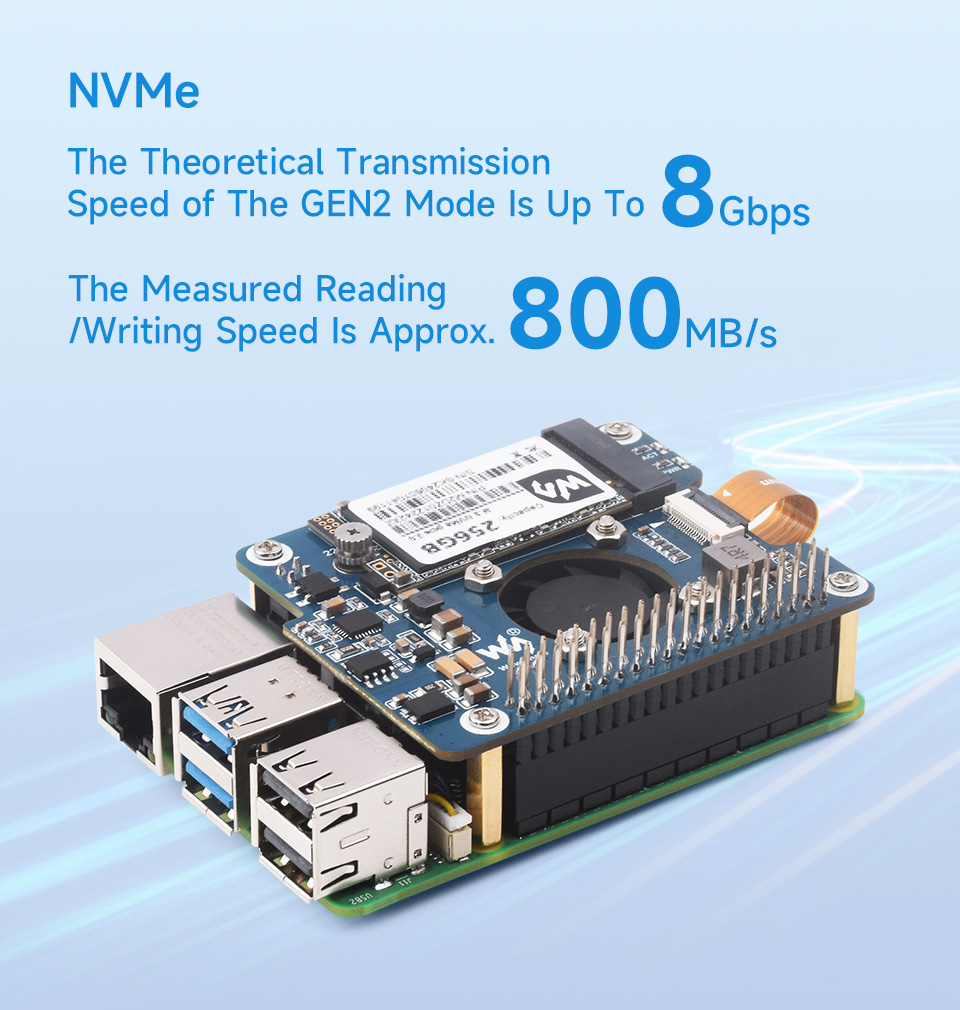
for reference only, the Raspberry Pi 5 is not included.
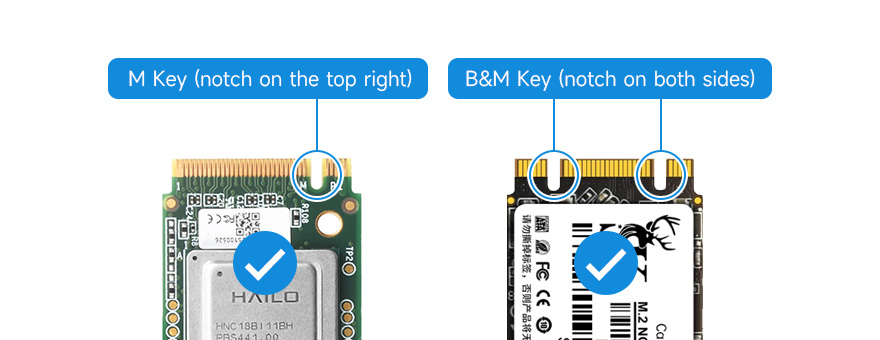
Note: Only supports the NVMe Protocol Solid State Drives.
Based on 16PIN PCIe Interface of Raspberry Pi 5.
Standard Raspberry Pi 40PIN GPIO stackable header, allows connecting other HATs
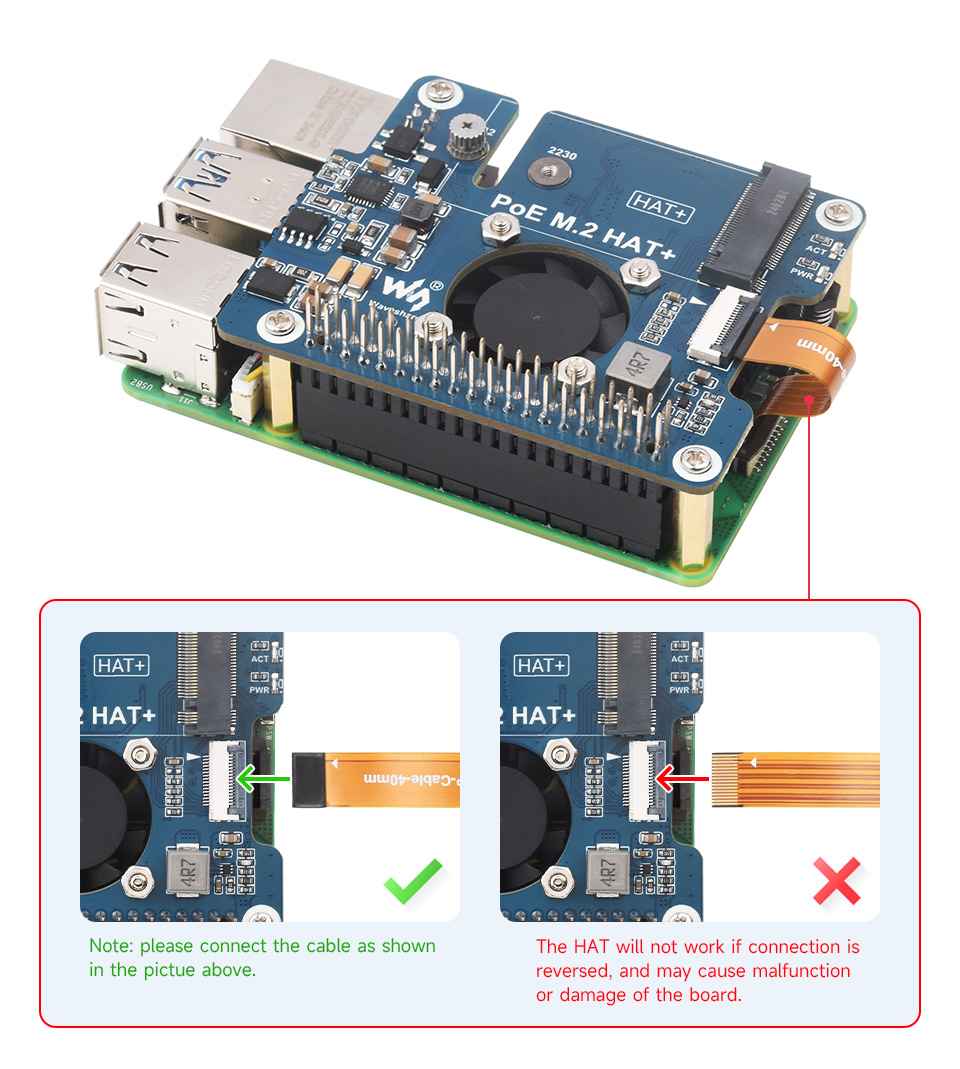
for reference only, please refer to the Package Content for detailed part list
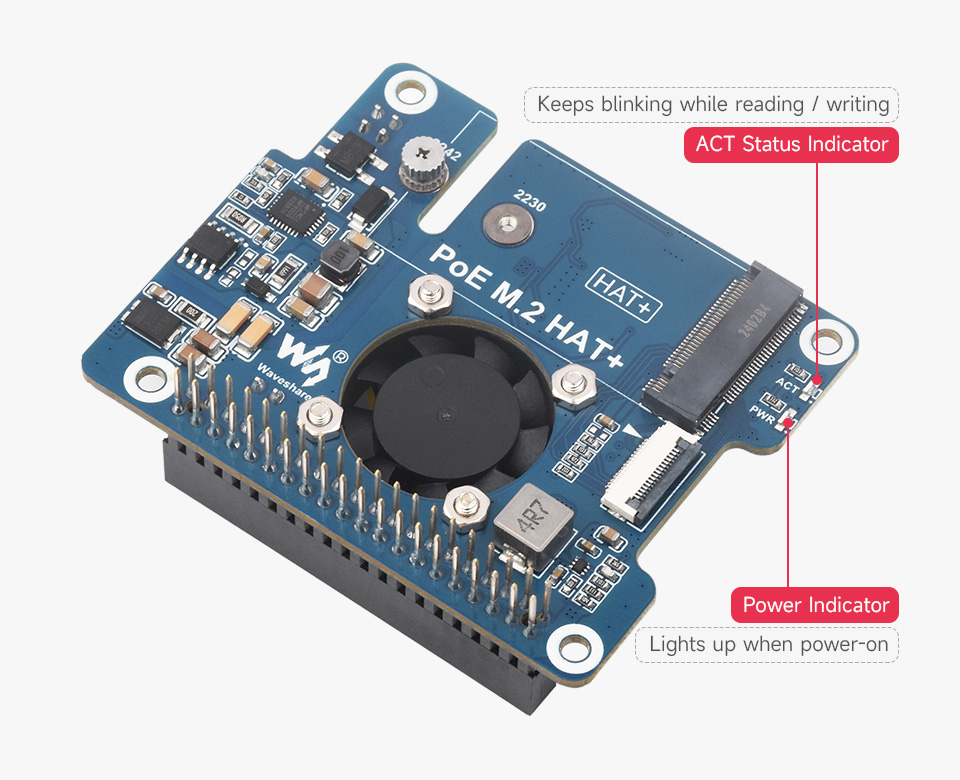
Easy to monitor the Working Status
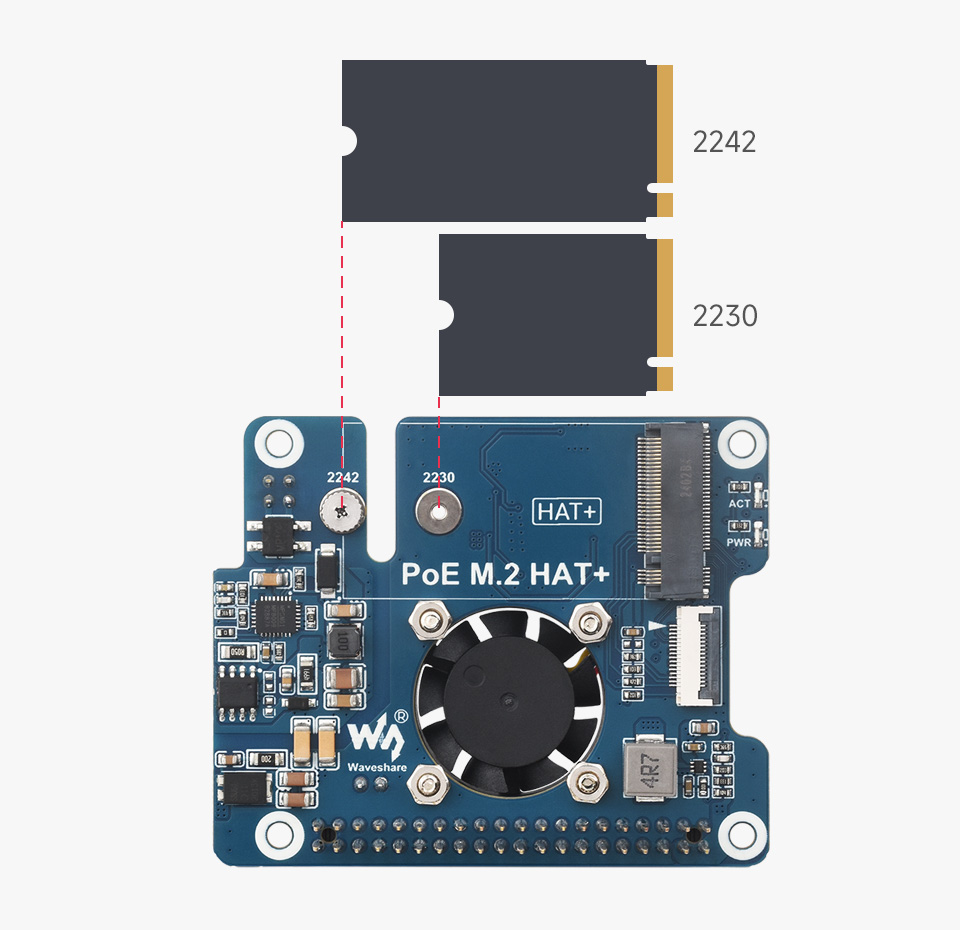
Compatible With 2230/2242 Size M.2 Solid State Drive
Supports Gen2 and Gen3 Modes, Supports Booting PI5 From Solid State Drive
Providing both network connection and power supply for your Raspberry Pi in one cable
5V header provides up to 4.5A output (MAX 25W for 12V+5V total output power)
be able to power extra devices while providing stable power to Raspberry Pi
Accelerate Cooling Effect, More Stable Performance
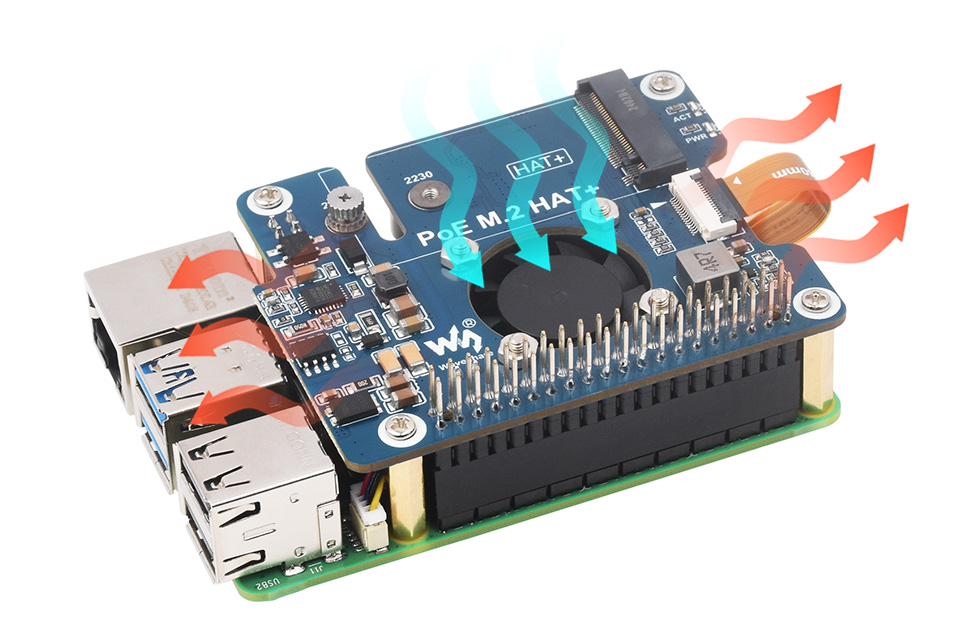
Attach the thermal tapes first, then install the metal heatsink and fix the HAT
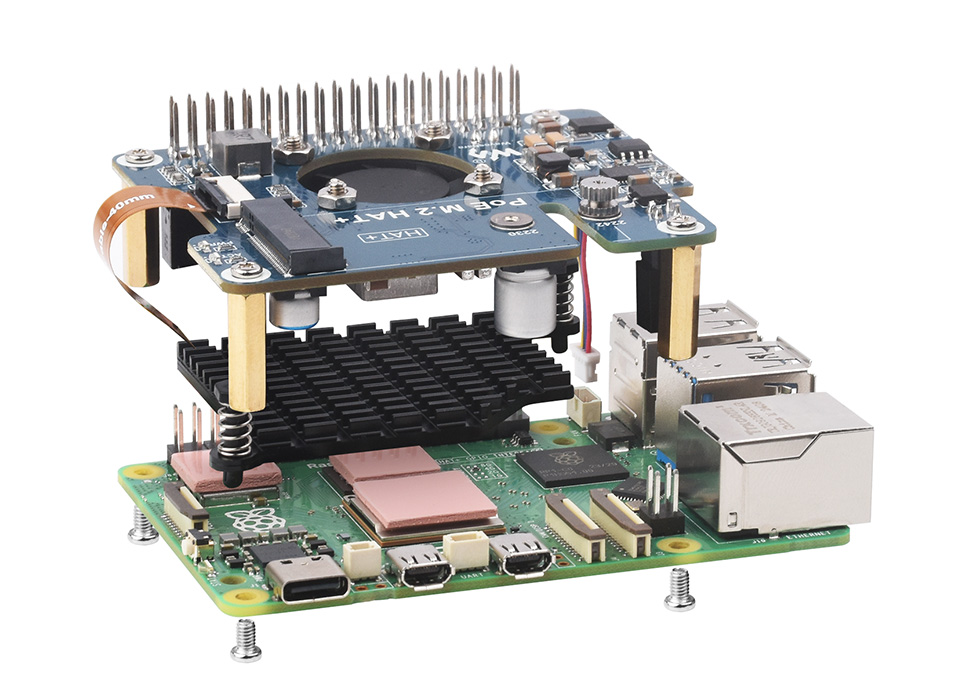
for reference only, please refer to the Package Content for detailed part list
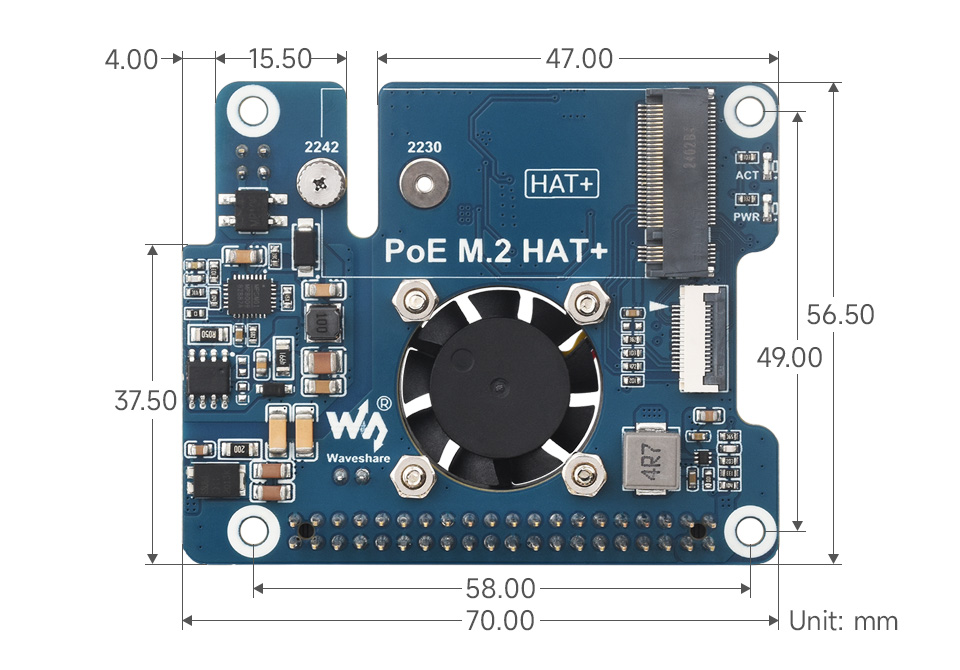
1 x PoE M.2 HAT+
1 x Metal heatsink
1 x 16P-Cable-40mm
1 x Thermal tape (3PCS)
1 x Screws pack
You might also need our case made specifically to house this kind of board