
PiShop Laser


If you want to mount your HighPi case, Modular case, Raspberry Pi 4/5 or Raspberry Pi Zero board to a TV or monitor, have a look at our multi function VESA plate. Great for media & signage applications e.g. hiding behind a TV or monitor.
- Modular Case for RPi4 via the case assembly screws (Included with your Modular Case)
- HighPi Case for RPi4 using bolts and nuts (Not included)
- Raspberry Pi 3 B / Raspberry Pi 4 B / Raspberry Pi 5 boards using standoffs with bolts and nuts (Not included)
- Rapsberry Pi Zero boards using standoffs with bolts and nuts (Not included)
You might also like our VESA Lite option for a more protected all in one solution.
This plate comes with
- 4 mounting holes for 100mm mounting points
- 2 mounting holes for 75mm mounting points
Easily mount this plate to our
- Official Raspberry Pi Red & White monitor
- Official Raspberry Pi Black monitor
- Mecer 19.5" 16 x 9 TFT LED Wide Monitor
- LG 20MK400H 19.5inch monitor
What's in the box?
4 x Nylon M4 Bolts (to mount the plate to your display)
4 x Nylon M4 Washers
1 x Acrylic Vesa mount

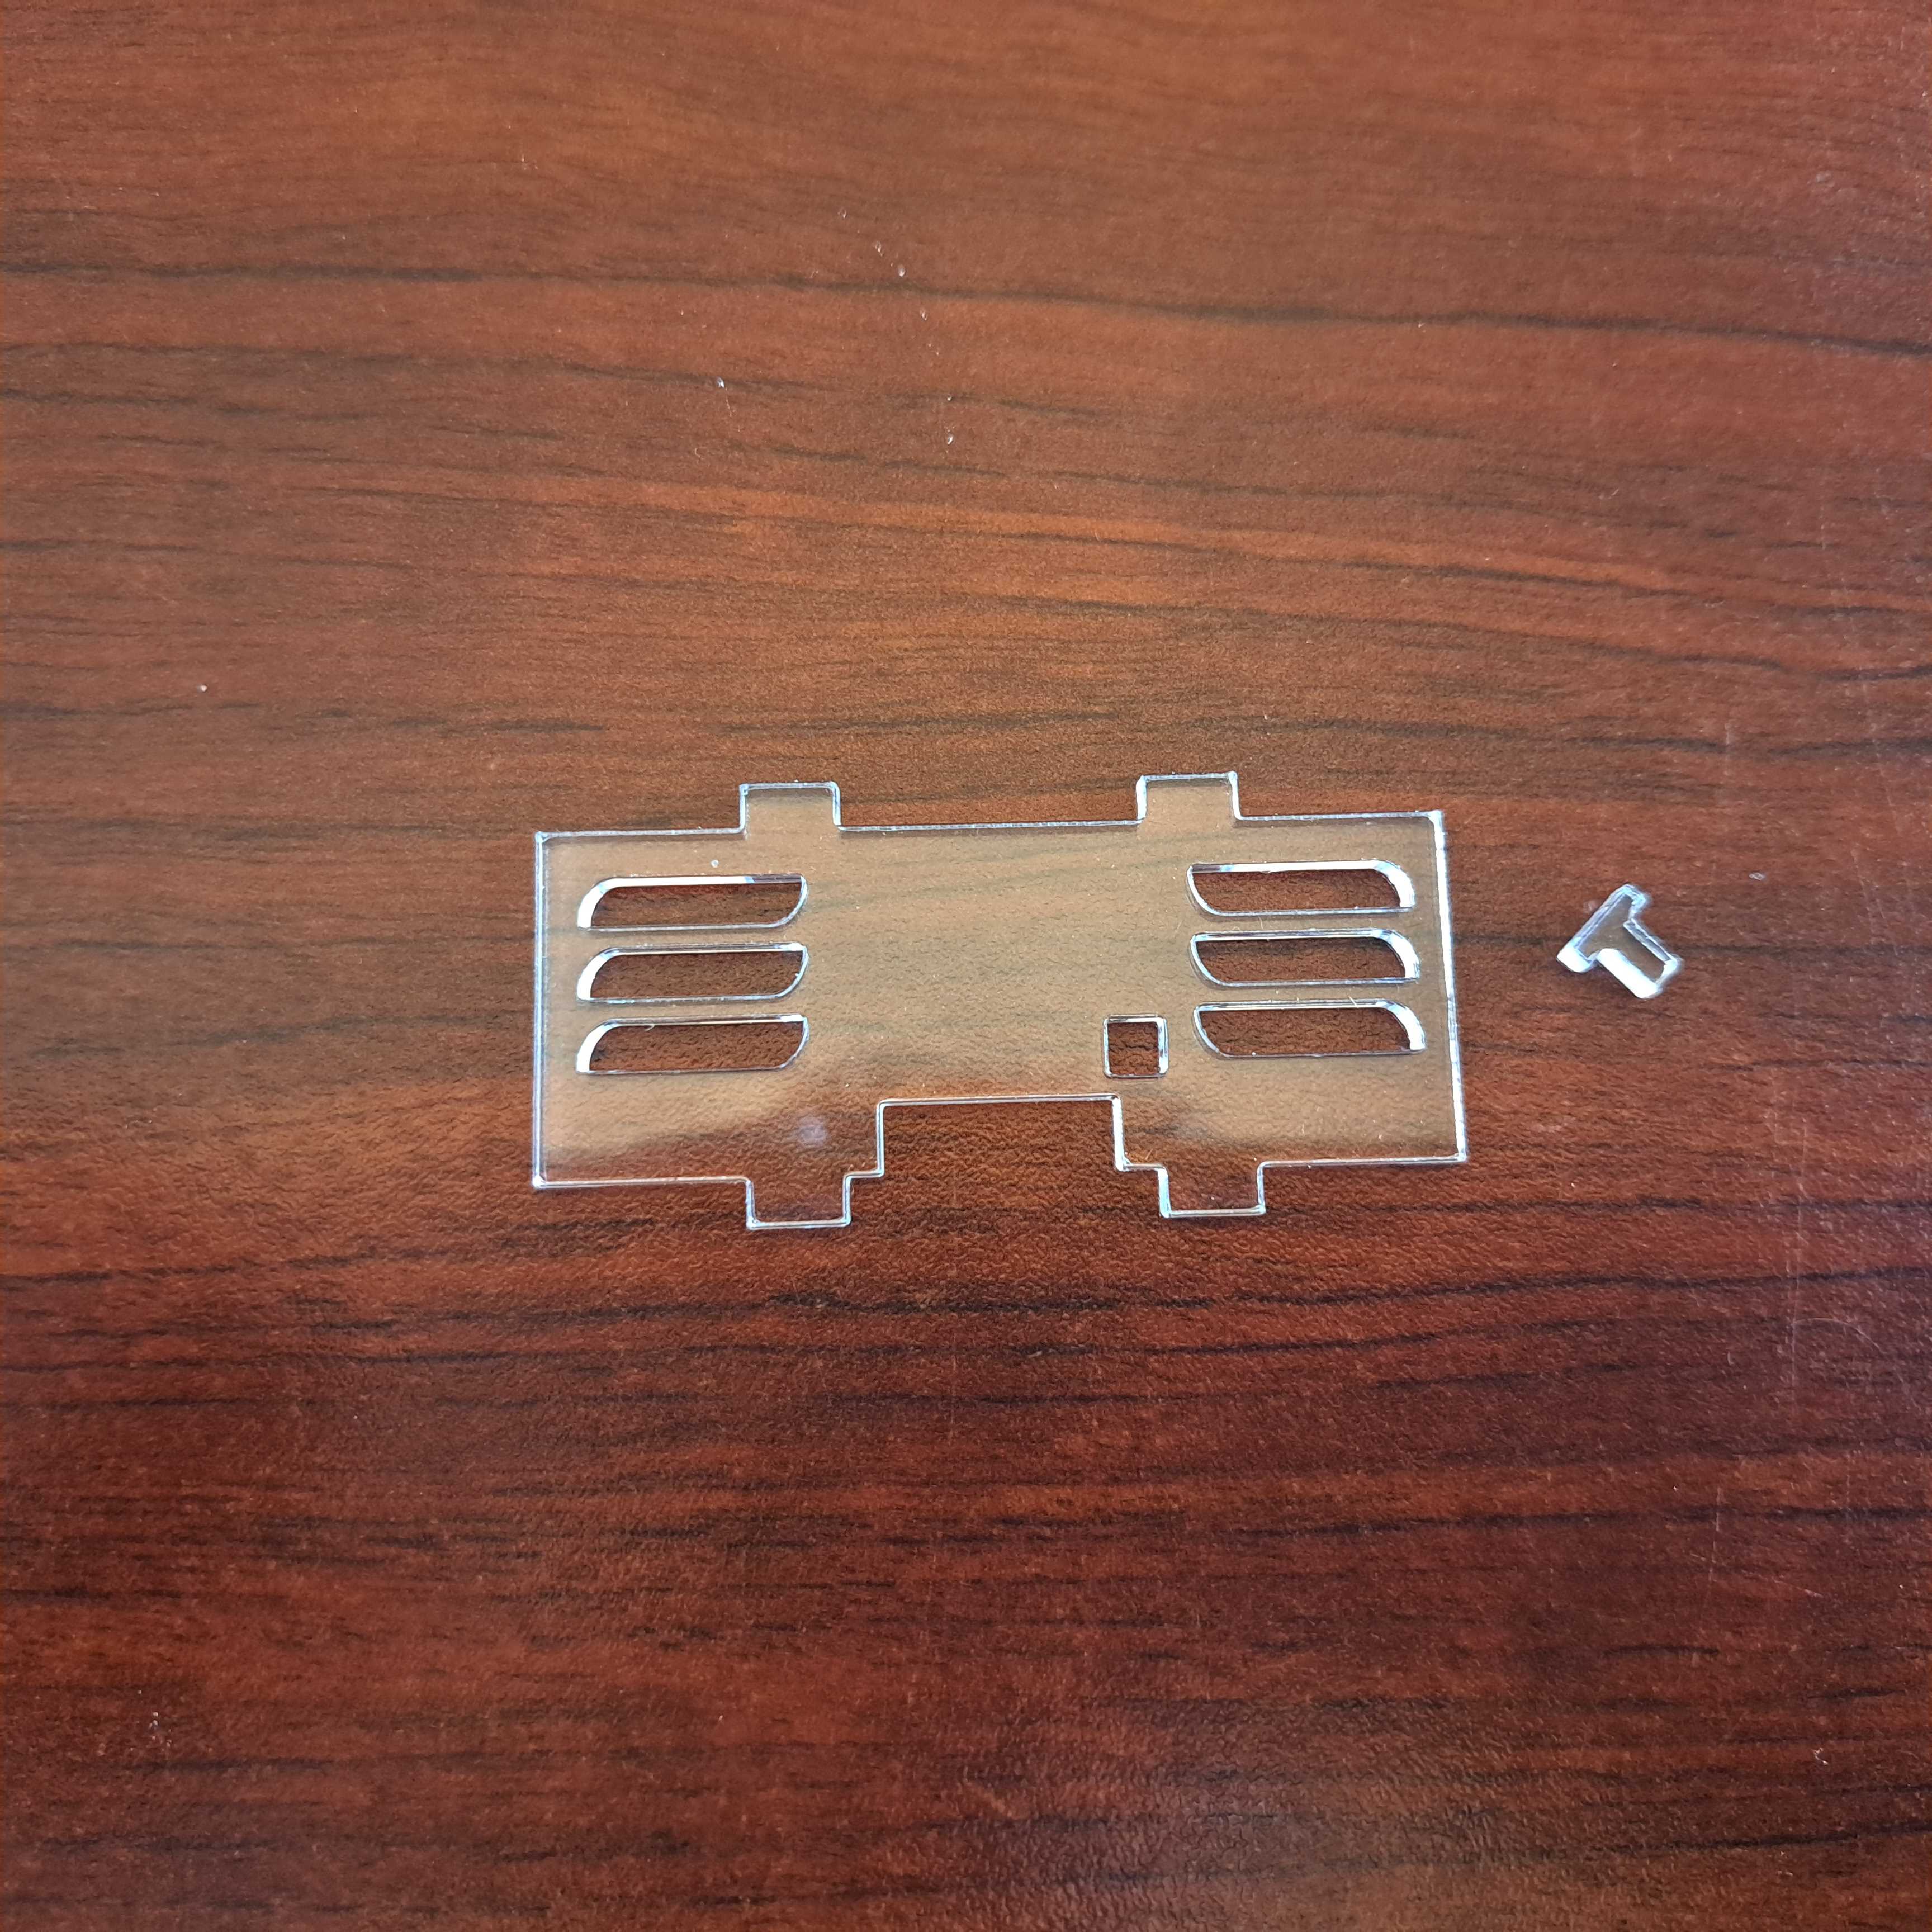
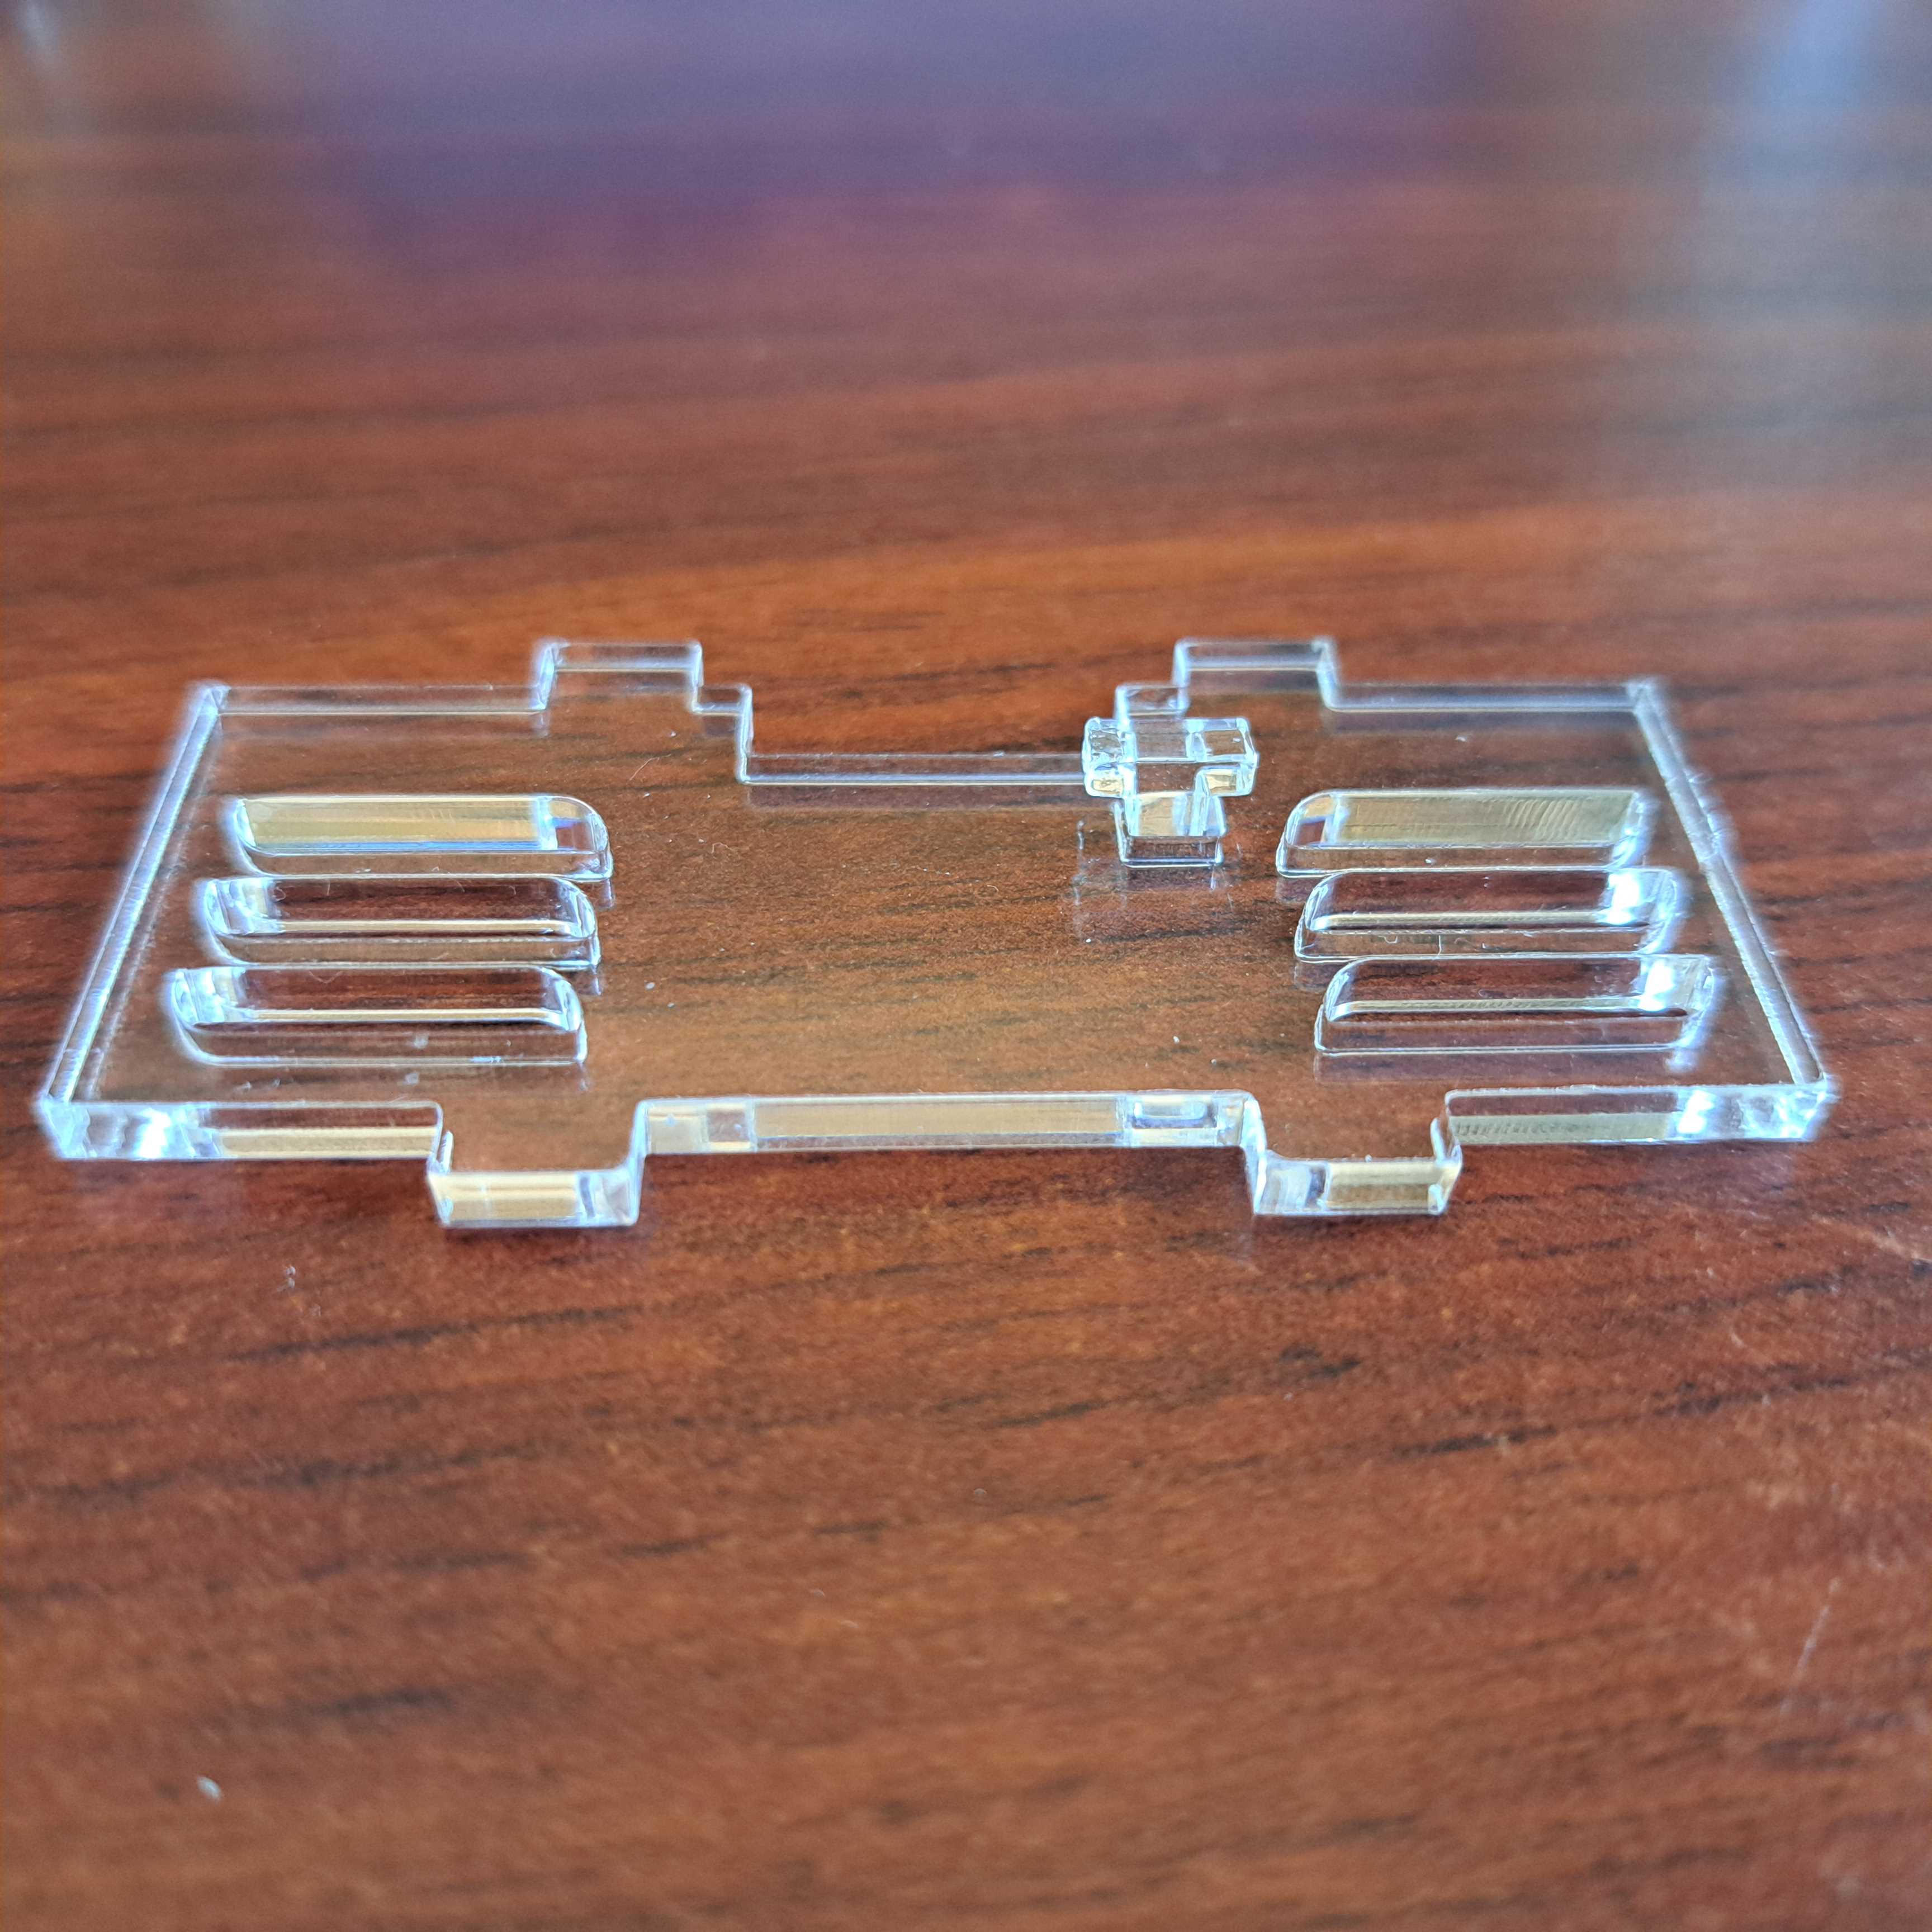
A tiny and lovely clear acrylic enclosure for the raspberry pi zero. It designed to be beautiful, light, and easy-assembly. Perfect for any use (but especially for those who want to carry their Pi around in their pocket!). This enclosure is only compatible with the Raspberry Pi Zero! The case is as minimal as it gets coming in just two pieces of acrylic that secure with four screws. Made of crystal-clear acrylic, this case keeps the Pi Zero secure.
There are two USB holes and one cooling hole, you can use all of the connectors on the edges of the Pi: mini HDMI, micro SD slot, micro USB power, and micro USB port. There's also a cut out to allow a 2x20-pin header to be soldered onto the Pi Zero.
This case is also available in black
Features
- Easy to assemble
- 2 layers, 4 bolts, spacers and nuts included
- Will fit Raspberry Zero & Zero 2
Notes
Only includes the case. RPi Zero is not included.
Don't forget to remove the protective film from the acrylic.
What's in the box?
1 x Clear acrylic top plate
1 x Clear acrylic bottom plate
1 x heatsink
4 x acrylic spacers
4 x M2.5 screws
4 x M2.5 nuts

A tiny and lovely clear acrylic enclosure for the raspberry pi zero. It designed to be beautiful, light, and easy-assembly. Perfect for any use (but especially for those who want to carry their Pi around in their pocket!). This enclosure is only compatible with the Raspberry Pi Zero! The case is as minimal as it gets coming in just two pieces of acrylic that secure with four screws. Made of crystal-clear acrylic, this case keeps the Pi Zero secure.
There are two USB holes and one cooling hole, you can use all of the connectors on the edges of the Pi: mini HDMI, micro SD slot, micro USB power, and micro USB port. There's also a cut out to allow a 2x20-pin header to be soldered onto the Pi Zero.
This case is also available in clear acrylic
Features
- Easy to assemble
- 2 layers, 4 bolts, spacers and nuts included
- Will fit Raspberry Zero & Zero 2
Notes
Only includes the case. RPi Zero is not included.
Don't forget to remove the protective film from the acrylic.
What's in the box?
1 x Black acrylic top plate
1 x Black acrylic bottom plate
1 x heatsink
4 x acrylic spacers
4 x M2.5 screws
4 x M2.5 nuts

Please Note: Raspberry Pi is not included
The included fan is powered from the GPIO pins
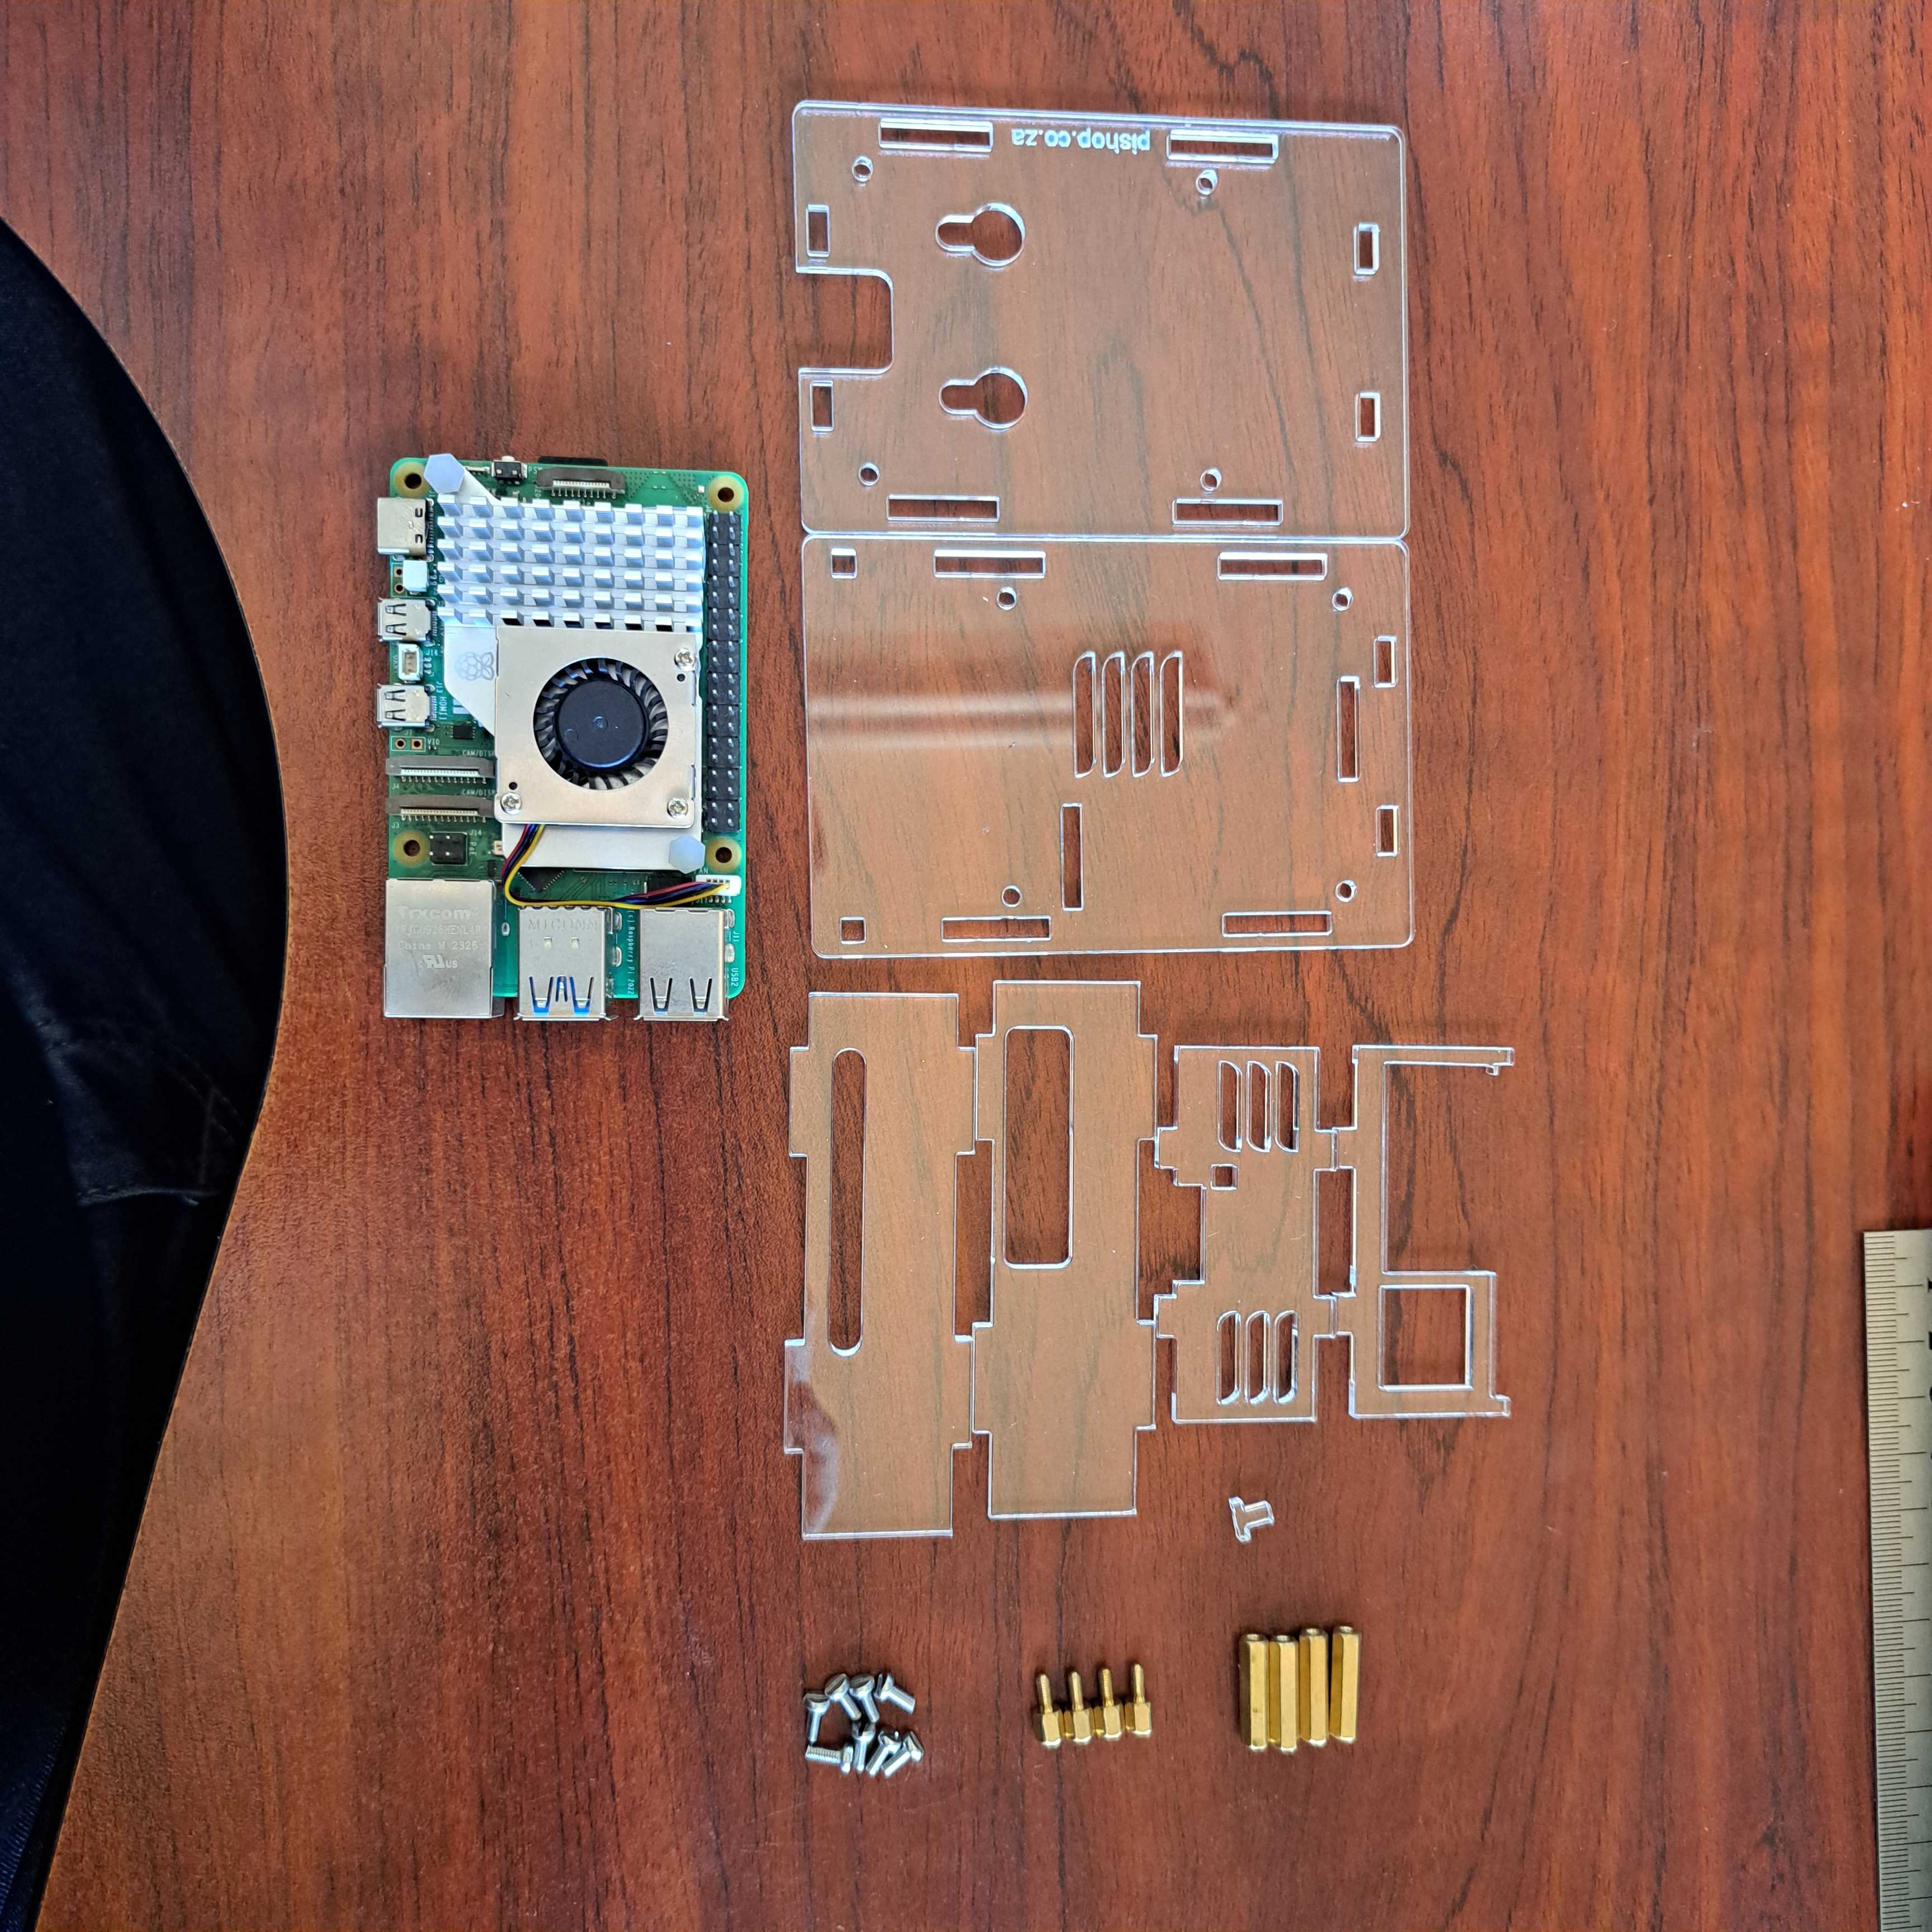
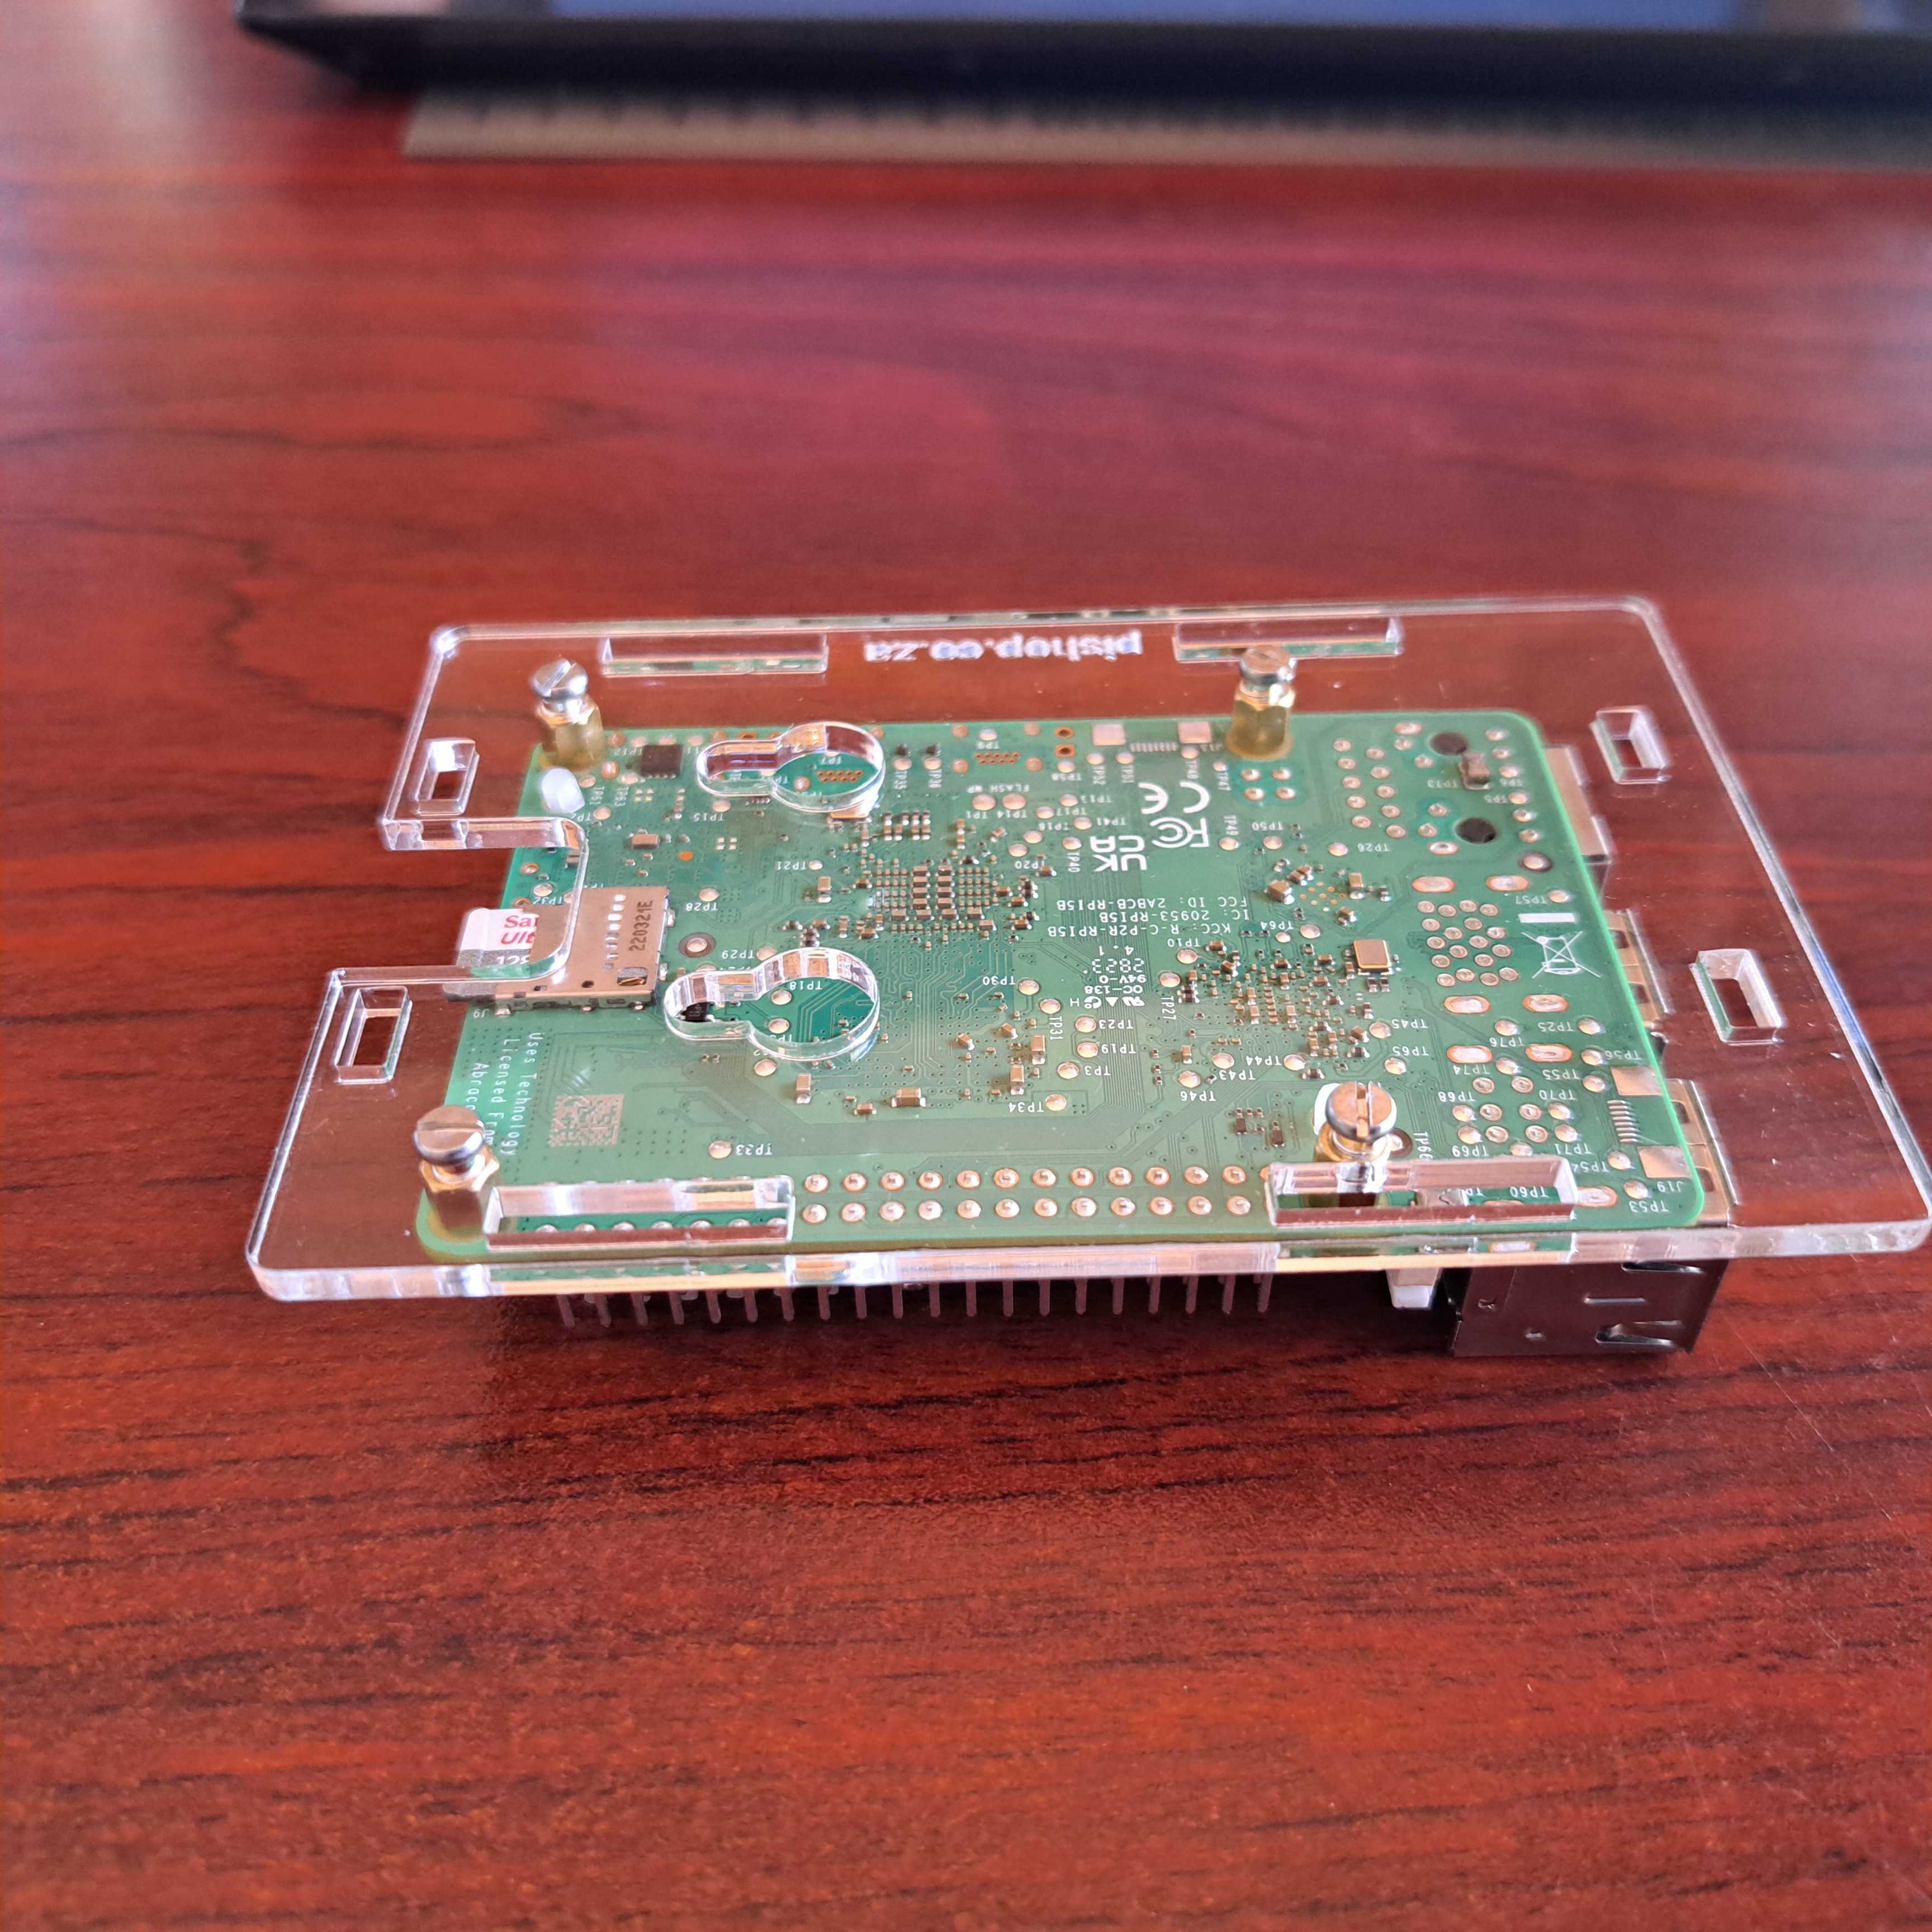
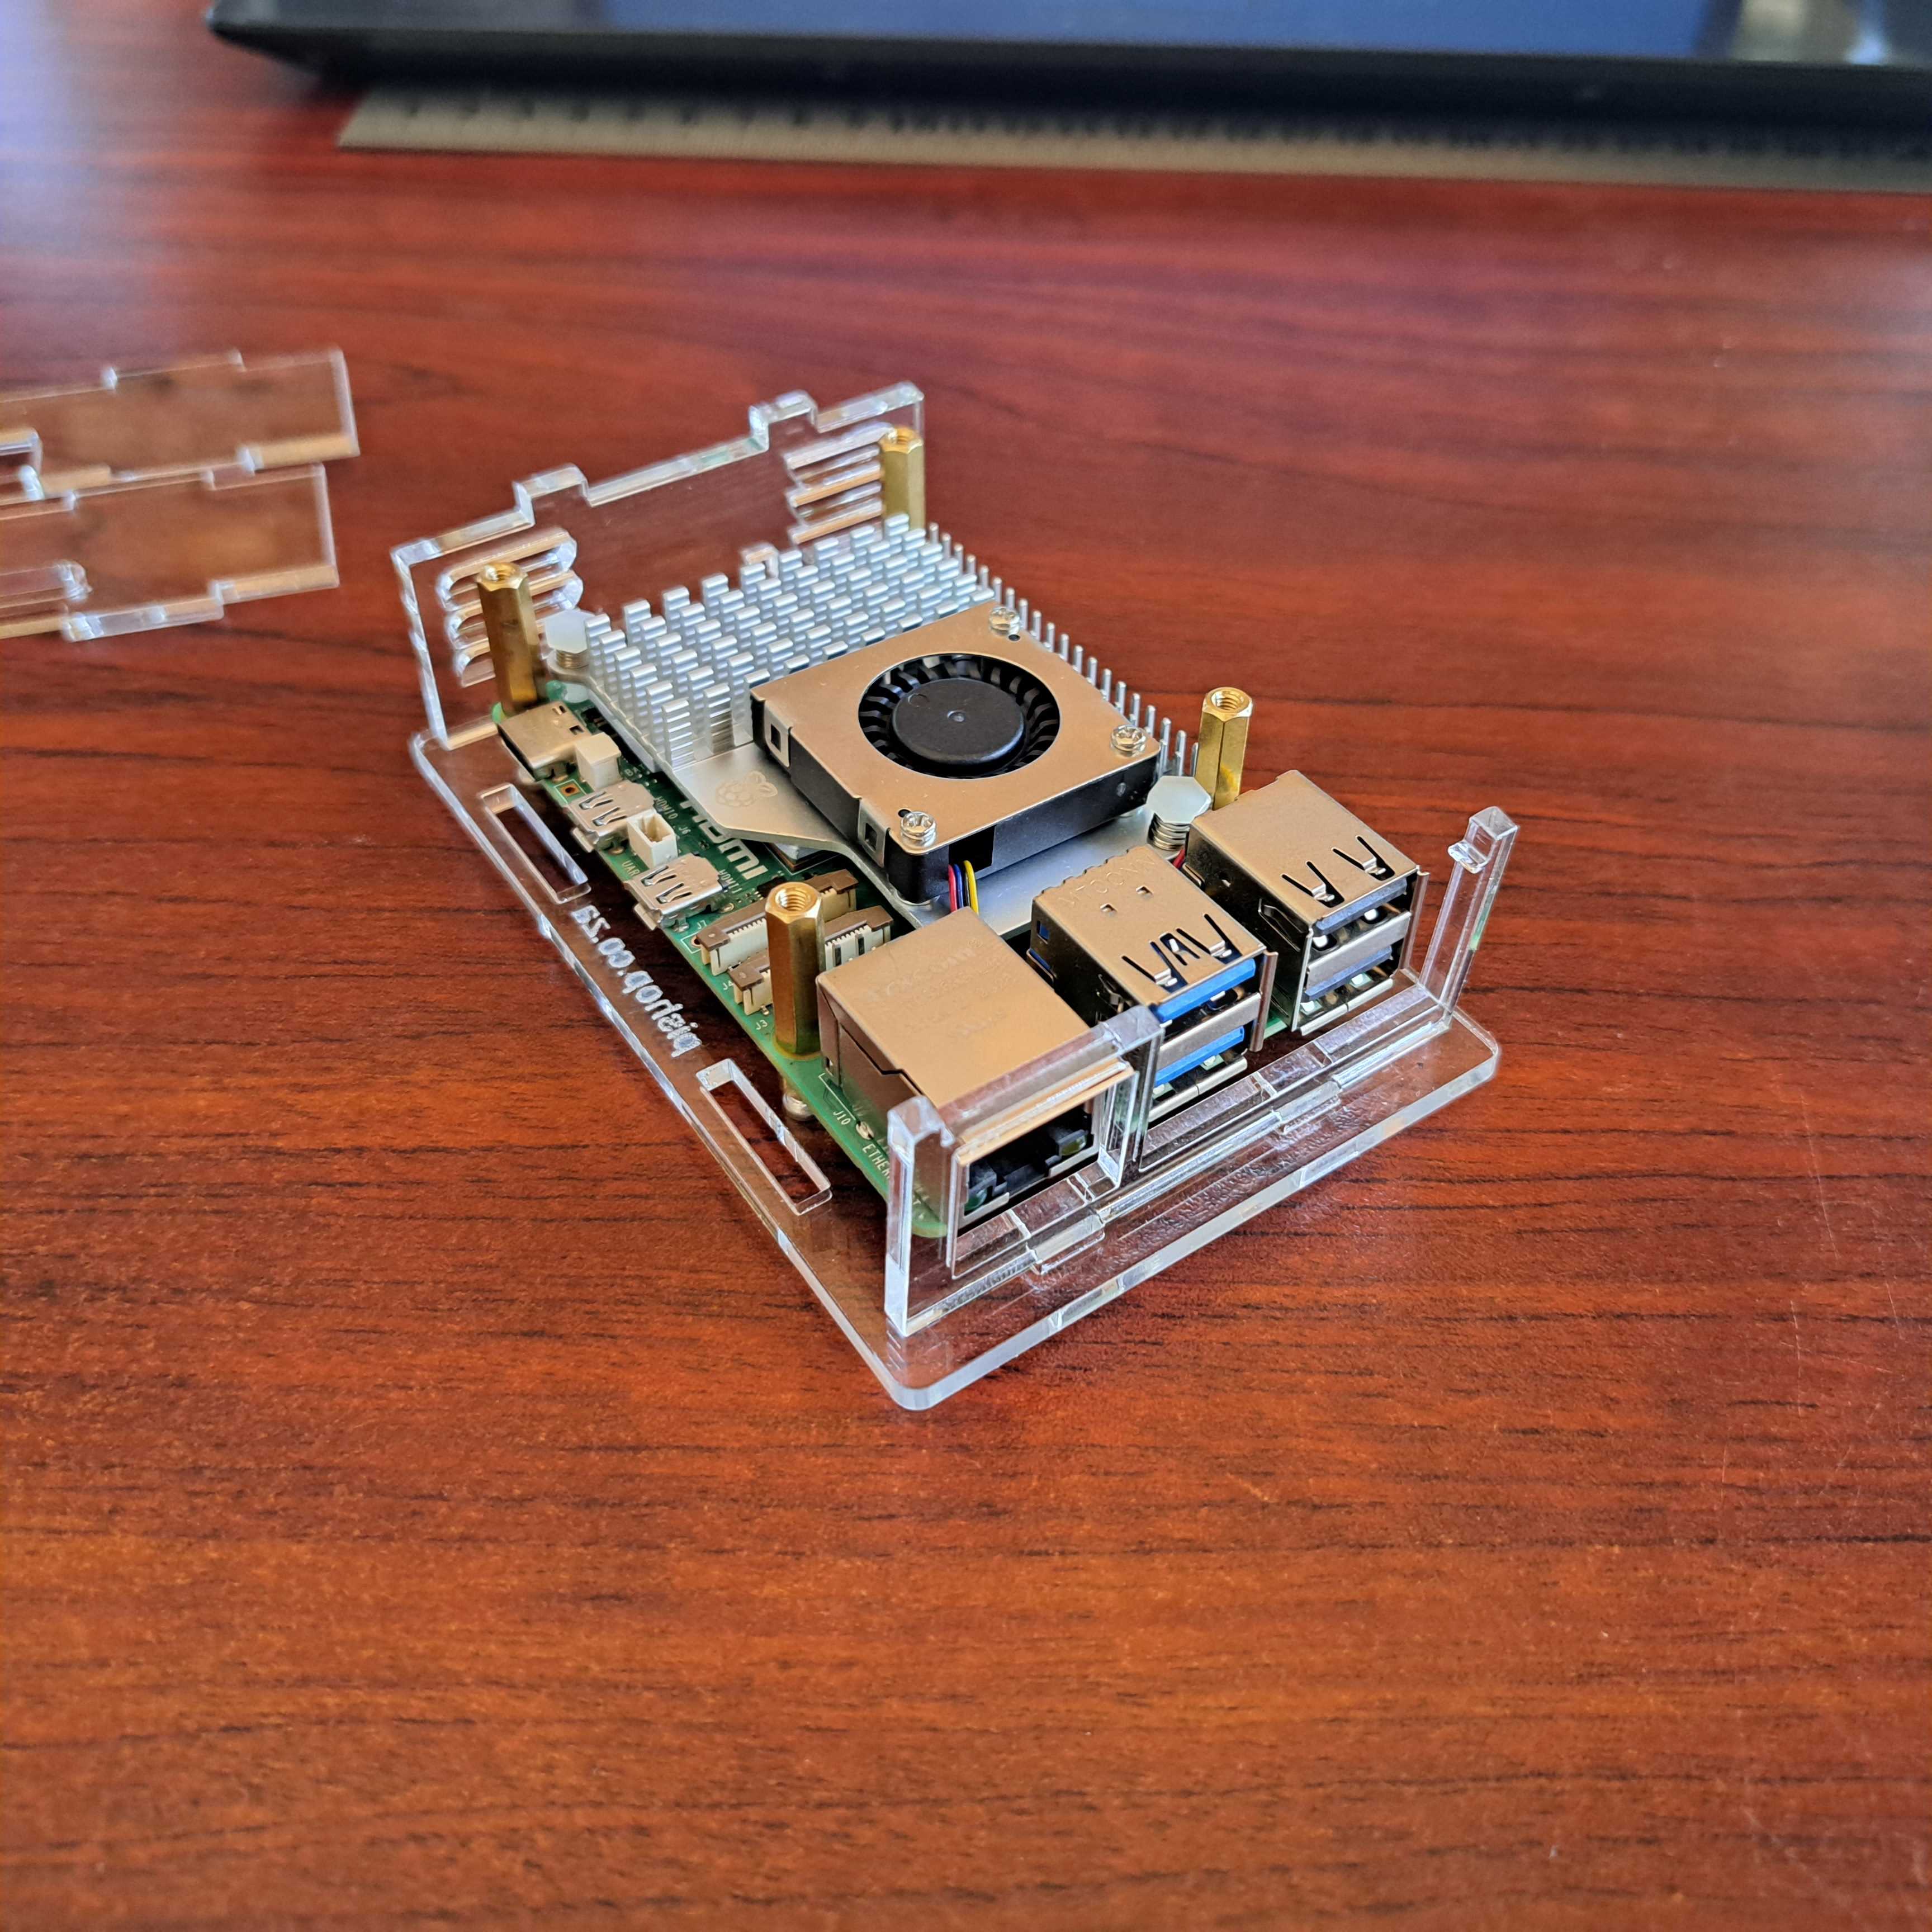
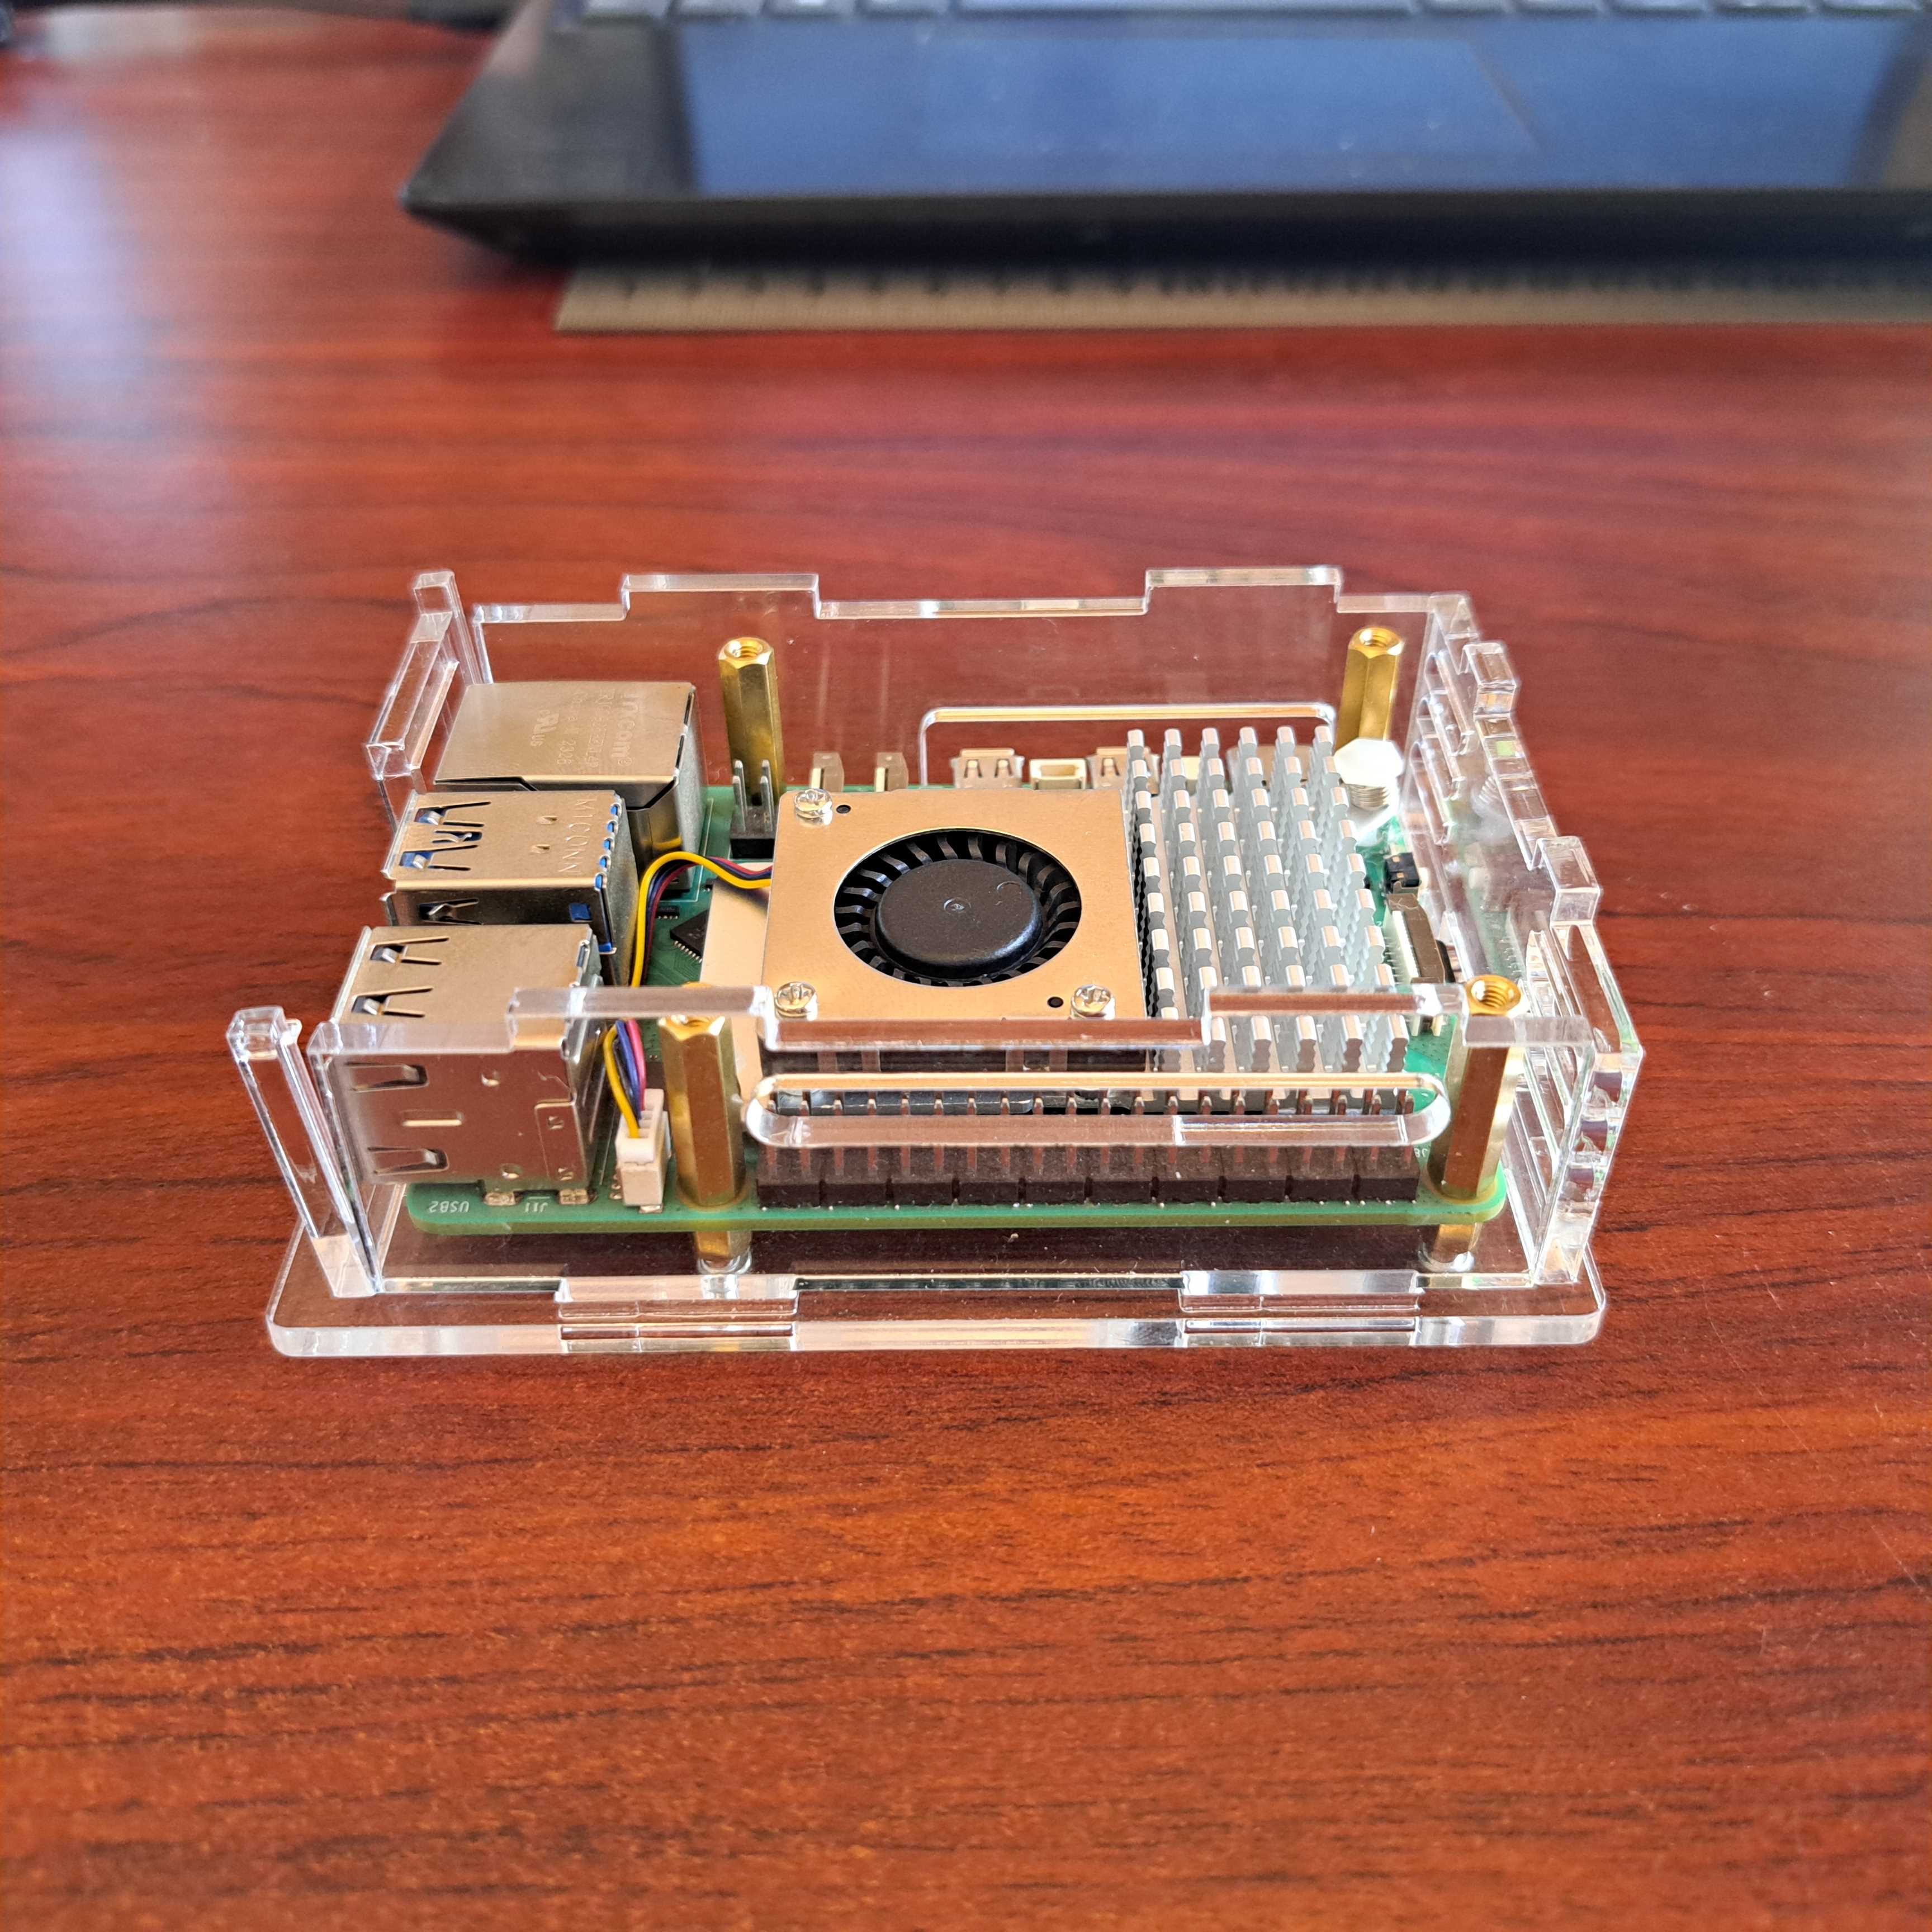
This DIY case requires assembly. You will need a small precision flathead screwdriver. The fan is powered from GPIO.
Features
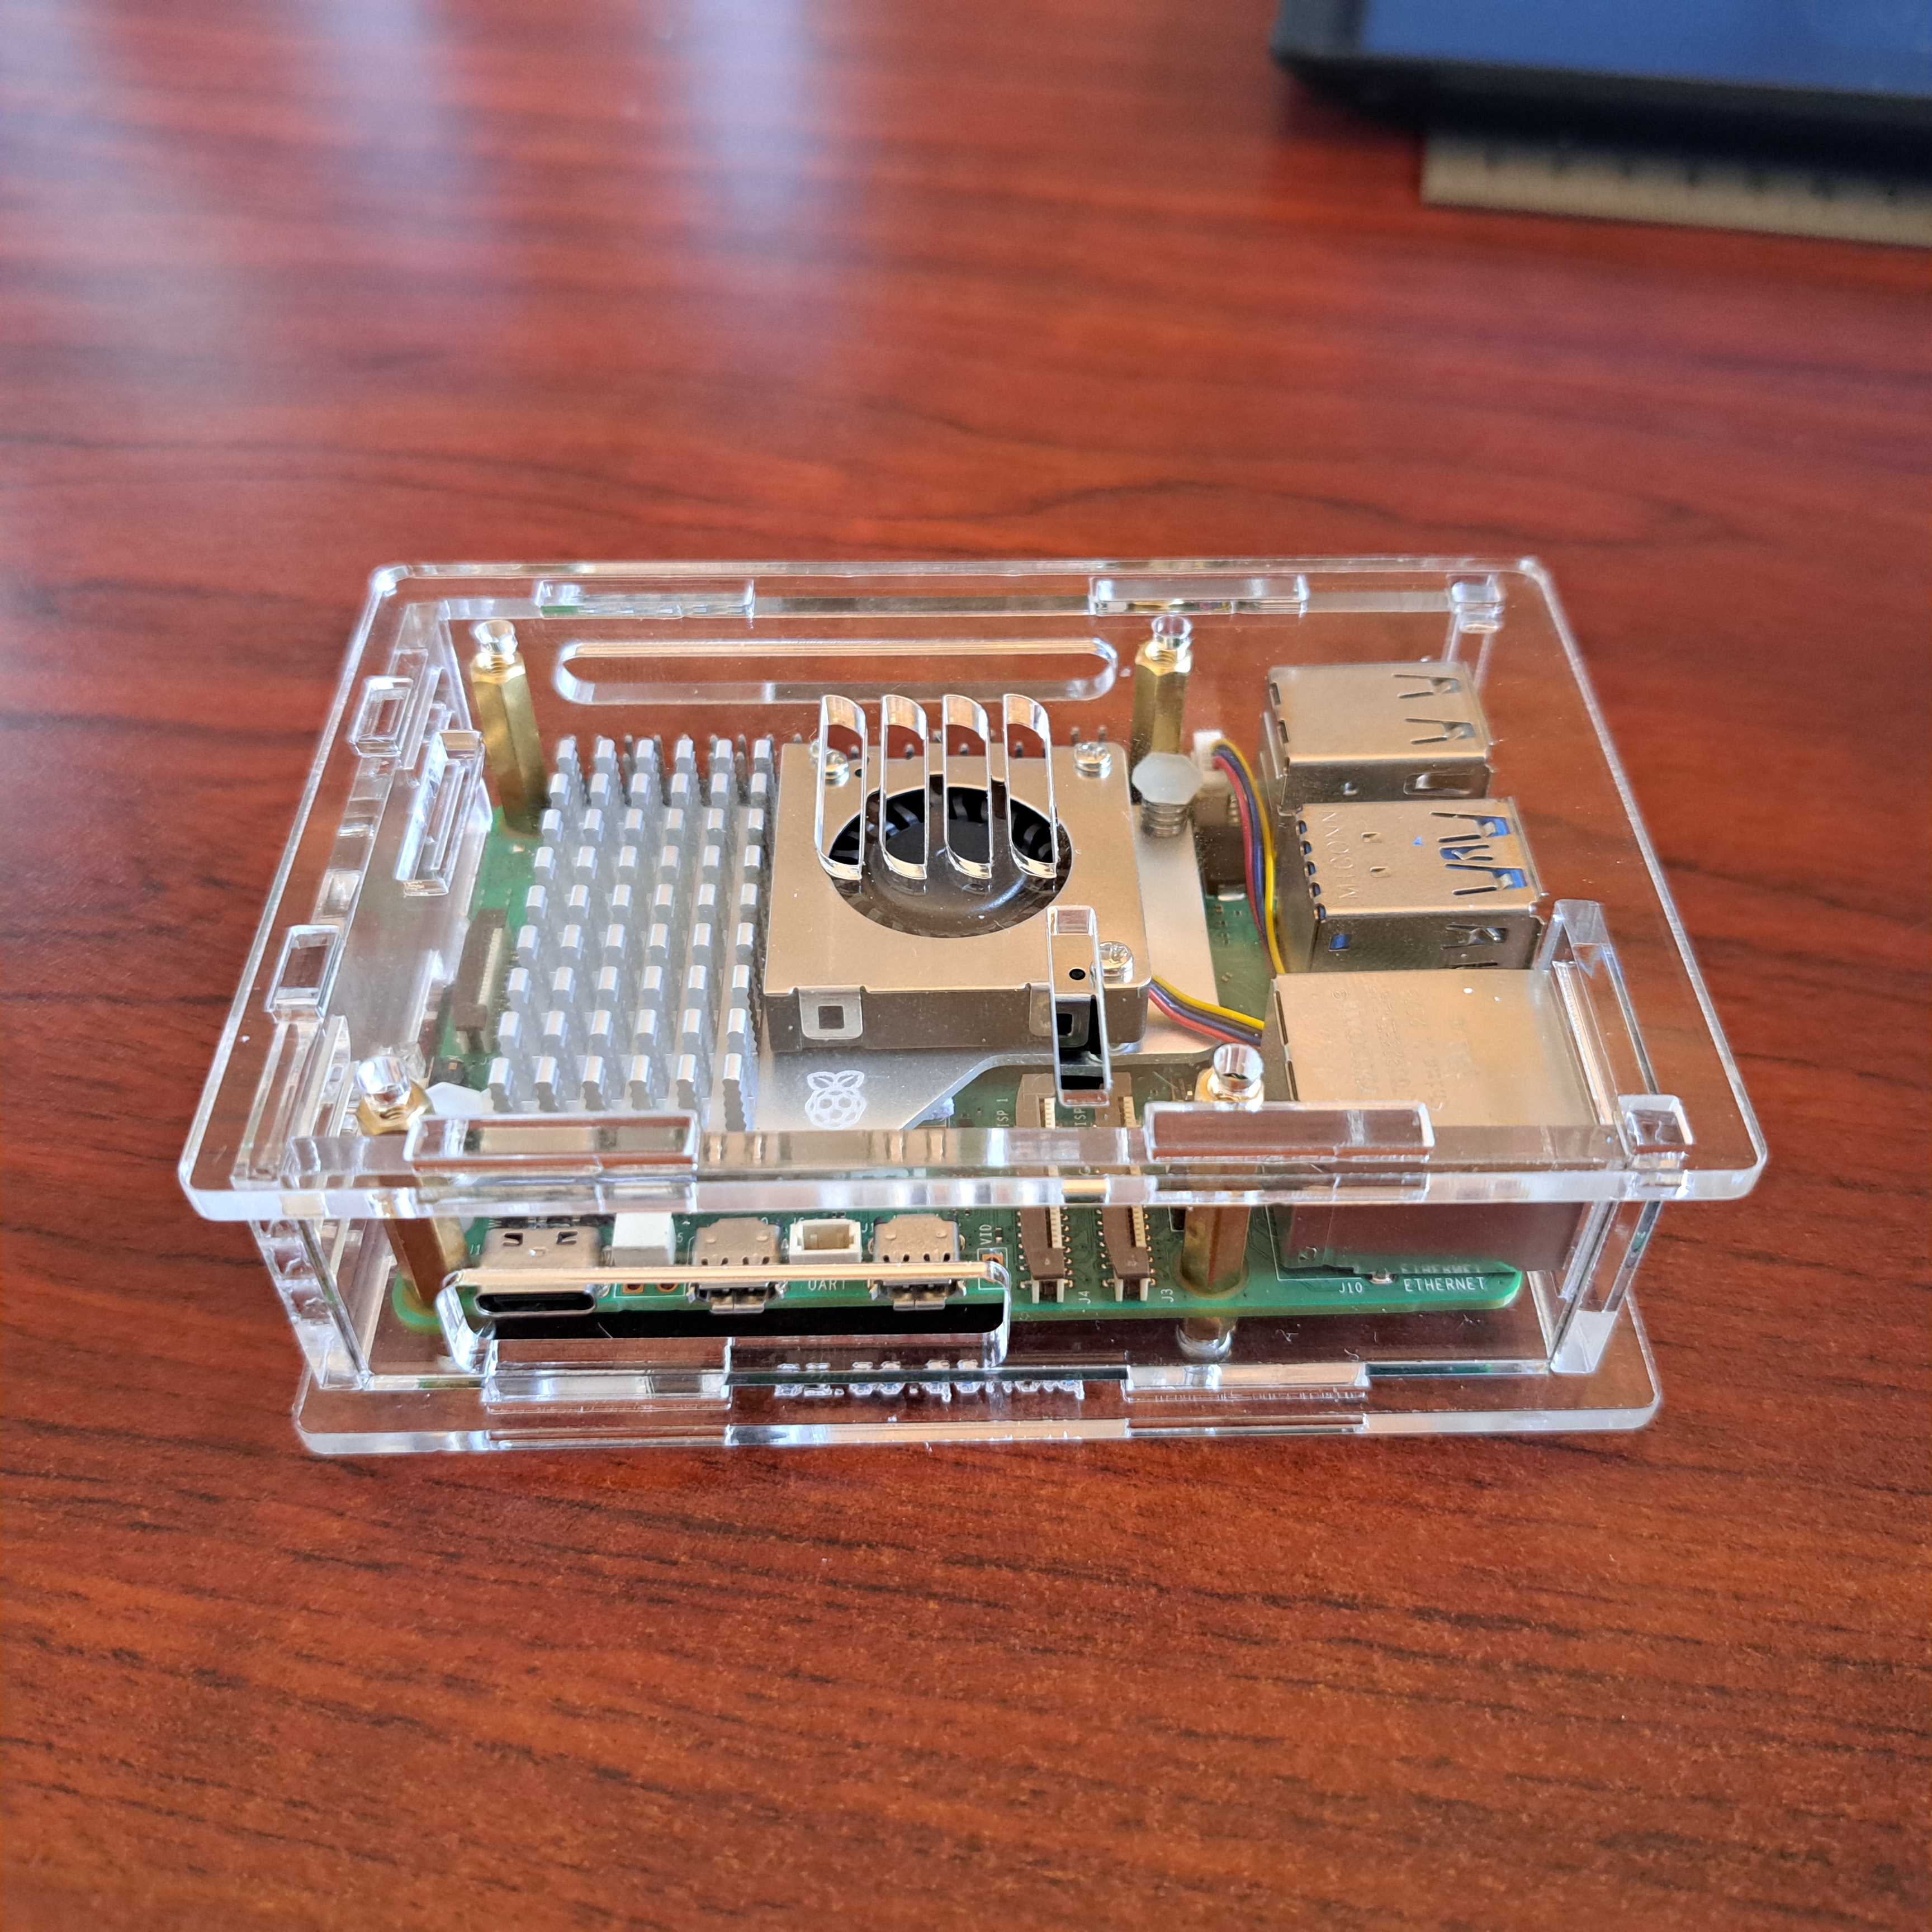
- Two-part Raspberry Pi case for Pi 3, Pi 4 and Pi 5.
- Easy access to all Pi connectors
- Open design to keep your Raspberry Pi cool
- You can mount a HQ cam onto this case. See the hint at the end of the description.
What's in the box?
2 x DIY Acrylic Case layers
1 x 30mm fan that gets powered from GPIO(Not the RPi5 fan adapter)
1 x 30mm fan grill
1 x 19mm x 14mm x 7mm heatsink
4 x 5mm standoffs
4 x 25mm standoffs
8 x M2.5x6 screws
4 x M3x16 screws
4 x M3 nuts
4 x rubber feet
You might prefer to add the RPi 5 fan that is OS controlled by your Raspberry Pi 5 board
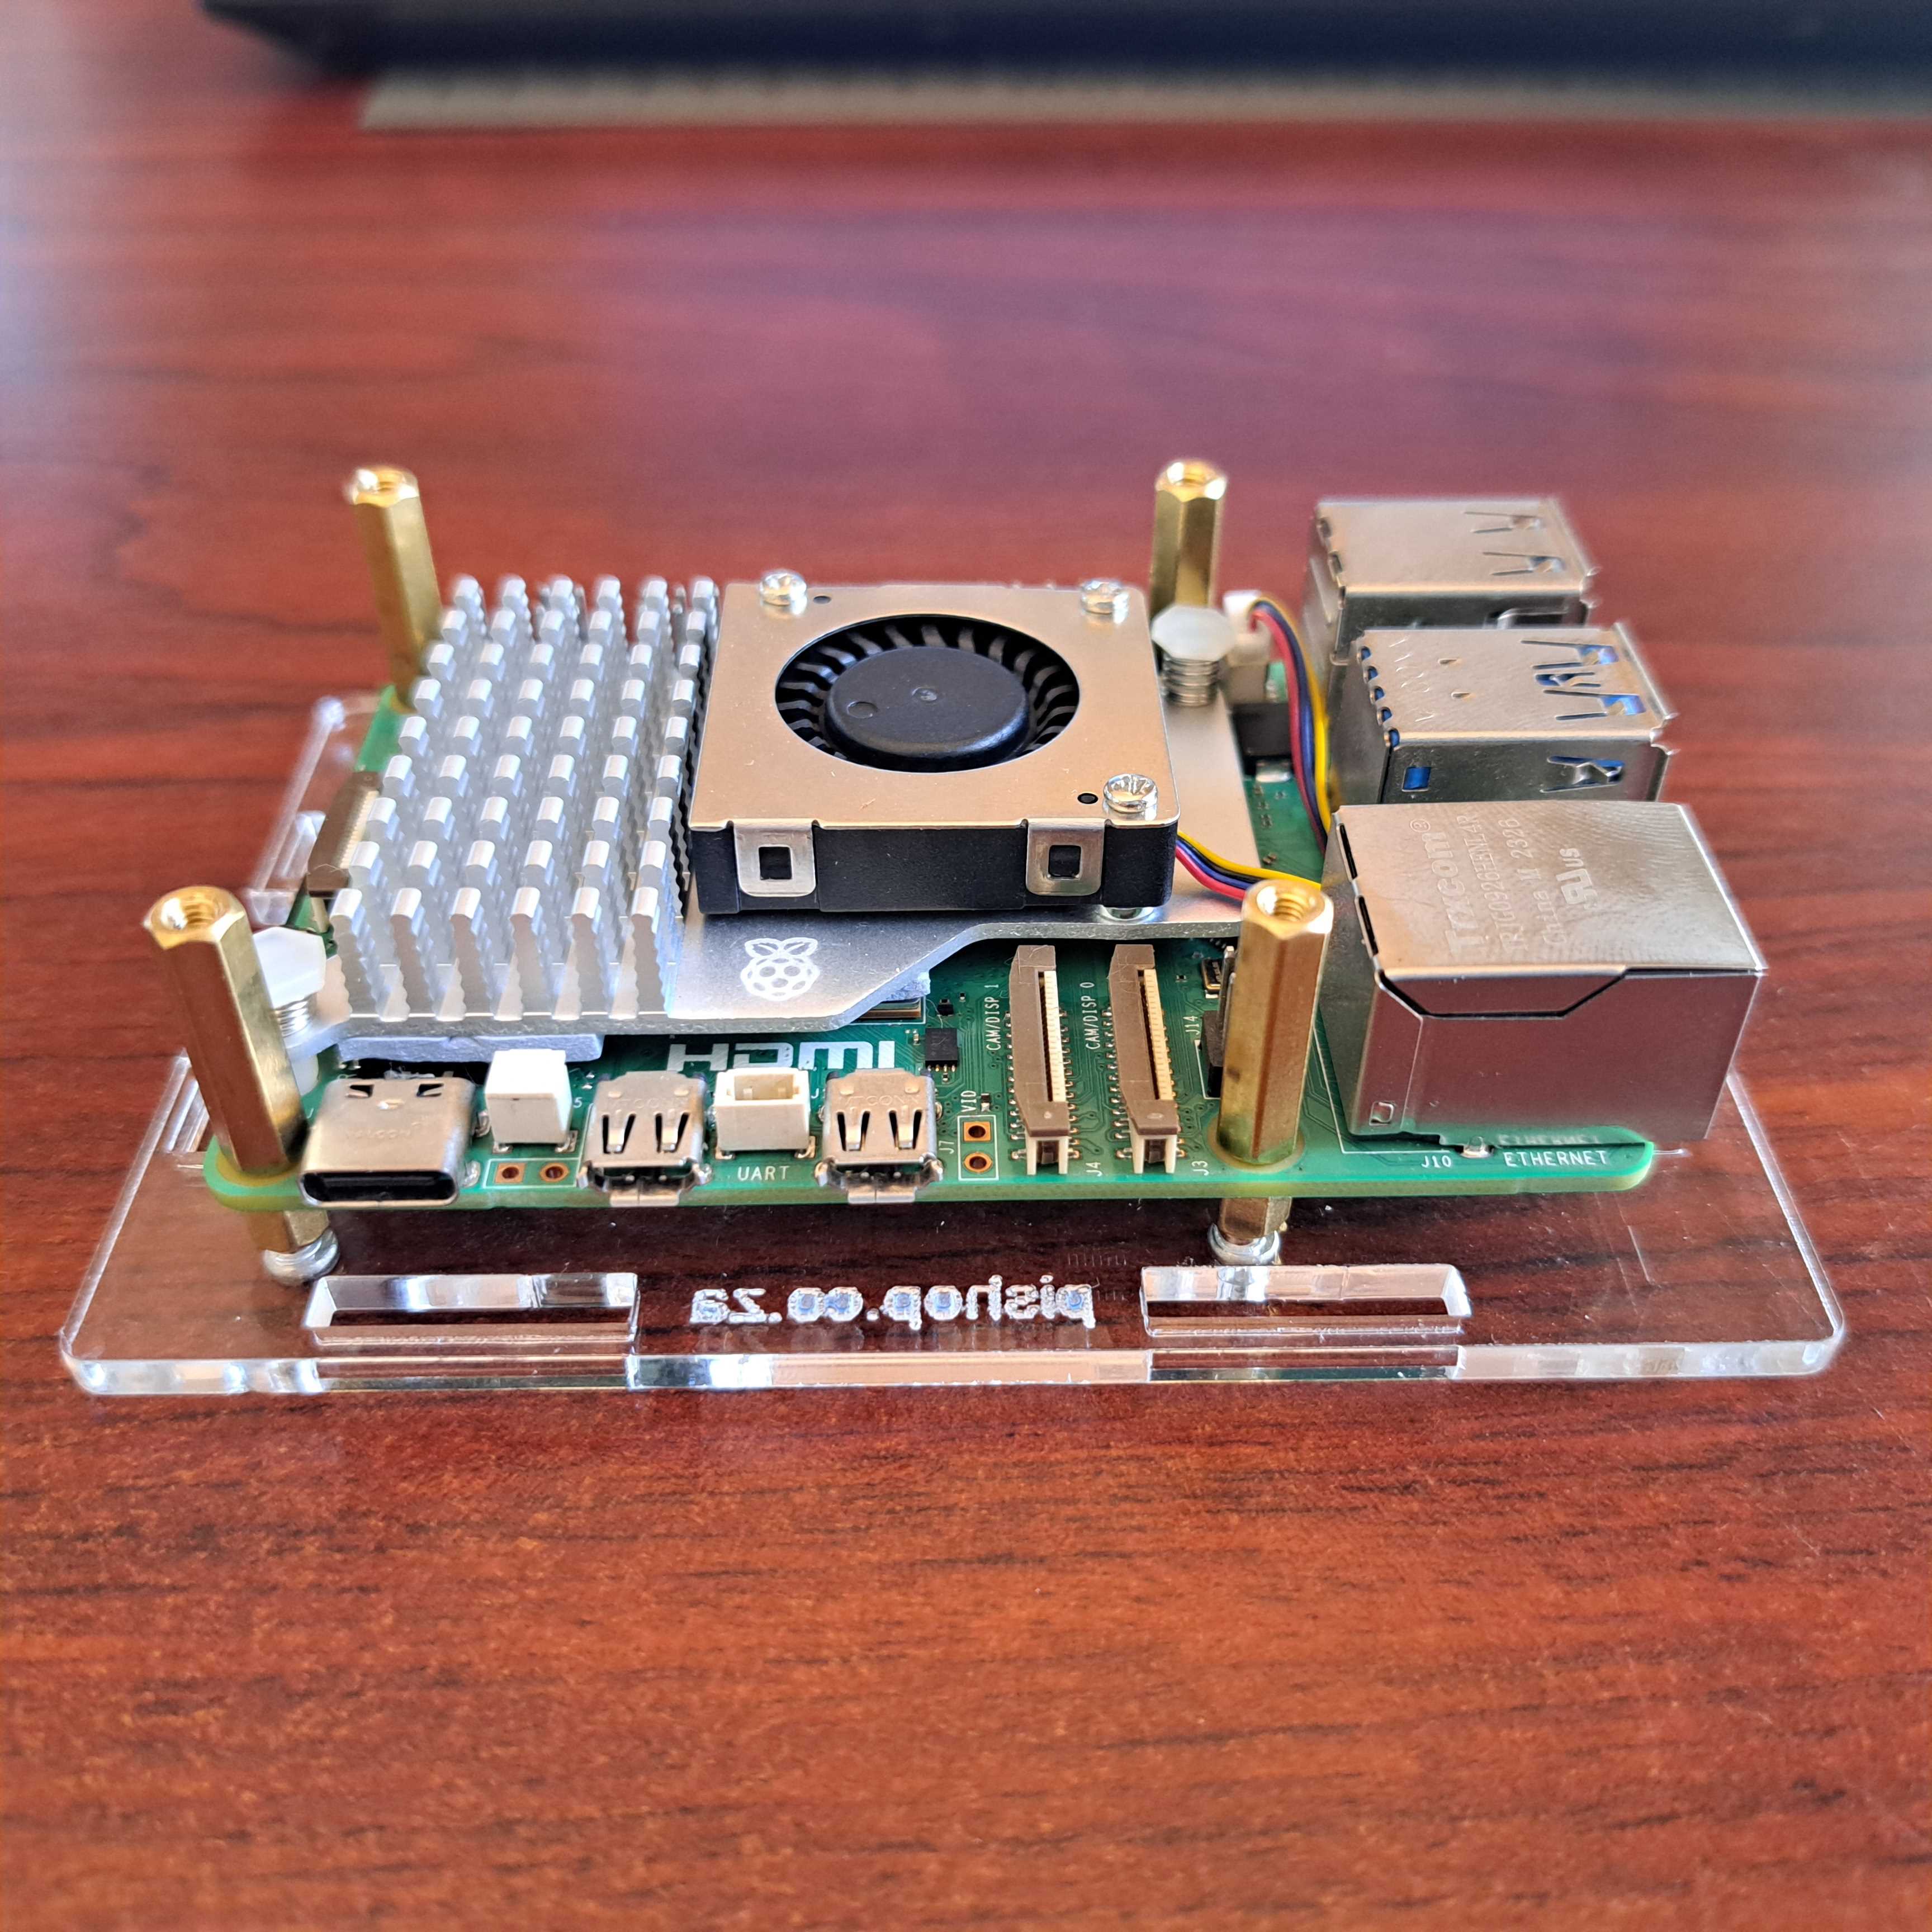
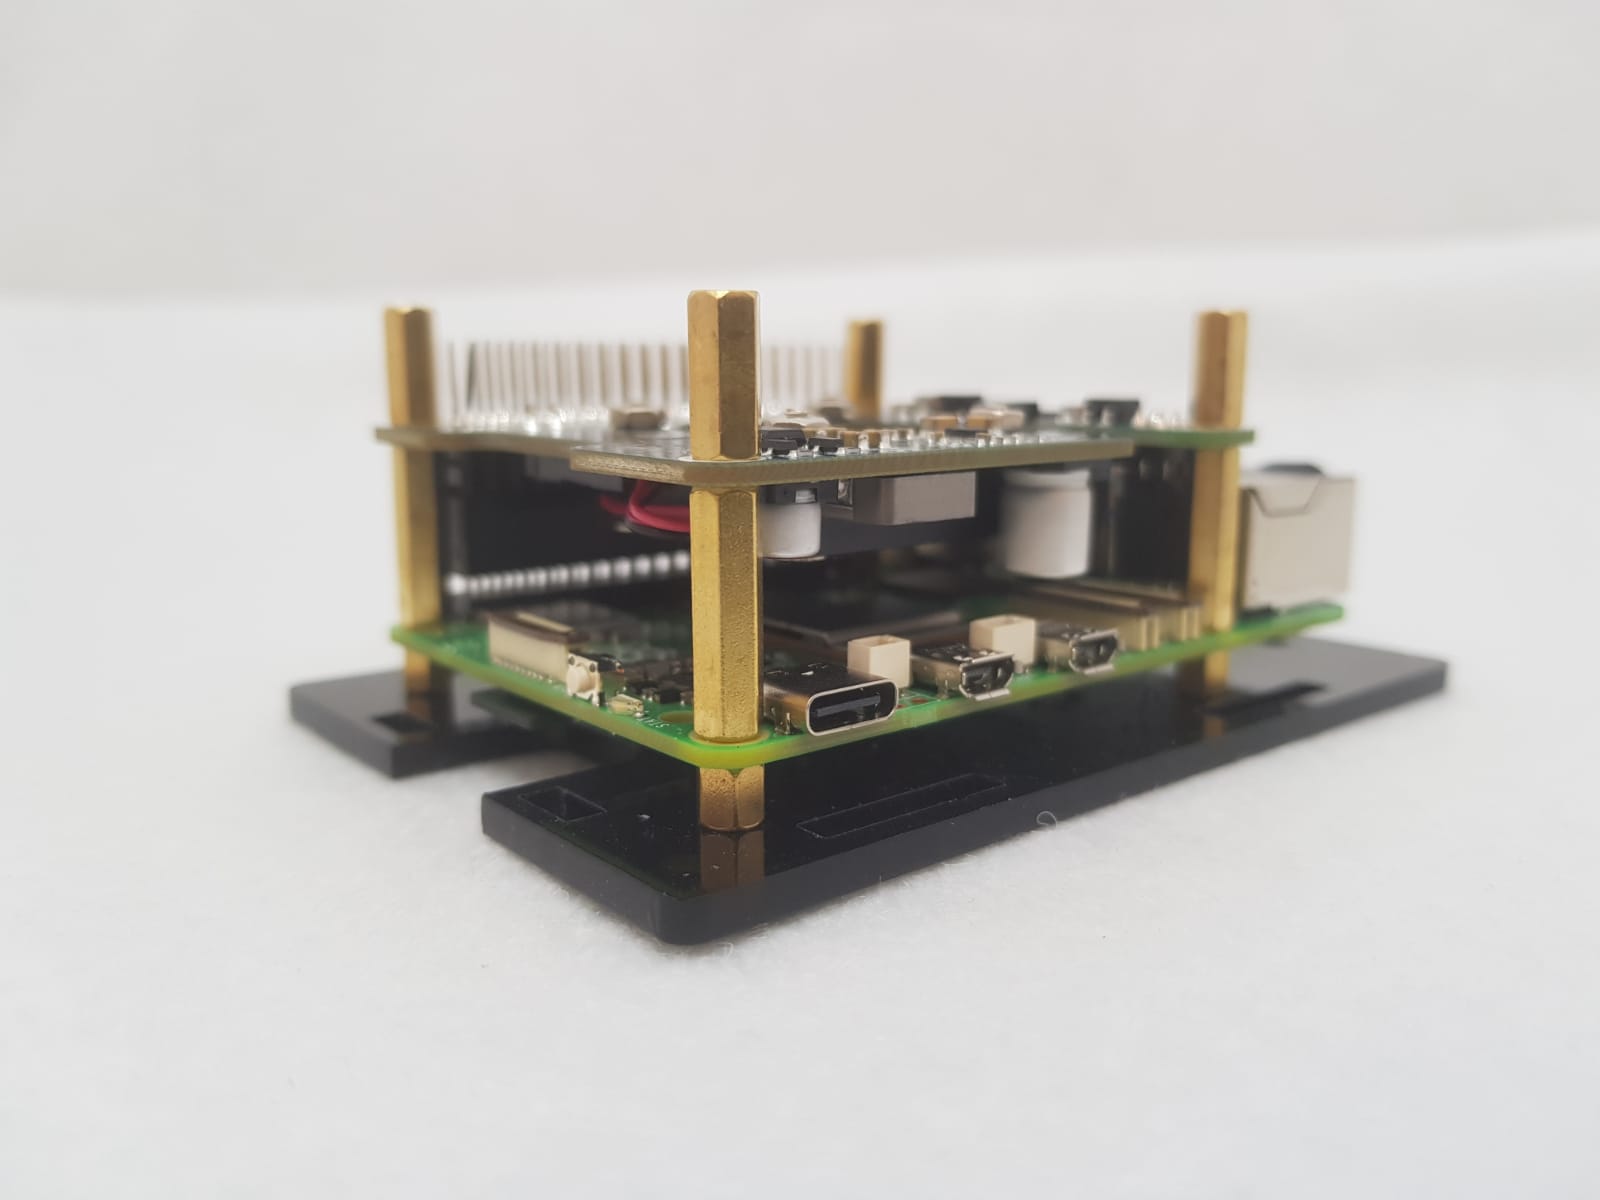
Case Assembly guide
1. Remove the acrylic protective film from the two plates
2. Install the standoffs first. Push the male part of the short standoffs through the RPi board mounting holes from the bottom upwards. Use the Female Female standoffs as nuts on the top of the RPi board.
3. Mount the fan and fan grill on the top acrylic plate.
4. Mount the top and bottom acrylic plates using the eight M2.5x8 screws.
5. Connect your fan power cable to the GPIO port.
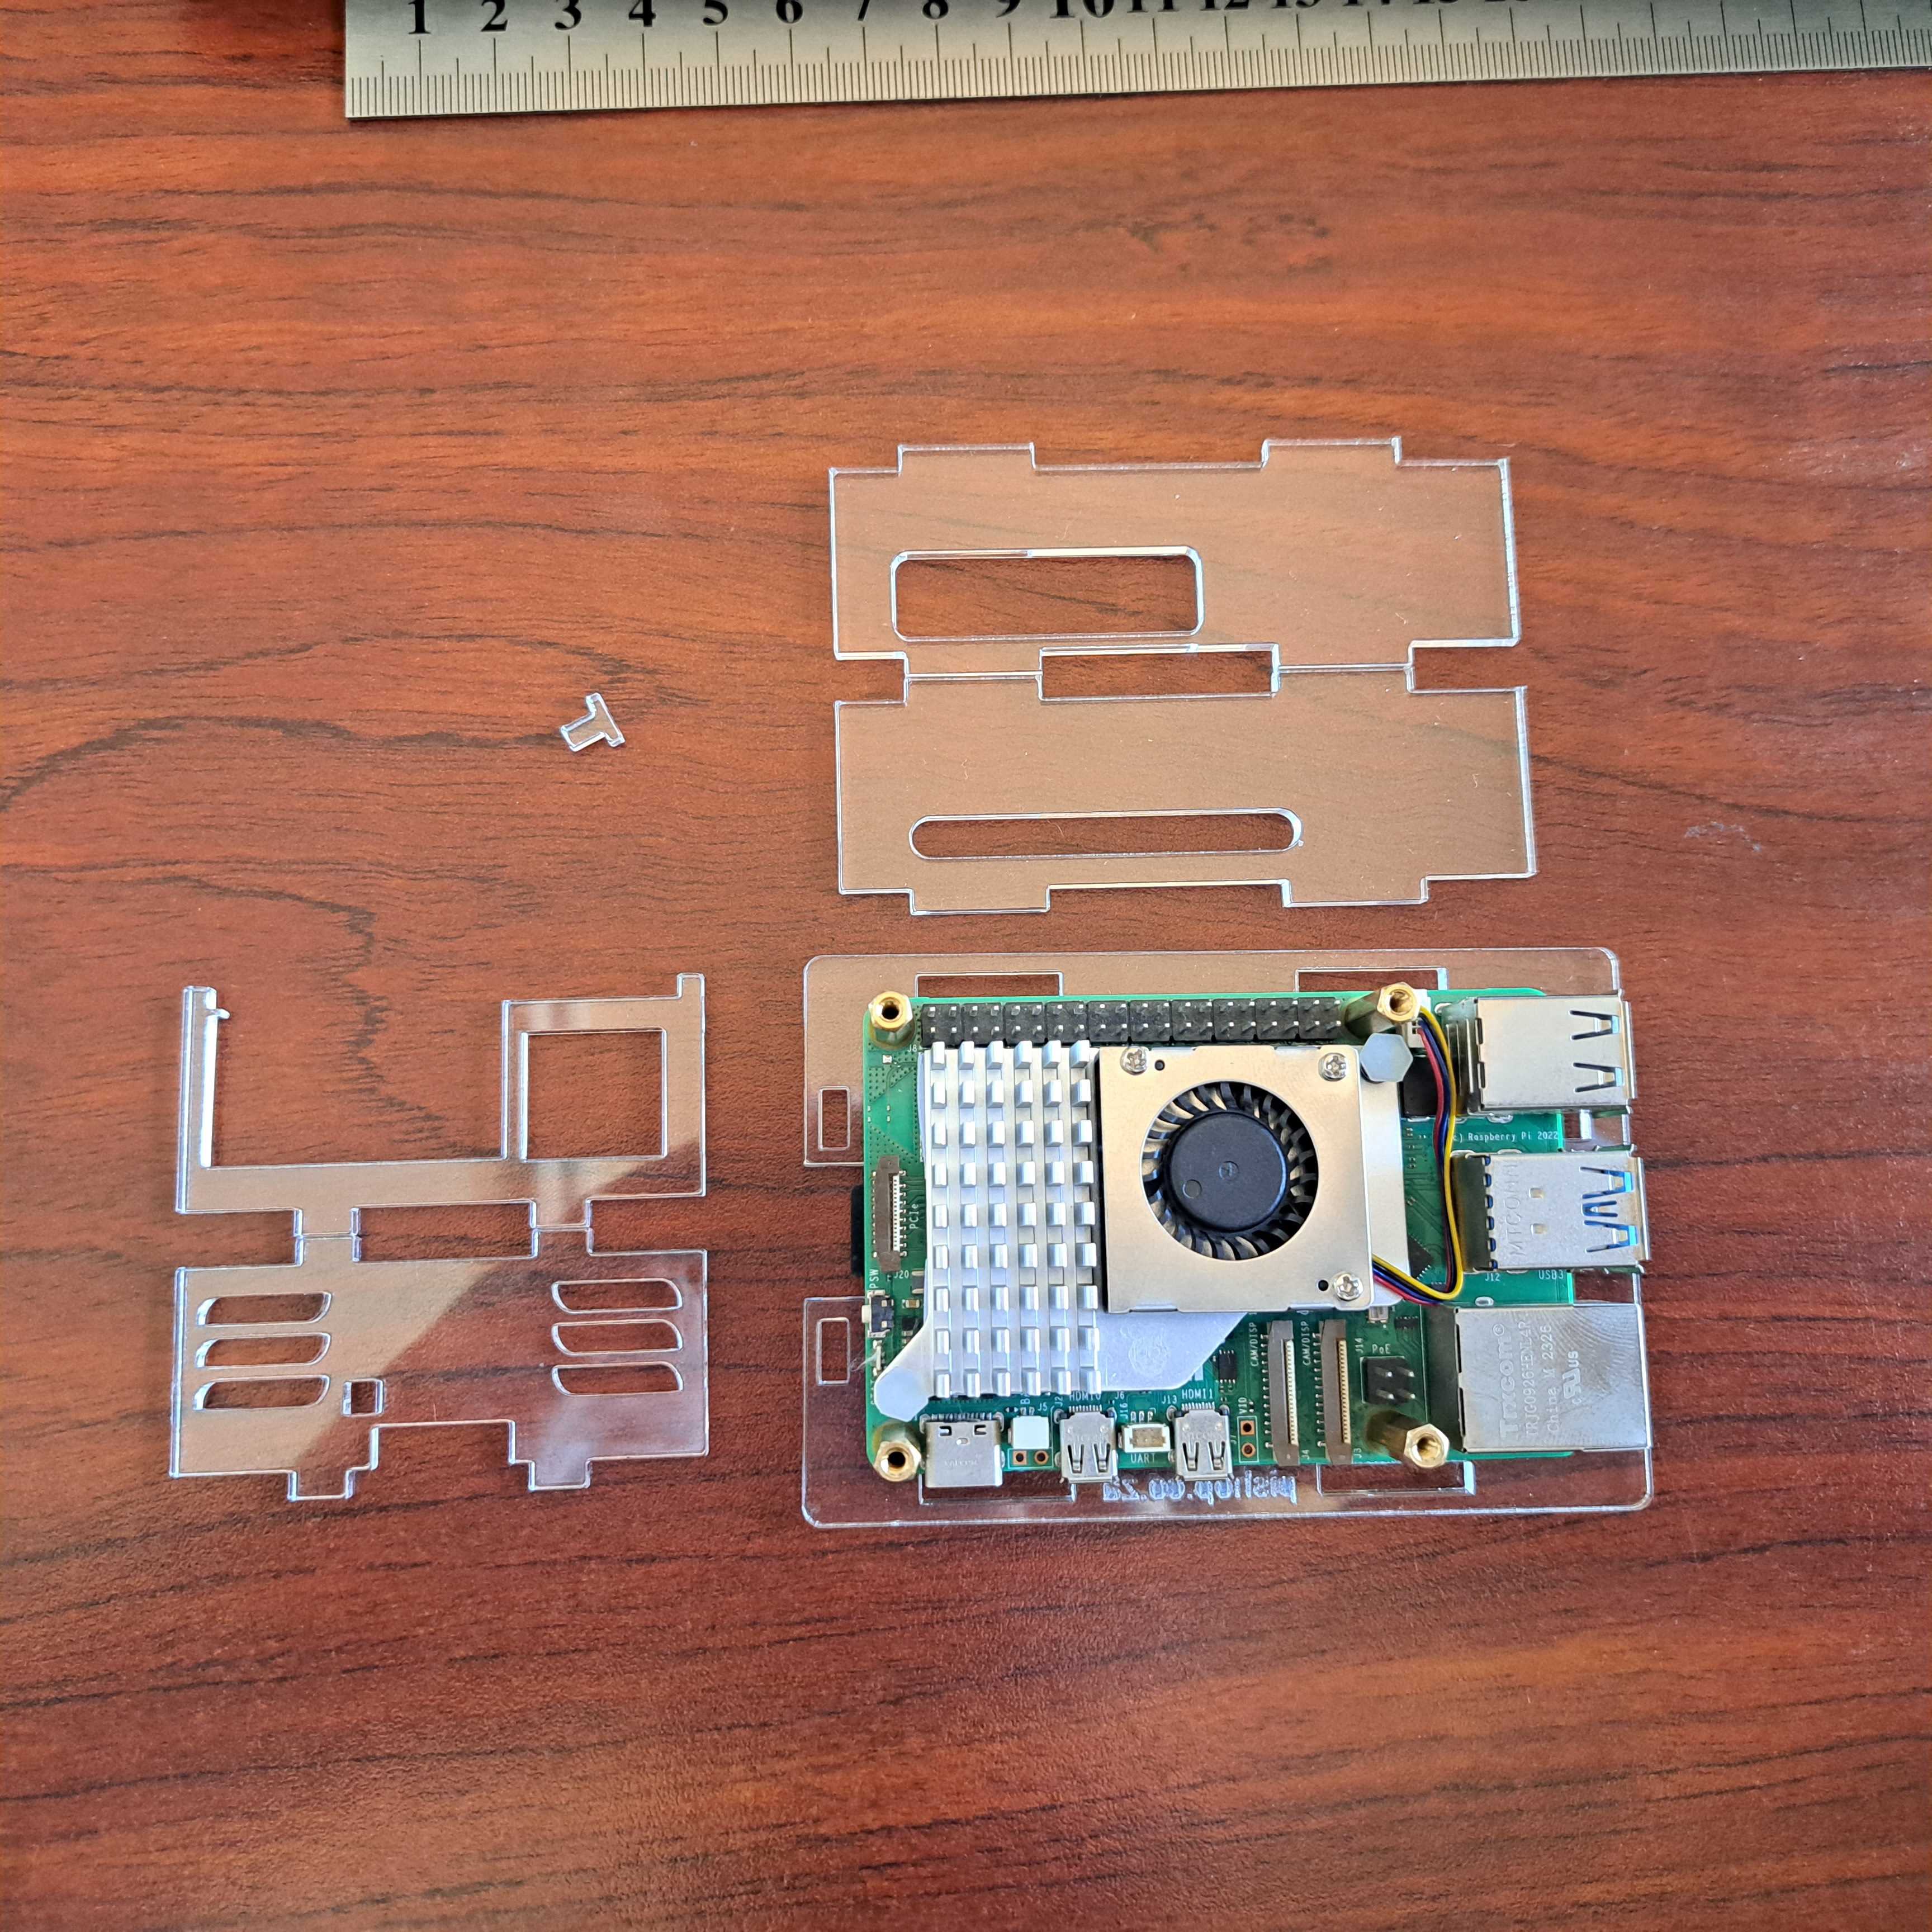
Hint
Why are there four extra holes on the bottom plate?
If you buy four 5mm standoffs with M2.5 nuts and M2.5x4 screws, you'll be able to mount an HQ camera on the bottom plate of the case, on which you can then add a tripod.

Please note: Raspberry Pi, camera board, camera cable and tripod are NOT included.
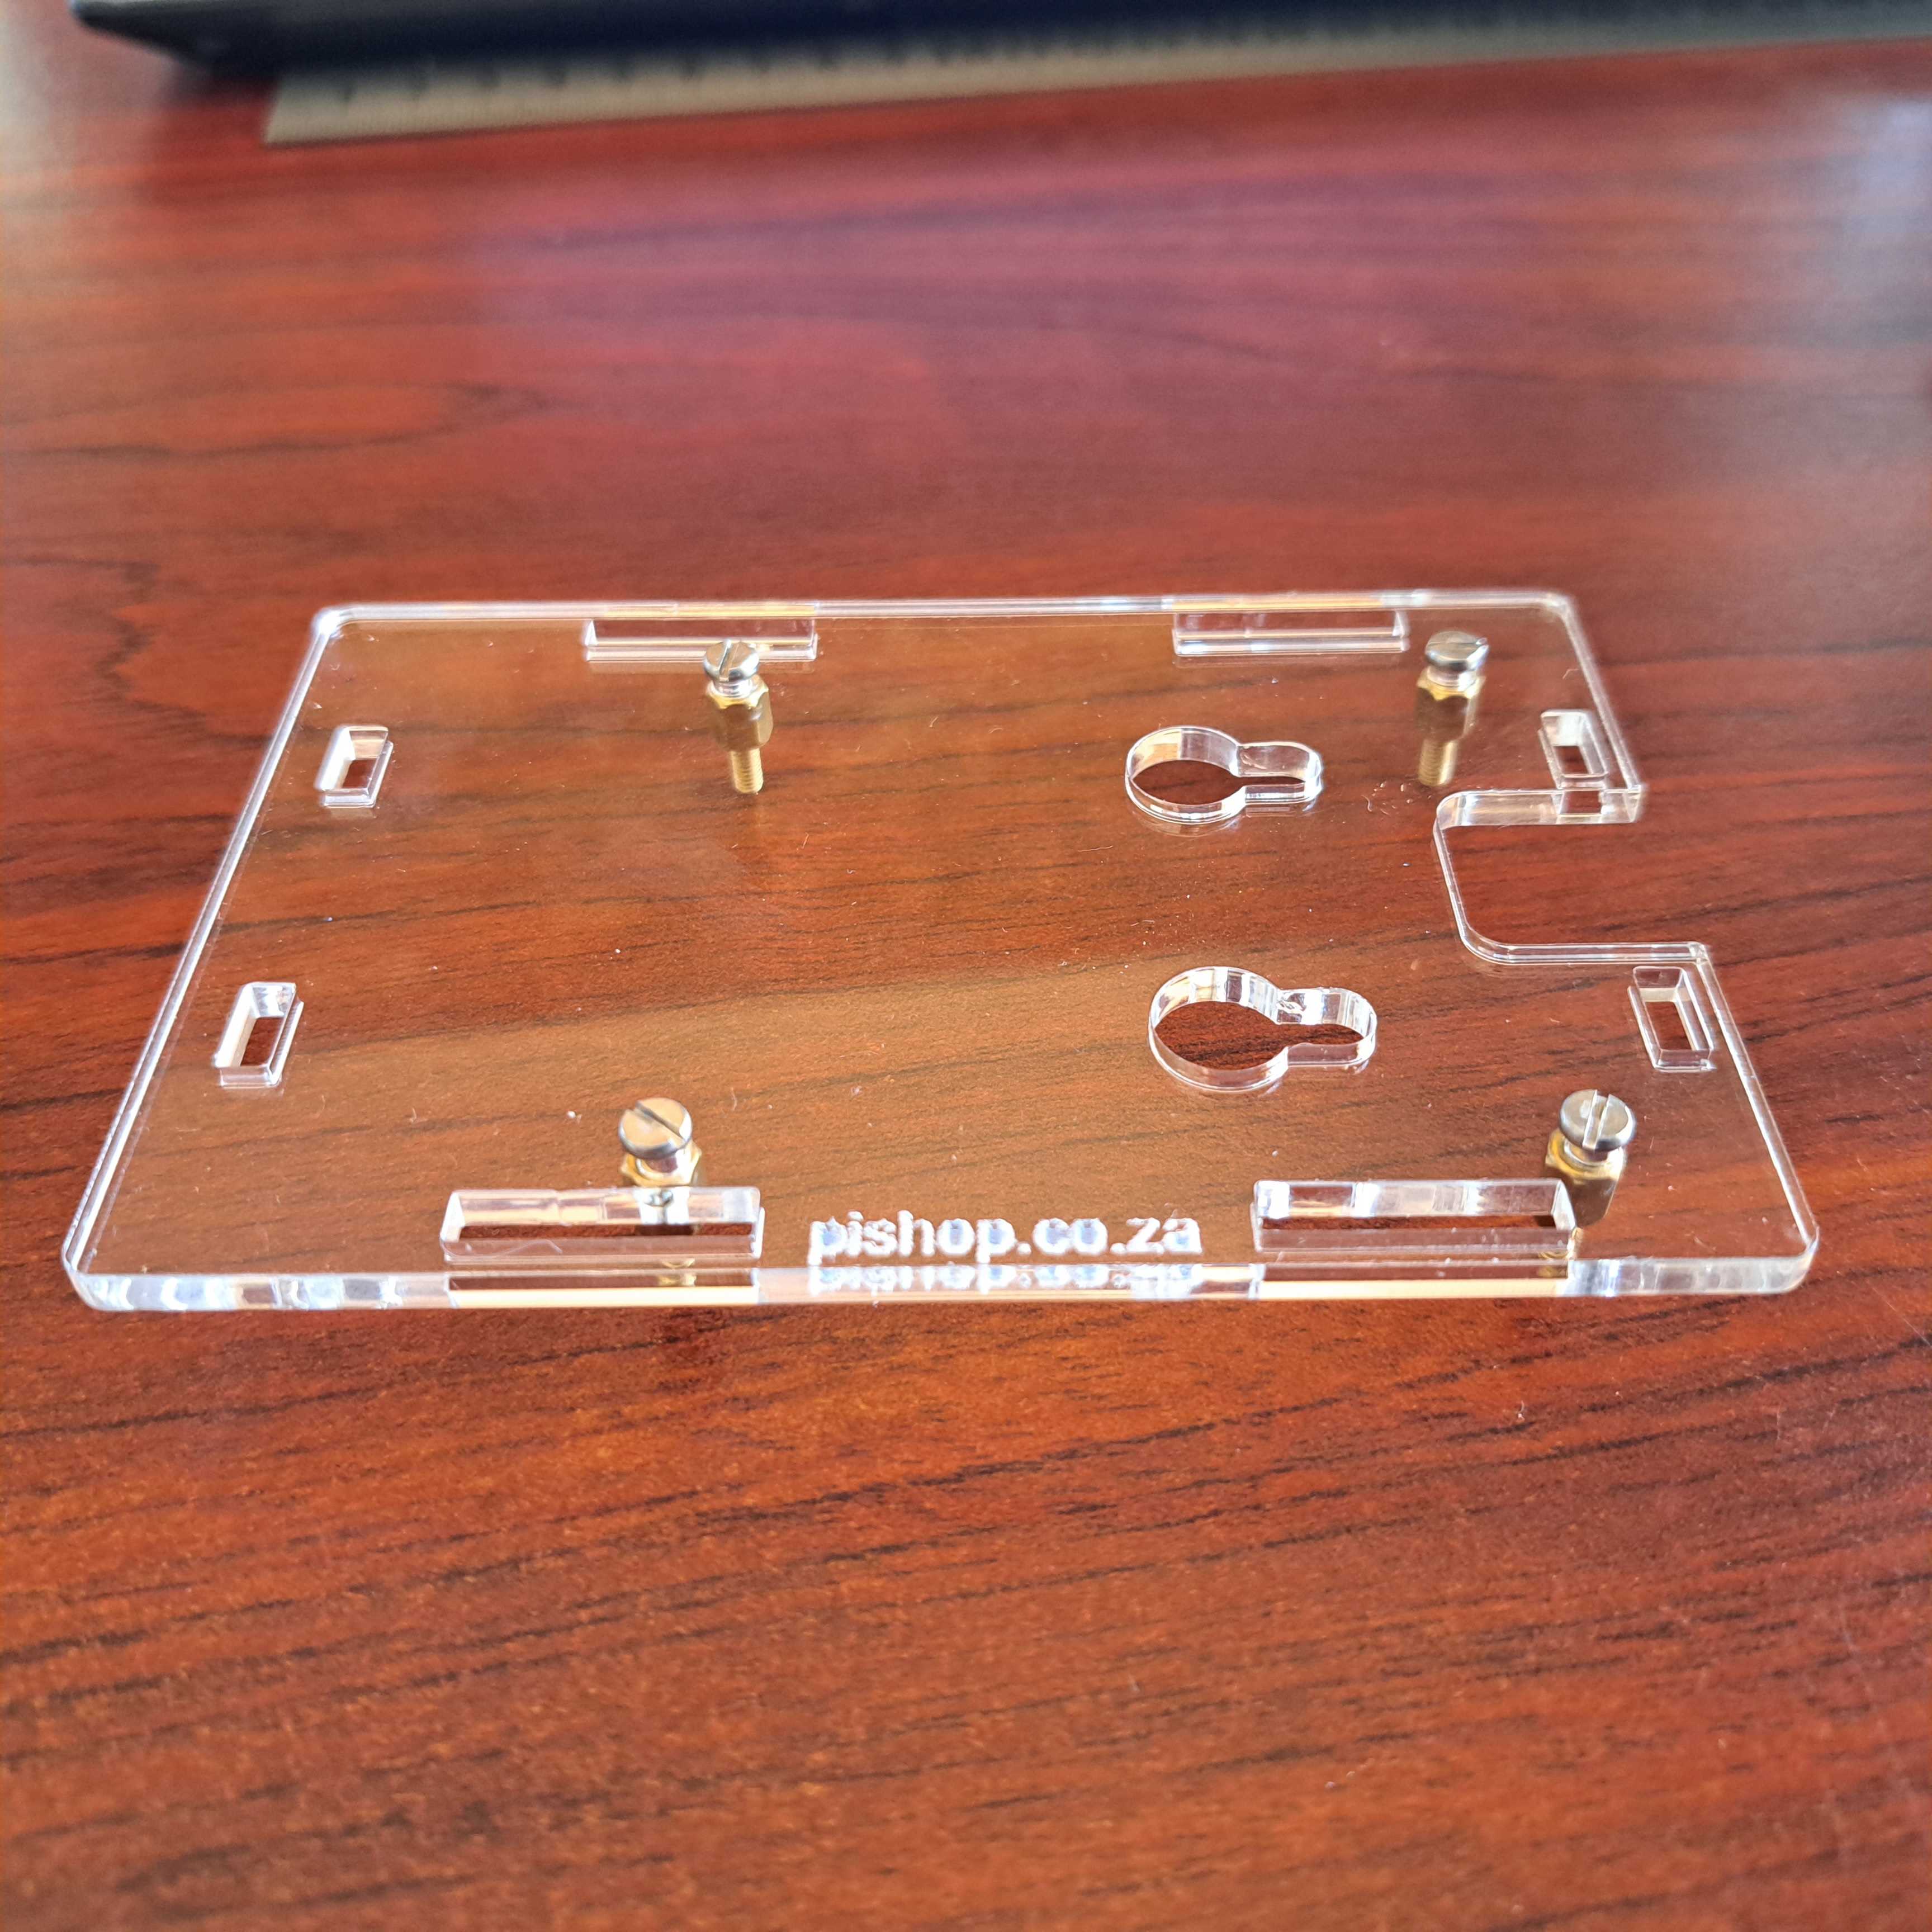
An affordable, simple solution to mounting your Raspberry Pi to your Raspberry Pi High Quality Camera, Global Shutter Camera or HQ M12 Mount Camera.
This sleek and transparent plate provides a secure and stable platform for attaching your camera to your Raspberry Pi. With its easy assembly process and included hardware, you can quickly and effortlessly set up your camera system.
The clear acrylic construction adds a touch of modernity while allowing for easy visibility of the camera. Enhance your photography and video projects with this durable and aesthetically pleasing mounting plate.
Combine with our affordable flexible tripod for a great project foundation!
What's in the box?
1 x Mount plate
8 x 5mm male to female brass spacers
8 x M2.5 SS nuts
8 x M2.5x4mm SS screws
Assembly guide
1. Install the standoffs first using their male threaded sides. Four on one side of the plate to mount the RPi3/4/5 and four on the other side of the plate to mount the camera. Secure them in place by tightening their nuts.
2. Mount the RPi board and camera board using the screws. (In no particular order)
3. Connect your RPi and HQ cam with the ribbon cable.

Specifications
- Material: Acrylic
- Colour: Transparent
- Layer: 3-Layer
- Compatible Model: For Raspberry Pi 5/4/3/2 model B
Convenient access to all external ports, like USB, GPIO and SD card.
What's in the box?
4 x Acrylic Boards (not including Raspberry Pi boards)
1 x set Screws and Nuts
3 x 30mm fans that get powered from GPIO(Not the RPi5 fan adapter)
1 x Fan Cover
You might also like to add the RPi 5 fans that are OS controlled.

Features
- Mounting holes for Arduino Uno R3/R4.
- Size: 145mm x 95mm.
- Ideal for use with Solderless 400 Point Breadboard (included).
- Acrylic board designed and laser cut inhouse.
- Shadow engraved on board for easy breadboard placing.
- Create an easy to use prototyping station
- Different lengths of male to male jumpers
What's in the box?
1 x Acrylic plate
4 x M2.5 + 5 standoffs
4 x M2.5x6 screws
4 x M2.5 nuts
4 x bumper pads
1 x 400 point breadboard
1 x set of 65 male jumpers

Note: The Raspberry Pi, High Quality Camera and flexible tripod not included)
An affordable, simple solution to mounting your Raspberry Pi to your Raspberry Pi High Quality Camera.
This camera stand is locally cut from clear acrylic for use with the official Raspberry Pi V2 and Module 3 cameras.
This acrylic stand is compatible with the below cams.
Raspberry Pi Camera V2
Raspberry Pi Camera Module 3
What's in the box?
2 x acrylic plates
1 x M2.5x12 bolt
1 x M2.5 nut
4 x M2x6 bolts
4 x M2 nuts
4 x silicone feet
Specifications
- ID: 2.8mm
- OD: 6mm
- Height: 4mm
- Material: Clear Acrylic
What's in the box?
1 x acrylic spacer
Please note: The Raspberry Pi camera and camera cable are not included
This camera stand is locally cut from clear acrylic for use with the official Raspberry Pi V2 and Module 3 cameras.
This acrylic stand was designed with the Raspberry Pi 4 and Raspberry Pi 5 in mind and compatible with the below cams.
- Raspberry Pi Camera V2
- Raspberry Pi Camera Module 3
- Raspberry Pi AI camera
This stand can even be mounted on a tripod with a 1/4inch screw. We included the mounting nut in this kit.
Below pic is for illustration purposes only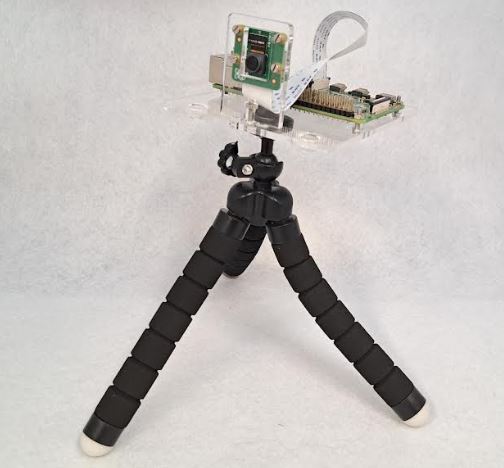
This stand will very comfortably just stand on it's own silicone feet as well.
What's in the box?
1 x Raspberry pi mount acrylic plate
1 x Camera mount acrylic plate
1 x M2.5x12 bolt (link the two plates)
1 x M2.5 nut
4 x M2x6 bolts (mount the camera)
4 x M2 nuts
4 x silicone feet
1 x 1/2inch nut (mount on a tripod)

Please note: The Raspberry Pi, camera and camera cable are not included
This camera stand is locally cut from clear acrylic for use with the official Raspberry Pi V2 and Module 3 cameras.
This acrylic stand was designed with the Raspberry Pi Zero in mind and compatible with the below cams.
- Raspberry Pi Camera V2
- Raspberry Pi Camera Module 3
- Raspberry Pi AI camera
This stand can even be mounted on a tripod with a 1/4inch screw. We included the mounting nut for you in this kit. 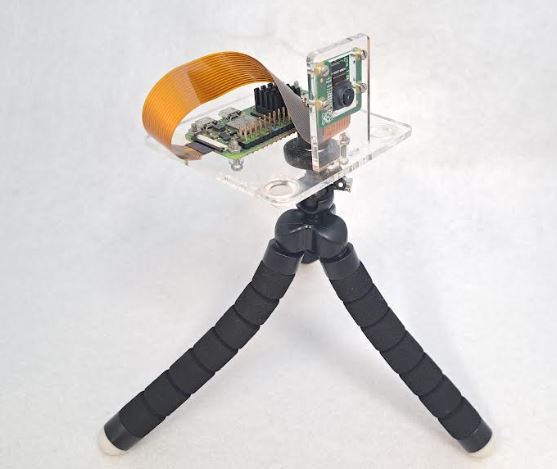
This stand will very comfortably just stand on it's own silicone feet as well.
What's in the box?
1 x Raspberry pi mount acrylic plate
1 x Camera mount acrylic plate
1 x M2.5x12 bolt (link the two plates)
1 x M2.5 nut
4 x M2x6 bolts (mount the camera)
4 x M2 nuts
4 x silicone feet
1 x 1/2inch nut (mount on a 1/4 inch tripod)

We also have a more open option with no sides available.
This DIY case requires assembly. You will need a small precision flathead screwdriver.
Clear 3mm Acrylic Panels to protect your Raspberry Pi 5.
- 40PIN GPIO
- PCIe
- DSI/CSI Interfaces
- Wall mounting holes
- Airflow Vents On The Top And Front
- With Power On/Off Button
- Easy To Pull & Plug TF Card On The Bottom
What's in the box?
1 x PI5 Acrylic Case A
1 x Nonskid rubber pad (4PCS)
1 x Screwdriver
1 x Screws and standoffs pack
Resources
The Case Consists Of 6 Layers Of Acrylic Panels. Install According To The Following Steps
1. Install the active cooler on the Raspberry Pi 5.

2. Install the short standoffs and screws onto the 1st acrylic panel, please pay attention to the orientation.
3. Install the long female to female standoffs on the RPi board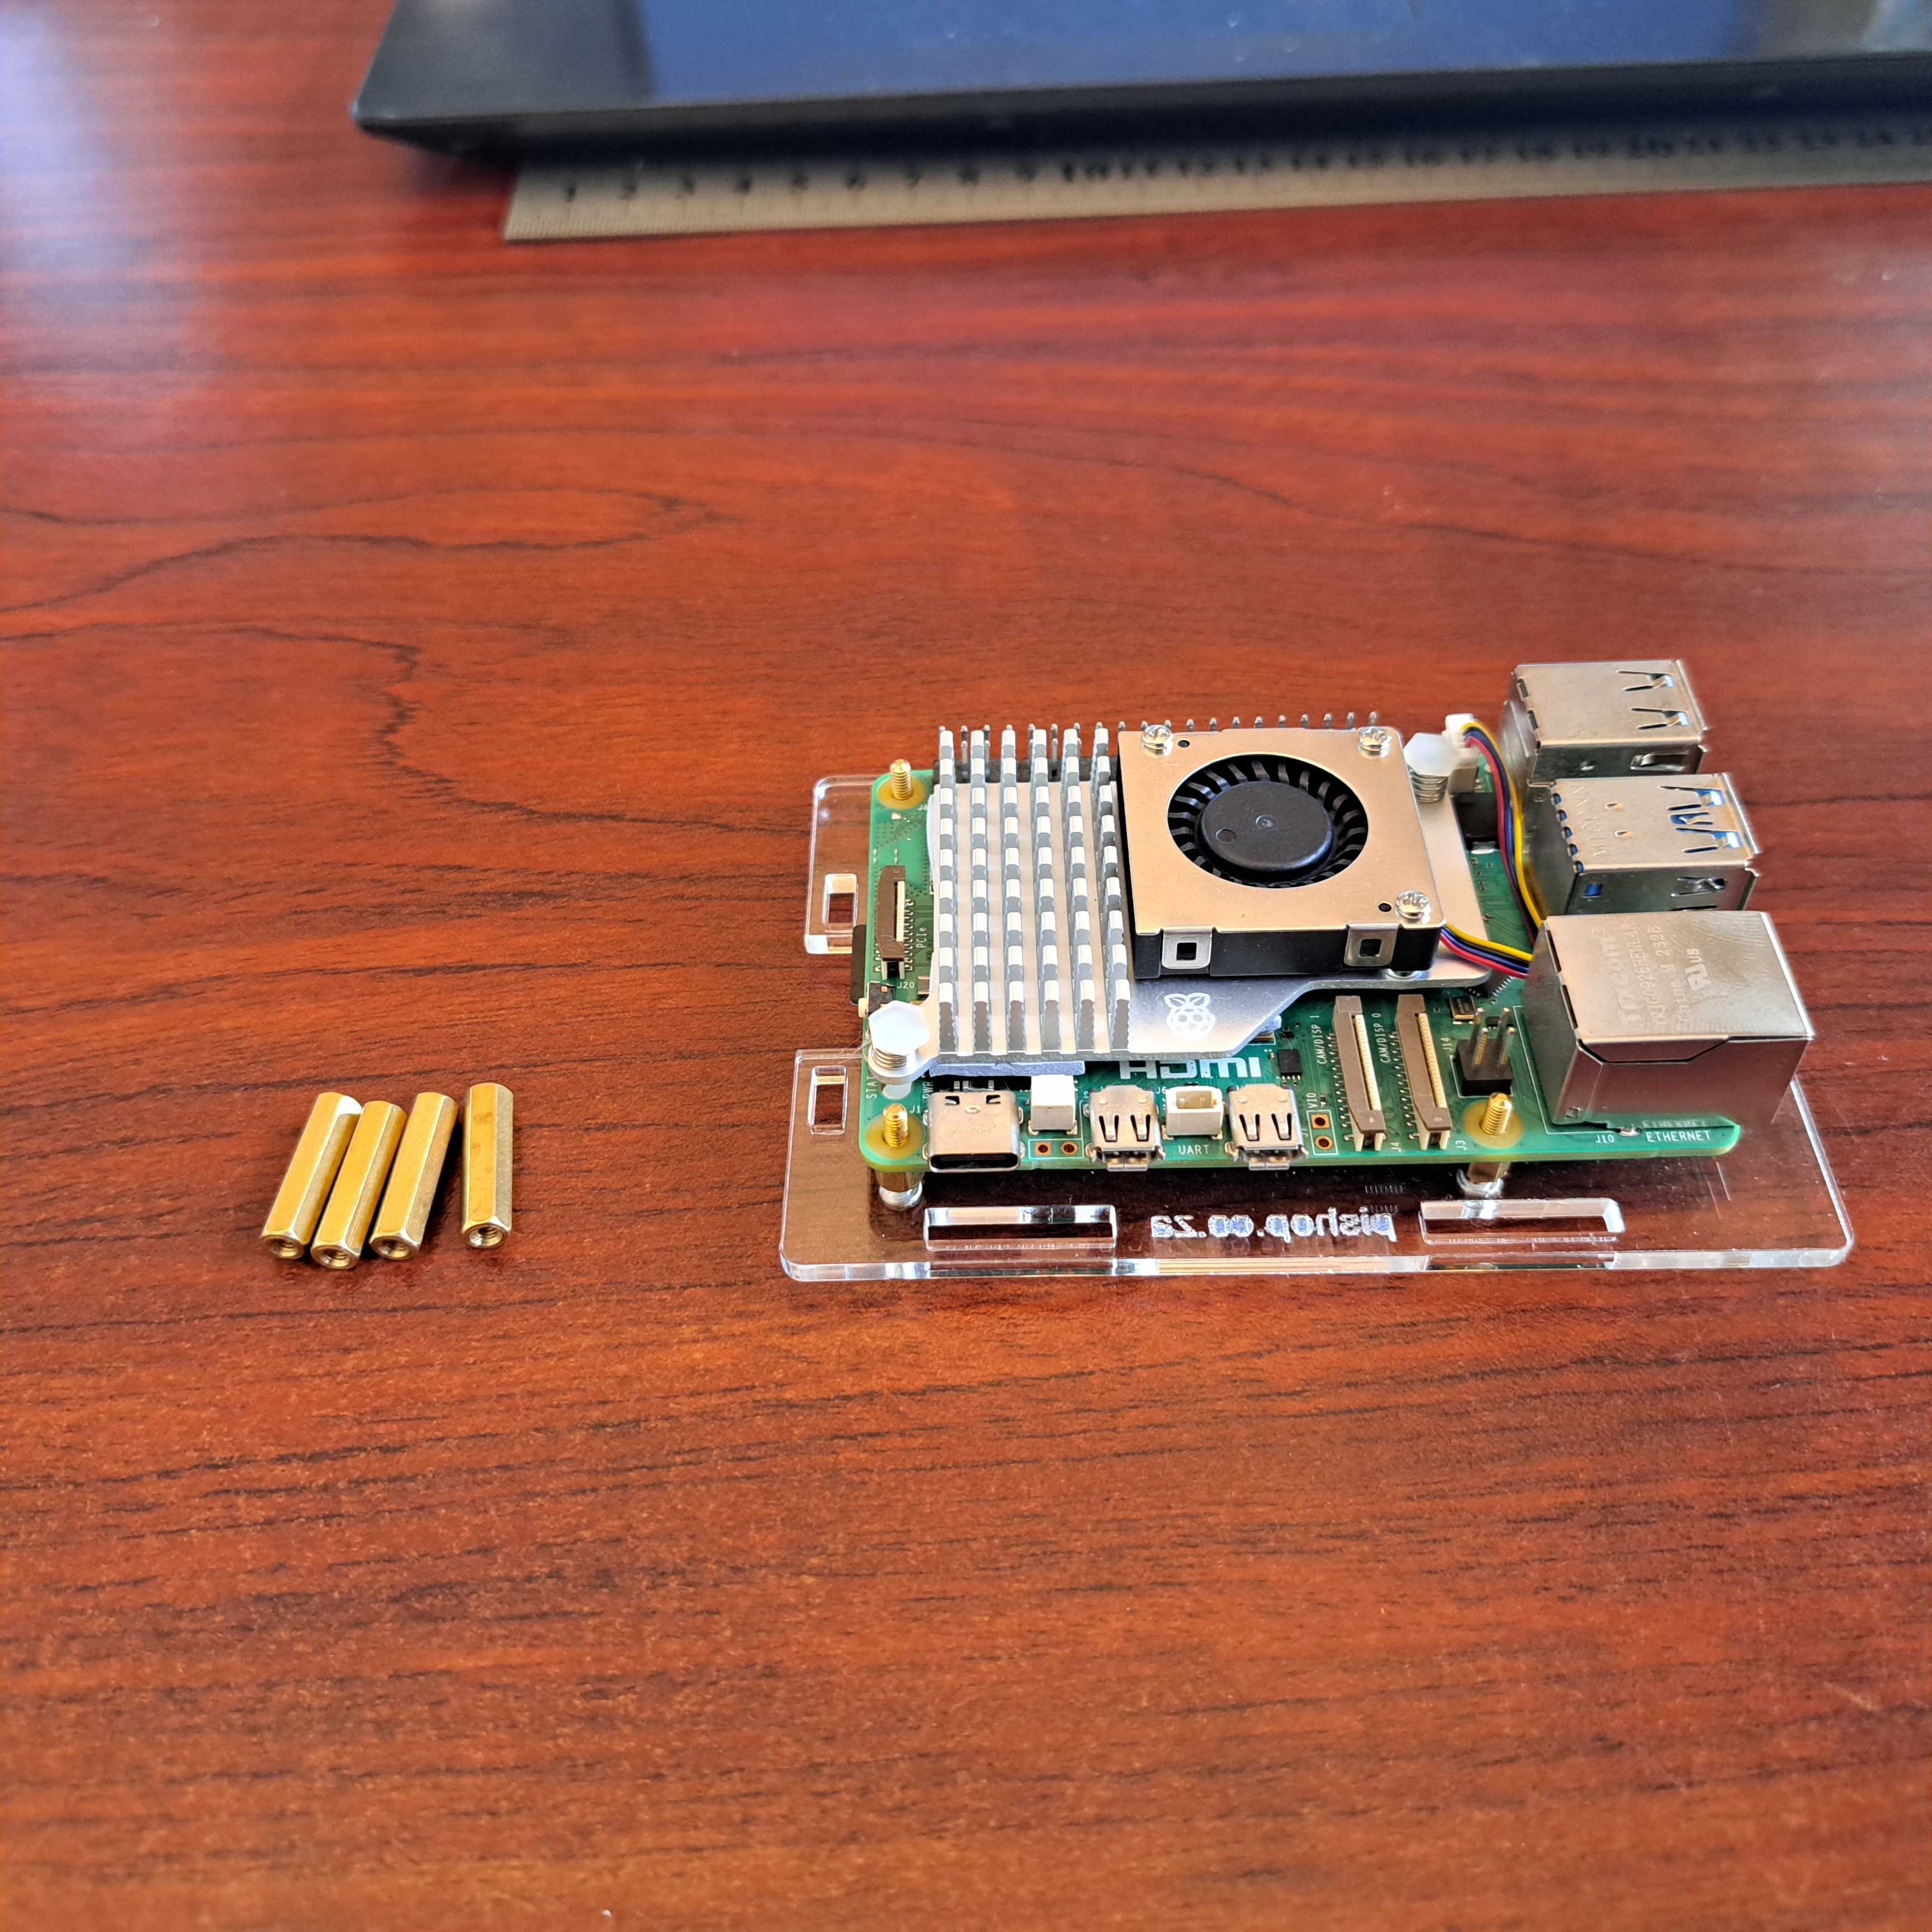
4. Install the 4 acrylic panel to the sides of the Raspberry Pi 5.
Don't forget to install the little power button first.
5. Install the top plate. This is where all the bits come together. You might experience a bit of difficulty aligning all the plates. A bit of pressure on the top plate helps to get all to pop into place.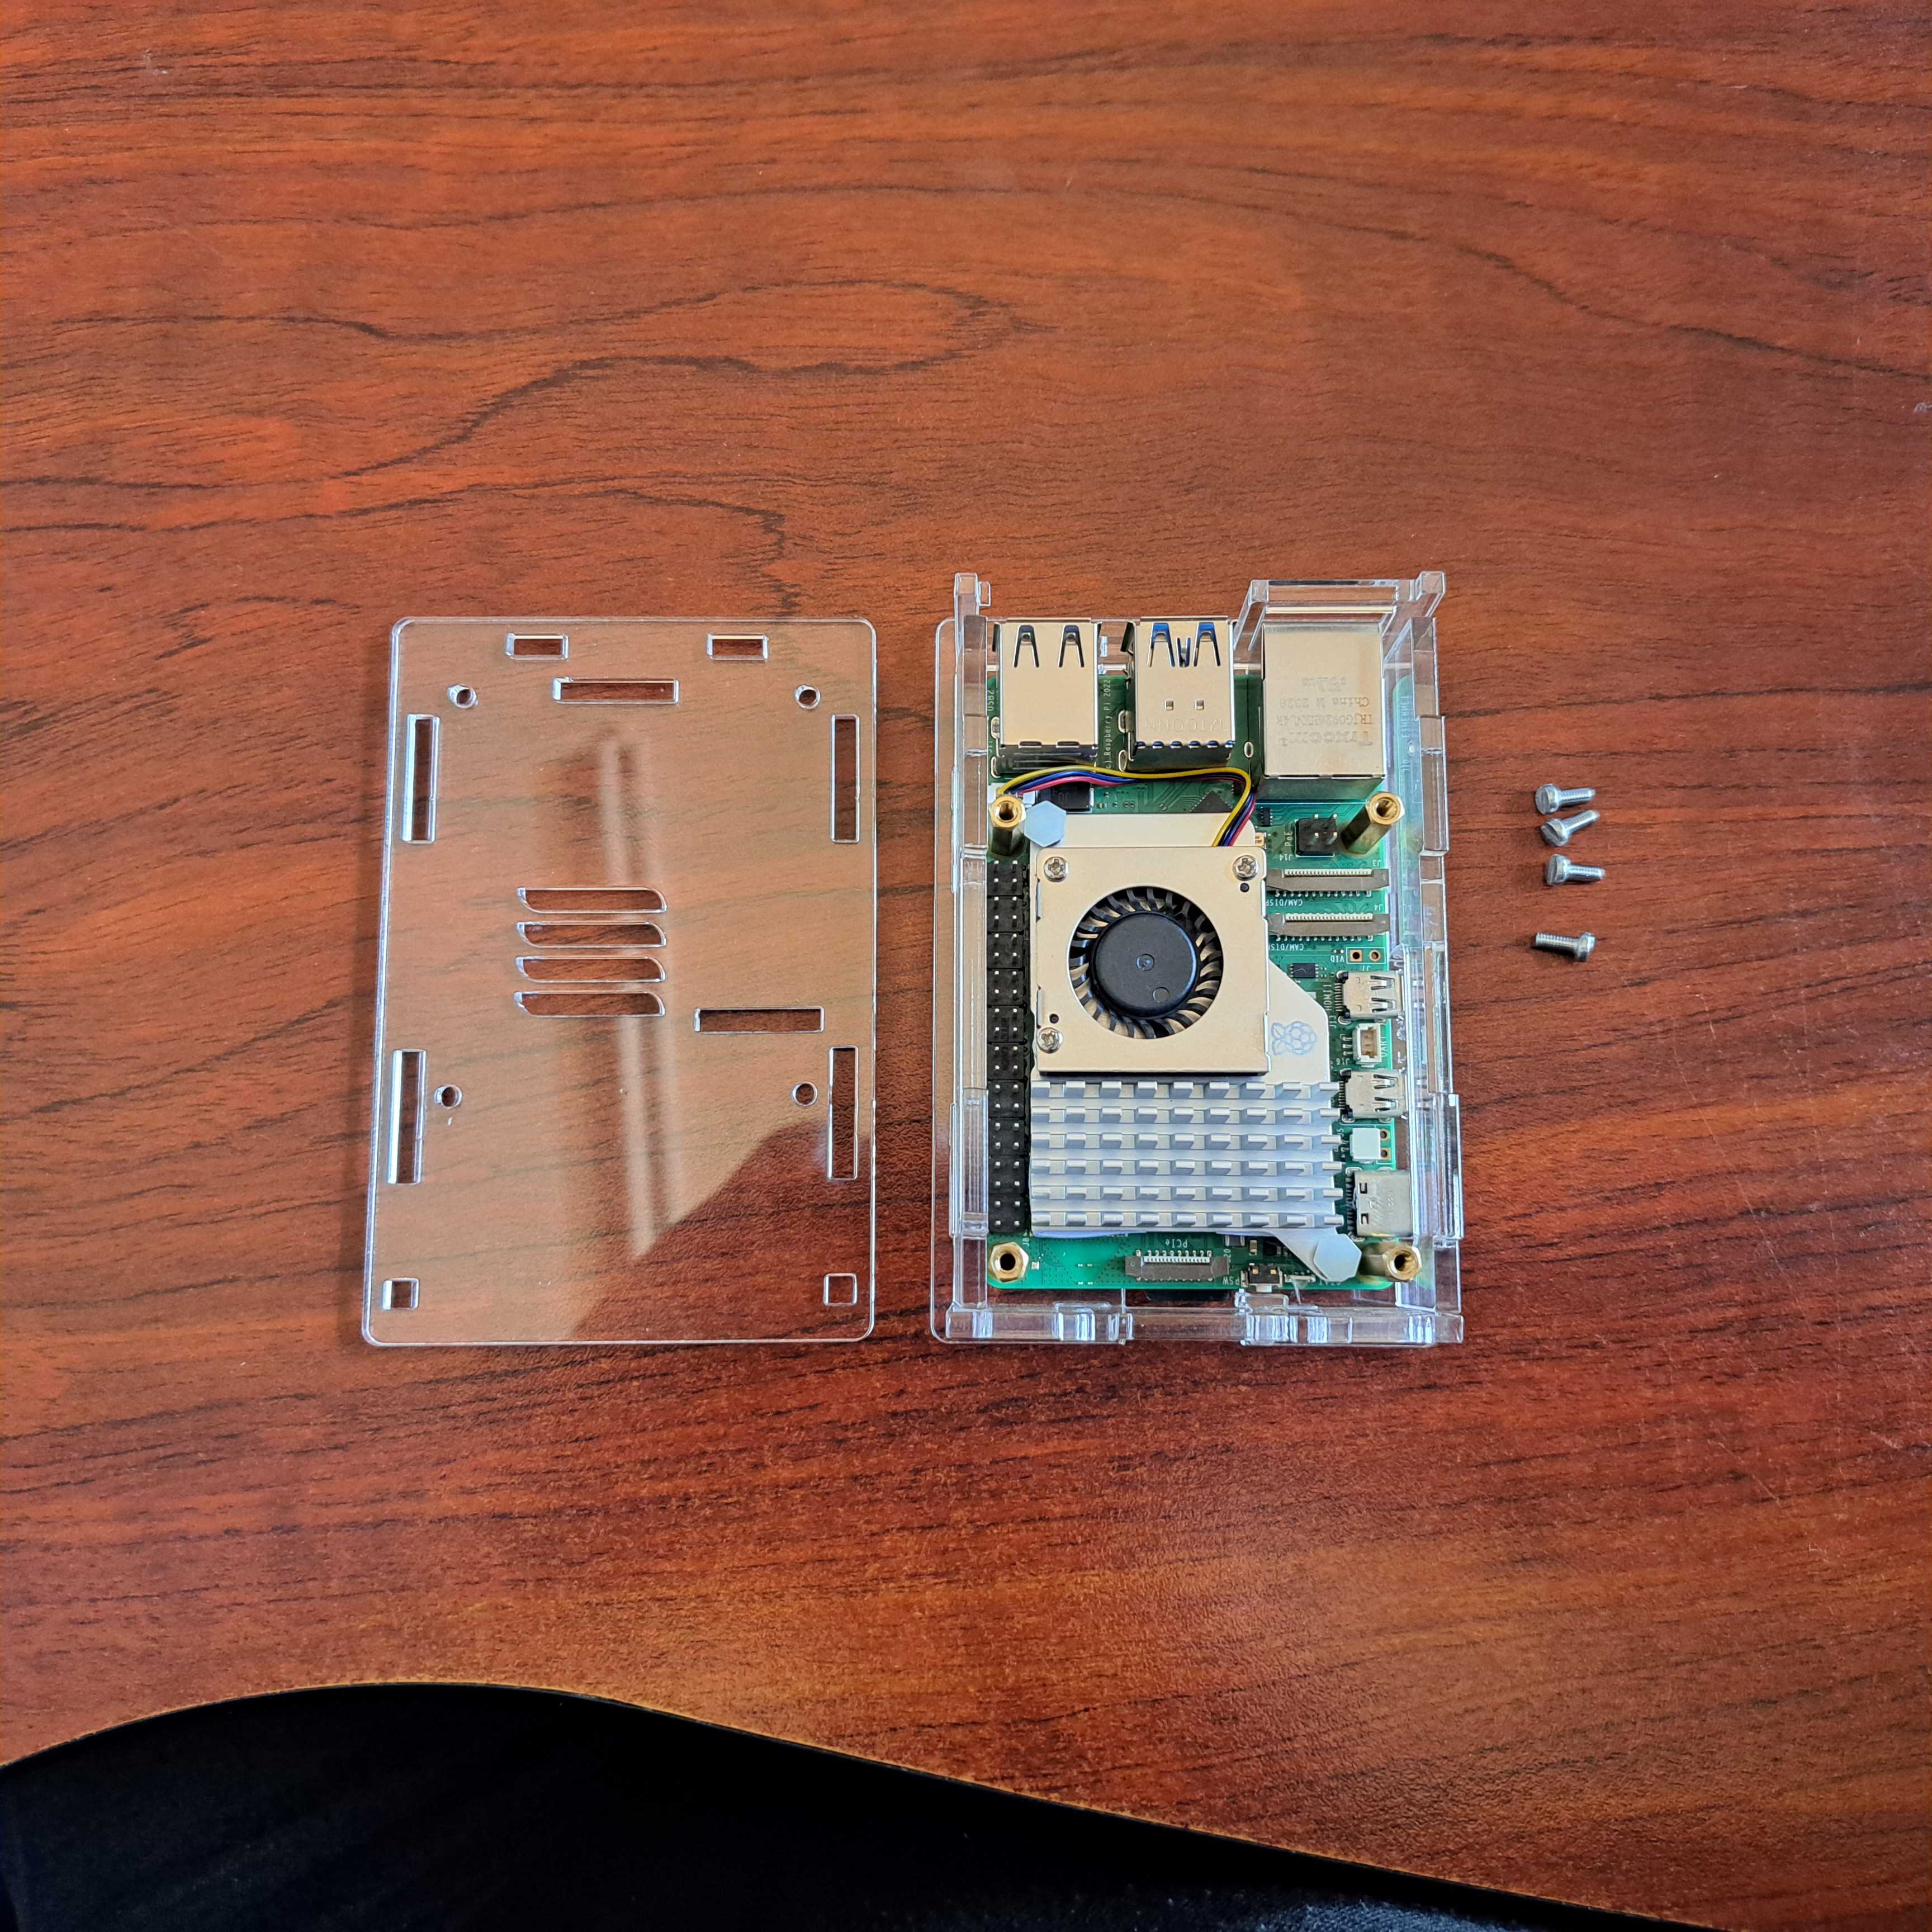
6. Insert the top 4 screws that holds it all together. You don't have to use force to tighten them.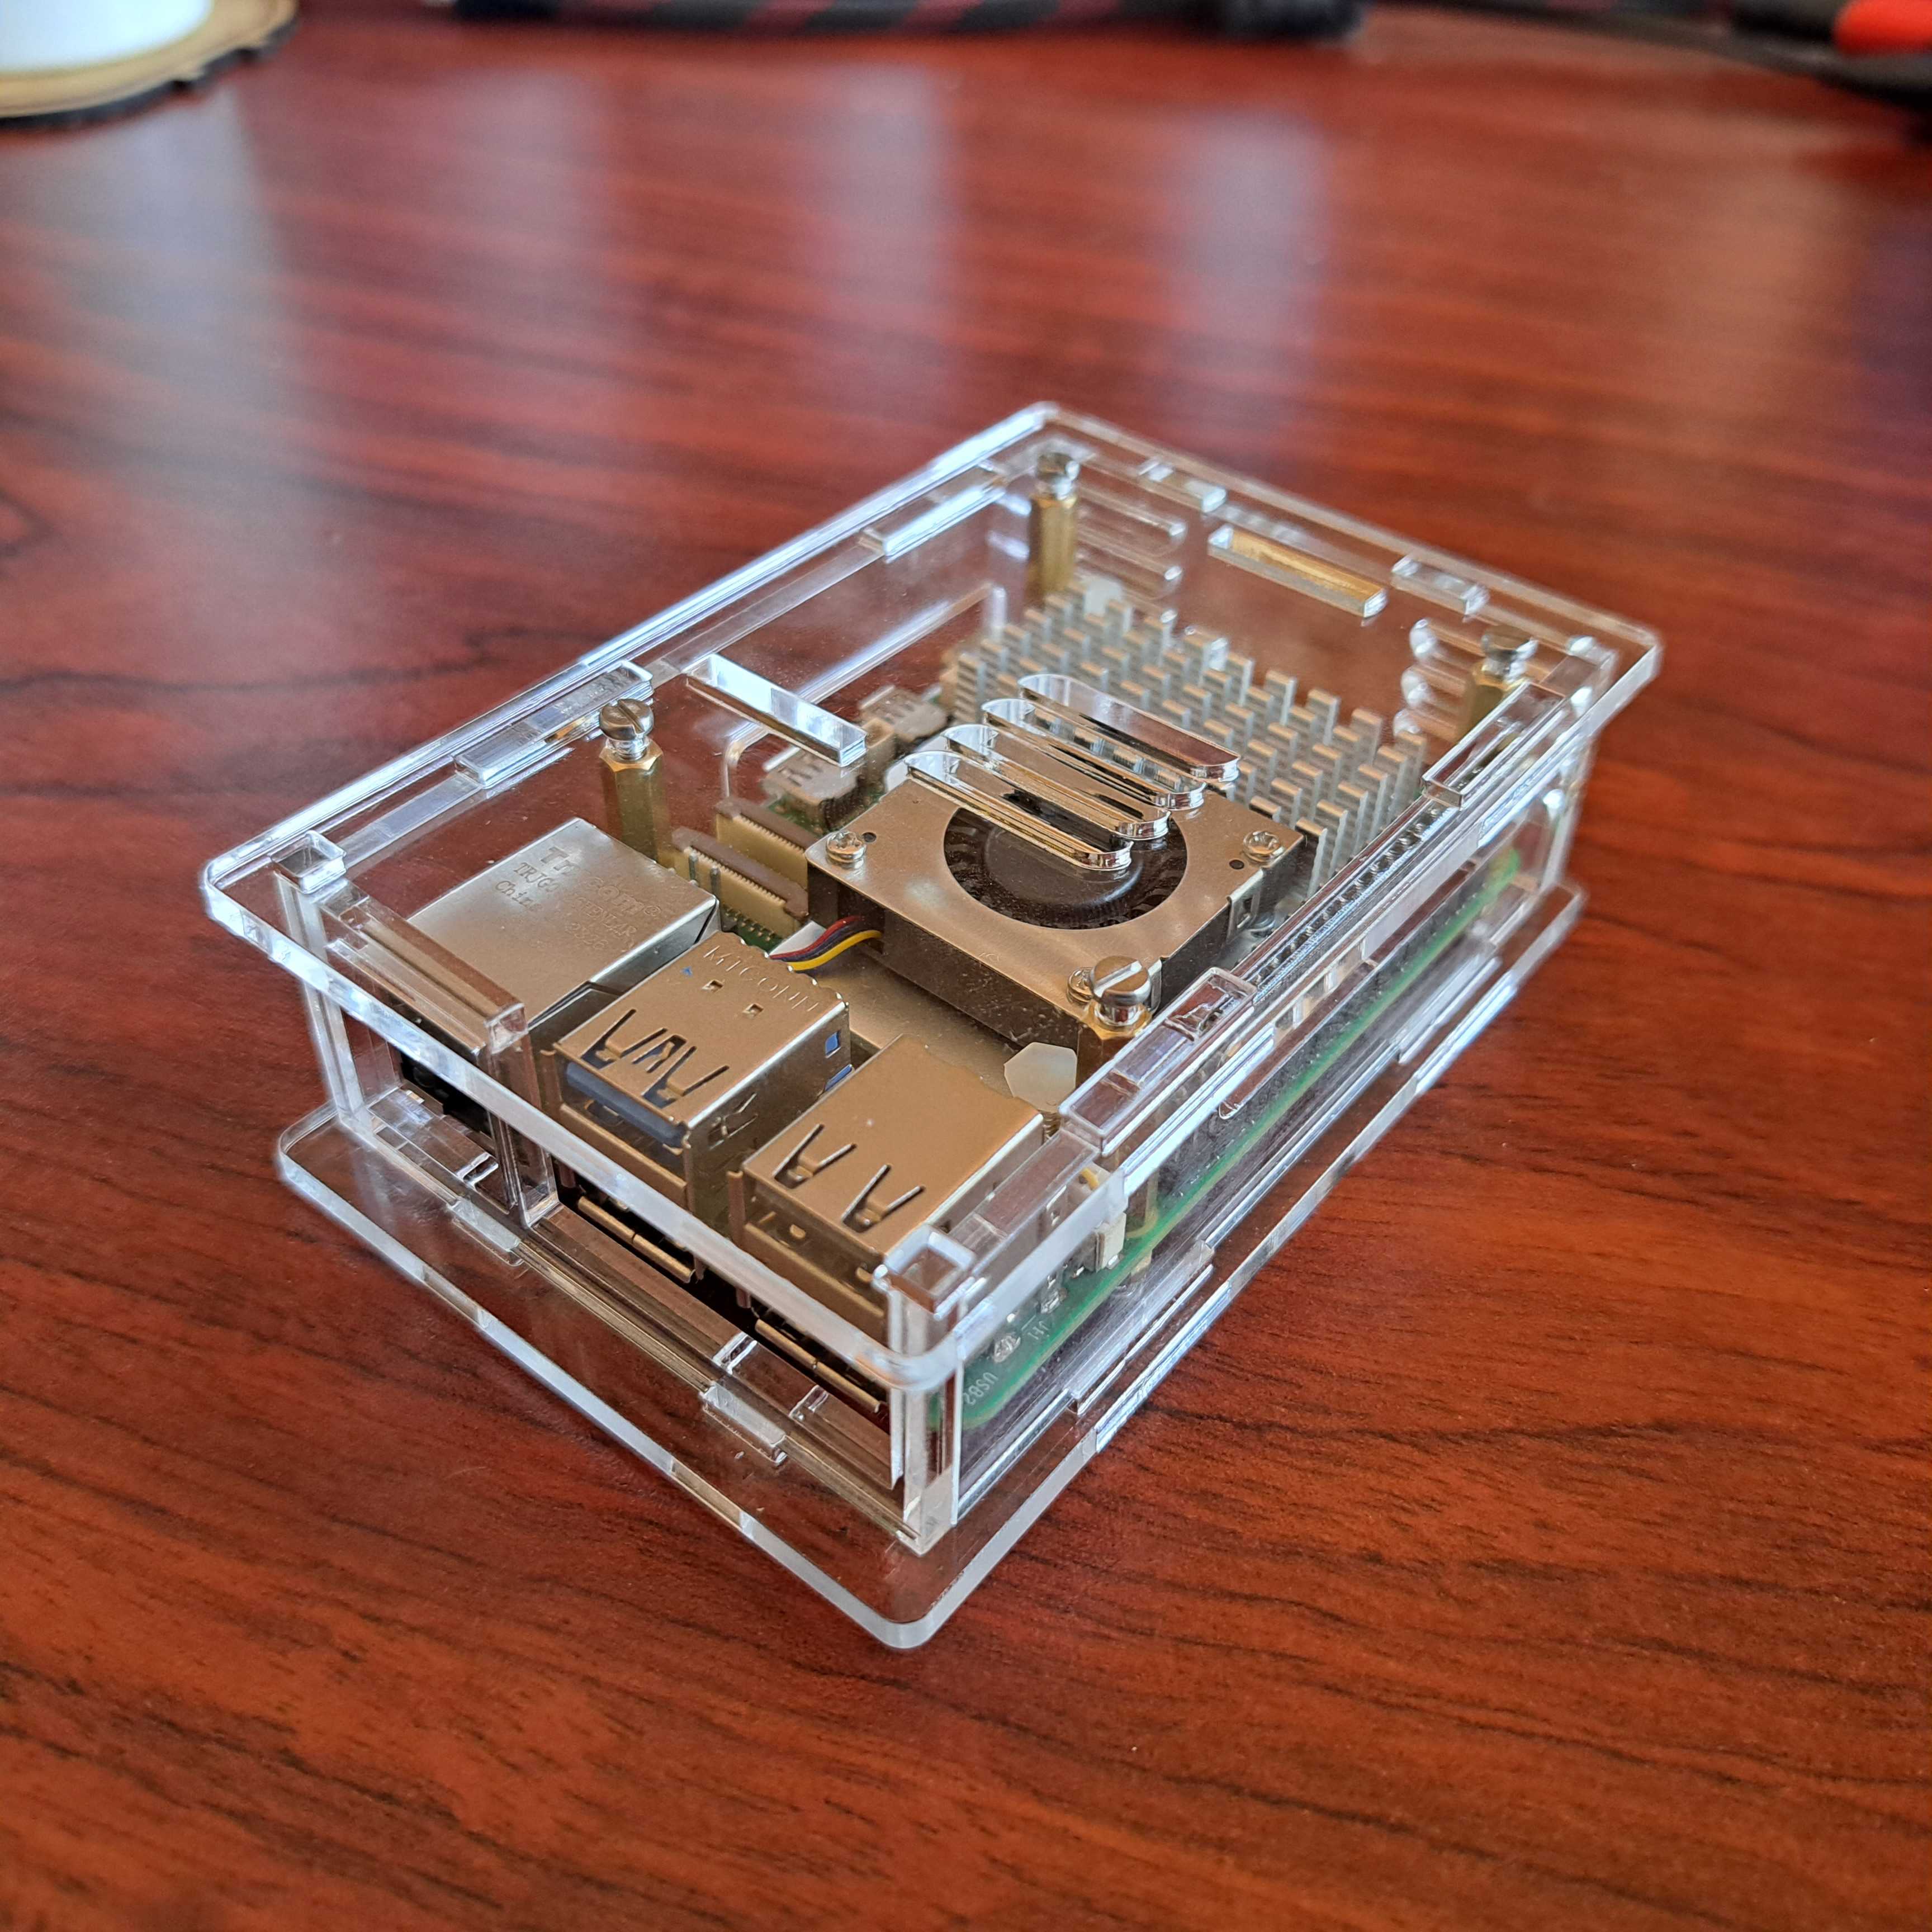

- Waveshare POE board for RPi5
- Waveshare M.2 HAT+
- Raspberry Pi M.2 HAT+
- Raspberry Pi M.2 HAT+ AI Kit
- we are testing some more HATs....
This DIY case requires assembly. You will need a small precision flathead screwdriver.
Clear 3mm Acrylic Panels to protect your Raspberry Pi 5.
- PCIe
- DSI/CSI Interfaces
- Wall mounting holes
- Airflow Vents On The Top And Front
- With Power On/Off Button
- Easy To Pull & Plug TF Card On The Bottom
- Ample space to fit the RPi5 heatsink included with the POE board or with most other HATs the Raspberry Pi Active Cooler(not included)
What's in the box?
1 x PI5-CASE-F
1 x Nonskid rubber pad (4PCS)
1 x Screwdriver
1 x Screws and standoffs pack
Resources

Keep your Raspberry Pi cool and safe with this enclosure. Convenient access to all external devices, like USB, GPIO and SD card.
Features
- Material: Acrylic
- Color: Transparent
- Layer: 1-Layer (can fit 1 x RPi board)
- Compatible Model: For Raspberry Pi 5/4/3/2 B and B
What's in the box?
2 x Acrylic Plates
1 x set Screws and Nuts
1 x 30mm fan that gets powered from GPIO(Not the RPi5 fan adapter)
1 x Fan Cover
You might also like to add the RPi 5 fans that are OS controlled.

Please note: Raspberry Pi board and jumper cables are not included
This Experimental Platform is for Raspberry Pi 2, 3, 4, 5
Size: 132mm x 108mm
Ideal for use with Solderless 400 Point Breadboard.(included)
Acrylic board locally designed and laser cut inhouse.
Shadows engraved on board for easy component placing
What's in the box?
1 x Acrylic plate
4 x M2.5 x 5 Standoffs
4 x M2.5x6 screws
4 x M2.5 nuts
4 x bumper pads
1 x 400 point breadboard

Please note: the display, Pico, breadboard, DHT22 and jumpers are not included. To find out what is included, see "What's in the box?" further down this page
Everyone likes the IIC / I2C 1602 Blue Backlight LCD Display This is the bracket for this useful little display, enables you to mount the display and add a breadboard to build your project.
Specifications
- Colour: Clear
- Material: Acrylic, (please tear off the protective cover)
- Size: ~ 100mm x 90mm x 50mm
- Stationary 1602LCD display
- Four mounting holes with M3 diameter (3.0mm)
- Score mark indicating where to place your 400 point breadboard(not included)
What's in the box?
1 x Acrylic dashboard Bracket
4 x M3 x 12mm bolts
4 x M3 nuts
4 x Silicone Rubber Bumper Feet

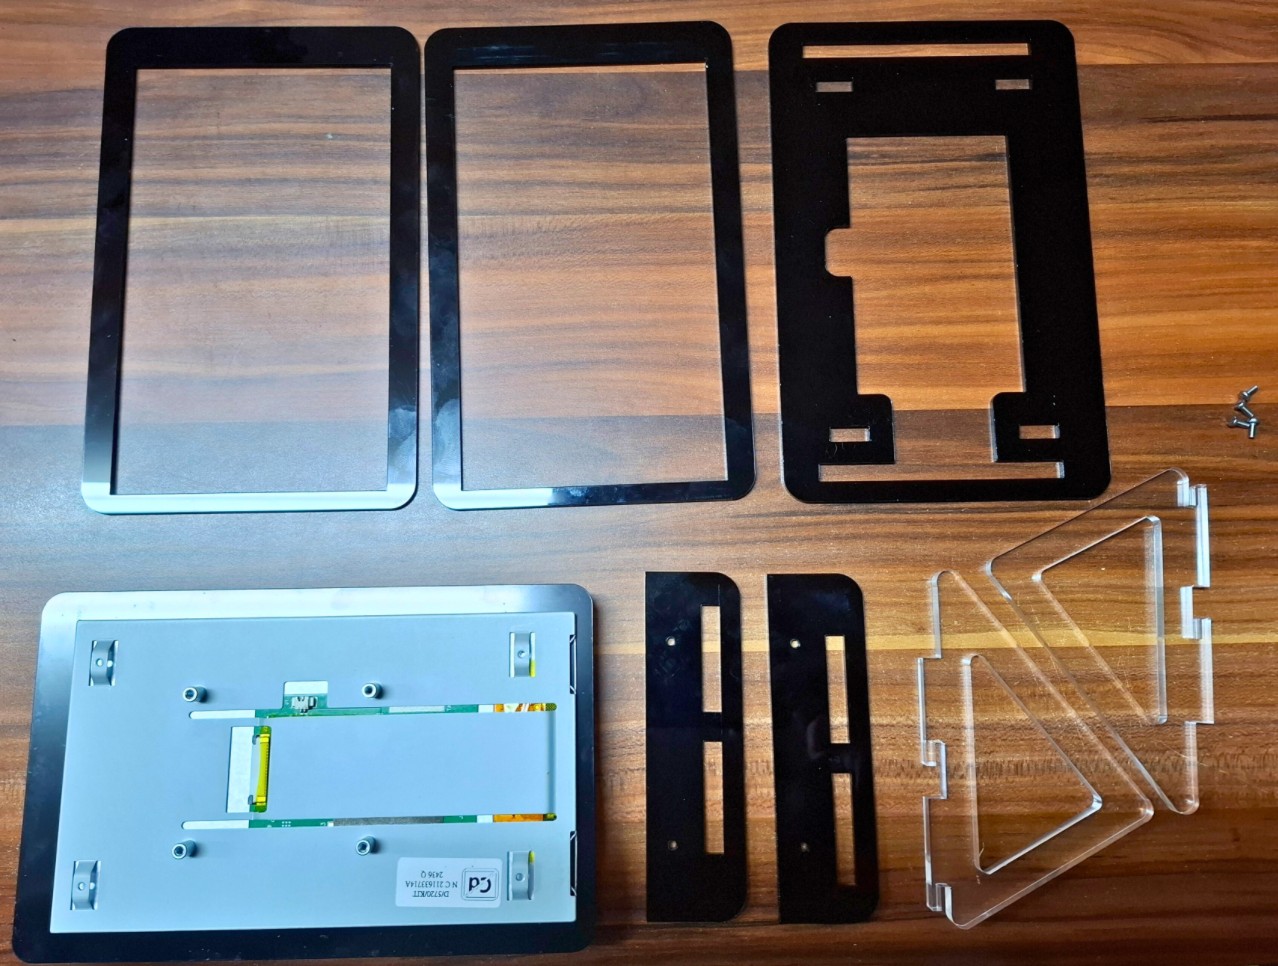
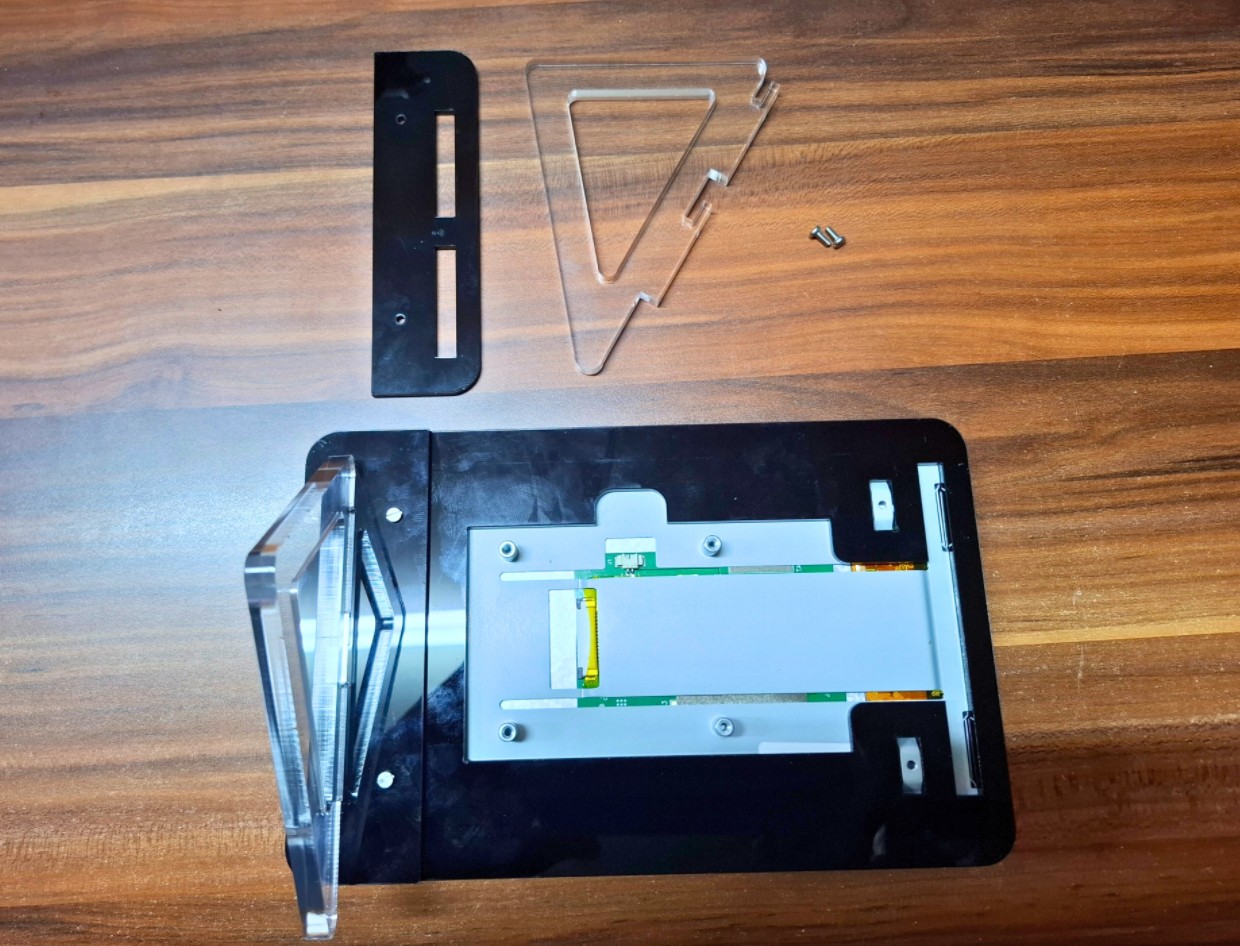
The Raspberry Pi Display 2 Stand is a custom-designed, sturdy accessory to securely hold the official Raspberry Pi 7-inch touchscreen display in an optimal position.
Features
- Compatibility: Tailored to fit the Raspberry Pi Display 2 and integrate seamlessly with various Raspberry Pi models like the Raspberry Pi 5 or Raspberry Pi 4.
- Material: Crafted from black and clear acrylic.
- Cable Management: The front of the display is raised to house keyboard cables. The stands have openings to route cables neatly if necessary eg mouse cable.
- Compact Design: Lightweight and space-saving, perfect for desks, workbenches, or portable setups.
- Easy Assembly: Comes with all necessary screws and tools for quick setup.
Ideal for use in DIY projects, kiosks, media centers, or as a control interface, the Raspberry Pi Display 2 Stand enhances usability and provides a stable foundation for your Raspberry Pi touchscreen setup.
What's in the box?
1 x Acrylic frame for Raspberry Pi Display 2

This DIY case requires assembly. You will need a small precision flathead screwdriver.
- 40PIN GPIO
- DSI/CSI Interfaces
- Wall mounting holes
- Airflow Vents On The Top And Front
- Easy To Pull & Plug TF Card On The Bottom
- Clear 3mm Acrylic Panels to protect your Raspberry Pi 4.
What's in the box?
1 x PI4 Acrylic Case A acrylic parts(remove the protection film)
1 x Nonskid rubber pad (4PCS)
1 x Screwdriver
1 x Screws and standoffs pack
You may also want to grab a 30mm fan and 30mm grill cover. You will also need four M3x16 screws with M3 nuts to mount the fan.
Resources
The Case Consists Of 6 Layers Of Acrylic Panels. Install According To The Following Steps
1. Install the active cooler on the Raspberry Pi 5.
2. Install the short standoffs and screws onto the 1st acrylic panel, please pay attention to the orientation.
3. Install the long female to female standoffs on the RPi board
4. Install the 4 acrylic panel to the sides of the Raspberry Pi 5.
Don't forget to install the little power button first.
5. Install the top plate. This is where all the bits come together. You might experience a bit of difficulty aligning all the plates. A bit of pressure on the top plate helps to get all to pop into place.
6. Insert the top 4 screws that holds it all together. You don't have to use force to tighten them.
Protect and showcase your Raspberry Pi with this durable, precision-cut acrylic case. Designed for optimal ventilation and full access to ports, this sleek enclosure keeps your Pi safe while maintaining a clean, modern look. Easy to assemble with included mini screwdriver.
Features
- Compatible with Raspberry Pi 5 and multifunctional adapter
- Sufficient space to fit the Active Cooler
- Transparent panels for visibility and aesthetics
- Ventilation slots for efficient heat dissipation
- Cutouts for all GPIO, USB, HDMI, and power ports
- Lightweight, stackable, and perfect for DIY projects
- Material: Acrylic
- Colour: Transparent (Remove the protective film)
- Requires Customer Assembly
What's in the box?
6 x acrylic plate parts(peel off the protective film on both sides)
4 x M2.5x5+5 standoffs to fit under the Pi screw part facing upwards
4 x M2.5x7 standoffs to fit under the adapter board screw part facing upwards
4 x FF M2.5 x 18 standoff to fit on top of the Pi
2 x FF M2.5x16 Brass standoffs to fit on the outer side of the adapter
2 x FF M2.5x5 brass standoffs to fit on the inner side of the adapter
14 x M2.5x6 screws - 8 for the bottom and 6 for the top of the case
4 x rubber feet
1 x mini screwdriver
Tip: It helps to tighten all the screws only once they have all been fitted loosely in place