
Special Offers


What's in the box?
1 x Levelling Kit Springs and Screw Wheel set of 4

We also have a more open option with no sides available.
This DIY case requires assembly. You will need a small precision flathead screwdriver.
Clear 3mm Acrylic Panels to protect your Raspberry Pi 5.
- 40PIN GPIO
- PCIe
- DSI/CSI Interfaces
- Wall mounting holes
- Airflow Vents On The Top And Front
- With Power On/Off Button
- Easy To Pull & Plug TF Card On The Bottom
What's in the box?
1 x PI5 Acrylic Case A
1 x Nonskid rubber pad (4PCS)
1 x Screwdriver
1 x Screws and standoffs pack
Resources
The Case Consists Of 6 Layers Of Acrylic Panels. Install According To The Following Steps
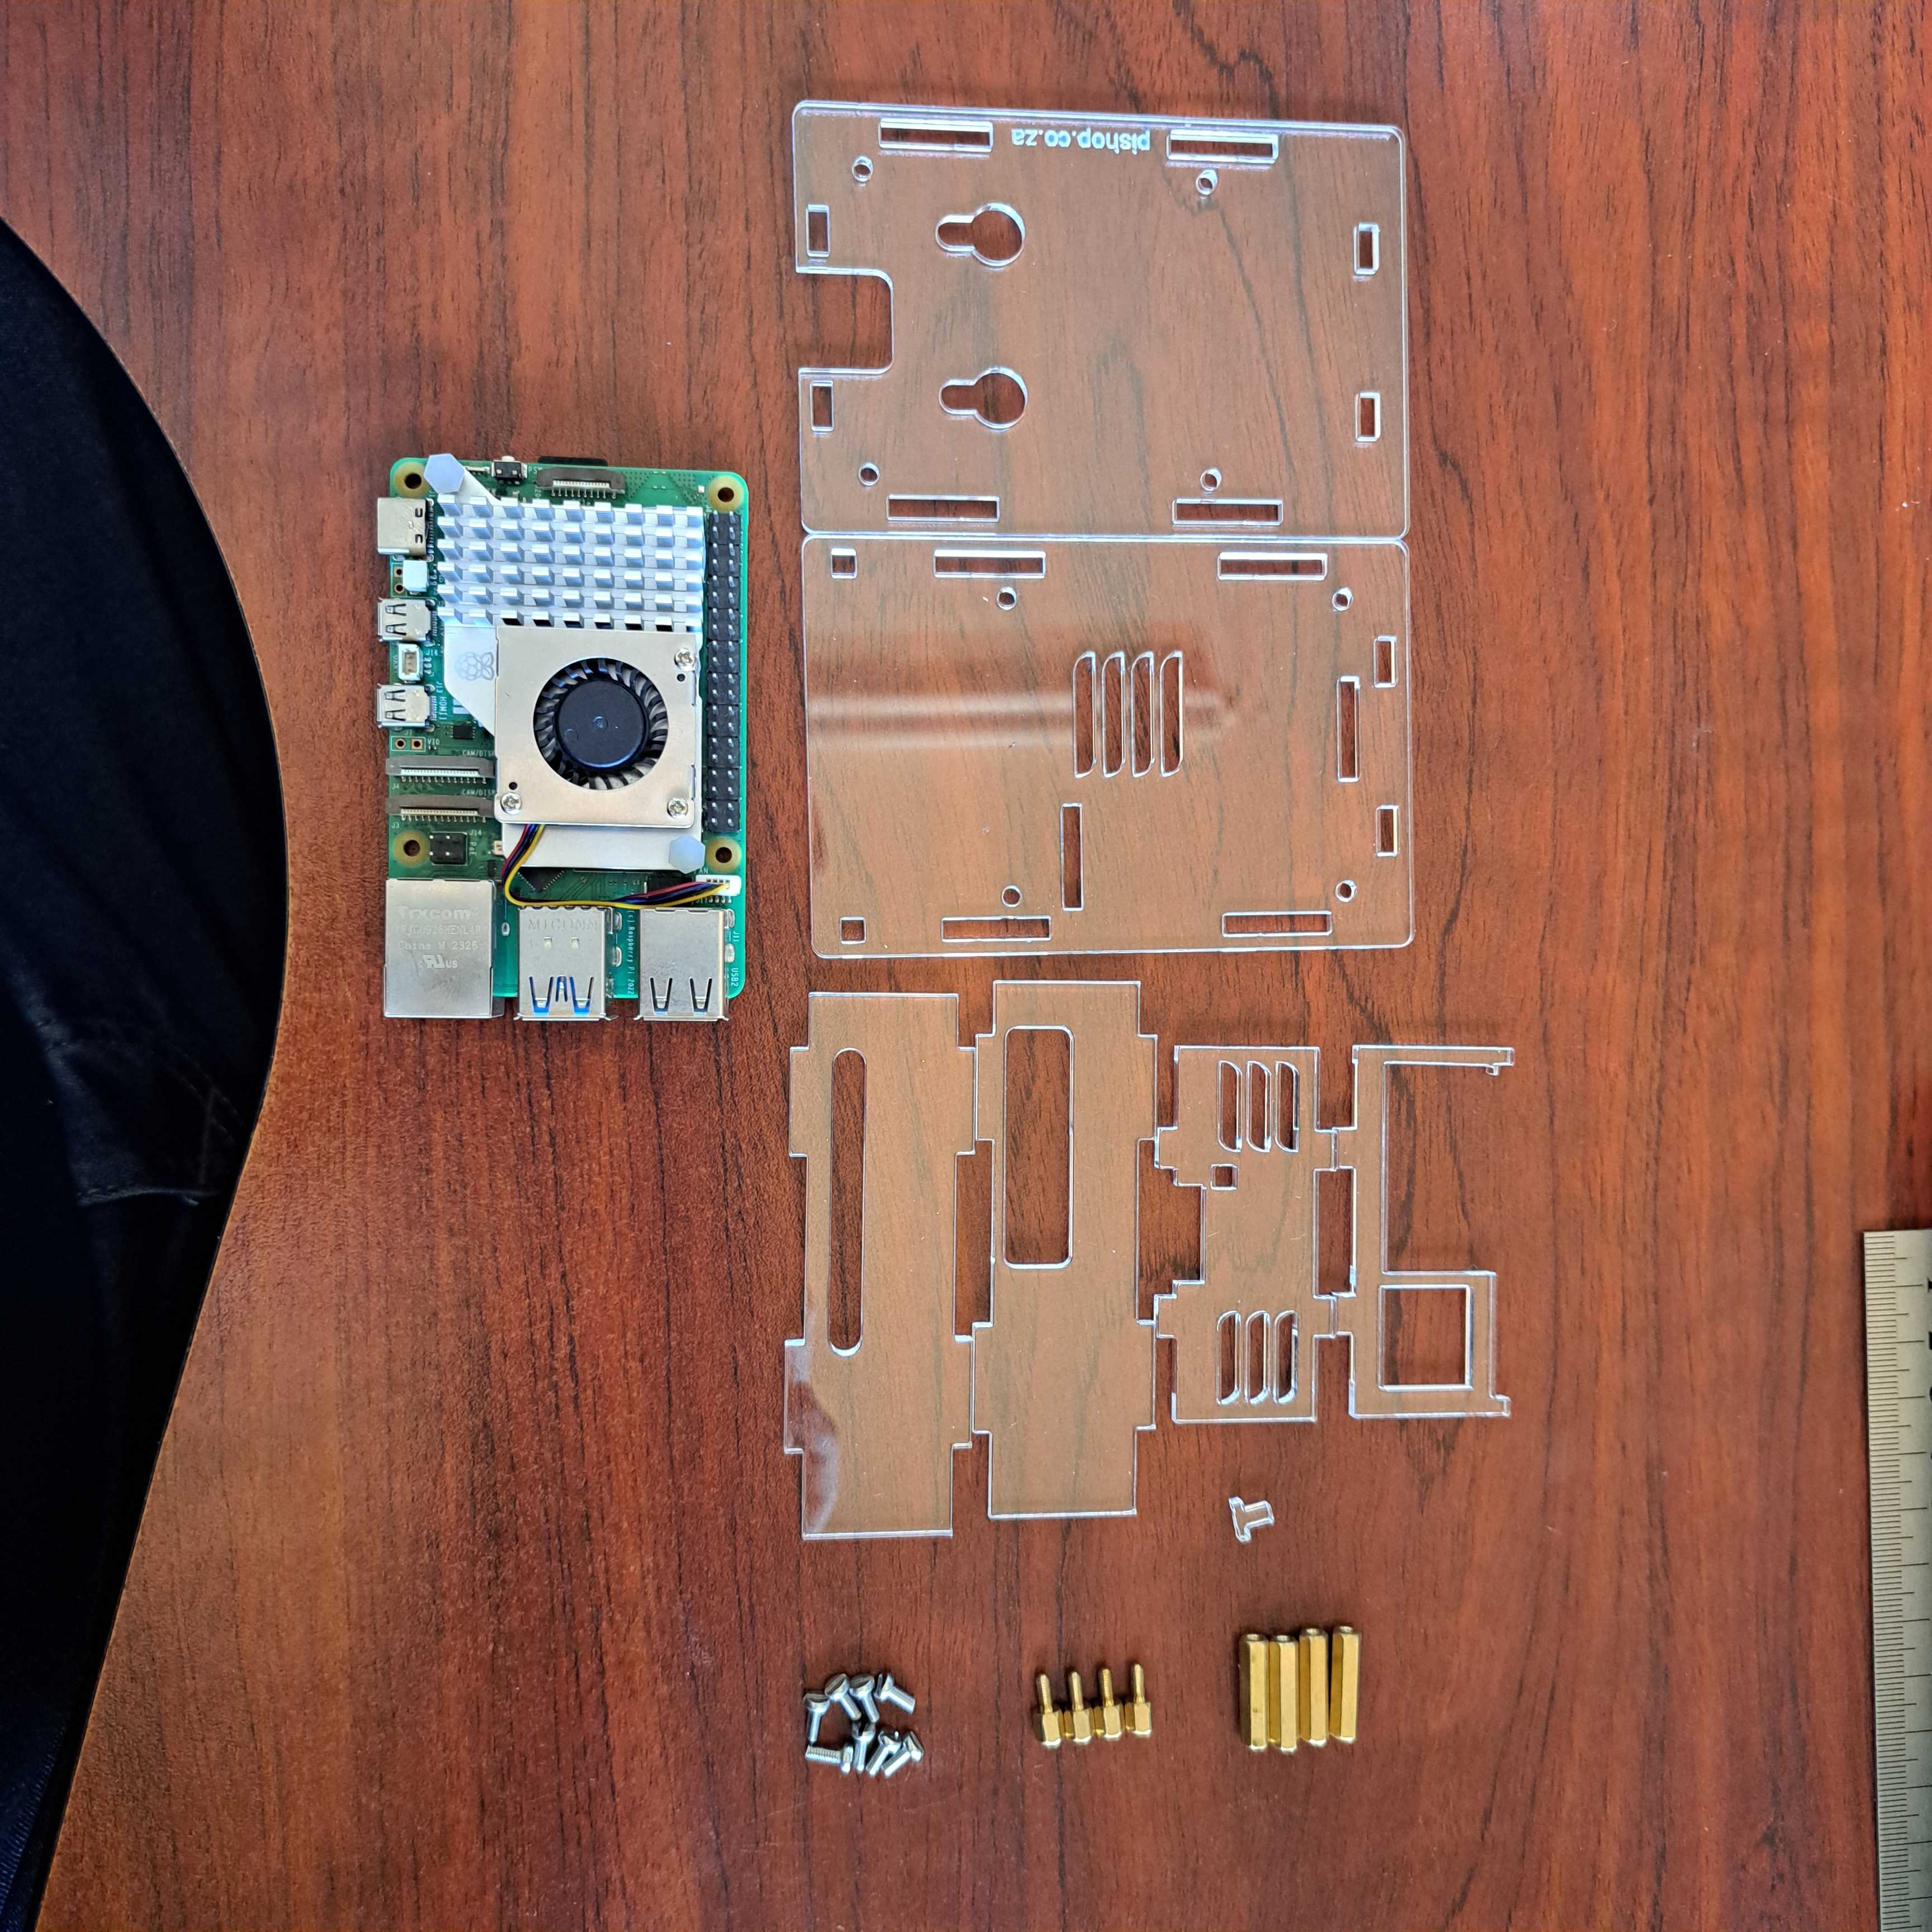
1. Install the active cooler on the Raspberry Pi 5.
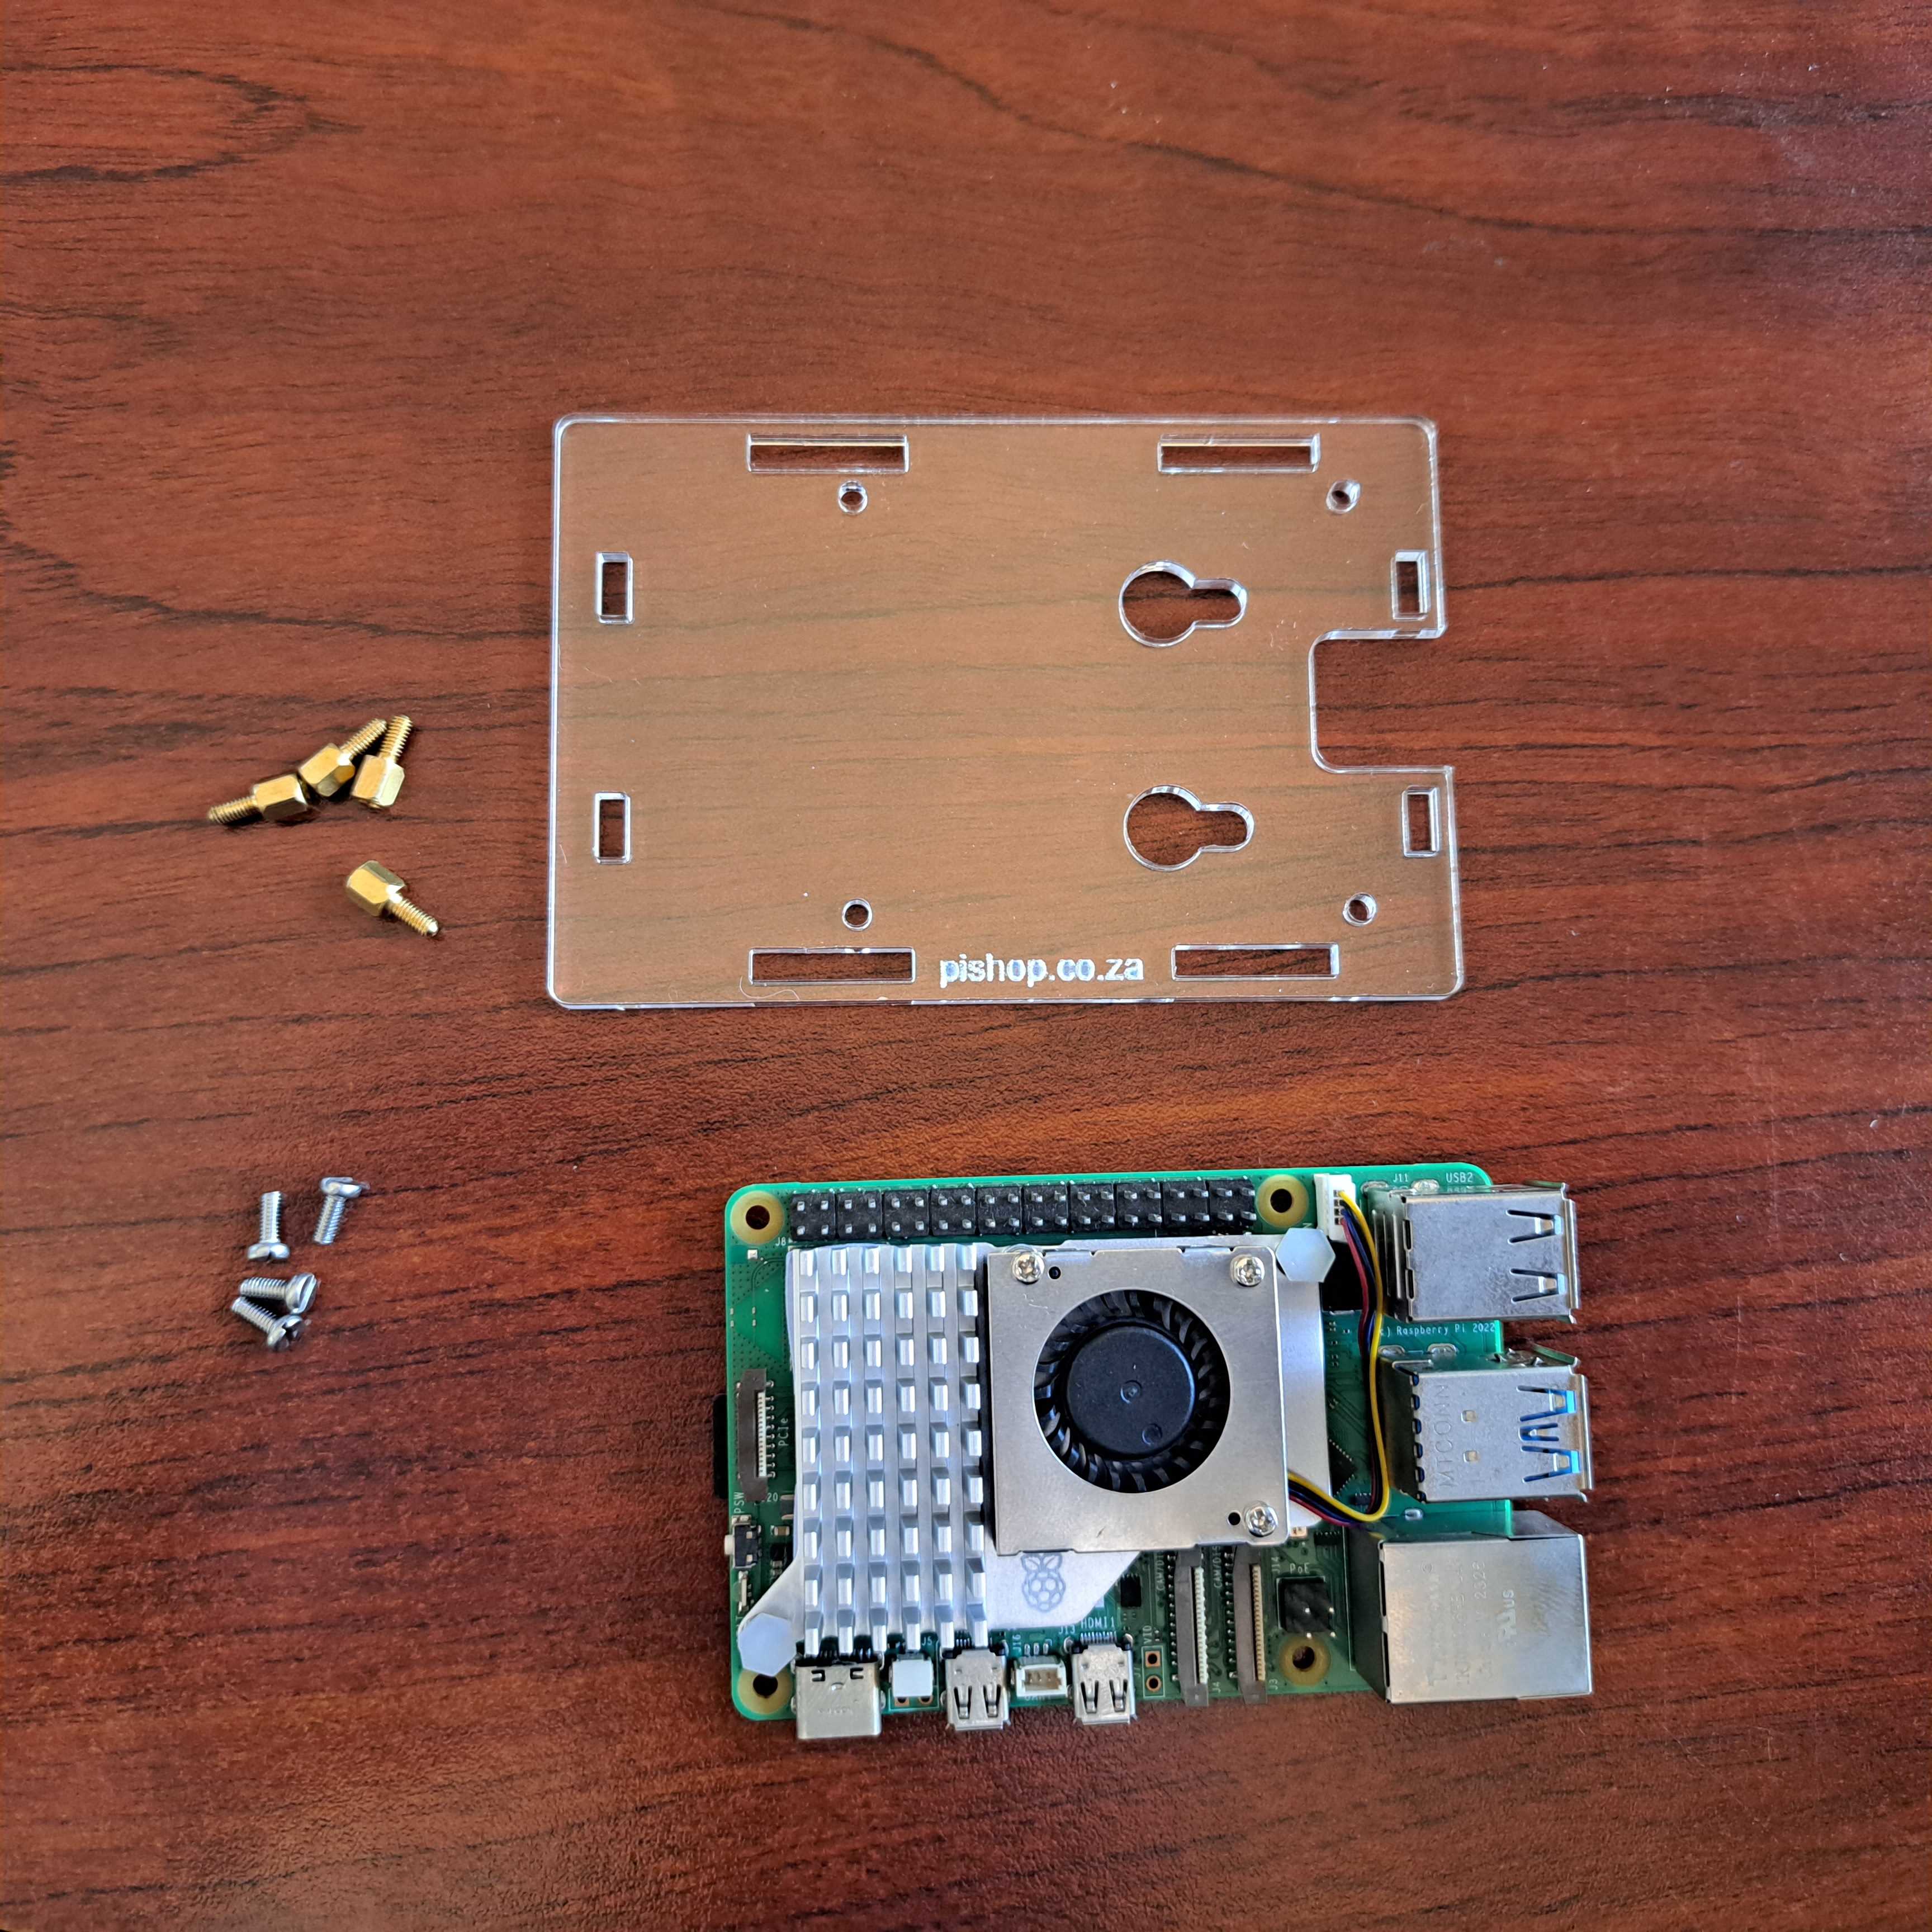
2. Install the short standoffs and screws onto the 1st acrylic panel, please pay attention to the orientation.
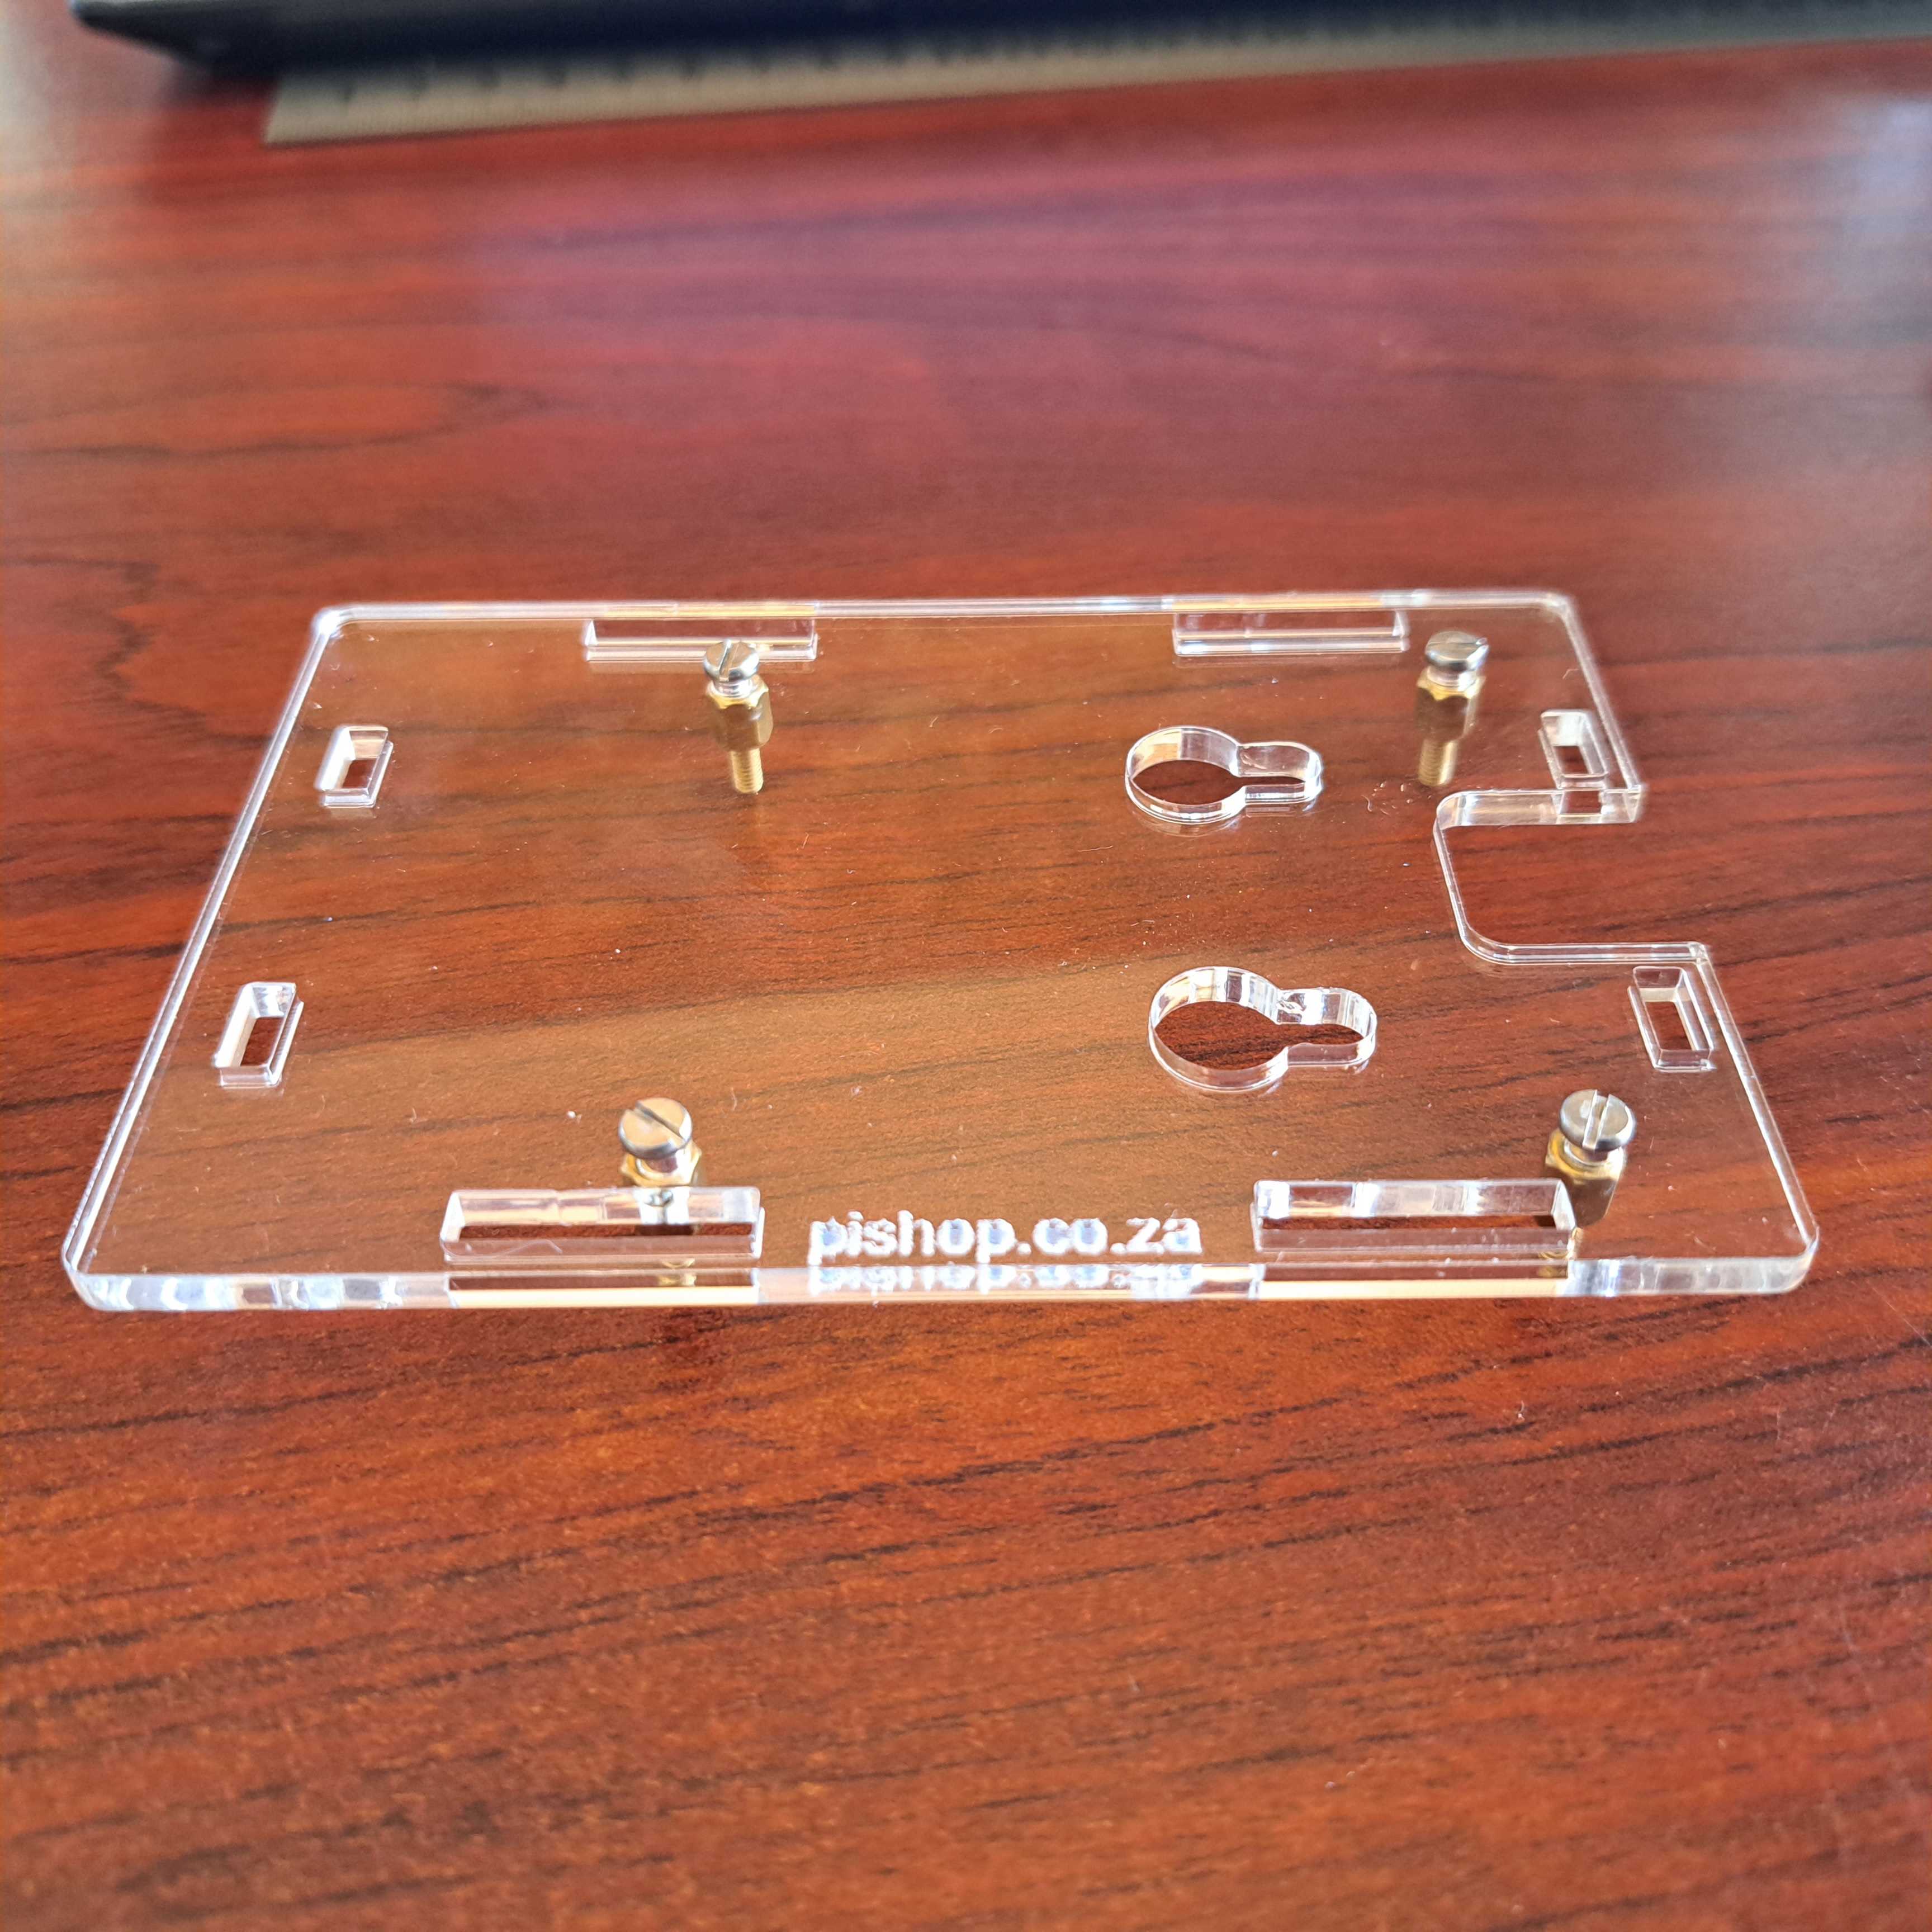
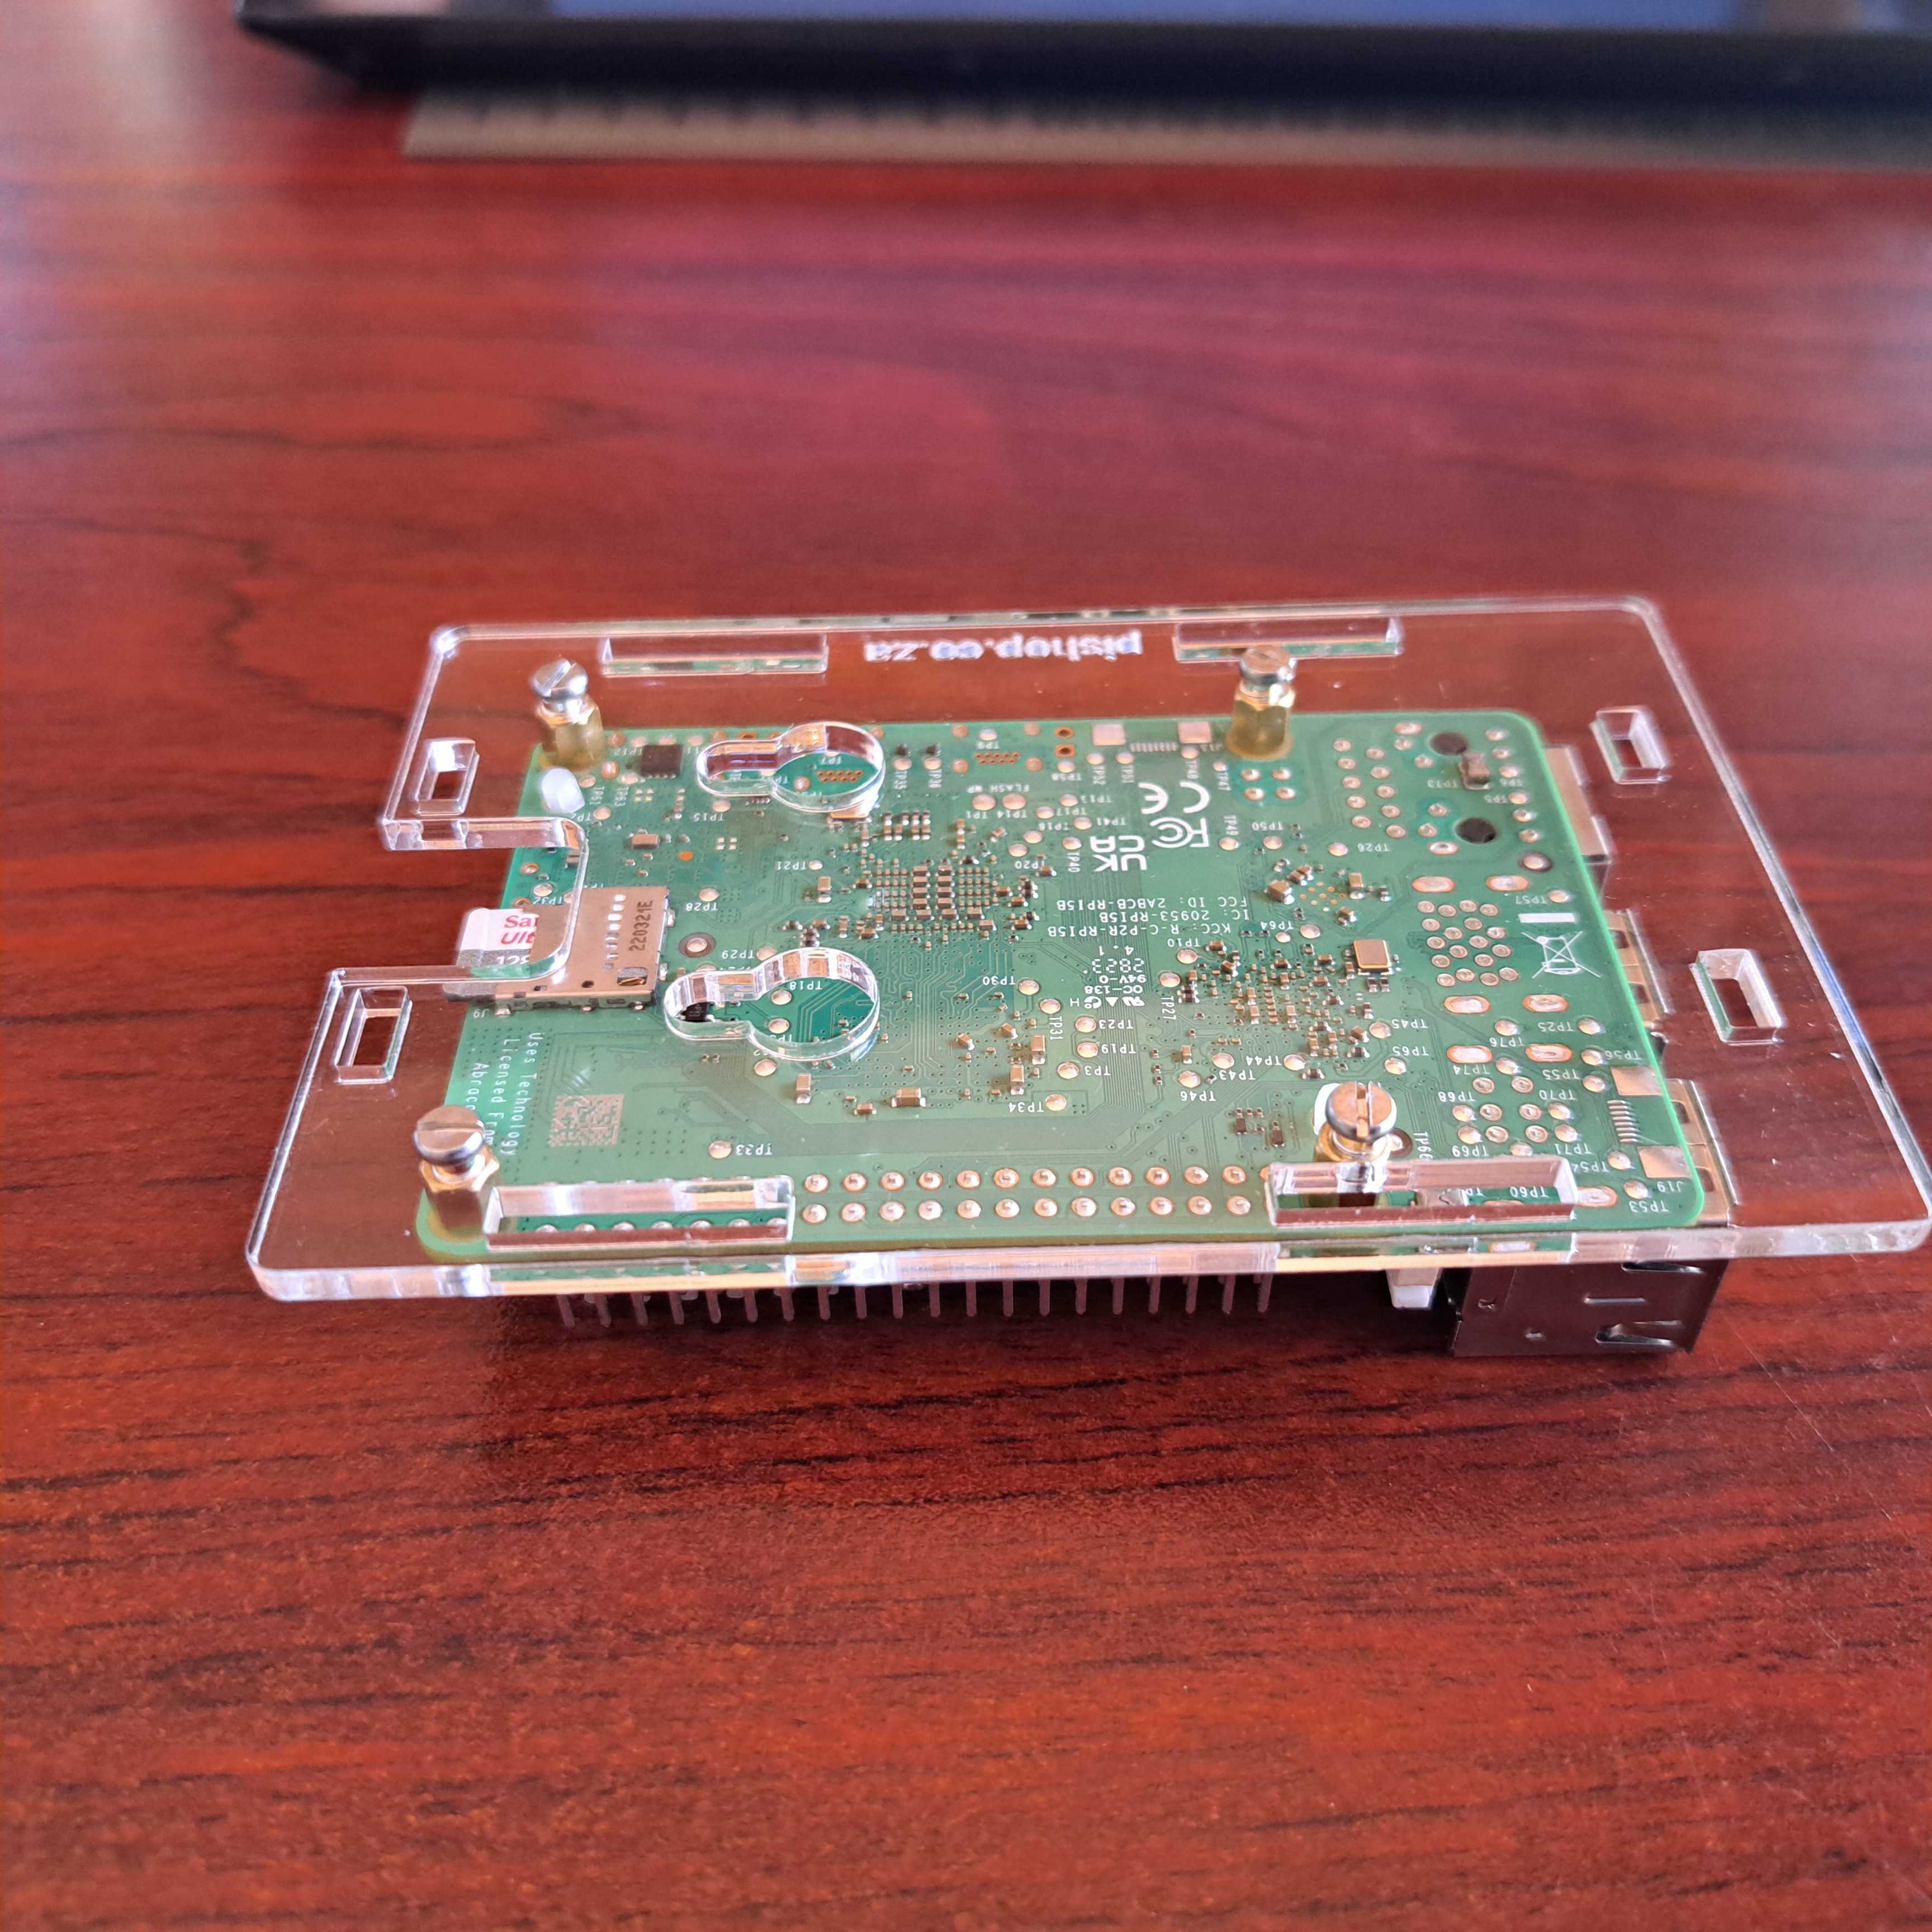
3. Install the long female to female standoffs on the RPi board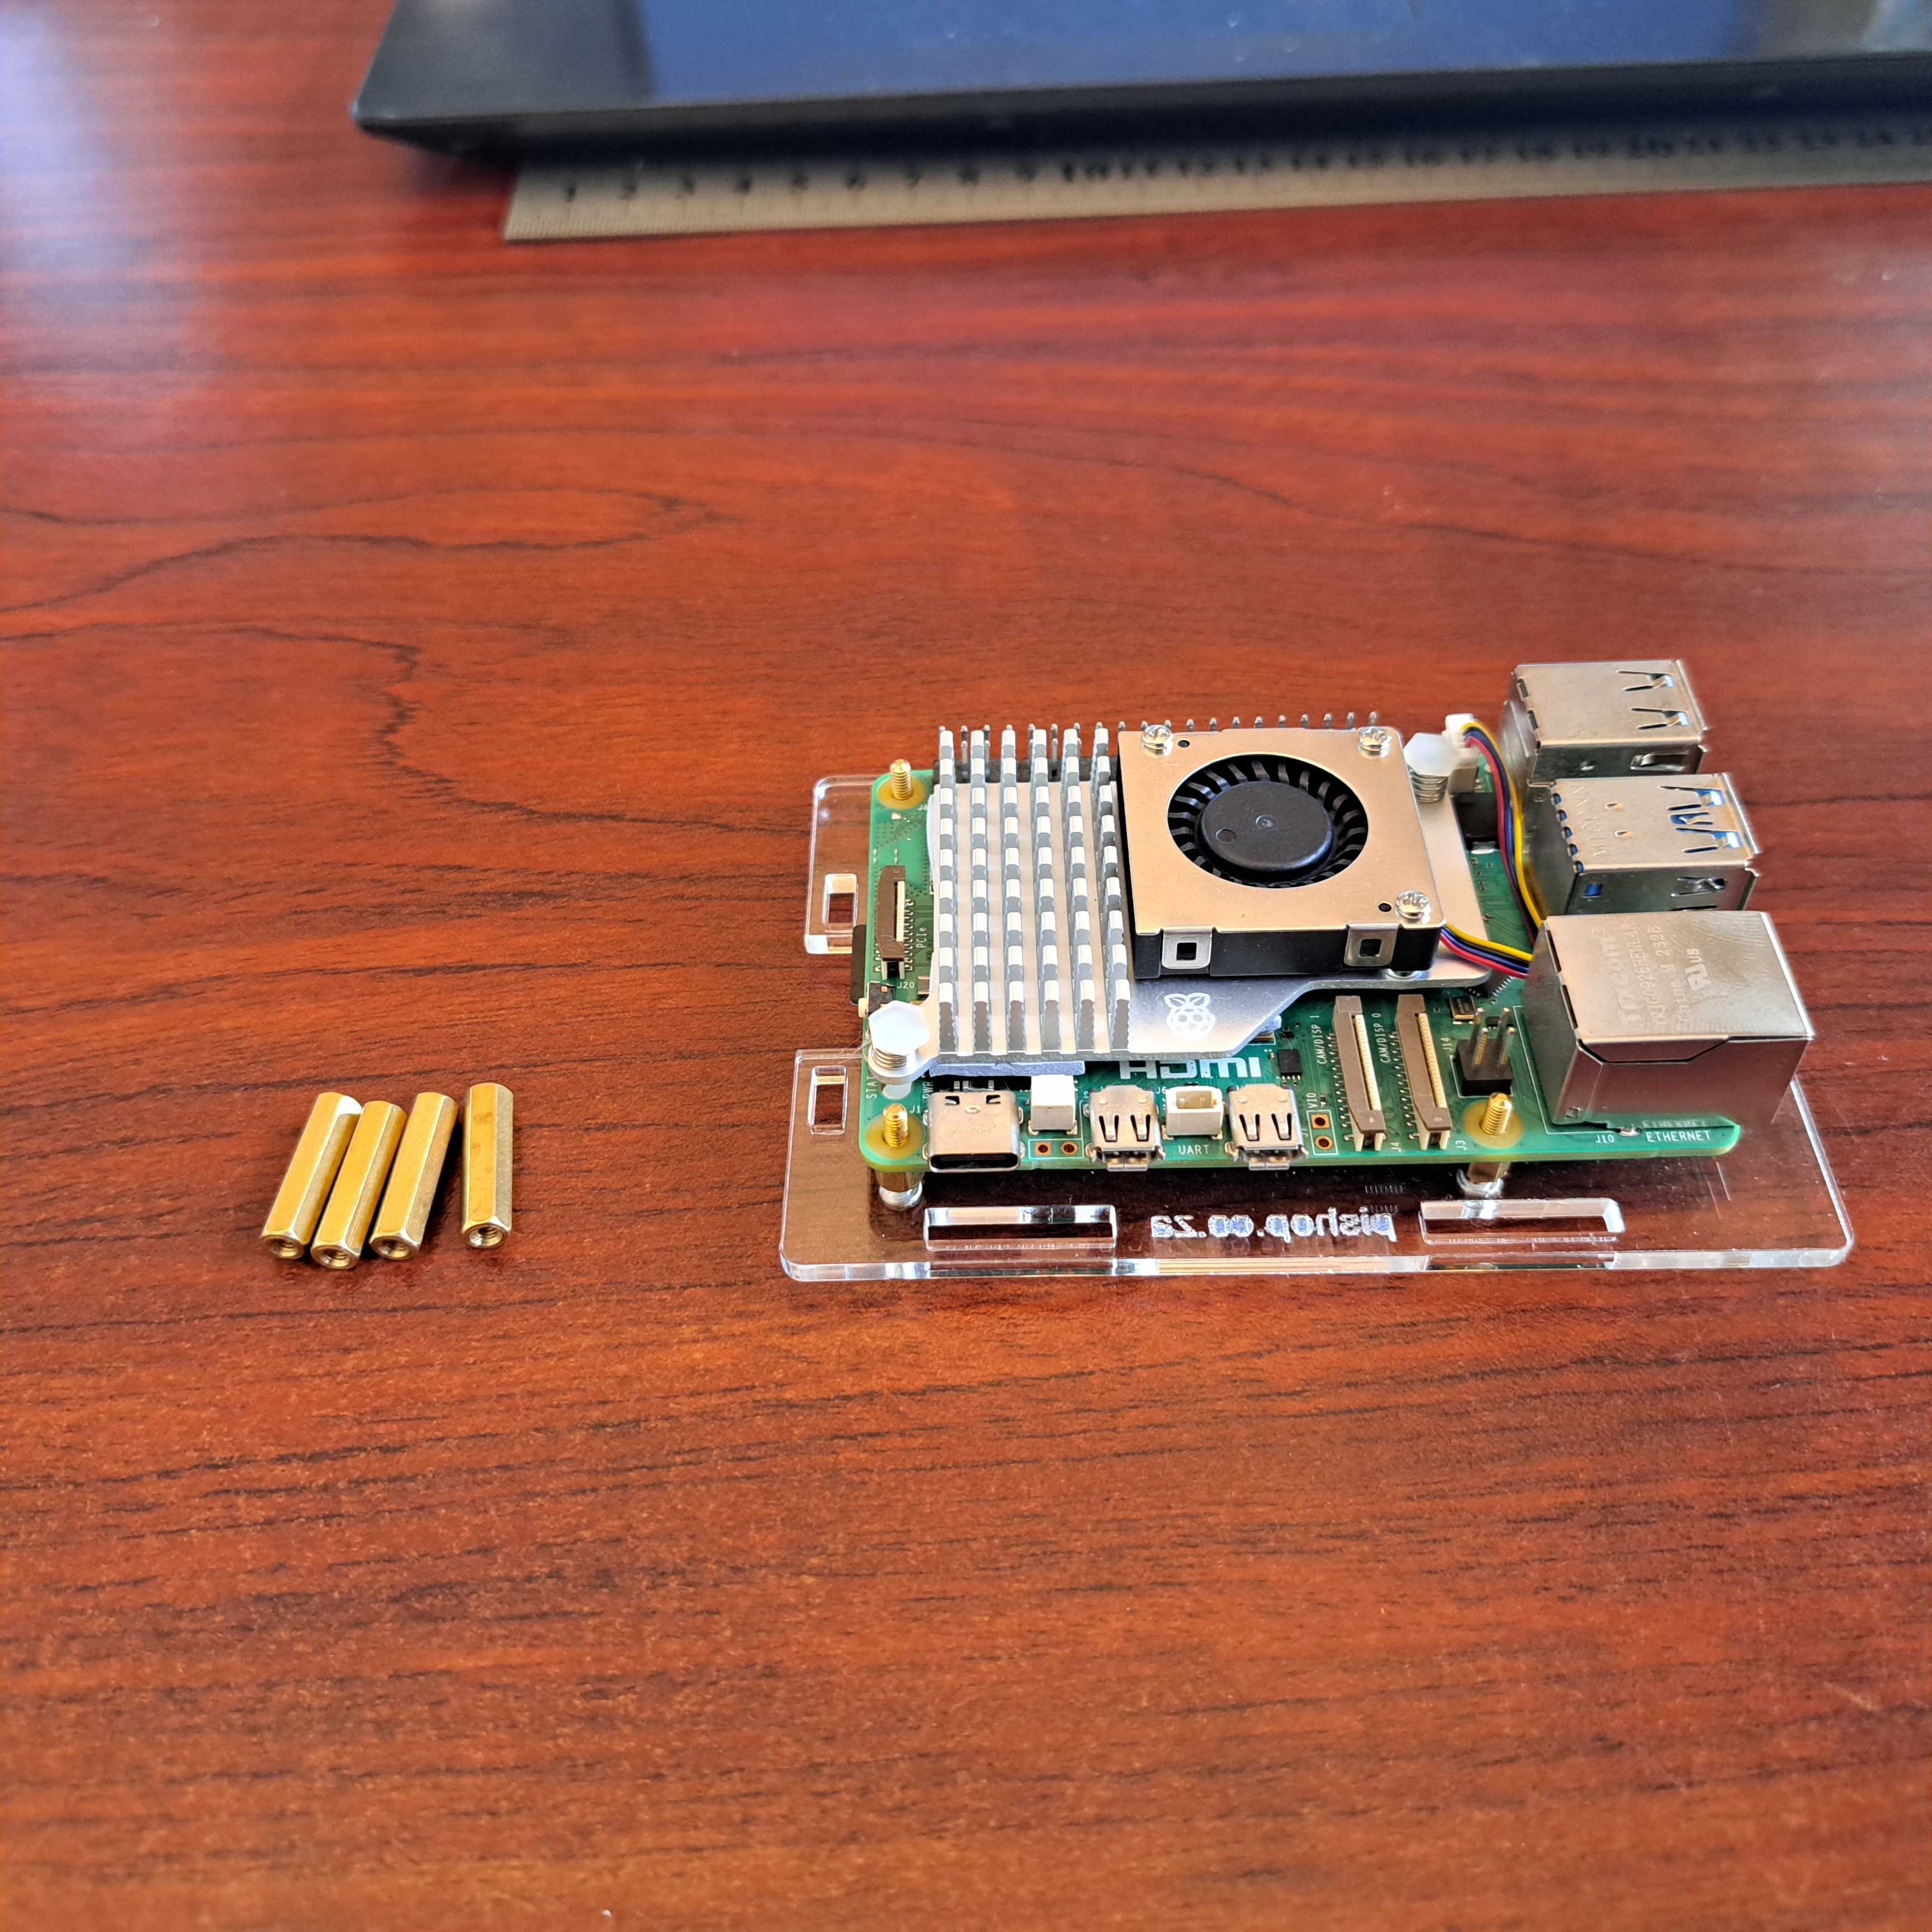
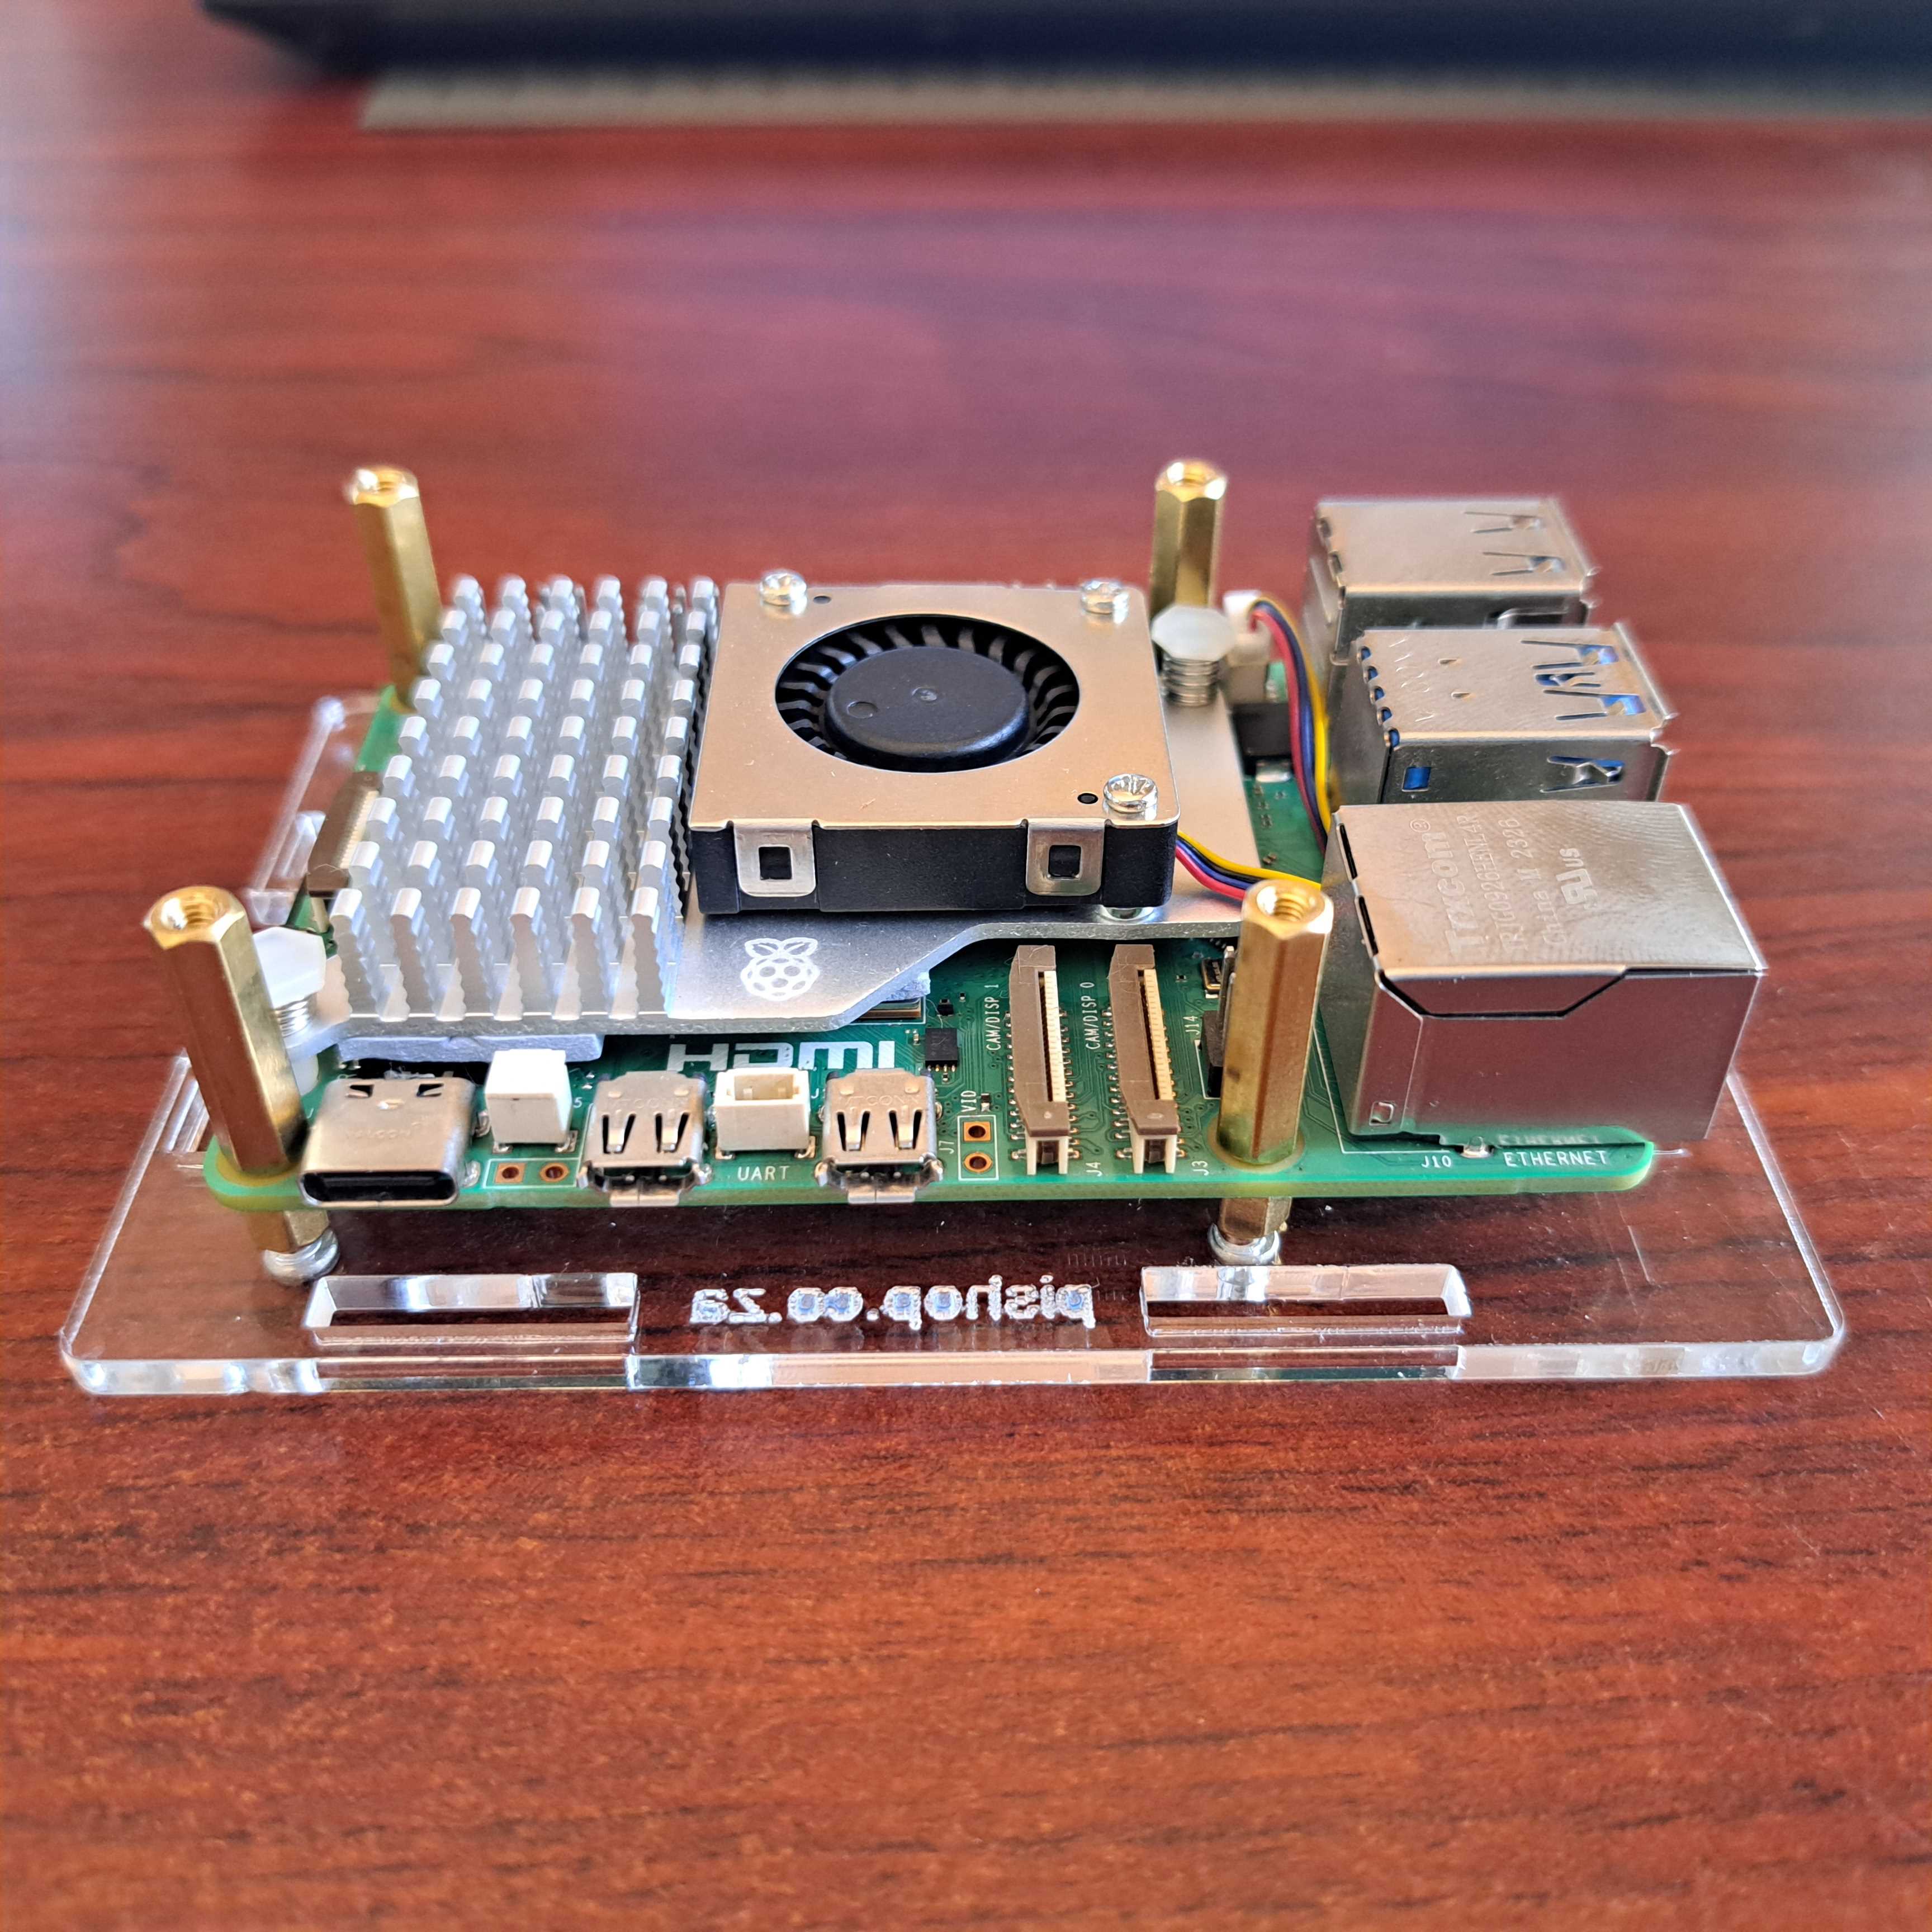
4. Install the 4 acrylic panel to the sides of the Raspberry Pi 5.
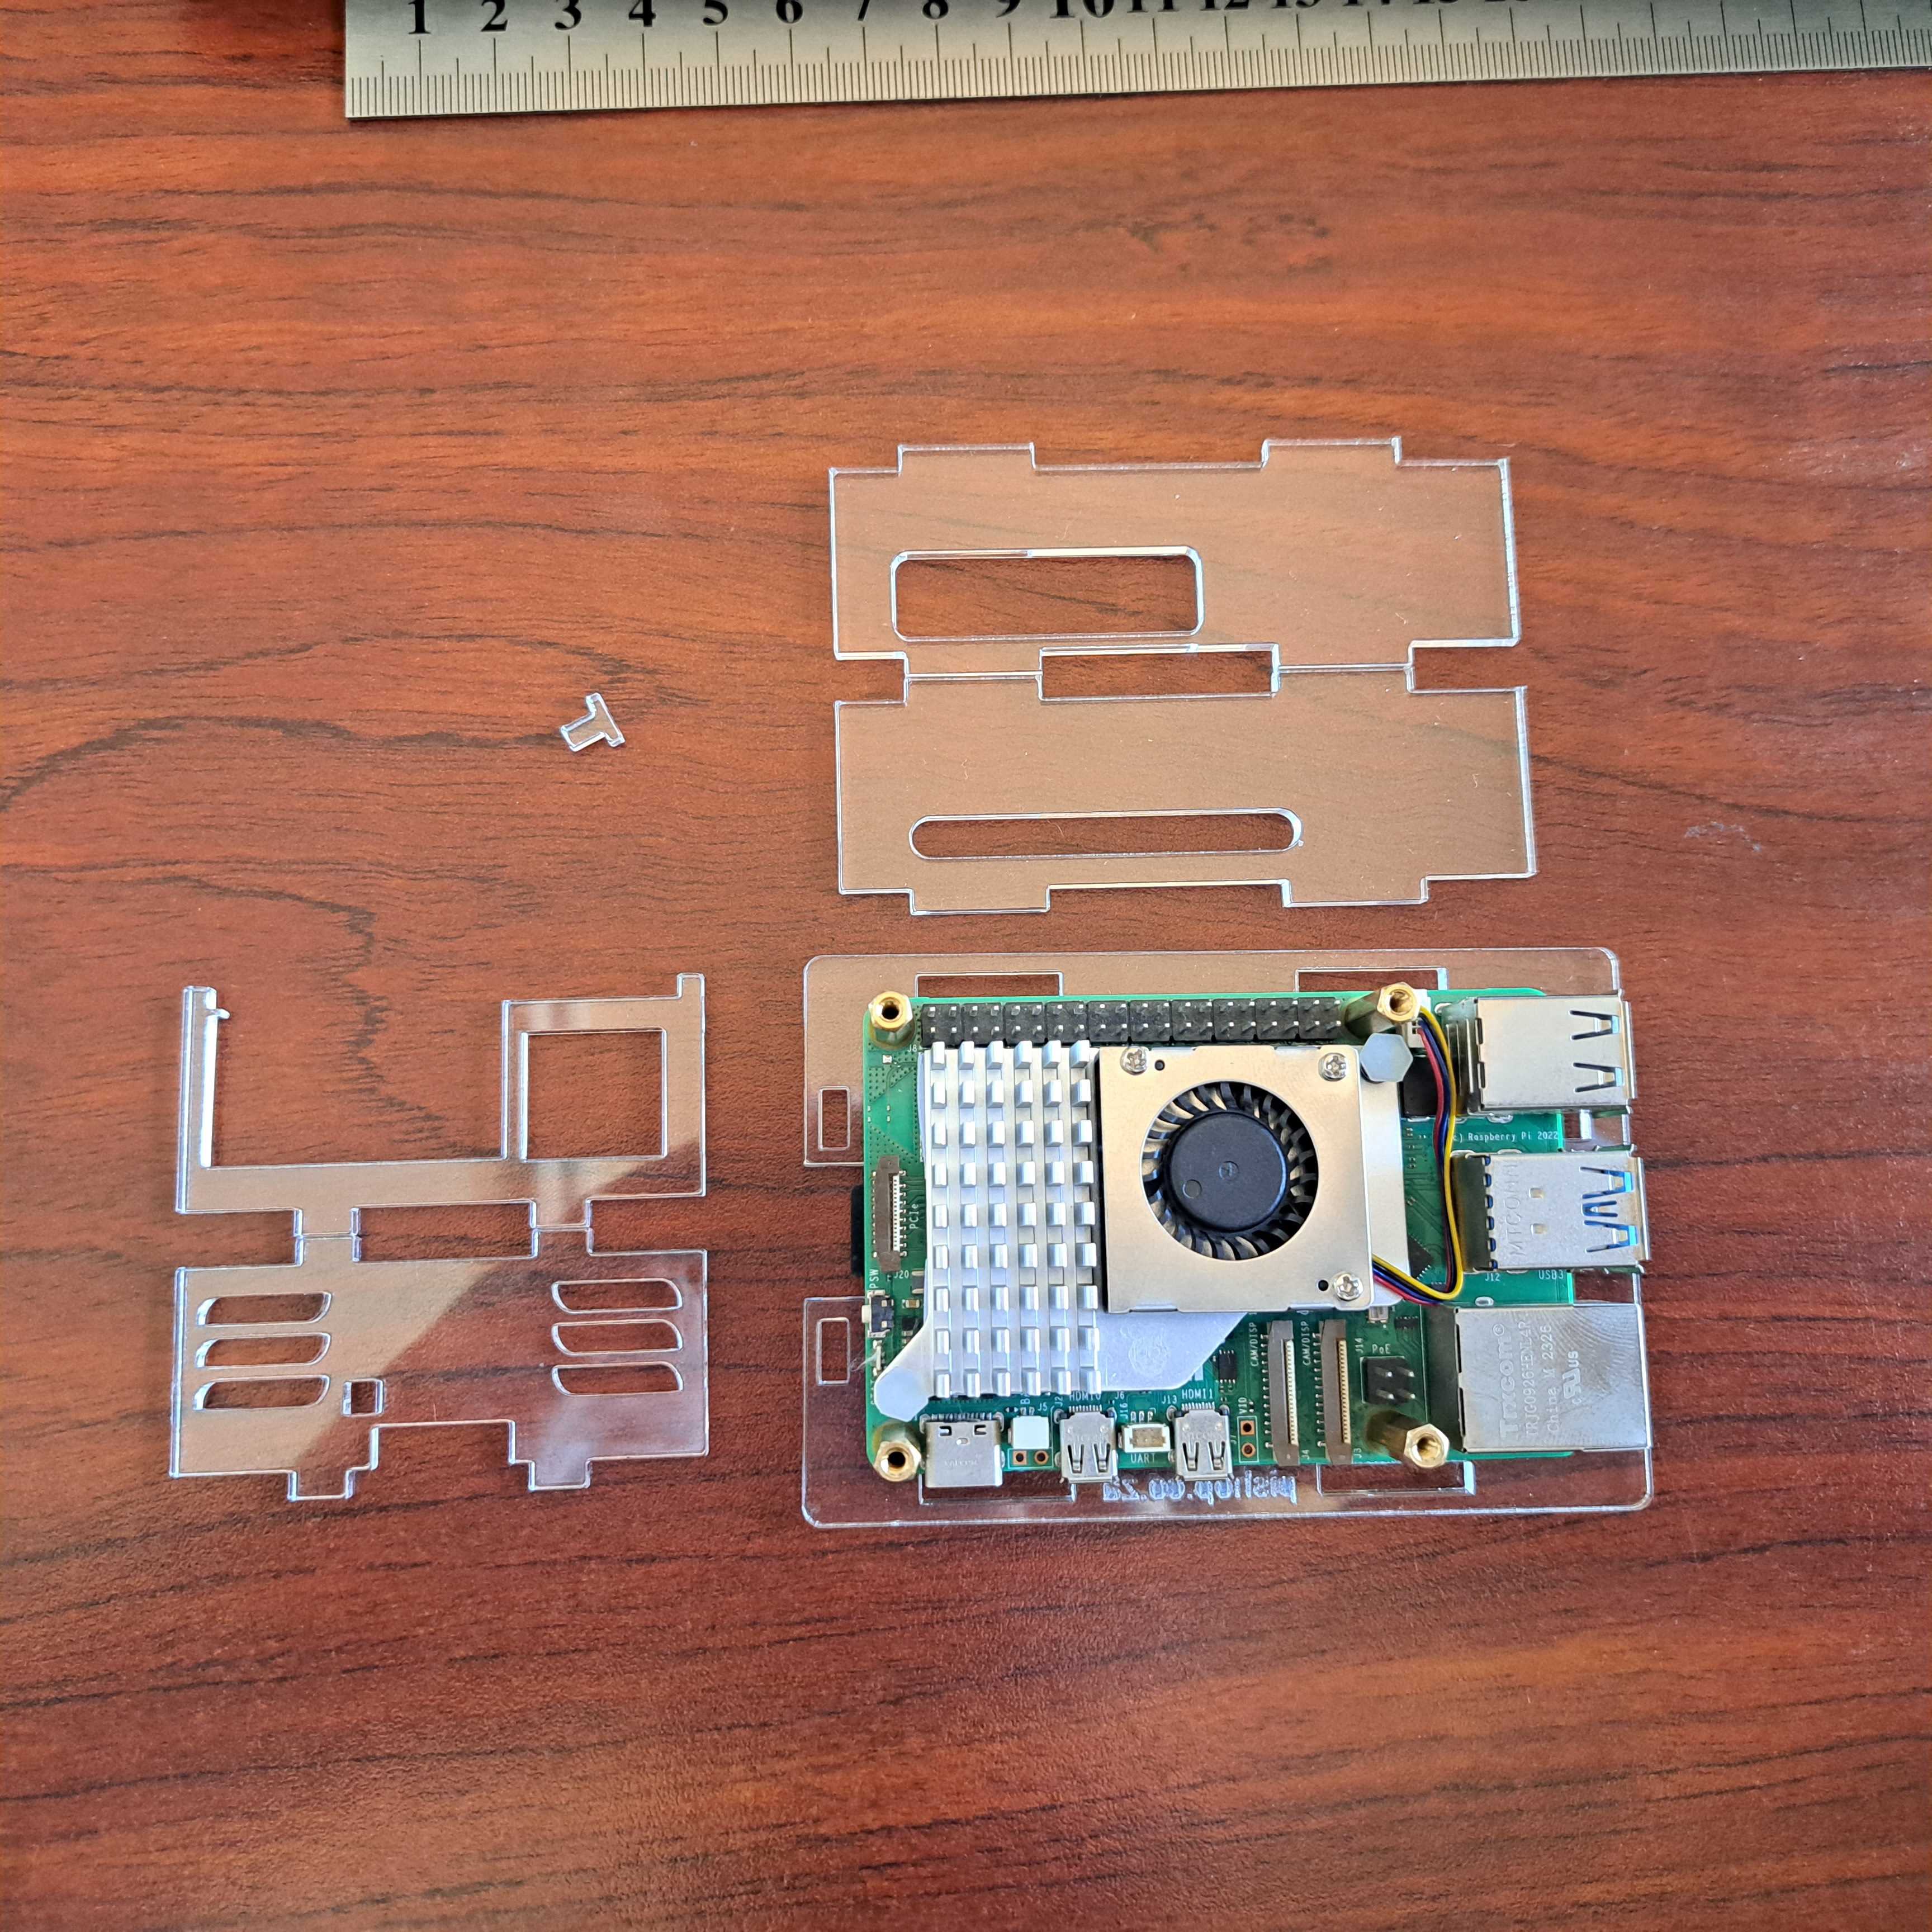
Don't forget to install the little power button first.
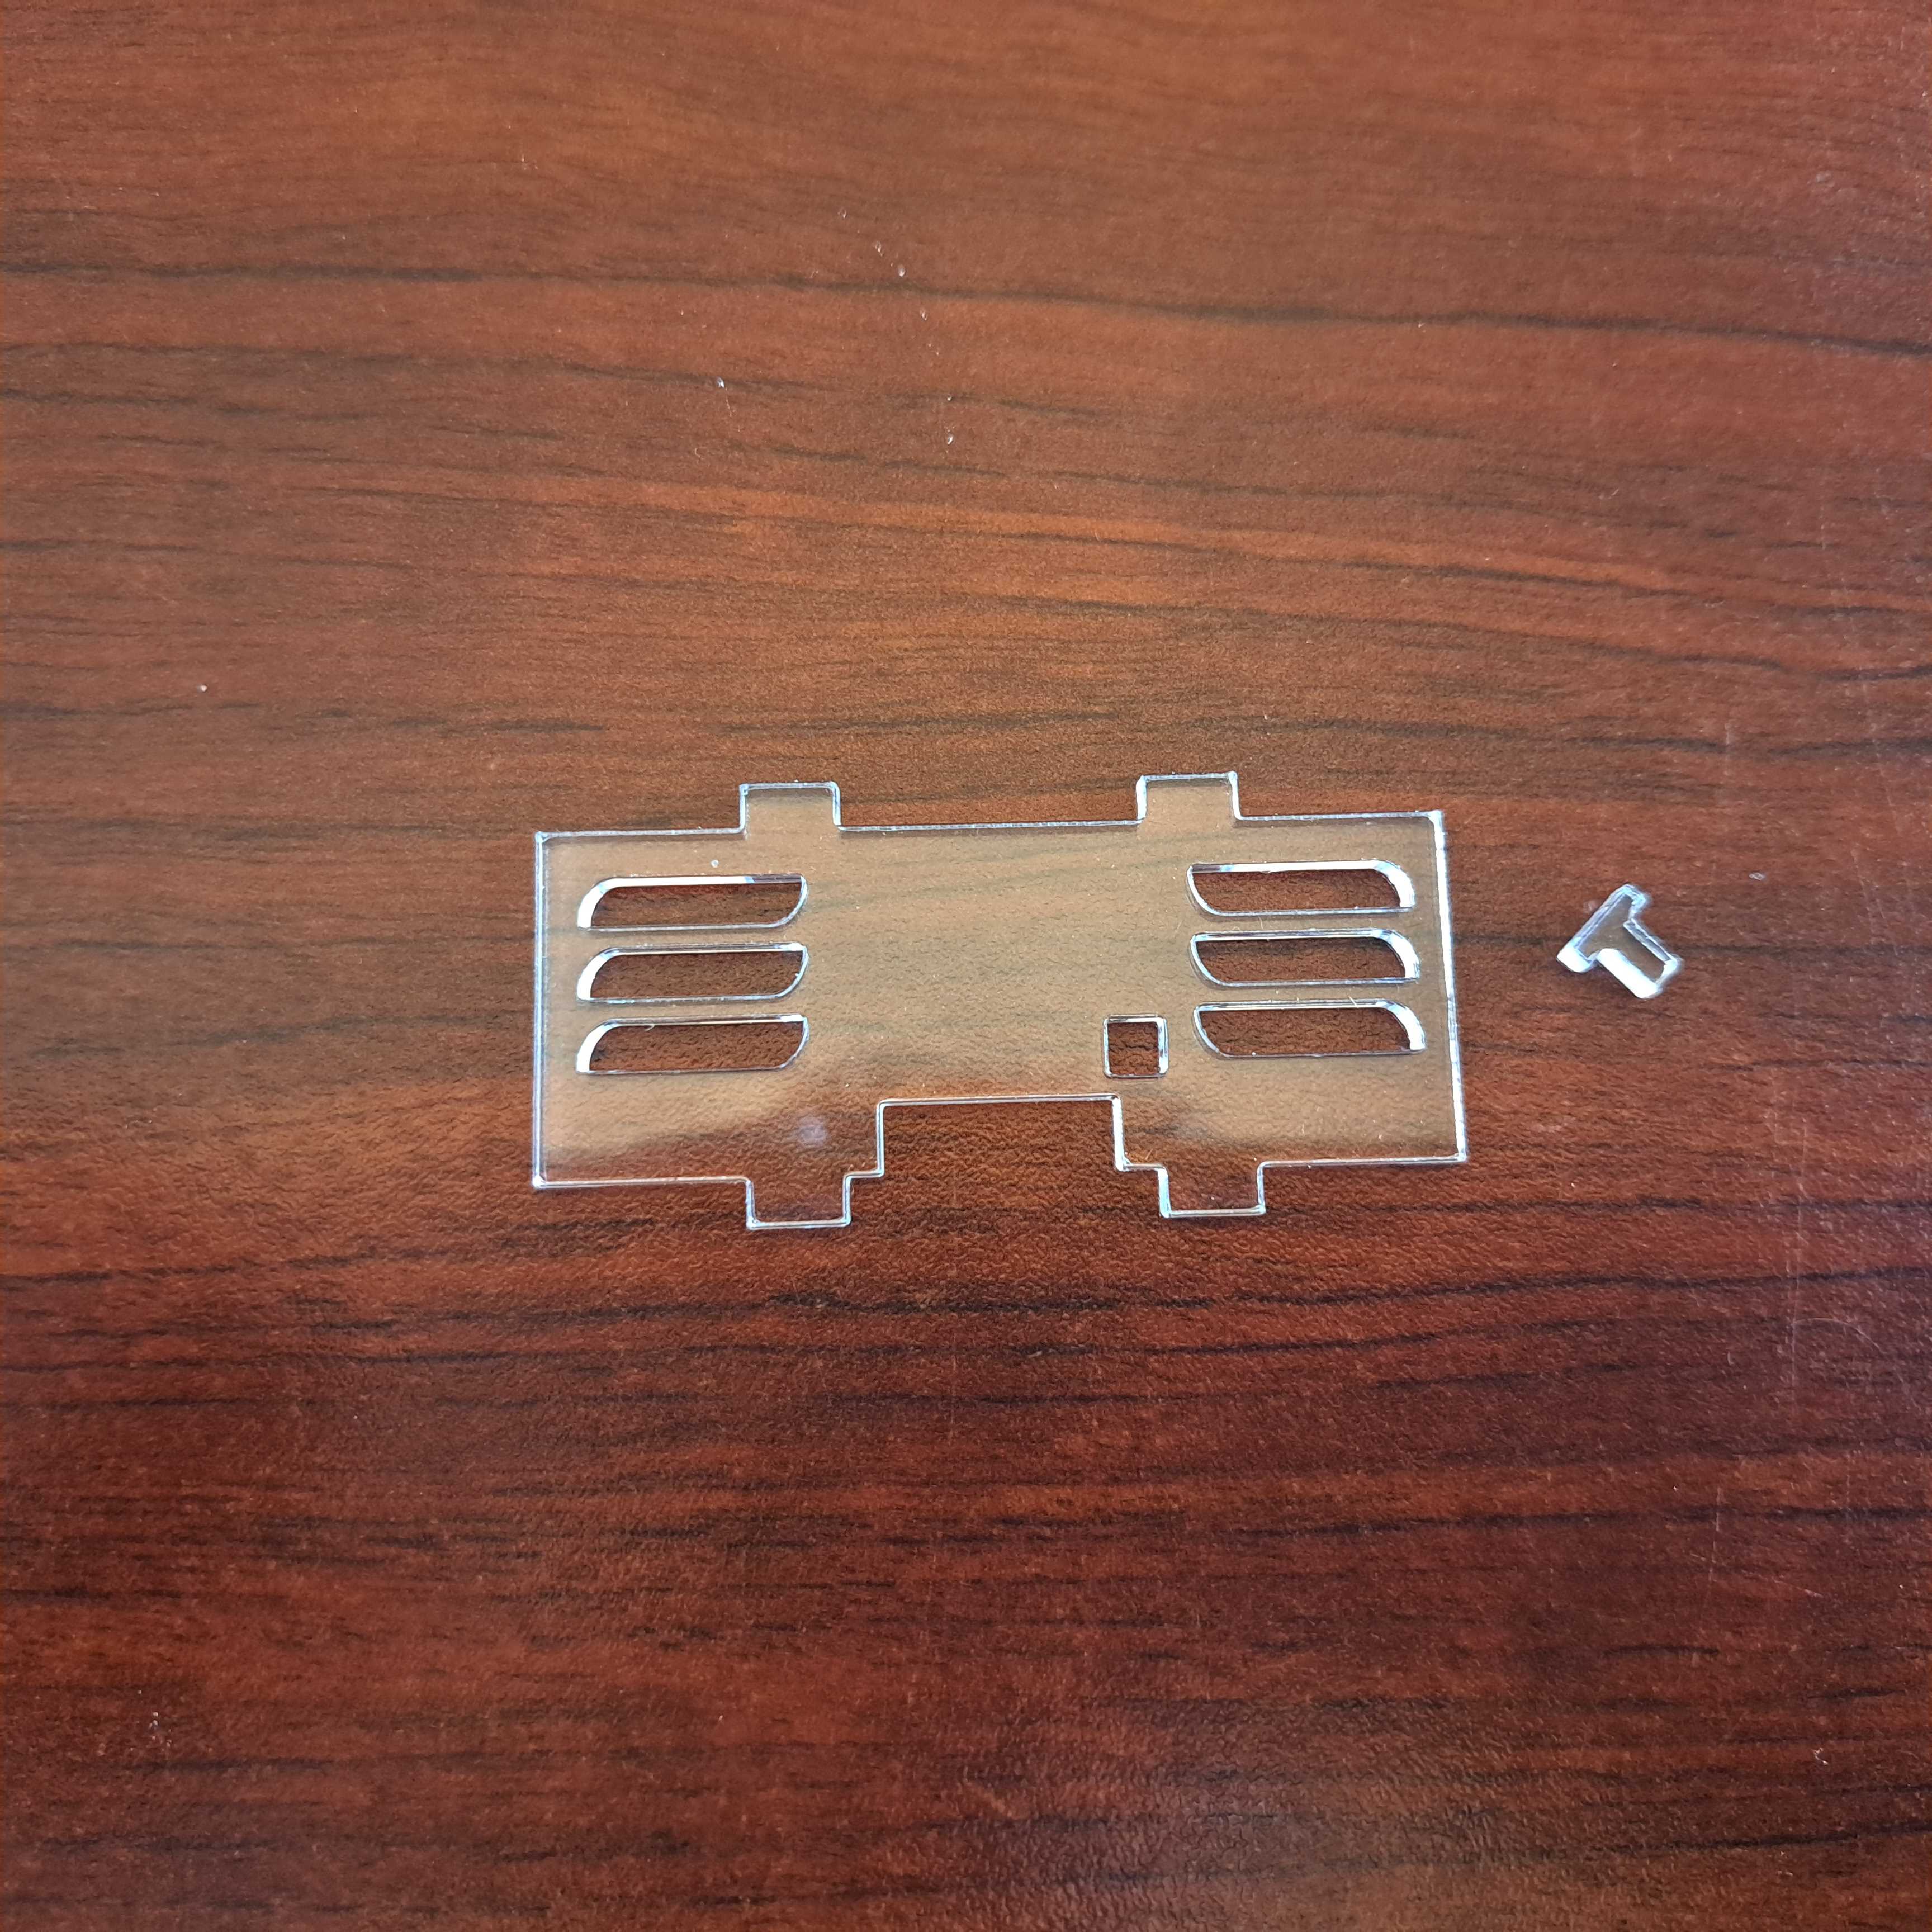
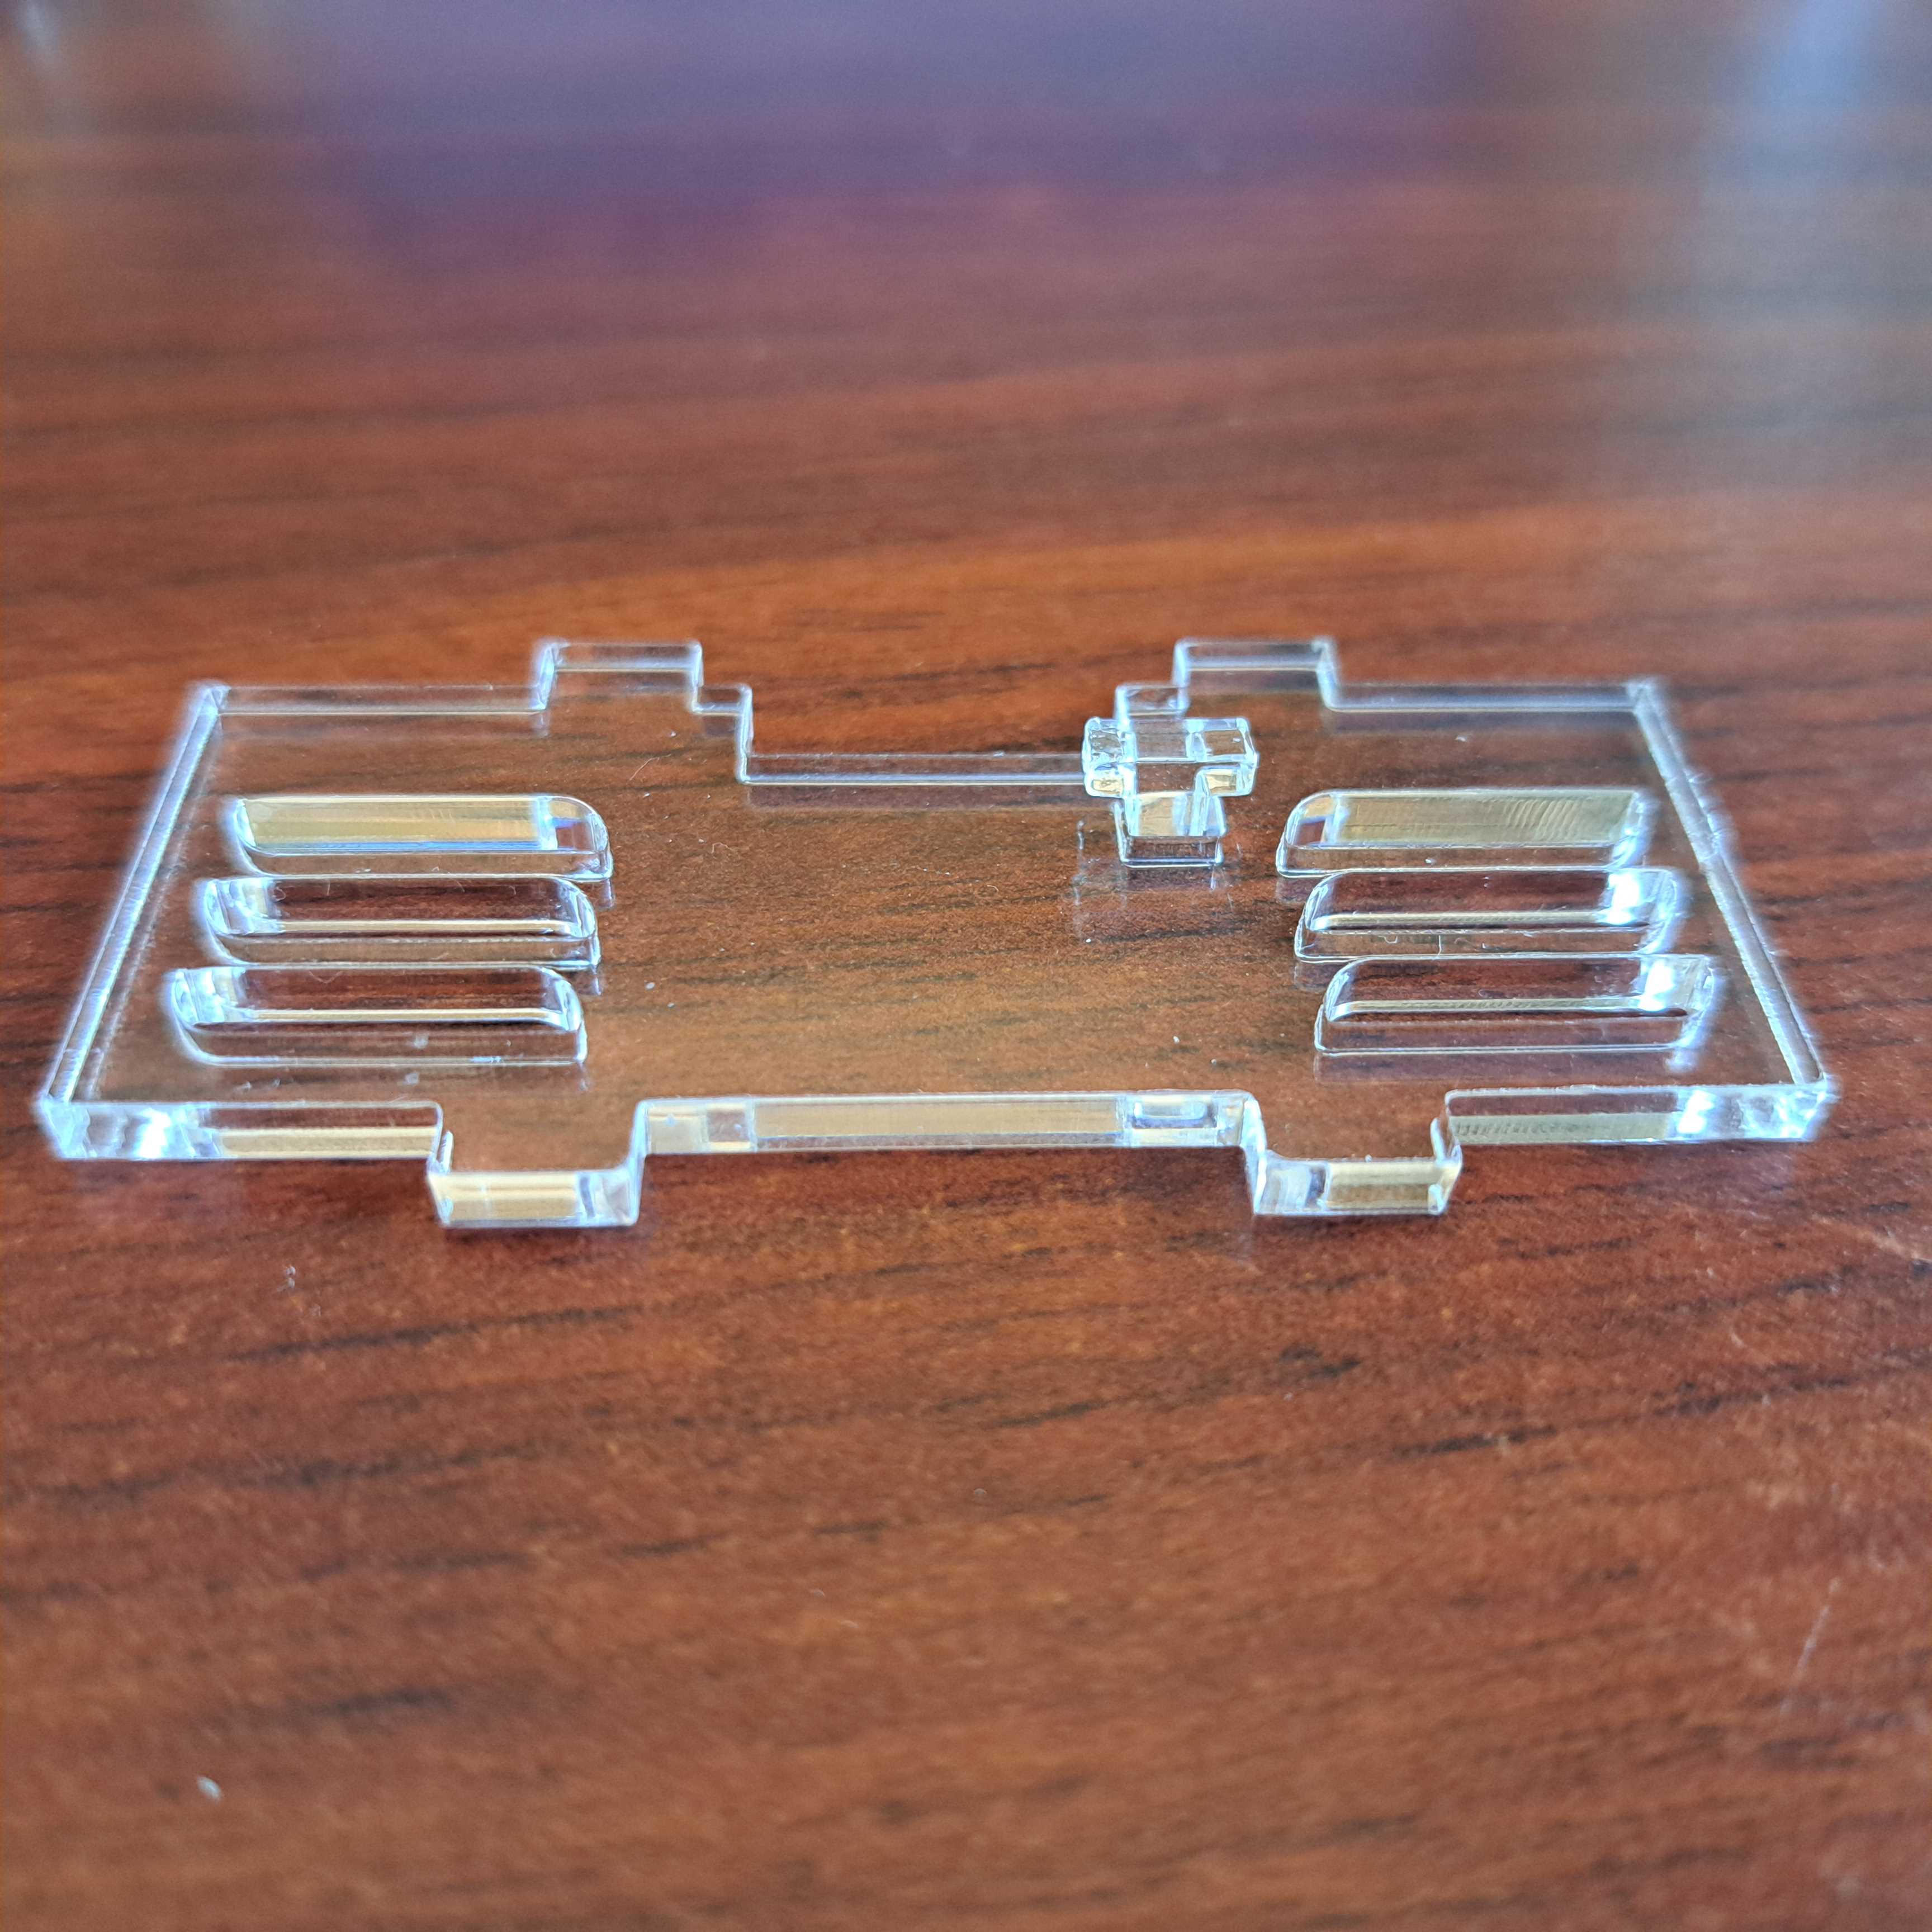
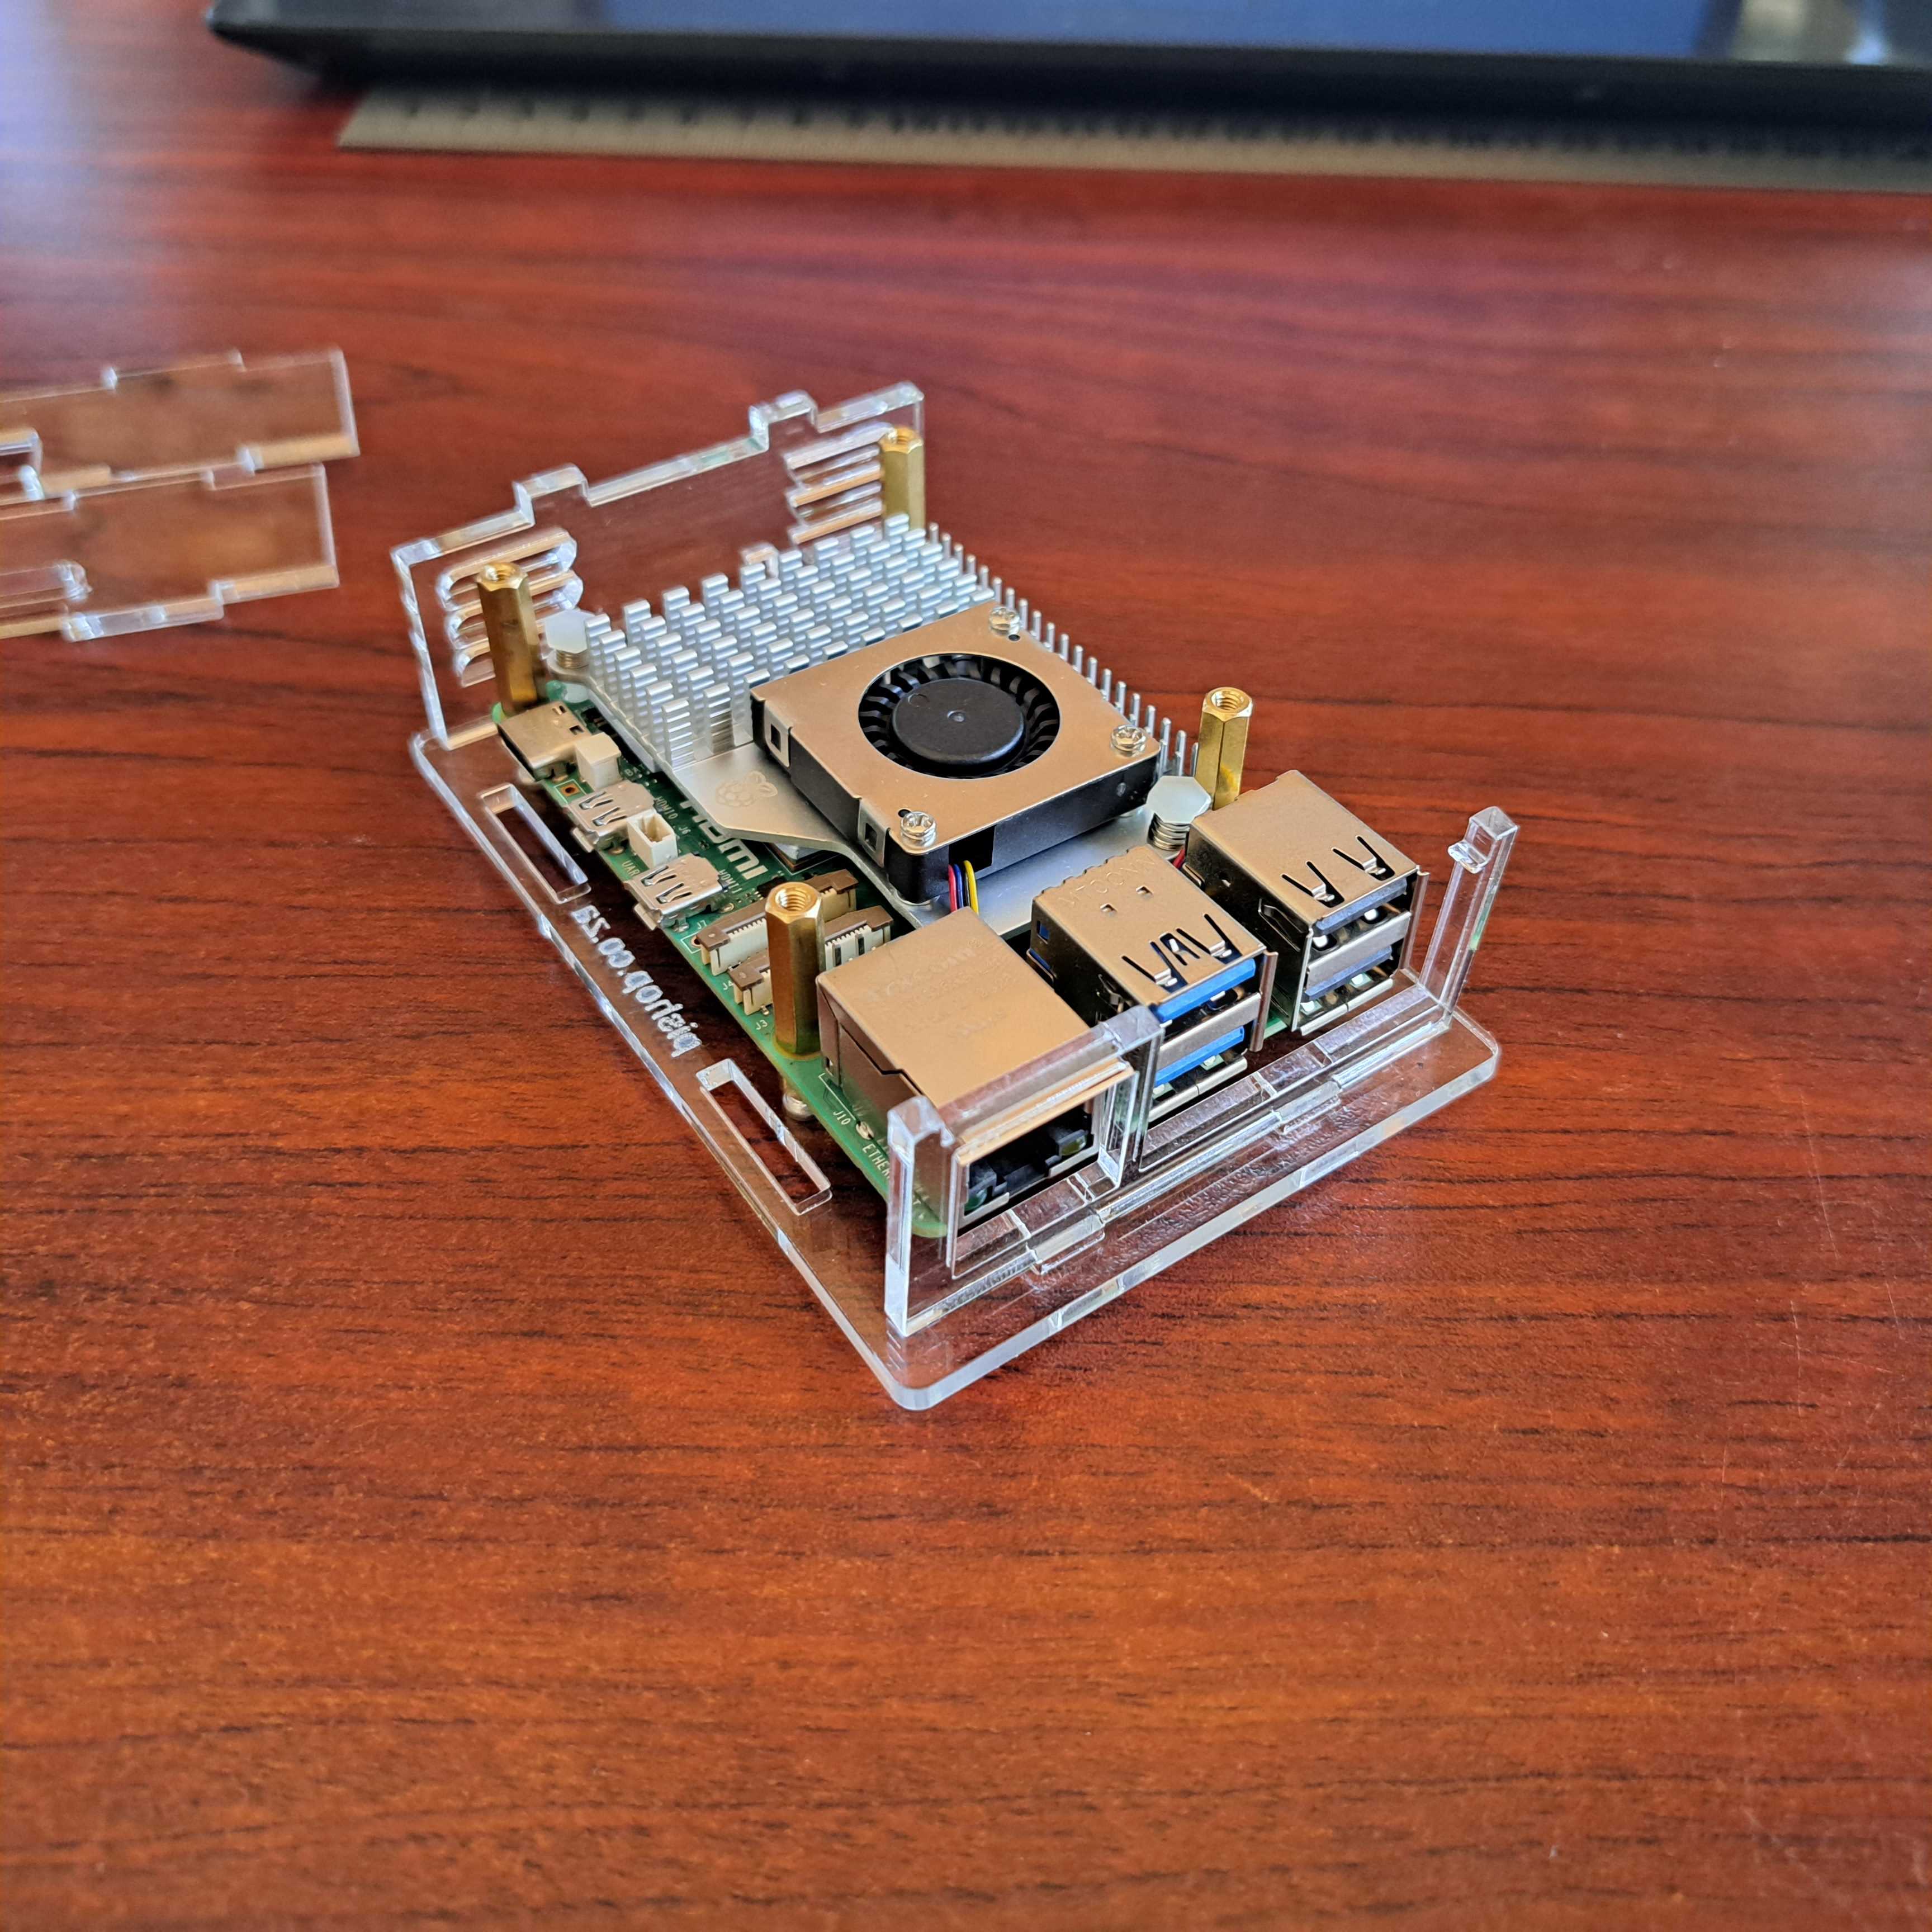
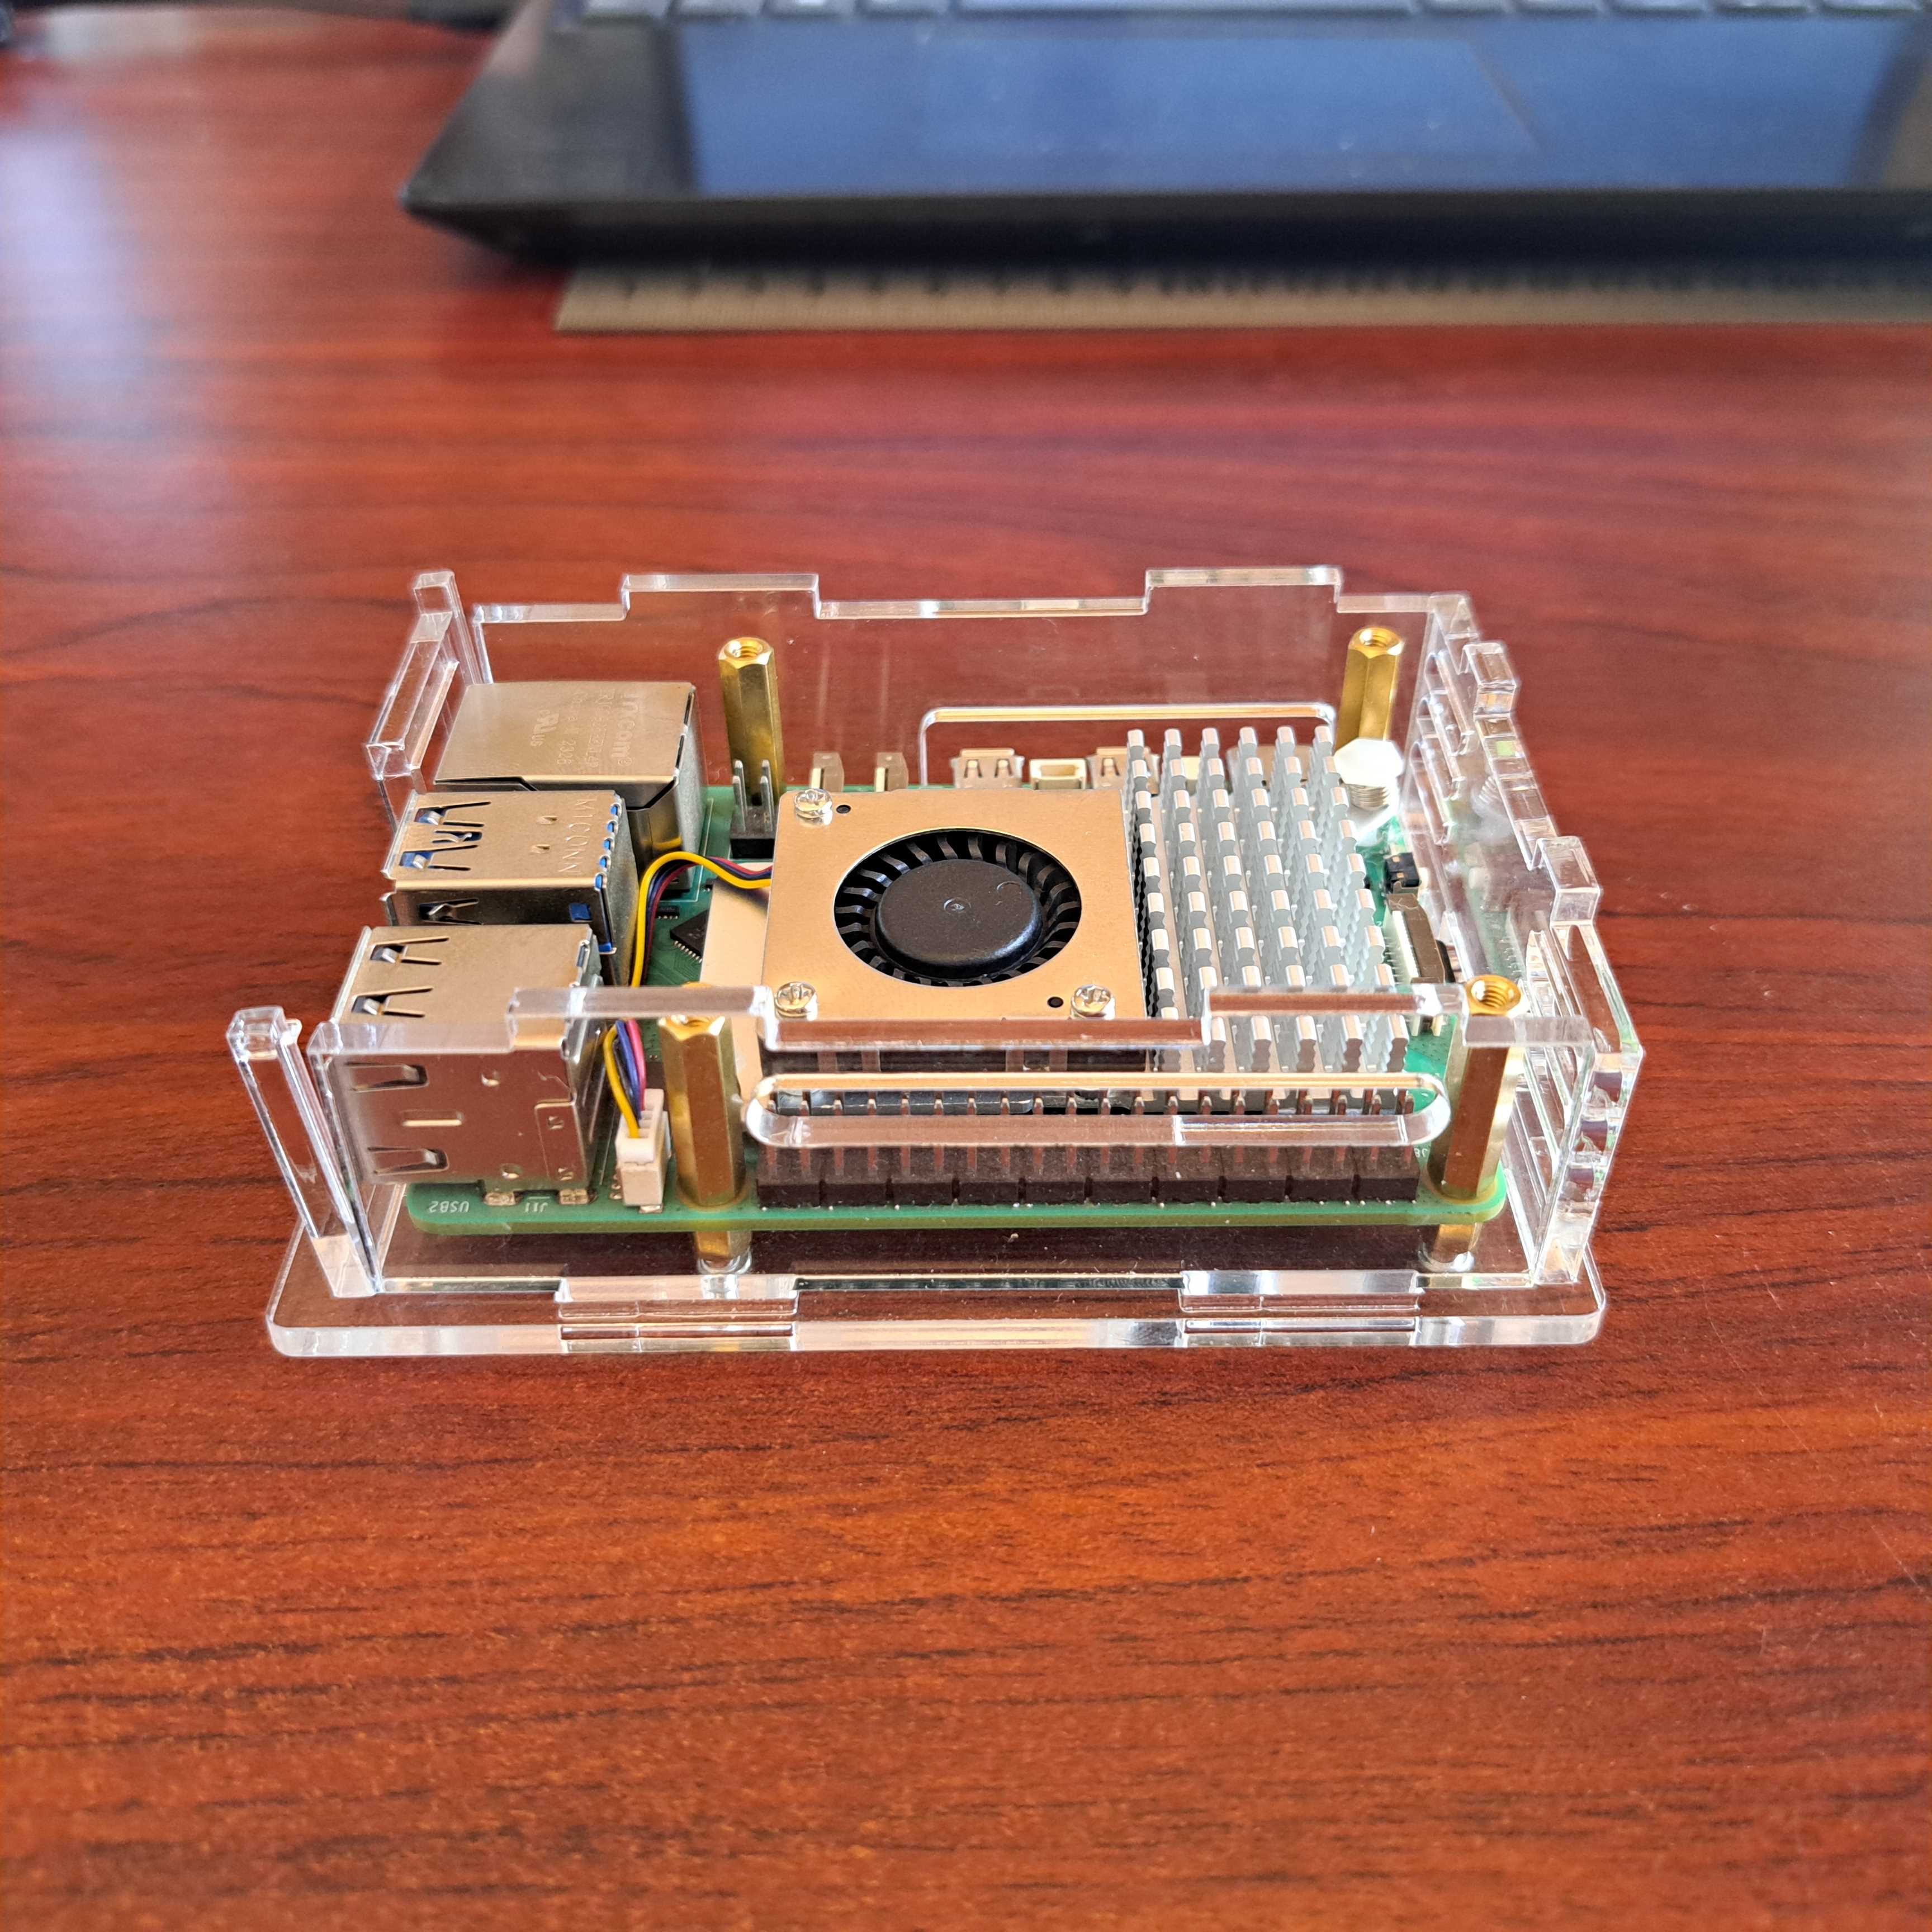
5. Install the top plate. This is where all the bits come together. You might experience a bit of difficulty aligning all the plates. A bit of pressure on the top plate helps to get all to pop into place.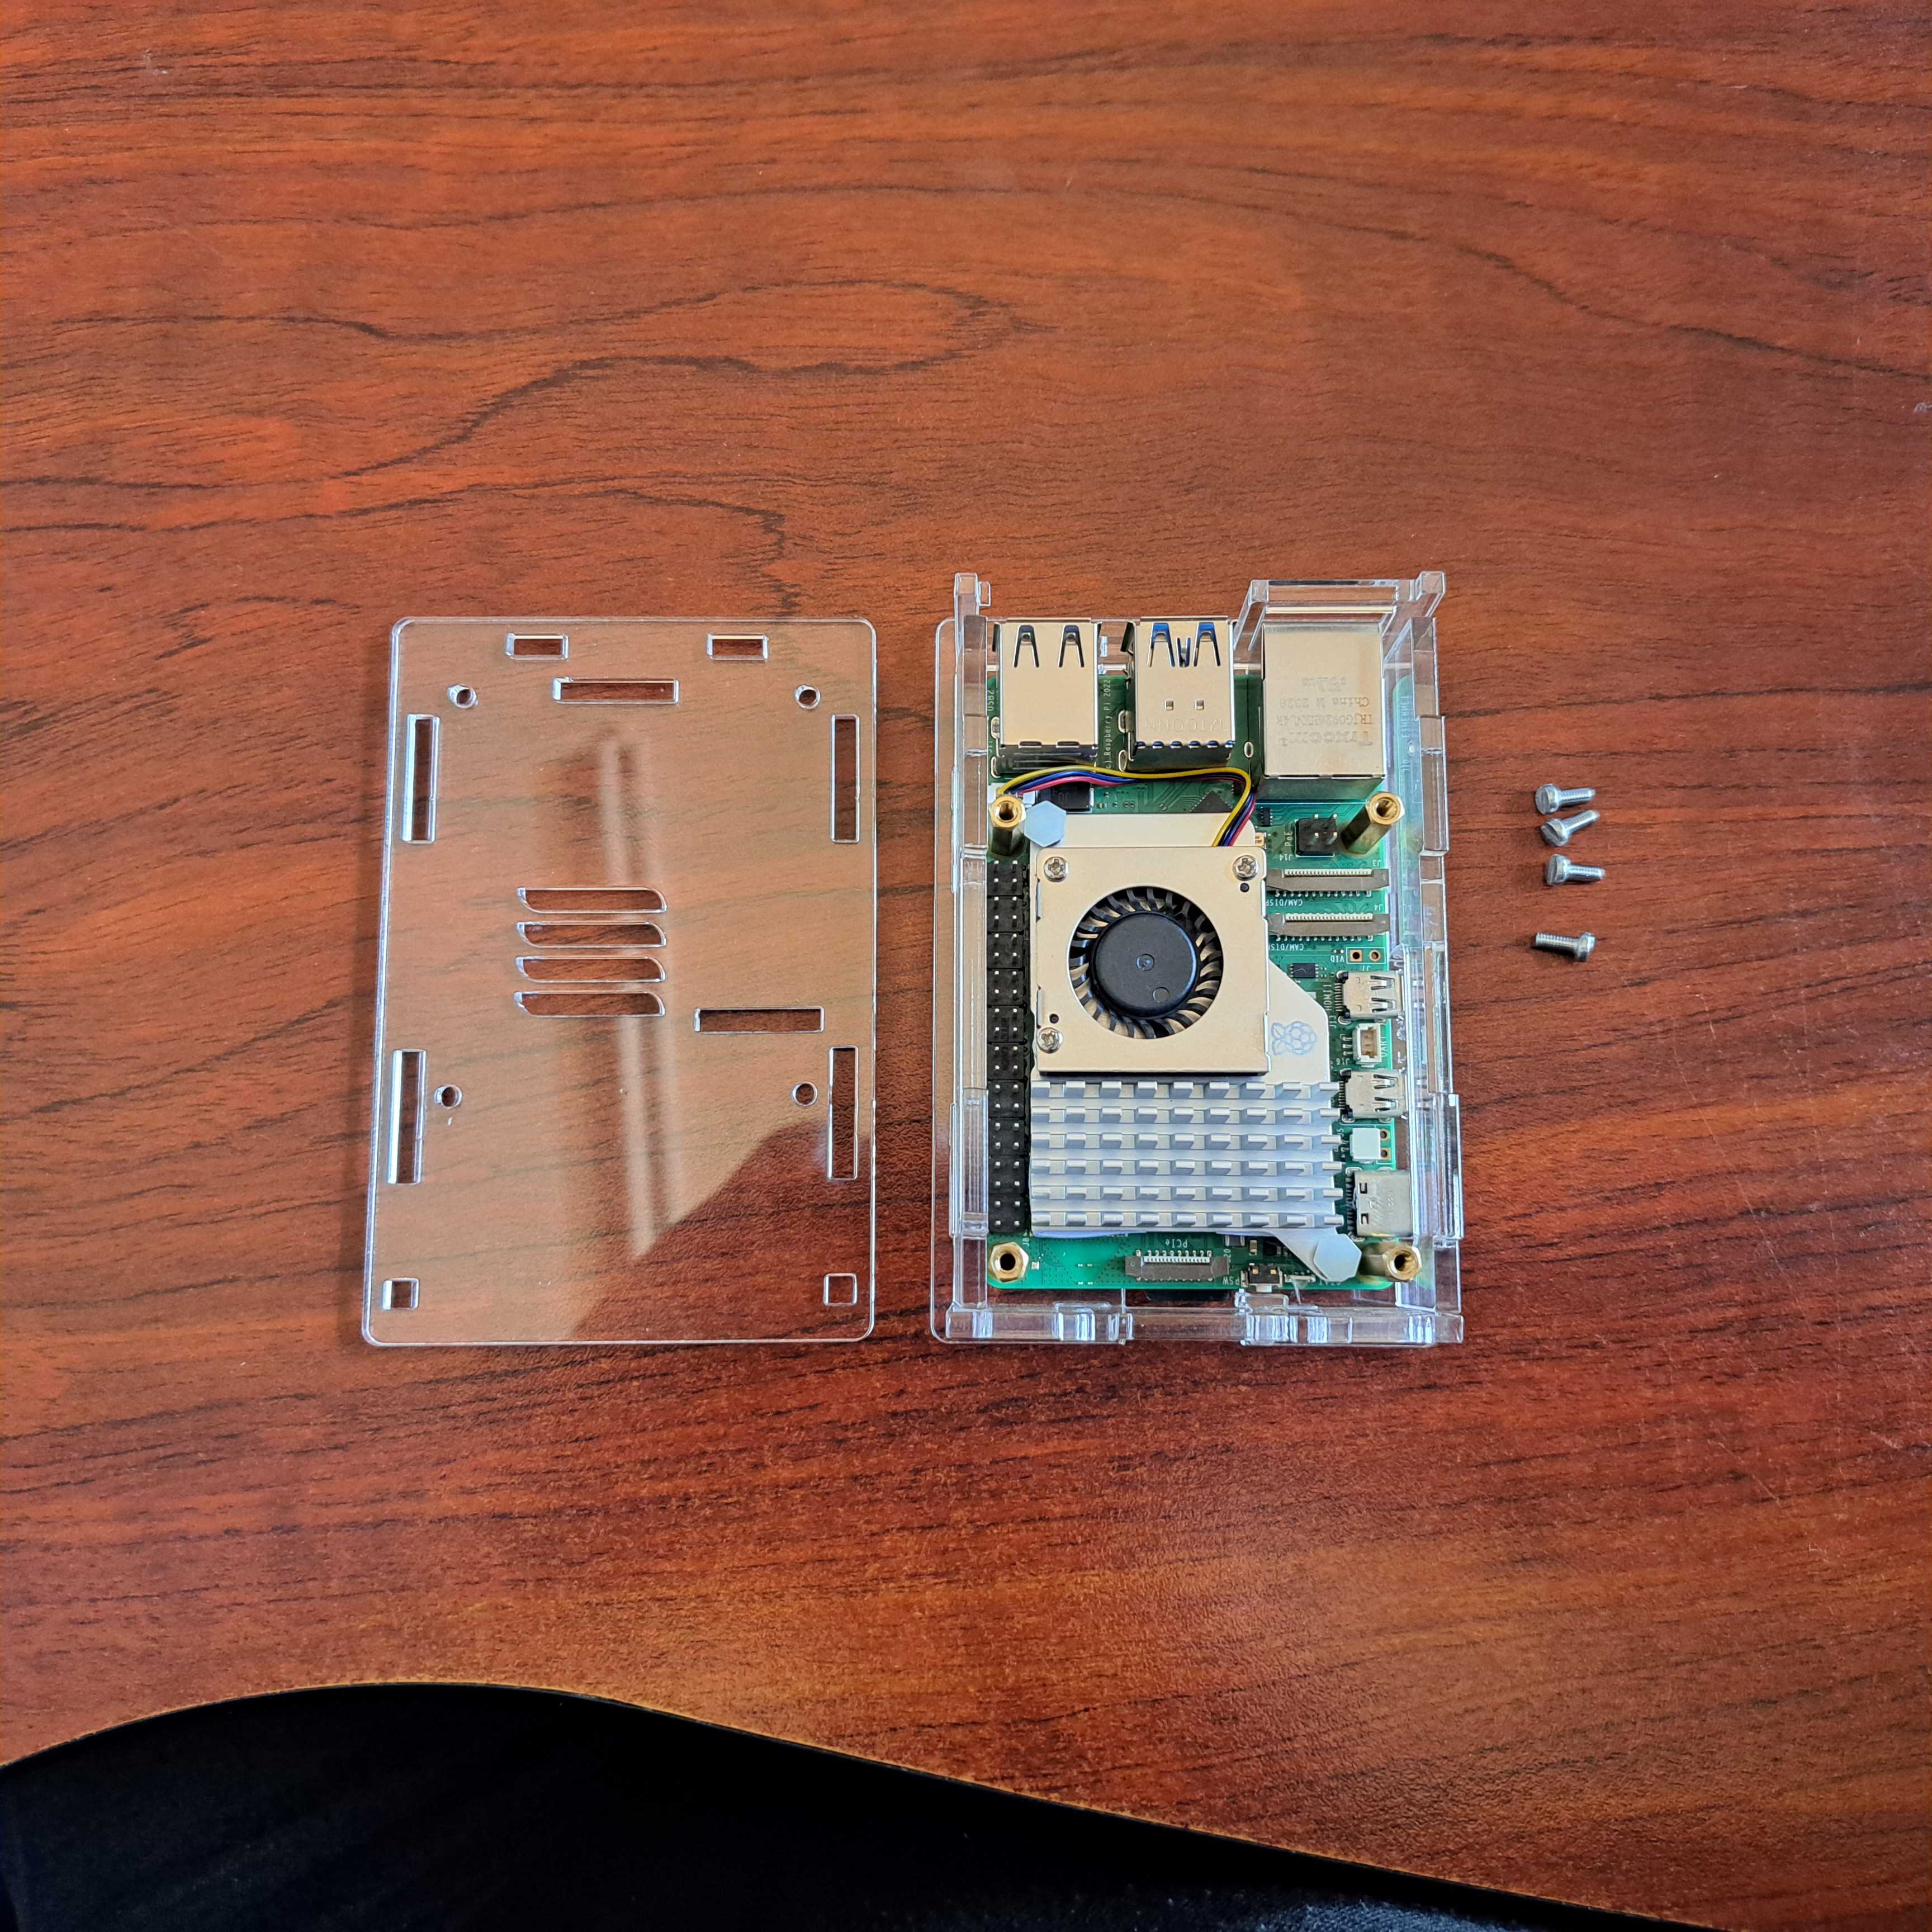
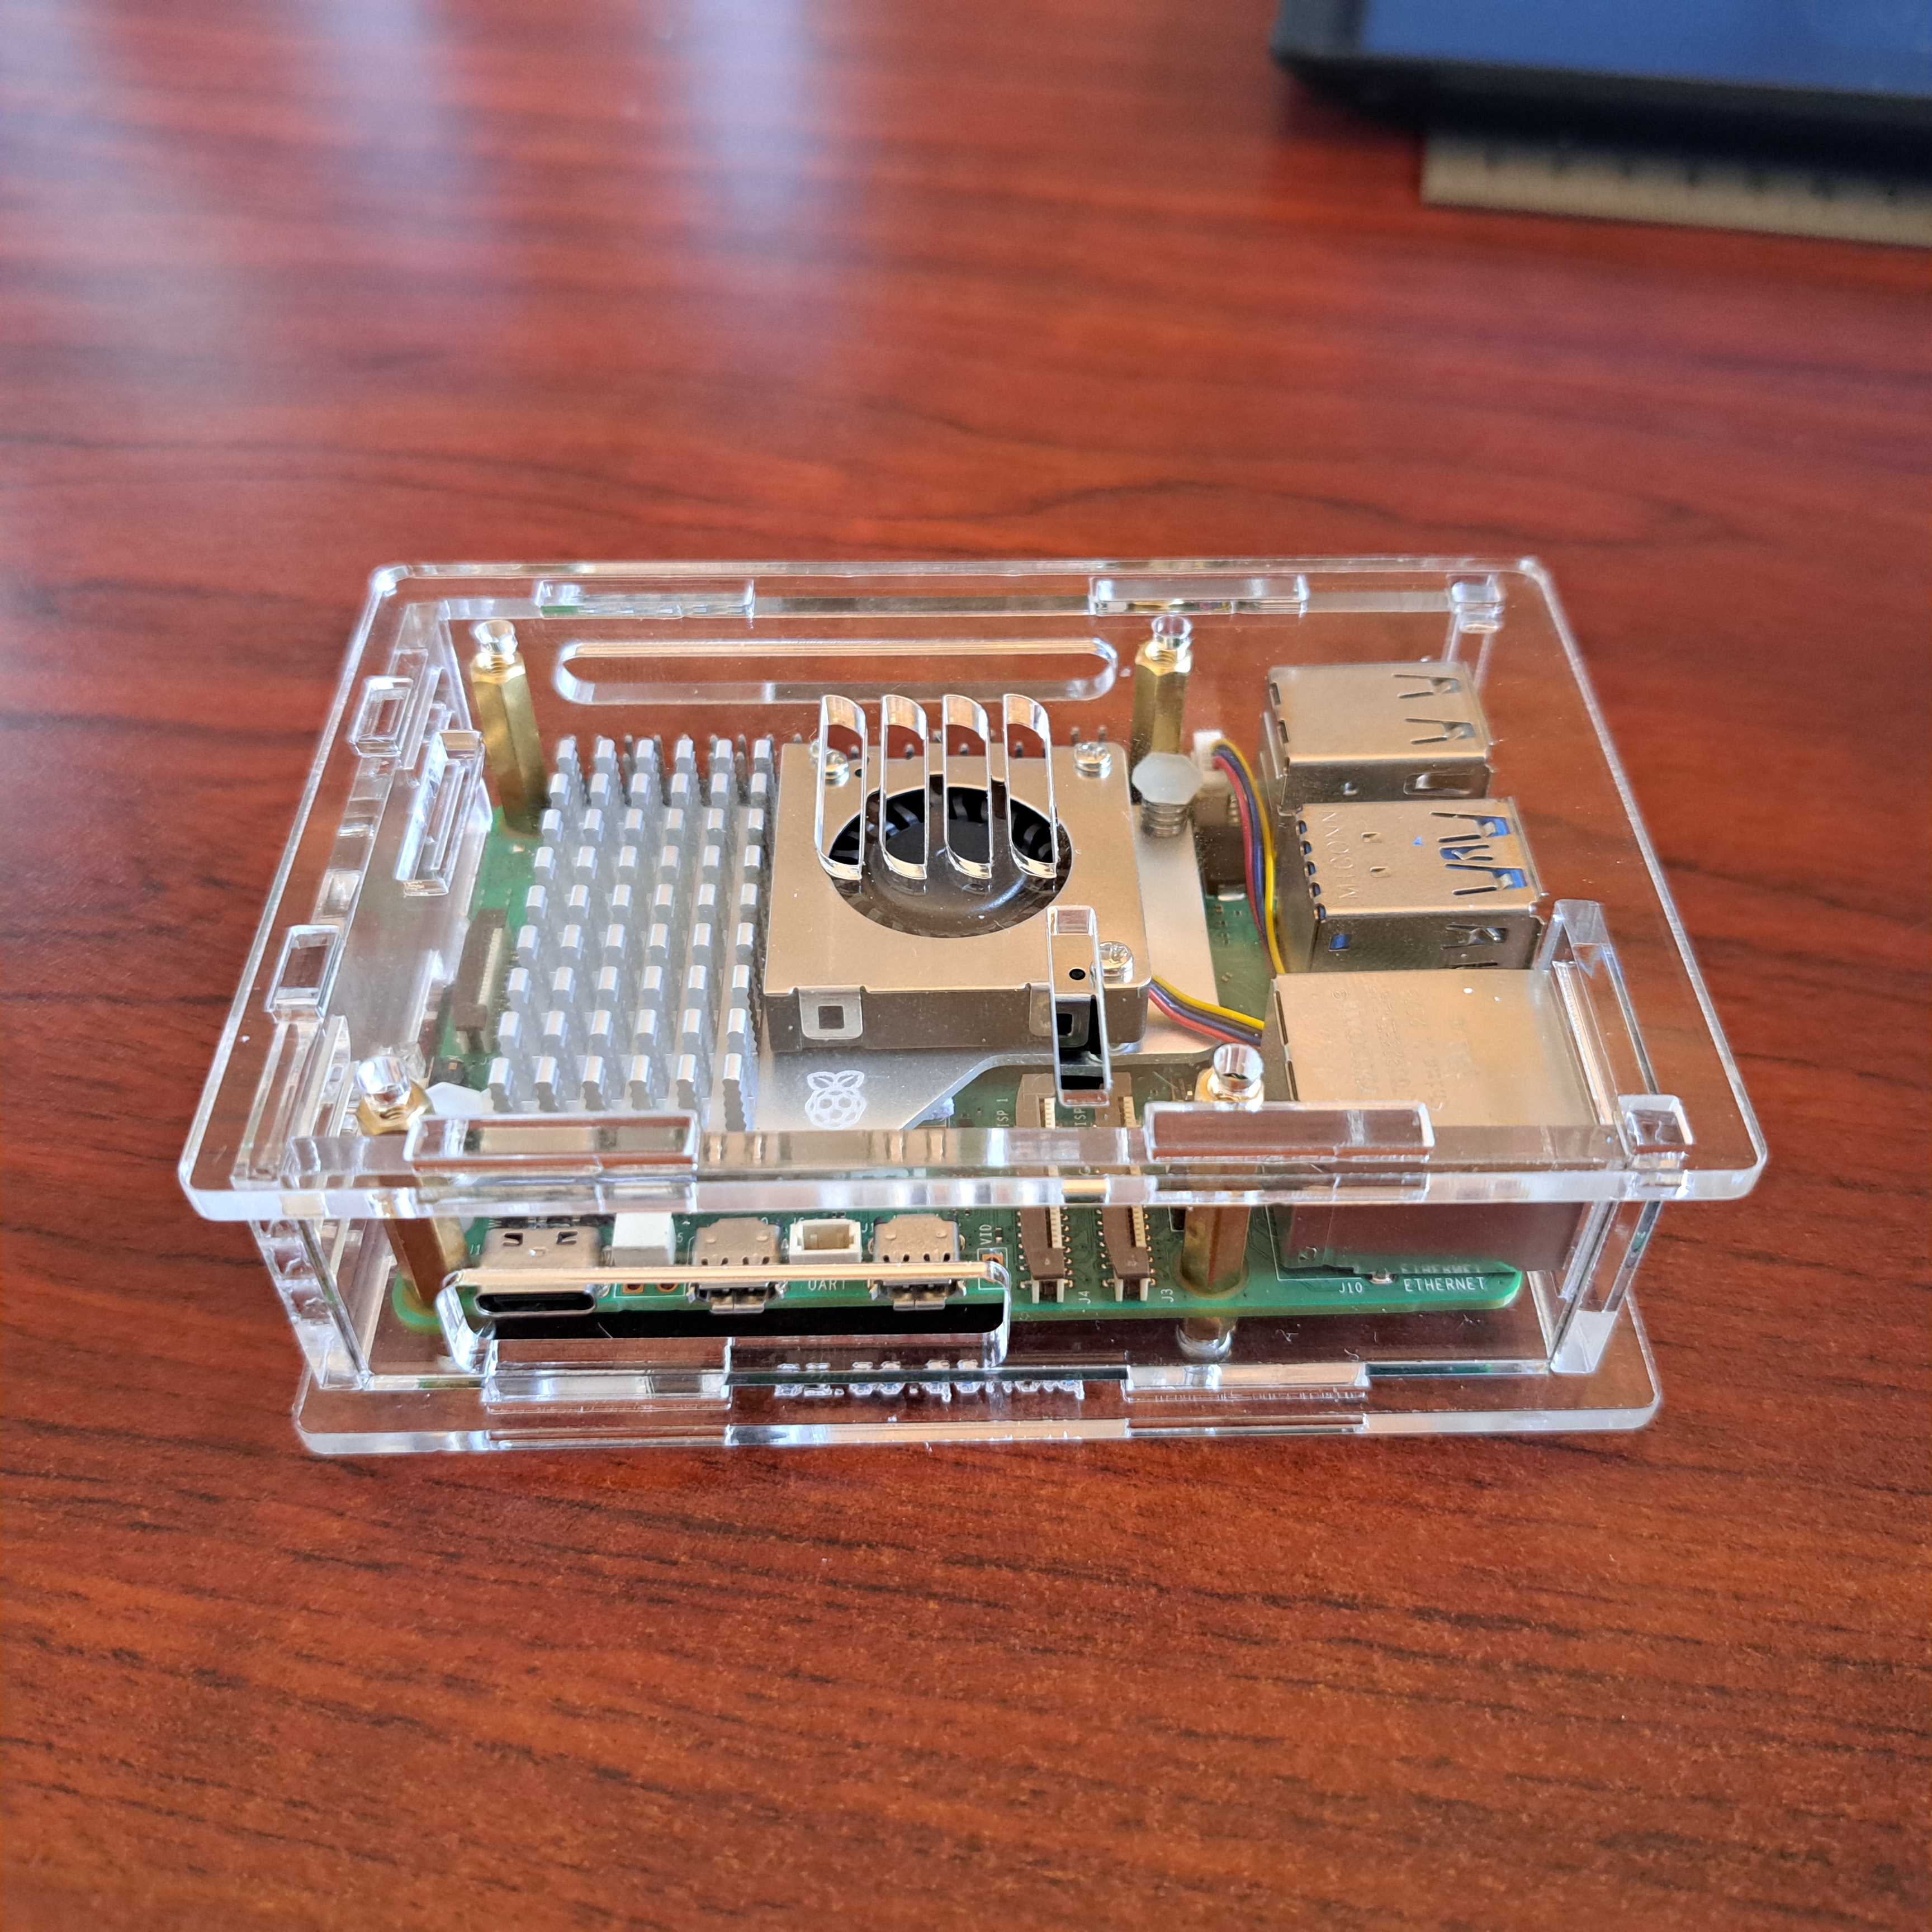
6. Insert the top 4 screws that holds it all together. You don't have to use force to tighten them.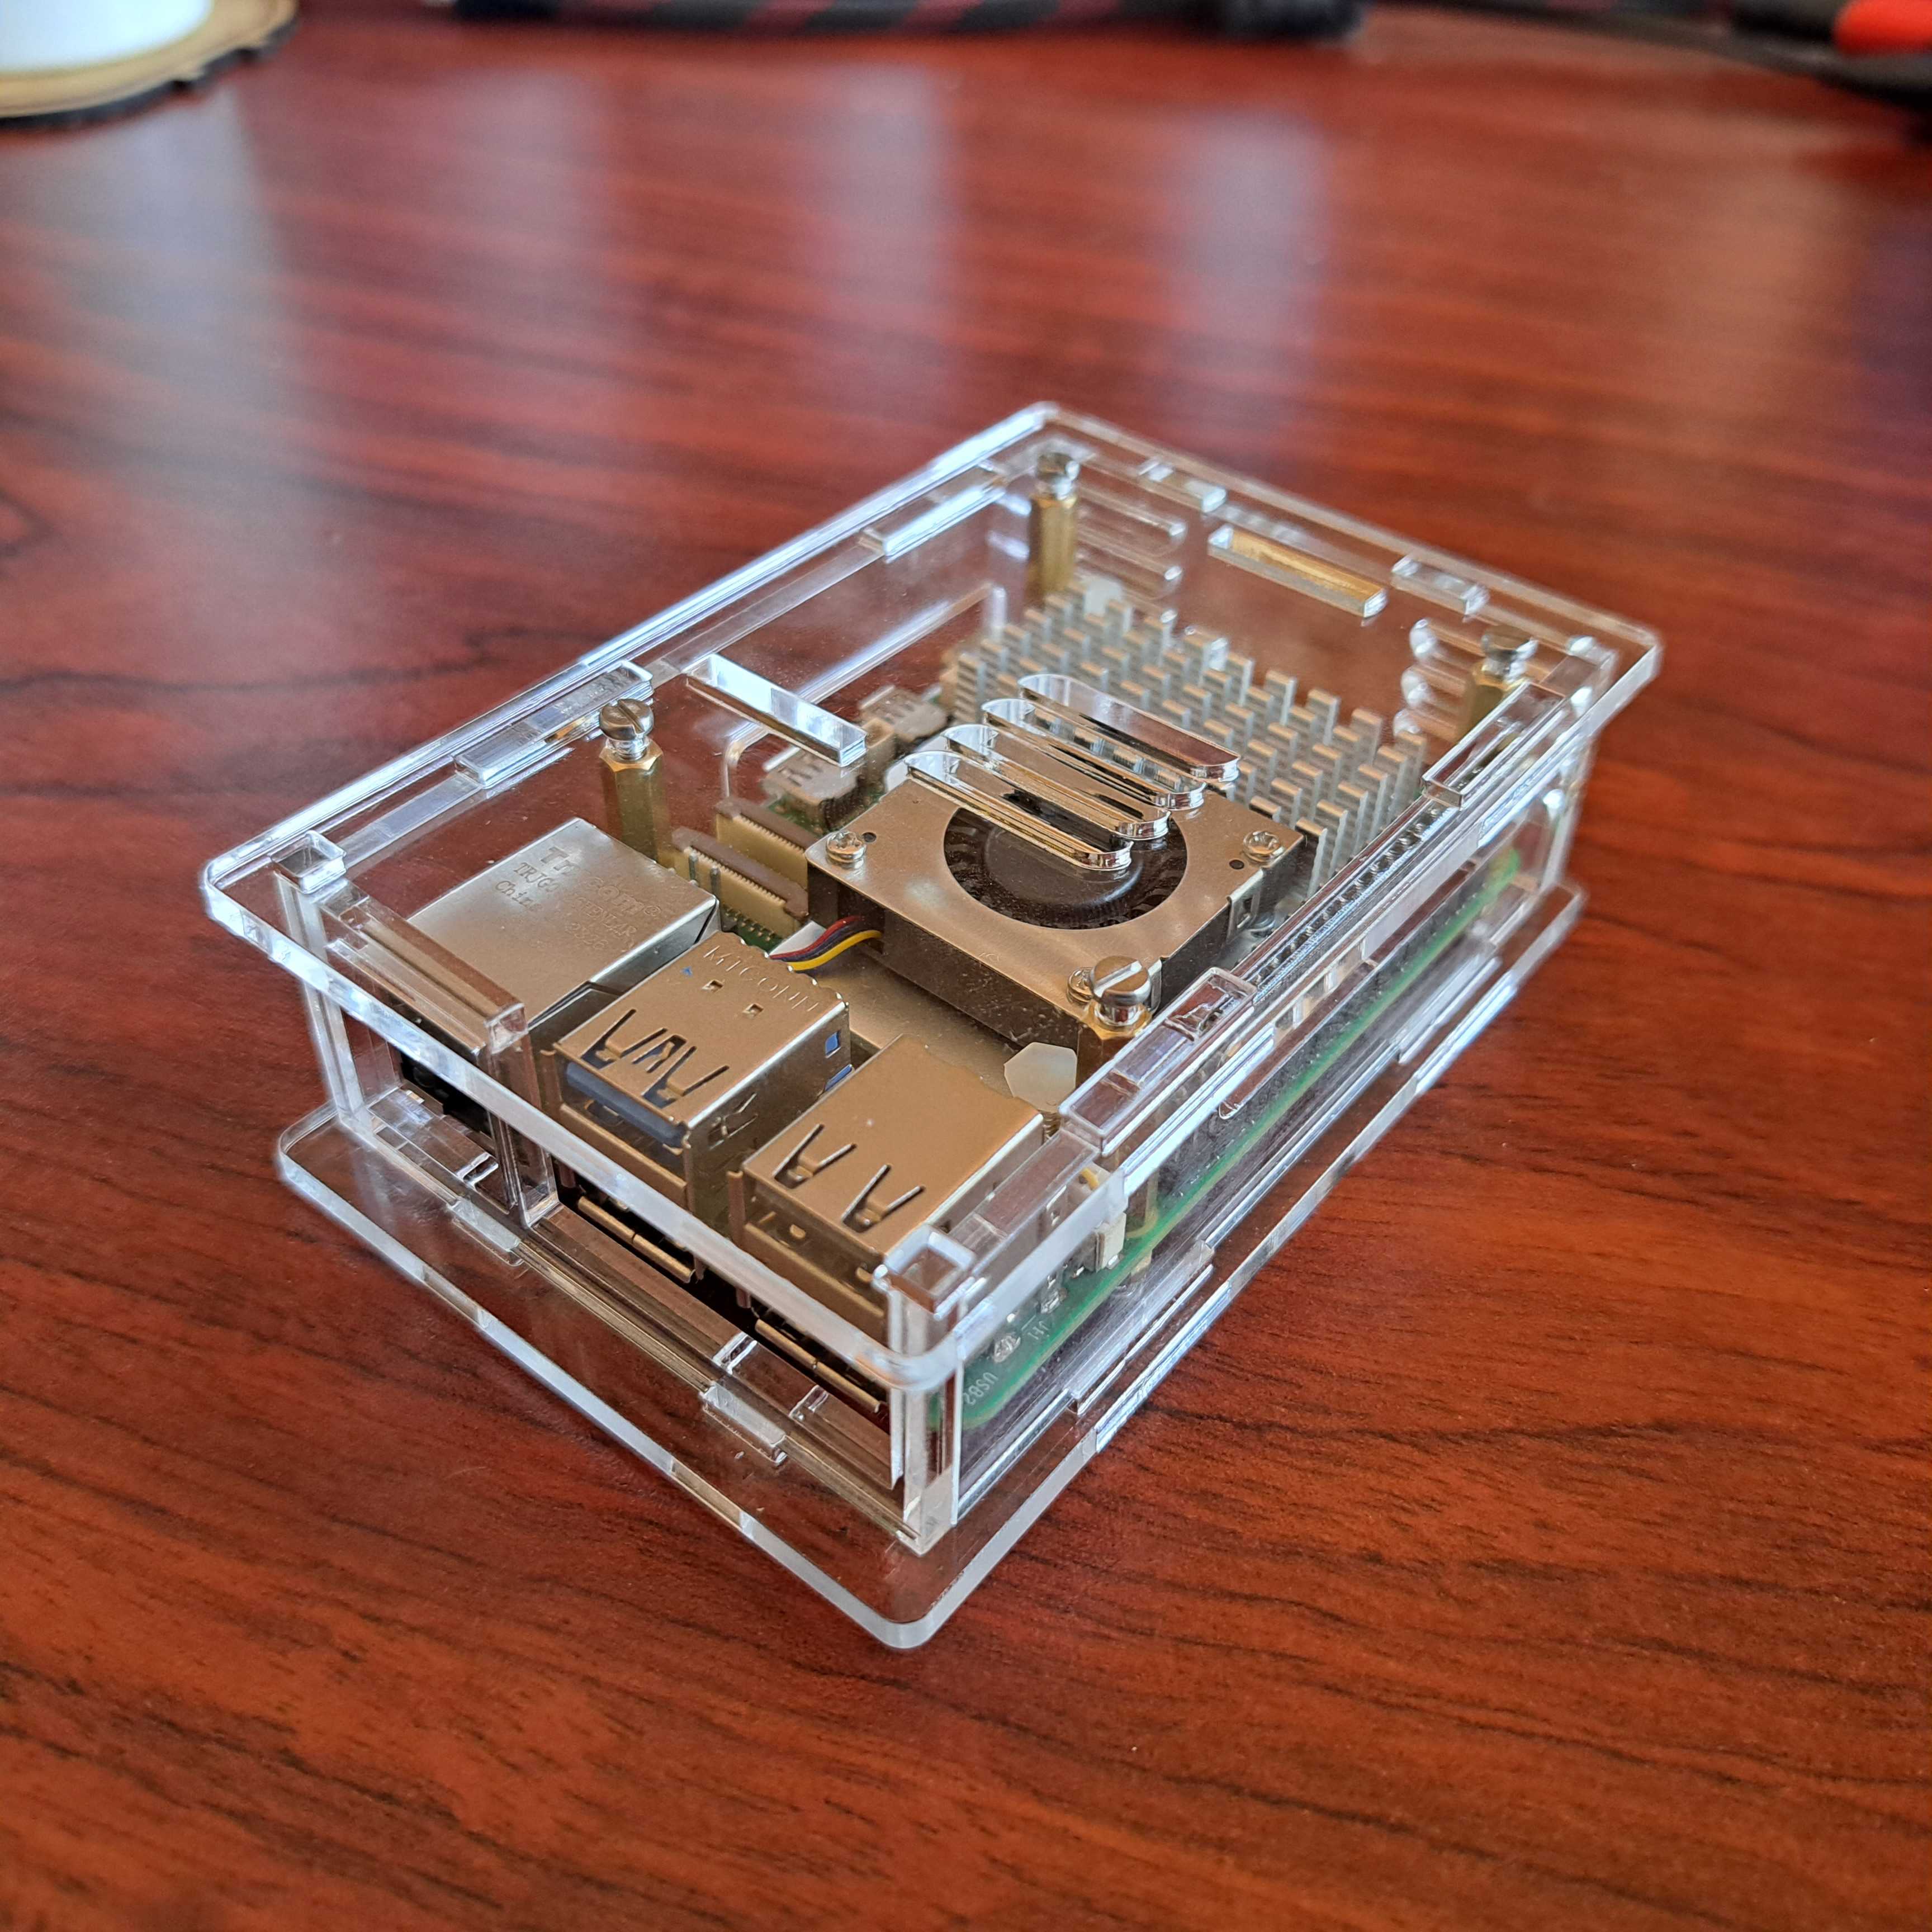

PETG is short for polyethylene terephthalate glycol-modified
PETG is the perfect filament to combine strength and ductility, which is why it's used in so many mechanical parts and robotics. It has great chemical resistance with good water, acidic and alkalic resistance. PETG in its raw form is also FDA and EU commission regulation approved as Food Contact Safe.
Print temp : 235 – 255°C
Heated Bed : 65 – 85°C
Fan speed / Cooling: 0 - 50%
Speed range : 30 - 60mm/s optimal
Printability : Moderate
Net Weight: 1kg
What's in the box ?
1 x SA Filament PETG Blue (1.75mm)

PETG is short for polyethylene terephthalate glycol-modified
PETG is the perfect filament to combine strength and ductility, which is why it's used in so many mechanical parts and robotics. It has great chemical resistance with good water, acidic and alkalic resistance. PETG in its raw form is also FDA and EU commission regulation approved as Food Contact Safe.
Print temp : 235 – 255°C
Heated Bed : 65 – 85°C
Fan speed / Cooling: 0 - 50%
Speed range : 30 - 60mm/s optimal
Printability : Moderate
Net Weight: 1kg
What's in the box ?
1 x SA Filament PETG Transparent (1.75mm)

Features
- Enhanced Heat Dispersion: Utilizing an 8mm large-aperture honeycomb pattern for swift heat dispersion and smoke removal, safeguarding against fire and preventing yellowing.
- Expansive Workspace: Accommodates a maximum area of 456*456mm, enabling seamless expression of creativity.
- Dual Desktop Defense: Combining honeycomb platform and aluminum plate for double-layer protection against desktop damage.
- Robust All-Metal Build: Ensures stability and longevity, resistant to deformation for prolonged usage.
What's in the box?
1 x Honeycomb
1 x Aluminium plate

- Waveshare POE board for RPi5
- Waveshare M.2 HAT+
- Raspberry Pi M.2 HAT+
- Raspberry Pi M.2 HAT+ AI Kit
- we are testing some more HATs....
This DIY case requires assembly. You will need a small precision flathead screwdriver.
Clear 3mm Acrylic Panels to protect your Raspberry Pi 5.
- PCIe
- DSI/CSI Interfaces
- Wall mounting holes
- Airflow Vents On The Top And Front
- With Power On/Off Button
- Easy To Pull & Plug TF Card On The Bottom
- Ample space to fit the RPi5 heatsink included with the POE board or with most other HATs the Raspberry Pi Active Cooler(not included)
What's in the box?
1 x PI5-CASE-F
1 x Nonskid rubber pad (4PCS)
1 x Screwdriver
1 x Screws and standoffs pack
Resources
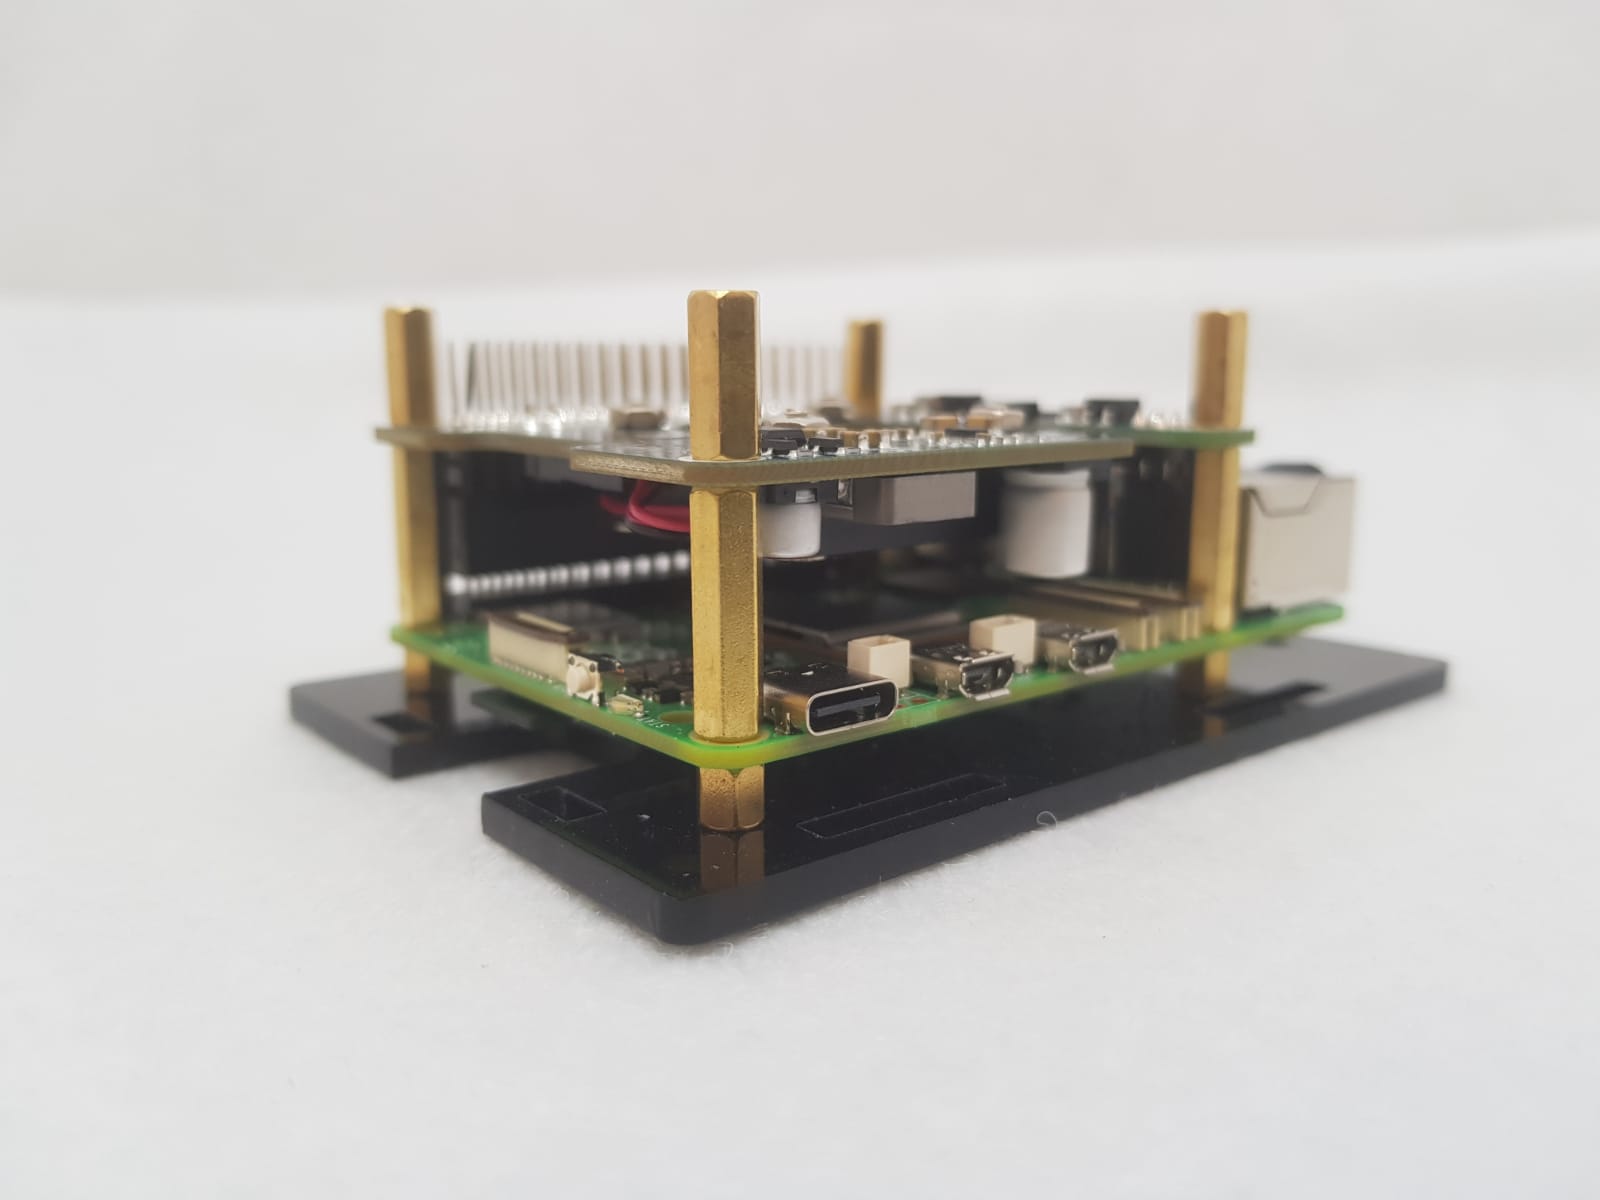


- Product Size: 193mm×155mm×50mm
- Gross Weight: 1.2kg
- Net weight: 1.1KG
- Minimum Engraving Diameter: 5mm
- Maximum Engraving Diameter: 120mm
- Maximum Load: 10kg
- Product Material: Aluminum Alloy Frame

Unlock the secrets of nature with code, engineering, and the Kitronik Smart Greenhouse Kit for BBC micro:bit!
The Kitronik Smart Greenhouse Kit for the BBC micro:bit provides an exciting way to learn about the relationship between plants and their environment. The user will learn how to monitor environmental conditions and then how to build automated systems.
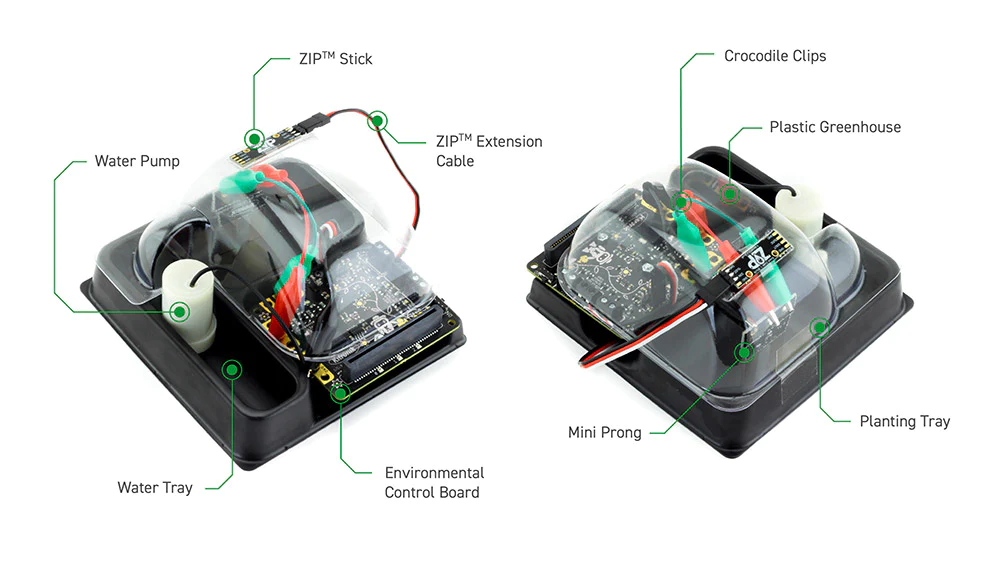
The kit comprises a two-part plastic greenhouse, Kitronik environmental control board, water pump, Kitronik ZIP Stick, and Mini Prong soils moisture sensor. Also included are 5 crocodile clips, ZIP extension cable and a small screwdriver. Just add a micro:bit, seeds, and then some water and you will have everything you need!
The kit also ships with detailed instructions that will get you up and cultivating in no time. Additionally, there are 7 online MakeCode tutorials. They cover everything from gathering sensor data and having the system automatically react to it, to visual user interfaces and more.
At the heart of the micro:bit controlled Kitronik Smart Greenhouse Kit is the Kitronik environmental control board. This board provides a variety of sensor inputs and connection points for the BBC micro:bit (V1 & V2) and provides the ability to control outputs for devices such as a water pump, fan, servo or heater pad.
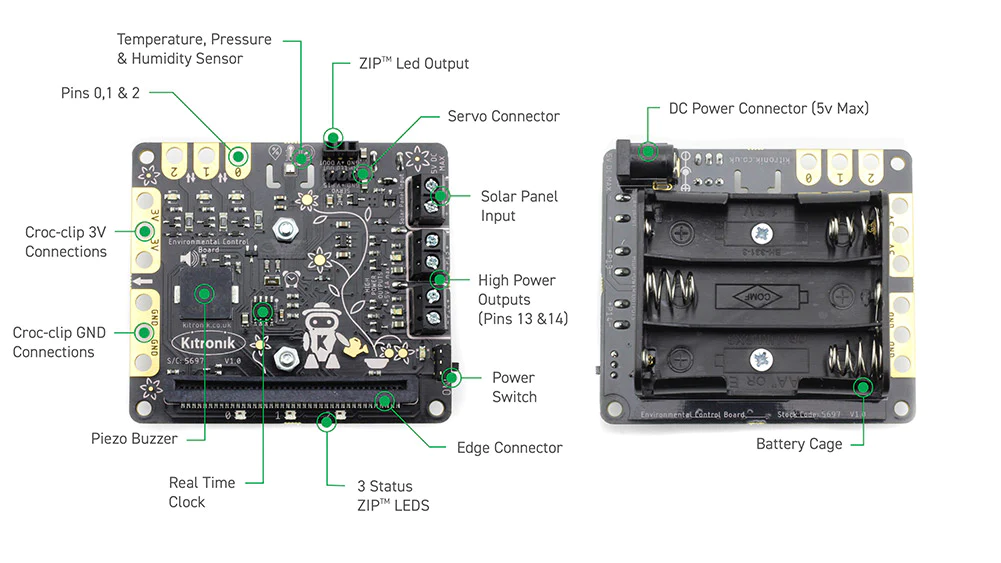
The environmental control board can be coded with the MakeCode editor and Kitronik has produced a set of custom blocks to make the job as simple as possible. The blocks can be added via the add Extensions function in the editor by searching “Kitronik” or from https://github.com/KitronikLtd/pxt-kitronik-smart-greenhouse.
The default crop for these types of experiments is often cress, as it is quick growing, requires little tending, and can be harvested when they are approximately 5cm tall (within a few days). There are other sprouting plants, such as sprouting white mustard, which also grow quickly and can be harvested when they are 5cm tall. You can also look into micro-herbs/micro-greens. Once you have chosen your preferred crop type you then need to choose a suitable soil.
Note:
- This kit does not come with a BBC micro:bit, available separately here > BBC micro:bit.
- This kit is not waterproof. If you get the board wet, please turn it off and allow it to fully dry. The risk of shock is very small, but be cautious.
- Due to electrolysis and the damp environment, the electrodes on the Mini Prong Moisture Sensor will degrade slowly over time. Please see our general safety advice for more information.
Features
- Build automated growing systems that react to changeable environmental conditions.
- This kit is compatible with both micro:bit V1 and microbit V2.
- The kit comes with detailed assembly and coding instructions.
- At the heart of the kit is the kitronik Environmental control board, designed to be the control hub for this kit.
- Key features of the Environmental control board are;
- It features a number of sensor inputs that can be coded to control the board's outputs.
- There is an onboard BME 280 environmental temperature, barometric pressure and humidity sensor and a separate Real-Time Clock (RTC).
- The board also features an onboard piezo buzzer, 2 1A outputs (ideal for a water pump, heater pads or fan), 3 status ZIP LEDs, a ZIP LED expansion connector and servo output. In addition to these, 3 BBC micro:bit pins are broken out to croc-clip connections as further inputs and outputs, along with pads for 3V and GND.
- It can be powered via the onboard 3xAA battery holder or the 2.1mm DC Jack, and the power is controlled via the on/off switch with an adjacent LED indicator.
- There are also 7 online MakeCode tutorials that introduce you to all of the features of the board.
- Crops such as cress, sprouting white mustard and micro-herbs/micro-greens are ideal for use with this kit.
- Code it with the MakeCode editor using our custom code blocks.
- The Kit can be powered by 3 x AA Batteries or a plug-in power supply.
What's in the box?
2 x Moulded plastic greenhouse enclosure parts.
1 x Kitronik Environmental Control Board for micro:bit.
1 x Water Pump.
1 x Kitronik ZIP Stick.
1 x Mini Prong Moisture Sensor.
5 x Crocodile Leads.
1 x ZIP extension cable.
1 x Screwdriver.
1 x User guide Booklet.
Requires
- A web browser and an internet connection.
- One of the following; BBC micro:bit V2. or BBC micro:bit Starter Pack V2.
- 3 x AA Batteries or plug-in power supply.
- Seeds, such as cress.
- Soil.
- Optional Solar kit
- Adding a Solar Panel to the Environmental Control Board.
- Tech Talks - live stream playback.
Resources
- Environmental Control Board Datasheet.

- Mini Prong general safety advice.
- This example code. Monitors temperature, humidity, soil moisture, and makes use of the LEDs/ZIP LEDs.
Seven online MakeCode tutorials for the Kitronik Smart Greenhouse Kit;
- A - Visual Thermometer.
- B - ZIP LED hue.
- C - Auto-watering.
- D - Growlight.
- E - Timed watering.
- F - Water level sensing.
- G - Datalogging.

These Lithium Batteries are a superior choice due to their combination of long lifespan (2000 cycles), high discharge capabilities (low internal resistance), and advanced safety features (integrated BMS) - all translating into a better investment compared to traditional lead acid batteries they can effectively replace.
Common Applications
- Gate motors
- Alarm panels
- UPS (Uninterrupted Power Supply)
- Toys
- Torches
Specifications
- Capacity in Ah: 8Ah
- Capacity in Wh: 102.4Wh
- Nominal Voltage1: 2.8v
- Maximum Continuous Discharge Current: 16Amps
- Peak Discharge Current (60 sec): 22Amps
- Charge Voltage: 13.8-14.6V
- Maximum Continuous Charge Current: 8Amps
- Short circuit protection: Yes
- Over voltage protection: Yes
- Under voltage protection: Yes
- Over current protection: Yes
- Charge Temperature: 5°C – 45°C
- Discharge Temperature: 0°C – 45°C
- Terminals: F1 – 4.75mm flat
- Weight (net): 1000g
- Dimension (L x W x H): 151 x 65 x 95 mm
- Number of Cycles (minimum) 100% DOD: 2000
What's in the box?
1 x 12.8v 8Ah Lithium Phosphate Battery
This tiny but powerful 30mm fan can be used to keep your Raspberry Pi 5 cool.
It comes with a 4 pin JST connector for the Raspberry Pi 5, allowing the fan to be controlled by software (the same way as the official Active Cooler).
Specifications
- Dimensions: 30x30x07mm
- Bearing Type: Sleeve
- Connector: Raspberry Pi 5 4-pin fan header
- Rated Voltage: DC 5V, 0.2A
- great for use with your own enclosures and designs
What's in the box?
1 x DC Fan 30x30x7mm

PETG is short for polyethylene terephthalate glycol-modified
PETG is the perfect filament to combine strength and ductility, which is why it's used in so many mechanical parts and robotics. It has great chemical resistance with good water, acidic and alkalic resistance. PETG in its raw form is also FDA and EU commission regulation approved as Food Contact Safe.
Print temp : 235 – 255°C
Heated Bed : 65 – 85°C
Fan speed / Cooling: 0 - 50%
Speed range : 30 - 60mm/s optimal
Printability : Moderate
Net Weight: 1kg
What's in the box ?
1 x SA Filament PETG White (1.75mm)

This is conductive stainless steel sewing thread. Very thin, strong, smooth and is suited to build wearable products.
Stainless steel fiber yarn has its ability in thermal resistant up to 1300 degrees, and these spun yarn can produce into different kind of electromagnetic shielding fabrics, and in producing permanent shielding and conductive products.
Features
- Thin
- Strong
Specifications
- Material: 100% Stainless Steel Fiber
- Certification: ISO9001:2008
What's in the box?
1 x 5m meter length of thread

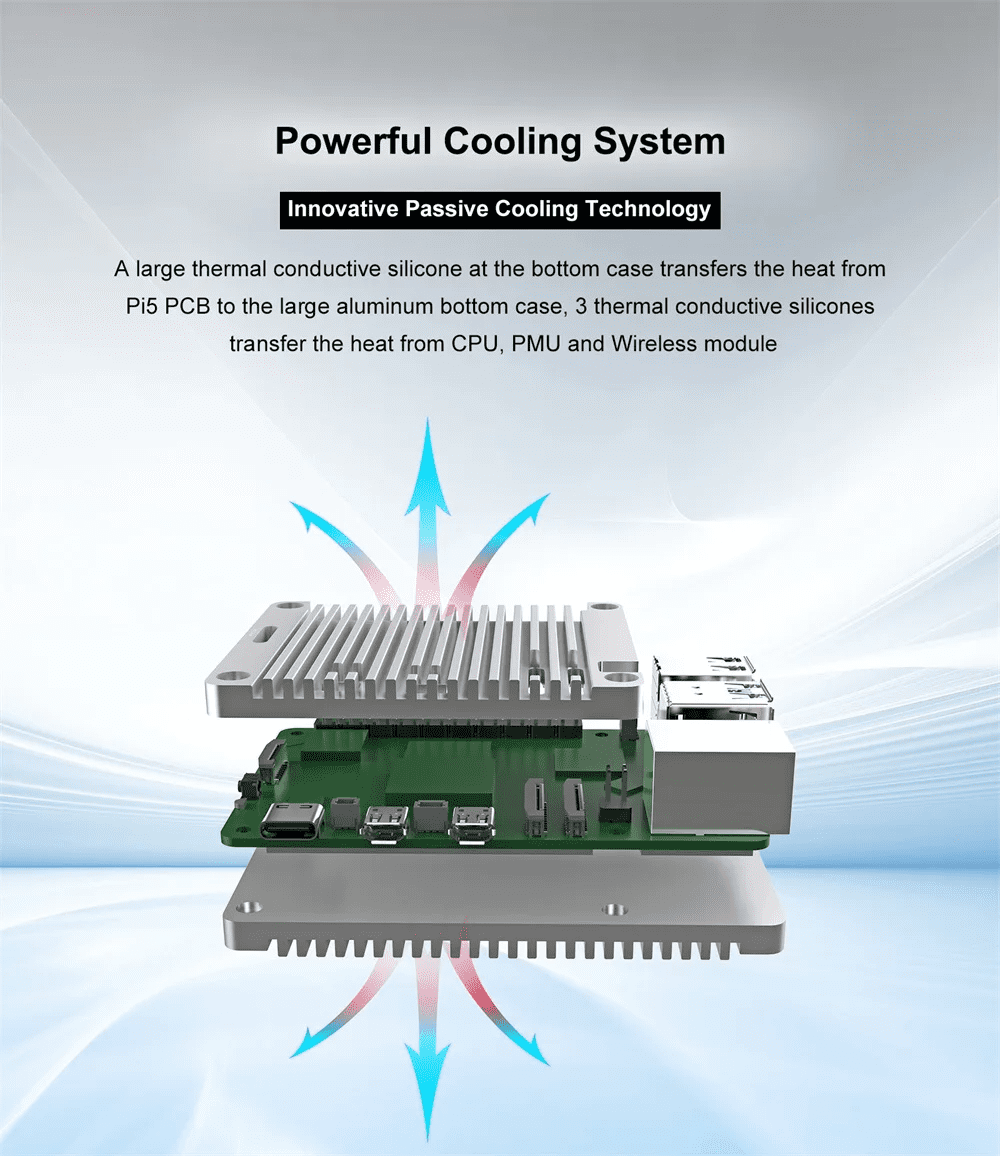
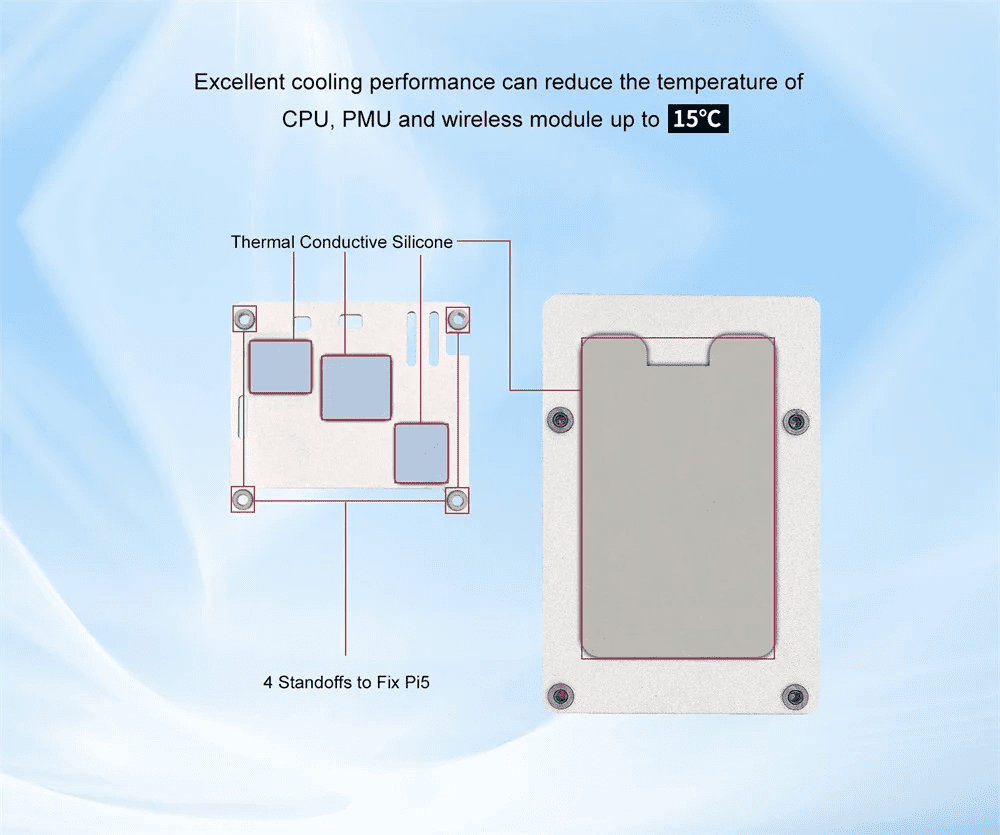
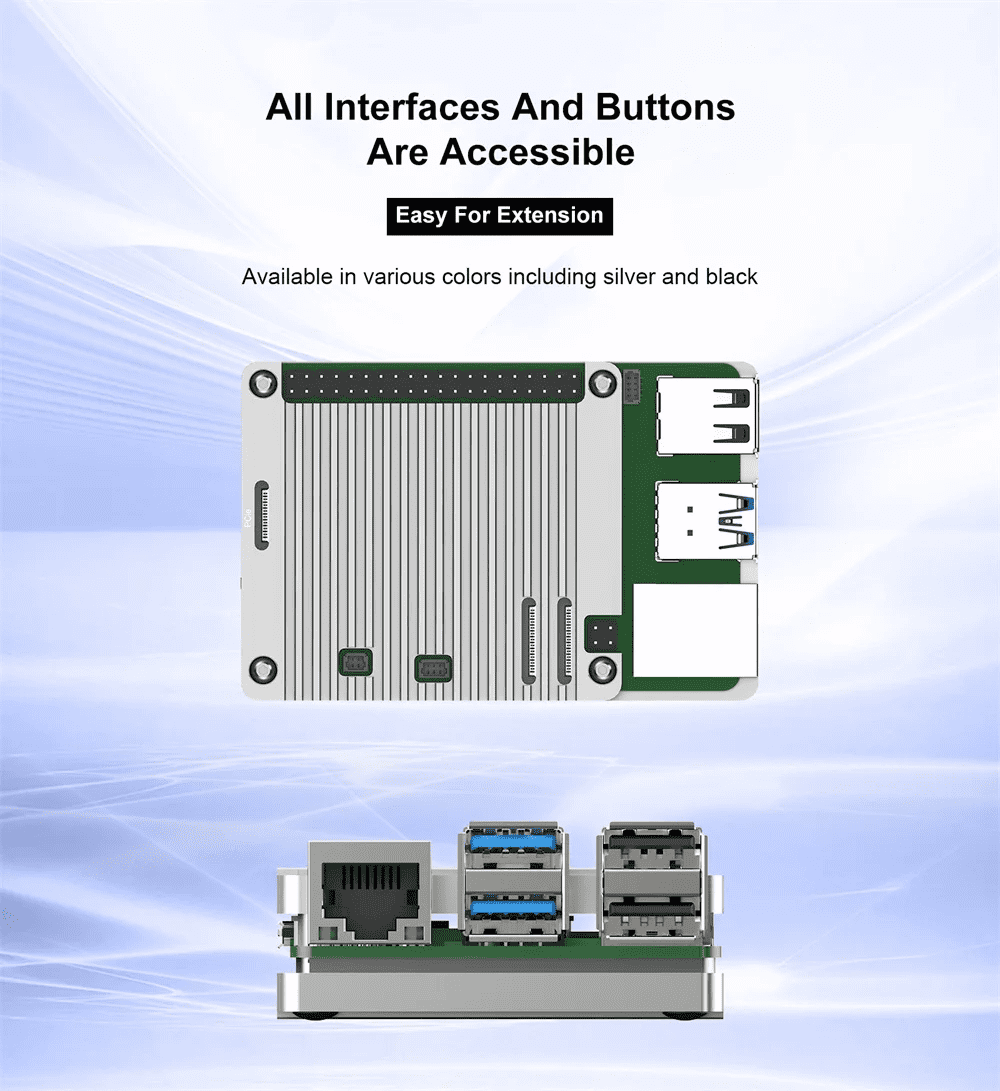
Full Aluminum Passive Cooling Open Case for Raspberry Pi 5

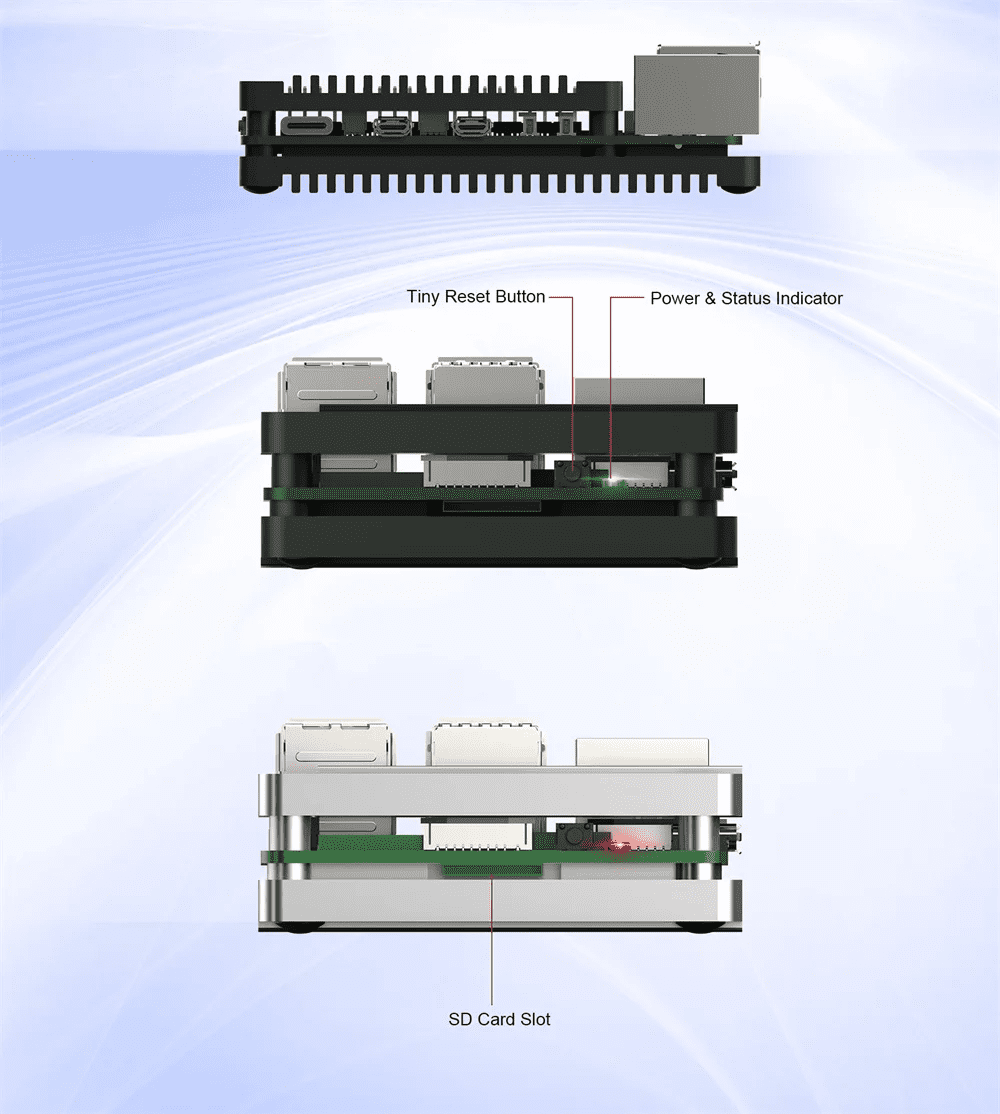
What's in the box?
1 x Full Aluminum Case for Raspberry Pi 5
Resources
Intsallation Guide: https://youtu.be/uOdaYrvMqxc
- Argon NEO 5 M.2 NVME Case further expands your Raspberry Pi 5 potential with included M.2 NVME Expansion Board support.
- Boot your Raspberry Pi 5 from an NVME M.2 Drive.
- Built-in HEATSINK for your M.2 NVME Drive
- Enjoy faster and higher storage access by connecting M.2 NVME drives via the PCIe slot on the Raspberry Pi 5
- Versatile M.2 NVME support compatible with any M.2 NVME with M-Key up to 2280 size
- Greater thermal management on M.2 NVME with included aluminum heatsink specific to M.2 drive to keep it cool, efficient and working longer
- Reliable and consistent data transfer with included FPC impedance controlled cable
What's in the box?
1 x Argon NEO 5 M.2 NVMeCase
Resources
M.2 NVMe Drive Compatibility:
Other drives may also be compatible but we have not tested yet.
Western Digital SN850
Western Digital SN740
Western Digital SN570
Western Digital SN530
Western Digital Black SN750 SE (Phison Controller)
Team MP33
Samsung 980 Pro
Samsung 980
Sabrent Rocket Nano
Sabrent Rocket 4.0
PNY CS1030
Origin Inception TLC830 Pro NVMe
Netac NV3000 NVMe SSD
Netac NV2000 NVMe SSD
Lexar NM710
Lexar NM620
Kioxia Exceria NVMe SSD
Kioxia Exceria G2 NVMe SSD
Kingston KC3000
Kingston SNV2S NV2 Gen4 PCIe NVMe M.2 2280 Solid-State Drive
Inland PCIe NVMe SSD
Crucial P3 Plus M.2
Crucial P3 M.2
Crucial P2 M.2
Axe Memory Generic Drive
- Aluminum enclosure designed for Raspberry Pi Zero 2 W (compatible with other Zero and Zero W Boards)
- Passive Cooling
- Access to all Zero 2 W Ports
- Replaceable ABS Plastic Cover
- Connects seamlessly with the POD HDMI-USB Hub Module and other POD modules
- Power requirement: 5V, 3Amp; via microUSB Port
What's in the box?
1 x Argon POD case only
Resources
Argon POD installation guide
- Aluminum enclosure designed for Raspberry Pi Zero 2 W (compatible with other Zero and Zero W Boards)
- Passive Cooling
- Access to all Zero 2 W Ports
- Replaceable ABS Plastic Cover
- Connects seamlessly with the POD HDMI-USB Hub Module and other POD modules
- Power requirement: 5V, 3Amp; via microUSB Port
- Includes HDMI-USB Module
- Converts Mini HDMI to regular HDMI
- adds 3 additional USB2.0 Ports
What's in the box?
1 x Argon POD case only
Resources
Argon POD installation guide
Please note: The Raspberry Pi 5 is not included
Features
- Argon THRML Radiator Cooler significantly boosts thermal management on the bare Raspberry Pi 5
- Superior heat dissipation away from the Raspberry Pi 5 with copper heat pipe and tower style radiator for enhanced cooling capabilities
- Integrated 60mm PWM blower fan helps cool down the Raspberry Pi 5 faster
- Quick snap on and push pins for easy mounting on Raspberry Pi 5
- Comes with thermal compound and thermal pad for better heat management
- Input voltage: 5V DC supplied via four-pin fan header on Raspberry Pi 5
- Fan speed control: Pulse width modulation control with tachometer
- Maximum airflow: 18.13 CFM
- Maximum fan speed: 5000 RPM +/- 15%
- Product material: Aluminum
What's in the box?
1 x radiator cooler
Introducing the HatNET! 2.5G, the latest network expansion board from Pineberry, engineered to supercharge your Raspberry Pi 5 with 2.5 Gigabit Ethernet capabilities. This board is designed for users who demand higher network throughput and performance, making it an ideal upgrade for advanced computing tasks, server applications, and high-speed data transfers.
Key Features and Specifications
- Optimized for Raspberry Pi 5: The HatNET! 2.5G is specifically designed to complement the Raspberry Pi 5, ensuring seamless integration and optimal performance.
- 2.5 Gigabit Ethernet Performance: Equipped with the Realtek RTL8125BG, this board offers 2.5 Gigabit Ethernet connectivity, significantly enhancing network speed and efficiency over standard Gigabit Ethernet.
- High-Quality Ethernet Plug: Utilizing the same high-quality Trxcom Ethernet plug as the Raspberry Pi, the HatNET! 2.5G guarantees compatibility and reliability in network connections.
- Activity and Link LEDs: Features Activity and Link LEDs that provide real-time visual feedback on network status, facilitating easier monitoring and troubleshooting.
- Dedicated MAC Address Range: Each HatNET! 2.5G board comes with a hardware MAC address from Pineberry Pi's own IEEE-assigned pool, ensuring unique and consistent network identification.
- Designed for Enhanced Networking: This board is tailored for users who require higher bandwidth and lower latency, perfect for network-intensive applications, multimedia streaming, and large file transfers.
- Robust Construction and Longevity: Manufactured with top-grade materials and components, the HatNET! 2.5G is built to last, ensuring sustained performance and reliability for your networking projects.
- Simple Installation and Network Setup: The HatNET! 2.5G is designed for ease of use, offering straightforward installation and network configuration, enabling users to quickly enhance their Raspberry Pi's networking capabilities.
What's in the box?
1 x HatNet
1 x FPC ribbon cable

Retro Gaming with Raspberry Pi shows you how to set up Raspberry Pi 5 to play a new generation of classic games. In this 180-page book, you’ll build a gaming console and full-size arcade cabinet, install emulation software and download original games with full step-by-step guides. Discover a vibrant homebrew scene packed with new games for original consoles and legal access to all those retro games you remember!
- Set up Raspberry Pi for retro gaming
- Emulate classic computers and consoles
- Learn to code retro-style games
- Build a console, handheld, and full-size arcade machine
What's in the box?
1 x Retro Gaming Book
Fun for the whole family to use. Encourage your child's creativity without the mess or use it yourself for lists.
Features and Specifications
- Product Size: 185mm x 280mm x 6.8mm
- Screen Size: 163mm x 23mm
- Net Weight: 210g
- Material: ABS
- Input Pressure: 10 - 20g
- Battery: CR2025
- One-click Erase
- Lock Key
WARNING
- Please do not put too much pressure on the screen, which might damage the product
- Please do not use sharp objects to write on the screen
- Do not get product wet or submerged under water
- Do not disassemble the product
What's in the box?
1 x Volkano Doodle Series Drawing Pad
1 x Writing Stylus
1 x Battery
1 x Instruction Manual