
Special Offers


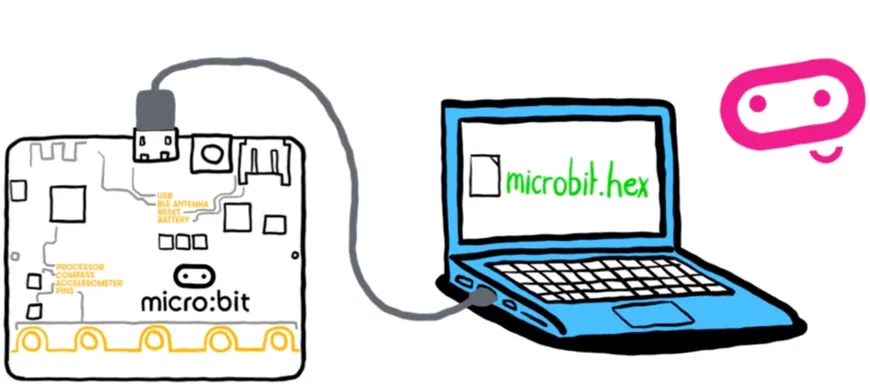
You can also watch an unboxing video by Aurora Tech at https://www.youtube.com/watch?v=iUdj2oZOWbw&list=WL&index=2&t=696s
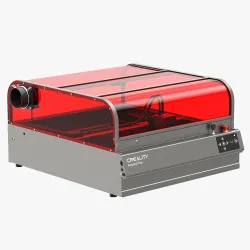
Overview
With four powerful 6W laser diodes compressed to increase its laser’s power to 22W, the Falcon2 22W laser engraver is more powerful and faster than ever. This engraver is packed with features, including integrated air assist, a triple monitoring system, and 5 safety and protection systems. From DIY home projects to education, from jewellery customisation to business signage, whatever you can think of, you can make with the Falcon2.
Features
More Powerfull, High Speed Engraving
Based on the latest FAC spot compression technology, four powerful 6W laser diodes are compressed to increase the laser’s power to 22W. With 2x faster engraving speed - 25000mm per minute, Falcon2 allows you to spend less time creating more.
Integrated Air Assist, 3-Step Assembly
You can manually adjust the air assist steplessly through the knob, or automatically adjust the airflow through LightBurn, to remove smoke and protect the laser lens, bringing a cleaner result. Only 3 steps are needed for full assembly. You can enjoy creating as soon as possible.
Tripple Monitoring System
Airflow monitoring indicates the current airflow volume, enabling you to adjust the airflow based on engraving needs. Built-in lens monitoring triggers an alarm when the lens gets dirty, which helps avoid lens breakage and frequent replacement. Flame monitoring – when a flame is detected, the indicator flashes red with an alarm and the machine will stop immediately.
Safety Protections
Bi-directional limit switch: if the laser head reaches the boundary, the machine will stop immediately and a buzzer will sound an alarm. Active stop function: the machine will stop working in the case of an accidental tilt, flip or drop, with the buzzer and indicator sending an alert. Security lock design – for professional use only.
Further Safety Protections
Emergency stop button: if an emergency occurs during operation, you can also stop the machine immediately. Laser protective cover: made from high-efficiency red filter glass material, the protective cover around the laser head effectively protects eyes from laser dazzle.
Exceptional Motion Stability, Sliding Rail
The Falcon2 features outstanding motion stability – the full aluminium alloy design makes for a more solid machine, ensuring exceptional stability even in high-speed operation. Integrated rail and durable wheels: the integrated sliding rail keeps the running highly synchronised, while the U-shaped wear-resistant wheels make motion more stable.
Adjustable Risers, Silicone Foot Pads
There are 3 adjustment holes on the bottom of the machine to suit different table sizes. Adjustable risers: multi-segment equal-length risers to increase height, for engraving skateboards, basketballs and other taller objects; 8 sections are provided. Silicone foot pads: the newly designed foot pads help the machine stand firmly on the table, ensuring 360-degree non-slip operation.
More information available at https://www.creality.com/products/creality-falcon2-22w or download the brochure
What's in the box?
1 x Creality Flacon2 Laser
You might also be interested in....
- A honeycomb bed for your laser engraver

Overview
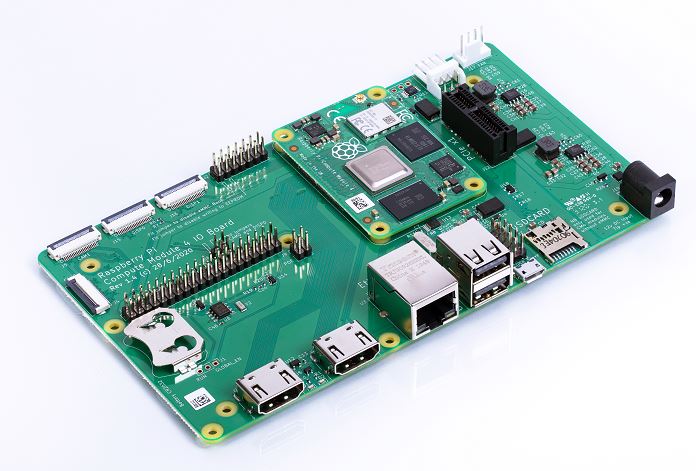
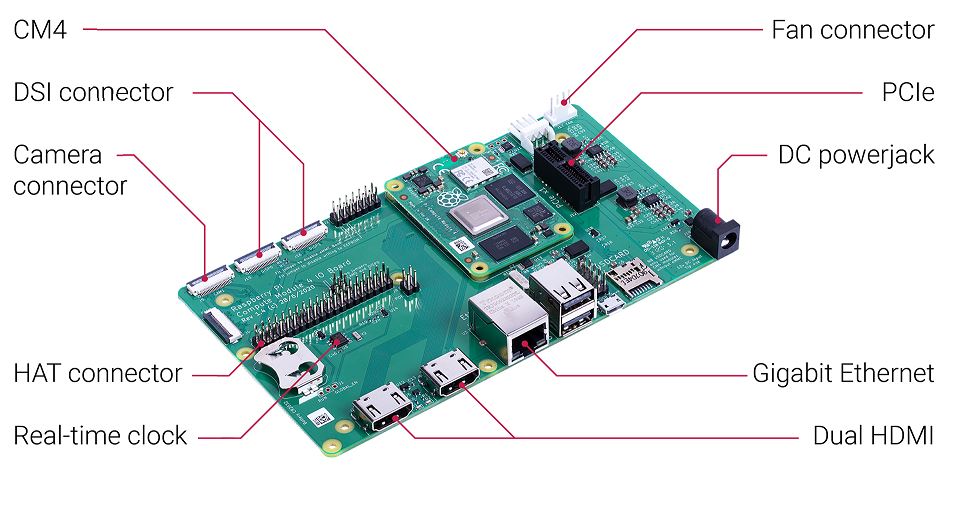
The Compute Module 4 IO Board is a companion board for Raspberry Pi Compute Module 4 (supplied separately). It is designed for use both as a development system for Compute Module 4 and as an embedded board integrated into end products.
The IO board is designed to allow you to create systems quickly using off-the shelf parts such as HATs and PCIe cards, which might include NVMe, SATA, networking, or USB. The major user connectors are located along one side to make enclosures simple.
Compute Module 4 IO Board also provides an excellent way to prototype systems using the Compute Module 4.
Specifications
• CM4 socket: suitable for all variants of Compute Module 4
• Standard Raspberry Pi HAT connectors with PoE support
• Standard PCIe Gen 2 x1 socket
• Real-time clock (RTC) with battery backup
• Dual HDMI connectors
• Dual MIPI camera connectors
• Dual MIPI display connectors
• Gigabit Ethernet socket supporting PoE HAT
• On-board USB 2.0 hub with 2 USB 2.0 connectors
• SD card socket for Compute Module 4 variants without eMMC
• Support for programming eMMC variants of Compute Module 4
• PWM fan controller with tachometer feedback
Input power: 12V input, 5V input with reduced functionality
(power supply not supplied)
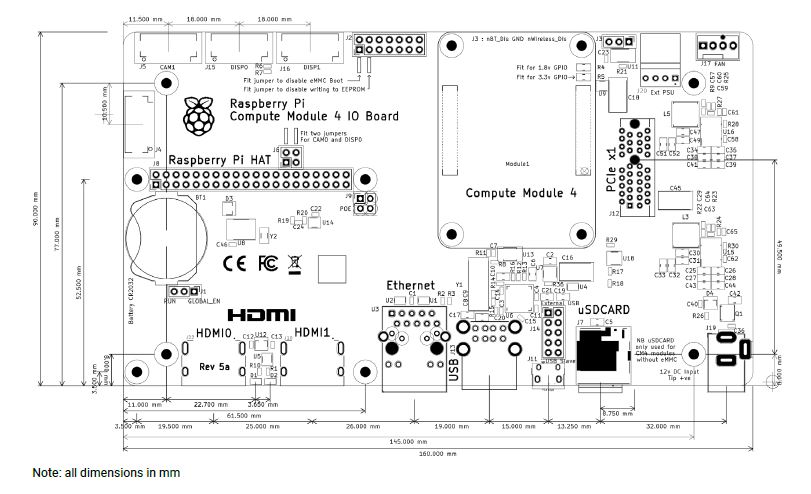
Dimensions: 160 mm × 90 mm
What's in the box?
1 x CM4 IO board
You will also need...
A Compute Module 4 board
A 12V power supply for the board
A CR2032 battery for the Real-time Clock backup
A heatsink designed for CM4
An enclosure for your CM4 IO board
A micro B USB to USB A cable to setup/update your CM4 via rpiboot
An antenna kit if your CM4 has onboard wifi
Mini Jumpers to assist you with setup
Resources
- Raspberry Pi Compute Module 4 IO Board product brief
- Raspberry Pi Compute Module 4 IO Board datasheet
- Raspberry Pi Compute Module 4 IO Board KiCAD file
Production lifetime: The Raspberry Pi Compute Module 4 IO Board will remain in production until at least January 2028
More details are available here
and a video discussion at https://www.youtube.com/watch?v=yiHgmNBOzkc&feature=youtu.be
Compliance: For a full list of local and regional product approvals,
please visit
www.raspberrypi.org/documentation/
WARNINGS
• Any external power supply used with the Raspberry Pi Compute Module 4 IO Board shall comply with relevant regulations and standards applicable in the country of intended use.
• This product should be operated in a well-ventilated environment, and if used inside a case, the case should not be covered
• Whilst in use, this product should be placed on a stable, flat, non-conductive surface, and should not be contacted by conductive items.
• The connection of incompatible devices to the Compute Module 4 IO Board may affect compliance,
result in damage to the unit, and invalidate the warranty.
• All peripherals used with this product should comply with relevant standards for the country of use and be marked accordingly to ensure that safety and performance requirements are met. These articles include but are not limited to keyboards, monitors, and mice when used in conjunction with the Compute Module 4 IO Board.
• The cables and connectors of all peripherals used with this product must have adequate insulation so that relevant safety requirements are met.
SAFETY INSTRUCTIONS
To avoid malfunction or damage to this product, please observe the following:
• Do not expose to water or moisture, or place on a conductive surface whilst in operation.
• Do not expose to heat from any source; the Raspberry Pi Compute Module 4 IO Board is designed for reliable operation at normal ambient temperatures.
• Take care whilst handling to avoid mechanical or electrical damage to the printed circuit board
and connectors.
• Whilst it is powered, avoid handling the printed
You will find loads of info, lessons, projects and other resources at https://microbit.org/get-started/first-steps/introduction/
Are you a teacher that need assistance or material to improve your classes? Have a look at the free resources for teachers
micro:bit V2 is a brand new, super-charged version of the popular pocket-sized codeable computer, brought bang up to date with a microphone, speaker and upgraded processing capabilities.
With over four times the processing power and eight times as much RAM as the original micro:bit this new model opens up a world of new possibilities! We're especially excited about how well MicroPython will run on the new model where previously the limited RAM was a struggle.
Features- Upgraded processor (nRF52833)
- 64MHz Arm Cortex-M4 FPU (over 4 times faster!)
- 512KB Flash storage on board
- 128KB RAM
- MEMS Microphone with LED indicator and on-board speaker
- 5x5 LED matrix display
- Touch sensitive logo "button"
- Accelerometer/compass
- Light and temperature sensors
- Sleep/off mode for batteries powered projects (w/ LED indicator)
- Up to 200mA of current for external accessories
- Bluetooth 5.0 radio allowing micro:bits to talk to each other
- Notched edge connector (easier to connect things like crocodile clips and conductive thread)
- Dimensions: 52mm x 42mm x 11.7mm
It's the same shape and size so should be already familiar to countless teachers and learners, and also compatible with the vast majority of add-on boards and accessories.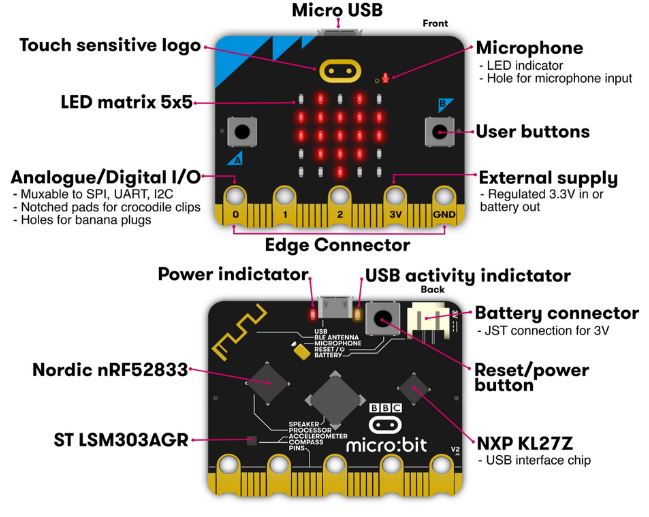
It's programmed with beginner friendly, drag and drop interface MakeCode with the option to progress into MicroPython later on, opening up even more programming possibilities!
It's packed with inputs, outputs, sensors and radio communication features that can be combined into and endless variety of projects.
Inputs and outputs: An important part of any computer system. As a very small computer, the BBC micro:bit has plenty of inputs and outputs to learn about and use.
LEDs: An LED, or light-emitting diode is an output device that gives off light. Your BBC micro:bit has a display of 25 LEDs for you to program.
Buttons: A very common input device. Your micro:bit has two "clicky" buttons and a touch sensitive button you can program, and a reset button.
Radio: A way of sending and receiving messages and BBC micro:bits can use radio waves to communicate with each other.
Accelerometer: A motion sensor that measures movement. The accelerometer in your BBC micro:bit detects when you tilt it left to right, backwards and forwards and up and down.
Compass: An input sensor that detects magnetic fields. Your BBC micro:bit has an inbuilt compass that can detect the direction in which it is facing.
Light sensor: An input device that measures light levels. Your BBC micro:bit uses the LEDs to sense the levels of light and lets you program your micro:bit as a light sensor.
Temperature sensor: An input device that measures temperature. Your BBC micro:bit has a temperature sensor inside the processor which can give you an approximation of the air temperature.
Pins: On the bottom edge of your BBC micro:bit there are 25 gold strips, called pins. These pins allow you to really get creative. You can create circuits, connect external things like buzzers and motors and make your own fun projects.
Sound: Your BBC micro:bit can be programmed to make a wide variety of sounds - from single notes, tones and beats to your own musical compositions.
What's in the box?
1 x micro:bit V2.2 board
1 x micro B USB Cable for programming
You will need....
- Computer/laptop with Internet access
Resources
Using the micro:bit V2.2Sensors
The micro:bit V2.2 has no less than six sensors onboard to create awesome projects:
More Resources
The BBC micro:bit is a pocket-sized computer that introduces you to how software and hardware work together. It has an LED light display, buttons, sensors, a speaker, microphone and many other input/output features that, when programmed, let it interact with you and your world.
Visit What is the micro:bit? to find out more or explore all the features in depth through short videos.
You will need a computer, tablet or phone to write and send code to the micro:bit, but once the code is on the micro:bit it works as a standalone device with just the battery pack. Visit getting started for support taking your first steps with the micro:bit.
The Micro:bit Educational Foundation produces free coding tools and teaching resources to support you as you explore the potential of the micro:bit:
- Choose your perfect programming tool in Let's Code:
- Run whole class coding sessions easily with micro:bit classroom
- Teach block-based coding with Microsoft MakeCode or text-based coding with the micro:bit Python Editor
- Explore our free resources for teachers including:
- Quick projects for beginners and more advanced users
- Curriculum-linked lessons and units of work
- Professional development courses and events like webinars and code-alongs
- Classroom resources such as student handouts, reward certificates and posters
As well as givings students a hands-on approach to coding, the micro:bit is an engaging classroom tool that gives students confidence to try new things and get creative with technology.

We designed this GPIO PCB to assist you with the MicroPython introduction tutorial found on Raspberry Pi Foundation projects. No soldering required. We will be directing you with links to the different sections of the Raspberry Pi Foundation’s introduction while supplying the code and a few fun projects on our page right here.
You can also order the complete kit with everything you need for the tutorials.
We included the following circuits on the board for coding/testing:
1 x RGB
3 x LED
1 x buzzer
1 x button
1 x potentiometer
Learn how to write the code to individually use/control the above mentioned input/output modules. You'll also learn how to pair some of them up with exciting results. Eg. use the three LEDs to display a bargraph or progress meter indicating the value generated by the potentiometer.
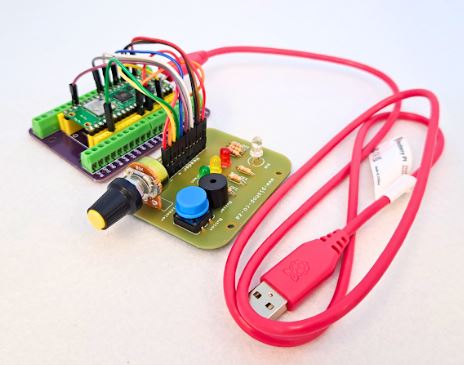
Usage example of the MODB board.
Please note: The Pico W, jumpers cables, USB cable and expansion board are not included with this product.
What's in the box?
1 x GPIO MODB beginners board
Resources
Blog tutorial
You will find loads of info, lessons, projects and other resources at https://microbit.org/get-started/first-steps/introduction/
Are you a teacher that need assistance or material to improve your classes? Have a look at the free resources for teachers
The BBC micro:bit is a pocket-sized codeable computer with motion detection, a built-in compass, LED display, and Bluetooth technology built in.
It measures 4cm by 5cm, is available in a range of colours, and designed to be fun and easy to use. It can be coded with something simple in seconds – like lighting up its LEDs or displaying a pattern – with no prior knowledge of computing.
It also connects to other devices, sensors, kits and objects, and is a companion to Arduino, Galileo, Kano, littleBits and Raspberry Pi, acting as a spring board to more complex learning.
Each element is completely programmable via easy-to-use software on a dedicated website that can be accessed from a PC, tablet or mobile.
Get creative, get connected & get coding with the micro:bit go. A complete set containing all the parts and inspirational ideas to get started with the micro:bit. Each micro:bit go contains 1x micro:bit, USB cable and battery holder. The micro:bit go is the quickest and easiest way for children to get going with the micro:bit. The micro:bit is a pocket-sized computer that you can code, customise and control to bring your digital ideas, games and apps to life. Measuring 4cm by 5cm, and designed to be fun and easy to use, users can create anything from games and animations to scrolling stories at school, at home and on the go - all you need is imagination and creativity. The micro:bit is completely programmable. That means each of its LEDs can be individually programmed as can its buttons, inputs and outputs, accelerometer, magnetometer and Bluetooth Smart Technology.
- Microprocessor: 32-bit ARM® Cortex™ M0 CPU
- A 5x5 LED matrix with 25 red LEDs to light up and can display animiated patterns, scrolling text and alphanumeric characters
- Two programmable buttons. Use them as a games controller, or control music on a smart phone
- On-board motion detector or 3-AXIS digital accelerometer that can detect movement e.g. shake, tilt or free-fall
- A built-in compass, 3D magnetometer to sense which direction you're facing and your movement in degrees and detect the presence of certain metals and magnets
- Bluetooth® Smart Technology. Connect the micro:bit to other micro:bits, devices, phones, tablets, cameras and other everday objects
- 20 pin edge connector: This allows the micro:bit to be connected to other devices such as Raspberry Pi, Arduino, Galileo and Kano through a standard connector
- Micro-USB controller: This is controlled by a separate processor and presents the micro:bit to a computer as a memory stick
- Five Ring Input and Output (I/O) including power (PWR), ground (GRD) and 3 x I/O.
- System LED x 1 (yellow)
- System push button switch x 1
Applications
- Embedded Design & Development
- Education
What's in the box?
20 x micro:bit V2.2 board
20 x USB cable
20 x 2xAA OR 2xAAA Battery holder depending on availability
40 x Duracell Alkaline AA or AAA batteries depending on battery holder
Resources
Using the micro:bit V2.2
Sensors
The micro:bit V2.2 has no less than six sensors onboard to create awesome projects:
More Resources
The BBC micro:bit is a pocket-sized computer that introduces you to how software and hardware work together. It has an LED light display, buttons, sensors, a speaker, microphone and many other input/output features that, when programmed, let it interact with you and your world.
Visit What is the micro:bit? to find out more or explore all the features in depth through short videos.
You will need a computer, tablet or phone to write and send code to the micro:bit, but once the code is on the micro:bit it works as a standalone device with just the battery pack. Visit getting started for support taking your first steps with the micro:bit.
The Micro:bit Educational Foundation produces free coding tools and teaching resources to support you as you explore the potential of the micro:bit:
- Choose your perfect programming tool in Let's Code:
- Run whole class coding sessions easily with micro:bit classroom
- Teach block-based coding with Microsoft MakeCode or text-based coding with the micro:bit Python Editor
- Explore our free resources for teachers including:
- Quick projects for beginners and more advanced users
- Curriculum-linked lessons and units of work
- Professional development courses and events like webinars and code-alongs
- Classroom resources such as student handouts, reward certificates and posters
As well as givings students a hands-on approach to coding, the micro:bit is an engaging classroom tool that gives students confidence to try new things and get creative with technology.

A tiny and lovely clear acrylic enclosure for the raspberry pi zero. It designed to be beautiful, light, and easy-assembly. Perfect for any use (but especially for those who want to carry their Pi around in their pocket!). This enclosure is only compatible with the Raspberry Pi Zero! The case is as minimal as it gets coming in just two pieces of acrylic that secure with four screws. Made of crystal-clear acrylic, this case keeps the Pi Zero secure.
There are two USB holes and one cooling hole, you can use all of the connectors on the edges of the Pi: mini HDMI, micro SD slot, micro USB power, and micro USB port. There's also a cut out to allow a 2x20-pin header to be soldered onto the Pi Zero.
This case is also available in clear acrylic
Features
- Easy to assemble
- 2 layers, 4 bolts, spacers and nuts included
- Will fit Raspberry Zero & Zero 2
Notes
Only includes the case. RPi Zero is not included.
Don't forget to remove the protective film from the acrylic.
What's in the box?
1 x Black acrylic top plate
1 x Black acrylic bottom plate
1 x heatsink
4 x acrylic spacers
4 x M2.5 screws
4 x M2.5 nuts
The Raspberry Pi Zero is an ultra low cost and ultra small variant of the original Raspberry Pi. It's tiny, measuring just 65mm x 30mm, and is perfectly designed for embedded applications, wearables, prototyping and any other Pi based tinkering you can think of, on a micro scale! The Raspberry Pi Zero Wireless features on board Wireless Internet & Bluetooth for all your connectivity needs!
The Raspberry Pi Zero features a BCM2835 chipset, overclocked to 1Ghz with 512MB RAM, and the same 1080p video output, so there's plenty of oomph in that little board. It also features the same 40 pin GPIO layout as the Raspberry Pi 2/B /A , which you'll need to solder your own headers to. With it's small form factor and reduction in connectors, the Raspberry Pi Zero only uses ~ 140mA at 5V!
Unlike it's larger brothers and sisters, the Raspberry Pi Zero has an unpopulated GPIO, unpopulated composite (RCA) header and an unpopulated reset header. There's also no DSI screen port, no ethernet, no analogue audio and no full sized USB ports. Instead, the Pi Zero features a micro-USB power port, a micro USB OTG host port (for peripherals e.g. WiFi dongle), and a mini HDMI port for video.
HAT Compatibility Note: The Pi Zero is fully compatible with all HAT breakout boards, as it features the same 40 Pin GPIO as the Raspberry Pi 2/B /A
Raspberry Pi Zero Wireless Features
- BCM2835 chipset, Overclocked to 1Ghz
- 512MB RAM
- Tiny Form Factor: 65mm x 30mm x 5mm
- Fully HAT compatible
- 40pin GPIO (Unpopulated)
- Stream and watch Hi-definition video output at 1080P
- Micro SD Slot for OS
- Tiny Current Draw ~ 140mA at 5V!
- Mini-HDMI for Video
- Micro-USB OTG Host for Data
- Micro-USB for Power
- Micro-CSI Camera Port
- On-Board WiFi
- On-Board Bluetooth
What's in the box?
1 x Raspberry Pi Zero W
You might also need...
The Raspberry Pi board comes without the below items. Have a look at what else you still need to get.
- download install Raspberry Pi OS using Raspberry Pi imager or grab a uSD card with Raspberry Pi OS preloaded
- a USB micro Bpower supply
- a mini HDMI cable or HDMI mini adapter
- an enclosure/case for your Pi Zero
- a keyboard and mouse
Resources
- Raspberry Pi Operating System Downloads https://www.raspberrypi.org/downloads/
Getting Started with Raspberry Pi - For a step-by-step guide to getting your Pi up and running, check out our online Getting started guide.
- There are loads of projects to get started on with your Raspberry Pi Zero in our learning resources area
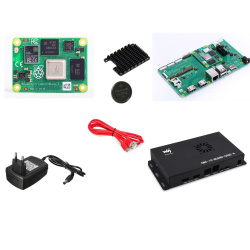
Overview
The Compute Module 4 IO Board is a companion board for Raspberry Pi Compute Module 4 (supplied separately). It is designed for use both as a development system for Compute Module 4 and as an embedded board integrated into end products.
The IO board is designed to allow you to create systems quickly using off-the shelf parts such as HATs and PCIe cards, which might include NVMe, SATA, networking, or USB. The major user connectors are located along one side to make enclosures simple.
Compute Module 4 IO Board also provides an excellent way to prototype systems using the Compute Module 4.
Specifications
• CM4 socket: suitable for all variants of Compute Module 4
• Standard Raspberry Pi HAT connectors with PoE support
• Standard PCIe Gen 2 x1 socket
• Real-time clock (RTC) with battery backup
• Dual HDMI connectors
• Dual MIPI camera connectors
• Dual MIPI display connectors
• Gigabit Ethernet socket supporting PoE HAT
• On-board USB 2.0 hub with 2 USB 2.0 connectors
• SD card socket for Compute Module 4 variants without eMMC
• Support for programming eMMC variants of Compute Module 4
• PWM fan controller with tachometer feedback
Input power: 12V input, 5V input with reduced functionality
(power supply not supplied)
Dimensions: 160 mm × 90 mm
What's in the box?
1 x CM4 IO board
1 x Compute Module 4 board CM4004032(4GB RAM, 32GB eMMC, no wifi)
1 x 12V power supply for the board
1 x CR2032 battery for the Real-time Clock backup
1 x heatsink designed for CM4
1 x enclosure for your CM4 IO board
1 x micro B USB to USB A cable to setup/update your CM4 via rpiboot
10 x Mini Jumpers to assist you with setup
Resources
- Raspberry Pi Compute Module 4 IO Board product brief
- Raspberry Pi Compute Module 4 IO Board datasheet
- Raspberry Pi Compute Module 4 IO Board KiCAD file
Production lifetime: The Raspberry Pi Compute Module 4 IO Board will remain in production until at least January 2028
More details are available here
and a video discussion at https://www.youtube.com/watch?v=yiHgmNBOzkc&feature=youtu.be
Compliance: For a full list of local and regional product approvals,
please visit
www.raspberrypi.org/documentation/
WARNINGS
• Any external power supply used with the Raspberry Pi Compute Module 4 IO Board shall comply with relevant regulations and standards applicable in the country of intended use.
• This product should be operated in a well-ventilated environment, and if used inside a case, the case should not be covered
• Whilst in use, this product should be placed on a stable, flat, non-conductive surface, and should not be contacted by conductive items.
• The connection of incompatible devices to the Compute Module 4 IO Board may affect compliance,
result in damage to the unit, and invalidate the warranty.
• All peripherals used with this product should comply with relevant standards for the country of use and be marked accordingly to ensure that safety and performance requirements are met. These articles include but are not limited to keyboards, monitors, and mice when used in conjunction with the Compute Module 4 IO Board.
• The cables and connectors of all peripherals used with this product must have adequate insulation so that relevant safety requirements are met.
SAFETY INSTRUCTIONS
To avoid malfunction or damage to this product, please observe the following:
• Do not expose to water or moisture, or place on a conductive surface whilst in operation.
• Do not expose to heat from any source; the Raspberry Pi Compute Module 4 IO Board is designed for reliable operation at normal ambient temperatures.
• Take care whilst handling to avoid mechanical or electrical damage to the printed circuit board
and connectors.
• Whilst it is powered, avoid handling the printed
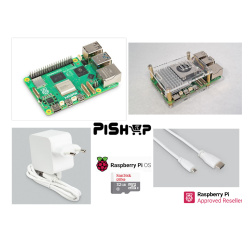
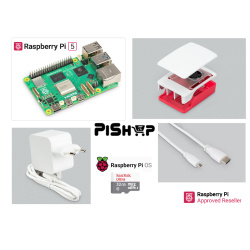
Get started with the Raspberry Pi with one of our pre-boxed kits for home, industry and education.
These kits are perfect for beginners that are just just getting exposed to the Raspberry Pi, Media enthusiasts looking to stream online content with Kodi, developers looking to exploit the many advantages of the RPI's GPIO pins and anybody looking to get some cool goodies at a great price! They contain all of the essential items that you need to get up and running in no time.
Please Note: These kits are pre-boxed and cannot be modified at all, we do however keep stock on all of the individual items so if you have a special need simply feel free to browse through the rest of our product offerings and select the items that you'd like.
What's in the box?
1 x Official 5.1V 5A 27W USB-C PD Power Supply in White
1 x 1m micro HDMI cable
1 x 32GB preloaded micro SD card with 64bit Raspberry Pi OS pre-loaded
1 x SP cooler case
1 x active cooler fan
Want to take your kit to the next level?
Turn your RPI into a Media Centre
Grab yourself a remote control, install LibreELEC or OSMC when setting up your RPI and you'll be streaming in no time. You can even add a wireless keyboard, mouse or other similar controllers
Want a cheap eco-friendly PC
Grab a Keyboard and Mouse, select Raspbian when setting up your RPI and you'll be browsing the web, sending emails, editing spreadsheets and watching videos just like you're used to with a desktop/laptop.
We know you love retro gaming!
RetroPie allows you to turn your Raspberry Pi into a retro-gaming machine Check out our Arcade section, whether you just want a retro control or a mini DIY arcade cabinet we have what you're looking for.
Did somebody say Robotics?
We've got some cool beginner's items in our robotic section
Our Kits come with the latest version of Raspberry Pi OS pre-installed, While we will certainly try our best to assist with any software related questions we cannot offer any kind of official support on community driven, open source, or non-PiShop produced proprietary software.
NOOBS, Raspbian, RetroPie, LibreELEC and OSMC are all examples of open-source software, please visit the developer's respective websites for more info.
Resources
A whole bunch of other really cool technical info can be found here.
Where do I start?.........Getting Started with Raspberry Pi
More on the Raspberry Pi 5
Get started with the Raspberry Pi with one of our pre-boxed kits for home, industry and education.
These kits are perfect for beginners that are just just getting exposed to the Raspberry Pi, Media enthusiasts looking to stream online content with Kodi, developers looking to exploit the many advantages of the RPI's GPIO pins and anybody looking to get some cool goodies at a great price! They contain all of the essential items that you need to get up and running in no time.
Please Note: These kits are pre-boxed and cannot be modified at all, we do however keep stock on all of the individual items so if you have a special need simply feel free to browse through the rest of our product offerings and select the items that you'd like.
What's in the box?
1 x Official 5.1V 5A 27W USB-C PD Power Supply in White
1 x 1m micro HDMI cable
1 x 32GB preloaded micro SD card with 64bit Raspberry Pi OS pre-loaded
1 x Official Pi5 Red/White Case with fan and heatsink
Want to take your kit to the next level?
Turn your RPI into a Media Centre
Grab yourself a remote control, install LibreELEC or OSMC when setting up your RPI and you'll be streaming in no time. You can even add a wireless keyboard, mouse or other similar controllers
Want a cheap eco-friendly PC
Grab a Keyboard and Mouse, select Raspbian when setting up your RPI and you'll be browsing the web, sending emails, editing spreadsheets and watching videos just like you're used to with a desktop/laptop.
We know you love retro gaming!
RetroPie allows you to turn your Raspberry Pi into a retro-gaming machine Check out our Arcade section, whether you just want a retro control or a mini DIY arcade cabinet we have what you're looking for.
Did somebody say Robotics?
We've got some cool beginner's items in our robotic section
Our Kits come with the latest version of Raspberry Pi OS pre-installed, While we will certainly try our best to assist with any software related questions we cannot offer any kind of official support on community driven, open source, or non-PiShop produced proprietary software.
NOOBS, Raspbian, RetroPie, LibreELEC and OSMC are all examples of open-source software, please visit the developer's respective websites for more info.
Resources
A whole bunch of other really cool technical info can be found here.
Where do I start?.........Getting Started with Raspberry Pi
More on the Raspberry Pi 5

Get started with the Raspberry Pi with one of our pre-boxed kits for home, industry and education.
These kits are perfect for beginners that are just just getting exposed to the Raspberry Pi, Media enthusiasts looking to stream online content with Kodi, developers looking to exploit the many advantages of the RPI's GPIO pins and anybody looking to get some cool goodies at a great price! They contain all of the essential items that you need to get up and running in no time.
Please Note: These kits are pre-boxed and cannot be modified at all, we do however keep stock on all of the individual items so if you have a special need simply feel free to browse through the rest of our product offerings and select the items that you'd like.
What's in the box?
1 x Official 5.1V 5A 27W USB-C PD Power Supply in White
1 x 1m micro HDMI cable
1 x 32GB preloaded micro SD card with 64bit Raspberry Pi OS pre-loaded
1 x Full Acrylic cooler case(A)
1 x active cooler fan
Want to take your kit to the next level?
Turn your RPI into a Media Centre
Grab yourself a remote control, install LibreELEC or OSMC when setting up your RPI and you'll be streaming in no time. You can even add a wireless keyboard, mouse or other similar controllers
Want a cheap eco-friendly PC
Grab a Keyboard and Mouse, select Raspbian when setting up your RPI and you'll be browsing the web, sending emails, editing spreadsheets and watching videos just like you're used to with a desktop/laptop.
We know you love retro gaming!
RetroPie allows you to turn your Raspberry Pi into a retro-gaming machine Check out our Arcade section, whether you just want a retro control or a mini DIY arcade cabinet we have what you're looking for.
Did somebody say Robotics?
We've got some cool beginner's items in our robotic section
Our Kits come with the latest version of Raspberry Pi OS pre-installed, While we will certainly try our best to assist with any software related questions we cannot offer any kind of official support on community driven, open source, or non-PiShop produced proprietary software.
NOOBS, Raspbian, RetroPie, LibreELEC and OSMC are all examples of open-source software, please visit the developer's respective websites for more info.
Resources
A whole bunch of other really cool technical info can be found here.
Where do I start?.........Getting Started with Raspberry Pi
More on the Raspberry Pi 5

Get started with the Raspberry Pi with one of our pre-boxed kits for home, industry and education.
These kits are perfect for beginners that are just just getting exposed to the Raspberry Pi, Media enthusiasts looking to stream online content with Kodi, developers looking to exploit the many advantages of the RPI's GPIO pins and anybody looking to get some cool goodies at a great price! They contain all of the essential items that you need to get up and running in no time.
Please Note: These kits are pre-boxed and cannot be modified at all, we do however keep stock on all of the individual items so if you have a special need simply feel free to browse through the rest of our product offerings and select the items that you'd like.
What's in the box?
1 x Official 5V 3A Power Supply in White
1 x 1m micro HDMI cable
1 x 32GB preloaded micro SD card with 64bit Raspberry Pi OS pre-loaded
1 x Official Pi4 Red/White Case
Want to take your kit to the next level?
Turn your RPI into a Media Centre
Grab yourself a remote control, install LibreELEC or OSMC when setting up your RPI and you'll be streaming in no time. You can even add a wireless keyboard, mouse or other similar controllers
Want a cheap eco-friendly PC
Grab a Keyboard and Mouse, select Raspbian when setting up your RPI and you'll be browsing the web, sending emails, editing spreadsheets and watching videos just like you're used to with a desktop/laptop.
We know you love retro gaming!
RetroPie allows you to turn your Raspberry Pi into a retro-gaming machine Check out our Arcade section, whether you just want a retro control or a mini DIY arcade cabinet we have what you're looking for.
Did somebody say Robotics?
We've got some cool beginner's items in our robotic section
Our Kits come with the latest version of Raspberry Pi OS pre-installed, While we will certainly try our best to assist with any software related questions we cannot offer any kind of official support on community driven, open source, or non-PiShop produced proprietary software.
NOOBS, Raspbian, RetroPie, LibreELEC and OSMC are all examples of open-source software, please visit the developer's respective websites for more info.
A whole bunch of other really cool technical info can be found here.
Where do I start?.........Getting Started with Raspberry Pi
Features
- Safe and Visible
- FDA Class 1 Safety Certification
- 360° Visual Design, Combines Aesthetics with Versatility.
- Pilot Technology, Visual Assistance for Precise Positioning
- Full-field Protection, Unleash Unlimited Creative Space.
- Drawer Design, Good Helper for Desktop Organization
- Fence Type Protection Strip, Heat and Smoke Dissipation
- High-efficiency Batch, Profit in Your Pocket
You might also be interested in....
- A honeycomb bed for your laser engraver
Resources

Board specifications
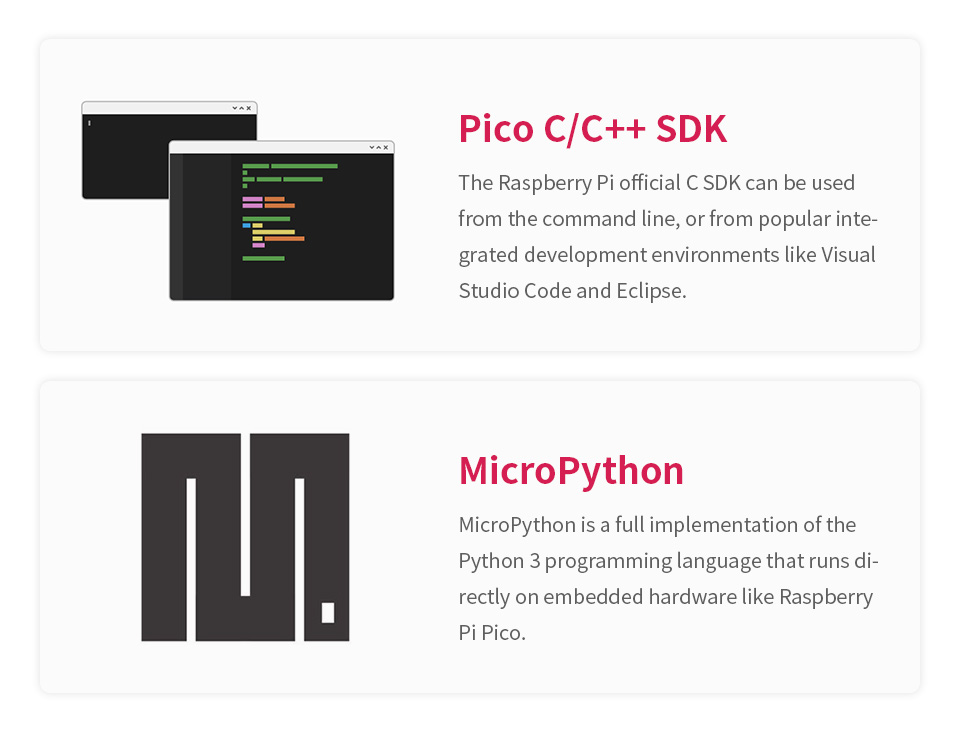
RP2040-LCD-0.96 is a low-cost, high-performance Pico-like MCU board with flexible digital interfaces. It incorporates Raspberry Pi's RP2040 microcontroller chip, as same as the one on Raspberry Pi Pico. For software development, either Raspberry Pi's C/C SDK, or the MicroPython is available, which makes it easy for you to get started, and integrate it into end products quickly.
In additional, there'rs also onboard 0.96inch IPS display, Lithium battery recharge/discharge header, and high efficiency DC-DC buck-boost chip.
Key features
- RP2040 microcontroller chip designed by Raspberry Pi in the United Kingdom
- Dual-core Arm Cortex M0 processor, flexible clock running up to 133 MHz
- 264KB of SRAM, and 2MB of on-board Flash memory
- USB-C connector, keeps it up to date, easier to use
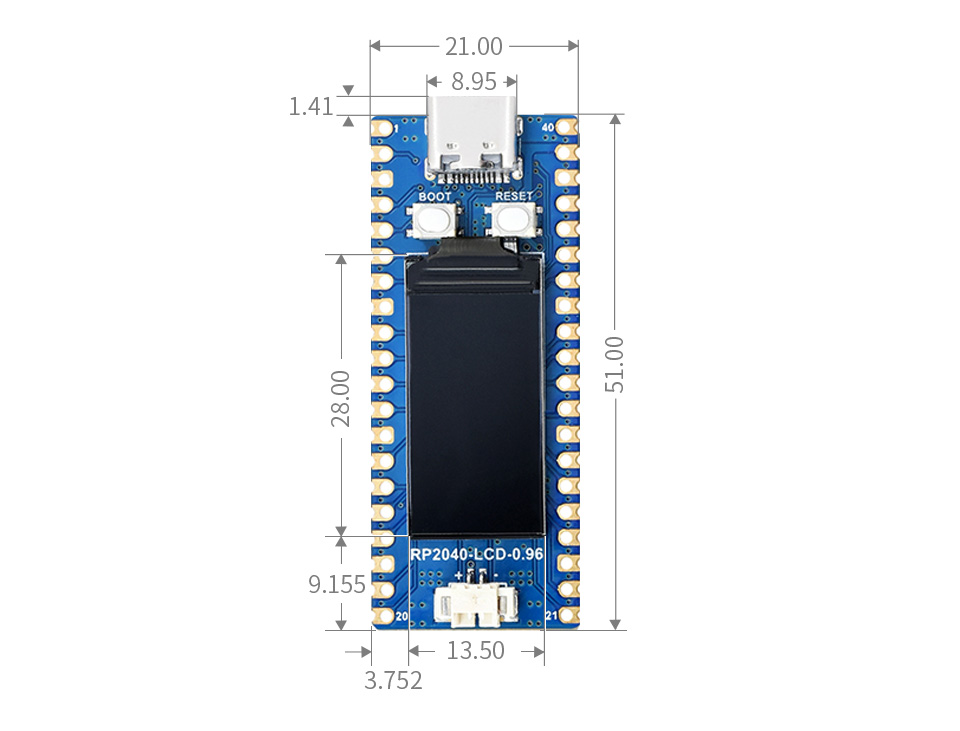
- 0.96inch 160×80 pixels 65K colorful IPS LCD display
- Lithium battery recharge/discharge header, suitable for mobile devices
- Onboard DC-DC chip TPS63000, high efficiency DC-DC buck-boost chip, 1.8A current switch
- Castellated module allows soldering direct to carrier boards (there should be dedicated cut-out for embedding the bottom components)
- USB 1.1 with device and host support
- Low-power sleep and dormant modes
- Drag-and-drop programming using mass storage over USB
- 26 × multi-function GPIO pins
- 2 × SPI, 2 × I2C, 2 × UART, 3 × 12-bit ADC, 16 × controllable PWM channels
- Accurate clock and timer on-chip
- Temperature sensor
- Accelerated floating-point libraries on-chip
- 8 × Programmable I/O (PIO) state machines for custom peripheral support
C/C ,MicroPython support
Comprehensive SDK, dev resources, tutorials to help you easily get started
Pico-like lcd code found at :
sudo apt-get install p7zip-full
cd ~
sudo wget https://www.waveshare.com/w/upload/7/74/Pico_LCD_code.7z
7z x Pico_LCD_code.7z -o./Pico_LCD_code
cd ~/Pico_LCD_code
cd c/build/
26 × multi-function GPIO pins
configurable pin function, allows flexible development and integration
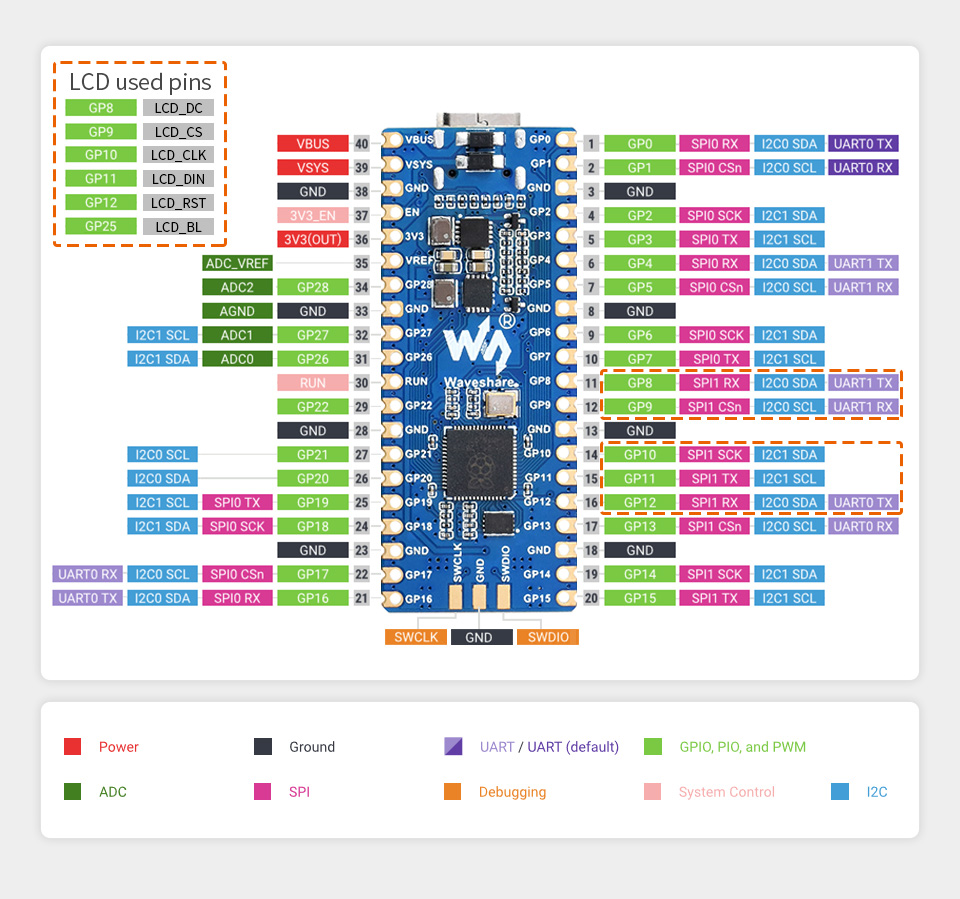
What's On Board
- USB Type-C connector
- BOOT button press it when resetting to enter download mode
- RESET button
- 0.96inch IPS LCD display 160 × 80 pixels, 65K colorful
- Battery header MX1.25 header, for 3.7V Lithium battery, allows recharging the battery and powering the board at the same time
- TPS63000 high efficiency DC-DC buck-boost chip
- ETA6096 high efficiency Lithium battery recharge manager
- RP2040 dual-core processor, up to 133MHz operating frequency
- W25Q16JVUXIQ 2MB NOR-Flash
- DEBUG points
- Pinout

Features
- Intelligent Three-level adjustable beam
- Cutting Power Up to 60w
- 3 Lasers in one Machine
- Super-higher Working Efficiency
- Fully Enclosed Design
- Built-in Camera for Auto-positioning
Specifications
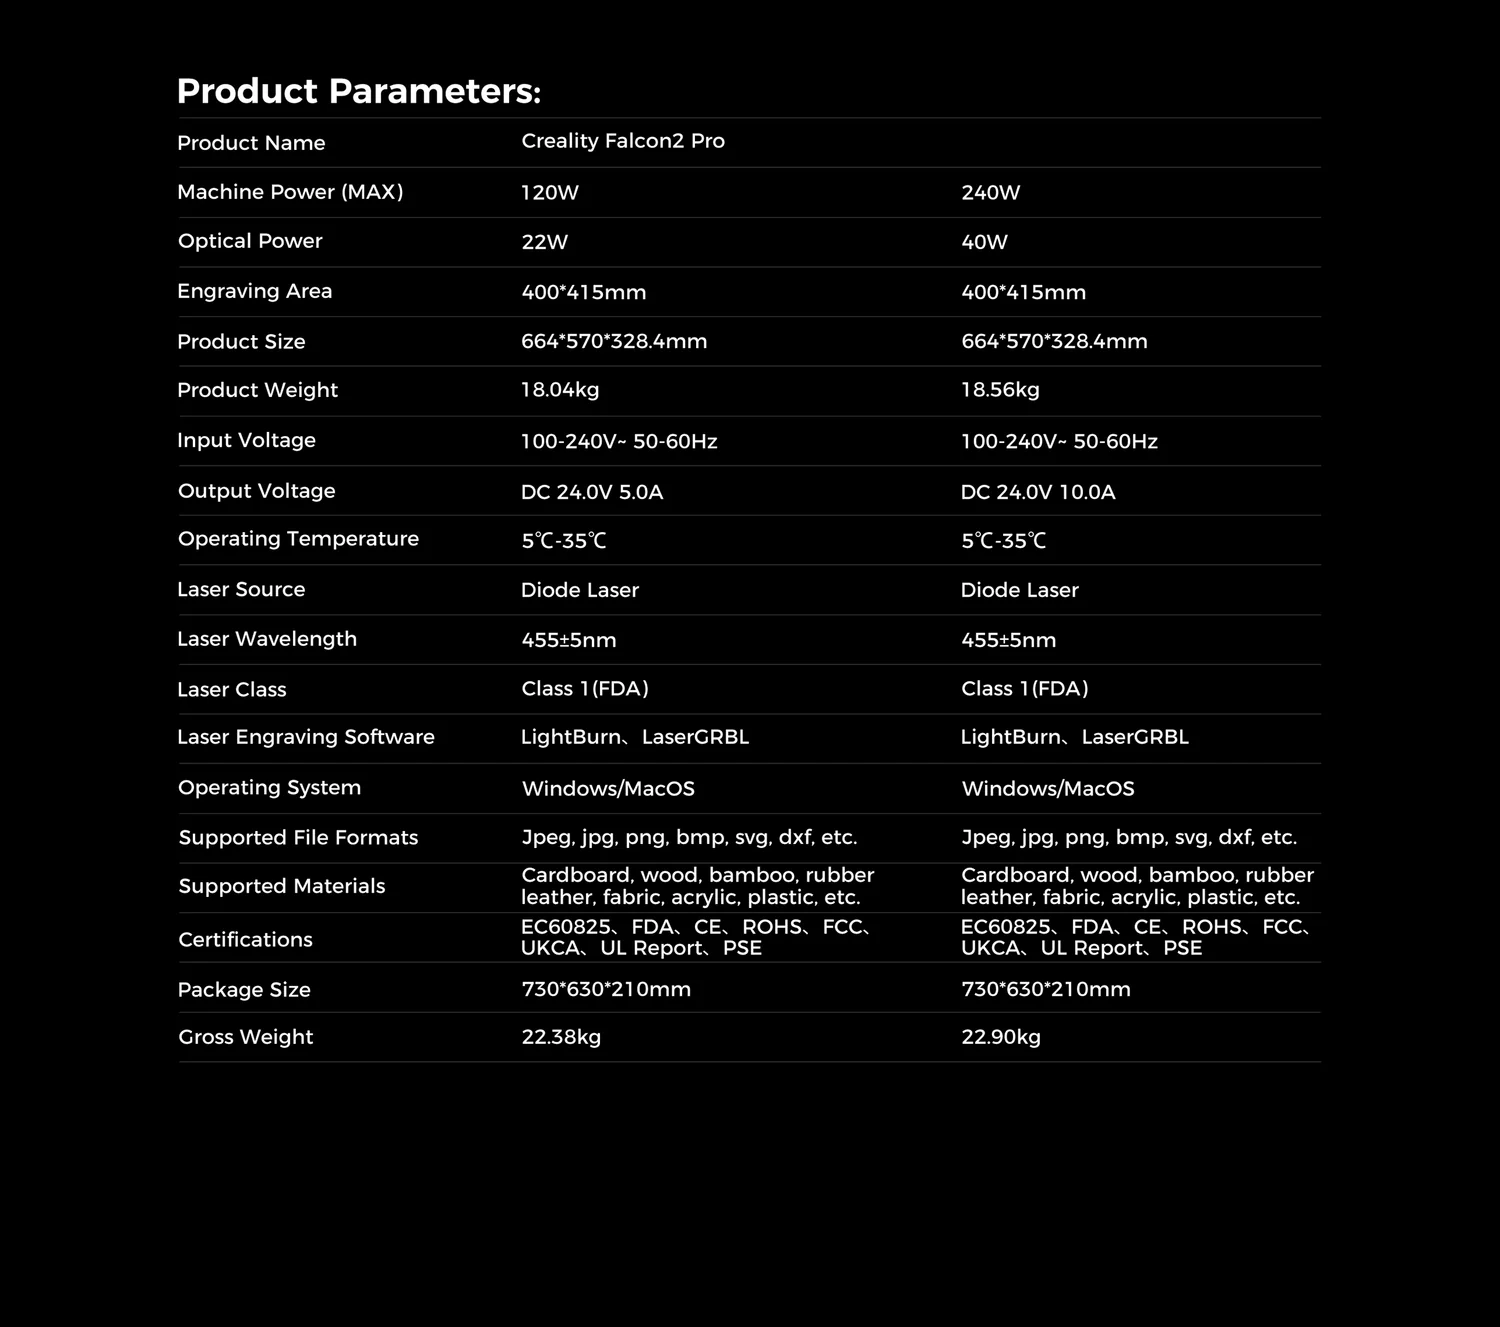
- Product Name: Creality Falcon2 Pro 60W
- Machine Power (MAX): 360W
- Optical Power: 60W+1.6W
- Product Size: 664*570*328.4mm
- Equipment Weight: 19.51kg
- Input Voltage: 100-240V~ 50-60Hz
- Output Voltage: DC 24.0V 15.0A
- Operating Temperature: 5℃-35℃
- Engraving Area: 400mm*400mm
- Laser Source: Diode Laser
- Laser Spot: 0.08*0.15mm
- Laser Wavelength: 455±5nm
- Laser Class: Class 1(FDA)
- Laser Engraving Software: LightBurn、LaserGRBL
- Operating System: Windows/MacOS
- Supported File Formats: Jpeg, jpg, png, bmp, svg, dxf, etc.
- Supported Materials: Cardboard, wood, bamboo, rubber, leather, fabric, acrylic, plastic, etc.
- Certifications: EC60825、FDA、CE、ROHS、FCC、UKCA、UL Report、PSE
- Gross Weight: 25.74KG
- Package Size: 770mm x 645mm x 285mm
What's in the box?
1 x Creality Falcon2 60W PRO Laser
You might also be interested in....
- A honeycomb bed for your laser engraver
- Get started with Micro:bit and teacher training: what is the micro:bit?
- Lessons and teaching resources: micro: micro:bit teach
- Projects: Make it: Code It Project
- Coding platforms: Let's code with micro:bit
- LED display and light sensor
- 2 x input buttons
- Microphone
- Speaker
- Compass
- Accelerometer
- Touch logo
- Radio and Bluetooth antenna
- Processor and temperature sensor
- Edge connector
What's in the box?
30 x micro:bit v2 boards
30 x micro USB cables
30 x battery holders
60 x AAA Batteries
32 x Wearable wrist strap
32 x flexible micro:bit holders

Please note: You will need to buy a different CSI cable for use with RPi 5 or ZERO.
Overview
The Raspberry Pi High Quality Camera is the latest camera accessory from Raspberry Pi. It offers higher resolution (12 megapixels, compared to 8 megapixels), and sensitivity (approximately 50% greater area per pixel for improved low-light performance) than the existing Camera Module v2, and
is designed to work with interchangeable lenses in both C- and CS-mount form factors. Other lens form factors can be accommodated using third-party lens adapters.
The High Quality Camera provides an alternative to the Camera Module v2 for industrial and consumer applications, including security cameras, which require the highest levels of visual fidelity and/or integration with specialist optics. It is compatible with all models of Raspberry Pi computer from Raspberry Pi 1 Model B onwards, using the latest software release from www.raspberrypi.org.(1)
The package comprises a circuit board carrying a Sony IMX477 sensor, an FPC cable for connection to a Raspberry Pi computer, a milled aluminium lens mount with integrated tripod mount and focus adjustment ring, and a C- to CS-mount adapter.
(1) Excluding early Raspberry Pi Zero models, which lack the necessary FPC connector. Later Raspberry Pi Zero models require an adapter FPC, sold separately.
Specifications
| Sensor: | Sony IMX477R stacked, back-illuminated sensor 12.3 megapixels 7.9 mm sensor diagonal 1.55 μm × 1.55 μm pixel size |
| Output: | RAW12/10/8, COMP8 |
| Back focus: | Adjustable (12.5 mm–22.4 mm) |
| Lens standards: | C-mount CS-mount (C-CS adapter included) |
IR cut filter: | Integrated(2) |
| Ribbon cable length: | 200 mm |
| Tripod mount: | 1/4”-20 |
Compliance: | FCC 47 CFR Part 15, Subpart B, Class B Digital Device Electromagnetic Compatibility Directive (EMC) 2014/30/EU Restriction of Hazardous Substances (RoHS) Directive 2011/65/EU |
| Production lifetime: | The Raspberry Pi High Quality Camera will remain in production until at least January 2026 |
(2) Can be removed to enable IR sensitivity. Modification is irreversible.
Physical specifications
The new Raspberry Pi OS release includes the new Picamera2 Python camera interface.
What's in the box?
1 x Raspberry Pi HQ Camera
You might also need...
- black flexible mini tripod
- Zero mounting plate for HQ cameraa
- Pi3/4/5 mounting plate for HQ cameras
- 16mm telephoto lens
- 6mm wide angle camera lens
Resources
HQ Camera product brief: https://datasheets.raspberrypi.com/hq-c ... -brief.pdf
More on the HQ cams: https://www.raspberrypi.com/products/raspberry-pi-high-quality-camera/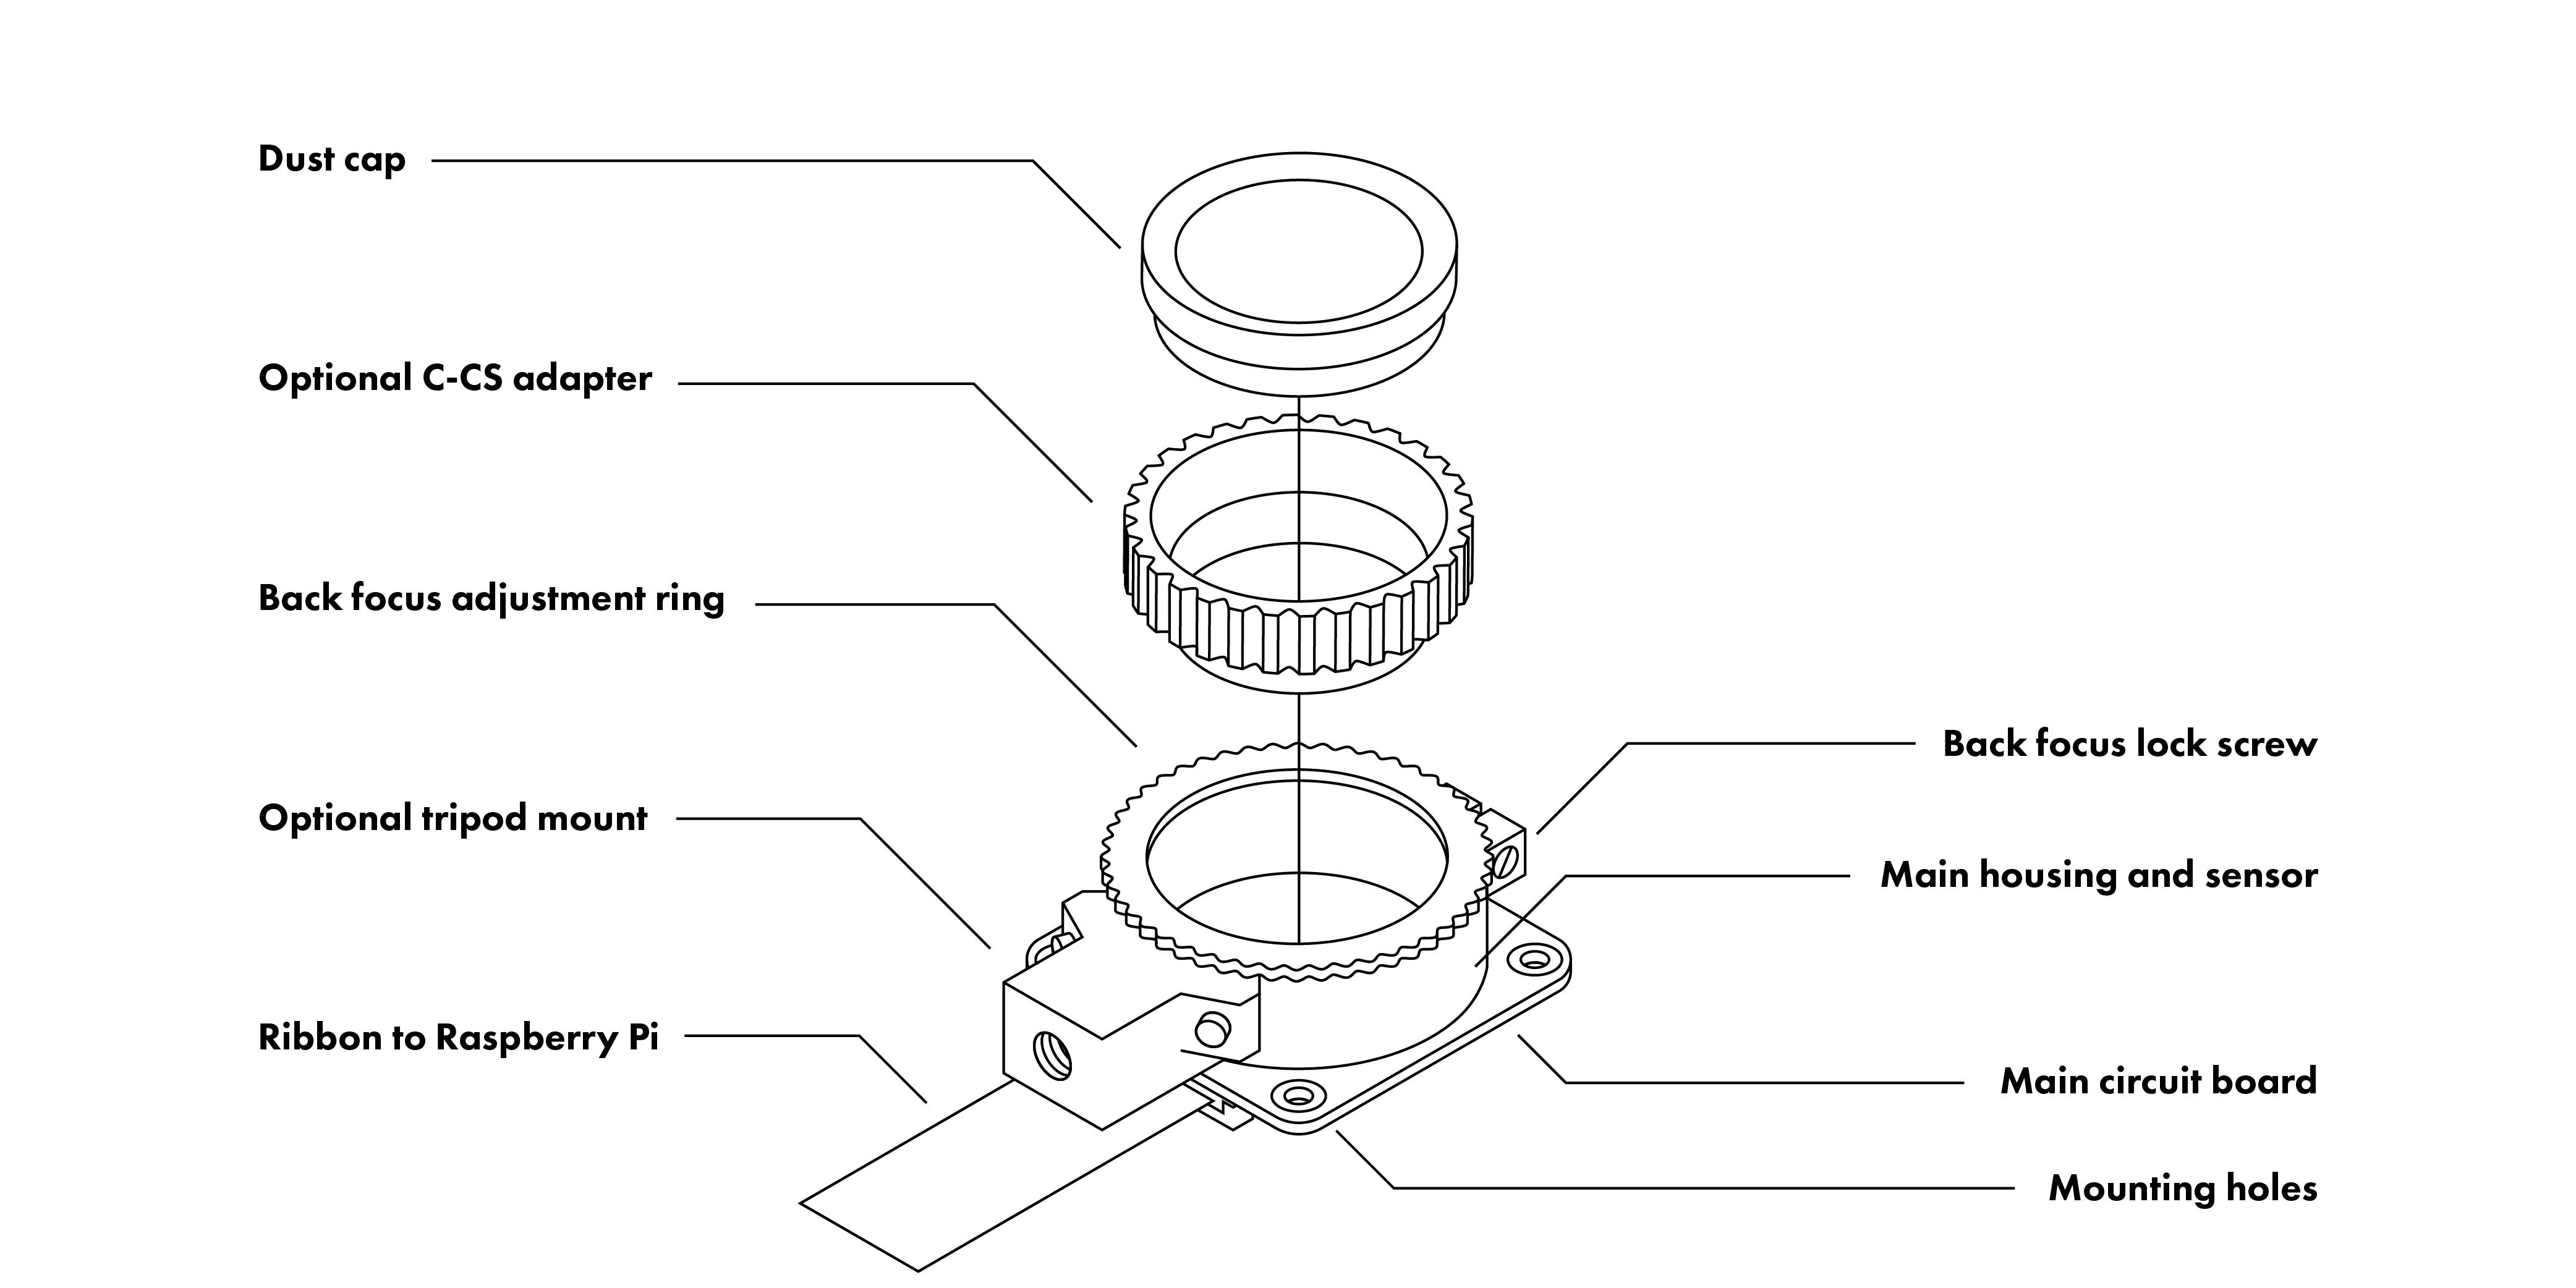
How to use this camera: https://www.youtube.com/watch?v=sAXDgByhcJU
and another video by ETA PRIME: https://www.youtube.com/watch?v=VDWORgW31Sw
Get started with the Raspberry Pi with one of our pre-boxed kits for home, industry and education.
These kits are perfect for beginners that are just just getting exposed to the Raspberry Pi, Media enthusiasts looking to stream online content with Kodi, developers looking to exploit the many advantages of the RPI's GPIO pins and anybody looking to get some cool goodies at a great price! They contain all of the essential items that you need to get up and running in no time.
Please Note: These kits are pre-boxed and cannot be modified at all, we do however keep stock on all of the individual items so if you have a special need simply feel free to browse through the rest of our product offerings and select the items that you'd like.
What's in the box?
1 x Official 5.1V 5A 27W USB-C PD Power Supply in White
1 x 1m micro HDMI cable
1 x 32GB preloaded micro SD card with 64bit Raspberry Pi OS pre-loaded
1 x Official Pi5 Red/White Case with fan and heatsink
Want to take your kit to the next level?
Turn your RPI into a Media Centre
Grab yourself a remote control, install LibreELEC or OSMC when setting up your RPI and you'll be streaming in no time. You can even add a wireless keyboard, mouse or other similar controllers
Want a cheap eco-friendly PC
Grab a Keyboard and Mouse, select Raspbian when setting up your RPI and you'll be browsing the web, sending emails, editing spreadsheets and watching videos just like you're used to with a desktop/laptop.
We know you love retro gaming!
RetroPie allows you to turn your Raspberry Pi into a retro-gaming machine Check out our Arcade section, whether you just want a retro control or a mini DIY arcade cabinet we have what you're looking for.
Did somebody say Robotics?
We've got some cool beginner's items in our robotic section
Our Kits come with the latest version of Raspberry Pi OS pre-installed, While we will certainly try our best to assist with any software related questions we cannot offer any kind of official support on community driven, open source, or non-PiShop produced proprietary software.
NOOBS, Raspbian, RetroPie, LibreELEC and OSMC are all examples of open-source software, please visit the developer's respective websites for more info.
Resources
A whole bunch of other really cool technical info can be found here.
Where do I start?.........Getting Started with Raspberry Pi
More on the Raspberry Pi 5